key battery Seat Ibiza ST 2015 Owner's manual
[x] Cancel search | Manufacturer: SEAT, Model Year: 2015, Model line: Ibiza ST, Model: Seat Ibiza ST 2015Pages: 248, PDF Size: 4.77 MB
Page 12 of 248
The essentials
● Openin g the r
e
ar lid: Pull on the release
lever and lift it up ››› Fig. 3. The rear lid opens
automatically.
● Closing the rear lid: Hold it by one of the
handle
s on the interior lining and close it by
pushing gently.
››› in Opening and closing on
page 120
››› page 10 Unlocking the rear lid manually
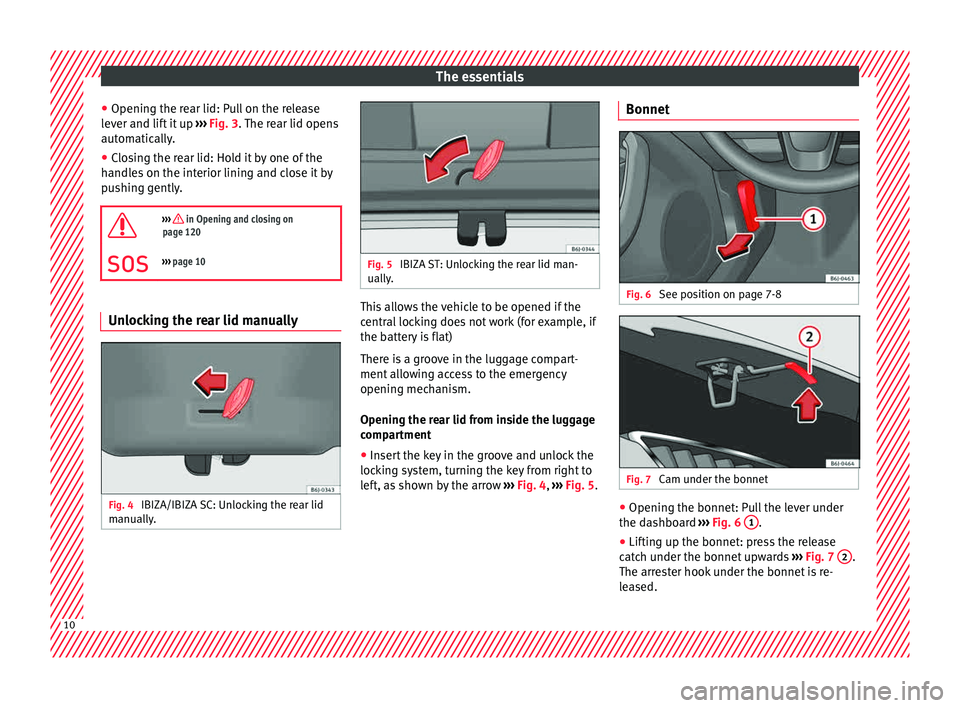
Fig. 4
IBIZA/IBIZA SC: Unlocking the rear lid
m anual
ly
. Fig. 5
IBIZA ST: Unlocking the rear lid man-
ually . This allows the vehicle to be opened if the
c
entr
al
locking does not work (for example, if
the battery is flat)
There is a groove in the luggage compart-
ment allowing access to the emergency
opening mechanism.
Opening the rear lid from inside the luggage
compartment
● Insert the key in the groove and unlock the
lockin
g system, turning the key from right to
left, as shown by the arrow ››› Fig. 4, ››› Fig. 5. Bonnet
Fig. 6
See position on page 7-8 Fig. 7
Cam under the bonnet ●
Opening the bonnet: Pull the lever under
the d ashbo
ard ››› Fig. 6 1 .
● Lifting up the bonnet: press the release
c at
c
h under the bonnet upwards ››› Fig. 7 2 .
The arr es
ter hook under the bonnet is re-
leased. 10
Page 84 of 248
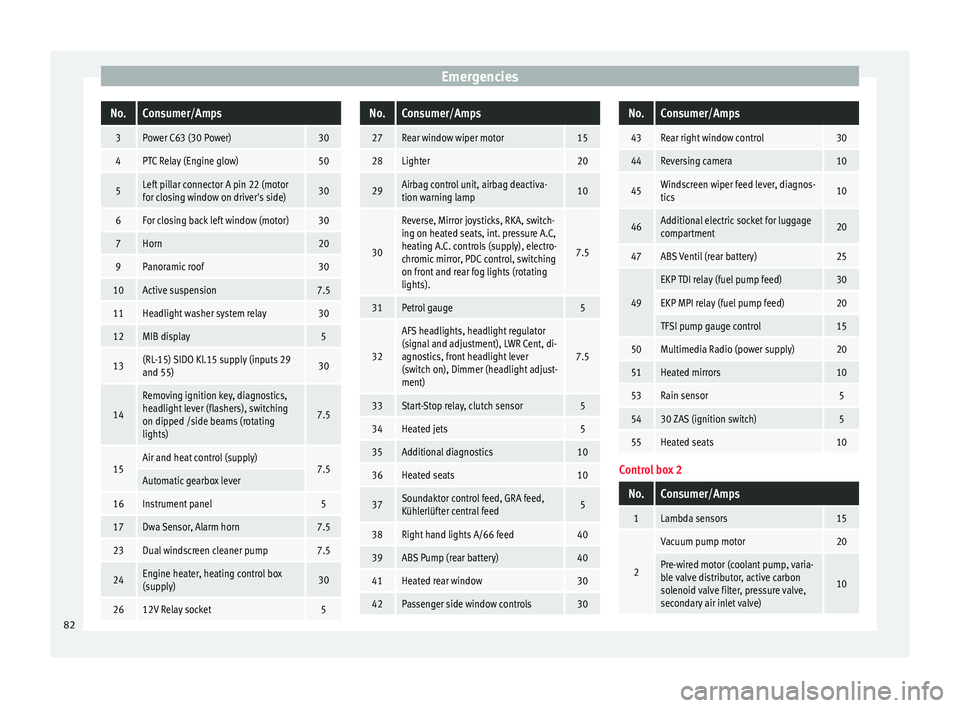
EmergenciesNo.Consumer/Amps
3Power C63 (30 Power)30
4PTC Relay (Engine glow)50
5Left pillar connector A pin 22 (motor
for closing window on driver's side)30
6For closing back left window (motor)30
7Horn20
9Panoramic roof30
10Active suspension7.5
11Headlight washer system relay30
12MIB display5
13(RL-15) SIDO Kl.15 supply (inputs 29
and 55)30
14
Removing ignition key, diagnostics,
headlight lever (flashers), switching
on dipped /side beams (rotating
lights)
7.5
15Air and heat control (supply)7.5Automatic gearbox lever
16Instrument panel5
17Dwa Sensor, Alarm horn7.5
23Dual windscreen cleaner pump7.5
24Engine heater, heating control box
(supply)30
2612V Relay socket5
No.Consumer/Amps
27Rear window wiper motor15
28Lighter20
29Airbag control unit, airbag deactiva-
tion warning lamp10
30
Reverse, Mirror joysticks, RKA, switch-
ing on heated seats, int. pressure A.C,
heating A.C. controls (supply), electro-
chromic mirror, PDC control, switching
on front and rear fog lights (rotating
lights).
7.5
31Petrol gauge5
32
AFS headlights, headlight regulator
(signal and adjustment), LWR Cent, di-
agnostics, front headlight lever
(switch on), Dimmer (headlight adjust-
ment)
7.5
33Start-Stop relay, clutch sensor5
34Heated jets5
35Additional diagnostics10
36Heated seats10
37Soundaktor control feed, GRA feed,
Kühlerlüfter central feed5
38Right hand lights A/66 feed40
39ABS Pump (rear battery)40
41Heated rear window30
42Passenger side window controls30
No.Consumer/Amps
43Rear right window control30
44Reversing camera10
45Windscreen wiper feed lever, diagnos-
tics10
46Additional electric socket for luggage
compartment20
47ABS Ventil (rear battery)25
49
EKP TDI relay (fuel pump feed)30
EKP MPI relay (fuel pump feed)20
TFSI pump gauge control15
50Multimedia Radio (power supply)20
51Heated mirrors10
53Rain sensor5
5430 ZAS (ignition switch)5
55Heated seats10
Control box 2
No.Consumer/Amps
1Lambda sensors15
2
Vacuum pump motor20
Pre-wired motor (coolant pump, varia-
ble valve distributor, active carbon
solenoid valve filter, pressure valve,
secondary air inlet valve)
10
82
Page 107 of 248
Instruments and warning/control lamps
WARNING
● When the tyr e pr
essure control lamp lights
up, reduce speed immediately and avoid any
sudden turning or braking manoeuvre. Stop
when possible, and check the tyre pressure
and status.
● The driver is responsible for maintaining
correct
tyre pressures. For this reason, tyre
pressure must be regularly checked.
● Under certain circumstances (e.g. when
driving in a s
porty manner, in winter condi-
tions or on a dirt track) the tyre control lamp
may light up belatedly or may function incor-
rectly. Note
If the battery is disconnected, the yellow
warnin g l
amp lights up after turning the
ignition on. This should turn off after a brief
journey. Speed selector lever lock*
The brake pedal must be depressed when
thi
s
w
arning lamp lights up. This is necessary
when the automatic gearbox* selector lever
is moved out of the positions P or N.Fuel Reserve/Level
It lights up when only 7 litres of fuel remain
in the tank, and an
ac
oustic signal* also
sounds. It reminds you to fuel up the fuel
tank as soon as possible ››› page 199.
Main beam headlights The control lamp
lights up when the m ain
be
ams are on or when the headlight flasher
is operated.
For further information see ›››
page 125.
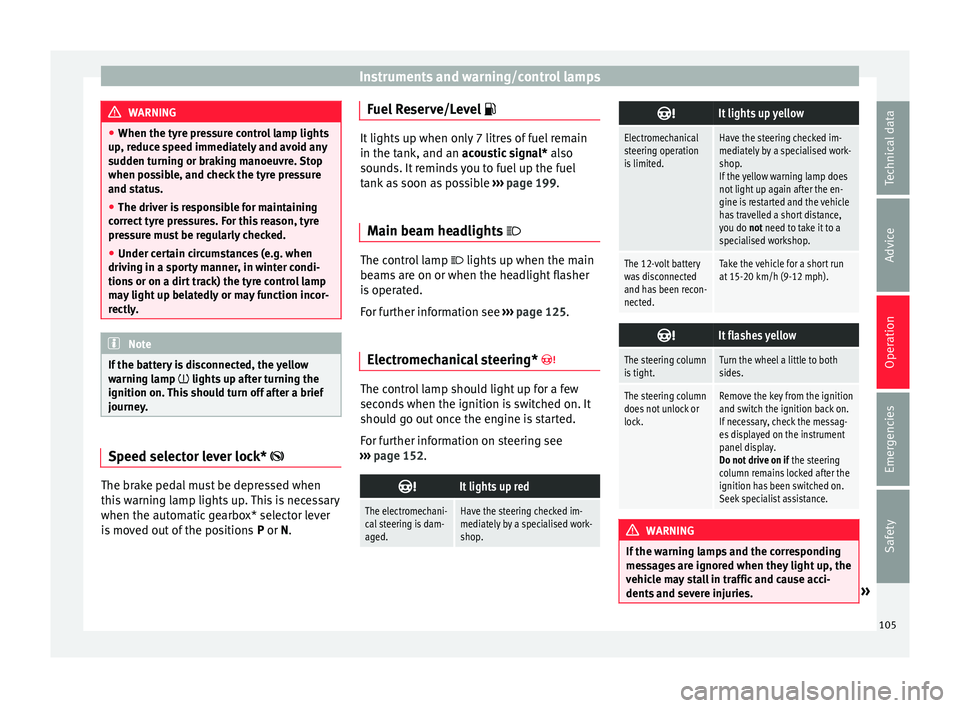
Electromechanical steering* The control lamp should light up for a few
sec
ond
s
when the ignition is switched on. It
should go out once the engine is started.
For further information on steering see
››› page 152.
It lights up red
The electromechani-
cal steering is dam-
aged.Have the steering checked im-
mediately by a specialised work-
shop.
It lights up yellow
Electromechanical
steering operation
is limited.Have the steering checked im-
mediately by a specialised work-
shop.
If the yellow warning lamp does
not light up again after the en-
gine is restarted and the vehicle
has travelled a short distance,
you do not need to take it to a
specialised workshop.
The 12-volt battery
was disconnected
and has been recon-
nected.Take the vehicle for a short run
at 15-20 km/h (9-12 mph).
It flashes yellow
The steering column
is tight.Turn the wheel a little to both
sides.
The steering column
does not unlock or
lock.Remove the key from the ignition
and switch the ignition back on.
If necessary, check the messag-
es displayed on the instrument
panel display.
Do not drive on if
the steering
column remains locked after the
ignition has been switched on.
Seek specialist assistance. WARNING
If the warning lamps and the corresponding
mes s
ages are ignored when they light up, the
vehicle may stall in traffic and cause acci-
dents and severe injuries. » 105
Technical data
Advice
Operation
Emergencies
Safety
Page 119 of 248
Opening and closing
Radio frequency remote con-
tr o
l*
Un
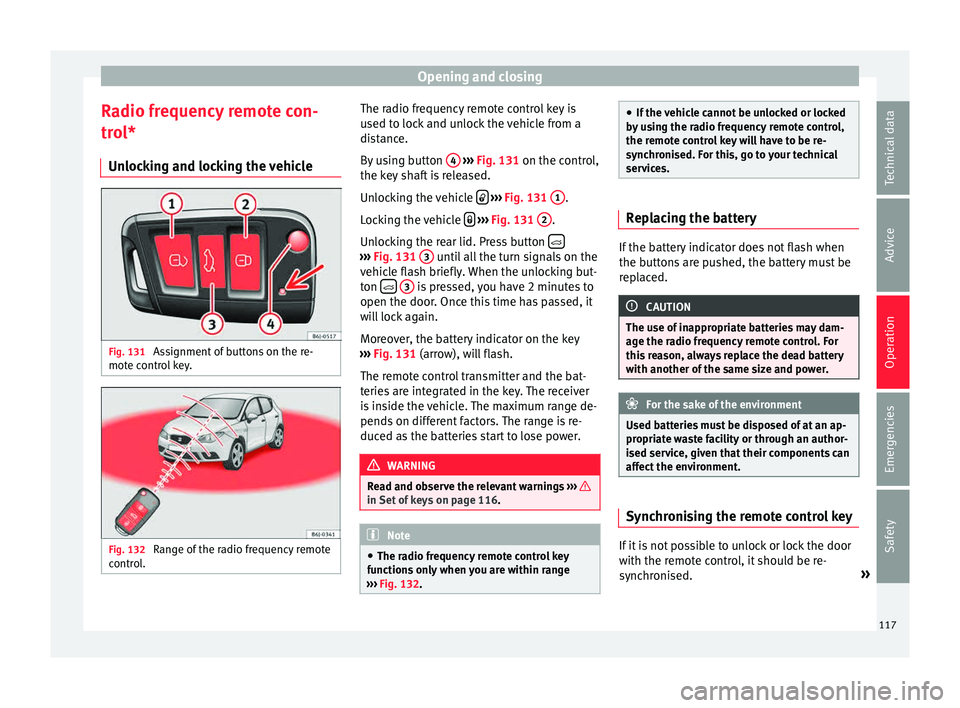
locking and locking the vehicle Fig. 131
Assignment of buttons on the re-
mot e c
ontr
ol key. Fig. 132
Range of the radio frequency remote
c ontr
o
l. The radio frequency remote control key is
u
sed t
o loc
k and unlock the vehicle from a
distance.
By using button 4
› ››
Fig. 131
on the c
ontrol,
the key shaft is released.
Unlocking the vehicle
› ››
Fig. 131
1 .
L oc
k
ing the vehicle
› ››
Fig. 131
2 .
Un loc
k
ing the rear lid. Press button ›››
Fig. 131 3 until all the turn signals on the
v ehic
l
e flash briefly. When the unlocking but-
ton
3 is pressed, you have 2 minutes to
open the door . Onc
e thi
s time has passed, it
will lock again.
Moreover, the battery indicator on the key
››› Fig. 131 (arrow), will flash.
The remote control transmitter and the bat-
teries are integrated in the key. The receiver
is inside the vehicle. The maximum range de-
pends on different factors. The range is re-
duced as the batteries start to lose power. WARNING
Read and observe the relevant warnings ›››
in Set of keys on page 116.
Note
● The ra dio fr
equency remote control key
functions only when you are within range
››› Fig. 132. ●
If the v
ehicle cannot be unlocked or locked
by using the radio frequency remote control,
the remote control key will have to be re-
synchronised. For this, go to your technical
services. Replacing the battery
If the battery indicator does not flash when
the butt
on
s are pushed, the battery must be
replaced. CAUTION
The use of inappropriate batteries may dam-
age the r a
dio frequency remote control. For
this reason, always replace the dead battery
with another of the same size and power. For the sake of the environment
Used batteries must be disposed of at an ap-
propri at
e waste facility or through an author-
ised service, given that their components can
affect the environment. Synchronising the remote control key
If it is not possible to unlock or lock the door
w
ith the r
emot
e control, it should be re-
synchronised. »
117
Technical data
Advice
Operation
Emergencies
Safety
Page 120 of 248
Operation
While the vehicle is open:
– Press the button
2
› ››
Fig. 131
on the
r
emote control.
– Then close the vehicle using the key shaft
within one minute.
Whi
le the vehicle is closed:
– Press the button
1
› ››
Fig. 131
on the
r
emote control.
– Then close the vehicle using the key shaft
within one minute.
It
is possible that the vehicle could no longer
be opened and closed with the remote con-
trol if the button is repeatedly pressed
outs ide of
the eff
ective range of the radio fre-
quency remote control. The remote control
key will have to be resynchronised.
Spare remote control keys are available at
your Technical Service, where they must be
matched to the locking system.
Up to five remote control keys can be used. Anti-theft alarm*
Des
cription of anti-theft alarm sys-
tem* The anti-theft alarm makes it more difficult to
bre
ak
into the vehicle or steal it. The system
will initiate acoustic and optical warning sig-
nals when your vehicle is tried to be forced.
The anti-theft alarm system is automatically
switched on when locking the vehicle. The
system is immediately activated and the turn
signal light located on the driver door will
flash along with the turn signals, indicating
that the alarm and the locking security sys-
tem (double lock) have been turned on.
If any of the doors or the bonnet are open,
they will not be included in the protection
zones of the vehicle when the alarm is con-
nected. If the door or the bonnet are subse-
quently closed, they will be automatically in-
cluded in the protection areas of the vehicle
and the turn signals will flash accordingly
when the doors close.
● The turn signal light will flash twice on
opening and de activ
ating the alarm.
● The turn signal light will flash once on clos-
ing and activatin
g the alarm. When does the system trigger an alarm?
The syst
em triggers an alarm, if the following
unauthorised actions are carried out when
the vehicle is locked:
● Mechanical opening of the vehicle with the
vehicl
e key without switching on the ignition
in the next 15 seconds (in certain markets,
such as the Netherlands, the alarm is activa-
ted immediately).
● A door is opened.
● Opening the bonnet.
● The rear lid is opened.
● Ignition switched on with a non-validated
key.
● Mo
vements in the driving compartment
(vehicl
es with a volume sensor).
● Towing of the vehicle 1)
.
● Vehicle tilt angle 1)
.
● Undue manipulation of the alarm.
● Battery handling.
In this c
ase, the acoustic signals will go off
and the turn signal will flash for approximate-
ly 30 seconds. This cycle may be repeated up
to 10 times depending on the country. 1)
With vehicles fitted with a tow-away protection
118
Page 121 of 248
Opening and closing
Opening all the doors in manual mode
In v
ehic
les without an alarm, when opening
the driver door manually, all doors are
opened.
How to switch the alarm off
To deactivate the anti-theft alarm, turn the
key in the opening direction, open the door
and switch the ignition on, or press the un-
lock button on the remote control.
In v
ehic
les equipped with an anti-theft alarm
system, you have 15 seconds to insert the
key in the ignition lock and activate the igni-
tion if the vehicle is opened using the driver
door key.
Otherwise, the alarm will trigger for 30 sec.
and the ignition will be blocked. Note
● Aft er 28 d
ays, the indicator light will be
switched off to prevent the battery from
draining if the vehicle has been left parked
for a long period of time. The alarm system
remains activated.
● The alarm will trigger again if attempts are
made t
o open another protection zone.
● The alarm system can be activated or deac-
tivated u
sing the radio frequency remote con-
trol ››› page 117.
● The anti-theft alarm is not activated when
the vehic
le is locked from within using the
central locking button . ●
If the v
ehicle battery is run down or flat
then the anti-theft alarm will not operate cor-
rectly.
● Vehicle monitoring remains active even if
the batter
y is disconnected or not working for
any reason.
● The alarm is triggered immediately if one of
the batter
y cables is disconnected while the
alarm system is active. Vehicle interior monitoring and anti-
to
w sy
stem* Monitoring or control function incorporated
in the anti-thef
t
al
arm* which detects unau-
thorised vehicle entry by means of ultra-
sound.
Activation
– It is automatically switched on when the
anti-theft al
arm is activated.
Deactivation – Open the vehicle with the key, either me-
chanic
ally or by pressing the button on
the r emot
e c
ontrol. The time period from
when the door is opened until the key is in-
serted into the contact should not exceed
15 seconds, otherwise the alarm will be
triggered. –
Pres
s the button on the remote control
tw ic
e.
The volumetric sensor and tilt sen-
sors will be deactivated. The alarm system
remains activated.
The vehicle interior monitoring and the anti-
tow system are automatically switched on
again next time the vehicle is locked.
The vehicle interior monitoring and anti-tow
sensor (tilt sensor) are automatically switch-
ed on when the anti-theft alarm is switched
on. In order to activate it, all the doors and
the rear lid must be closed.
If you wish to switch off the vehicle interior
monitoring and the anti-tow system, it must
be done each time that the vehicle is locked;
if not, they will be automatically switched on.
The vehicle interior monitoring and the anti-
tow system should be switched off if animals
are left inside the locked vehicle (otherwise,
their movements will trigger the alarm) or
when, for example, the vehicle is transported
or has to be towed with only one axle on the
ground.
False alarms
Interior monitoring will only operate correctly
if the vehicle is completely closed. Please ob-
serve related legal requirements.
The following cases may cause a false alarm: ● Open windows (partially or fully), »
119
Technical data
Advice
Operation
Emergencies
Safety
Page 123 of 248
Opening and closing
door. The other doors each have a switch for
their o wn w
indo
w.
Always close the windows fully if you park
the vehicle or leave it unattended ››› .
Y ou c
an u
se the electric windows for approx.
10 minutes after switching off the ignition if
neither the driver door nor the front passen-
ger door has been opened and the key has
not been removed from the ignition.
Safety switch not pressed: buttons on rear
doors are activated.
Safety switch pressed: buttons on rear doors
are deactivated. WARNING
Observe the safety warnings ›››
in Set of
key s on p
age 116.
● Incorrect use of the electric windows can
res
ult in injury.
● Never close the rear lid without observing
and ensurin
g it is clear, to do otherwise could
cause serious injury to you and third parties.
Make sure that no one is in the path of a win-
dow.
● If the ignition is switched on, the electric
equipment cou
ld be activated with risk of in-
jury, for example, in the electric windows.
● The doors can be locked using the remote
contro
l key. This could become an obstacle
for assistance in an emergency situation. ●
Alw a
ys take the key with you when you
leave the vehicle.
● The electric windows will work until the ig-
nition has
been switched off and one of the
front doors has been opened.
● If necessary, use the safety switch to disa-
ble the r
ear electric windows. Make sure that
they have been disabled. Note
If the window is not able to close because it
i s s
tiff or because of an obstruction, the win-
dow will automatically open again
››› page 121. If this happens, check why the
window could not be closed before attempt-
ing to close it again. One-touch opening and closing*
One-touch opening and closing means you
do not
h
av
e to hold down the button.
Buttons ››› Fig. 133 1 ,
2 ,
4 and
5 have
tw o po
s
itions for opening windows and two
for closing them. This makes it easier to open
and close windows to the desired position.
One-touch closing
– Pull up the window button briefly up to the
second pos
ition. The window closes fully. One-touch opening
– Push down the window button briefly up to
the second pos
ition. The window opens
fully.
Restoring one-touch opening and closing
– The automatic open and close function will
not work
if the battery has been temporari-
ly disconnected. The function can be re-
stored as follows:
– Close the window as far as it will go by lift-
ing and hol
ding the electric window switch.
– Release the switch and then lift it again for
1 second. Thi
s will re-enable the automatic
function.
If you push (or pull) a button to the first
stage, the window will open (or close) until
you release the button. If you push or lift the
button briefly to the second stage, the win-
dow will open (one-touch opening) or close
(one-touch closing) automatically. If you op-
erate the button while the window is opening
or closing, it stops at this position.
Roll-back function The roll-back function reduces the risk of in-
jur
y
when the el
ectric windows close. »
121
Technical data
Advice
Operation
Emergencies
Safety
Page 130 of 248
Operation
All turn signals flash simultaneously when
the h az
ar
d warning lights are switched on.
The two turn signal turn signal lamps
and the turn signal lamp in the switch will
flash at the same time. The hazard warning
lights also work when the ignition is switch-
ed off. WARNING
● The risk of
an accident increases if your ve-
hicle breaks down. Always use the hazard
warning lights and a warning triangle to draw
the attention of other road users to your sta-
tionary vehicle.
● Due to the high temperatures that the cata-
lytic con
verter can reach, never park in an
area where the catalytic converter could come
into contact with highly inflammable materi-
als, for example dry grass or spilt petrol. This
could start a fire. Note
● The batt er
y will run down if the hazard
warning lights are left on for a long time,
even if the ignition is switched off.
● The use of the hazard warning lights de-
scribed her
e is subject to the relevant statu-
tory requirements. Interior lights
Int erior and r
e
ading lights Read the additional information carefully
›› ›
page 22
Luggage compartment lighting
The light is activated when the rear lid is
open, even when the ignition and lights are
turned off. For this reason, ensure that the
rear lid is always closed.
Glove compartment light
When opening the glove compartment on the
passenger side, the glove compartment light
will automatically turn on and will turn off
upon closure.
Ambient light*
››› table on page 2
The ambient lighting lights up the central
console area and the footwell area.
They will switch on fully when the doors are
opened and will decrease in intensity while
driving when the dipped beam headlight is
on.
The intensity of the ambient light* can be ad-
justed using the Easy Connect menu (see
Adjusting Lights > Interior light-
ing ›››
page 24). Note
If not all the vehicle doors are closed, the in-
terior light s
will be switched off after approx.
10 minutes, providing the ignition key has
been removed and the courtesy light position
selected. This prevents the battery from dis-
charging. Visibility
Heat ed r
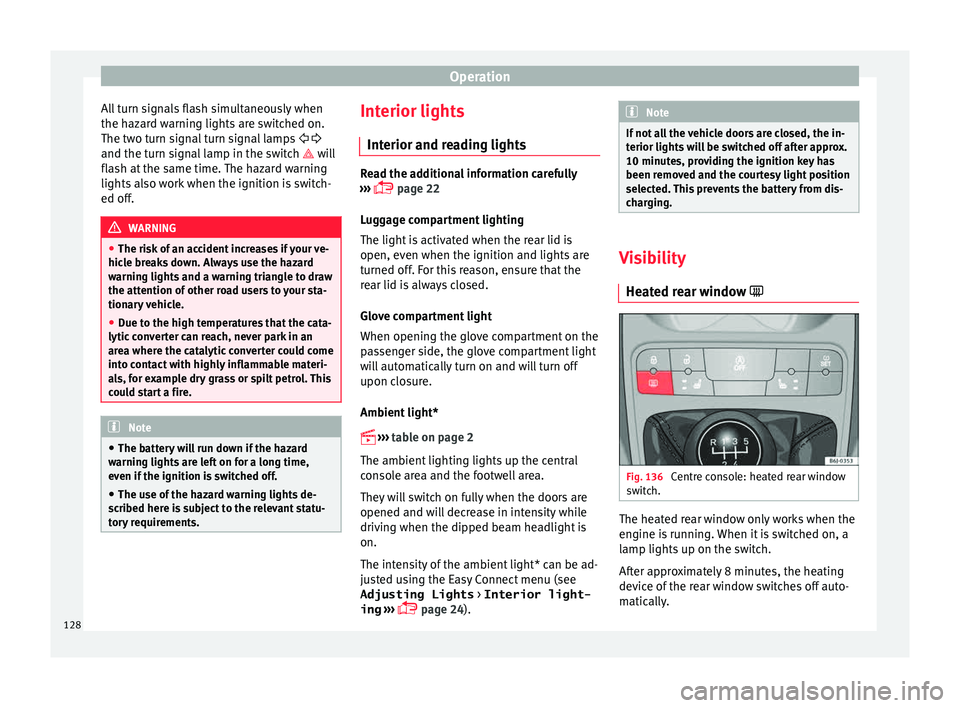
ear window Fig. 136
Centre console: heated rear window
sw it
c
h. The heated rear window only works when the
en
gine i
s
running. When it is switched on, a
lamp lights up on the switch.
After approximately 8 minutes, the heating
device of the rear window switches off auto-
matically.
128
Page 157 of 248
Driving
WARNING
● Never s t
art or run the engine in unventila-
ted or closed rooms. The exhaust gases con-
tain carbon monoxide, an odourless and col-
ourless poisonous gas. Risk of fatal acci-
dents. Carbon monoxide can cause loss of
consciousness and result in death.
● Never leave the vehicle unattended if the
engine is
running.
● Never use “cold start sprays”, they could
explode or c
ause the engine to run at high
revs. Risk of injury. CAUTION
● When the engine i s
cold, you should avoid
high engine speeds, driving at full throttle
and over-loading the engine. Risk of engine
damage.
● The vehicle should not be pushed or towed
more than 50 metr
es to start the engine. Un-
burnt fuel could enter the catalytic converter
and damage it.
● Before attempting to push-start or tow a ve-
hicle in or
der to start it, you should first try to
start it using the battery of another vehicle.
Please observe and follow the notes on the
››› page 52, How to jump start. For the sake of the environment
Do not warm-up the engine by running the
engine w ith the
vehicle stationary. Start off
immediately, driving gently. This helps the engine reach operating temperature faster
and reduc
e
s emissions. Starting diesel engines
The engine can only be started using a genu-
ine S
EA
T key with its correct code.
– Move the gearbox lever to the neutral posi-
tion and depres
s the clutch pedal thor-
oughly and hold it in this position for the
starter to turn the engine on.
– Turn the ignition key to position ›››
Fig. 168
2 . The warning lamp
wi
l l light for en-
gine pre-heating.
– When the lamp turns off, turn the ignition
key t
o position 3 to start the engine. Do
not pr
e
ss the accelerator.
– Release the ignition key as soon as the en-
gine star
ts. The starter motor should not
turn at the same time.
When starting a cold engine, it may be a little
noisy for the first few seconds until oil pres-
sure has built up in the hydraulic valve com-
pensators. This is quite normal, and no cause
for concern.
If there are problems starting the engine, see
the ›››
page 52. Glow plug system for the diesel engine
To avoid u
nnecessary discharging of the bat-
tery, do not use any other major electrical
equipment while the glow plugs are pre-heat-
ing.
Start the engine as soon as the glow plug
warning lamp goes out.
Starting a diesel engine after the fuel tank
has been completely run dry
If the fuel tank has been completely run dry,
it may take longer than normal (up to one mi-
nute) to start a diesel engine after refuelling.
This is because the fuel system must elimi-
nate air first. WARNING
Observe the safety warnings ›››
in Starting
petro l
engines on page 155. CAUTION
● When the engine i s
cold, you should avoid
high engine speeds, driving at full throttle
and over-loading the engine. Risk of engine
damage.
● The vehicle should not be pushed or towed
more than 50 metr
es to start the engine. Un-
burnt fuel could enter the catalytic converter
and damage it.
● Before attempting to push-start or tow a ve-
hicle in or
der to start it, you should first try to » 155
Technical data
Advice
Operation
Emergencies
Safety
Page 158 of 248
Operation
start it using the battery of another vehicle.
Ple
a
se observe and follow the notes on the
››› page 52, How to jump start. For the sake of the environment
Do not warm-up the engine by running the
en gine w ith the
vehicle stationary. You
should drive off as soon as you start the en-
gine. This helps the engine reach operating
temperature faster and reduces emissions. Switching off the engine
–
Stop the vehicle.
– Turn the ignition key to position ››
›
Fig. 168
1 .
Af t
er sw
itching the engine off, the radiator
fan may run on for up to 10 minutes. It is also
possible that the fan turns itself on once
more if the coolant temperature increases
due to the heat accumulated in the engine
compartment or due to its prolonged expo-
sure to solar radiation. WARNING
● Never sw it
ch the engine off until the vehi-
cle is completely stationary.
● The brake servo works only when the en-
gine is ru
nning. With the engine switched off,
more strength is needed to brake. As normal brake operation cannot be performed, risk of
acc
ident
s and serious injury may exist.
● The steering lock can be immediately
block
ed once the key is removed from the ig-
nition. The vehicle cannot be steered. Risk of
accident.
● Power-assisted steering does not work
when the engine is
off, and more strength is
needed to turn the wheel.
● If the key is removed from the ignition lock
the steerin
g lock could be engaged and vehi-
cle steering would not work. CAUTION
When the engine has been running under a
heavy lo
ad for a long period, heat can accu-
mulate in the engine compartment and cause
engine damage. For this reason, idle the en-
gine for approximately 2 minutes before
switching it off. Braking and parking
Br ak
in
g capacity and braking distance The efficiency of the brakes depends directly
on the br
ak
e p
ad wear. This wear depends to
a great extent on the conditions under which
the vehicle is operated and the way the vehi-
cle is driven. If you often drive in town, drive
short distances or have a sporty driving style,
we recommend that you have the thickness of your brake pads checked by technical serv-
ices
more frequently than recommended in
the Maintenance Programme.
If you drive with wet brakes, for example, af-
ter crossing areas of water, on days of heavy
rainfall or even after washing the car, the ef-
fect of the brakes is reduced as the brake
discs are wet or even frozen (in winter): in
this case, the brakes should be “dried” by
pressing the brake pedal several times. WARNING
Longer braking distances and faults in the
brak e sy
stem increase the risk of accidents.
● New brake pads must be run in and do not
have the c
orrect friction during the first
200 km. This reduced braking capacity may
be compensated for by pressing on the brake
pedal a little harder, which also applies when
the brake pads have to be changed further
on.
● If brakes are wet or frozen, or if you are
driving on r
oads which have been salted,
braking power may be lower than normal.
● On steep slopes, if brakes are excessively
used, they w
ill overheat. Before driving down
a long steep slope, it is advisable to reduce
speed and change down into a lower gear or
range (depending on the type of transmis-
sion). Thus, make use of engine braking and
relieve the brakes.
● Never let the brakes “drag” by applying
light pre
ssure. Continuous braking will cause156