turn signal bulb Seat Ibiza ST 2015 Owner's manual
[x] Cancel search | Manufacturer: SEAT, Model Year: 2015, Model line: Ibiza ST, Model: Seat Ibiza ST 2015Pages: 248, PDF Size: 4.77 MB
Page 85 of 248
Fuses and bulbs
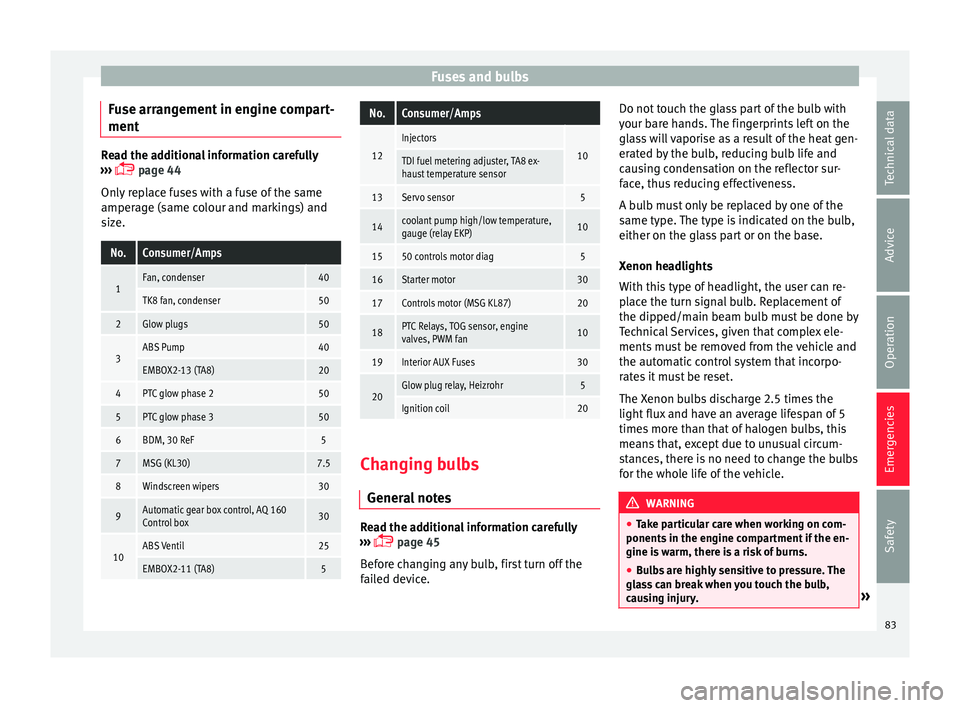
Fuse arrangement in engine compart-
ment Read the additional information carefully
›› ›
page 44
Only replace fuses with a fuse of the same
amperage (same colour and markings) and
size.
No.Consumer/Amps
1Fan, condenser40
TK8 fan, condenser50
2Glow plugs50
3ABS Pump40
EMBOX2-13 (TA8)20
4PTC glow phase 250
5PTC glow phase 350
6BDM, 30 ReF5
7MSG (KL30)7.5
8Windscreen wipers30
9Automatic gear box control, AQ 160
Control box30
10ABS Ventil25
EMBOX2-11 (TA8)5
No.Consumer/Amps
12
Injectors
10TDI fuel metering adjuster, TA8 ex-
haust temperature sensor
13Servo sensor5
14coolant pump high/low temperature,
gauge (relay EKP)10
1550 controls motor diag5
16Starter motor30
17Controls motor (MSG KL87)20
18PTC Relays, TOG sensor, engine
valves, PWM fan10
19Interior AUX Fuses30
20Glow plug relay, Heizrohr5
Ignition coil20 Changing bulbs
Gener al
notes Read the additional information carefully
› ›
›
page 45
Before changing any bulb, first turn off the
failed device. Do not touch the glass part of the bulb with
your bar
e hands. The fingerprints left on the
glass will vaporise as a result of the heat gen-
erated by the bulb, reducing bulb life and
causing condensation on the reflector sur-
face, thus reducing effectiveness.
A bulb must only be replaced by one of the
same type. The type is indicated on the bulb,
either on the glass part or on the base.
Xenon headlights
With this type of headlight, the user can re-
place the turn signal bulb. Replacement of
the dipped/main beam bulb must be done by
Technical Services, given that complex ele-
ments must be removed from the vehicle and
the automatic control system that incorpo-
rates it must be reset.
The Xenon bulbs discharge 2.5 times the
light flux and have an average lifespan of 5
times more than that of halogen bulbs, this
means that, except due to unusual circum-
stances, there is no need to change the bulbs
for the whole life of the vehicle. WARNING
● Tak e p
articular care when working on com-
ponents in the engine compartment if the en-
gine is warm, there is a risk of burns.
● Bulbs are highly sensitive to pressure. The
glas
s can break when you touch the bulb,
causing injury. » 83
Technical data
Advice
Operation
Emergencies
Safety
Page 86 of 248
Emergencies
●
The high v o
ltage element of gas discharge
bulbs* (xenon light) must be handled correct-
ly. Otherwise, there is a risk of death.
● When changing bulbs, please take care not
to injure
yourself on sharp parts in the head-
light housing. CAUTION
● Remo v
e the ignition key before working on
the electric system. Otherwise, a short circuit
could occur.
● Switch off the lights or parking lights be-
fore
you change a bulb. For the sake of the environment
Please ask your specialist retailer how to dis-
pose of u
sed bulbs in the proper manner. Note
● Dependin g on w
eather conditions (cold or
wet), the front lights, the fog lights, the tail
lights and the turn signals may be temporari-
ly misted. This has no influence on the useful
life of the lighting system. By switching on
the lights, the area through which the beam
of light is projected will quickly be demisted.
However, the edges may continue to be mis-
ted.
● Please check at regular intervals that all
lighting (es
pecially the exterior lighting) on
your vehicle is functioning properly. This is not only in the interest of your own safety,
but
a
lso that of all other road users.
● Before changing a bulb, make sure you
have the c
orrect new bulb.
● Do not touch the glass part of the bulb with
your bar
e hands, use a cloth or paper towel
instead. The residue left by the fingerprints
would vaporise as a result of the heat gener-
ated by the bulb, they will be deposited on
the reflector and will impair its surface. Single headlight bulb change
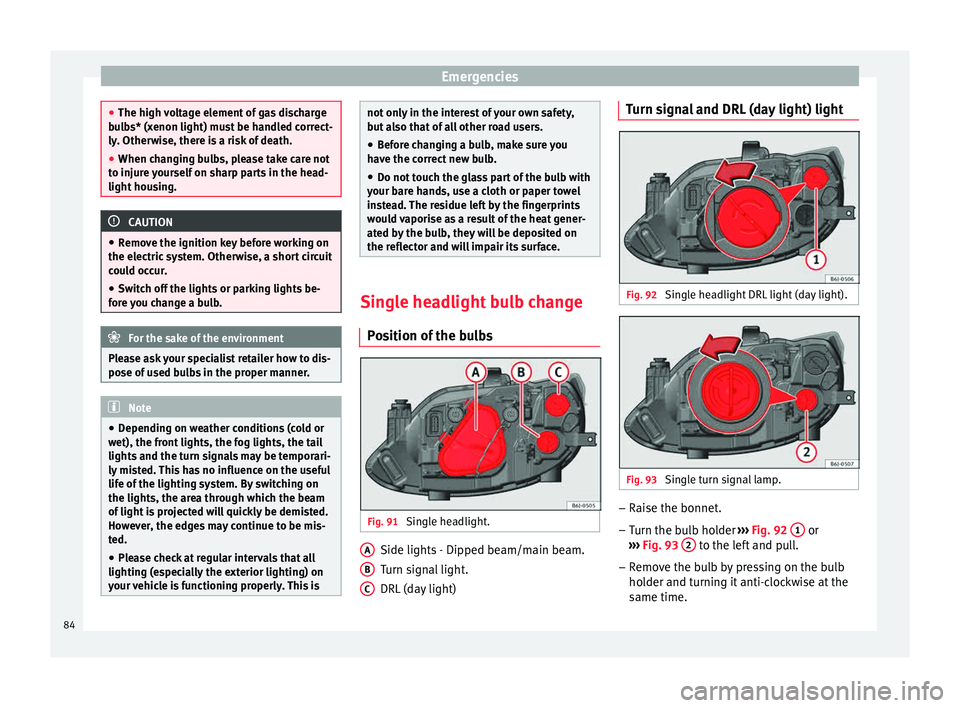
P o
s
ition of the bulbs Fig. 91
Single headlight. Side lights - Dipped beam/main beam.
T
urn s
ign
al light.
DRL (day light)
A B
C Turn signal and DRL (day light) light
Fig. 92
Single headlight DRL light (day light). Fig. 93
Single turn signal lamp. –
Raise the bonnet.
– Turn the bulb holder ››
›
Fig. 92 1 or
› ›
›
Fig. 93 2 to the left and pull.
– Remove the bulb by pressing on the bulb
ho l
der and t
urning it anti-clockwise at the
same time.
84
Page 87 of 248
Fuses and bulbs
– Ins
t
allation involves all of the above steps
in reverse sequence.
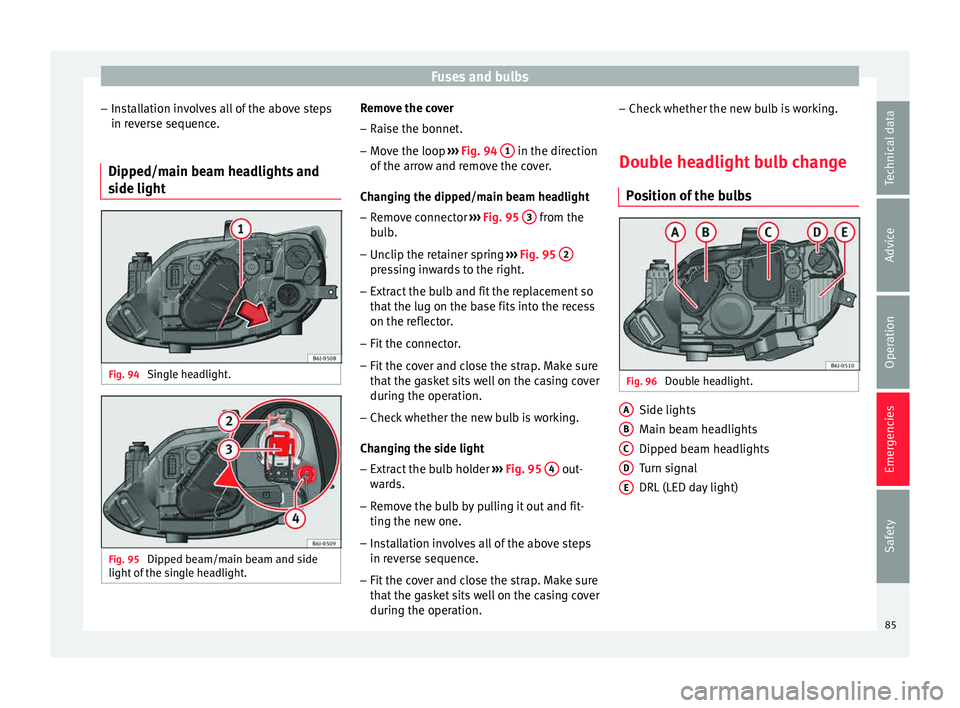
Dipped/main beam headlights and
side light Fig. 94
Single headlight. Fig. 95
Dipped beam/main beam and side
light of
the s
ingle headlight. Remove the cover
– Raise the bonnet.
– Move the loop ›
››
Fig. 94 1 in the direction
of the arr
o
w and remove the cover.
Changing the dipped/main beam headlight – Remove connector ›››
Fig. 95 3 from the
b u
l
b.
– Unclip the retainer spring ›››
Fig. 95 2 pressing inwards to the right.
– Extract the bulb and fit the replacement so
th at
the lug on the b
ase fits into the recess
on the reflector.
– Fit the connector.
– Fit the cover and close the strap. Make sure
that the g
asket sits well on the casing cover
during the operation.
– Check whether the new bulb is working.
Changin
g the side light
– Extract the bulb holder ›››
Fig. 95 4 out-
w ar
d
s.
– Remove the bulb by pulling it out and fit-
ting the new one.
– Ins
tallation involves all of the above steps
in rever
se sequence.
– Fit the cover and close the strap. Make sure
that the g
asket sits well on the casing cover
during the operation. –
Check whether the new b
ulb is working.
Double headlight bulb change Pos
ition of the bulbs Fig. 96
Double headlight. Side lights
M
ain be
am he
adlights
Dipped beam headlights
Turn signal
DRL (LED day light)
A B
C
D
E
85
Technical data
Advice
Operation
Emergencies
Safety
Page 89 of 248
Fuses and bulbs
– Unc lip the r
et
ainer spring ››› Fig. 100 3 pressing inwards to the right.
– Extract the bulb and fit the replacement so
th at
the lug on the b
ase fits into the recess
on the reflector.
– Fit the connector.
– Fit the cover and close the strap. Make sure
that the g
asket sits well on the casing cover
during the operation.
– Check whether the new bulb is working.
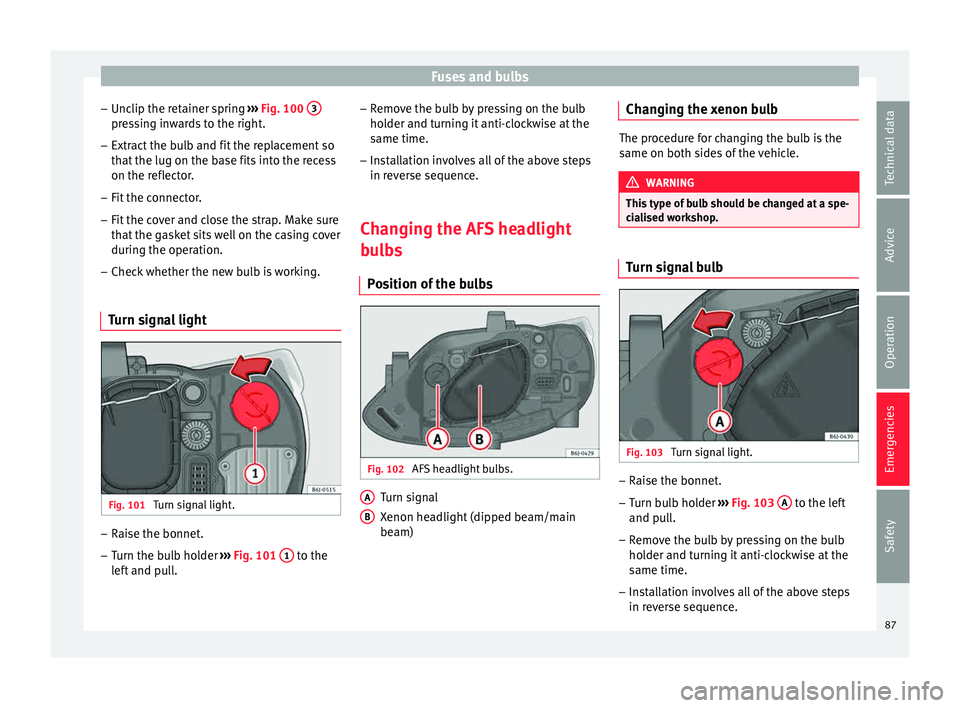
Turn signal light Fig. 101
Turn signal light. –
Raise the bonnet.
– Turn the bulb holder ››
›
Fig. 101 1 to the
l ef t
and pull. –
Remov
e the bulb by pressing on the bulb
holder and turning it anti-clockwise at the
same time.
– Installation involves all of the above steps
in rever
se sequence.
Changing the AFS headlight
bul
bs
Position of the bulbs Fig. 102
AFS headlight bulbs. Turn signal
X
enon he
a
dlight (dipped beam/main
beam)
A B Changing the xenon bulb
The procedure for changing the bulb is the
same on both s
ide
s of the vehicle. WARNING
This type of bulb should be changed at a spe-
ci a
lised workshop. Turn signal bulb
Fig. 103
Turn signal light. –
Raise the bonnet.
– Turn bulb holder ››
›
Fig. 103 A to the left
and p u
l
l.
– Remove the bulb by pressing on the bulb
holder and t
urning it anti-clockwise at the
same time.
– Installation involves all of the above steps
in rever
se sequence.
87
Technical data
Advice
Operation
Emergencies
Safety
Page 91 of 248
Fuses and bulbs
Changing the tail light bulbs S umm
ar
y of LED tail lights3 Applies to the model: IBIZA/IBIZA SC
LED
● Br ak
e lights
● Side lights
Bul
bs
● Retro fog light
● Reverse lights
● Turn signal
Tail light summary 3 App
lies to the model: IBIZA ST
T
ail lights on side panel Bulb lamps
● Brake lights
● Side lights
● Turn signal
Lights on the r
ear lid Bulb lamps
● Reverse lights
● Side lights
● Fog lights Tail lights on side panel LED lamps
●
Brake light (LED)
● Side light (LED)
● Turn signal
Lights on the r
ear lid LED lamps
● Reverse lights
● Side light (LED)
● Fog lights
Access to tail lights 3 App
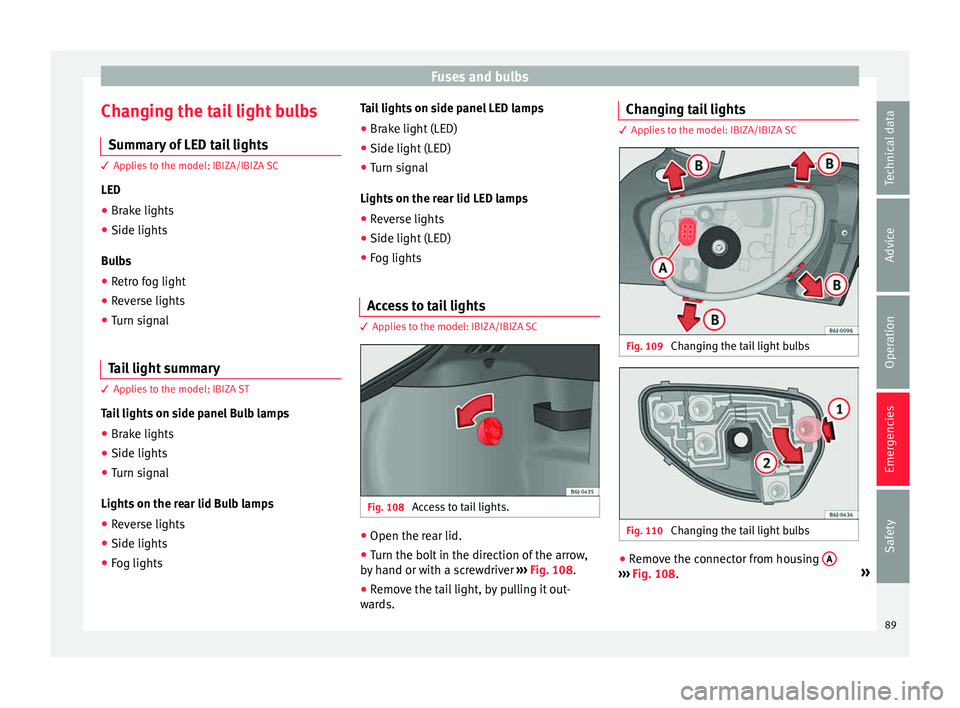
lies to the model: IBIZA/IBIZA SC Fig. 108
Access to tail lights. ●
Open the rear lid.
● Turn the bolt in the direction of the arrow,
b y
h
and or with a screwdriver ››› Fig. 108.
● Remove the tail light, by pulling it out-
ward
s. Changing tail lights 3 Applies to the model: IBIZA/IBIZA SC
Fig. 109
Changing the tail light bulbs Fig. 110
Changing the tail light bulbs ●
Remove the connector from housing A ›››
Fig. 108. »
89
Technical data
Advice
Operation
Emergencies
Safety
Page 93 of 248
Fuses and bulbs
Changing the tail light bulbs (on the
r e
ar lid) 3 Applies to the model: IBIZA ST
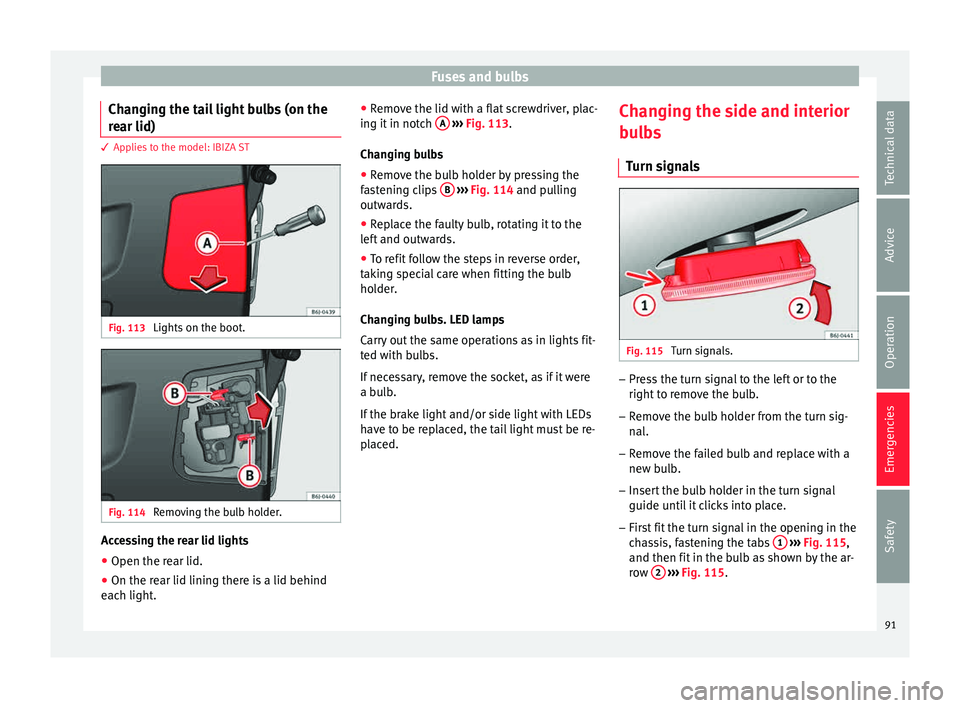
Fig. 113
Lights on the boot. Fig. 114
Removing the bulb holder. Accessing the rear lid lights
● Open the rear lid.
● On the rear lid lining there is a lid behind
e ac
h light
. ●
Remov
e the lid with a flat screwdriver, plac-
ing it in notch A
› ››
Fig. 113
.
Ch
anging bulbs
● Remove the bulb holder by pressing the
fas
tening clips B
› ››
Fig. 114
and p ulling
outwards.
● Replace the faulty bulb, rotating it to the
left
and outwards.
● To refit follow the steps in reverse order,
takin
g special care when fitting the bulb
holder.
Changing bulbs. LED lamps
Carry out the same operations as in lights fit-
ted with bulbs.
If necessary, remove the socket, as if it were
a bulb.
If the brake light and/or side light with LEDs
have to be replaced, the tail light must be re-
placed. Changing the side and interior
bul
bs
Turn signals Fig. 115
Turn signals. –
Press the turn signal to the left or to the
right t
o r
emove the bulb.
– Remove the bulb holder from the turn sig-
nal.
– R
emove the failed bulb and replace with a
new bul
b.
– Insert the bulb holder in the turn signal
guide until
it clicks into place.
– First fit the turn signal in the opening in the
cha
ssis, fastening the tabs 1
› ›
› Fig. 115 ,
and then fit in the bulb as shown by the ar-
row 2
› ›
› Fig. 115
.
91
Technical data
Advice
Operation
Emergencies
Safety
Page 127 of 248
Lights and visibility
Note
See legal requirements for each country. Instrument and switch lighting, head-
light r
an
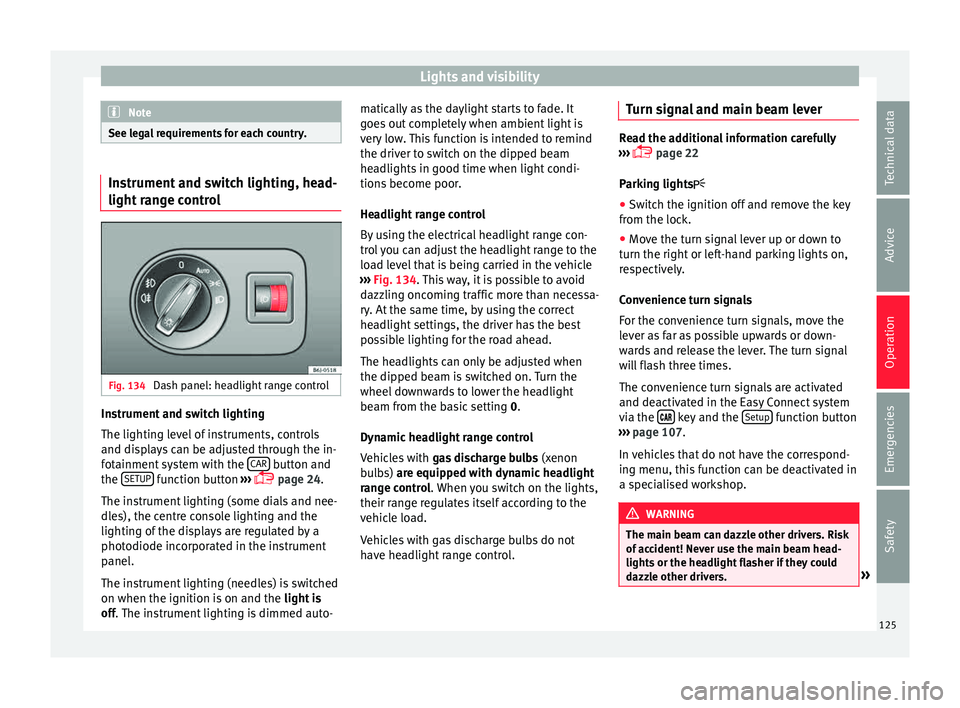
ge control Fig. 134
Dash panel: headlight range control Instrument and switch lighting
The lightin
g l
ev
el of instruments, controls
and displays can be adjusted through the in-
fotainment system with the CAR button and
the S
ETUP function button
››
›
page 24.
The instrument lighting (some dials and nee-
dles), the centre console lighting and the
lighting of the displays are regulated by a
photodiode incorporated in the instrument
panel.
The instrument lighting (needles) is switched
on when the ignition is on and the light is
off. The instrument lighting is dimmed auto- matically as the daylight starts to fade. It
goes
out completely when ambient light is
very low. This function is intended to remind
the driver to switch on the dipped beam
headlights in good time when light condi-
tions become poor.
Headlight range control
By using the electrical headlight range con-
trol you can adjust the headlight range to the
load level that is being carried in the vehicle
››› Fig. 134. This way, it is possible to avoid
dazzling oncoming traffic more than necessa-
ry. At the same time, by using the correct
headlight settings, the driver has the best
possible lighting for the road ahead.
The headlights can only be adjusted when
the dipped beam is switched on. Turn the
wheel downwards to lower the headlight
beam from the basic setting 0.
Dynamic headlight range control
Vehicles with gas discharge bulbs (xenon
bulbs) are equipped with dynamic headlight
range control. When you switch on the lights,
their range regulates itself according to the
vehicle load.
Vehicles with gas discharge bulbs do not
have headlight range control. Turn signal and main beam lever Read the additional information carefully
›› ›
page 22
Parking lights
● Switch the ignition off and remove the key
from the lock.
● Mo
ve the turn signal lever up or down to
turn the right or l
eft-hand parking lights on,
respectively.
Convenience turn signals
For the convenience turn signals, move the
lever as far as possible upwards or down-
wards and release the lever. The turn signal
will flash three times.
The convenience turn signals are activated
and deactivated in the Easy Connect system
via the key and the
Set
up function button
› ›
›
page 107.
In vehicles that do not have the correspond-
ing menu, this function can be deactivated in
a specialised workshop. WARNING
The main beam can dazzle other drivers. Risk
of ac c
ident! Never use the main beam head-
lights or the headlight flasher if they could
dazzle other drivers. » 125
Technical data
Advice
Operation
Emergencies
Safety
Page 128 of 248
Operation
Note
● If the c on
venience turn signals are operat-
ing (three flashes) and the other convenience
turn signals are switched on, the active part
stops flashing and only flashes once in the
new part selected.
● The turn signals only
work when the igni-
tion is switched on. The corresponding warn-
ing lamp or flashes in the instrument
panel. The control lamp flashes when the
turn signals are operated, provided a trailer is
correctly attached and connected to the vehi-
cle. If a turn signal bulb is defective, the con-
trol lamp flashes at double speed. If the trail-
er turn signal bulbs are defective, the control
lamp does not light up. Change the bulb.
● The main beam headligh
ts can only be
switched on if the dipped beam headlights
are already on. The warning lamp then
comes on in the instrument panel.
● The headlight flasher come
s on for as long
as you pull the lever – even if no other lights
are switched on. The warning lamp then
comes on in the instrument panel.
● When the parking ligh
ts are switched on,
the headlight and the tail light on the corre-
sponding side of the vehicle light up. The
parking lights will only work if the key is re-
moved from the ignition. If said light is on, an
audible warning will be emitted while the
driver door is open.
● If the turn signal lever is left on after the
key h
as been taken out of the ignition lock,
an acoustic signal sounds when the driver door is opened. This is intended as a remind-
er to sw
it
ch off the turn signal, unless you
wish to leave the parking light on. Coming Home/Leaving Home Func-
tion*
The Coming Home function is controlled man-
ually
.
The Leaving Home function is control-
led with a photosensor.
If the Coming Home or Leaving Home func-
tion is connected, the front side and dipped
lights, the tail lights and the number plate
light will light up to provide assistance.
Coming home function
The Coming Home function is activated by
switching off the ignition and briefly flashing
the lights. When the driver door is opened,
the Coming Home lighting comes on. If the
driver door is already open when the lights
are flashed briefly, the Coming Home lighting
comes on immediately.
When the last door of the vehicle or the rear
lid is closed, the Coming Home function
starts and the switching off the headlights is
delayed.
The Coming Home lighting switches off in the
following cases: ●
On comp l
etion of the time period establish-
ed for the delay in switching off the lights af-
ter all the vehicle doors and the rear lid have
been closed.
● If, 30 seconds after being connected, any
doors or the r
ear lid remain open.
● If the light switch is turned to position .
● If the ignition is switched on.
Automatic
Leaving Home function
The Leaving Home function is activated when
the vehicle is unlocked if:
● the light control is in position and
● the photo
sensor detects “darkness”.
The Leav
ing Home lighting switches off in the
following cases:
● If the time period for the delay in switching
off the hea
dlights has ended
● If the vehicle is locked again.
● If the light switch is turned to position .
● If the ignition is switched on.
Manual
Leaving Home function
In vehicles without an automatic headlight
system (light sensor), if the manual Coming
Home function is activated when leaving the
car, upon returning to the car and unlocking
it the manual Leaving Home function will be
activated automatically.
126
Page 238 of 248
Index
C
C ap
ac
ities . . . . . . . . . . . . . . . . . . . . . . . . . . . . . . . . 40
fuel tank . . . . . . . . . . . . . . . . . . . . . . . . . . . . . . 100
Car care Exterior . . . . . . . . . . . . . . . . . . . . . . . . . . . . . . . 192
Catalytic converter . . . . . . . . . . . . . . . . . . . . . . . . 166
CCS . . . . . . . . . . . . . . . . . . . . . . . . . . . . . . . . . . . . . 34
Central locking anti-theft alarm . . . . . . . . . . . . . . . . . . . . . . . . . 118
automatic speed-dependent locking . . . . . . . 114
central locking button . . . . . . . . . . . . . . . . . . . 115
electric windows . . . . . . . . . . . . . . . . . . . . . . . . 122
key by remote control . . . . . . . . . . . . . . . . . . . . 117
Selective unlocking system . . . . . . . . . . . . . . . 113
self-locking system to prevent involuntary un-locking . . . . . . . . . . . . . . . . . . . . . . . . . . . . . . 114
unlocking system . . . . . . . . . . . . . . . . . . . . . . . 114
Central locking system . . . . . . . . . . . . . . . . . . . . . 112 Safe security system . . . . . . . . . . . . . . . . . . . . 112
Cetane number . . . . . . . . . . . . . . . . . . . . . . . . . . . 200
Changing a DRL light bulb . . . . . . . . . . . . . . . . . . . . . . . . . . . 84
Changing a bulb additional brake light . . . . . . . . . . . . . . . . . . . . . 92
AFS headlight bulbs . . . . . . . . . . . . . . . . . . . . . . 87
fog light bulbs . . . . . . . . . . . . . . . . . . . . . . . . . . 88
general notes . . . . . . . . . . . . . . . . . . . . . . . . . . . 83
interior light and reading light . . . . . . . . . . . . . 92
luggage compartment light . . . . . . . . . . . . . . . . 93
number plate light . . . . . . . . . . . . . . . . . . . . . . . 92
tail light bulb on the rear lid . . . . . . . . . . . . . . . 91
tail light bulb on the side panel . . . . . . . . . . . . 90
tail light bulbs . . . . . . . . . . . . . . . . . . . . . . . . . . . 89
turn signal light . . . . . . . . . . . . . . . . . . . . . . . . . 87
Turn signals . . . . . . . . . . . . . . . . . . . . . . . . . . . . . 91 Changing a double headlight bulb
dipped beam he adlights . . . . . . . . . . . . . . . . . . 86
double headlight bulbs . . . . . . . . . . . . . . . . . . . 85
Changing an AFS headlight bulb . . . . . . . . . . . . . . 87 turn signal light . . . . . . . . . . . . . . . . . . . . . . . . . 87
xenon light . . . . . . . . . . . . . . . . . . . . . . . . . . . . . 87
Changing a single headlight bulb side light . . . . . . . . . . . . . . . . . . . . . . . . . . . . . . . 85
single headlight bulbs . . . . . . . . . . . . . . . . . . . . 84
turn signal light . . . . . . . . . . . . . . . . . . . . . . . . . 84
Changing a wheel . . . . . . . . . . . . . . . . . . . . . . . . . 47 subsequent work . . . . . . . . . . . . . . . . . . . . . . . . 50
Changing double headlight bulb side light . . . . . . . . . . . . . . . . . . . . . . . . . . . . . . . 86
Changing settings CAR menu . . . . . . . . . . . . . . . . . . . . . . . . . . . . . . 24
Changing the blades . . . . . . . . . . . . . . . . . . . . . . . 78
Changing the double headlight bulb main beam . . . . . . . . . . . . . . . . . . . . . . . . . . . . . 86
Changing the single headlight bulbs dipped/main beam . . . . . . . . . . . . . . . . . . . . . . 85
Charging the battery . . . . . . . . . . . . . . . . . . . . . . . 52
Checking levels engine compartment . . . . . . . . . . . . . . . . . . . . 204
Child-proof locking electric windows . . . . . . . . . . . . . . . . . . . . . . . . 120
Child seat Categorisation in groups . . . . . . . . . . . . . . . . . . 73
Child seats . . . . . . . . . . . . . . . . . . . . . . . . . . . . 16, 73 ISOFIX system . . . . . . . . . . . . . . . . . . . . . . . . . . . 18
safety instructions . . . . . . . . . . . . . . . . . . . . 16, 72
Securing with the seat belt . . . . . . . . . . . . . . . . 17
Top Tether system . . . . . . . . . . . . . . . . . . . . . 18, 20
Chrome parts cleaning . . . . . . . . . . . . . . . . . . . . . . . . . . . . . . 195
Cigarette lighter . . . . . . . . . . . . . . . . . . . . . . . . . . 138 Cleaning . . . . . . . . . . . . . . . . . . . . . . . . . . . . . . . . 191
alloy wheel rims . . . . . . . . . . . . . . . . . . . . . . . . 196
chrome parts . . . . . . . . . . . . . . . . . . . . . . . . . . . 195
cleaning of windows and exterior mirrors . . . . 194
engine compartment . . . . . . . . . . . . . . . . . . . . 196
fabric . . . . . . . . . . . . . . . . . . . . . . . . . . . . . . . . . 197
high pressure cleaners . . . . . . . . . . . . . . . . . . . 193
leather . . . . . . . . . . . . . . . . . . . . . . . . . . . . . . . . 197
plastic parts . . . . . . . . . . . . . . . . . . . . . . 194, 197
radio and climate controls . . . . . . . . . . . . . . . . 197
rubber seals . . . . . . . . . . . . . . . . . . . . . . . . . . . 195
seat belts . . . . . . . . . . . . . . . . . . . . . . . . . . . . . 198
steel wheel rims . . . . . . . . . . . . . . . . . . . . . . . . 195
upholstery . . . . . . . . . . . . . . . . . . . . . . . . . . . . . 197
washing the vehicle . . . . . . . . . . . . . . . . . . . . . 192
windscreen wiper blades . . . . . . . . . . . . . . . . . 195
wooden trim . . . . . . . . . . . . . . . . . . . . . . . . . . . 197
Climatronic . . . . . . . . . . . . . . . . . . . . . . . . . . . . . . . 39 adjusting the temperature . . . . . . . . . . . . . . . . 151
air recirculation . . . . . . . . . . . . . . . . . . . . . . . . . 152
automatic mode . . . . . . . . . . . . . . . . . . . . . . . . 151
blower selection . . . . . . . . . . . . . . . . . . . . . . . . 152
controls . . . . . . . . . . . . . . . . . . . . . . . . . . . . . . . 150
general notes . . . . . . . . . . . . . . . . . . . . . . . . . . 144
windscreen defrost . . . . . . . . . . . . . . . . . . . . . . 152
Closing . . . . . . . . . . . . . . . . . . . . . . . . . . . . . . . . . 112 bonnet . . . . . . . . . . . . . . . . . . . . . . . . . . . . . . . . 203
tilting panoramic sunroof . . . . . . . . . . . . . . . . 122
windows . . . . . . . . . . . . . . . . . . . . . . . . . . . . . . 120
Coming Home Function . . . . . . . . . . . . . . . . . . . . 126
Contact key . . . . . . . . . . . . . . . . . . . . . . . . . . . . . . 153
Controls and displays general instrument panel . . . . . . . . . . . . . . . . . . 95
Controls on the steering wheel operating the audio system . . . . . . . . . . . . . . . 109
operating the audio system and telephone . . 110
236
Page 242 of 248
Index
odometer . . . . . . . . . . . . . . . . . . . . . . . . . . . . . . . 99
ser v
ic
e interval indication . . . . . . . . . . . . . . . . . 33
warning and indication lamps . . . . . . . . . . . . . 100
Interior lights . . . . . . . . . . . . . . . . . . . . . . . . . . . . . 22
Interior mirror . . . . . . . . . . . . . . . . . . . . . . . . . . . . 131 anti-dazzle . . . . . . . . . . . . . . . . . . . . . . . . . . . . 131
Interior view left guide . . . . . . . . . . . . . . . . . . . . . . . . . . . . . . . . 7
right-hand drive . . . . . . . . . . . . . . . . . . . . . . . . . . 8
ISOFIX system . . . . . . . . . . . . . . . . . . . . . . . . . . 18, 19
J Jack . . . . . . . . . . . . . . . . . . . . . . . . . . . . . . . . . . . . . 47 mounting points . . . . . . . . . . . . . . . . . . . . . . . . . 48
Journey data . . . . . . . . . . . . . . . . . . . . . . . . . . . . . . 25 data summary . . . . . . . . . . . . . . . . . . . . . . . . . . . 30
memory . . . . . . . . . . . . . . . . . . . . . . . . . . . . . . . . 29
Jump leads . . . . . . . . . . . . . . . . . . . . . . . . . . . . . . . 52
K
Key-operated switch . . . . . . . . . . . . . . . . . . . . . . . . 70
Key by remote control unlocking and locking . . . . . . . . . . . . . . . . . . . 117
Keys replacing the battery . . . . . . . . . . . . . . . . . . . . 117
spare key . . . . . . . . . . . . . . . . . . . . . . . . . . . . . . 116
synchronise . . . . . . . . . . . . . . . . . . . . . . . . . . . . 117
unlocking and locking . . . . . . . . . . . . . . . . . . . 117
vehicle key . . . . . . . . . . . . . . . . . . . . . . . . . . . . 116
Kick-down automatic gearbox . . . . . . . . . . . . . . . . . . . . . . 164
L
Lamp fault control lamp . . . . . . . . . . . . . . . . . . . . . . . . . . . 102
Leaving Home Function . . . . . . . . . . . . . . . . . . . . 126
Level control . . . . . . . . . . . . . . . . . . . . . . . . . . . . . . 40 Lifting the vehicle . . . . . . . . . . . . . . . . . . . . . . . . . . 48
Lighting of the in
strument panel, . . . . . . . . . . . . 125
Lights . . . . . . . . . . . . . . . . . . . . . . . . . . . . . . 21, 123 adaptive headlights . . . . . . . . . . . . . . . . . . . . . 127
additional brake light . . . . . . . . . . . . . . . . . . . . . 92
automatic lighting . . . . . . . . . . . . . . . . . . . . . . 124
changing a bulb . . . . . . . . . . . . . . . . . . . . . . . . . 83
coming home . . . . . . . . . . . . . . . . . . . . . . . . . . 126
Daytime running lights . . . . . . . . . . . . . . . . . . . 124
fog lights with cornering function . . . . . . . . . . 127
headlight range control . . . . . . . . . . . . . . . . . . 125
interior light and front reading lights . . . . . . . . 92
interior lights . . . . . . . . . . . . . . . . . . . . . . . . . . 128
leaving home . . . . . . . . . . . . . . . . . . . . . . . . . . 126
lighting of the instrument panel . . . . . . . . . . . 125
light switch . . . . . . . . . . . . . . . . . . . . . . . . . . . . 123
luggage compartment light . . . . . . . . . . . . . . . . 93
main beam lever . . . . . . . . . . . . . . . . . . . . . . . . 125
main beams . . . . . . . . . . . . . . . . . . . . . . . . . . . . 22
number plate light . . . . . . . . . . . . . . . . . . . . . . . 92
parking lights . . . . . . . . . . . . . . . . . . . . . . . . . . 125
reading lights . . . . . . . . . . . . . . . . . . . . . . . . . . 128
turn signal lever . . . . . . . . . . . . . . . . . . . . . . . . 125
turn signals . . . . . . . . . . . . . . . . . . . . . . . . . . . . . 91
Light switch . . . . . . . . . . . . . . . . . . . . . . . . . . . . . . 21
Load compartment in the luggage compartment see Loading the luggage compartment . . . . . 139
Loading the luggage compartment . . . . . . . . . . . 139
Loading the vehicle fastening rings . . . . . . . . . . . . . . . . . . . . . . . . . 140
luggage compartment . . . . . . . . . . . . . . . . . . . . . 9
roof luggage rack . . . . . . . . . . . . . . . . . . . . . . . 142
Locking and unlocking with the central lock button . . . . . . . . . . . . . . . 115
Luggage compartment . . . . . . . . . . . . . . . . . . . 9, 139 luggage compartment lighting . . . . . . . . . . . . 128
store the rear shelf . . . . . . . . . . . . . . . . . . . . . . 141 stretched luggage net . . . . . . . . . . . . . . . . . . . 141
Unlock
ing manually . . . . . . . . . . . . . . . . . . . . . . 10
see also Loading the luggage compartment . 139
Luggage compartment lid . . . . . . . . . . . . . . . . . . . 10
M Main beam headlights control lamp . . . . . . . . . . . . . . . . . . . . . . . . . . . 105
Main beam lever . . . . . . . . . . . . . . . . . . . . . . . . . . 125
Maintenance and cleaning . . . . . . . . . . . . . . . . . 190
Maintenance intervals . . . . . . . . . . . . . . . . . . . . . 204
Malfunction gearbox . . . . . . . . . . . . . . . . . . . . . . . . . . . . . . . 164
Manual gearbox . . . . . . . . . . . . . . . . . . . . . . . . . . 159
Mobile phones . . . . . . . . . . . . . . . . . . . . . . . . . . . 191
Modifications . . . . . . . . . . . . . . . . . . . . . . . . . . . . 190
Multimedia . . . . . . . . . . . . . . . . . . . . . . . . . . . . . . 112
N
Noises tyres . . . . . . . . . . . . . . . . . . . . . . . . . . . . . . . . . . . 49
Number of seats . . . . . . . . . . . . . . . . . . . . . . . . . . . 61
O Octane number . . . . . . . . . . . . . . . . . . . . . . . . . . . 200
Odometer . . . . . . . . . . . . . . . . . . . . . . . . . . . . . . . . 99 Reset button . . . . . . . . . . . . . . . . . . . . . . . . . . . . 99
total . . . . . . . . . . . . . . . . . . . . . . . . . . . . . . . . . . . 96
Trip recorder . . . . . . . . . . . . . . . . . . . . . . . . . . . . 96
Oil change . . . . . . . . . . . . . . . . . . . . . . . . . . . . . . . 206
Oil properties . . . . . . . . . . . . . . . . . . . . . . . . . . . . . 41
One-touch opening and closing electric windows . . . . . . . . . . . . . . . . . . . . . . . . 121
Open and close . . . . . . . . . . . . . . . . . . . . . . . . . . 112 rear lid . . . . . . . . . . . . . . . . . . . . . . . . . . . . . . . . 120
240