oil Seat Ibiza ST 2016 Owner's Guide
[x] Cancel search | Manufacturer: SEAT, Model Year: 2016, Model line: Ibiza ST, Model: Seat Ibiza ST 2016Pages: 252, PDF Size: 5.56 MB
Page 195 of 252
Care and maintenance
– Rin se the
vehic
le thoroughly with water.
– Dry the vehicle surface gently with a cha-
mois le
ather.
– In cold temperature, dry the rubber seals
and their surf
aces to prevent them from
freezing. Apply silicone spray to the rubber
seals.
After washing the vehicle – After washing, avoid sudden and sharp
braking. “Dr
y” the brakes by braking sever-
al times. WARNING
● Wash y
our vehicle with the ignition switch-
ed off.
● Protect your hands and arms from cuts on
sharp metal
edges when cleaning the under-
body, the inside of the wheel housings etc.
Risk of injury.
● Water, ice and salt on the brake system can
reduce brak
ing effectiveness. Risk of acci-
dent. CAUTION
● Never remo v
e dirt, mud or dust if the vehi-
cle surface is dry. Never use a dry cloth or
sponge for cleaning purposes. This could
scratch the paintwork or glass on your vehi-
cle. ●
Washin g the
vehicle in low temperatures:
when washing the vehicle with a hose, do not
direct water into the lock cylinders or the
gaps around the doors, rear lid, or sunroof.
Risk of freezing. For the sake of the environment
To protect the environment, the vehicle
shou ld be w a
shed only in specially provided
wash bays, to prevent toxic, oil-laden waste
water from entering the sewer system. In
some places, washing vehicles outside wash
bays is prohibited. Note
Do not wash the vehicle in direct sunlight. Washing the vehicle with a high pres-
s
ur
e c l
eaner Be particularly careful when using a high
pr
e
ss
ure cleaner!
– Always observe the instructions for the
high-press
ure cleaner, particularly those
concerning the pressure and the spraying
distance.
– Increase the spraying distance for soft ma-
terials
and painted bumpers. –
Do not use a high pre
ssure cleaner to re-
move ice or snow from windows
››› page 194.
– Never use concentrated jet nozzles (“rotat-
ing jets”) ››
› .
– After washing, avoid sudden and sharp
br ak
ing. “Dr
y” the brakes by braking sever-
al times ››› page 152. WARNING
● Never wa sh ty
res with a concentrated jet
(“rotating nozzle”). Even at large spraying
distances and short cleaning times, damage
can occur to the tyres. This may cause an ac-
cident.
● Water, ice and salt on the brake system can
reduce brak
ing effectiveness. Risk of acci-
dent. CAUTION
● Do not use w at
er hotter than +60 °C
(+140 °F). This could damage the vehicle.
● To avoid damage to the vehicle, keep a suf-
ficient dis
tance from sensitive materials such
as flexible hoses, plastic, soundproofing ma-
terial, etc. This also applies to bumpers pain-
ted in the colour of the bodywork. The closer
the nozzle is to the surface, the greater the
wear on the material. 193
Technical data
Advice
Operation
Emergencies
Safety
Page 197 of 252
Care and maintenance
painted surfaces are not suitable to clean
w indo
ws
because they are soiled with wax
deposits which could smear the windows.
If possible, use a de-icing spray to remove
ice. If you use an ice scraper, push it in one
direction only without swinging it.
Use window cleaner or a silicone remover to
clean rubber, oil, grease and silicone depos-
its off.
Wax deposits can only be removed with a
special cleaner available at your Technical
Service. Wax deposits on the windscreen
could cause the wiper blades to judder. Add-
ing a window cleaner that dissolves wax to
the windscreen washer fluid prevents wiper
blades from juddering, but wax deposits are
not removed. CAUTION
● Never use w arm or hot
water to remove
snow and ice from windows and mirrors. This
could cause the glass to crack!
● The heating element for the rear window is
located on the inner side of
the window. To
prevent damage, do not put stickers over the
heating elements on the inside of the win-
dow. Cleaning windscreen wiper blades
Clean wiper blades improve visibility. 1. Use a soft cloth to remove dust and dirt
from the w
inds
creen wiper blades.
2. Use window cleaner to clean the wind- screen w
iper blades. Use a sponge or a
cloth to remove stubborn dirt.
Care of rubber seals If rubber seals are well looked after, they will
not freez
e so quic
kly.
1. Use a soft cloth to remove dust and dirt from the rubber seal s.
2.
Apply a specialist care product to the rub-
ber seals.
The rubber strip
s on the doors, windows, etc.
will remain pliable and last longer if they are
treated with a suitable rubber care product
from time to time (for example silicone
spray).
Caring for rubber seals will also prevent pre-
mature ageing and leaks. The doors will be
easier to open. If rubber seals are well looked
after, they will not freeze so quickly in winter.
Door lock cylinder The door lock cylinders can freeze up in win-
t
er
. T
o de-ic
e the lock cylinders you should only
use spra
y with lubricating and anti-corrosive
properties.
Cleaning chrome parts 1. Clean chrome parts with a damp cloth.
2. Polish chrome parts with a soft, dry cloth.
If this
doe
s not provide satisfying results, use
a specialist chrome cleaning product.
Chrome cleaning products will remove stains
from the surface. CAUTION
To prevent scratching chrome surfaces:
● Never use an abrasive cleaning product on
chrome.
● Do not c
lean or polish chrome parts in a
sandy or dus
ty environment. Steel wheel rims
–
Clean steel wheel rims regularly using a
sep ar
at e s
ponge.
Use an industrial cleaner to remove brake
dust. Any damage to the paint on steel wheel
rims should be repaired before starting to
rust. »
195
Technical data
Advice
Operation
Emergencies
Safety
Page 199 of 252
Care and maintenance
●
Befor e openin
g the bonnet, switch the en-
gine off, apply the handbrake firmly and al-
ways remove the key from the ignition.
● Allow the engine to cool before you clean
the engine compar
tment.
● Do not clean, for example, the vehicle un-
derbody, wheel arc
hes or wheel trims without
protecting your hands and arms. You may cut
yourself on sharp-edged metal parts. Failure
to comply could result in injury.
● Moisture, ice and salt on the brake system
may aff
ect braking effectiveness. Risk of acci-
dent. Directly after washing, avoid sudden
and sharp braking.
● Never touch the radiator fan. It is tempera-
ture-contr
olled and could start automatically,
even when the key is removed from the igni-
tion! For the sake of the environment
Fuel, grease and oil deposits can be removed
when the engine is w
ashed. The polluted wa-
ter must be cleaned in an oil separator. For
this reason, engine washing should be car-
ried out only by a specialised workshop or a
petrol station. Caring for the vehicle interior
C l
e anin
g plastic parts and the dash
panel –
Use a clean, damp cloth to clean plastic
parts and the d
ash panel.
– If this does not provide satisfactory results,
use a speci
al solvent-free plastic cleaning
product. WARNING
Never clean the dash panel and the airbag
module s ur
face with cleaners containing sol-
vents. Solvents cause the surface to become
porous. If the airbag triggered, plastic parts
could become detached and cause injuries. CAUTION
Cleaning products which contain solvents will
damag e the m
aterial. Cleaning wooden trim*
–
Clean the wooden trim with a water-mois-
tened c
le
an cloth.
– If this does not provide satisfactory results,
use a gentle
soap solution. CAUTION
Cleaning products which contain solvents will
damag e the m
aterial. Cleaning upholstery and fabric trim
Cloth seat covers and fabric trim on the
doors, hea
dlinin
g etc. can be cleaned with a
special interior cleaner or with dry foam and
a soft brush.
Cleaning the radio and climate con-
trol s To clean the radio and/or climate controls,
u
se a sof
t d
amp cloth. For more resistant dirt,
a neutral soap solution may be used.
Cleaning leather* Normal cleaning
–
Moisten a cotton or woollen cloth with wa-
ter and w
ipe ov
er the leather surfaces.
Cleaning stubborn stains – More stubborn dirt can be removed using a
mild soap so
lution (pure liquid soap; two
tablespoons diluted in one litre of water)
and a cloth. »
197
Technical data
Advice
Operation
Emergencies
Safety
Page 203 of 252
Checking and refilling levels
Note
● You ma y
use petrol with a high octane num-
ber than the one recommended for your
engine.
● In those countries where unleaded petrol is
not avail
able, you may refuel with a fuel with
a low lead content. Diesel fuel
Please note the information on the inside of
the f
uel
tank
flap.
We recommend the use of diesel fuel which
complies to European standard EN 590. If
diesel fuel which meets European standard
EN 590 is not available, the Cetane number
(CZ) must, at minimum, be 51. If the engine
is equipped with a particulate filter, the sul-
phur content of the fuel must be below 50
parts per million.
Winter-grade diesel
Summer fuel becomes thicker in winter and it
is more difficult to start the engine. For this
reason, petrol stations in some countries al-
so offer winter diesel with improved fluidity
when cold (winter-grade diesel). Water in the fuel filter
1)
If your
vehicle has a diesel engine and is
equipped with a fuel filter with a water sepa-
rator, the instrument panel may display the
following warning: Water in the
fuel filter. If this is the case, take the
vehicle to a specialised workshop so that
they can drain the fuel filter. CAUTION
● The vehic l
e is not designed for the use of
FAME fuel (biodiesel). The fuel system would
be damaged if you used biodiesel.
● Do not mix fuel additives, the so-called
“thinners”, petrol
or similar additives with
diesel fuel.
● If poor-quality diesel fuel is used, it may be
necess
ary to drain the fuel filter more fre-
quently than is specified in the Maintenance
Programme. We recommend having this done
by a specialised workshop. If water is allowed
to collect in the filter, this can cause engine
performance problems. Working in the engine compart-
ment
saf
ety not
es for work in the engine
compartment Read the additional information carefully
›››
p
age 10
Before starting any work on the engine or in
the engine compartment:
1. Switch off the engine and remove the key from the ignition.
2. Ap p
ly the handbrake.
3. Move the gear lever to neutral or the selec- tor lever t
o position P.
4. Wait for the engine to cool down.
5. Keep children away from the vehicle.
6. Raise the bonnet ›››
p
age 203.
You should not do any work in the engine
compartment unless you know exactly how to
carry out the jobs and have the correct tools!
Have the work carried out by a specialised
workshop if you are uncertain.
All service fluids and consumables, e.g. cool-
ant, engine oil, spark plugs and batteries, »1)
Valid for the market: Algeria.
201
Technical data
Advice
Operation
Emergencies
Safety
Page 205 of 252
Checking and refilling levels
●
Only open and c lo
se the bonnet when there
is nobody within its range. CAUTION
When topping up service fluids, make sure
not to mi s
take them. Using the wrong fluids
could cause serious malfunctions and engine
damage! For the sake of the environment
Service fluids leaks are harmful to the envi-
ronment. F or thi
s reason you should make
regular checks on the ground underneath
your vehicle. If you find spots of oil or other
fluids, have your vehicle inspected in a speci-
alised workshop. Opening the bonnet
Read the additional information carefully
› ›
›
p
age 10
The bonnet is released from inside the vehi-
cle.
Before opening the bonnet ensure that the
windscreen wipers are in rest position. WARNING
Hot coolant can scald! ●
Never open the bonnet if
you see steam,
smoke or coolant escaping from the engine
compartment.
● Wait until no more steam, smoke or coolant
is emitted fr
om the bonnet, then carefully
open the bonnet.
● When working in the engine compartment,
alway
s observe the safety warnings
››› page 201. Closing the bonnet
–
Slightly lift the bonnet.
– Release the bonnet stay and replace it in its
sup
por t
.
– At a height of approximately 30 cm let it fall
so it locks.
If
the bonnet does not close, do not press
downwards. Open it again and let it fall as
mentioned above. WARNING
If the bonnet is not closed properly, it could
open while y
ou are driving and completely
obscure your view of the road. Risk of acci-
dent.
● After closing the bonnet, always check that
it is pr
operly secured. The bonnet must be
flush with the surrounding body panels. ●
If y ou notic
e that the bonnet latch is not se-
cured when the vehicle is moving, stop the
vehicle immediately and close the bonnet
properly. Risk of accident. 203
Technical data
Advice
Operation
Emergencies
Safety
Page 206 of 252

Advice
Checking levels Fig. 185
Diagram for the location of the various elements. Fig. 186
For vehicles with the battery in the
luggag e c
ompartment. From time to time, the levels of the different
fluid
s in the
v
ehicle must be checked. Never
fill with incorrect fluids, otherwise serious
damage to the engine may be caused. Coolant expansion tank
Engine oil l
evel dipstick
Engine oil filler cap
Brake fluid reservoir
Vehicle battery
Windscreen washer reservoir
The checking and refilling of service fluids
are carried out on the components men-
tioned above. These operations are descri-
bed in ››› page 201.
Overview
You will find further explanations, instruc-
tions and restrictions on the technical speci-
fications as of ››› page 219.
1 2
3
4
5
6 Note
The layout of parts may vary depending on
the engine. Engine oil
General not
es The engine comes with a special, multi-grade
oil th
at
can be used all year round.
Because the use of high-quality oil is essen-
tial for the correct operation of the engine
and its long useful life, when topping up or
changing oil, use only those oils that comply
with VW standards.
204
Page 207 of 252
Checking and refilling levels
The specifications (VW standards) set out in
the f o
llo
wing page should appear on the con-
tainer of the service oil; when the container
displays the specific standards for petrol and
diesel engines together, it means that the oil
can be used for both types of engines.
We recommend that the oil change indicated
in the Maintenance Programme, be per-
formed by a technical service or specialised
workshop.
The correct oil specifications for your engine
are listed in the ›››
page 41.
Service intervals
Service intervals can be flexible (LongLife
service) or fixed (dependent on time/dis-
tance travelled).
If the PR code that appears on the back of the
Maintenance Programme booklet is PR QI6,
this means that your vehicle has the LongLife
service program. If it lists the codes QI1, QI2,
QI3, QI4 or QI7, the interval service is de-
pendent on the time/distance travelled.
Flexible service intervals (LongLife service
intervals*)
Special oils and processes have been devel-
oped which, depending on the characteris-
tics and individual driving profiles, enable
the extension of the oil change service (Long-
Life service intervals). Because this oil is essential for extending the
service int
ervals, it must only be used ob-
serving the following indications:
● Avoid mixing it with oil for fixed service in-
terval
s.
● Only in exceptional circumstances, if the
engine oil l
evel is too low ››› page 206 and
LongLife oil is not available, it is permitted to
top up (once) with oil for fixed service inter-
vals ›››
page 41 (up to a maximum of 0.5
litres).
Fixed service intervals*
If your vehicle does not have the “LongLife
service interval” or it has been disabled (by
request), you may use oils for fixed service
intervals, which also appear in
››› page 41. In this case, your vehicle
must be serviced after a fixed interval of 1
year/15,000 km (10,000 miles)(whatever
comes first) ››› Booklet Maintenance Pro-
gramme.
● In exceptional circumstances, if the engine
oil lev
el is too low ››› page 206 and you can-
not obtain the oil specified for your vehicle,
you can add a small quantity of oil conform-
ing to the specification ACEA A2 or ACEA A3
(petrol engines) or ACEA B3 or ACEA B4 (die-
sel engines) (up to 0.5 l). Vehicles with diesel particulate filter*
The Maintenanc
e Programme states whether
your vehicle is fitted with a diesel particulate
filter.
Only VW 507 00 engine oil, with reduced ash
formation, may be used in diesel engines
equipped with particulate filter. Using other
types of oil will cause a higher soot concen-
tration and reduce the life of the DPF. There-
fore:
● Avoid mixing this oil with other engine oils.
● Only in exceptional circumstances, if the
engine oil l
evel is too low ››› page 206 and
you cannot obtain the oil specified for your
vehicle, you can use a small quantity of oil
(once) conforming to the VW 506 00,
VW 506 01, VW 505 00, VW 505 01 or
ACEA B3/ACEA B4 specification. (up to 0.5 l). Note
Before a long trip, we recommend finding an
engine oil th
at conforms to the correspond-
ing VW specifications and recommend keep-
ing it in the vehicle. This way, the correct en-
gine oil will always be available for a top-up if
needed. Warning lamp
If this warning lamp
is
r ed it
indicates
that the engine oil pressure is too low. »
205
Technical data
Advice
Operation
Emergencies
Safety
Page 208 of 252
Advice
If this warning symbol starts to flash, and is
ac c
omp anied b
y three audible warnings,
switch off the engine and check the oil level.
If necessary, add more oil ››› page 206.
If the warning lamp flashes although the oil
level is correct, stop driving. Do not even run
the engine at idle speed! Obtain technical as-
sistance.
Checking oil level
If the warning lamp is yellow the engine
oil level should be checked as soon as possi-
ble. Top up the oil at the next opportunity
››› page 206.
Oil level sensor faulty*
If the yellow warning lamp flashes, take
the vehicle to a specialised workshop to have
the oil level sensor checked. Until then it is
advisable to check the oil level every time
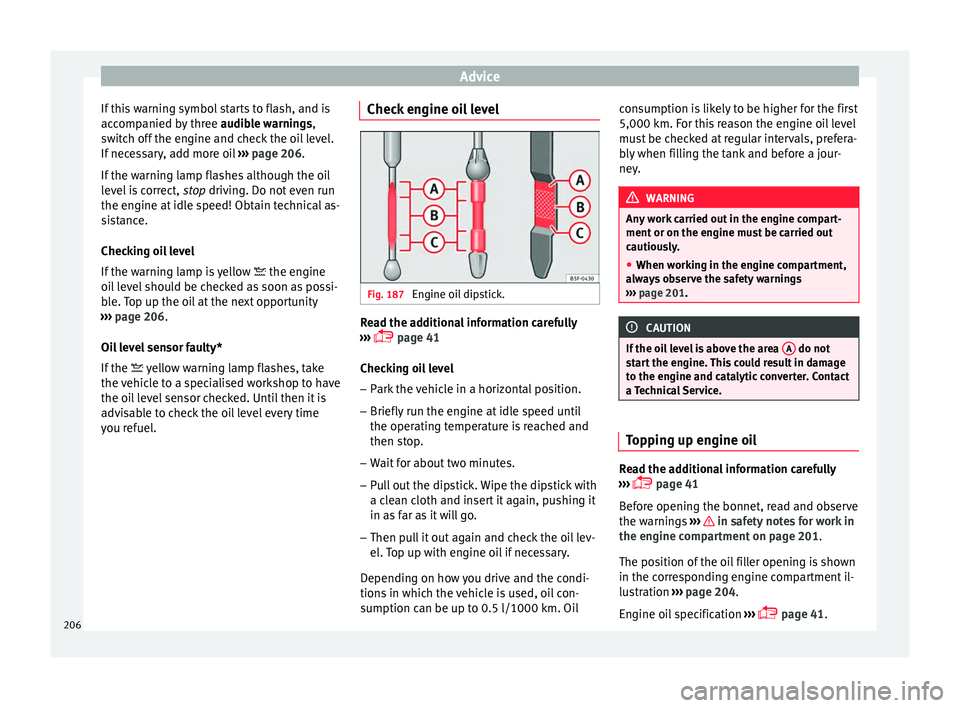
you refuel. Check engine oil level Fig. 187
Engine oil dipstick. Read the additional information carefully
› ›
›
p
age 41
Checking oil level
– Park the vehicle in a horizontal position.
– Briefly run the engine at idle speed until
the operating temper
ature is reached and
then stop.
– Wait for about two minutes.
– Pull out the dipstick. Wipe the dipstick with
a clean c
loth and insert it again, pushing it
in as far as it will go.
– Then pull it out again and check the oil lev-
el. Top up w
ith engine oil if necessary.
Depending on how you drive and the condi-
tions in which the vehicle is used, oil con-
sumption can be up to 0.5 l/1000 km. Oil consumption is likely to be higher for the first
5,000 km. For this r
eason the engine oil level
must be checked at regular intervals, prefera-
bly when filling the tank and before a jour-
ney. WARNING
Any work carried out in the engine compart-
ment or on the engine mu s
t be carried out
cautiously.
● When working in the engine compartment,
alway
s observe the safety warnings
››› page 201. CAUTION
If the oil level is above the area A do not
star t
the engine. This could result in damage
to the engine and catalytic converter. Contact
a Technical Service. Topping up engine oil
Read the additional information carefully
› ›
›
p
age 41
Before opening the bonnet, read and observe
the warnings ››› in safety notes for work in
the en gine c
ompar
tment on page 201.
The position of the oil filler opening is shown
in the corresponding engine compartment il-
lustration ›››
page 204.
Engine oil specification ›››
page 41.
206
Page 209 of 252
Checking and refilling levels
WARNING
Oil is highly inflammable! Ensure that no oil
comes int
o contact with hot engine compo-
nents when topping up. CAUTION
If the oil level is above the area A do not
star t
the engine. This could result in damage
to the engine and catalytic converter. Contact
a specialised workshop. For the sake of the environment
The oil level must never be above area A .
Otherwi se oi
l can be drawn in through the
crankcase breather and escape into the at-
mosphere via the exhaust system. Changing engine oil
Read the additional information carefully
› ›
›
p
age 41
The engine oil must be changed at the inter-
vals given in the service schedule.
We recommend that you have the engine oil
changed by a Technical Service.
The oil change intervals are shown in the
Maintenance Programme. WARNING
Only change the engine oil yourself if you
have the s pec
ialist knowledge required!
● Before opening the bonnet, read and ob-
serve the warnin
gs ››› page 201, safety notes
for work in the engine compartment .
● Wait for the engine to cool down. Hot oil
may c
ause burn injuries.
● Wear eye protection to avoid injuries, such
as acid b
urns, caused by splashes of oil.
● When removing the oil drain plug with your
fingers, k
eep your arm horizontal to help pre-
vent oil from running down your arm.
● Wash your skin thoroughly if it comes into
contact w
ith engine oil.
● Engine oil is poisonous! Used oil must be
stored in a s
afe place out of the reach of chil-
dren. CAUTION
No additives should be used with engine oil.
This c ou
ld result in engine damage. Any dam-
age caused by the use of such additives
would not be covered by the factory warranty. For the sake of the environment
● Becau se of
disposal problems and the spe-
cial tools and specialist knowledge required,
we recommend that you have the engine oil
and filter changed by a Technical Service. ●
Never pour oil do
wn drains or into the
ground.
● Use a suitable container when draining the
used oil. It
must be large enough to hold all
the engine oil. Cooling system
Contro l
lamp There is a fault if:
● The l amp does not go out again after a
f ew sec ond
s.
● The lamp lights up or flashes while the
vehicl
e is running, and three acoustic warn-
ing signals are emitted ››› .
Thi s
me an
s that either the coolant level is too
low or the coolant temperature is too high.
Coolant temperature too high
If the lamp lights up, stop the vehicle,
turn off the engine and wait for it to cool
down. Check the coolant level.
If the coolant level is correct, the overheating
may be caused by a malfunction of the radia-
tor fan. Check the radiator fan fuse and have
it replaced if necessary ››› page 81.
If the control lamp lights up again after driv-
ing on for a short distance, stop the vehicle»
207
Technical data
Advice
Operation
Emergencies
Safety
Page 210 of 252
Advice
and switch the engine off. C ont
act a
Techni-
cal Service or a specialised workshop.
Coolant level too low
If the lamp lights up, stop the vehicle,
turn off the engine and wait for it to cool
down. First check the coolant level. If the lev-
el of the coolant is below the “MIN” mark,
top up with coolant liquid ››› .
WARNING
● If y our
vehicle is immobilised for technical
reasons, move it to a safe distance from traf-
fic. Turn the engine off, turn the hazard lights
on and place the warning triangle.
● Never open the bonnet if you can see or
hear ste
am or coolant escaping from the en-
gine compartment. Risk of scalding. Wait un-
til you can no longer see or hear escaping
steam or coolant.
● The engine compartment is a dangerous
area. Bef
ore carrying out any work in the en-
gine compartment, switch off the engine and
allow it to cool down. Always note the corre-
sponding warnings ››› page 201. Topping up coolant
Read the additional information carefully
› ›
›
p
age 42
Top up coolant when the level is below the
MIN (minimum) mark. Checking coolant level
– Park the vehicle in a horizontal position.
– Switch the ignition off.
– Read off the coolant level on coolant ex-
pansion t
ank. When the engine is cold, the
coolant level should be between the marks.
When the engine is hot, it may be slightly
above the upper mark.
Topping up coolant – Wait for the engine to cool down.
– Cover the coolant expansion tank cap with
a cloth and caref
ully unscrew it to the left
››› .
– Top up the coolant only if there is still cool-
ant in the e
xpan
sion tank, otherwise you
could damage the engine. If there is no
coolant in the expansion tank, do not con-
tinue driving. You should obtain professio- nal assistance ››› .
– If there is still some coolant in the expan-
sion t
ank, t op up t
o the upper mark.
– Top up with coolant until the level becomes
stabl
e.
– Screw the cap back on correctly.
Any los
s of coolant fluid normally indicates a
leak in the cooling system. Take the vehicle
straight to a specialised workshop to have
the cooling system examined. If there are no leaks in the engine cooling system, a loss of
coolant
can only occur if the coolant boils
and is forced out of the system as a result of
overheating. WARNING
● The coolin g sy
stem is under pressure. Do
not unscrew the cap on the coolant expan-
sion tank when the engine is hot: risk of
burns!
● The antifreeze and coolant fluid can be a
health haz
ard. Therefore, the antifreeze
should be stored in the original container in a
safe place out of reach of children. Failure to
comply could result in poisoning.
● If working inside the engine compartment,
remember that, even when the ignition i
s
switched off, the radiator fan may start up au-
tomatically, and therefore there is a risk of in-
jury. WARNING
If there is not enough anti-freeze in the cool-
ant sys t
em, the engine may fail leading to se-
rious damage.
● Please make sure that the percentage of
additive i
s correct with respect to the lowest
expected ambient temperature in the zone in
which the vehicle is to be used.
● When the outside temperature is very low,
the coolant
could freeze and the vehicle
would be immobilised. In this case, the heat-
ing would not work either and inadequately
dressed passengers could die of cold. 208