height Seat Ibiza ST 2016 Owner's manual
[x] Cancel search | Manufacturer: SEAT, Model Year: 2016, Model line: Ibiza ST, Model: Seat Ibiza ST 2016Pages: 252, PDF Size: 5.56 MB
Page 15 of 252
The essentials
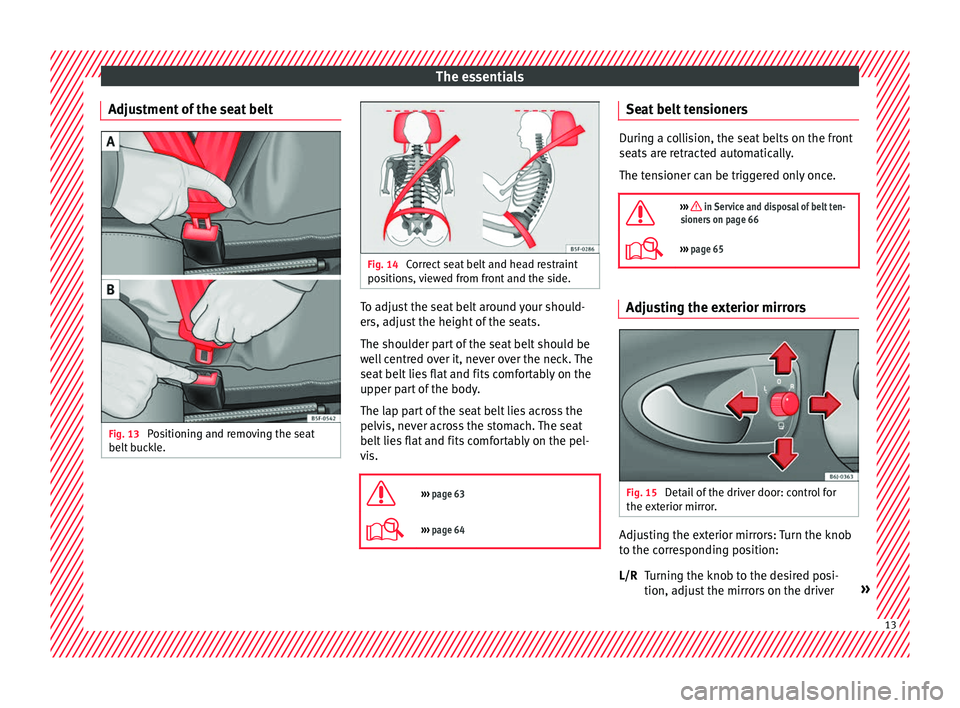
Adjustment of the seat belt Fig. 13
Positioning and removing the seat
belt b
uc k
le. Fig. 14
Correct seat belt and head restraint
position s,
viewed from front and the side. To adjust the seat belt around your should-
er
s, a
djus
t the height of the seats.
The shoulder part of the seat belt should be
well centred over it, never over the neck. The
seat belt lies flat and fits comfortably on the
upper part of the body.
The lap part of the seat belt lies across the
pelvis, never across the stomach. The seat
belt lies flat and fits comfortably on the pel-
vis.
››› page 63
››› page 64 Seat belt tensioners
During a collision, the seat belts on the front
seats ar
e r
etracted automatically.
The tensioner can be triggered only once.
››› in Service and disposal of belt ten-
sioners on page 66
››› page 65 Adjusting the exterior mirrors
Fig. 15
Detail of the driver door: control for
the e xt
erior mirr or
. Adjusting the exterior mirrors: Turn the knob
t
o the c
orre
sponding position:
Turning the knob to the desired posi-
tion, adjust the mirrors on the driver »
L/R 13
Page 19 of 252
The essentials
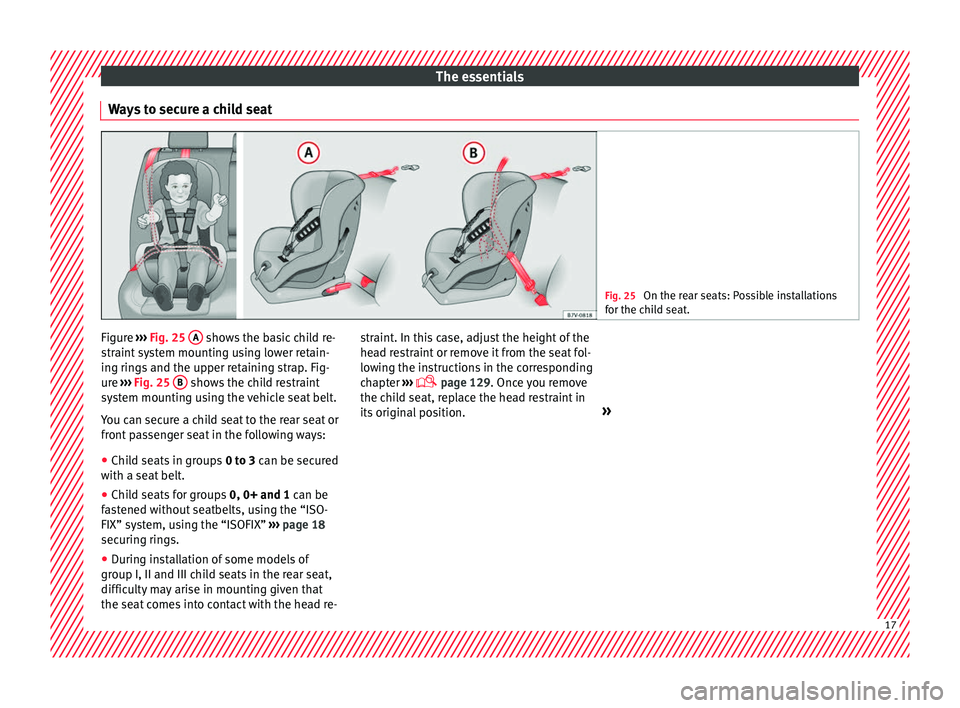
Ways to secure a child seat Fig. 25
On the rear seats: Possible installations
for the chi l
d seat. Figure
›››
Fig. 25
A shows the basic child re-
s tr
aint sy
stem mounting using lower retain-
ing rings and the upper retaining strap. Fig-
ure ››› Fig. 25 B shows the child restraint
sy s
tem mou
nting using the vehicle seat belt.
You can secure a child seat to the rear seat or
front passenger seat in the following ways:
● Child seats in groups 0 to 3 can be sec
ured
with a seat belt.
● Child seats for groups 0, 0+ and 1 can be
fas
tened without seatbelts, using the “ISO-
FIX” system, using the “ISOFIX” ››› page 18
securing rings.
● During installation of some models of
group I, II and III chil
d seats in the rear seat,
difficulty may arise in mounting given that
the seat comes into contact with the head re- straint. In this case, adjust the height of the
head re
straint or remove it from the seat fol-
lowing the instructions in the corresponding
chapter ›››
page 129. Once you remove
the child seat, replace the head restraint in
its original position. » 17
Page 51 of 252
The essentials
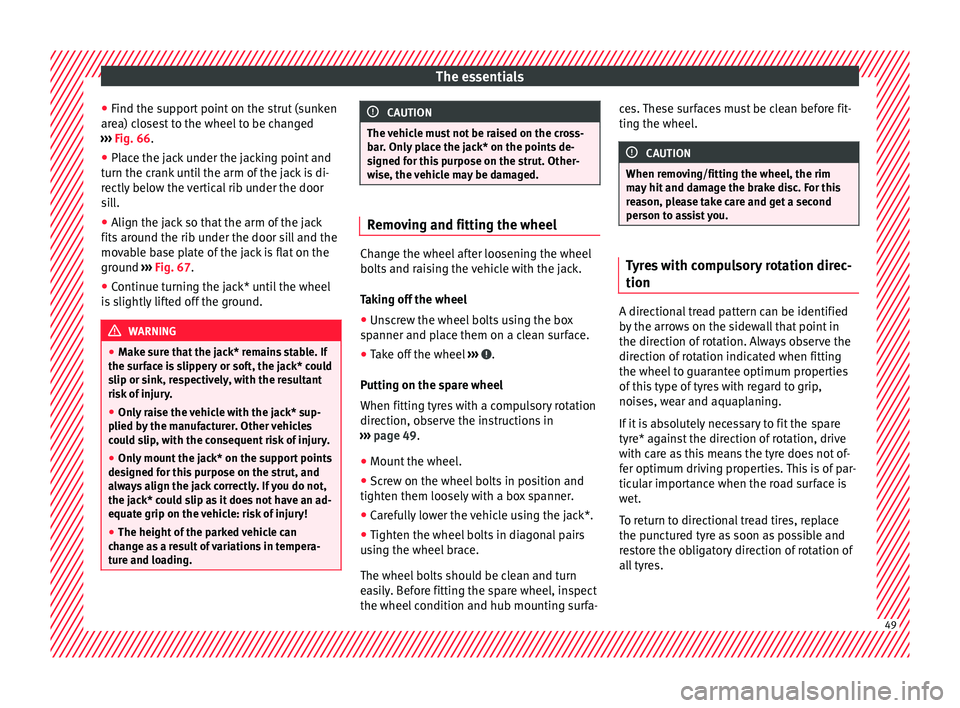
● Find the s up
por t
point on the strut (sunken
area) closest to the wheel to be changed
››› Fig. 66.
● Place the jack under the jacking point and
turn the crank
until the arm of the jack is di-
rectly below the vertical rib under the door
sill.
● Align the jack so that the arm of the jack
fits around the rib u
nder the door sill and the
movable base plate of the jack is flat on the
ground ››› Fig. 67.
● Continue turning the jack* until the wheel
is slightly
lifted off the ground. WARNING
● Make s ur
e that the jack* remains stable. If
the surface is slippery or soft, the jack* could
slip or sink, respectively, with the resultant
risk of injury.
● Only raise the vehicle with the jack* sup-
plied by the m
anufacturer. Other vehicles
could slip, with the consequent risk of injury.
● Only mount the jack* on the support points
designed for thi
s purpose on the strut, and
always align the jack correctly. If you do not,
the jack* could slip as it does not have an ad-
equate grip on the vehicle: risk of injury!
● The height of the parked vehicle can
chang
e as a result of variations in tempera-
ture and loading. CAUTION
The vehicle must not be raised on the cross-
bar. On ly
place the jack* on the points de-
signed for this purpose on the strut. Other-
wise, the vehicle may be damaged. Removing and fitting the wheel
Change the wheel after loosening the wheel
bolts and r
ai
sing the vehicle with the jack.
Taking off the wheel
● Unscrew the wheel bolts using the box
spanner and p l
ace them on a clean surface.
● Take off the wheel ››› .
P uttin
g on the s p
are wheel
When fitting tyres with a compulsory rotation
direction, observe the instructions in
››› page 49.
● Mount the wheel.
● Screw on the wheel bolts in position and
tighten them loosely w
ith a box spanner.
● Carefully lower the vehicle using the jack*.
● Tighten the wheel bolts in diagonal pairs
using the wheel
brace.
The wheel bolts should be clean and turn
easily. Before fitting the spare wheel, inspect
the wheel condition and hub mounting surfa- ces. These surfaces must be clean before fit-
ting the wheel. CAUTION
When removing/fitting the wheel, the rim
may hit
and damage the brake disc. For this
reason, please take care and get a second
person to assist you. Tyres with compulsory rotation direc-
tion
A directional tread pattern can be identified
b
y
the arr o
ws on the sidewall that point in
the direction of rotation. Always observe the
direction of rotation indicated when fitting
the wheel to guarantee optimum properties
of this type of tyres with regard to grip,
noises, wear and aquaplaning.
If it is absolutely necessary to fit the spare
tyre* against the direction of rotation, drive
with care as this means the tyre does not of-
fer optimum driving properties. This is of par-
ticular importance when the road surface is
wet.
To return to directional tread tires, replace
the punctured tyre as soon as possible and
restore the obligatory direction of rotation of
all tyres. 49
Page 58 of 252
Safety
Safety
Saf e driv
ing
Saf
ety first! This chapter contains important information,
tips, sug
g
estions and warnings that you
should read and consider for both your own
safety and for your passengers' safety. WARNING
● This m anua
l contains important informa-
tion about the operation of the vehicle, both
for the driver and the passengers. The other
sections of the on-board documentation also
contain further information that you should
be aware of for your own safety and for the
safety of your passengers.
● Ensure that the on-board documentation is
kept in the v
ehicle at all times. This is espe-
cially important when lending or selling the
vehicle to another person. Advice about driving
B ef or
e settin
g offFor your own safety and the safety of your
p
a
ssen
gers, always note the following points
before every trip: –
Make sur
e that the vehicle's lights and turn
signals are working properly.
– Check tyre pressure.
– Ensure that all windows provide a clear and
good view of
the surroundings.
– Ensure that all luggage is correctly secured
››› p
age 135.
– Make sure that no objects can interfere
with the pedals.
– Adju
st front seat, head restraint and mir-
rors pr
operly according to your size.
– Ensure that the passenger in the central
rear seat
always has the head restraint in
the correct position for use.
– Instruct passengers to adjust the head re-
straints ac
cording to their height.
– Protect children with appropriate child
seats and properly
applied seat belts
››› page 72.
– Assume the correct sitting position. Instruct
your pas
sengers also to assume a proper
sitting position. ››› page 57.
– Fasten your seat belt securely. Instruct your
passen
gers also to fasten their seat belts
properly. ››› page 61. What affects driving safety? As a driver, you are responsible for yourself
and your p
a
ssengers. When your concentra-
tion or driving safety is affected by any cir-
cumstance, you endanger yourself as well as
others on the road ››› , for this reason:
– Always pay attention to traffic and do not
get di s
tracted by passengers or telephone
calls.
– Never drive when your driving ability is im-
paired (e.g. b
y medication, alcohol, drugs).
– Observe traffic laws and speed limits.
– Always reduce your speed as appropriate
for ro a
d, traffic and weather conditions.
– When travelling long distances, take
breaks
regularly - at least every two hours.
– If possible, avoid driving when you are tired
or stres
sed. WARNING
When driving safety is impaired during a trip,
the risk of injur
y and accidents increases. Safety equipment
Never put your safety or the safety of your
p
a
ssen
gers in danger. In the event of an acci-
dent, the safety equipment may reduce the
56
Page 59 of 252
Safe driving
risk of injury. The following list includes most
of the s
afety
equipment in your SEAT:
● Three-point seat belts
● Belt tension limiter for the front and rear
side seats
● Belt
tensioners for the front seats
● Front airbags
● Side airbags in the front seat backrests,
with ches
t and head protection
● “ISOFIX” anchor points for “ISOFIX” rear
child se
at system
● Height-adjustable front head restraints
● Rear-centre head restraints with in-use po-
sition and non-use pos
ition
● Adjustable steering column
The safety equipment
mentioned above
works together to provide you and your pas-
sengers with the best possible protection in
the event of an accident. However, these
safety systems can only be effective if you
and your passengers are sitting in a correct
position and use this equipment properly.
Safety is everyone's business! Correct position for passengers
Correct s
itting position for driver Fig. 75
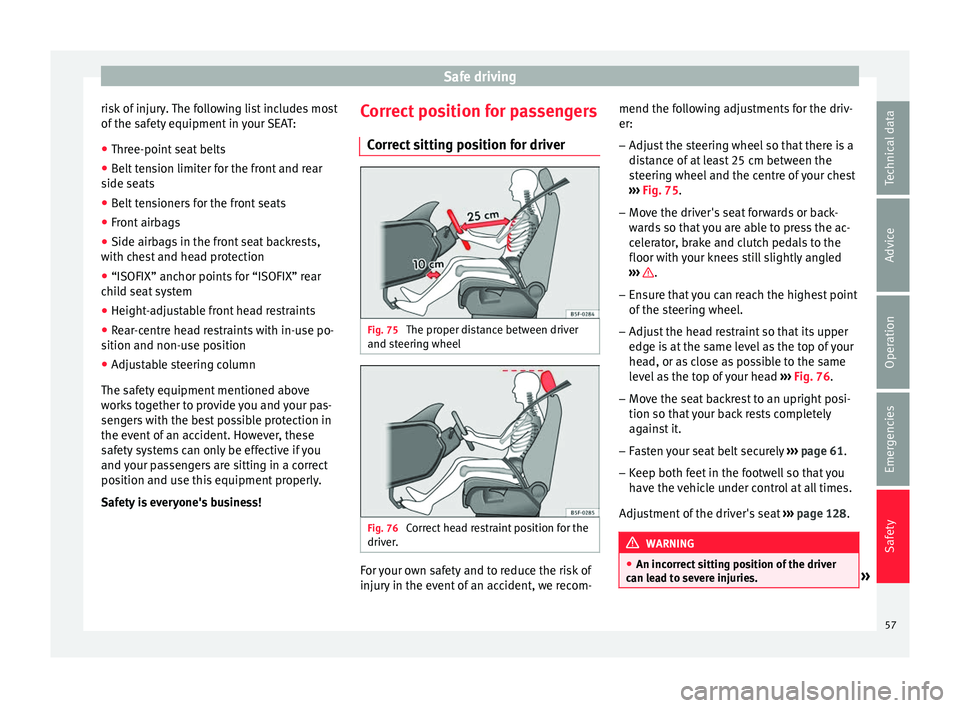
The proper distance between driver
and s t
eerin g wheel Fig. 76
Correct head restraint position for the
driv er
. For your own safety and to reduce the risk of
injur
y
in the ev ent
of an accident, we recom- mend the following adjustments for the driv-
er:
– Adjust the steering wheel so that there is a
distanc
e of at least 25 cm between the
steering wheel and the centre of your chest
››› Fig. 75.
– Move the driver's seat forwards or back-
wards
so that you are able to press the ac-
celerator, brake and clutch pedals to the
floor with your knees still slightly angled
››› .
– Ensure that you can reach the highest point
of the s
teerin
g wheel.
– Adjust the head restraint so that its upper
edge is at
the same level as the top of your
head, or as close as possible to the same
level as the top of your head ››› Fig. 76.
– Move the seat backrest to an upright posi-
tion so that y
our back rests completely
against it.
– Fasten your seat belt securely ››› p
age 61.
– Keep both feet in the footwell so that you
have the v
ehicle under control at all times.
Adjustment of the driver's seat ››› page 128. WARNING
● An incorrect s
itting position of the driver
can lead to severe injuries. » 57
Technical data
Advice
Operation
Emergencies
Safety
Page 62 of 252
Safety
WARNING
● Any inc orr
ect sitting position increases the
risk of severe injuries.
● Sitting in an incorrect position exposes the
vehicle oc
cupants to severe injuries if airbags
are triggered, by striking a vehicle occupant
who has assumed an incorrect sitting posi-
tion.
● Before the vehicle moves, assume the prop-
er sitting pos
ition and maintain it throughout
the trip. Before every trip, instruct your pas-
sengers to sit properly and to stay in this po-
sition during the trip ››› page 57, Correct posi-
tion for passengers. Correct adjustment of front head re-
s
tr
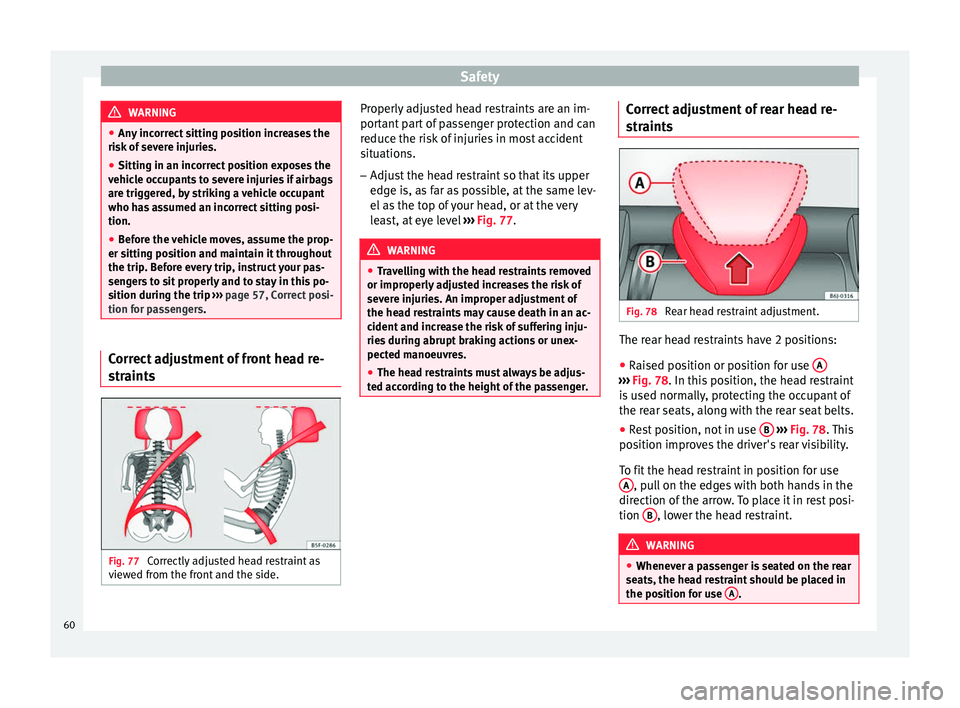
aint s Fig. 77
Correctly adjusted head restraint as
v iew
ed fr om the fr
ont and the side. Properly adjusted head restraints are an im-
por
t
ant p
art of passenger protection and can
reduce the risk of injuries in most accident
situations.
– Adjust the head restraint so that its upper
edge is, as
far as possible, at the same lev-
el as the top of your head, or at the very
least, at eye level ››› Fig. 77. WARNING
● Trav el
ling with the head restraints removed
or improperly adjusted increases the risk of
severe injuries. An improper adjustment of
the head restraints may cause death in an ac-
cident and increase the risk of suffering inju-
ries during abrupt braking actions or unex-
pected manoeuvres.
● The head restraints must always be adjus-
ted accor
ding to the height of the passenger. Correct adjustment of rear head re-
s
tr
aint s Fig. 78
Rear head restraint adjustment. The rear head restraints have 2 positions:
● Raised position or position for use A ›››
Fig. 78. In this po s ition, the head restraint
is used normally, protecting the occupant of
the rear seats, along with the rear seat belts.
● Rest position, not in use B
› ›
› Fig. 78 .
This
position improves the driver's rear visibility.
To fit the head restraint in position for use A , pull on the edges with both hands in the
dir ection of
the arro
w. To place it in rest posi-
tion B , lower the head restraint.
WARNING
● Whenever a pa s
senger is seated on the rear
seats, the head restraint should be placed in
the position for use A .
60
Page 64 of 252
Safety
Seat belt lamp* Fig. 79
Warning lamp on the instrument pan-
el . The control lamp illuminates to remind the
driv
er t
o fa
sten his seat belt.
Before starting the vehicle: – Fasten your seat belt securely.
– Instruct your passengers to fasten their
seat belts pr
operly before driving off.
– Protect children by using a child seat ac-
cording t
o the child's height and weight.
When the ignition is switched on, the control
lamp in the instrument panel lights up* if
the driver or passenger* have not fastened
their seat belts.
An audible warning signal will sound for a
few seconds if the seat belts are not fastened
as the vehicle drives off and reaches a speed
of more than approximately 25 km/h (15 mph) or if the seat belts are unfastened
while the v
ehicle is in motion. The warning
lamp will also flash .
The lamp goes out when the driver and
passenger seat belts are fastened with the ig-
nition switched on.
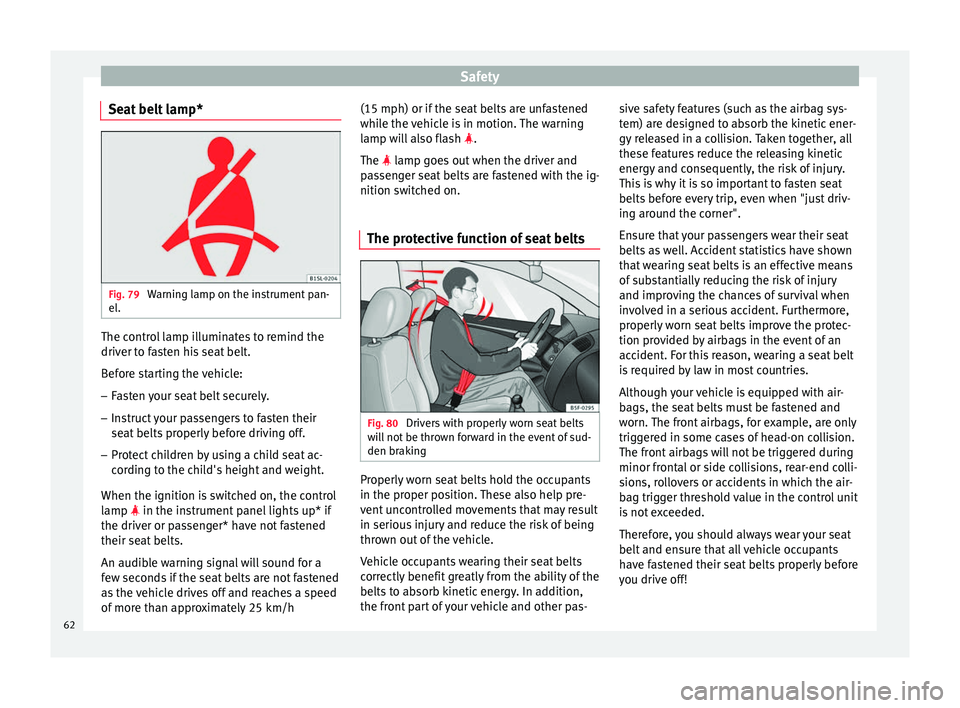
The protective function of seat belts Fig. 80
Drivers with properly worn seat belts
w i
ll
not be thrown forward in the event of sud-
den braking Properly worn seat belts hold the occupants
in the pr
oper po
sition.
These also help pre-
vent uncontrolled movements that may result
in serious injury and reduce the risk of being
thrown out of the vehicle.
Vehicle occupants wearing their seat belts
correctly benefit greatly from the ability of the
belts to absorb kinetic energy. In addition,
the front part of your vehicle and other pas- sive safety features (such as the airbag sys-
tem) are des
igned to absorb the kinetic ener-
gy released in a collision. Taken together, all
these features reduce the releasing kinetic
energy and consequently, the risk of injury.
This is why it is so important to fasten seat
belts before every trip, even when "just driv-
ing around the corner".
Ensure that your passengers wear their seat
belts as well. Accident statistics have shown
that wearing seat belts is an effective means
of substantially reducing the risk of injury
and improving the chances of survival when
involved in a serious accident. Furthermore,
properly worn seat belts improve the protec-
tion provided by airbags in the event of an
accident. For this reason, wearing a seat belt
is required by law in most countries.
Although your vehicle is equipped with air-
bags, the seat belts must be fastened and
worn. The front airbags, for example, are only
triggered in some cases of head-on collision.
The front airbags will not be triggered during
minor frontal or side collisions, rear-end colli-
sions, rollovers or accidents in which the air-
bag trigger threshold value in the control unit
is not exceeded.
Therefore, you should always wear your seat
belt and ensure that all vehicle occupants
have fastened their seat belts properly before
you drive off!
62
Page 74 of 252
Safety
Transporting children safely Saf ety
for c
hildren
Introduction For safety reasons, as we have learned from
accident
s
tatistics, we recommend that chil-
dren under 12 years of age travel in the rear
seats. Depending on their age, height and
weight, children travelling in rear seats must
use a child seat or a seat belt. For safety rea-
sons, the child seat should be installed in the
rear seat, behind the front passenger seat or
in the centre back seat.
The physical laws involved and the forces
acting in a collision apply also to children
››› page 63. But unlike adults, children do not
have fully developed muscle and bone struc-
tures. This means that children are subject to
a greater risk of injury.
To reduce the risk of injuries, children must
always use special child restraint systems
when travelling in the vehicle.
We recommend the use of child safety prod-
ucts from the SEAT Original Accessories Pro-
gramme, which includes systems for all ages
made by “Peke” (not for all countries).
These systems have been especially de-
signed and approved, complying with the
ECE-R44. regulation. Follow the manufacturer's instructions and
obser
v
e any statutory requirements when in-
stalling and using child seats. Always read
and note ››› page 72.
We recommend you always carry the manu-
facturer's Child Seat Instruction Manual to-
gether with the on-board documentation.
Important information regarding the
front pa
ssenger's airbag Read the additional information carefully
› ›
›
p
age 16.
Read and always observe the safety informa-
tion included in the following chapters:
● Safety distance with respect to the passen-
ger airbag ››
› page 66.
● Objects between the passenger and the
passen
ger side airbag ››› in Front airbags
on p ag
e 69 .
The p
assenger side front airbag, when ena-
bled, is a serious risk for a child that is facing
backward since the airbag can strike the seat
with such force that it can cause serious or
fatal injuries. Children up to 12 years old
should always travel on the rear seat.
Therefore we strongly recommend you to
transport children on the rear seats. This is
the safest location in the vehicle. Alternative-
ly, the front passenger airbag can be disa- bled with a key-operated switch
››› p
age 70.
When transporting children, use a child seat
appropriate to the age and size of each child. WARNING
● If a chi l
d seat is secured to the front pas-
senger seat, the risk to the child of sustain-
ing critical or fatal injuries in the event of an
accident increases.
● An inflating front passenger airbag can
strike the re
ar-facing child seat and project it
with great force against the door, the roof or
the backrest.
● Never install a child seat facing backwards
on the front pa
ssenger seat unless the front
passenger front airbag has been disabled.
Risk of potentially fatal injuries to the child!
However, if it is necessary, in exceptional ca-
ses, to transport a child in the front passen-
ger seat, the front passenger front airbag
must always be disabled ››› page 70, Deacti-
vation of front passenger front airbag*. If the
front passenger seat has a height adjustment
option, move it to the highest position.
● For those vehicles that do not include a key
lock swit
ch to deactivate the airbag, the vehi-
cle must be taken to a technical service.
● All vehicle occupants, especially children,
must a
ssume the proper sitting position and
be properly belted in while travelling.
● Never hold children or babies on your lap,
this can r
esult in potentially fatal injuries to
the child! 72
Page 130 of 252
Operation
●
If pos s
ible, use the rear vision mirror to es-
timate distances to vehicles behind you.
● Make sure that you do not get your finger
trapped between the mirr
or and the mirror
base when folding back the mirrors. Risk of
injury! For the sake of the environment
The exterior mirror heating should be switch-
ed off when it i s
no longer needed. Other-
wise, it is an unnecessary fuel waste. Note
● If the electric a
l adjustment ever fails to op-
erate, the mirrors can be adjusted by hand by
lightly pressing the edge of the mirror glass.
● In vehicles with electric exterior mirrors,
the follo
wing points should be observed: if,
due to an external force (e.g. being knocked
while manoeuvring), the adjustment of the
mirror housing is altered, the mirror will have
to be fully folded electrically. Do not readjust
the rear vision mirror housing by hand, as
this will interfere with the mirror adjuster
function.
● The rear vision mirrors can be adjusted sep-
arately or s
imultaneously, as described
above.
● The fold-in function on the exterior mirrors
will
not activate at speeds over 40 km/h
(25 mph). Seats and head restraints
Adju
s
tin g the se
at and head re-
straints
Adjusting the front seats Read the additional information carefully
›››
p
age 12 WARNING
The safe driving chapter contains important
information, tip s, s
uggestions and warnings
that you should read and observe for your
own safety and the safety of your passengers
››› page 56. WARNING
● Never adju s
t the driver or front passenger
seat while the vehicle is in motion. While ad-
justing your seat, you will assume an incor-
rect sitting position. Risk of accidents. Adjust
the driver or front passenger seat only when
the vehicle is stationary.
● To reduce the risk of injury to the driver and
front pa
ssenger in case of a sudden braking
or an accident, never drive with the backrest
tilted towards the rear. The maximum protec-
tion of the seat belt can be achieved only
when the backrests are in an upright position
and the driver and front passenger have prop-
erly adjusted their seat belts. The further the backrests are tilted to the rear, the greater
the risk of
injur
y due to improper positioning
of the belt web!
● Exercise caution when securing the seat
height into for
wards/backwards position. In-
juries can be caused if the seat height is ad-
justed without due care and attention.
● To move the seat forwards and backwards,
pull
upwards and not sideways on the lever,
as the force exerted on it in that direction
could damage it. Folding and lifting the backrest of the
fr
ont
seat
s 3 Applies to vehicles with 3 doors:
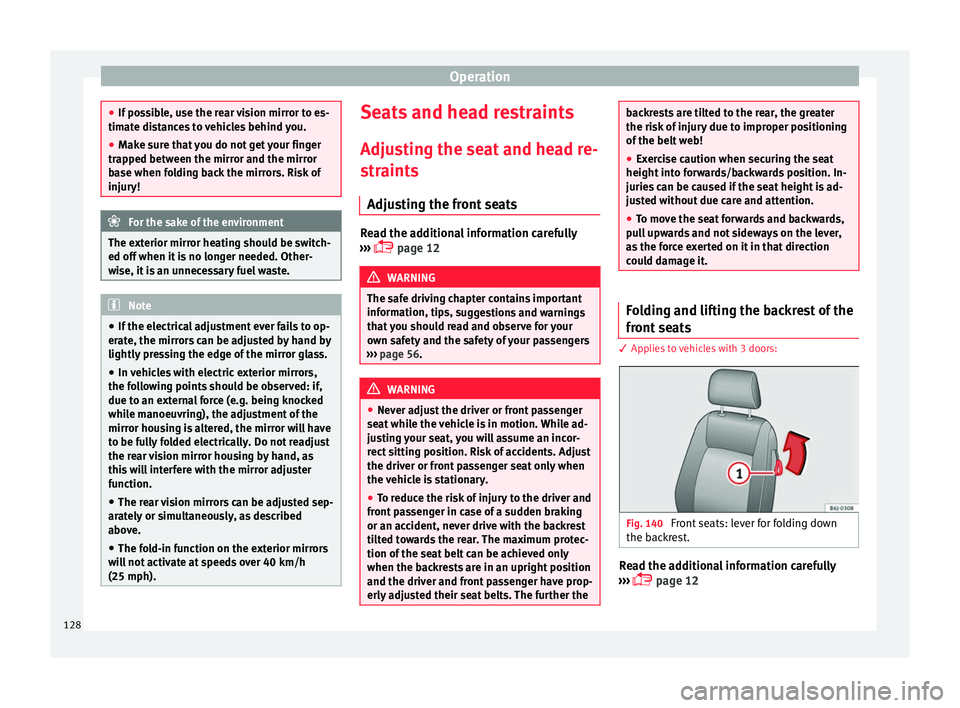
Fig. 140
Front seats: lever for folding down
the b ac
kr
est. Read the additional information carefully
› ›
›
p
age 12
128
Page 131 of 252
Seats and head restraints
Vehicles without the Easy-Entry function
– To f old the backrest, pull the lever 1 up-
w ar
ds
and push the backrest forwards.
– To unfold the backrest, push it back.
Vehicl
es with the Easy-Entry function
– To fold the backrest, pull the lever 1 up-
w ar
ds
and push the backrest forwards. You
can push the seat forwards at the same
time to make entry to the rear seats easier.
– To unfold the backrest, first move the seat
compl
etely back.
The Easy-Entry function facilitates the access
to the vehicle rear seats. Before lifting the
backrest, return the seat to the original posi-
tion. The seat inserts when the backrest is lif-
ted. Adjusting or disassembling the head
restr
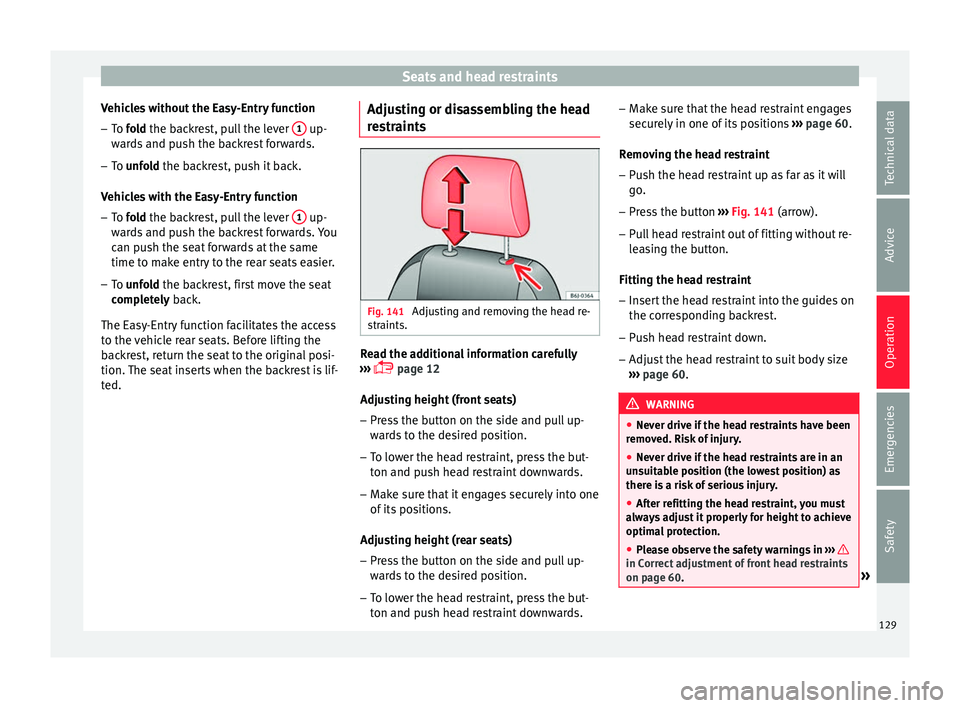
aints Fig. 141
Adjusting and removing the head re-
s tr
aints. Read the additional information carefully
› ›
›
p
age 12
Adjusting height (front seats)
– Press the button on the side and pull up-
wards
to the desired position.
– To lower the head restraint, press the but-
ton and push he
ad restraint downwards.
– Make sure that it engages securely into one
of its pos
itions.
Adjusting height (rear seats)
– Press the button on the side and pull up-
wards
to the desired position.
– To lower the head restraint, press the but-
ton and push he
ad restraint downwards. –
Make sur
e that the head restraint engages
securely in one of its positions ››› page 60.
Removing the head restraint – Push the head restraint up as far as it will
go.
– Pre
ss the button ››› Fig. 141
(arrow).
– Pull head restraint out of fitting without re-
leas
ing the button.
Fitting the head restraint
– Insert the head restraint into the guides on
the corres
ponding backrest.
– Push head restraint down.
– Adjust the head restraint to suit body size
››› p
age 60. WARNING
● Never drive if the he
ad restraints have been
removed. Risk of injury.
● Never drive if the head restraints are in an
unsuit
able position (the lowest position) as
there is a risk of serious injury.
● After refitting the head restraint, you must
alway
s adjust it properly for height to achieve
optimal protection.
● Please observe the safety warnings in ››› in Correct adjustment of front head restraints
on page 60
. » 129
Technical data
Advice
Operation
Emergencies
Safety