tailgate Seat Leon 5D 2007 User Guide
[x] Cancel search | Manufacturer: SEAT, Model Year: 2007, Model line: Leon 5D, Model: Seat Leon 5D 2007Pages: 302, PDF Size: 9.14 MB
Page 107 of 302
Unlocking and locking105
Safety First
Operating instructions
Tips and Maintenance
Te c h n i c a l D a t a
WARNING
•
Always close the tailgate properly. Risk of accident or injury.
•
The tailgate must not be opened when the reverse or rear fog lights are
lit. This may damage the lighting units.
•
Do not close the tailgate by pushin g it down with your hand on the
window. The glass could shatter. Risk of injury!
•
Ensure the tailgate is locked after closing. If not, it may open unexpect-
edly while driving.
•
Never allow children to play in or ar ound the vehicle. A locked vehicle
can be subjected to extremely high and low temperatures, depending on
the time of year. This could cause serious injuries/illness. It could even
have fatal consequences. Close and lock both the tailgate and all the other
doors when you are not using the vehicle.
•
Never close the tailgate without observing and ensuring it is clear, to do
otherwise could cause serious injury to you and others. Make sure that no
one is in the path of the tailgate.
•
Never drive with the tailgate open or half-closed, exhaust gasses may
penetrate into the interior of th e vehicle. Danger of poisoning!
•
If only the boot is opened then do not leave the key inside. The vehicle
may not be opened if the key is left inside.
Emergency opening
This allows the vehicle to be opened if the central locking
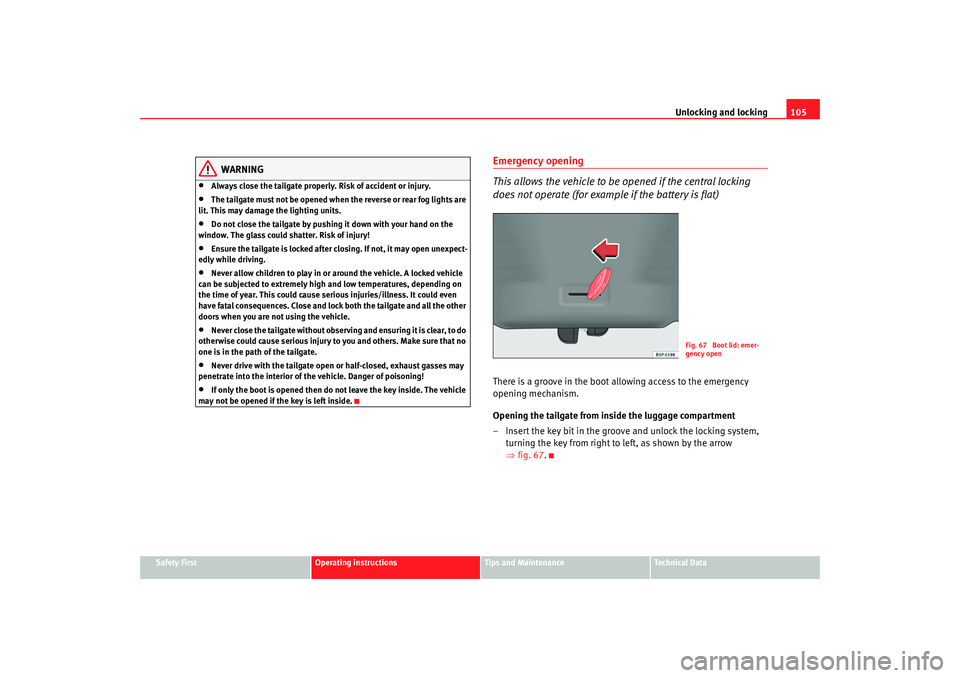
does not operate (for example if the battery is flat)There is a groove in the boot allowing access to the emergency
opening mechanism.
Opening the tailgate from inside the luggage compartment
– Insert the key bit in the groove and unlock the locking system, turning the key from right to left, as shown by the arrow
⇒fig. 67 .
Fig. 67 Boot lid: emer-
gency open
leon ingles.book Seite 105 Dienst ag, 11. September 2007 1:47 13
Page 108 of 302

Unlocking and locking
106WindowsOpening or closing the windows electrically
The front and rear electric windows can be operated using the
controls in the driver's door.Opening and closing the windows
– Press the button to open a window.
– Pull button to close a window ⇒.Always close the windows fully if you park the vehicle or leave it unattended
⇒.
You can use the electric windows for approx. 10 minutes after switching off
the ignition if neither the driver door nor the front passenger door has been
opened and the key has not been removed from the ignition. Buttons in the driver door
Button for window in front left door
Button for window in front right door
Buttons for rear windows* Safety switch for deactivating the electric window buttons in the rear
doors
Button for window in rear left door
Button for window in rear right door
Safety switch
*
Safety switch in the driver door can be used to disable the electric window
buttons in the rear doors.
Safety switch not pressed: buttons on rear doors are activated.
Safety switch pressed: buttons on rear doors are deactivated.
WARNING
•
Incorrect use of the electric windows can result in injury.
•
Never close the tailgate without observing and ensuring it is clear, to do
otherwise could cause serious injury to you and others. Make sure that no
one is in the path of a window.
•
Always take the vehicle key with you when you leave the vehicle.
•
Never leave children or disabled persons in the vehicle, particularly if
they have access to the keys. Unsupervised use of a key could mean that
the engine is started or that electric al equipment is used (e.g. electric
windows). Risk of accident. The doors can be locked using the remote
control key. This could result in people being trapped in the vehicle in an
emergency.
•
The electric windows will work unti l the key has been removed from the
ignition and one of the front doors has been opened.
Fig. 68 Detail of driver
door: controls for the front
and rear windows
A1A2A3A4A5
A3
leon ingles.book Seite 106 Dienst ag, 11. September 2007 1:47 13
Page 110 of 302

Unlocking and locking
108The one-touch function and roll-back fu nction will not work if there is a
malfunction in the electric windows. Co ntact an Authorised Service Centre.
WARNING
•
Incorrect use of the electric windows can result in injury.
•
Always take the key with you when leaving the vehicle, even if you only
intend to be gone for a short time. Please ensure that children are never left
unsupervised in the vehicle.
•
The electric windows will work until the key has been removed from the
ignition and one of the front doors has been opened.
•
Never close the tailgate without observin g a n d e n s u r i n g i t i s c l e a r, t o d o
otherwise could cause serious injury to you and others. Make sure that no
one is in the path of a window.
•
Never allow people to remain in th e vehicle when you close the vehicle
from the outside. The windows cannot be opened even in an emergency.Note
The roll-back function is deactivated if the windows are closed from the
outside of the vehicle using the ignition key for convenience closing
⇒ page 108.Convenience opening and closing* Using the door lock
– Hold the key in the door lock of the driver door in either the
locking or the unlocking position until all windows are either
opened or closed.
– Release the key to interrupt this function. – Once the windows are completely closed, the indicators will
flash.
Using the remote control
– Push the lock button on the remote control for about 3 seconds. All windows which function electric ally will be either opened or
closed.
– Press the unlock button to interrupt the function.
– Once the windows are completely closed, the indicators will flash.
leon ingles.book Seite 108 Dienst ag, 11. September 2007 1:47 13
Page 116 of 302

Lights and visibility
114•
Do not put stickers on the windscreen in front of the sensor. This may
cause disruptions or faults in the automatic lighting system.
Coming home / leaving home function*
After dark the area around the car is lit up with the aid of the
coming home / leaving home function.Coming home function*
To activate the function
– Put the light switch into the position
or in the “Auto” position
for those vehicles fitted with the automatic lighting function.
– Remove key from ignition switch.
To deactivate the function
– Turn light switch to position 0.
When the system is activated and it is dark the dipped headlights, rear lights
and number plate lights come on for 40 seconds, after the vehicle has been
closed.
While one of the doors or the tailgate are open, the dipped headlights, the
rear lights and the registration plate lighting remain on for about 90 seconds.
If, before this time is up, all of the doors and the tailgate are closed, another
40 seconds of lighting is given. However, if all of the doors and the tailgate
are closed after the 90 seconds have pas sed, the system will be deactivated
and the lights will not come on.
If you wish to reactivate the system, you must start from the beginning.
The lighting time is defined at the time of manufacture. Leaving home function*
The function is activated when the vehicle is unlocked using the remote
control. In the dark, the leaving home
function will light the dipped beam
lights, the rear lights and the registration plate lighting for about 40 seconds.
With the lights switch in the position “0”, the leaving home function is not
activated.
Note
•
If the vehicle is used often during the night for short trips using the
coming home function, this will place a heavy demand on the battery. To
avoid this, make longer journeys whenever possible.
•
Observe all relevant statutory requirements when using the lighting
systems described here.
•
For those vehicles fitted with the “Dot Matrix” display, the time for the
Coming home function (about 40 sec onds) can be adjusted using the
“Configuration, lights and visibility” menu.
leon ingles.book Seite 114 Dienst ag, 11. September 2007 1:47 13
Page 126 of 302

Lights and visibility
124
Switching on the windscreen wiper and washer system
– Press the lever fully forwards to position ⇒page 123, fig. 85 .
The wash function will start immediately and the wiper will start
with a slight delay. The windscreen wash system will function as
long as you hold the lever in this position.
– Release the lever. The wiper then wipes for approximately 4 seconds, and then in intervals again.
– Release the lever. The washer system stops and the wipers func- tion.
WARNING
•
A worn or dirty wiper blade will obstruct visibility and reduce safety.
•
Always note the corresponding warnings on ⇒page 215, “Changing
the front windscreen wiper blades”.Caution
In icy conditions, always check that the wiper blade is not frozen to the glass
before using the wiper for the first time. If you switch on the wiper when the
wiper blade is frozen to the glass, this could damage both the wiper blade
and the wiper motor.
Note
•
The windscreen wiper will only function when the ignition is switched on
and the tailgate is closed.
•
In reverse gear, with the windscreen wipers switched on, the rear wind-
screen wiper will make one wipe.
Headlight washer system*
The headlight washers clea n the headlight lenses.The headlight washers are activated automatically when the windscreen
washer is used and the windscreen wiper lever is pulled towards the steering
wheel for at least 1.5 seconds – provided the dipped headlights or main
beams are switched on. Clean off stubbo rn dirt (insects, etc.) from the head-
lights at regular intervals, for in stance when filling the fuel tank.
Note
•
To ensure that the headlight washers work properly in winter, keep the
nozzle holders in the bumper free of snow and remove any ice with a de-icer
spray.
•
To remove water, the windscreen wipers will be activated from time to
time, the headlight wipers will be activated every three cycles.
MirrorsInterior mirror
It is dangerous to drive if you cannot see clearly through the
rear window.Manual anti-dazzle function for interior mirror
In the basic mirror position, the lever at the bottom edge of the mirror should
be at the front. Pull the lever to the back to select the anti-dazzle function.
A7
leon ingles.book Seite 124 Dienstag, 11. September 2007 1:47 13
Page 142 of 302

Seats and stowage
140Luggage compartment coverRemoving the cover
– Disengage the loops ⇒fig. 106 from the retaining pins .
– Extract the cover from its slot, in its rest position and pull outwards.
WARNING
Do not place heavy or hard objects on the luggage compartment cover, this
will endanger the vehicle occupants in case of sudden braking.
Caution
•
Before closing the tailgate, ensure th at the stowage compartment tray is
correctly fitted.
•
An overloaded boot could mean that the rear stowage tray is not correctly
seated and it may be bent or damaged.
•
If the boot is overloaded, remove the tray.Note
•
Ensure that, when placing items of clothing on the luggage compartment
cover, rear visibility is not reduced.
Roof carrier*Please observe the following points if you intend to carry loads on the roof:•
For safety reasons, only luggage racks and accessories approved by SEAT
should be used.
•
It is imperative to precisely follow the fitting instructions included for the
rack, taking special care when fitting the front bar in the holes designed for
this and the rear bar between the marks on the upper part of the rear door
frame while respecting the correct direction of travel indicated in the installa-
tion manual. Not following these instr uctions may lead to paintwork damage
or marks on the bodywork.
•
Pay special attention to the tightening torque of the attachment bolts and
check them following a short journey. If necessary, retighten the bolts and
check them at regular intervals.
•
Distribute the load evenly. A maximum load of 40 kg only is permitted for
each roof carrier system support bar, the load must be distributed evenly over
the entire length. However, the maxi mum load permitted for the entire roof
(including the support system) of 75 kg must not be exceeded nor should the
total weight of the vehicle be exceeded. See the chapter on “Technical Data”.
•
When transporting heavy or large objects on the roof, any change in the
normal vehicle behaviour due to a change in the centre of gravity or an
Fig. 106 Luggage
compartment cover
AB
AA
leon ingles.book Seite 140 Dienst ag, 11. September 2007 1:47 13
Page 203 of 302
Checking and refilling levels201
Safety First
Operating instructions
Tips and Maintenance
Te c h n i c a l D a t a
Checking and refilling levelsRefuellingThe fuel cap cover opens automatically with the central
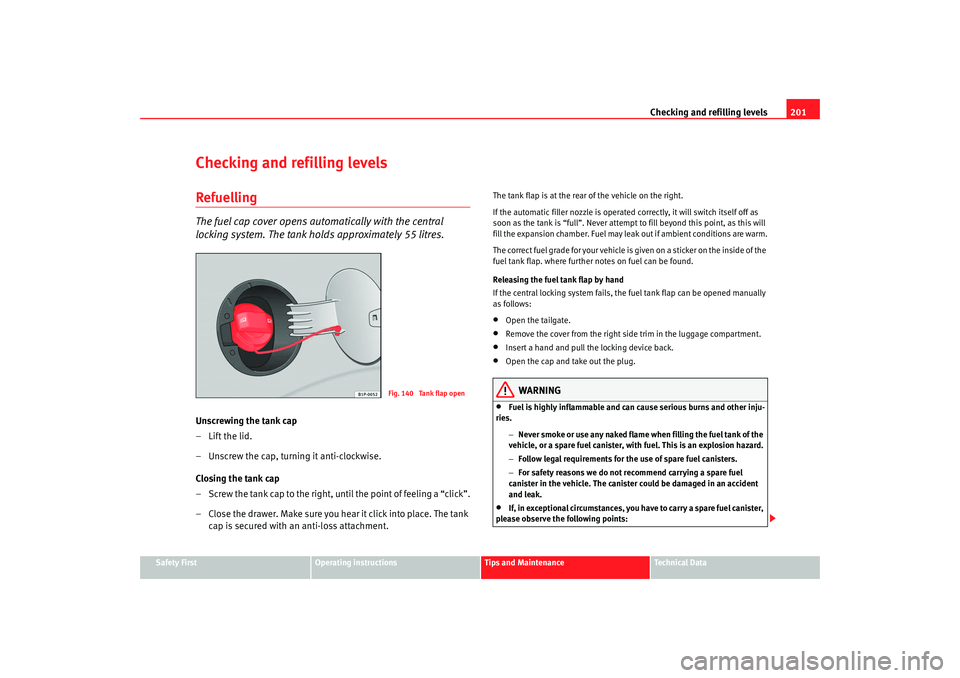
locking system. The tank holds approximately 55 litres.Unscrewing the tank cap
– Lift the lid.
– Unscrew the cap, turning it anti-clockwise.
Closing the tank cap
– Screw the tank cap to the right, until the point of feeling a “click”.
– Close the drawer. Make sure you hear it click into place. The tank
cap is secured with an anti-loss attachment.
The tank flap is at the rear of the vehicle on the right.
If the automatic filler nozzle is operated correctly, it will switch itself off as
soon as the tank is “full”. Never attempt to fill beyond this point, as this will
fill the expansion chamber. Fuel may le ak out if ambient conditions are warm.
The correct fuel grade for your vehicle is given on a sticker on the inside of the
fuel tank flap. where further notes on fuel can be found.
Releasing the fuel tank flap by hand
If the central locking system fails, the fuel tank flap can be opened manually
as follows:•
Open the tailgate.
•
Remove the cover from the right side trim in the luggage compartment.
•
Insert a hand and pull the locking device back.
•
Open the cap and take out the plug.
WARNING
•
Fuel is highly inflammable and can cause serious burns and other inju-
ries.
−Never smoke or use any naked flame when filling the fuel tank of the
vehicle, or a spare fuel canister, with fuel. This is an explosion hazard.
− Follow legal requirements for the use of spare fuel canisters.
− For safety reasons we do not recommend carrying a spare fuel
canister in the vehicle. The canister could be damaged in an accident
and leak.
•
If, in exceptional circumstances, you have to carry a spare fuel canister,
please observe the following points:
Fig. 140 Tank flap open
leon ingles.book Seite 201 Dienst ag, 11. September 2007 1:47 13
Page 248 of 302
If and when
246Bulb changeGeneral notesBefore changing any bulb, first turn off the equipment concerned.
Do not touch the bulb glass. Fingerprints vaporise in the heat, causing a
reduction in the bulb life and conden sation on the mirror surface, thus
reducing efficiency.
A bulb should only be replaced by one of the same type. The type is inscribed
on the bulb, either on the glass part or on the base.
It is highly recommended to keep a box of spare bulbs in the vehicle. At the
very least, the bulbs that most affect road safety should have spares in the
vehicle.
Main headlights
Dipped beam - H7
Main beam - H1
Position - W5W
Turn signals - PY21W
Xenon headlights
22)/ self-adjusting*
Dipped and full beam - D1S
23)
Flashes and extra full beam - H1
Position W5W
Turn signals PY21W Fog lights
Fog lights - H3
Fixed rear light
Stop/Position - P21W
24)
Turn signals - P21W
Rear tailgate light unit
Fog light (driver's side) - P21W
Reverse (passenger's side) - P21W
Position - W5W
Side indicator
Side indicator - W5W
Registration plate light
Registration plate light - C5W
Note
•
Due to the difficulty in accessing the lamps, any replacement work should
be done by a SEAT dealer. However, the following is a description of how to
change the bulbs except for the fog lights and interior bulbs.
22)On this type of headlight, the bulb changes must be made by the SEAT dealer, given
that complex elements must be removed from the vehicle and a reset must be made
on the automatic control system incorporated.23)The Xenon bulbs discharge 2.5 times the light flux and have an average lifespan of 5
times more than that of halo gen bulbs, this means that, except due to unusual circum-
stances, there is no need to change the bulbs for the whole life of the vehicle.
24)Electronically controlled single filament bulb for Stop/side bulbs. If the bulb blows it
will not work in either position or Stop.
leon ingles.book Seite 246 Dienst ag, 11. September 2007 1:47 13
Page 252 of 302
If and when
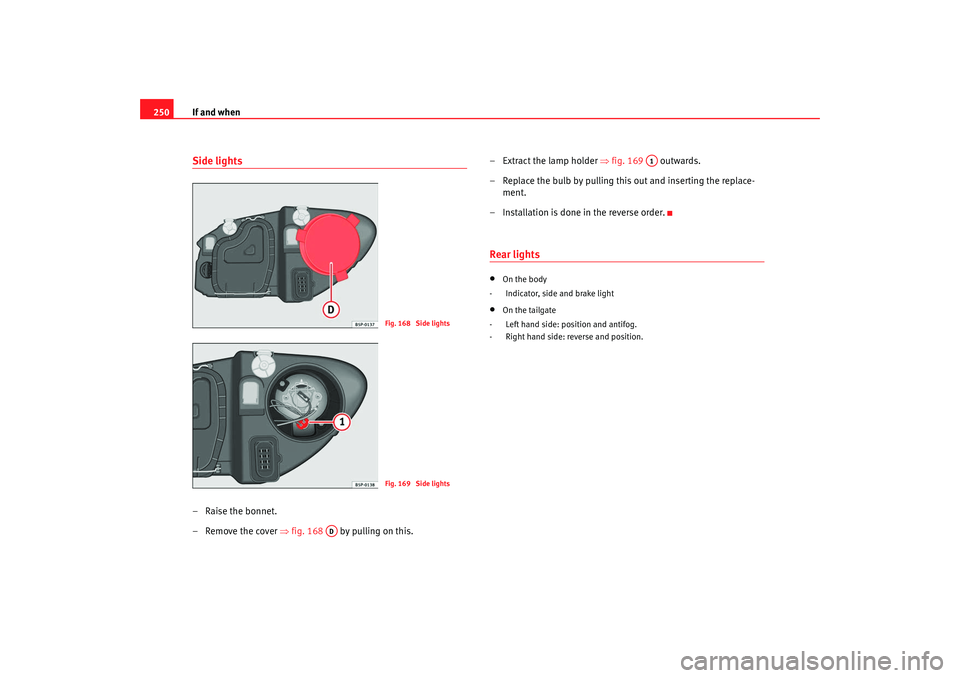
250Side lights– Raise the bonnet.
– Remove the cover ⇒fig. 168 by pulling on this. – Extract the lamp holder
⇒fig. 169 outwards.
– Replace the bulb by pulling this out and inserting the replace- ment.
– Installation is done in the reverse order.
Rear lights•
On the body
- Indicator, side and brake light
•
On the tailgate
- Left hand side: position and antifog.
- Right hand side: reverse and position.
Fig. 168 Side lightsFig. 169 Side lights
AD
A1
leon ingles.book Seite 250 Dienst ag, 11. September 2007 1:47 13
Page 253 of 302
If and when251
Safety First
Operating instructions
Tips and Maintenance
Te c h n i c a l D a t a
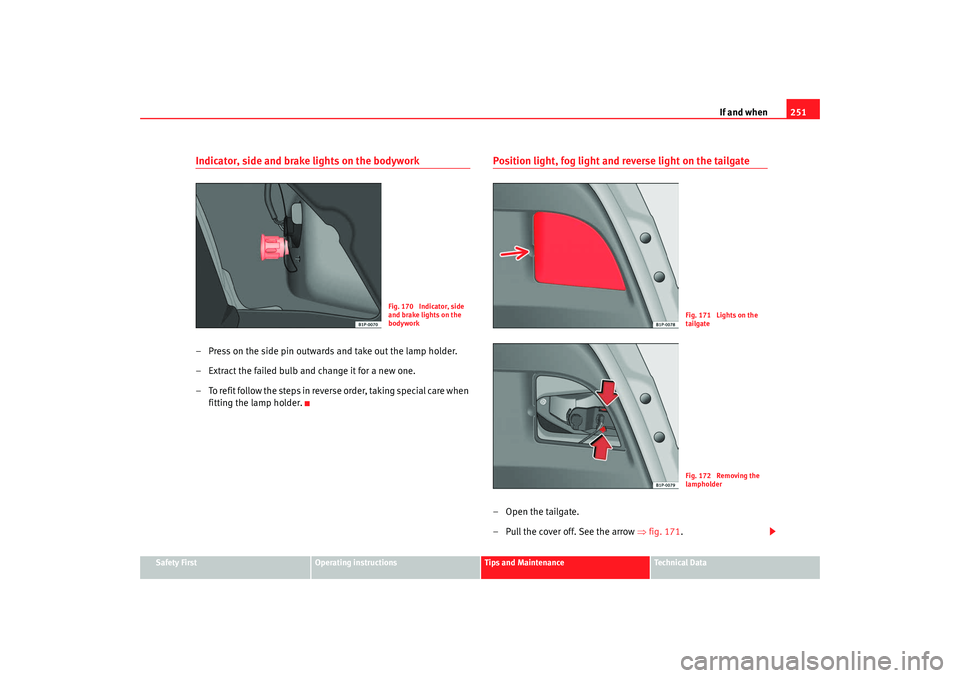
Indicator, side and brake lights on the bodywork– Press on the side pin outwards and take out the lamp holder.
– Extract the failed bulb and change it for a new one.
– To refit follow the steps in reverse order, taking special care when
fitting the lamp holder.
Position light, fog light and reverse light on the tailgate–Open the tailgate.
– Pull the cover off. See the arrow ⇒ fig. 171.
Fig. 170 Indicator, side
and brake lights on the
bodywork
Fig. 171 Lights on the
tailgateFig. 172 Removing the
lampholder
leon ingles.book Seite 251 Dienstag, 11. September 2007 1:47 13