headlights Seat Leon 5D 2007 Owner's manual
[x] Cancel search | Manufacturer: SEAT, Model Year: 2007, Model line: Leon 5D, Model: Seat Leon 5D 2007Pages: 302, PDF Size: 9.14 MB
Page 78 of 302
Cockpit
76Coolant level too low
The instrument panel displays shows the following message
10): STOP CHECK
COOLANT INSTRUCTION MANUAL ⇒ page 212.
First look at the coolant temperature gauge. If the needle is in the normal
range, top up with coolant at the earliest opportunity ⇒ .
WARNING
•
If your vehicle is immobilised for any technical reasons, move it to a
safe distance from traffic. Turn off the engine, turn on the hazard lights and
place the warning triangle.
•
Never open the bonnet if you can see or hear steam or coolant escaping
from the engine compartment. Risk of scalding. Wait until you can no
longer see or hear escaping steam or coolant.
•
The engine compartment of any motor vehicle is a dangerous area!
Before carrying out any work in the engine compartment, switch off the
engine and allow it to cool down. Always note the corresponding warnings
⇒ page 204.
Rear fog light
This warning lamp lights up when the rear fog light is switched on
. Further
information ⇒page 112.
Turn sig nals
The warning lamp flashes when the turn signals are in oper-
ation.Depending on which turn signal is operated, either the left
or right
indi-
cator lamp flashes. Both warning lamps will flash at the same time when the
hazard warning lights are switched on.
If one turn signal fails, the warning lamp will start flashing twice as fast.
Further information on the turn signals ⇒page 117.
Trailer turn signals
This warning lamp also flashes when the turn signals are
operated while towing a caravan or trailer.The warning lamp
flashes when the turn signals are operated, provided a
trailer is correctly attached and connected to the vehicle.
The warning lamp will not flash if one of the turn signals on the trailer fails.
Main beam headlights
This warning lamp lights up when the main beams are on.The warning lamp
lights up when the main beams are on or when the
headlight flasher is operated.
Further information ⇒page 117.
10)Depending on the model version
leon ingles.book Seite 76 Dienstag, 11. September 2007 1:47 13
Page 114 of 302
Lights and visibility
112Lights and visibilityLightsSwitching lights on and off
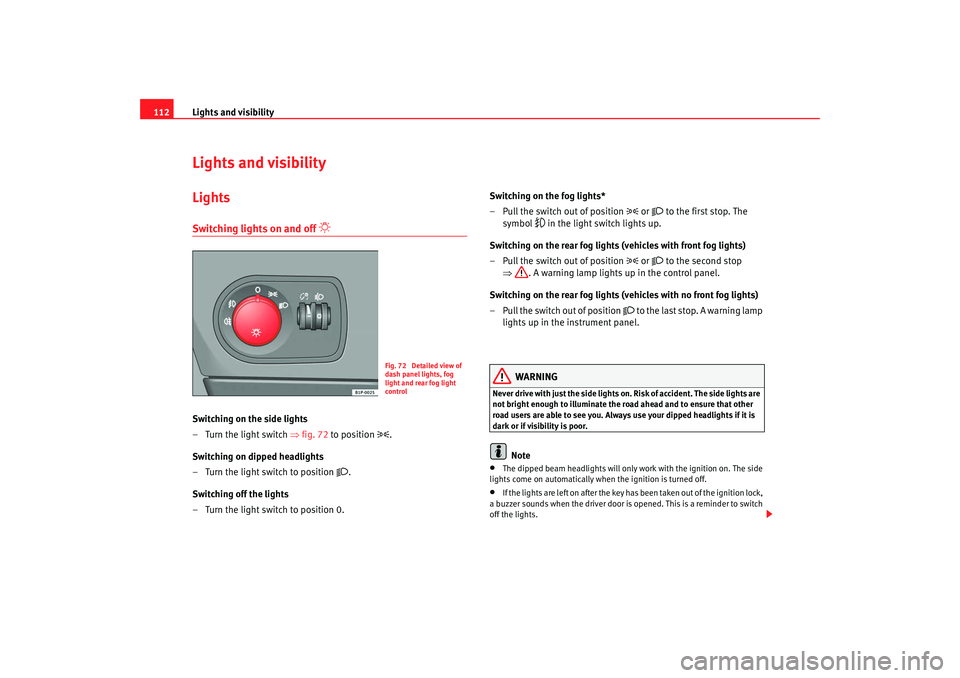
Switching on the side lights
– Turn the light switch ⇒fig. 72 to position
.
Switching on dipped headlights
– Turn the light switch to position
.
Switching off the lights
– Turn the light switch to position 0. Switching on the fog lights*
– Pull the switch out of position
or
to the first stop. The
symbol
in the light switch lights up.
Switching on the rear fog lights (vehicles with front fog lights)
– Pull the switch out of position
or
to the second stop
⇒ . A warning lamp lights up in the control panel.
Switching on the rear fog lights (vehicles with no front fog lights)
– Pull the switch out of position
to the last stop. A warning lamp
lights up in the instrument panel.
WARNING
Never drive with just the side lights on . Risk of accident. The side lights are
not bright enough to illuminate the road ahead and to ensure that other
road users are able to see you. Always use your dipped headlights if it is
dark or if visibility is poor.
Note
•
The dipped beam headlights will only work with the ignition on. The side
lights come on automatically when the ignition is turned off.
•
If the lights are left on after the key has been taken out of the ignition lock,
a buzzer sounds when the driver door is opened. This is a reminder to switch
off the lights.
Fig. 72 Detailed view of
dash panel lights, fog
light and rear fog light
control
leon ingles.book Seite 112 Dienst ag, 11. September 2007 1:47 13
Page 115 of 302
Lights and visibility113
Safety First
Operating instructions
Tips and Maintenance
Te c h n i c a l D a t a
•
If the coming home* feature is activated, the acoustic signal for the
dipped beam headlights will not sound, it will sound if the position lights are
activated.
•
The rear fog light is so bright that it can dazzle drivers behind you. You
should use the rear fog light only when visibility is very poor.
•
If you are towing a trailer equipped with a rear fog light on a vehicle with
a factory-fitted towing bracket, the rear fog light on the car will automatically
be switched off.
•
The use of the lighting described here is subject to the relevant statutory
requirements.
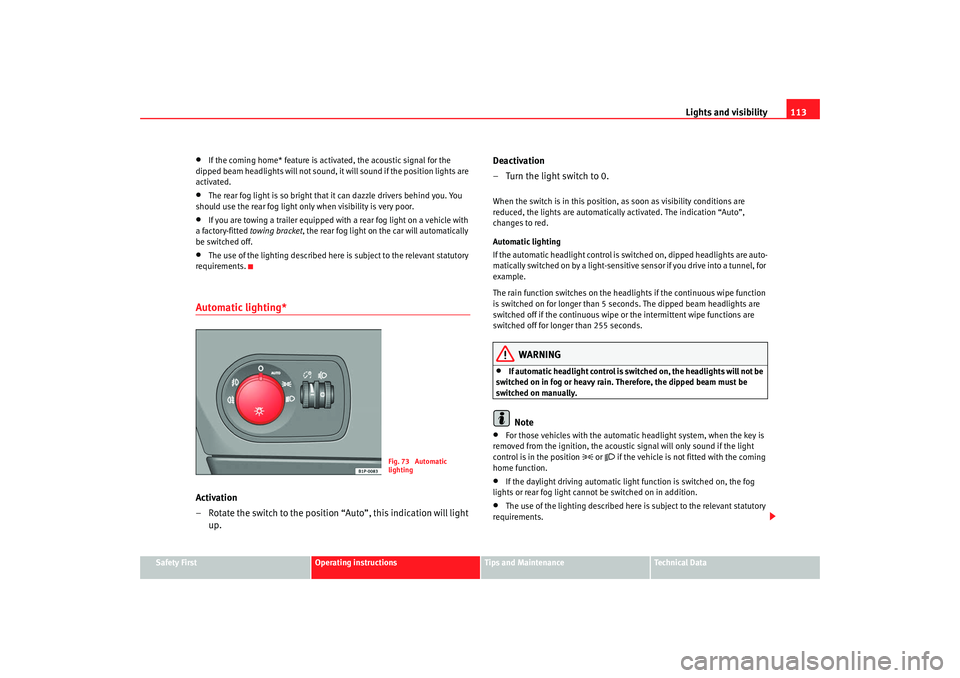
Automatic lighting*Activation
– Rotate the switch to the position “Auto”, this indication will light up. Deactivation
– Turn the light switch to 0.
When the switch is in this position, as soon as visibility conditions are
reduced, the lights are automaticall
y activated. The indication “Auto”,
changes to red.
Automatic lighting
If the automatic headlight control is switched on, dipped headlights are auto-
matically switched on by a light-sensitive sensor if you drive into a tunnel, for
example.
The rain function switches on the headlights if the continuous wipe function
is switched on for longer than 5 sec onds. The dipped beam headlights are
switched off if the continuous wipe or the intermittent wipe functions are
switched off for longer than 255 seconds.
WARNING
•
If automatic headlight control is switched on, the headlights will not be
switched on in fog or heavy rain. Therefore, the dipped beam must be
switched on manually.Note
•
For those vehicles with the automatic headlight system, when the key is
removed from the ignition, the acoustic signal will only sound if the light
control is in the position
or if the vehicle is not fitted with the coming
home function.
•
If the daylight driving automatic light function is switched on, the fog
lights or rear fog light cannot be switched on in addition.
•
The use of the lighting described here is subject to the relevant statutory
requirements.
Fig. 73 Automatic
lighting
leon ingles.book Seite 113 Dienst ag, 11. September 2007 1:47 13
Page 116 of 302

Lights and visibility
114•
Do not put stickers on the windscreen in front of the sensor. This may
cause disruptions or faults in the automatic lighting system.
Coming home / leaving home function*
After dark the area around the car is lit up with the aid of the
coming home / leaving home function.Coming home function*
To activate the function
– Put the light switch into the position
or in the “Auto” position
for those vehicles fitted with the automatic lighting function.
– Remove key from ignition switch.
To deactivate the function
– Turn light switch to position 0.
When the system is activated and it is dark the dipped headlights, rear lights
and number plate lights come on for 40 seconds, after the vehicle has been
closed.
While one of the doors or the tailgate are open, the dipped headlights, the
rear lights and the registration plate lighting remain on for about 90 seconds.
If, before this time is up, all of the doors and the tailgate are closed, another
40 seconds of lighting is given. However, if all of the doors and the tailgate
are closed after the 90 seconds have pas sed, the system will be deactivated
and the lights will not come on.
If you wish to reactivate the system, you must start from the beginning.
The lighting time is defined at the time of manufacture. Leaving home function*
The function is activated when the vehicle is unlocked using the remote
control. In the dark, the leaving home
function will light the dipped beam
lights, the rear lights and the registration plate lighting for about 40 seconds.
With the lights switch in the position “0”, the leaving home function is not
activated.
Note
•
If the vehicle is used often during the night for short trips using the
coming home function, this will place a heavy demand on the battery. To
avoid this, make longer journeys whenever possible.
•
Observe all relevant statutory requirements when using the lighting
systems described here.
•
For those vehicles fitted with the “Dot Matrix” display, the time for the
Coming home function (about 40 sec onds) can be adjusted using the
“Configuration, lights and visibility” menu.
leon ingles.book Seite 114 Dienst ag, 11. September 2007 1:47 13
Page 117 of 302

Lights and visibility115
Safety First
Operating instructions
Tips and Maintenance
Te c h n i c a l D a t a
Instrument and switch lighting / Headlight range controlInstrument and switch lighting
When the headlights are switched on, the brightness of the instruments and
switch lighting can be regulated to suit your requirements by turning the
thumb wheel ⇒fig. 74 .
Those vehicles fitted with xenon gas discharge headlights are fitted with an
automatic headlight range system.
Headlight range control
Using the electrical headlight range control, you can adjust the headlight
range to the load level that is being carried in the vehicle. In this way it is
possible to avoid dazzling oncoming traffi c more than necessary. At the same
time, the driver has the best possible lighting for the road ahead using the
correct headlight settings.
The headlights can only be adjusted when the dipped beam is switched on.
To lower the beam, turn the thumb wh eel down from the basic setting 0.Dynamic headlight range control
Vehicles with
gas discharge lamps (“xenon lamps”) are equipped with
dynamic headlight range control . This means that the headlights will be
adjusted to suit the load level of the vehicle and “nodding movements” when
pulling off and braking are automatically compensated for.
Vehicles with gas discharge lamps do not have headlight range control.
Self directional headlights*
When driving around bends the headlights will light the most
important areas of the road.This cornering light gives better illumina tion of the side of the road when
driving through a corner. The dynamic lighting is controlled automatically
according to speed and the steering wheel angle.
The two main headlights move at different angles to avoid that the front of the
vehicle is left completely in the dark.
Fig. 74 Instrument panel:
regulation for instrument
and switch illumination
and headlight range
control
A1
A1A2
A2A2
Fig. 75 Cornering
lighting using directional
headlights
leon ingles.book Seite 115 Dienst ag, 11. September 2007 1:47 13
Page 120 of 302

Lights and visibility
118
WARNING
The main beam can dazzle other drivers. Risk of accident! Never use the
main beam headlights or the headlight flasher if they could dazzle other
drivers.
Note
•
The turn signals only work when the ignition is switched on. The corre-
sponding warning lamp
or flashes in the combi-instrument. The
warning lamp
flashes when the turn signals are operated, provided a
trailer is correctly attached and connected to the vehicle. If a turn signal bulb
is defective, the warning lamp flashes at double speed. If the trailer turn
signal bulbs are damaged, warning lamp
does not light up. You should
have the bulb replaced.
•
The main beam headlights can only be switched on if the dipped beam
headlights are already on. The warning lamp
then comes on in the combi-
instrument.
•
The headlight flasher comes on for as long as you pull the lever – even if
no other lights are switched on. The warning lamp
then comes on in the
combi-instrument.
•
When the parking lights are switched on, the headlight and the rear light
on the corresponding side of the vehicle light up. The parking lights will only
work if the key is removed from the ignition. If the lights are switched on, a
buzzer gives an audible warning while the driver door is open.
•
If the turn signal lever is left on after the key has been taken out of the
ignition lock, an acoustic signal sounds when the driver door is opened. This
is a reminder to switch off the turn signal, unless of course you wish to leave
the parking light on.
Interior lightsFront interior light The switch ⇒fig. 78 is used to select the following positions:
Courtesy light position
Rocker switch in flat position (not activated). The interior lights are automat-
ically switched on when the vehicle is unlocked or the key removed from the
ignition lock and turn off about 20 secon ds after the closure of the doors. The
interior lights are switched off when the vehicle is locked or when the ignition
is switched on.
Interior light switched on
Push the switch to the position
.
Interior light switched off O
Push the switch to the position O ⇒fig. 78.
Fig. 78 Interior roof trim:
front interior lights
AA
leon ingles.book Seite 118 Dienst ag, 11. September 2007 1:47 13
Page 126 of 302

Lights and visibility
124
Switching on the windscreen wiper and washer system
– Press the lever fully forwards to position ⇒page 123, fig. 85 .
The wash function will start immediately and the wiper will start
with a slight delay. The windscreen wash system will function as
long as you hold the lever in this position.
– Release the lever. The wiper then wipes for approximately 4 seconds, and then in intervals again.
– Release the lever. The washer system stops and the wipers func- tion.
WARNING
•
A worn or dirty wiper blade will obstruct visibility and reduce safety.
•
Always note the corresponding warnings on ⇒page 215, “Changing
the front windscreen wiper blades”.Caution
In icy conditions, always check that the wiper blade is not frozen to the glass
before using the wiper for the first time. If you switch on the wiper when the
wiper blade is frozen to the glass, this could damage both the wiper blade
and the wiper motor.
Note
•
The windscreen wiper will only function when the ignition is switched on
and the tailgate is closed.
•
In reverse gear, with the windscreen wipers switched on, the rear wind-
screen wiper will make one wipe.
Headlight washer system*
The headlight washers clea n the headlight lenses.The headlight washers are activated automatically when the windscreen
washer is used and the windscreen wiper lever is pulled towards the steering
wheel for at least 1.5 seconds – provided the dipped headlights or main
beams are switched on. Clean off stubbo rn dirt (insects, etc.) from the head-
lights at regular intervals, for in stance when filling the fuel tank.
Note
•
To ensure that the headlight washers work properly in winter, keep the
nozzle holders in the bumper free of snow and remove any ice with a de-icer
spray.
•
To remove water, the windscreen wipers will be activated from time to
time, the headlight wipers will be activated every three cycles.
MirrorsInterior mirror
It is dangerous to drive if you cannot see clearly through the
rear window.Manual anti-dazzle function for interior mirror
In the basic mirror position, the lever at the bottom edge of the mirror should
be at the front. Pull the lever to the back to select the anti-dazzle function.
A7
leon ingles.book Seite 124 Dienstag, 11. September 2007 1:47 13
Page 127 of 302

Lights and visibility125
Safety First
Operating instructions
Tips and Maintenance
Te c h n i c a l D a t a
Automatic anti-dazzle interior mirror*
The automatic anti-dazzle function can be switched on and off
as desired.Switching off anti-dazzle function
– Press button ⇒fig. 86 . Warning lamp goes out:
Switching on anti-dazzle function
– Press button ⇒fig. 86 . Warning lamp is lit.Anti-dazzle function
The anti-dazzle function is activated ev ery time the ignition is switched on.
The green indicator lamp lights up in the mirror housing.
When the anti-dazzle function is activated the interior mirror will darken auto-
matically according to the amount of light it receives (for example from the
headlights of a vehicle behind). The anti-dazzle function is cancelled if
reverse gear is engaged.
Note
•
The automatic anti-dazzle function will only work properly if the sun
blind* for the rear window is retracted and there are no other objects
preventing light from reac hing the interior mirror.
•
If you have to stick any type of sticker on the windscreen, do not do so in
front of the sensors. Doing so could prevent the anti-dazzle function from
working well or even from working at all.
Exterior mirrors
The exterior mirrors can be adjusted using the rotary knob in
the centre console.Basic setting of exterior mirrors
1. Turn knob ⇒fig. 87 to position L ( left exterior mirror).
Fig. 86 Automatic anti-
dazzle interior mirror.
AA
AB
AA
Fig. 87 Exterior mirror
control
leon ingles.book Seite 125 Dienst ag, 11. September 2007 1:47 13
Page 182 of 302
Driving and the environment
180•
In some countries it is possible that a vehicle model is sold under condi-
tions where some spare parts are not available or that the Authorised Service
Centres may only carr y out limited repairs.
SEAT importers and distributors will gladly provide information about the
technical preparation of your vehicle in addition to necessary maintenance
and repair possibilities.
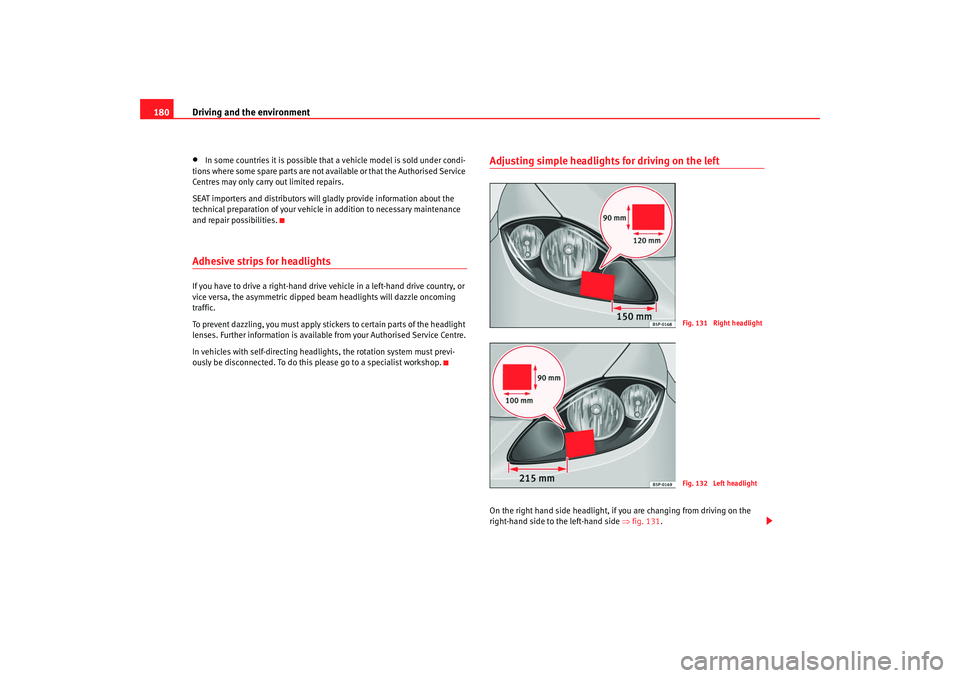
Adhesive strips for headlightsIf you have to drive a right-hand drive vehicle in a left-hand drive country, or
vice versa, the asymmetric dipped beam headlights will dazzle oncoming
traffic.
To prevent dazzling, you must apply stickers to certain parts of the headlight
lenses. Further information is available from your Authorised Service Centre.
In vehicles with self-directing headlights, the rotation system must previ-
ously be disconnected. To do this please go to a specialist workshop.
Adjusting simple headlights for driving on the leftOn the right hand side headlight, if you are changing from driving on the
right-hand side to the left-hand side ⇒ fig. 131.
Fig. 131 Right headlightFig. 132 Left headlight
leon ingles.book Seite 180 Dienst ag, 11. September 2007 1:47 13
Page 183 of 302
Driving and the environment181
Safety First
Operating instructions
Tips and Maintenance
Te c h n i c a l D a t a
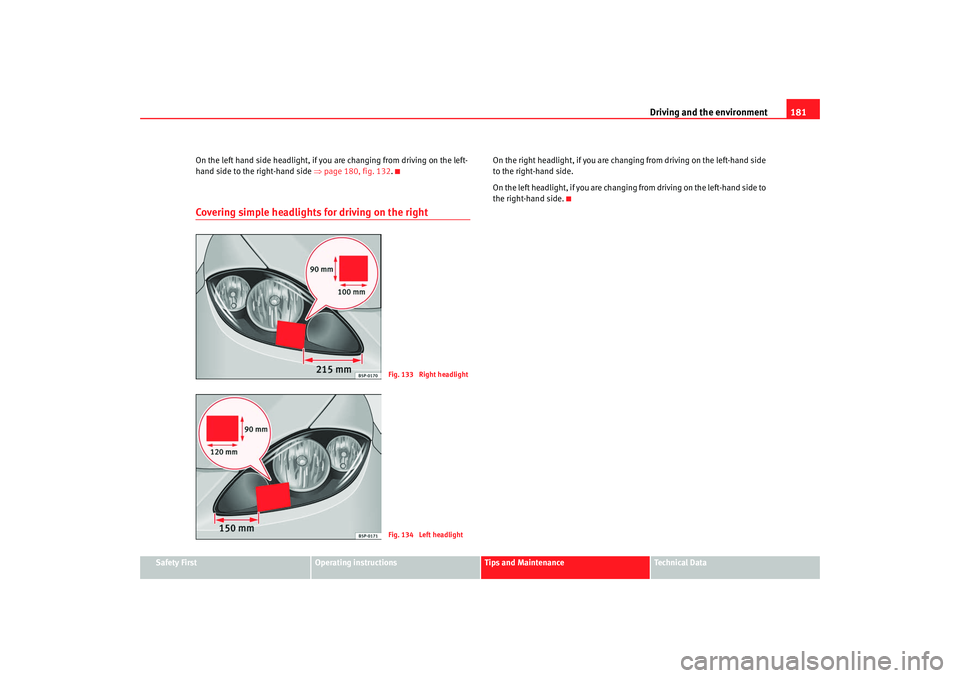
On the left hand side headlight, if y
ou are changing from driving on the left-
hand side to the right-hand side ⇒page 180, fig. 132 .
Covering simple headlights for driving on the right
On the right headlight, if you are chan ging from driving on the left-hand side
to the right-hand side.
On the left headlight, if you are changing from driving on the left-hand side to
the right-hand side.
Fig. 133 Right headlightFig. 134 Left headlight
leon ingles.book Seite 181 Dienst ag, 11. September 2007 1:47 13