sensor Seat Leon 5D 2008 User Guide
[x] Cancel search | Manufacturer: SEAT, Model Year: 2008, Model line: Leon 5D, Model: Seat Leon 5D 2008Pages: 293, PDF Size: 8.67 MB
Page 122 of 293

Lights and visibility121
Safety First
Operating instructions
Practical tips
Te c h n i c a l D a t a
is in transit (drip function). If you activate the wipers less than three secionds
after the drip function, a new wash sequence will begin without the last wipe.
For the “drip” function to work again, you have to turn the ignition off and
then on again.
•
When the “intermittent wipe function”
is on, the intervals are directly
proportional to the speed. This way, the higher the vehicle speed the shorter
the intervals.
•
The wiper will try to wipe away any obstacles that are on the windscreen.
The wiper will stop moving if the obstacle blocks its path. Remove the
obstacle and switch the wiper back on again.
•
Before removing any objects that may be trapped in the side areas of the
windscreen, always move the wiper arms to the service position (horizontal).
•
The heat output of the heated jets is controlled automatically when the
ignition is switched on, dependi ng upon the outside temperature.
Rain sensor*
The rain sensor controls the frequency of the windscreen
wiper intervals, depending on the amount of rain.
Fig. 82 Rain sensor*Fig. 83 Windscreen wiper
lever
leon_ingles Seite 121 Montag, 26. Januar 2009 4:29 16
Page 123 of 293

Lights and visibility
122
Switching on the rain sensor
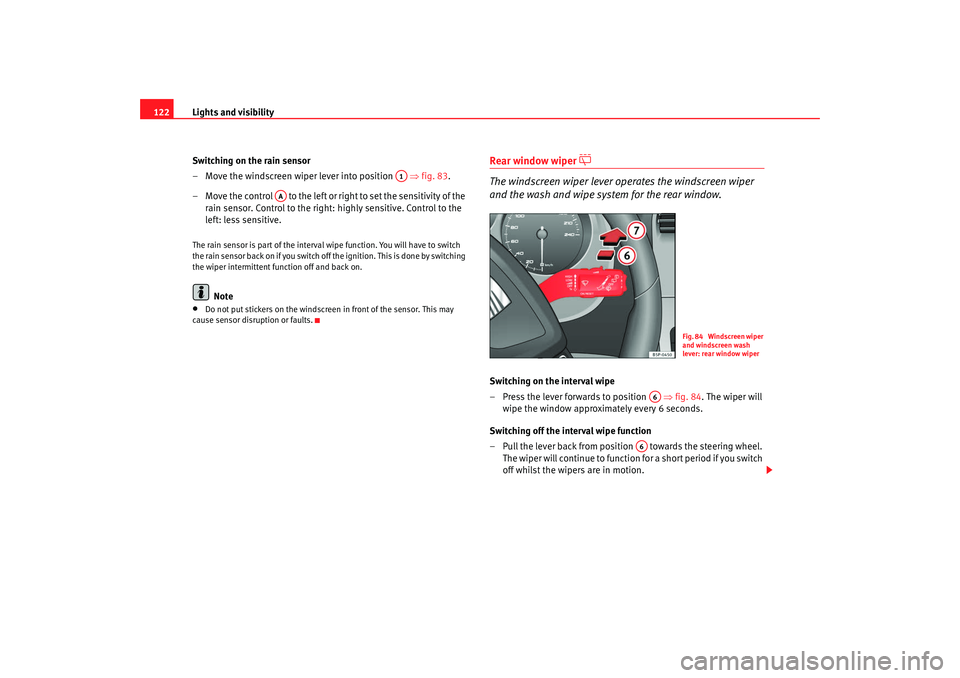
– Move the windscreen wiper lever into position ⇒fig. 83 .
– Move the control to the left or right to set the sensitivity of the rain sensor. Control to the right: highly sensitive. Control to the
left: less sensitive.The rain sensor is part of the interval wipe function. You will have to switch
the rain sensor back on if you switch off the ignition. This is done by switching
the wiper intermittent function off and back on.
Note
•
Do not put stickers on the windscreen in front of the sensor. This may
cause sensor disruption or faults.
Rear window wiper
The windscreen wiper lever operates the windscreen wiper
and the wash and wipe system for the rear window.
Switching on the interval wipe
– Press the lever forwards to position ⇒fig. 84 . The wiper will
wipe the window approximately every 6 seconds.
Switching off the interval wipe function
– Pull the lever back from position towards the steering wheel. The wiper will continue to function for a short period if you switch
off whilst the wipers are in motion.
A1
AA
Fig. 84 Windscreen wiper
and windscreen wash
lever: rear window wiper
A6
A6
leon_ingles Seite 122 Montag, 26. Januar 2009 4:29 16
Page 125 of 293

Lights and visibility
124Automatic anti-dazzle interior mirror*
The automatic anti-dazzle function can be switched on and off
as desired.Switching off anti-dazzle function
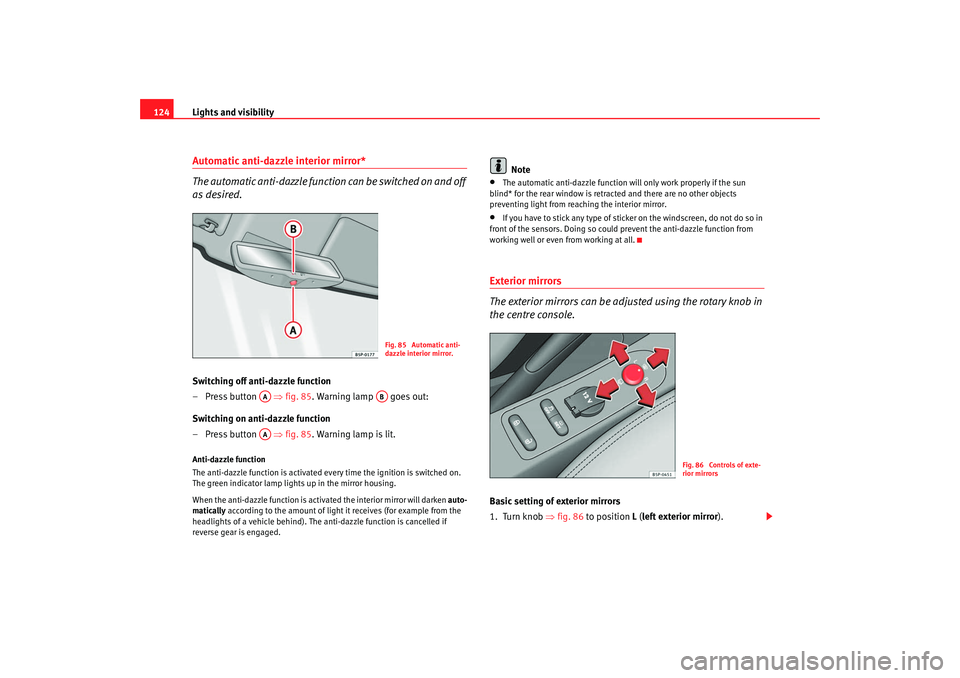
– Press button ⇒fig. 85 . Warning lamp goes out:
Switching on anti-dazzle function
– Press button ⇒fig. 85 . Warning lamp is lit.Anti-dazzle function
The anti-dazzle function is activated every time the ignition is switched on.
The green indicator lamp lights up in the mirror housing.
When the anti-dazzle function is activa ted the interior mirror will darken auto-
matically according to the amount of light it receives (for example from the
headlights of a vehicle behind). The anti-dazzle function is cancelled if
reverse gear is engaged.
Note
•
The automatic anti-dazzle function wi ll only work properly if the sun
blind* for the rear window is retracted and there are no other objects
preventing light from reaching the interior mirror.
•
If you have to stick any type of sticke r on the windscreen, do not do so in
front of the sensors. Doing so could prevent the anti-dazzle function from
working well or even from working at all.
Exterior mirrors
The exterior mirrors can be adjusted using the rotary knob in
the centre console.Basic setting of exterior mirrors
1. Turn knob ⇒fig. 86 to position L ( left exterior mirror ).
Fig. 85 Automatic anti-
dazzle interior mirror.
AA
AB
AA
Fig. 86 Controls of exte-
rior mirrors
leon_ingles Seite 124 Montag, 26. Januar 2009 4:29 16
Page 169 of 293

Driving
168
NoteTo ensure the acoustic parking aid works properly, the sensors must be kept
clean and free of snow and ice.Seat Parking System: Description
The parking system is an acoustic parking aid.Sensors are located in the rear bumper. When the sensors detect an obstacle,
you are alerted by acoustic signals (beeps). The measuring range of the
sensors starts at about:
The acoustic signals sound with increasing frequency as you approach the
obstacle. When the vehicle is less than approx. 0.30 m away from the
obstacle, the warning tone will sound continuously. Do not drive on!
The volume of the warning beeps will be gradually reduced after about 4
seconds if the vehicle remains at a constant distance from a detected
obstacle (it does not affect the permanent acoustic signal).
The parking aid is switched on automati cally when reverse gear is engaged.
You will hear a brief acknowledgement tone.
WARNING
•
The parking aid is not a replacement for driver awareness. The driver is
personally responsible for safe parking and other manoeuvres.
•
The sensors have blind spots in which obstacles are not registered.
Always look out for small children and animals because the system will not always detect them. Always pay attention when reversing to avoid acci-
dents.
•
Always keep a close eye on the area around the vehicle and make full
use of the rear-view mirrors.Caution
Please note that low obstacles detected by the system may no longer be
registered by the sensors as the car moves closer, so the system will not give
any further warning. Certain kinds of obstacles (such as wire fences, chains,
thin painted posts or trailer draw bars, etc) may not always be detected by the
system, so take care not to damage the vehicle in such cases.
Note
Please refer to the notes on towing ⇒page 170.Seat Parking system plus*: Description
The parking system plus is an acoustic and optical parking
aid.Sensors are located in the front and re ar bumpers. When the sensors detect
an obstacle, you are alerted by acoustic and optical signals. The measuring
range of the sensors starts at about:
Rear
Side
0,60
Centre
1,60
Front
Side
0,90
Centre
1,20
Rear
Side
0,60
Centre
1,60
WARNING (continued)
leon_ingles Seite 168 Montag, 26. Januar 2009 4:29 16
Page 170 of 293

Driving169
Safety First
Operating instructions
Practical tips
Te c h n i c a l D a t a
The acoustic signals sound with increasing frequency as you approach the
obstacle. When the vehicle is less than approx. 0.30 m away from the
obstacle, the warning tone will sound continuously. Stop moving immedi-
ately!
The volume of the warning beeps will be gradually reduced after about 4
seconds if the vehicle remains at a constant distance from a detected
obstacle (it does not affect the permanent acoustic signal).
Enabling/DisablingEnabling
– Connects the radionavigator.
–Press the switch
on the central console ⇒
fig. 128 or on the
gear selector gate. You will hear a brief acknowledgement tone
and the LED on the switch will light up. Disabling
– Drive forwards faster than 10 km/h, or
– Press the switch
or
– Switch the ignition off.
Segments in the optical display
Some colour segments in front and behind and an acoustic signal enable the
driver to assess the distance with respect to an obstacle. The ambar colour
segments combined with a discontinuous beep indicate the presence of an
obstacle. As the vehicle gets closer to the obstacle, the colour of the segment
changes to red and the acoustic signal beeps continuously. When the penul-
timate segment is displayed, this means that the vehicle has reached the
collision zone. Stop moving immediately! ⇒.
WARNING
•
The parking aid is not a replacement for driver awareness. The driver is
personally responsible for safe parking and other manoeuvres.
•
The sensors have blind spots in which obstacles are not registered.
Always look out for small children and animals because the system will not
always detect them. Always pay attention when reversing to avoid acci-
dents.
•
Always keep a close eye on the area around the vehicle and make full
use of the rear-view mirrors.Caution
Please note that low obstacles detected by the system may no longer be
registered by the sensors as the car moves closer, so the system will not give
any further warning. Certain kinds of ob stacles (such as wire fences, chains,
thin painted posts or trailer draw bars, etc) may not always be detected by the
system, so take care not to damage the vehicle in such cases.
Fig. 128 Centre console:
Switch for parking aid
leon_ingles Seite 169 Montag, 26. Januar 2009 4:29 16
Page 171 of 293

Driving
170
Note•
Please refer to the notes on towing ⇒page 170.
•
There is a slight delay in the picture display.
To w i n g b r a c k e tIn towing mode, the rear parking sensors are not enabled when you select
reverse gear or press the switch
. This function may not be guaranteed on
towing brackets that are not factory fitted . This results in the following restric-
tions:
SEAT parking system*
No warning is given.
SEAT parking system plus*
There is no rear distance warning. The system will still give a warning when
obstacles are detected while driving forwards. The optical display changes to
towing mode.
Fault messagesIf you hear a long beep for a few seconds and the LED on the switch
* starts
flashing when you switch on the parking aid, a system fault has occurred.
Please refer the problem to an Authori sed SEAT dealer or specialised work-
shop.
Note
If the fault is not corrected before you switch off the ignition, it will only be
indicated by the flashing LED on the switch
the next time you switch on
the parking aid.
Cruise control system (CCS)*Description
The cruise control system is able to maintain the set speed in
the range from approx. 30 km/h to 180 km/h.Once the speed setting has been saved, you may take your foot off the accel-
erator.
WARNING
It could be dangerous to use the cruise control system if it is not possible
to drive at constant speed.•
For safety reasons the cruise control system should not be used in
dense traffic, in sections with bends or where roads are in bad conditions
(e.g. aquaplanning, loose chippings, slippery surfaces, snow). Risk of acci-
dent.
•
Always switch the CCS off when finish to use it in order to avoid an
involuntary use.
•
It is dangerous to use a set speed which is too high for the current road,
traffic or weather conditions. Risk of accident.
leon_ingles Seite 170 Montag, 26. Januar 2009 4:29 16
Page 178 of 293

Intelligent technology177
Safety First
Operating instructions
Practical tips
Te c h n i c a l D a t a
•
With compact temporary spare wheel.
•
When using the snow chains.
•
When driving in deep snow or on soft terrain.
•
When the vehicle is bogged-down, to free it by “rocking.”
The TCS should be switched on again afterwards as soon as possible.
WARNING
•
It must be remembered that TCS cann ot defy the laws of physics. This
should be kept in mind, particular ly on slippery and wet roads and when
towing a trailer.
•
Always adapt your driving style to suit the condition of the roads and
the traffic situation. Do not let the extra safety afforded by TCS tempt you
into taking any risks when driving, this can cause accidents.Caution
•
In order to ensure that TCS function correctly, all four wheels must be
fitted with the same tyres. Any differences in the rolling radius of the tyres can
cause the system to reduce engine power when this is not desired.
•
Modifications to the vehicle (e.g. to the engine, the brake system, running
gear or any components affecting the wh eels and tyres) could affect the effi-
ciency of the ABS and TCS.
XDS*
Driveshaft differentialWhen taking a bend, the driveshaft differential mechanism allows the outer
wheel to turn at a higher speed than the inner wheel. In this way, the wheel
which is turning faster (outer wheel) receives less drive torque than the inner
wheel. This may mean that in certain situations the torque provided to the inner wheel is too high, causing the wheels to spin. On the other hand, the
outer wheel receives a lower drive torque than it could transmit. This causes
an overall loss of lateral grip on the front shaft, resulting in understeering or
“lengthening” of the path.
The XDS system is able, using the ESP sensors and signals, to detect and
correct this effect.
The XDS, via the ESP, brakes the inner wheel thus counteracting the excess
drive torque in this wheel. This means that the path requested by the driver
is more precise,
The XDS system operates in combination with the ESP and is always active,
even when the traction control, TCS, is disconnected.
Electronic stabilisation programme (ESP)*General notes
The electronic stabilisation programme increases the
vehicle's stability on the road.The electronic stabilisation programme helps to reduce the danger of skid-
ding.
The electronic stabilisation programme (ESP) consists of
ABS, EDL, TCS and
Steering manoeuvre recommendations.
Electronic Stabilising Program (ESP)*
ESP reduces the danger of skidding by braking the wheels individually.
The system uses the steering wheel angle and road speed to calculate the
changes of direction desired by the driver, and constantly compares them
with the actual behaviour of the vehi cle. If the desired course is not being
leon_ingles Seite 177 Montag, 26. Januar 2009 4:29 16
Page 179 of 293

Intelligent technology
178maintained (for instance, if the car is starting to skid), then the ESP compen-
sates automatically by braking the appropriate wheel.
The forces acting on the braked wheel bring the vehicle back to a stable
condition. If the vehicle tends to oversteer, the system will act on the front
wheel on the outside of the turn.
Steering manoeuvre recommendations
This is a complementary safety function included in the ESP This function aids
the driver to better stabilize the vehicle in a critical situation. For example, in
case of sudden braking surface with varied adherence, the vehicle will tend
to destabilize its trajectory to the right to or to the left. In this case the ESP
recognizes the situation and helps the driver with a counter steering
manoeuvre from the power steering.
This function simply provides the driver with a recommended manoeuvre in
critical situations.
The vehicle doesn't steer itself with this function, the driver has full control of
the vehicle at all times.
WARNING
•
It must be remembered that ESP cannot defy the laws of physics. This
should be kept in mind, particularly on slippery and wet roads and when
towing a trailer.
•
Always adapt your driving style to suit the condition of the roads and
the traffic situation. Do not let the extra safety afforded by ESP tempt you
into taking any risks when driv ing, this can cause accidents.Caution
•
In order to ensure that ESP functions correctly, all four wheels must be
fitted with the same tyres. Any differences in the rolling radius of the tyres can
cause the system to reduce engine power when this is not desired.
•
Modifications to the vehicle (e.g. to the engine, the brake system, running
gear or any components affecting the wheels and tyres) could affect the effi-
ciency of the ABS, EDL, ESP and TCS.
Anti-lock brake system (ABS)The anti-lock brake system prevents the wheels locking during braking
⇒ page 176.Electronic differential lock (EDL)*
The electronic differential lock helps prevent the loss of trac-
tion caused if one of the driven wheels starts spinning.EDL helps the vehicle to start moving, accelerate and climb a gradient in slip-
pery conditions where this may otherwise be difficult or even impossible.
The system will control the revolutions of the drive wheels using the ABS
sensors (in case of an EDL fault th e warning lamp for ABS lights up)
⇒ page 77.
At speeds of up to approximately 80 km/h, it is able to balance out differ-
ences in the speed of the driven wheels of approximately 100 rpm caused by
a slippery road surface on one side of the vehicle. It does this by braking the
wheel which has lost traction and distributing more driving force to the other
driven wheel via the differential.
To prevent the disc brake of the braking wheel from overheating, the EDL cuts
out automatically if subjected to excessive loads. The vehicle will continue to
function normally without EDL. For this reason, the driver is not informed that
the EDL has been switched off.
The EDL will switch on again automatically when the brake has cooled down.
leon_ingles Seite 178 Montag, 26. Januar 2009 4:29 16
Page 224 of 293

Wheels and tyres223
Safety First
Operating instructions
Practical tips
Te c h n i c a l D a t a
2. The tyre pressures should only be checked when the tyres are
cold. The slightly raised pressures of warm tyres must not be
reduced.
3. Adjust the tyre pressure to the load you are carrying.Tyre pressure
The correct tyre pressure is especially important at high speeds. The pressure
should therefore be checked at least once a month and before starting a
journey.
The sticker with the tyre pressure values can be found on the inside of the
tank flap. The tyre pressure values given are for cold tyres. The slightly raised
pressures of warm tyres must not be reduced ⇒.
WARNING
•
Check the tyre pressure at least once per month. Checking tyre pressure
value is very important. If the tyre pre ssure is too high or too low, there is
an increased danger of accidents - particularly at high speeds.
•
A tyre can easily burst if the pressure is too low, causing an accident!
•
At continuously high speeds, a tyre with insufficient pressure flexes
more. In this way it becomes too hot, and this can cause tread separation
and tyre blow-out. Always observe the recommended tyre pressures.
•
If the tyre pressure is too low or too high, the tyres will wear prema-
turely and the vehicle will not handle well. Risk of accident!For the sake of the environment
Under-inflated tyres will increase fuel consumption.
Tyre pressure monitoring*
The tyre pressure monitoring system constantly checks the
pressure of the tyres.The system uses the speed sensors of the ABS wheels. It operates by
analysing the speed and frequency spectrum of each wheel.
For optimum performance, use genuine SEAT tyres. In addition, check and
adjust tyre pressures regularly.
Whenever the tyre pressures are changed or one or more tyres are changed,
the system should be Reset by pressing the SET switch on the central console.
The system warns the driver in the event of a loss of pressure by means of
symbols and messages in the instrument cluster display. The system uses
ESP ⇒page 177.
Note that tyre pressure also depends on tyre temperature. Tyre pressure
increases about 0.1 bar for each 10°C in tyre temperature increase. The tyre
heats up while the vehicle is being driven and the tyre pressure will rise
accordingly. For this reason, you should only adjust the tyre pressures when
they are cold (i.e. approximately at ambient temperature).
To ensure that the tyre pressure monitoring system works reliably, you should
check and, if necessary, adjust the tyre pressures at regular intervals and
store the correct pressures (reference values) in the system.
A tyre pressure information label is attached to the inside of the fuel tank flap.
WARNING
•
Never adjust tyre pressure when the tyres are hot. This may damage or
even burst the tyres. Risk of accident!
•
An insufficiently inflated tyre flexes a lot more at high speeds and
causes significant heating of the ty re. Under these conditions, the tyre
bead may be released or the tyre may burst. Risk of accident!
leon_ingles Seite 223 Montag, 26. Januar 2009 4:29 16
Page 243 of 293

If and when
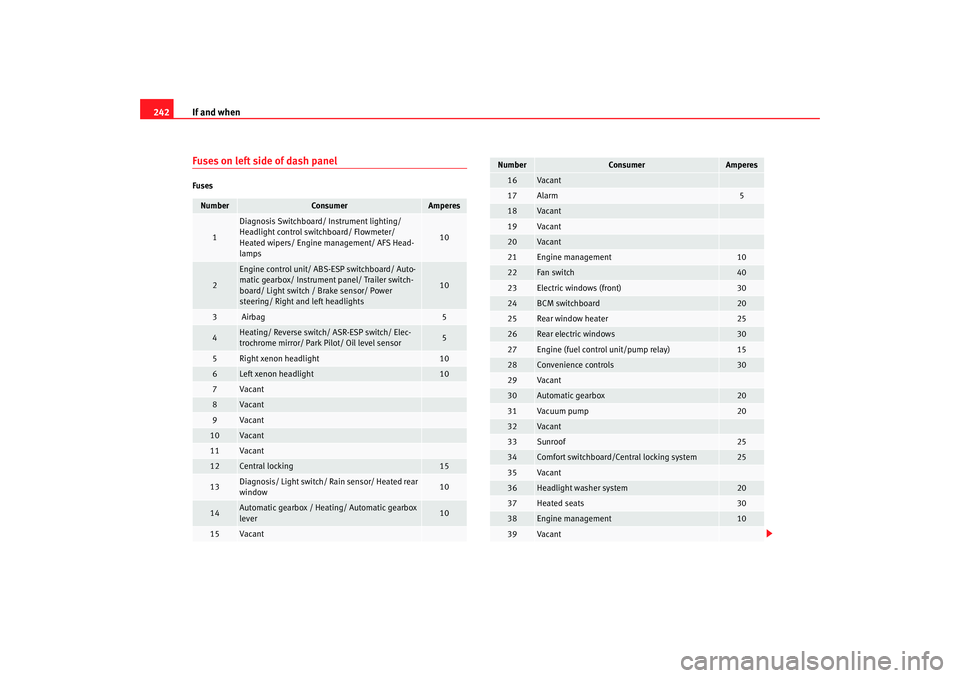
242Fuses on left side of dash panelFusesNumber
Consumer
Amperes
1
Diagnosis Switchboard/ Instrument lighting/
Headlight control switchboard/ Flowmeter/
Heated wipers/ Engine management/ AFS Head-
lamps
10
2
Engine control unit/ ABS-ESP switchboard/ Auto-
matic gearbox/ Instrument panel/ Trailer switch-
board/ Light switch / Brake sensor/ Power
steering/ Right an d left headlights
10
3
Airbag
5
4
Heating/ Reverse switch/ ASR-ESP switch/ Elec-
trochrome mirror/ Park Pilot/ Oil level sensor
5
5
Right xenon headlight
10
6
Left xenon headlight
10
7
Vacant
8
Vacant
9
Vacant
10
Vacant
11
Vacant
12
Central locking
15
13
Diagnosis/ Light switch/ Rain sensor/ Heated rear
window
10
14
Automatic gearbox / Heating/ Automatic gearbox
lever
10
15
Vacant
16
Va ca n t
17
Alarm
5
18
Va ca n t
19
Va ca n t
20
Va ca n t
21
Engine management
10
22
Fan switch
40
23
Electric windows (front)
30
24
BCM switchboard
20
25
Rear window heater
25
26
Rear electric windows
30
27
Engine (fuel control unit/pump relay)
15
28
Convenience controls
30
29
Va ca n t
30
Automatic gearbox
20
31
Vacuum pump
20
32
Va ca n t
33
Sunroof
25
34
Comfort switchboard/Central locking system
25
35
Va ca n t
36
Headlight washer system
20
37
Heated seats
30
38
Engine management
10
39
Va ca n t
Number
Consumer
Amperes
leon_ingles Seite 242 Montag, 26. Januar 2009 4:29 16