lock Seat Leon 5D 2013 MEDIA SYSTEM PLUS - NAVI SYSTEM
[x] Cancel search | Manufacturer: SEAT, Model Year: 2013, Model line: Leon 5D, Model: Seat Leon 5D 2013Pages: 72, PDF Size: 3 MB
Page 6 of 72
5IntroductionWARNINGAn armrest may obstruct the driver's arm movements, which could causeaccidents and severe injuries.●
Always keep the armrest closed while the vehicle is in motion.
WARNINGOpening the housing of a CD player can cause injury due to invisible la-ser radiation.●
CD players should only be repaired by a qualified workshop.
WARNINGThe recommendations and traffic signs shown by the navigation systemmay differ from the true traffic conditions.●
Traffic signs and traffic regulations have priority over the recommen-dations and displays provided by the navigation system.
●
Adjust your speed and driving style to visibility, road, traffic andweather conditions.
Note
Not inserting the data medium correctly, or inserting unsuitable data media,may damage the unit.●
When inserting the memory card, make sure it is in the correct position⇒ page 28.
●
If you push too hard, you could damage the lock on the memory cardslot.
●Only use suitable memory cards.●
The CD slot is equipped with a lock function. Do not force CDs into theslot.
●
Only have the CD player repaired by a specialised workshop.
●
If you insert a CD while another is already inside or is being ejected, thiscould damage the CD player unit. Always wait until the data medium hasbeen fully ejected!
Note
The CD drive can be damaged by any foreign objects attached to a data me-dium and by irregularly shaped data media.●
Only use standard 12 cm CDs!
●
Do not stick stickers or other items to the data media. Stickers may peeloff and damage the drive.
●
Do not use printable data media. Covers and stickers may peel off anddamage the drive.
●
Do not insert CD or DVD “singles” (8 cm) or CDs that are not round(“shape-CDS”).
●
Do not insert DVD Plus discs, dual discs or flip discs, as these are thickerthan normal CDs.
Note
Playing media at a very high or distorted volume can damage the speakersof the vehicle.
Page 10 of 72
9IntroductionAdjusting the base volumeeffectuseIncrease the vol-ume.Turn the volume control clockwise or turn the rightroller upwards on the multifunction steering wheel⇒ Booklet Instruction manual.
Lower the vol-ume.Turn the volume control anticlockwise or turn the rightthumbwheel downwards on the multifunction steeringwheel.
The volume modification is shown on the screen with a bar. During this timethe unit cannot be operated.
It is possible to preset certain volume settings and adjustments⇒ page 64.
Silence the unit
●
Turn the volume control anticlockwise until you see .
●
OR: Press the MUTE infotainment button.
Note
If the basic playback volume of an audio source has been increased sub-stantially, lower the volume before changing to another audio source.
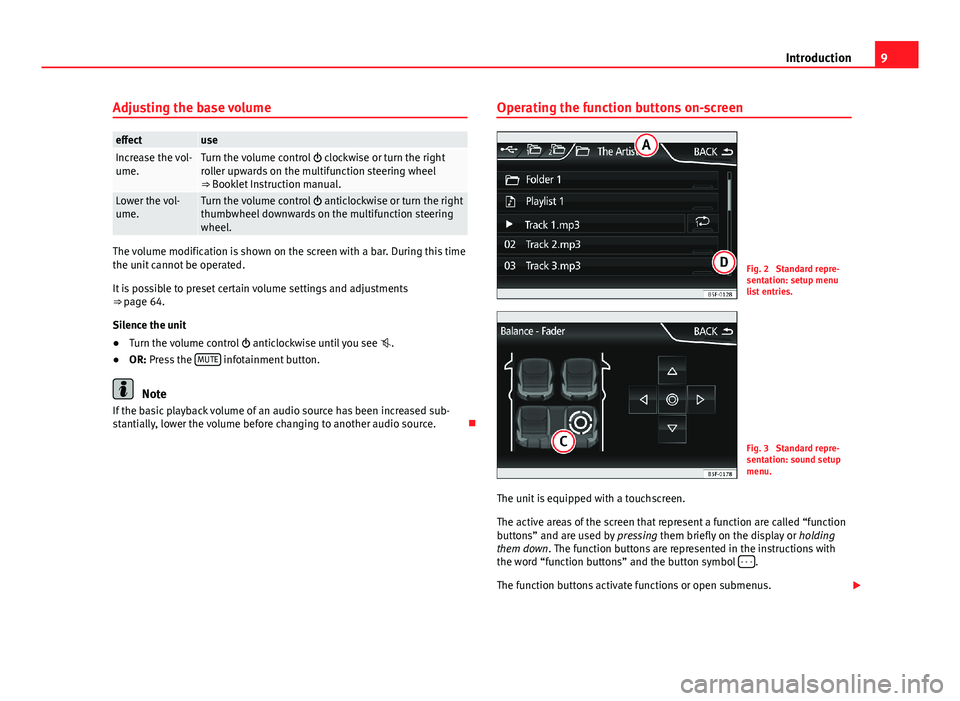
Operating the function buttons on-screenFig. 2
Standard repre-sentation: setup menulist entries.
Fig. 3
Standard repre-sentation: sound setupmenu.
The unit is equipped with a touchscreen.
The active areas of the screen that represent a function are called “functionbuttons” and are used by pressing them briefly on the display or holdingthem down. The function buttons are represented in the instructions withthe word “function buttons” and the button symbol - - -.
The function buttons activate functions or open submenus.
Page 15 of 72
14Audio modeName of the station and automatic station tracking
When the RDS is available, you can view the station names in the RADIOmain menu and in the list of FM stations.
The FM stations send different content under one name (for example, Radio2) in various regional frequencies, provisionally or permanently.
When driving, the automatic station tracking automatically changes to thefrequency that provides the best reception of the currently-selected station.As a result, you may lose the regional programme you are listening to.
The automatic change of frequencies and automatic station tracking can belinked through the FM setup ⇒ page 20.
Radio text
Some RDS-compatible stations also broadcast additional text informationknown as radio text.
The radio text is displayed in the top half of the screen, above the storedstation buttons.
The radio text display can be linked through the FM setup ⇒ page 20.
Note
●The radio stations are responsible for the content broadcast.●
Due to infrastructure issues, RDS functions may be limited in certaincountries, and you may not be able to use traffic reports, automatic stationtracking (AF) or programme types (PTY).
●
In some cases the name of the station is too long. This text may beblocked/unblocked by pressing on the station name for 3 seconds (a dotwill appear on the left and right of the station name).
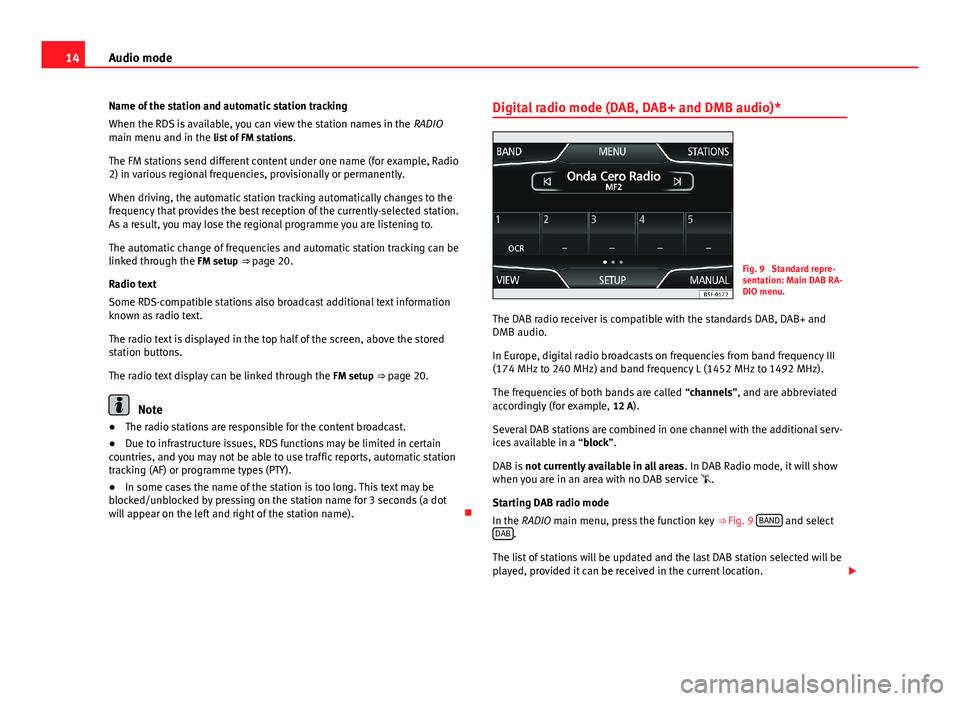
Digital radio mode (DAB, DAB+ and DMB audio)*Fig. 9
Standard repre-sentation: Main DAB RA-DIO menu.
The DAB radio receiver is compatible with the standards DAB, DAB+ andDMB audio.
In Europe, digital radio broadcasts on frequencies from band frequency III(174 MHz to 240 MHz) and band frequency L (1452 MHz to 1492 MHz).
The frequencies of both bands are called “channels”, and are abbreviatedaccordingly (for example, 12 A).
Several DAB stations are combined in one channel with the additional serv-ices available in a “block”.
DAB is not currently available in all areas. In DAB Radio mode, it will showwhen you are in an area with no DAB service .
Starting DAB radio mode
In the RADIO main menu, press the function key ⇒ Fig. 9 BAND and selectDAB.
The list of stations will be updated and the last DAB station selected will beplayed, provided it can be received in the current location.
Page 16 of 72
15Audio modeThe station selected at that time is shown on the top line of the screen. Theblock selected is shown underneath it ⇒ Fig. 9.
Additional DAB stations
Some DAB stations temporarily or permanently offer additional pro-grammes, (for example, for broadcasting sports events). Additional stationsare selected in the same way as the conventional DAB stations. The DABmain menu shows the name of the additional station set under the name ofthe main DAB station. The additional stations cannot be stored.
Automatic station tracking: change from DAB to FM
In DAB setup/Advanced setup you can change to the FM frequency band forautomatic station tracking.
When the DAB station you are listening to can no longer be received (for ex-ample, due to DAB no longer being available), the unit will try to locate andtune in this station in the FM band frequency.
For station tracking across various frequencies, the DAB station and the FMstation must broadcast the same station code, or the station in FM that cor-responds to the equivalent in DAB, must be indicated through the DAB.
When a corresponding FM station is found, it will show FM after the stationname. When its DAB equivalent can be received again, it will change to DABmode after a certain time. The FM indication will disappear.
When the signal of a DAB station is very weak and its FM equivalent cannotbe found, the radio will be muted.
DAB displays
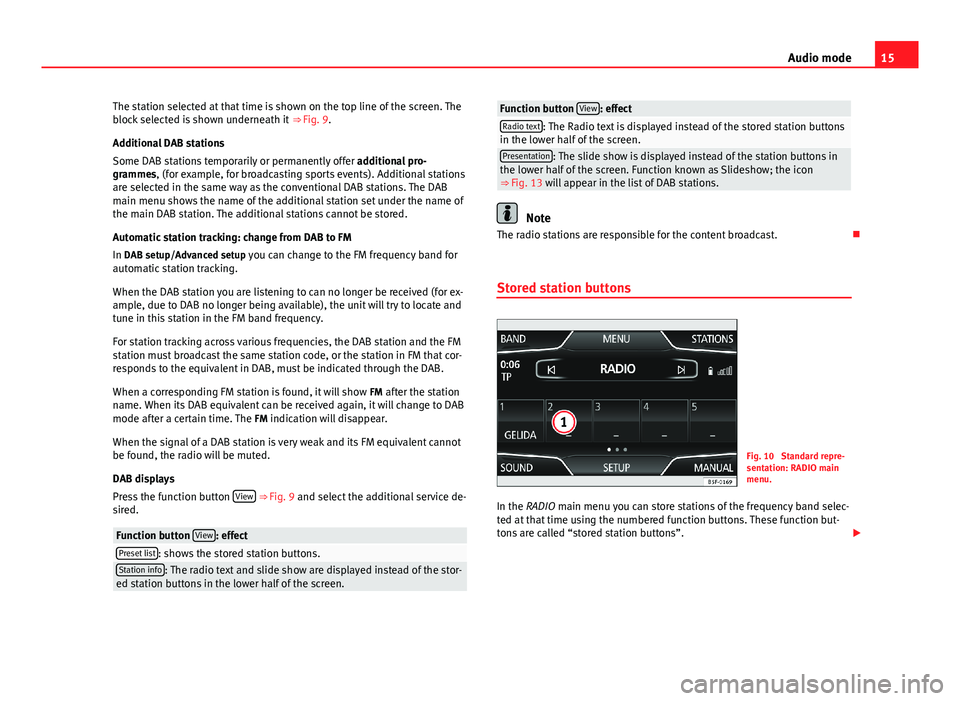
Press the function button View ⇒ Fig. 9 and select the additional service de-sired.
Function button View: effectPreset list: shows the stored station buttons.Station info: The radio text and slide show are displayed instead of the stor-ed station buttons in the lower half of the screen.Function button View: effectRadio text: The Radio text is displayed instead of the stored station buttonsin the lower half of the screen.Presentation: The slide show is displayed instead of the station buttons inthe lower half of the screen. Function known as Slideshow; the icon⇒ Fig. 13 will appear in the list of DAB stations.
Note
The radio stations are responsible for the content broadcast.
Stored station buttons
Fig. 10
Standard repre-sentation: RADIO mainmenu.
In the RADIO main menu you can store stations of the frequency band selec-ted at that time using the numbered function buttons. These function but-tons are called “stored station buttons”.
Page 18 of 72
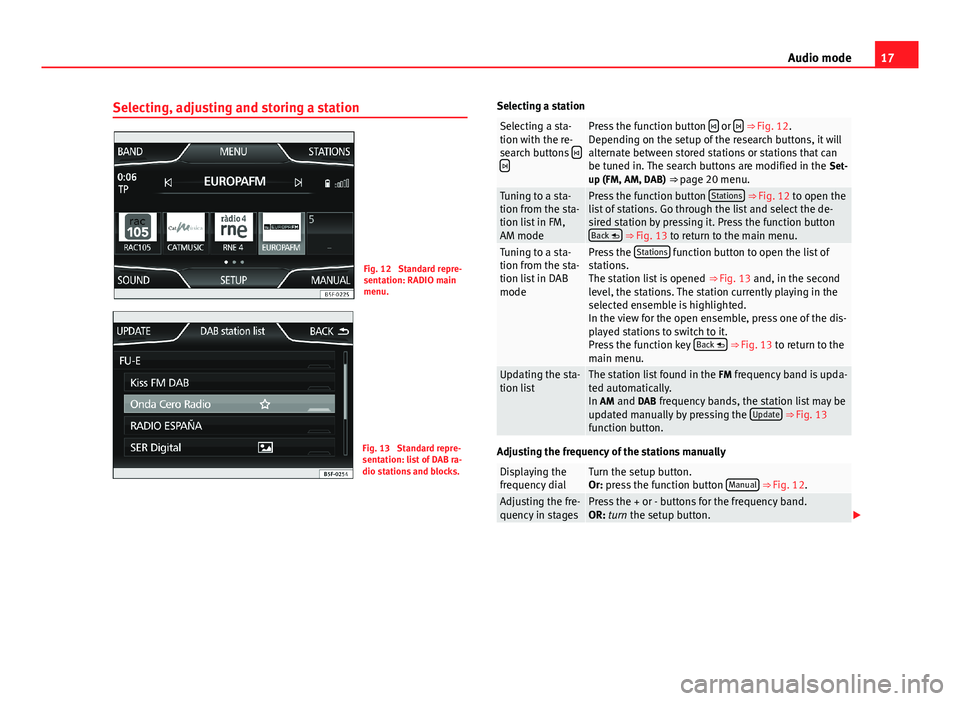
17Audio modeSelecting, adjusting and storing a stationFig. 12
Standard repre-sentation: RADIO mainmenu.
Fig. 13
Standard repre-sentation: list of DAB ra-dio stations and blocks.
Selecting a stationSelecting a sta-tion with the re-search buttons
Press the function button or ⇒ Fig. 12.Depending on the setup of the research buttons, it willalternate between stored stations or stations that canbe tuned in. The search buttons are modified in the Set-up (FM, AM, DAB) ⇒ page 20 menu.
Tuning to a sta-tion from the sta-tion list in FM,AM mode
Press the function button Stations ⇒ Fig. 12 to open thelist of stations. Go through the list and select the de-sired station by pressing it. Press the function buttonBack ⇒ Fig. 13 to return to the main menu.
Tuning to a sta-tion from the sta-tion list in DABmode
Press the Stations function button to open the list ofstations.The station list is opened ⇒ Fig. 13 and, in the secondlevel, the stations. The station currently playing in theselected ensemble is highlighted.In the view for the open ensemble, press one of the dis-played stations to switch to it.Press the function key Back ⇒ Fig. 13 to return to themain menu.
Updating the sta-tion listThe station list found in the FM frequency band is upda-ted automatically.In AM and DAB frequency bands, the station list may beupdated manually by pressing the Update ⇒ Fig. 13function button.
Adjusting the frequency of the stations manually
Displaying thefrequency dialTurn the setup button.Or: press the function button Manual ⇒ Fig. 12.Adjusting the fre-quency in stagesPress the + or - buttons for the frequency band.OR: turn the setup button.
Page 29 of 72
28Audio modeInserting and removing memory cards
Inserting a memory card
If a memory card cannot be inserted, ensure that it is positioned correctlyand is compatible with the unit.
Playback starts automatically if supported audio files are stored on thememory card.
Insert a compatible memory card, push it into the memory card slot with thecut-off corner first and facing upwards until it locks.
Removing a memory card
The memory card inserted must be prepared before it is ejected.
●
Press the infotainment button MENU; then, press Setup to open themenu System settings.
●
Press the function button Remove SD card 1 safely or Remove SD card 2 safely.After ejecting the memory card, the function button will be shown in grey.
●
Press the memory card inserted. The memory card jumps to the eject po-sition.
●
Remove the memory card.
Unreadable memory card
If you insert a memory card containing data that cannot be read, the unitwill not change to memory card mode after loading.
It will show the indication: There are no playable files available.
External audio source connected to the AUX-IN multimedia
socket
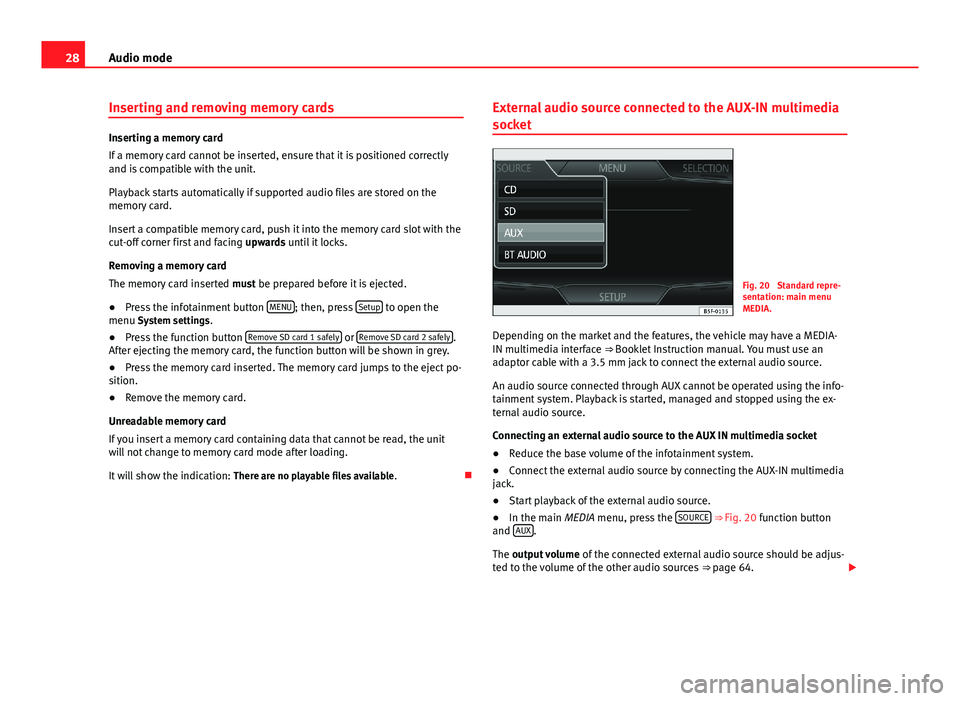
Fig. 20
Standard repre-sentation: main menuMEDIA.
Depending on the market and the features, the vehicle may have a MEDIA-IN multimedia interface ⇒ Booklet Instruction manual. You must use anadaptor cable with a 3.5 mm jack to connect the external audio source.
An audio source connected through AUX cannot be operated using the info-tainment system. Playback is started, managed and stopped using the ex-ternal audio source.
Connecting an external audio source to the AUX IN multimedia socket
●
Reduce the base volume of the infotainment system.
●
Connect the external audio source by connecting the AUX-IN multimediajack.
●
Start playback of the external audio source.
●
In the main MEDIA menu, press the SOURCE ⇒ Fig. 20 function buttonand AUX.
The output volume of the connected external audio source should be adjus-ted to the volume of the other audio sources ⇒ page 64.
Page 31 of 72
30Audio modeNotes and restrictions
The infotainment system enables you to view, play and manage compatibleaudio files through the MEDIA-IN multimedia interface.
In the case of MTP players and depending on the battery charge and thequantity of data, it may take a few minutes for them to be ready for use.
External hard discs with a capacity greater than 32 GB must, in certain cir-cumstances, be reformatted to the FAT32 file system. On the Internet, for ex-ample, you will find programs and instructions for this.
If the data carrier has several partitions, only the first partition will be recog-nised (except with USB, in which the first 2 will be visible). Take into ac-count all other instructions and limitations regarding requirements for me-dia sources.
Connecting and disconnecting an external data medium
●
Connect a suitable adaptor to the MEDIA-IN multimedia interface.
●
Connect the external data medium to the MEDIA-IN multimedia interfacevia the adapter.
●
If necessary, switch on the external data medium or select the appropri-ate data mode.
Regardless of any indications to the contrary that there may be on the mat-ter, the external data medium can be disconnected from the MEDIA-IN multi-media interface at any time without losing the data.
When disconnecting an iPod® or iPhone® from the adaptor, take care topress the two unlocking tabs on the narrow sides of the iPod® connector si-multaneously.
Operating the infotainment system
An external data medium that is correctly connected to the MEDIA-IN multi-media interface can be operated using the infotainment system.
●
In the main MEDIA menu, press the button SOURCE ⇒ Fig. 20 and selectUSB or iPod.... ⇒ page 29.
Other operations with the external data medium (changing tracks, selectingtracks and activating playback modes) are carried out as described in thecorresponding chapters.
iPod® and iPhone®
If you connect an iPod® or iPhone®, the top selection level will display thespecific lists of the iPod ( playlists, artist, album, title, pod-casts etc.). The appearance of these lists is similar to that of the media cen-tre, and they are managed as described.
Music management is blocked so it can be managed with the iPod® oriPhone® that is connected.
The playback volume of some iPods® or iPhones® can adapt to the volumeof the other audio sources ⇒ page 29.
Files from iPods® or iPhones® cannot be imported.
Possible error messages after connecting an external data mediumError messageCauseProcedureDevice not suppor-tedThe external data me-dium cannot be played– Consult the list of suppor-ted devices on the web.– When possible, update thesoftware of the external datamedium.
Unit not operationalCommunication fault.Check the connection andmake sure the external datamedium is working correctly.
Due to the large number of different data media available, it is not possi-ble to guarantee fault-free operation of all functions described here.
Page 40 of 72
39NavigationNote●If you miss a turning during route guidance and are currently unable toturn back, keep on driving until the navigation system offers a new route.●
The quality of the instructions given by the unit will depend on the navi-gation data available and the traffic reports received.
Route
Press the Route function button in the main navigation menu ⇒ Fig. 26.
The function button Route is only displayed when the guided navigation isactivated.
Function button: effectStop Route: stops the guided navigation underway.New destination: Enter a new destination ⇒ page 37 and accept it in the des-tination pop-up window as an intermediate or final destination.Route information: view information related to the route underway. Save: stores the destination currently selected in the destinationmemory.Route list: shows the roads you must drive along on the route, aswell as the respective section.
Congestion ahead: blocks the section ahead (from 0.2 to 10 km) of the routeunderway to, for example, avoid congestion. To unblock, press the func-tion button Route and then, Cancel congestion.
My destinations (destination memory)●
Press the My destinations button in the main navigation menu ⇒ Fig. 26.
●
Select the desired function button (Store position, Destinations and con-tacts or Home address).
1. Store current position
●
Press the function button Store position, to store the position indicated asa target flag in the Destination memory.
To save the stored position permanently, change the name of the position inthe destination memory. Otherwise the stored position will be overwrittenthe next time a flagged destination is stored.
In the following data entry mask you can modify the name. To save the des-tination, press the function button .
2. Destinations and contacts
Press the function button Options in the menu of Destinations and contacts..
Function button: effectRecent destinations: shows the destinations for which guided navigation hasalready been started.Dest. memory: Display of the destinations stored manually and importedvCards ⇒ page 45.Favourites: display of the destinations stored as favourites.Contacts: display of the entries in the telephone book with addresses stor-ed.
3. Home address
Only one address or position can be stored as the home address at any onetime. The stored home address can be edited or overwritten.
If there is a private address already stored, the guided navigation to this ad-dress will begin.
Page 44 of 72
43Navigationwith traffic. The quality of the dynamic route guidance depends on the infor-mation contained in the TMC traffic reports. The radio stations broadcastingthis information are responsible for the content.
The route to cover can also be blocked manually to force a new route to becalculated ⇒ page 39.
TMC traffic reports on the map
Icon: meaning: queues: traffic jam: accident: slippery ground: danger of skidding: danger: roadworks: strong wind: road closed
During guided navigation, traffic incidents that affect the calculated routeare represented in red, while those that do not are represented in grey.
The length of a traffic incident along the route calculated is represented bya red line.
The TMC symbol is located at the start of the traffic delay, provided it hasbeen defined clearly in the TMC traffic report.
Depending on the scale of the map, other congestion icons may be hiddenbehind one TMC icon. In this case, press the TMC icon and a list will openwith further traffic incidents present.
●
Select the desired entry by pressing it.
Guide to the destination in demonstration mode (Demo)
If, in the menu Navigation setup, Demo mode is active ⇒ page 44, an addi-tional pop-up window will appear when guided navigation starts.
●
Pressing the function button Demo mode starts a “virtual” guided naviga-tion to the final destination indicated.
●
If you press the function button Normal mode, the “real” guided naviga-tion will begin.
The sequence of events and the operations in virtual route guidance aresimilar to those in real route guidance.
Virtual route guidance is repeated when you reach the fictitious destinationand always starts again from the starting point if it is interrupted.
If in the menu Navigation setup the starting point of the Demo mode was de-termined manually, the virtual guided navigation will begin from this posi-tion.
If the vehicle is moved and the unit can determine its current location byGPS, any manually entered starting point will be overwritten with the currentvehicle location.
When real route guidance is started following virtual route guidance indemo mode, the unit first has to reorient itself. This orientation can lastsome time depending on the number of satellites that are received at thattime. Moving the vehicle may speed up the reorientation process.
Note
Deactivate the Demo mode after use, because otherwise before starting gui-ded navigation you will always have to select whether you want virtual orreal navigation.
Page 51 of 72
50Telephone management (PHONE)●If you detect any strange behaviour between your mobile phone and theradio, restart your mobile by switching it off and on again.●
Consult the compatibility list to ensure your mobile phone will workproperly.
●
Most electronic devices are shielded against high-frequency radio sig-nals. On certain occasions, nevertheless, electronic equipment might notbe protected against the radio frequency signals of the telephone manage-ment (Phone). This may produce interference.
Places with special regulations
Switch off the mobile phone and the preinstallation for mobile telephonesin places with risk of explosion. These areas are common but are not alwaysclearly marked ⇒ in Introduction on page 49. They include, for example:
●
Areas with piping and reservoirs containing chemical products.
●
Below deck, on boats and ferries.
●
Near vehicles that run on liquefied gas (such as propane or butane).
●
In places where there are chemical substances or particles such as flour,dust or metal chips in the air.
●
In any other place where you must turn off the engine of your vehicle.
WARNINGSwitch off your mobile phone in places with risk of explosion! Your mo-bile phone will automatically connect to the mobile phone network assoon as the Bluetooth connection is cut from the mobile preinstallation.
NoteIn areas with special requirements and where the use of mobile phones isprohibited, you must keep the mobile phone and its preinstallation switch-ed off at all times. The radiation emitted by mobile phones when switchedon can cause interference in sensitive technical and medical equipment,which could damage this equipment or cause it to stop working properly.
Linking and connecting your mobile phone to the
infotainment system
To operate a mobile phone through the infotainment system, you need tolink both devices one time only.
For your safety, we recommend you make the link when the vehicle is sta-tionary. In some countries you cannot make the link with the vehicle run-ning.
You must guarantee the following setup in the mobile phone and the info-tainment system:
●
The Bluetooth® function must be active and visible on the mobile phoneand infotainment system, respectively.
●
The keypad lock of the mobile phone must be disconnected.
●
The notification and key tones of your mobile phone must be disconnec-ted.
In some countries, after switching the ignition on, the Bluetooth® functionof the infotainment system should be activated or remain visible for around3 minutes.
During the linking process you must enter data using your mobile phone'skeypad. To do so, you must have your mobile phone to hand.
Once the link has been made, the schedule and call lists stored in your mo-bile phone will be loaded. The duration of the loading process depends on