display Seat Leon 5D 2013 Owner's Guide
[x] Cancel search | Manufacturer: SEAT, Model Year: 2013, Model line: Leon 5D, Model: Seat Leon 5D 2013Pages: 339, PDF Size: 4.8 MB
Page 78 of 339

76Driver information system
Multifunction display memory
The multifunction display is equipped with three memories that work auto-
matically: MFD from departure, MFD from refuelling, MFD total calculation.
On the screen display, you can read which memory is currently displayed.
To change between memories with the ignition on and the memory shown,
press the button
on the windscreen wiper lever or you can also
change between memories using the button on the multifunction steer-
ing wheel.
Menueffect
MFD from de-
parture
Display and storage of the values for the journey and the
consumption from when the ignition is switched on to
when it is switched off.
If the journey is continued in less than 2 hours after the ig-
nition is switched off, the new data is added to the data al-
ready stored in the memory. The memory will automatically
be deleted if the journey is interrupted for more than two
hours.
MFD from re-
fuellingDisplay and storage of the values for the journey and the
consumption. By refuelling, the memory will be erased au-
tomatically.
MFD total cal-
culation
The memory records the values for a specific number of
partial trips, up to a total of 19 hours and 59 minutes or 99
hours and 59 minutes, or 1999.9 km (or miles) or 9999 km
(or miles), depending on the model of instrument panel.
On reaching either of these limits a)
, the memory is auto-
matically erased and starts to count from 0 again.
a) It varies according to the type of instrument panel fitted.
Erasing a memory manually
● Select the memory that you wish to erase.
● Press and hold the button
on the windscreen wiper lever or the
button on the multifunction steering wheel for about 2 seconds. Personalising the displays
In the Easy Connect system you can adjust which of the possible displays of
the MFD can be shown on the instrument panel display with the button
and the function button Setup ⇒ page 79.
DisplaysMenueffect
Current fuel con-
sumptionThe current fuel consumption display operates through-
out the journey, in litres/100 km; and with the engine
running and the vehicle stopped, in litres/hour.
Average fuel con-
sumption
After turning on the ignition, average fuel consumption
in litres/100 km will be shown after travelling approxi-
mately 100 metres. Otherwise horizontal lines are dis-
played. The value shown is updated approximately ev-
ery 5 seconds.
Operating range
Approximate distance in km that can still be travelled
with the fuel remaining in the tank, assuming the same
style of driving is maintained. This is calculated using
the current fuel consumption.
Journey durationThis indicates the hours (h) and minutes (min) since
the ignition was switched on.
Distance coveredDistance covered in km (m) after switching on the igni-
tion.
CNG quality
Whenever you refuel, an automatic check is run on the
quality of the natural gas and is displayed after the ig-
nition is switched on. The indication is given as a per-
centage of between 70 % and 100 %. The greater the
percentage, the lower the consumption.
Average speed
The average speed will be shown after a distance of ap-
proximately 100 metres has been travelled. Otherwise
horizontal lines are displayed. The value shown is up-
dated approximately every 5 seconds.
Digital display of
speedCurrent speed displayed in digital format.
Page 79 of 339
77
Driver information system
DisplaysMenueffectSpeed warning at
--- km/h or Speed
warning at --- mphIf the stored speed is exceeded (between 30 - 250 km/
h, or 19 - 155 mph), an audible warning is given to-
gether with a visual warning.
Oil temperatureUpdated engine oil temperature digital displayCoolant tempera-
ture gaugeDigital display of the current temperature of the liquid
coolant.
Storing a speed for the speed warning
● Select the display Speed warning at --- km/h (--- mph)
● Press the button
on the windscreen wiper lever or the button on the multifunction steering wheel to store the current speed and activate
the warning.
●
If necessary, adjust the desired speed within 5 seconds using the rocker
switch
on the windscreen wiper lever or by turning the thumbwheel on
the multifunction steering wheel. Next, press the button or again
or wait several seconds. The speed is stored and the warning activated.
● To deactivate it press the button
or the button . The stored
speed is deleted.
Assist systems submenu
Assist systems
menueffect
Lane Assist*Switching the Lane Assist system on or off ⇒ page 210.Tiredness detec-
tion*Switching the tiredness detection on or off (pause recom-
mendation) ⇒ page 213.Engine oil temperature display
Vehicles without multifunction steering wheel
–
To display the temperature of the engine oil, press the rocker
switch ⇒ Fig. 42 2
until the main menu appears. Enter into
Journey data . With the button 2 move to the oil temperature
gauge.
Vehicles with multifunction steering wheel
– To display the engine oil temperature, enter the submenu Jour-
ney data and turn the thumbwheel until the oil temperature dis-
play appears.
The engine reaches its operating temperature when in normal driving condi-
tions, the oil temperature is between 80 °C (180 °F) and 120 °C (250 °F). If
the engine is required to work hard and the outside temperature is high, the
engine oil temperature can increase. This does not present any problem as
long as the warning lamps ⇒ page 69 or ⇒ page 70 do not appear on
the display.
Additional electrical appliances
– Operation with the windscreen wiper lever*: Press the rocker
switch ⇒ Fig. 42 2 until the main menu appears. Enter into the
section Journey data . With the rocker switch, move to the display
Convenience appliances.
– Operation with the multifunction steering wheel*: Move with
the buttons 1
or 2 to Journey data
and enter with OK. Turn the
thumbwheel to the right until the Convenience appliances dis-
play appears.
Safety FirstOperating instructionsPractical TipsTechnical specifications
Page 80 of 339
78Driver information system
In addition, a scale will inform you of the current sum of all the additional
appliances.
Saving tips
Tips on how to save fuel will be displayed in certain conditions that
contribute to increased consumption. Following these tips could
reduce the fuel consumption of your vehicle. The displays appear
automatically and will only be shown with the efficiency pro-
gramme. After a time, the saving tips will disappear automatically.
– If you wish to hide a saving tip immediately after it appears,
press any button on the windscreen wiper lever*/multifunction
steering wheel*.
Note
● If you hide a saving tip, it will reappear after you switch the ignition on
again.
● The saving tips do not appear in all situations, but rather with a large
separation of time.
Page 81 of 339
79
Introduction to the Easy Connect system*
Introduction to the Easy Connect system* System settings (CAR)*Introduction
To select the settings menus, press the Easy Connect button and the
Setup function button.
The actual number of menus available and the name of the various options
in these menus will depend on the vehicle’s electronics and equipment.
Additional information and warnings:
● Driver assistance systems ⇒ page 184
WARNING
Any distraction may lead to an accident, with the risk of injury. Operating
the Easy Connect system while driving could distract you from traffic.
CAR menu (Setup) settings
– Switch the ignition on.
– Switch on the Easy Connect system.
– Press the Easy Connect button
.
– Press the Setup
function button to open the main Vehicle set-
tings menu . Pressing the menu button will always take you to the last menu
used.
Function buttons in the
vehicle’s settings menuPageESC system⇒ page 79Tyres⇒ page 80Driver assistance⇒ page 80Parking and manoeuvring⇒ page 81Vehicle lights⇒ page 82Rear vision mirrors and windscreen wipers⇒ page 82Opening and closing⇒ page 83Multifunction display⇒ page 83Date and time⇒ page 84Units⇒ page 84Service⇒ page 85Factory settings⇒ page 85
Any changes made using the settings menus are automatically saved on
closing those menus.
WARNING
Any distraction may lead to an accident, with the risk of injury. Operating
the Easy Connect system while driving could distract you from traffic.
ESC System menu
–Switch the ignition on.
Safety FirstOperating instructionsPractical TipsTechnical specifications
Page 83 of 339
81
Introduction to the Easy Connect system*
– Press the Driver assistance
function button to open the Driver as-
sistance settings menu.
When the function button check box is activated , the function is active.
Pressing the menu button
will always take you to the last menu used.
MenuSubmenuPossible settingDescription
Driver Assis-
tance settings
ACC (Adaptive
Cruise Control)
Activation and deacti-
vation of the setting
that takes the last dis-
tance selected.
The following functions
can be set:
– Driving programme
– Time distance to the
vehicle ahead (level of
distance)
⇒ page 189
Front Assist
The following functions
can be switched on
and off:
– Monitoring System
– Pre-warning
– Distance warning
display
⇒ page 202
City emergency
braking functionCity emergency brak-
ing function switch on
and off
Lane Assist (sys-
tem warning you if
you leave the lane)Lane Centring Assist⇒ page 207Activation/deactiva-
tion
Tiredness detec-
tionActivation/deactiva-
tion⇒ page 213
Any changes made using the settings menus are automatically saved on
closing those menus.
WARNING
Any distraction may lead to an accident, with the risk of injury. Operating
the Easy Connect system while driving could distract you from traffic.
Parking and Manoeuvring Settings menu
–Switch the ignition on.
– Switch on the Easy Connect system.
– Press the Easy Connect button
.
– Press the Setup
function button.
– Press the Parking and manoeuvring
button to open the Parking and
manoeuvring settings menu.
When the function button check box is activated , the function is active.
Pressing the menu button
will always take you to the last menu used.
MenuSubmenuPossible settingDescription
Parking and Ma-
noeuvring set-
tingsParkPilot
Automatically acti-
vate, front volume,
front sound settings,
rear volume, rear
sound settings, ad-
just volume.
⇒ page 217
Any changes made using the settings menus are automatically saved on
closing those menus.
Safety FirstOperating instructionsPractical TipsTechnical specifications
Page 85 of 339
83
Introduction to the Easy Connect system*
Any changes made using the settings menus are automatically saved on
closing those menus.
WARNING
Any distraction may lead to an accident, with the risk of injury. Operating
the Easy Connect system while driving could distract you from traffic.
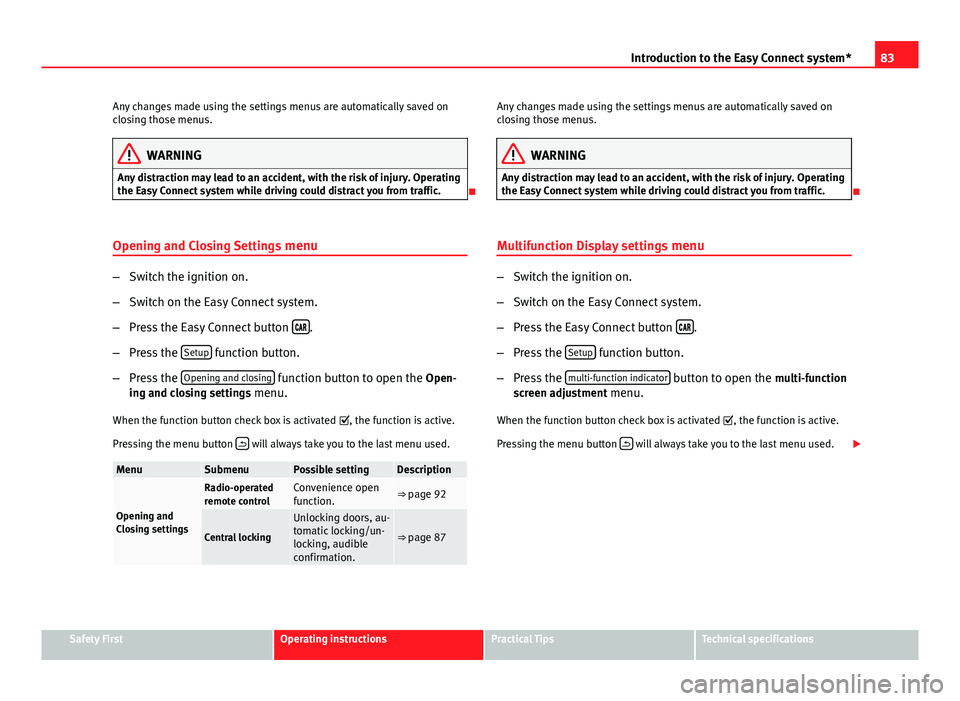
Opening and Closing Settings menu
–Switch the ignition on.
– Switch on the Easy Connect system.
– Press the Easy Connect button
.
– Press the Setup
function button.
– Press the Opening and closing
function button to open the Open-
ing and closing settings menu.
When the function button check box is activated , the function is active.
Pressing the menu button
will always take you to the last menu used.
MenuSubmenuPossible settingDescription
Opening and
Closing settings
Radio-operated
remote controlConvenience open
function.⇒ page 92
Central locking
Unlocking doors, au-
tomatic locking/un-
locking, audible
confirmation.
⇒ page 87
Any changes made using the settings menus are automatically saved on
closing those menus.
WARNING
Any distraction may lead to an accident, with the risk of injury. Operating
the Easy Connect system while driving could distract you from traffic.
Multifunction Display settings menu
–Switch the ignition on.
– Switch on the Easy Connect system.
– Press the Easy Connect button
.
– Press the Setup
function button.
– Press the multi-function indicator
button to open the multi-function
screen adjustment menu.
When the function button check box is activated , the function is active.
Pressing the menu button
will always take you to the last menu used.
Safety FirstOperating instructionsPractical TipsTechnical specifications
Page 87 of 339
85
Introduction to the Easy Connect system*
When the menu appears, choose the desired option.
Pressing the menu button
will always take you to the last menu used.
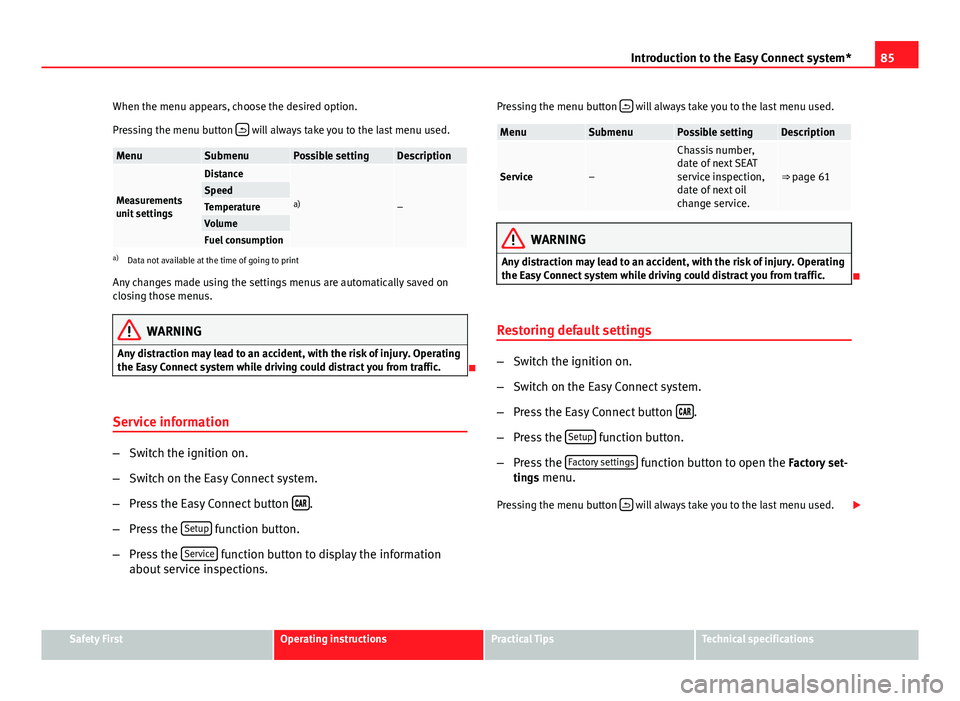
MenuSubmenuPossible settingDescription
Measurements
unit settings
Distance
a)–SpeedTemperatureVolumeFuel consumptiona)
Data not available at the time of going to print
Any changes made using the settings menus are automatically saved on
closing those menus.
WARNING
Any distraction may lead to an accident, with the risk of injury. Operating
the Easy Connect system while driving could distract you from traffic.
Service information
– Switch the ignition on.
– Switch on the Easy Connect system.
– Press the Easy Connect button
.
– Press the Setup
function button.
– Press the Service
function button to display the information
about service inspections. Pressing the menu button
will always take you to the last menu used.
MenuSubmenuPossible settingDescription
Service–
Chassis number,
date of next SEAT
service inspection,
date of next oil
change service.
⇒ page 61
WARNING
Any distraction may lead to an accident, with the risk of injury. Operating
the Easy Connect system while driving could distract you from traffic.
Restoring default settings
– Switch the ignition on.
– Switch on the Easy Connect system.
– Press the Easy Connect button
.
– Press the Setup
function button.
– Press the Factory settings
function button to open the Factory set-
tings menu.
Pressing the menu button
will always take you to the last menu used.
Safety FirstOperating instructionsPractical TipsTechnical specifications
Page 89 of 339
87
Opening and closing
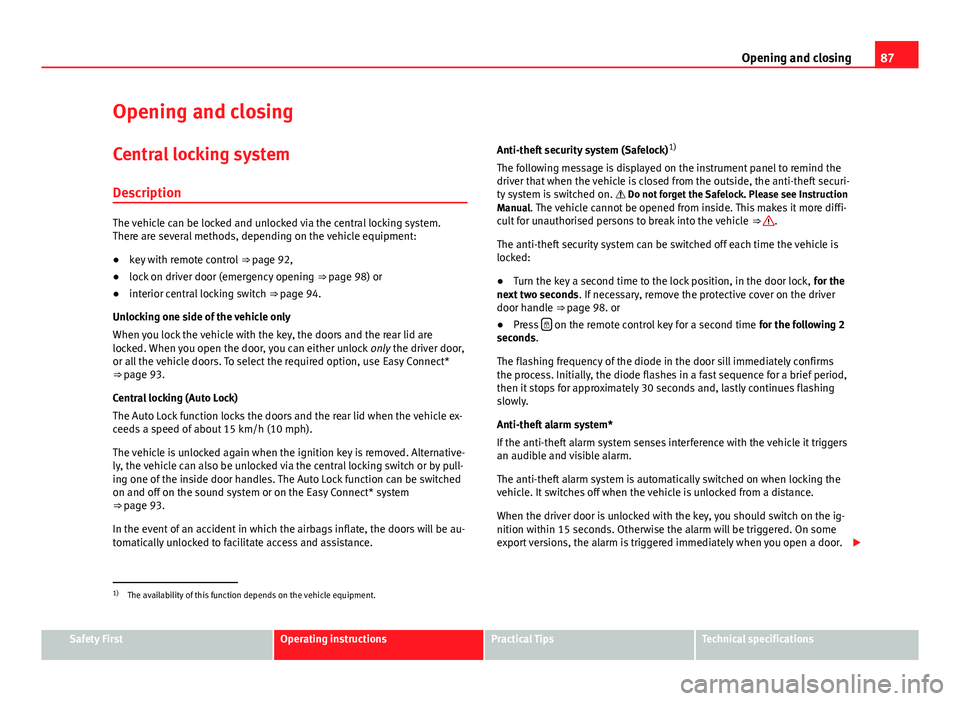
Opening and closing Central locking system
Description
The vehicle can be locked and unlocked via the central locking system.
There are several methods, depending on the vehicle equipment:
● key with remote control ⇒ page 92,
● lock on driver door (emergency opening ⇒ page 98) or
● interior central locking switch ⇒ page 94.
Unlocking one side of the vehicle only
When you lock the vehicle with the key, the doors and the rear lid are
locked. When you open the door, you can either unlock only the driver door,
or all the vehicle doors. To select the required option, use Easy Connect*
⇒ page 93.
Central locking (Auto Lock)
The Auto Lock function locks the doors and the rear lid when the vehicle ex-
ceeds a speed of about 15 km/h (10 mph).
The vehicle is unlocked again when the ignition key is removed. Alternative-
ly, the vehicle can also be unlocked via the central locking switch or by pull-
ing one of the inside door handles. The Auto Lock function can be switched
on and off on the sound system or on the Easy Connect* system
⇒ page 93.
In the event of an accident in which the airbags inflate, the doors will be au-
tomatically unlocked to facilitate access and assistance. Anti-theft security system (Safelock)
1)
The following message is displayed on the instrument panel to remind the
driver that when the vehicle is closed from the outside, the anti-theft securi-
ty system is switched on. Do not forget the Safelock. Please see Instruction
Manual. The vehicle cannot be opened from inside. This makes it more diffi-
cult for unauthorised persons to break into the vehicle ⇒ .
The anti-theft security system can be switched off each time the vehicle is
locked:
● Turn the key a second time to the lock position, in the door lock, for the
next two seconds . If necessary, remove the protective cover on the driver
door handle ⇒ page 98. or
● Press
on the remote control key for a second time
for the following 2
seconds.
The flashing frequency of the diode in the door sill immediately confirms
the process. Initially, the diode flashes in a fast sequence for a brief period,
then it stops for approximately 30 seconds and, lastly continues flashing
slowly.
Anti-theft alarm system*
If the anti-theft alarm system senses interference with the vehicle it triggers
an audible and visible alarm.
The anti-theft alarm system is automatically switched on when locking the
vehicle. It switches off when the vehicle is unlocked from a distance.
When the driver door is unlocked with the key, you should switch on the ig-
nition within 15 seconds. Otherwise the alarm will be triggered. On some
export versions, the alarm is triggered immediately when you open a door.
1)
The availability of this function depends on the vehicle equipment.
Safety FirstOperating instructionsPractical TipsTechnical specifications
Page 102 of 339
100Opening and closing
Rear lid (luggage compartment)
Rear lid
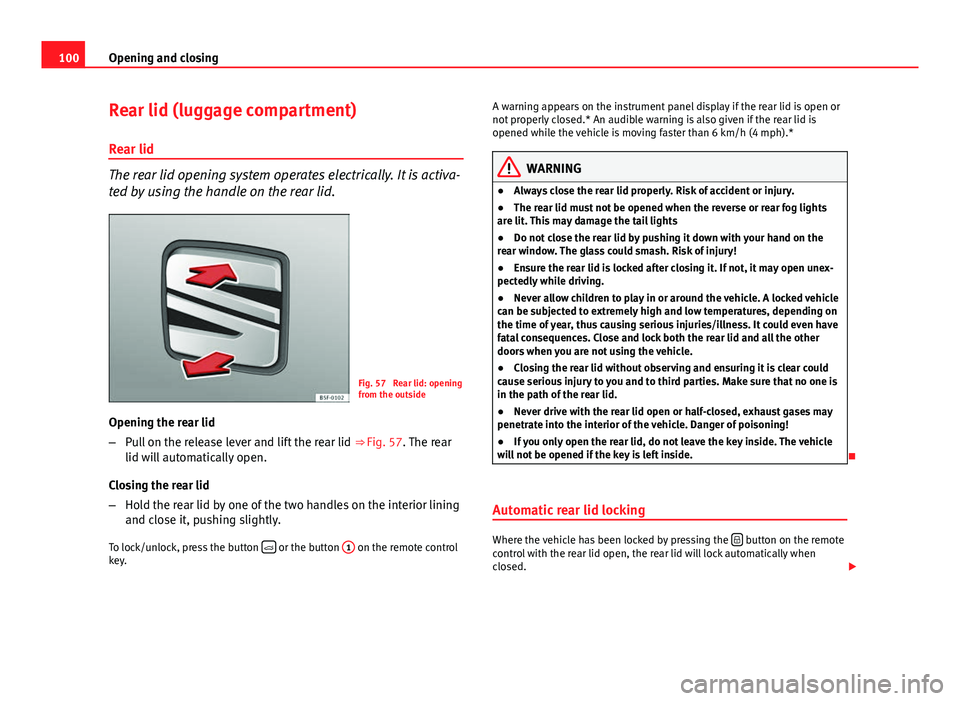
The rear lid opening system operates electrically. It is activa-
ted by using the handle on the rear lid.
Fig. 57 Rear lid: opening
from the outside
Opening the rear lid
– Pull on the release lever and lift the rear lid ⇒ Fig. 57. The rear
lid will automatically open.
Closing the rear lid
– Hold the rear lid by one of the two handles on the interior lining
and close it, pushing slightly.
To lock/unlock, press the button
or the button
1 on the remote control
key. A warning appears on the instrument panel display if the rear lid is open or
not properly closed.* An audible warning is also given if the rear lid is
opened while the vehicle is moving faster than 6 km/h (4 mph).*
WARNING
● Always close the rear lid properly. Risk of accident or injury.
● The rear lid must not be opened when the reverse or rear fog lights
are lit. This may damage the tail lights
● Do not close the rear lid by pushing it down with your hand on the
rear window. The glass could smash. Risk of injury!
● Ensure the rear lid is locked after closing it. If not, it may open unex-
pectedly while driving.
● Never allow children to play in or around the vehicle. A locked vehicle
can be subjected to extremely high and low temperatures, depending on
the time of year, thus causing serious injuries/illness. It could even have
fatal consequences. Close and lock both the rear lid and all the other
doors when you are not using the vehicle.
● Closing the rear lid without observing and ensuring it is clear could
cause serious injury to you and to third parties. Make sure that no one is
in the path of the rear lid.
● Never drive with the rear lid open or half-closed, exhaust gases may
penetrate into the interior of the vehicle. Danger of poisoning!
● If you only open the rear lid, do not leave the key inside. The vehicle
will not be opened if the key is left inside.
Automatic rear lid locking
Where the vehicle has been locked by pressing the button on the remote
control with the rear lid open, the rear lid will lock automatically when
closed.
Page 117 of 339
115
Lights and visibility
Switching the main beam assist on and off
effectuse
Activate:
– Switch the ignition on and turn the light switch to position
.
– From the base position, move the main beam and turn signal
lever forwards ⇒ page 110. When the warning lamp is dis-
played on the instrument panel display, the main beam assist is
switched on.
To
switch
system off:
– Switch off the ignition.
– OR: Turn the light switch to a different position to
⇒ page 111.
– OR: with main beam on, move the main beam and turn signal
lever backwards.
– OR: Move the main beam and turn signal lever forwards to
manually switch main beam on. The main beam assist will then
be deactivated.
Malfunctions
The following conditions may prevent the main beam headlight control from
turning off the headlights in time or from turning off altogether:
● In poorly lit towns with highly reflective signs.
● Other insufficiently lit road users (such as pedestrians or cyclists).
● On tight bends and steep slopes (bumps) and when oncoming vehicles
are partially obscured.
● When the drivers of other oncoming vehicles (such as a truck) can see
over a guard rail in the centre of the road.
● If the camera is damaged or the power supply is cut off.
● In fog, snow and heavy rain.
● With dust and sand turbulence.
● With loose gravel in the field of vision of the camera.
● When the field of vision of the camera is misted up, dirty or covered by
stickers, snow, ice...
WARNING
The convenience features of the main beam assist should not encourage
the taking of risks. The system is not a replacement for driver concentra-
tion.
● You are always in control of the main beam and adapting it to the
light, visibility and traffic conditions.
● It is possible that the main beam headlight control does not recog-
nise all driving situations and is limited under certain circumstances.
● When the field of vision of the camera is dirty, covered or damaged,
operation of the main beam control may be affected. This also applies
when changes are made to the vehicle lighting system, for example, if
additional headlights are installed.
CAUTION
To avoid affecting the operation of the system, take the following points in-
to consideration:
● Clean the field of vision of the camera regularly and make sure it is free
of snow and ice.
● Do not cover the field of vision of the camera.
● Check that the windscreen is not damaged in the area of the field of vi-
sion of the camera.
Note
Main beam and headlight flasher can be turned on and off manually at any
time with the turn signal and main beam lever ⇒ page 110.
Adjusting the headlights
The light beam of the dipped beam lights is asymmetric: the side of the
road on which you are driving is lit more intensely.
Safety FirstOperating instructionsPractical TipsTechnical specifications