key Seat Leon 5D 2013 Owner's Guide
[x] Cancel search | Manufacturer: SEAT, Model Year: 2013, Model line: Leon 5D, Model: Seat Leon 5D 2013Pages: 339, PDF Size: 4.8 MB
Page 118 of 339
116Lights and visibility
When a car that is manufactured in a country that drives on the right travels
to a country that drives on the left (or vice versa), it is normally necessary to
cover part of the headlight bulbs with stickers or to change the adjustment
of the headlights to avoid dazzling other drivers.
In such cases, the regulations specify certain light values that must be com-
plied with for designated points of the light distribution. This is known as
“Tourist light”.
The light distribution that the halogen and full-LED headlights of the SEAT
Leon range have, allows the specific “tourist light” values to be met without
the need for stickers or changes in the settings.
Note
“Tourist light” is only allowed temporarily. If you are planning a long stay in
a country that drives on the other side, you should take the vehicle to an
Authorised Technical Service to change the headlights.
Coming home “function”
This function may be connected/disconnected through the radio menu. The
“Coming Home” and/or “Leaving Home” delay functions may also be set
(default: 30 sec.).
Vehicle with halo-
gen headlightsIn the “Coming Home” function, the daytime running
lights (DRL), the rear side lights and the licence plate
lights are turned on.
Vehicle with full-
LED headlightsIn the “Coming Home” function, the dipped beams
and the daytime running lights (DRL), the rear side
lights and the licence plate lights are switched on.
Automatic “Coming Home” activation*
For vehicles with a light and rain sensor (rotary light switch in position ). ●
Switch off the engine and remove the key from the ignition with the rota-
ry light switch in position ⇒ Fig. 65.
● The automatic “Coming Home” function is only active when the light
sensor detects darkness.
● When the car door is opened, the “Coming Home” lighting comes on.
Activation “Coming Home” manual
For vehicles with a light and rain sensor (rotary light switch without position
).
● Switch off the engine and remove the key from the ignition.
● Activate the headlight flashers for approximately 1 second.
● Activated for any position of the rotary light switch.
● When the car door is opened, the “Coming Home” lighting comes on.
The headlights are turned off 60 seconds after the vehicle door is opened.
Deactivation
● If no door has been closed, they go out automatically after 60 seconds.
● After the last door has been closed, the headlights will be switched off
after the “Coming Home” delay (as established in the radio menu).
● On turning the light switch to position ⇒ Fig. 65 .
● When the ignition is switched on (when starting the engine).
Leaving Home “function”
The “Leaving Home” function is only available for vehicles with a light and
rain sensor (rotary light switch in position ).
This function may be connected/disconnected through the radio menu. The
“Leaving Home” delay may also be set (default: 30 sec.).
Page 120 of 339
118Lights and visibility
WARNING
Heavy objects in the vehicle may mean that the headlights dazzle and
distract other drivers. This could result in a serious accident.
● Adjust the light beam to the vehicle load status so that it does not
blind other drivers.
Interior and reading lights 1)
Button/
Positioneffect
Switches interior lights off.
Switches interior lights on.
Switches door contact control on (central position).
The interior lights come on automatically when the vehicle is
unlocked, a door is opened or the key is removed from the ig-
nition.
The lights go off a few seconds after all the doors are closed,
the vehicle is locked or the ignition is switched on.
Turning the reading light on and off
Glove compartment and luggage compartment lighting*
When opening and closing the glove compartment on the front passenger
side and the rear lid, the respective light will automatically switch on and
off. Footwell lighting*
The lights in the footwell area below the dash (driver and front passenger
sides) will switch on when the doors are opened and will decrease in inten-
sity while driving. The intensity of these lights can be adjusted using the ra-
dio menu (see Easy Connect > Adjusting Lighting > Interior lighting
⇒ page 82).
Ambient light*
The ambient light in the door panel changes colour (white or red) depend-
ing on the driving mode. The intensity of these lights can be adjusted using
the radio menu (see Easy Connect > Adjusting Lights > Interior lighting
⇒ page 82).
Note
The reading lights switch off when the vehicle is locked using a key or after
several minutes if the key is removed from the ignition. This prevents the
battery from discharging.
Sun protection equipment Introduction
WARNING
Folded sun blinds can reduce visibility.
● Always store sun blinds and visors in their housing when not in use.
1)
Depending on the level of equipment fitted in the vehicle, LEDs can be used for the follow-
ing interior lights: front courtesy light, rear courtesy light, footwell light and sun visor light.
Page 165 of 339
163
Driving
WARNING
Failure to heed the warning lamps when they light up and the corre-
sponding messages may cause the vehicle to stall in traffic and cause ac-
cidents and severe injuries.
● Never ignore the warning lamps or messages.
● Stop the vehicle at the next safe opportunity.
● If the vehicle breaks down or has to be parked for repair, always park
it a safe distance away from the road, switch on the hazard warning
lights, switch off the engine and take other relevant safety measures to
warn vehicles approaching from the rear.
CAUTION
Failure to heed the control lamps when they light up and the corresponding
messages may result in damage to the vehicle. Starting the engine with the ignition key
Switch on the ignition with the key in the ignition and start
the engine.
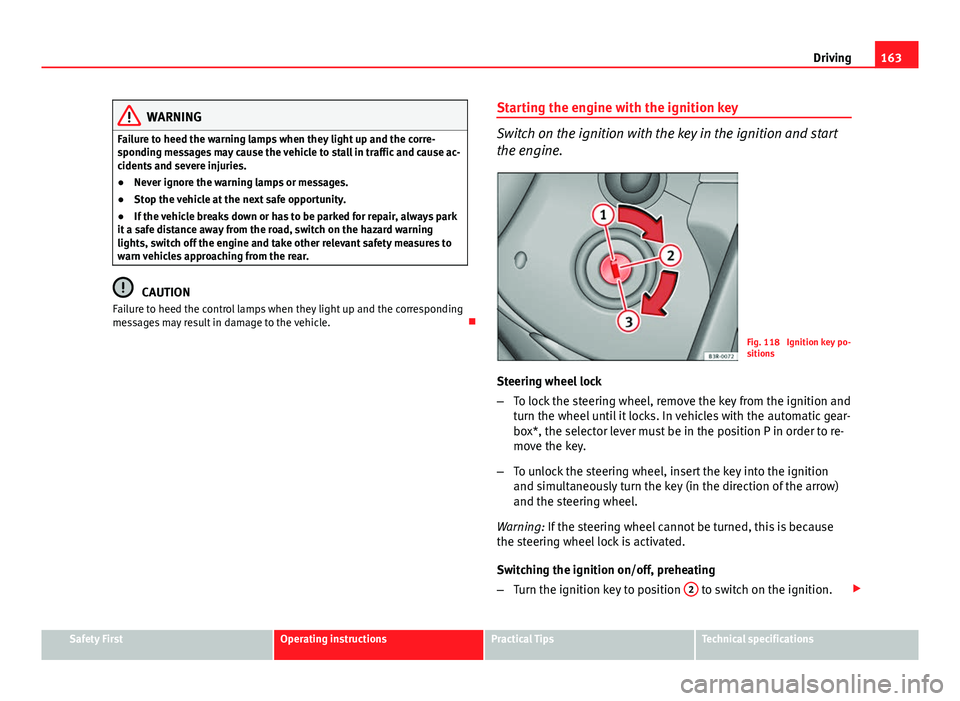
Fig. 118 Ignition key po-
sitions
Steering wheel lock
– To lock the steering wheel, remove the key from the ignition and
turn the wheel until it locks. In vehicles with the automatic gear-
box*, the selector lever must be in the position P in order to re-
move the key.
– To unlock the steering wheel, insert the key into the ignition
and simultaneously turn the key (in the direction of the arrow)
and the steering wheel.
Warning: If the steering wheel cannot be turned, this is because
the steering wheel lock is activated.
Switching the ignition on/off, preheating
– Turn the ignition key to position 2
to switch on the ignition.
Safety FirstOperating instructionsPractical TipsTechnical specifications
Page 166 of 339
164Driving
–Turn the ignition key to position 1
to switch off the ignition.
Preheating is produced in Diesel vehicles when the ignition is
switched on.
Starting up the engine
– Manual gearbox: Press the clutch pedal all the way down and
move the gearbox lever into neutral.
– Automatic gearbox : Press the brake pedal and move the selec-
tor lever to position P or N.
– Turn the ignition key to position 3
. The key returns to position
2 automatically. Do not press the accelerator.
Diesel engines can take a few seconds longer than usual to start
on cold days. Therefore the clutch pedal (manual gearbox) or the
brake pedal (automatic gearbox) must remain pressed until the en-
gine starts up. During preheating, the warning lamp remains lit.
The preheating time depends on the coolant and exterior tempera-
tures. When the engine is at operating temperature or at outside
temperatures above +8 °C (46 °F) the warning lamp will only
light up for about one second. This means that the engine starts
immediately.
If the engine does not immediately start up, interrupt the starting process
and try again after 30 seconds. To start the engine again, return the key to
position 1
.
Start-Stop System*
If the vehicle is stopped and the Start-Stop system* switches off the engine,
the ignition remains switched on.
Automatic gearbox: Before leaving the vehicle, make sure that the ignition
is switched off and the selector lever is in position P. Driver messages on the instrument panel display
Press the clutch This message appears on vehicles with a manual gearbox if the driver tries
to start the engine without having the clutch pedal pressed. The engine will
only start if you press the clutch pedal.
Press the brake
This message appears on vehicles with an automatic gearbox if the driver
tries to start the engine without having the brake pedal pressed.
Select N or P
This message appears if you try to start or stop the engine when the selec-
tor lever of the automatic gearbox is not in position P or N. The engine can
only start or stop in these positions.
Engage position P; the vehicle can move; doors can only close in position P. For safety reasons, this driver message appears and an audible warning
sounds if the selector lever of the automatic gearbox is not in position P af-
ter you switch off the ignition. Otherwise the vehicle could move.
Gear change: selector lever in the drive position!
This driver message is displayed and a buzzer is sounded when the selector
lever is not in the position P when the driver door is opened. Put the selec-
tor lever in position P; otherwise the vehicle can roll away.
Ignition is switched onThis driver message is displayed and a buzzer is sounded when the driver
door is opened with the ignition switched on.
Page 167 of 339
165
Driving
WARNING
● Never run the engine in confined spaces, as the exhaust gases are
poisonous.
● Never remove the key from the ignition if the vehicle is in motion.
Otherwise, the steering could suddenly lock, making it impossible to
steer the vehicle: risk of accident!
● Always take the key with you when you leave the vehicle. This is par-
ticularly important if there are children in the vehicle, as they might oth-
erwise be able to start the engine or use power-operated equipment (e.g.
the electric windows), which could cause injuries.
CAUTION
Avoid high engine speeds, full throttle and extreme load conditions until
the engine has reached its normal operating temperature, otherwise this
can damage the engine.
For the sake of the environment
Do not warm up the engine by running it with the car stationary. You should
drive off as soon as you start the engine. This will help avoid unnecessary
exhaust emissions.
Note
● If it is difficult to turn the ignition key to the position 1, turn the steer-
ing wheel to both sides to release the steering lock.
● When starting from cold, the engine may be a little noisy for the first few
seconds until oil pressure has built up in the hydraulic valve lifters. This is
quite normal, and no cause for concern.
● If the vehicle battery is disconnected and reconnected, the key must re-
main in the position 1
for around 5 seconds before starting up.
● Vehicles with automatic gearbox: After switching off the ignition, you
can only remove the ignition key if the selector lever is in position “P” (park-
ing lock). Next, the selector lever is locked. Switching off the engine with the key
Switching off the engine
–
Stop the vehicle.
– Turn the ignition key to position 1
⇒ Fig. 118.
Engaging the steering wheel lock
Important: selector lever (automatic gearbox*) must be in position
P.
– Remove the key from the ignition in position 1
⇒ Fig. 118
⇒ .
– Turn the steering wheel until you hear it engage.
Possible vehicle theft is prevented with the steering lock engaged.
WARNING
● Never switch the engine off until the vehicle is stationary. The brake
servo and power steering functions will not be completely covered under
warranty. More force may also be needed to turn the steering wheel or to
brake. As you cannot steer and brake in the normal manner, there is a
greater risk of accidents and serious injury.
● Never remove the key from the ignition if the vehicle is in motion.
Otherwise, the steering could lock making it impossible to steer the vehi-
cle.
● Always take the ignition key with you whenever you leave the vehicle,
even temporarily. This is particularly important if there are children in
the vehicle, as they might otherwise be able to start the engine or use
power-operated equipment (e.g. the electric windows), which could
cause injuries.
Safety FirstOperating instructionsPractical TipsTechnical specifications
Page 169 of 339
167
Driving
Always apply the handbrake as far as it will go in order to prevent yourself
from driving with the handbrake applied by mistake ⇒
.
The handbrake warning lamp lights up when the handbrake is applied
and the ignition switched on. The warning lamp turns off when the hand-
brake is released.
If you drive faster than 6 km/h (4 mph) with the handbrake on, the following
message* will appear on the instrument panel display: HANDBRAKE ON. You
will also hear an audible warning.
WARNING
● Never use the handbrake to stop the vehicle when it is in motion. The
braking distance is considerably longer, because braking is only applied
to the rear wheels. Risk of accident!
● If the handbrake is only partially released, this will cause the rear
brakes to overheat, which can impair the function of the brake system
and could lead to an accident. This also causes premature wear on the
rear brake pads.
CAUTION
Always apply the handbrake before you leave the vehicle. The first gear
should also be selected.
Parking
The handbrake should always be firmly applied when the
vehicle is parked.
Always note the following points when parking the vehicle:
– Use the brake pedal to stop the vehicle. –
Apply the handbrake.
– Select first gear.
– Switch the engine off and remove the key from the ignition. Turn
the steering wheel slightly to engage the steering lock.
– Always take you keys with you when you leave the vehicle ⇒
.
Additional notes on parking the vehicle on gradients:
Turn the steering wheel so that the vehicle rolls against the kerb if it started
to roll.
● If the vehicle is parked facing downhill, turn the front wheels so that
they point towards the kerb .
● If the vehicle is parked facing uphill, turn the front wheels so that they
point away from the kerb .
● Secure the vehicle as normal by applying the handbrake firmly and se-
lecting first gear.
WARNING
● Take measures to reduce the risk of injury when you leave your vehi-
cle unattended.
● Never park where the hot exhaust system could ignite inflammable
materials, such as dry grass, low bushes, spilt fuel etc.
● Never allow vehicle occupants to remain in the vehicle when it is
locked. They would be unable to open the vehicle from the inside, and
could become trapped in the vehicle in an emergency. In the event of an
emergency, locked doors will delay assistance to vehicle occupants.
● Never leave children alone in the vehicle. They could set the vehicle
in motion, for example, by releasing the handbrake or the gearbox lever.
● Depending on weather conditions, it may become extremely hot or
cold inside the vehicle. This can be fatal.
Safety FirstOperating instructionsPractical TipsTechnical specifications
Page 171 of 339
169
Driving
countries with general speed limits, or if a particular speed should not be
exceeded when winter tyres are fitted etc.
Note
● Please bear in mind that, even with the speed warning function, it is still
important to keep an eye on the vehicle speed with the speedometer and to
observe the legal speed limits.
● The speed limit warning function in the version for several countries
warns you at a speed of 120 km/h (80 mph). This is a factory-set speed lim-
it.
Setting speed limit warning
You can use the radio or the Easy Connect* to set, alter or
cancel the speed limit warning.
Vehicles with radio
– Select: SETUP
button > control button
Driver assistant > Speed
warning.
Vehicles with Easy Connect
– Select: Systems control button or Vehicle systems > Driver assis-
tant > Speed warning.
The warning limit can be set from 30 to 240 km/h (20 to 150 mph). The ad-
justment is done in 10 km/h (mph) intervals. Start-Stop system*
Description and operation
The Start-Stop system helps save fuel and reduce CO 2 emissions.
In Start-Stop mode, the engine will automatically switch off when the vehi-
cle stops, when stopping at traffic lights for example. The ignition remains
switched on during the stopping phase. The engine automatically switches
back on when required.
As soon as the ignition is switched on, the Start-Stop function is automati-
cally activated.
Basic requirements for the Start-Stop mode
● The driver door must be closed.
● The driver must have their seat belt fastened.
● The bonnet must be closed.
● The vehicle must have travelled at more than 4 km/h since the last stop.
● The vehicle cannot be towing a trailer.
WARNING
● Never switch the engine off until the vehicle is stationary. The brake
servo and power steering functions will not be completely covered under
warranty. More force may also be needed to turn the steering wheel or to
brake. As you cannot steer and brake in the normal manner, there is a
greater risk of accidents and serious injury.
● Never remove the key from the ignition if the vehicle is in motion.
Otherwise, the steering could lock making it impossible to steer the vehi-
cle.
Safety FirstOperating instructionsPractical TipsTechnical specifications
Page 172 of 339
170Driving
WARNING (Continued)
● Always take the ignition key with you whenever you leave the vehicle,
even temporarily. This is particularly important if there are children in
the vehicle, as they might otherwise be able to start the engine or use
power-operated equipment (e.g. the electric windows), which could
cause injuries.
● To avoid injury, make sure that the Start-Stop system is switched off
when working in the engine compartment ⇒ page 171.
CAUTION
The Start-Stop system must always be switched off when driving through
flooded areas ⇒ page 171.
Stop/Start the engine
Vehicles with a manual gearbox
– When the vehicle is stopped, put it into neutral and release the
clutch pedal. The engine will switch off. The warning lamp
will appear on the instrument panel display.
– When the clutch pedal is pressed the engine will start up again.
The warning lamp will switch off.
Vehicles with an automatic gearbox
– Use the foot brake to bring the vehicle to a stop and keep the
brake pedal pressed down with your foot. The engine will switch
off. The warning lamp will appear in the display.
– When you take your foot off the brake pedal the engine will start
up again. The warning lamp will switch off. Additional information related to the automatic gearbox
The engine stops when the selector lever is in the positions P, D, N and S, in
addition to when in manual mode. With the selector lever in position P, the
engine will also remain switched off when you take your foot off the brake
pedal. In order to start the engine up again the accelerator must be press-
ed, or another gear engaged or the brake released.
If the selector lever is placed in position R during the stopping phase, the
engine will start up again.
Change from position D to P to prevent the engine from accidentally starting
when changing and passing by position R.
Note
● You can control whether the engine should switch off or not by reducing
or increasing the brake force applied. While the vehicle remains stopped,
the engine will not stop if the brake pedal is slightly pressed, in traffic jams
with frequent stopping and starting for example. As soon as strong pressure
is applied to the brake pedal, the engine will stop.
● In vehicles with manual gearbox, during the stopping phases the brake
pedal must remain depressed to prevent the vehicle from moving.
● If the engine stalls in vehicles with manual gearbox, it can be directly
started up again by immediately pressing the clutch pedal.
General notes
The system can interrupt the Start-Stop mode frequently for
different reasons.
The engine does not switch off
Before the stopping phase, the system verifies whether certain conditions
are met. The engine does not switch off, in the following situations for ex-
ample:
Page 177 of 339
175
Driving
Selector lever lock
The selector lever lock prevents gears from being engaged
inadvertently, so that the vehicle is not set in motion unin-
tentionally.
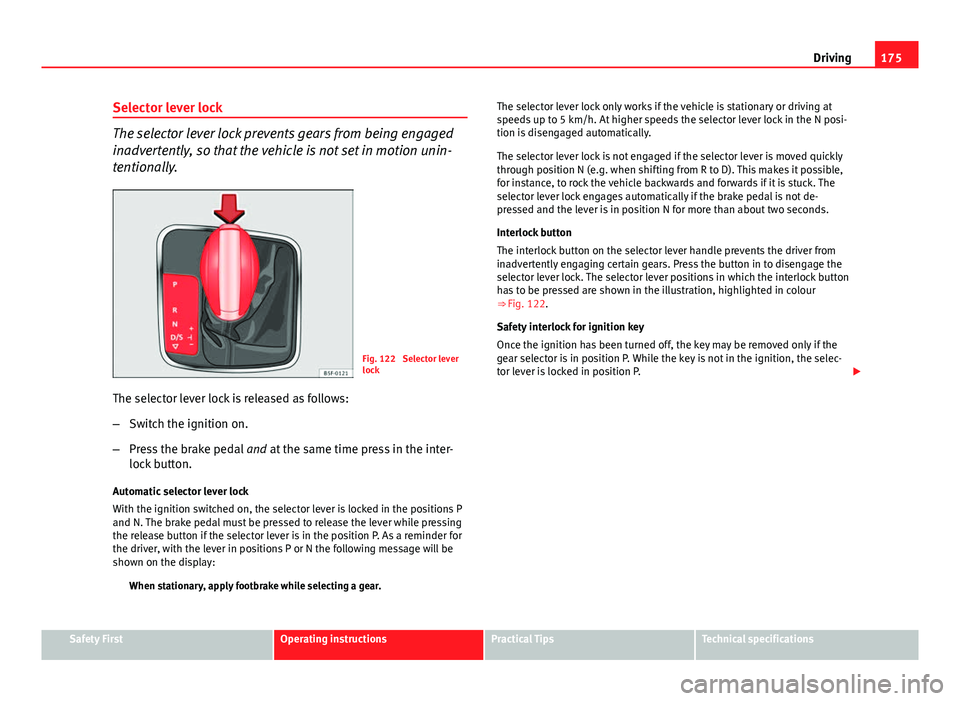
Fig. 122 Selector lever
lock
The selector lever lock is released as follows:
– Switch the ignition on.
– Press the brake pedal and at the same time press in the inter-
lock button.
Automatic selector lever lock
With the ignition switched on, the selector lever is locked in the positions P
and N. The brake pedal must be pressed to release the lever while pressing
the release button if the selector lever is in the position P. As a reminder for
the driver, with the lever in positions P or N the following message will be
shown on the display: When stationary, apply footbrake while selecting a gear. The selector lever lock only works if the vehicle is stationary or driving at
speeds up to 5 km/h. At higher speeds the selector lever lock in the N posi-
tion is disengaged automatically.
The selector lever lock is not engaged if the selector lever is moved quickly
through position N (e.g. when shifting from R to D). This makes it possible,
for instance, to rock the vehicle backwards and forwards if it is stuck. The
selector lever lock engages automatically if the brake pedal is not de-
pressed and the lever is in position N for more than about two seconds.
Interlock button
The interlock button on the selector lever handle prevents the driver from
inadvertently engaging certain gears. Press the button in to disengage the
selector lever lock. The selector lever positions in which the interlock button
has to be pressed are shown in the illustration, highlighted in colour
⇒
Fig. 122.
Safety interlock for ignition key
Once the ignition has been turned off, the key may be removed only if the
gear selector is in position P. While the key is not in the ignition, the selec-
tor lever is locked in position P.
Safety FirstOperating instructionsPractical TipsTechnical specifications
Page 244 of 339
242Care and cleaning
Car polish or other abrasive agents should not be used for maintaining the
rims. If the protective coating is damaged, e.g. by stone impact, the dam-
aged area should be touched up immediately.
WARNING
Please note when cleaning the wheels that water, ice and road salt can
impair the effectiveness of the brakes; this can cause an accident.
Exhaust tail pipe
It is important to remove road salt and brake dust by washing the wheels at
regular intervals, otherwise the exhaust tail pipe material could be dam-
aged. To remove impurities, do not use rim, paint or chrome cleaners or oth-
er abrasive products. Clean the exhaust tail pipes with cleaning products
that are suitable for stainless steel.
SEAT Official Services carry stocks of cleaning products that have been tes-
ted and approved for use on your vehicle.
Care of the vehicle interior Radio display/Easy Connect* and control panel*
The display can be cleaned with a soft cloth and a professionally available
“LCD cleaner”. Moisten the cloth with a small amount of the cleaning fluid.
The Easy Connect control panel* should first be cleaned with a brush so
that no dirt goes into the device or between the keys and housing. Next, we
recommend cleaning the Easy Connect control panel* using a cloth damp-
ened with water and washing-up liquid.
CAUTION
● To avoid scratching the screen, do not wipe the display with a dry cloth.
● To avoid damage, ensure that no liquid goes into the Easy Connect con-
trol panel*.
Plastic and leatherette parts
Plastic parts and leatherette can be cleaned with a damp cloth. If this is not
sufficient, plastic parts and leatherette should only be treated with a special
solvent-free plastic cleaner .
Textile covers and trim parts
Textile covers and trim parts (e.g. seats, door trim) should be cleaned regu-
larly with a vacuum cleaner. This will remove surface dirt which could other-
wise be rubbed into the textile material during use. Do not use steam clean-
ers, as the steam could carry the dirt deeper into the textile material.
Normal cleaning
We recommend that you use a soft sponge or a commercially available lint-
free, micro-fibre cloth for normal cleaning. Only use brushes on floor cover-
ings and mats, as other textile surfaces could become damaged.
In the case of normal surface dirt you can use a foam cleaner. Use a sponge
to spread the foam on the textile surface and to work it into the material
lightly. However, make sure that the textile material does not become soak-
ing wet. Then dab off the foam with a dry and absorbent cloth (e.g. a micro-
fibre cloth) and vacuum off any residue once the surface is completely dry.
Cleaning stains
Treat drink stains (such as coffee or fruit juice, etc.) with a cleaning solution
for delicate fabrics. The cleaning product solution should be applied with a