fog light Seat Leon 5D 2015 Owner's manual
[x] Cancel search | Manufacturer: SEAT, Model Year: 2015, Model line: Leon 5D, Model: Seat Leon 5D 2015Pages: 308, PDF Size: 5.93 MB
Page 7 of 308
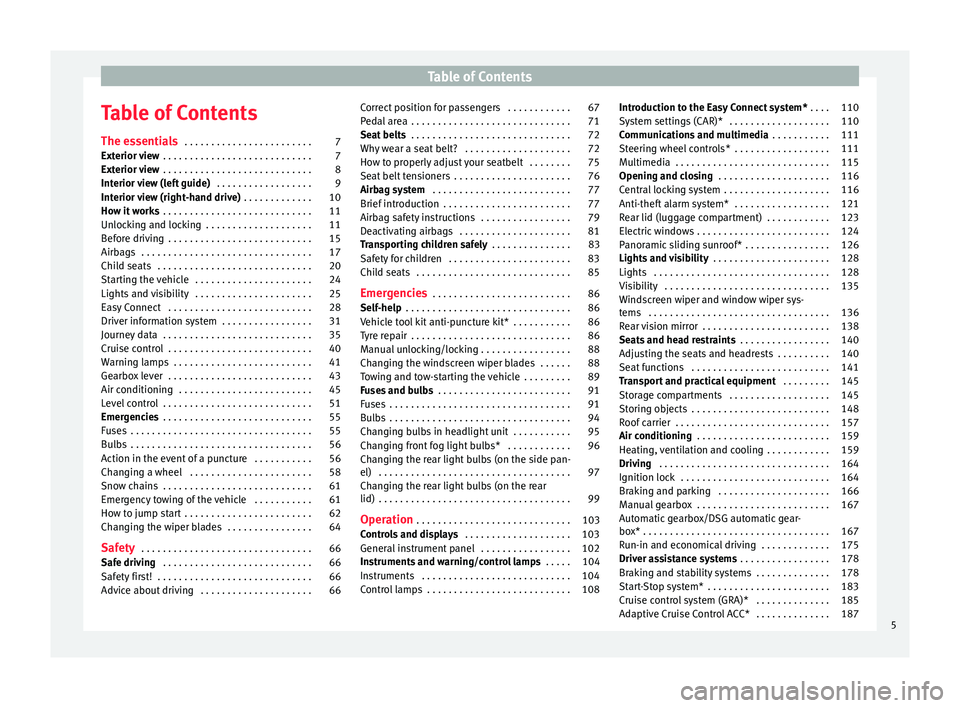
Table of Contents
Table of Contents
The e s
senti
als . . . . . . . . . . . . . . . . . . . . . . . . 7
Exterior view . . . . . . . . . . . . . . . . . . . . . . . . . . . . 7
Exterior view . . . . . . . . . . . . . . . . . . . . . . . . . . . . 8
Interior view (left guide) . . . . . . . . . . . . . . . . . . 9
Interior view (right-hand drive) . . . . . . . . . . . . . 10
How it works . . . . . . . . . . . . . . . . . . . . . . . . . . . . 11
Unlocking and locking . . . . . . . . . . . . . . . . . . . . 11
Before driving . . . . . . . . . . . . . . . . . . . . . . . . . . . 15
Airbags . . . . . . . . . . . . . . . . . . . . . . . . . . . . . . . . 17
Child seats . . . . . . . . . . . . . . . . . . . . . . . . . . . . . 20
Starting the vehicle . . . . . . . . . . . . . . . . . . . . . . 24
Lights and visibility . . . . . . . . . . . . . . . . . . . . . . 25
Easy Connect . . . . . . . . . . . . . . . . . . . . . . . . . . . 28
Driver information system . . . . . . . . . . . . . . . . . 31
Journey data . . . . . . . . . . . . . . . . . . . . . . . . . . . . 35
Cruise control . . . . . . . . . . . . . . . . . . . . . . . . . . . 40
Warning lamps . . . . . . . . . . . . . . . . . . . . . . . . . . 41
Gearbox lever . . . . . . . . . . . . . . . . . . . . . . . . . . . 43
Air conditioning . . . . . . . . . . . . . . . . . . . . . . . . . 45
Level control . . . . . . . . . . . . . . . . . . . . . . . . . . . . 51
Emergencies . . . . . . . . . . . . . . . . . . . . . . . . . . . . 55
Fuses . . . . . . . . . . . . . . . . . . . . . . . . . . . . . . . . . . 55
Bulbs . . . . . . . . . . . . . . . . . . . . . . . . . . . . . . . . . . 56
Action in the event of a puncture . . . . . . . . . . . 56
Changing a wheel . . . . . . . . . . . . . . . . . . . . . . . 58
Snow chains . . . . . . . . . . . . . . . . . . . . . . . . . . . . 61
Emergency towing of the vehicle . . . . . . . . . . . 61
How to jump start . . . . . . . . . . . . . . . . . . . . . . . . 62
Changing the wiper blades . . . . . . . . . . . . . . . . 64
Safety . . . . . . . . . . . . . . . . . . . . . . . . . . . . . . . . 66
Safe driving . . . . . . . . . . . . . . . . . . . . . . . . . . . . 66
Safety first! . . . . . . . . . . . . . . . . . . . . . . . . . . . . . 66
Advice about driving . . . . . . . . . . . . . . . . . . . . . 66 Correct position for passengers . . . . . . . . . . . . 67
Pedal area . . . . . . . . . . . . . . . . . . . . . . . . . . . . . . 71
Seat belts
. . . . . . . . . . . . . . . . . . . . . . . . . . . . . . 72
Why wear a seat belt? . . . . . . . . . . . . . . . . . . . . 72
How to properly adjust your seatbelt . . . . . . . . 75
Seat belt tensioners . . . . . . . . . . . . . . . . . . . . . . 76
Airbag system . . . . . . . . . . . . . . . . . . . . . . . . . . 77
Brief introduction . . . . . . . . . . . . . . . . . . . . . . . . 77
Airbag safety instructions . . . . . . . . . . . . . . . . . 79
Deactivating airbags . . . . . . . . . . . . . . . . . . . . . 81
Transporting children safely . . . . . . . . . . . . . . . 83
Safety for children . . . . . . . . . . . . . . . . . . . . . . . 83
Child seats . . . . . . . . . . . . . . . . . . . . . . . . . . . . . 85
Emergencies . . . . . . . . . . . . . . . . . . . . . . . . . . 86
Self-help . . . . . . . . . . . . . . . . . . . . . . . . . . . . . . . 86
Vehicle tool kit anti-puncture kit* . . . . . . . . . . . 86
Tyre repair . . . . . . . . . . . . . . . . . . . . . . . . . . . . . . 86
Manual unlocking/locking . . . . . . . . . . . . . . . . . 88
Changing the windscreen wiper blades . . . . . . 88
Towing and tow-starting the vehicle . . . . . . . . . 89
Fuses and bulbs . . . . . . . . . . . . . . . . . . . . . . . . . 91
Fuses . . . . . . . . . . . . . . . . . . . . . . . . . . . . . . . . . . 91
Bulbs . . . . . . . . . . . . . . . . . . . . . . . . . . . . . . . . . . 94
Changing bulbs in headlight unit . . . . . . . . . . . 95
Changing front fog light bulbs* . . . . . . . . . . . . 96
Changing the rear light bulbs (on the side pan-
el) . . . . . . . . . . . . . . . . . . . . . . . . . . . . . . . . . . . . 97
Chan
ging the rear light bulbs (on the rear
lid) . . . . . . . . . . . . . . . . . . . . . . . . . . . . . . . . . . . . 99
Operation . . . . . . . . . . . . . . . . . . . . . . . . . . . . .
103
Controls and displays . . . . . . . . . . . . . . . . . . . . 103
General instrument panel . . . . . . . . . . . . . . . . . 102
Instruments and warning/control lamps . . . . . 104
Instruments . . . . . . . . . . . . . . . . . . . . . . . . . . . . 104
Control lamps . . . . . . . . . . . . . . . . . . . . . . . . . . . 108 Introduction to the Easy Connect system*
. . . . 110
System settings (CAR)* . . . . . . . . . . . . . . . . . . . 110
Communications and multimedia . . . . . . . . . . . 111
Steering wheel controls* . . . . . . . . . . . . . . . . . . 111
Multimedia . . . . . . . . . . . . . . . . . . . . . . . . . . . . . 115
Opening and closing . . . . . . . . . . . . . . . . . . . . . 116
Central locking system . . . . . . . . . . . . . . . . . . . . 116
Anti-theft alarm system* . . . . . . . . . . . . . . . . . . 121
Rear lid (luggage compartment) . . . . . . . . . . . . 123
Electric windows . . . . . . . . . . . . . . . . . . . . . . . . . 124
Panoramic sliding sunroof* . . . . . . . . . . . . . . . . 126
Lights and visibility . . . . . . . . . . . . . . . . . . . . . . 128
Lights . . . . . . . . . . . . . . . . . . . . . . . . . . . . . . . . . 128
Visibility . . . . . . . . . . . . . . . . . . . . . . . . . . . . . . . 135
Windscreen wiper and window wiper sys-
tems . . . . . . . . . . . . . . . . . . . . . . . . . . . . . . . . . . 136
R
ear vision mirror . . . . . . . . . . . . . . . . . . . . . . . . 138
Seats and head restraints . . . . . . . . . . . . . . . . . 140
Adjusting the seats and headrests . . . . . . . . . . 140
Seat functions . . . . . . . . . . . . . . . . . . . . . . . . . . 141
Transport and practical equipment . . . . . . . . . 145
Storage compartments . . . . . . . . . . . . . . . . . . . 145
Storing objects . . . . . . . . . . . . . . . . . . . . . . . . . . 148
Roof carrier . . . . . . . . . . . . . . . . . . . . . . . . . . . . . 157
Air conditioning . . . . . . . . . . . . . . . . . . . . . . . . . 159
Heating, ventilation and cooling . . . . . . . . . . . . 159
Driving . . . . . . . . . . . . . . . . . . . . . . . . . . . . . . . . 164
Ignition lock . . . . . . . . . . . . . . . . . . . . . . . . . . . . 164
Braking and parking . . . . . . . . . . . . . . . . . . . . . 166
Manual gearbox . . . . . . . . . . . . . . . . . . . . . . . . . 167
Automatic gearbox/DSG automatic gear-
box* . . . . . . . . . . . . . . . . . . . . . . . . . . . . . . . . . . . 167
R
un-in and economical driving . . . . . . . . . . . . . 175
Driver assistance systems . . . . . . . . . . . . . . . . . 178
Braking and stability systems . . . . . . . . . . . . . . 178
Start-Stop system* . . . . . . . . . . . . . . . . . . . . . . . 183
Cruise control system (GRA)* . . . . . . . . . . . . . . 185
Adaptive Cruise Control ACC* . . . . . . . . . . . . . . 187 5
Page 27 of 308
The essentials
press the locking key on the selector lever
and r el
e
ase it again.
● Unlocking the steering wheel: Put the key
into the ignition and turn it
at the same time
as the steering wheel in the direction indica-
ted by the arrow. If it is not possible to turn
the steering wheel, it may be because it is
locked.
Turning on/switching off the ignition, glow
plugs reheating
● Switch ignition on: Turn the key to the 2position.
●
Switch ignition off. Turn the key to the 1position.
●
Diesel vehicles : The glo
w p
lugs reheat
when the ignition is switched on
Starting the engine
● Manual gearbox: press the clutch pedal all
the way
down and move the gearbox lever in-
to neutral.
● Automatic gearbox: Press the brake pedal
and move the sel
ector lever to the P position
or into N.
● Turn the key to the 3 position. The key au-
t om
atic
ally returns to the 2 position. Do not
pr e
s
s the accelerator. Start-Stop System*
When you s
top and release the clutch pedal,
the Start-Stop system* turns off the engine.
The ignition remains switched on.
››› in Switching the ignition on and
starting the engine with the key on
page 165
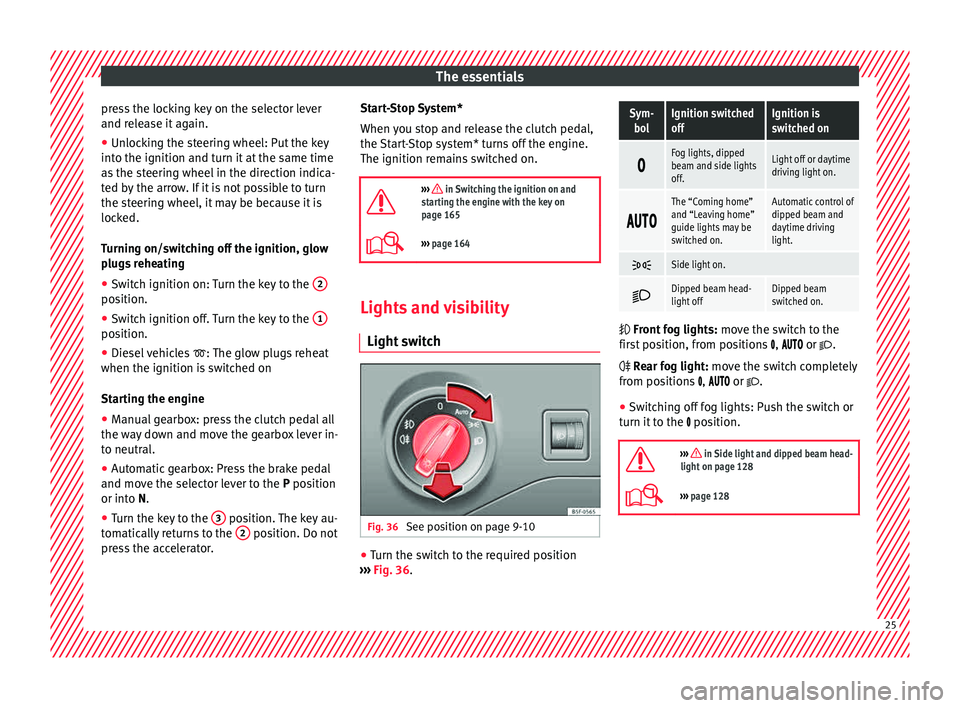
››› page 164 Lights and visibility
Light sw
it
ch Fig. 36
See position on page 9-10 ●
Turn the switch to the required position
› ›
›
Fig. 36.
Sym-
bolIgnition switched
offIgnition is
switched on
Fog lights, dipped
beam and side lights
off.Light off or daytime
driving light on.
The “Coming home”
and “Leaving home”
guide lights may be
switched on.Automatic control of
dipped beam and
daytime driving
light.
Side light on.
Dipped beam head-
light offDipped beam
switched on.
Front fog lights: mo
ve the switch to the
first position, from positions , or .
Rear fog light: move the switch completely
from positions , or .
● Switching off fog lights: Push the switch or
turn it t
o the position.
››› in Side light and dipped beam head-
light on page 128
››› page 128 25
Page 44 of 308
The essentials
Front brake pads worn.
›››
page
178
it lights up:
Fault in the ESC, or dis-
connection caused by the system.
flashes: ESC or ASR activated.
ASR manually deactivated.
ESC in Sport mode or OFF
ABS faulty or does not work.
Rear fog light switched on.›››
page
128
lights up or flashes:
fault in the
emission control system.–
it lights up:
pre-ignition of diesel
engine.
››› page
109
flashes: fault in the diesel engine
management.
fault in the petrol engine manage-
ment.›››
page
109
lights up or flashes:
fault in the
steering system.››› page
238
Tyre pressure too low, or fault in
the tyre pressure monitoring sys-
tem.›››
page
259
Fuel tank almost empty.›››
page
104
Fault in airbag system and seat
belt tensioners.›››
page
77
Lane Assist is switched on, but not
active.›››
page
202 Other warning lamps
Left or right turn signal.›››
page
128
Hazard warning lights on.››› page
133
Trailer turn signals›››
page
220
it lights up:
Press the foot brake!
flashes: the selector lever locking
button has not engaged.››› page
167
it lights up:
cruise control activated
or speed limiter switched on and
active.
››› page
185
flashes: the speed set by the
speed limiter has been exceeded.
green warning lamp: Lane Assist is
switched on and active.›››
page
202
Main beam on or flasher on.›››
page
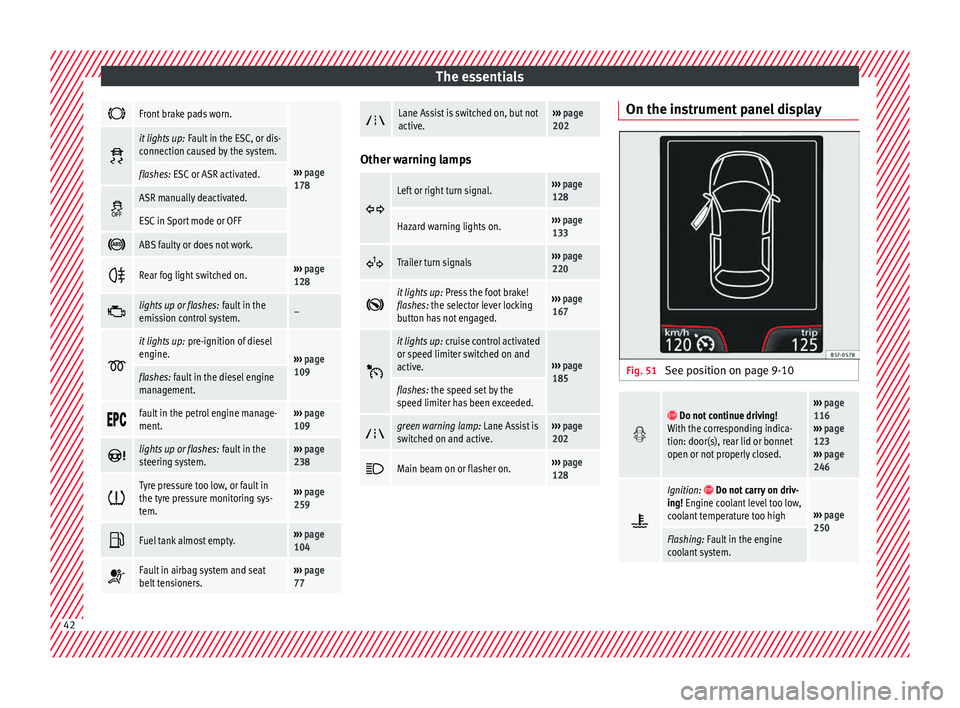
128 On the instrument panel display
Fig. 51
See position on page 9-10
Do not continue driving!
With the corresponding indica-
tion: door(s), rear lid or bonnet
open or not properly closed.››› page
116
››› page
123
››› page
246
Ignition: Do not carry on driv-
ing! Engine coolant level too low,
coolant temperature too high
››› page
250
Flashing: Fault in the engine
coolant system. 42
Page 58 of 308
The essentials
● Rep
l
ace the cover again or close the fuse
box lid.
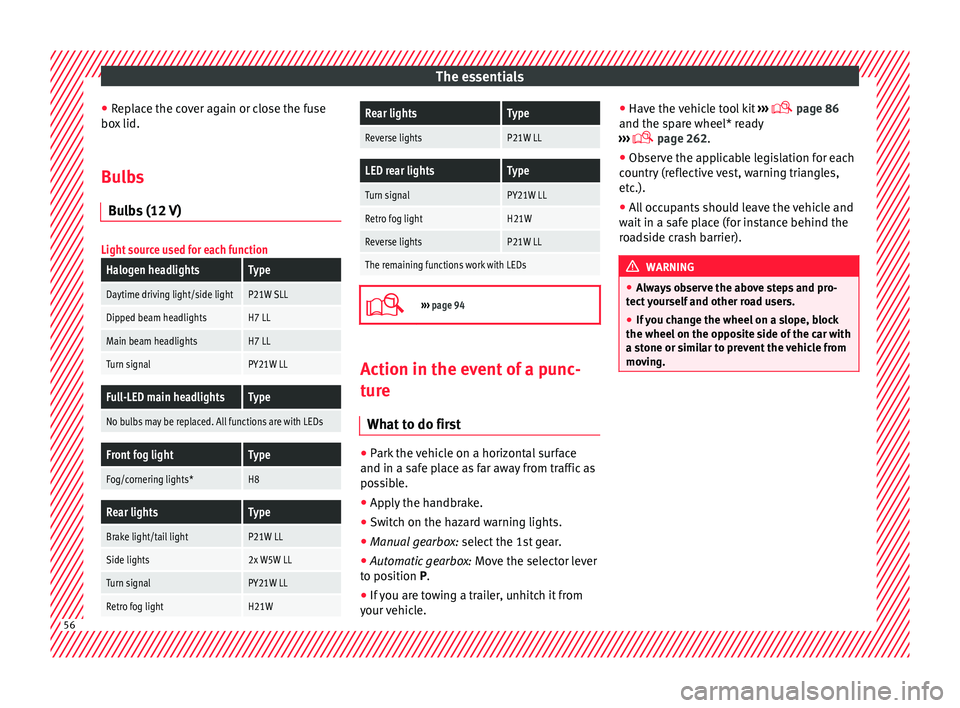
Bulbs Bul
bs (12 V)
Light source used for each function
Halogen headlightsType
Daytime driving light/side lightP21W SLL
Dipped beam headlightsH7 LL
Main beam headlightsH7 LL
Turn signalPY21W LL
Full-LED main headlightsType
No bulbs may be replaced. All functions are with LEDs
Front fog lightType
Fog/cornering lights*H8
Rear lightsType
Brake light/tail lightP21W LL
Side lights2x W5W LL
Turn signalPY21W LL
Retro fog lightH21W
Rear lightsType
Reverse lightsP21W LL
LED rear lightsType
Turn signalPY21W LL
Retro fog lightH21W
Reverse lightsP21W LL
The remaining functions work with LEDs
›››
page 94 Action in the event of a punc-
t
ur
e
Wh
at to do first ●
Park the vehicle on a horizontal surface
and in a s af
e p
lace as far away from traffic as
possible.
● Apply the handbrake.
● Switch on the hazard warning lights.
● Manual gearbox: select the 1s
t gear.
● Automatic gearbox: Move the sel
ector lever
to position P.
● If you are towing a trailer, unhitch it from
your v
ehicle. ●
Have the v
ehicle tool kit ›››
page 86
and the spare wheel* ready
››› page 262.
● Observe the applicable legislation for each
countr
y (reflective vest, warning triangles,
etc.).
● All occupants should leave the vehicle and
wait in a s
afe place (for instance behind the
roadside crash barrier). WARNING
● Alw a
ys observe the above steps and pro-
tect yourself and other road users.
● If you change the wheel on a slope, block
the wheel on the oppo
site side of the car with
a stone or similar to prevent the vehicle from
moving. 56
Page 98 of 308
Emergencies
– Remo
v
e the bulb by pressing on the bulb
holder and turning it anti-clockwise at the
same time.
– Installation involves all of the above steps
in rever
se sequence.
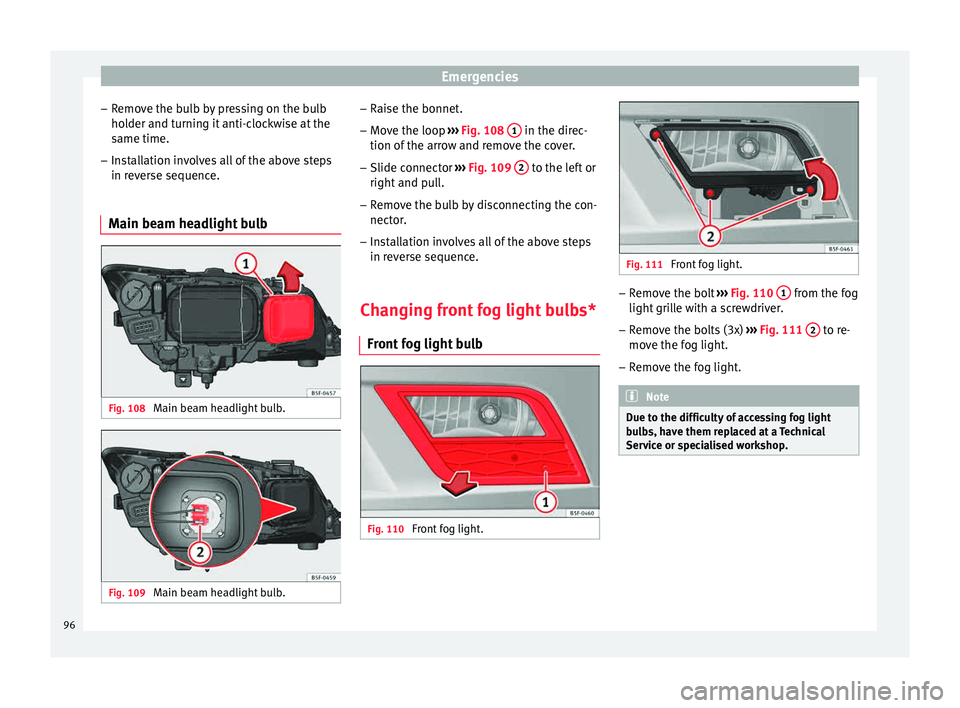
Main beam headlight bulb Fig. 108
Main beam headlight bulb. Fig. 109
Main beam headlight bulb. –
Rai
se the bonnet
.
– Move the loop ›››
Fig. 108 1 in the direc-
tion of the arr
o
w and remove the cover.
– Slide connector ›››
Fig. 109 2 to the left or
right and p
u
ll.
– Remove the bulb by disconnecting the con-
nector.
– In
stallation involves all of the above steps
in rever
se sequence.
Changing front fog light bulbs* Front f
og light bulb Fig. 110
Front fog light. Fig. 111
Front fog light. –
Remove the bolt ››
›
Fig. 110 1 from the fog
light gri
l
le with a screwdriver.
– Remove the bolts (3x) ›››
Fig. 111 2 to re-
mo v
e the f
og light.
– Remove the fog light. Note
Due to the difficulty of accessing fog light
bu l
bs, have them replaced at a Technical
Service or specialised workshop. 96
Page 99 of 308
Fuses and bulbs
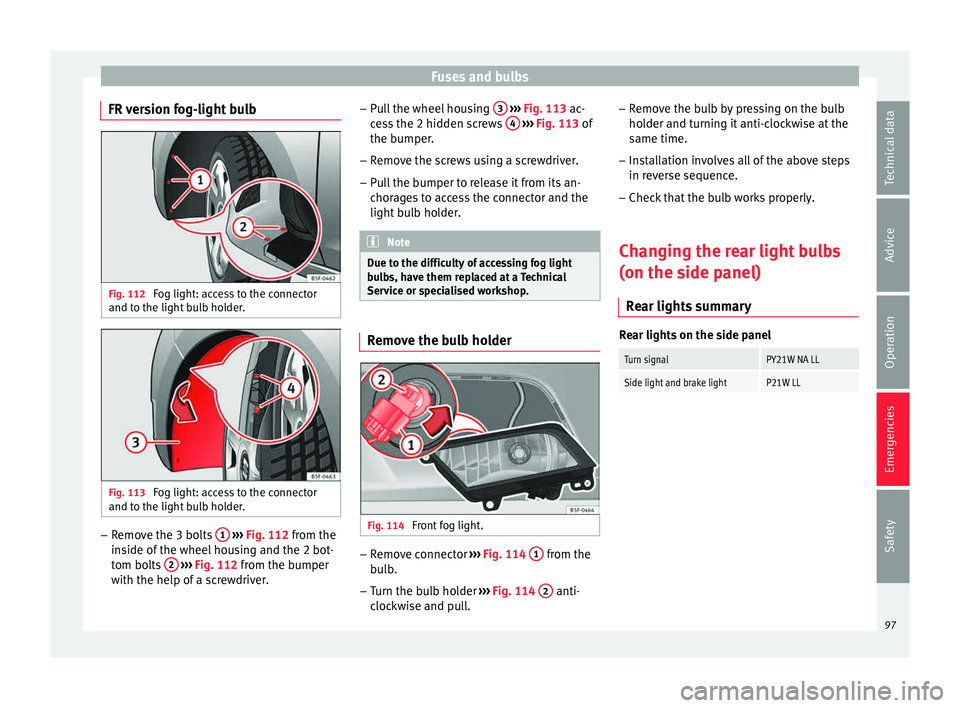
FR version fog-light bulb Fig. 112
Fog light: access to the connector
and t o the light
b
ulb holder. Fig. 113
Fog light: access to the connector
and t o the light
b
ulb holder. –
Remove the 3 bolts 1
› ›
› Fig. 112
from the
inside of the wheel housing and the 2 bot-
tom bolts 2
› ›
› Fig. 112
from the bumper
with the help of a screwdriver. –
Pul
l the wheel housing 3
› ››
Fig. 113
ac -
cess the 2 hidden screws 4
› ››
Fig. 113
of
the b
umper.
– Remove the screws using a screwdriver.
– Pull the bumper to release it from its an-
chorag
es to access the connector and the
light bulb holder. Note
Due to the difficulty of accessing fog light
bu l
bs, have them replaced at a Technical
Service or specialised workshop. Remove the bulb holder
Fig. 114
Front fog light. –
Remove connector ››
›
Fig. 114 1 from the
b ul
b.
– Turn the bulb holder ›››
Fig. 114 2 anti-
c loc
k
wise and pull. –
Remov
e the bulb by pressing on the bulb
holder and turning it anti-clockwise at the
same time.
– Installation involves all of the above steps
in rever
se sequence.
– Check that the bulb works properly.
Changing the rear light bulbs
(on the side panel) R
ear lights summary Rear lights on the side panel
Turn signalPY21W NA LL
Side light and brake lightP21W LL
97
Technical data
Advice
Operation
Emergencies
Safety
Page 101 of 308
Fuses and bulbs
Changing the rear light bulbs
(on the r e
ar lid)
R
ear lights summary Rear lights on tailgate
Left side
Side lights2x W5W LL
Fog lightsH21 W
Right side
Side lights2x W5W LL
Reverse lightP21W LL
The table corresponds to a right-hand traffic
v
ehic
l
e. The position of lights may vary ac-
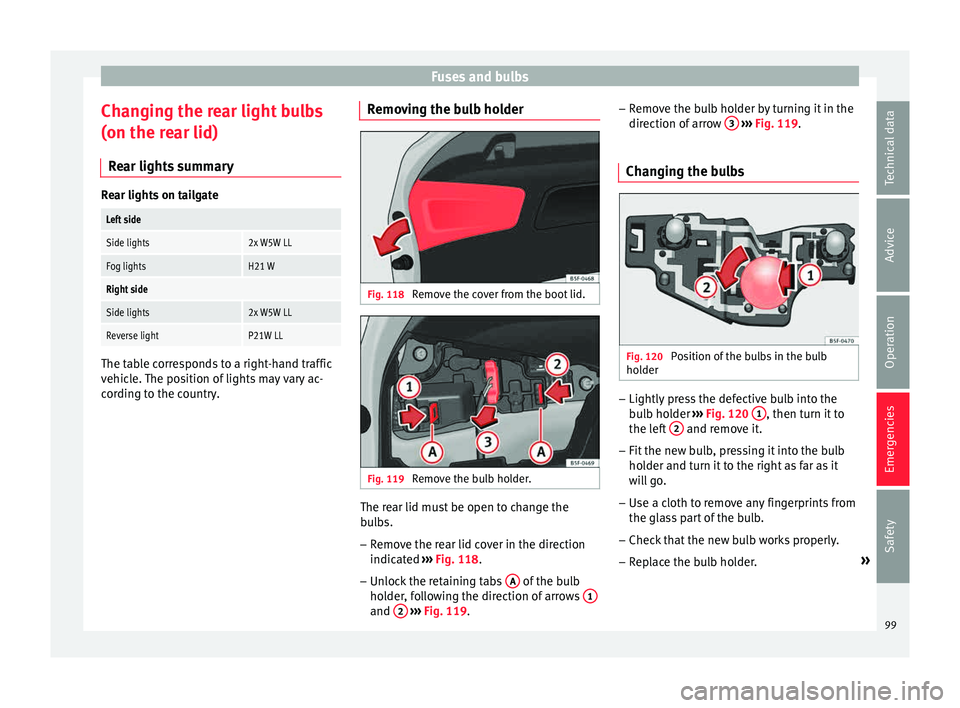
cording to the country. Removing the bulb holder Fig. 118
Remove the cover from the boot lid. Fig. 119
Remove the bulb holder. The rear lid must be open to change the
b
u
l
bs.
– Remove the rear lid cover in the direction
indicated ›
›› Fig. 118.
– Unlock the retaining tabs A of the bulb
ho l
der
, following the direction of arrows 1 and
2
› ›
› Fig. 119
. –
Remov
e the bulb holder by turning it in the
direction of arrow 3
› ››
Fig. 119
.
Ch
anging the bulbs Fig. 120
Position of the bulbs in the bulb
ho l
der –
Lightly press the defective bulb into the
bu
l
b holder ››› Fig. 120 1 , then turn it to
the l ef
t
2 and remove it.
– Fit the new bulb, pressing it into the bulb
ho l
der and t
urn it to the right as far as it
will go.
– Use a cloth to remove any fingerprints from
the glas
s part of the bulb.
– Check that the new bulb works properly.
– Replace the bulb holder. »
99
Technical data
Advice
Operation
Emergencies
Safety
Page 102 of 308
Emergencies
Note
For LED pilots, you can only change the fog or
rev er
se bulb, on the left or right guide. Fitting the bulb holder
–
Install the bulb holder making sure that
lock in
g clips ››› Fig. 119 A are properly
clip ped on.
– R
eplace the cover of the rear lid lining
›››
Fig. 118.
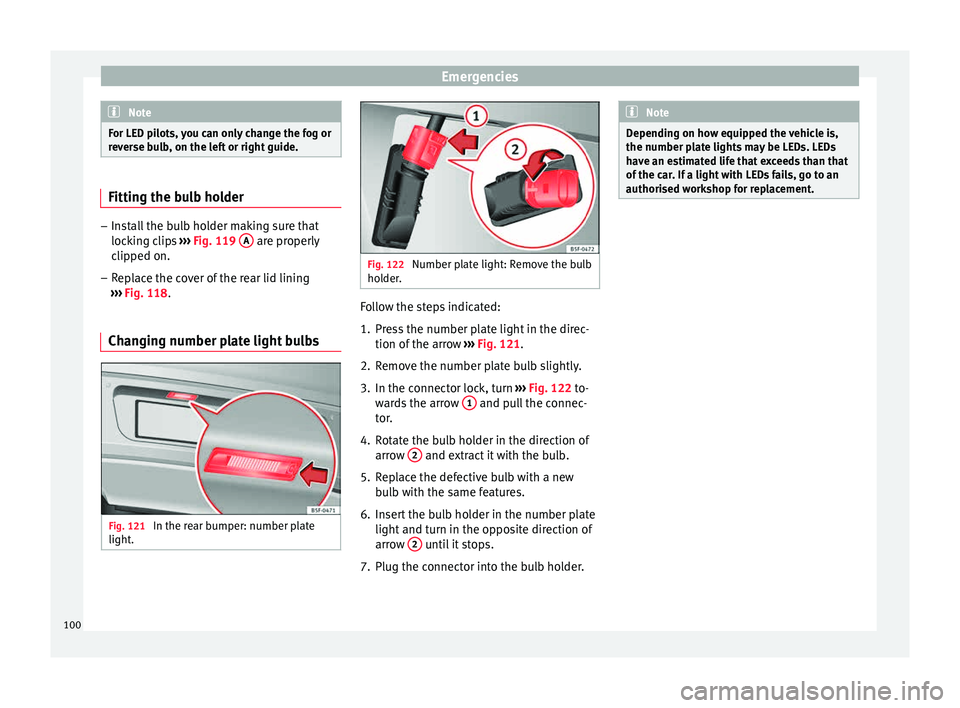
Changing number plate light bulbs Fig. 121
In the rear bumper: number plate
light . Fig. 122
Number plate light: Remove the bulb
hol der
. Follow the steps indicated:
1. Press the number plate light in the direc-
tion of the arr
o
w ››› Fig. 121.
2. Remove the number plate bulb slightly.
3. In the connector lock, turn ›››
Fig. 122 to-
wards the arrow 1 and pull the connec-
t or
.
4.
Rotate the bulb holder in the direction of
arrow 2 and extract it with the bulb.
5. Replace the defective bulb with a new bu
l
b with the same features.
6. Insert the bulb holder in the number plate light and turn in the op
posite direction of
arrow 2 until it stops.
7. Plug the connector into the bulb holder. Note
Depending on how equipped the vehicle is,
the number pl at
e lights may be LEDs. LEDs
have an estimated life that exceeds than that
of the car. If a light with LEDs fails, go to an
authorised workshop for replacement. 100
Page 126 of 308

Operation
The automatic tailgate locking time extension
f u
nction c
an be activated. Where this func-
tion is activated and once the rear lid has
been unlocked by pressing the button on
the r emot
e c
ontrol key ››› page 118, the rear
lid can be re-opened for a certain length of
time.
Where required, the automatic tailgate lock-
ing time extension function can be activated
or deactivated at an Authorised SEAT Service,
which will provide all the necessary informa-
tion.
Before the vehicle locks automatically, there
is a risk of intruders getting into the vehicle.
Therefore, we recommend you always lock
the vehicle by pressing the button on the
r emot
e c
ontrol or by using the central locking
button. WARNING
Observe the safety warnings ›››
in Intro-
duction on pag e 88
.
● Always close the rear lid properly. Risk of
accident
or injury.
● The rear lid must not be opened when the
rever
se or rear fog lights are lit. This may
damage the tail lights.
● Do not close the rear lid by pushing it down
with y
our hand on the rear window. The glass
could smash. Risk of injury! ●
Ens ur
e the rear lid is locked after closing it.
If not, it may open unexpectedly while driv-
ing.
● Closing the rear lid without observing and
ensurin
g it is clear could cause serious injury
to you and to third parties. Make sure that no
one is in the path of the rear lid.
● Never drive with the rear lid open or half-
closed, e
xhaust gases may penetrate into the
interior of the vehicle. Danger of poisoning!
● If you only open the rear lid, do not leave
the key in
side. The vehicle cannot be opened
if the key is left inside. Electric windows
Openin g and c
lo
sing of the electric
windows* Fig. 137
Detail of the driver door: controls for
the w indo
w
s (5-door vehicle with front and
rear electric windows). Read the additional information carefully
› ›
›
page 14
The front and rear electric windows can be
operated by using the controls on the driver
door. The other doors each have a switch for
their own window.
Always close the windows fully if you park
the vehicle or leave it unattended ››› .
Y ou c
an u
se the electric windows for approx.
10 minutes after switching off the ignition if
neither the driver door nor the front passen-
ger door has been opened and the key has
not been removed from the ignition.
124
Page 132 of 308
Operation
●
If a tr ai
ler turn signal malfunctions, the
control lamp will stop flashing (trailer turn
signals) and the vehicle turn signal will flash
at double speed.
● The main beam headligh
ts can only be
switched on if the dipped beam headlights
are already on.
● In cold or damp weather conditions, the
headlight
s, tail lights and turn signals may
mist up inside temporarily. This is normal and
in no way effects the useful life of the vehicle
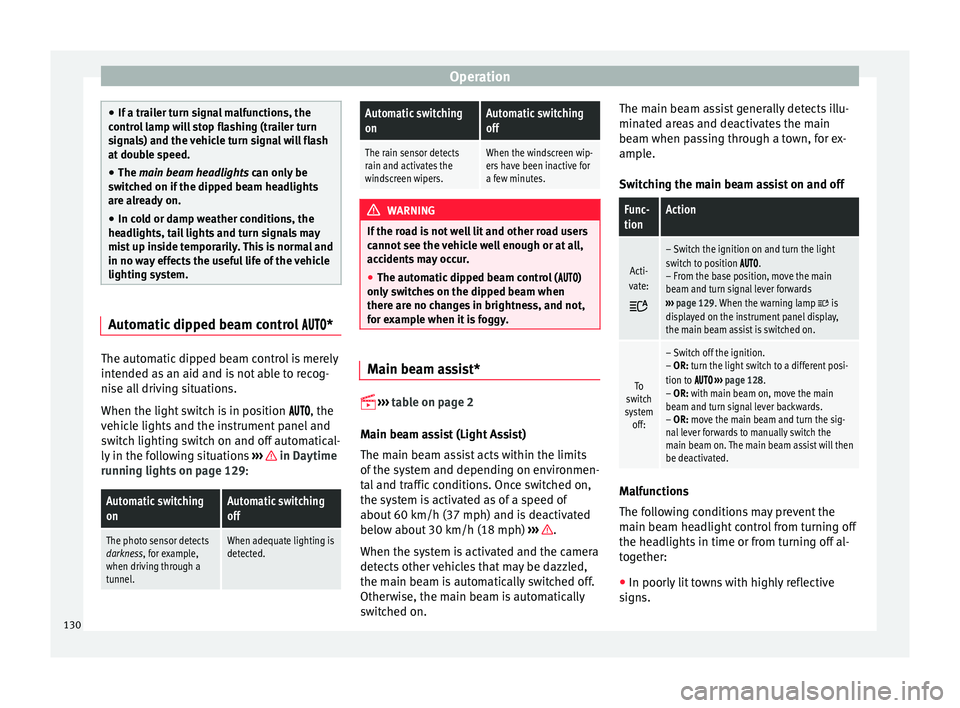
lighting system. Automatic dipped beam control
*The automatic dipped beam control is merely
int
ended a
s
an aid and is not able to recog-
nise all driving situations.
When the light switch is in position , the
vehicle lights and the instrument panel and
switch lighting switch on and off automatical-
ly in the following situations ››› in Daytime
ru nnin
g light
s on page 129:
Automatic switching
onAutomatic switching
off
The photo sensor detects
darkness, for example,
when driving through a
tunnel.When adequate lighting is
detected.
Automatic switching
onAutomatic switching
off
The rain sensor detects
rain and activates the
windscreen wipers.When the windscreen wip-
ers have been inactive for
a few minutes. WARNING
If the road is not well lit and other road users
cannot see the
vehicle well enough or at all,
accidents may occur.
● The automatic dipped beam control ( )
only sw
itches on the dipped beam when
there are no changes in brightness, and not,
for example when it is foggy. Main beam assist*
››
›
table on page 2
Main beam assist (Light Assist)
The main beam assist acts within the limits
of the system and depending on environmen-
tal and traffic conditions. Once switched on,
the system is activated as of a speed of
about 60 km/h (37 mph) and is deactivated
below about 30 km/h (18 mph) ››› .
When the sy s
t
em is activated and the camera
detects other vehicles that may be dazzled,
the main beam is automatically switched off.
Otherwise, the main beam is automatically
switched on. The main beam assist generally detects illu-
minated ar
eas and deactivates the main
beam when passing through a town, for ex-
ample.
Switching the main beam assist on and off
Func-
tionAction
Acti-
vate:
– Switch the ignition on and turn the light
switch to position .
– From the base position, move the main
beam and turn signal lever forwards
››› page 129. When the warning lamp
is
displayed on the instrument panel display,
the main beam assist is switched on.
To
switch
system off:
– Switch off the ignition.
– OR: turn the light switch to a different posi-
tion to
››› page 128.
– OR: with main beam on, move the main
beam and turn signal lever backwards.
– OR: move the main beam and turn the sig-
nal lever forwards to manually switch the
main beam on. The main beam assist will then
be deactivated. Malfunctions
The f
o
l
lowing conditions may prevent the
main beam headlight control from turning off
the headlights in time or from turning off al-
together:
● In poorly lit towns with highly reflective
signs.
130