window Seat Leon 5D 2015 Owner's manual
[x] Cancel search | Manufacturer: SEAT, Model Year: 2015, Model line: Leon 5D, Model: Seat Leon 5D 2015Pages: 308, PDF Size: 5.93 MB
Page 7 of 308
Table of Contents
Table of Contents
The e s
senti
als . . . . . . . . . . . . . . . . . . . . . . . . 7
Exterior view . . . . . . . . . . . . . . . . . . . . . . . . . . . . 7
Exterior view . . . . . . . . . . . . . . . . . . . . . . . . . . . . 8
Interior view (left guide) . . . . . . . . . . . . . . . . . . 9
Interior view (right-hand drive) . . . . . . . . . . . . . 10
How it works . . . . . . . . . . . . . . . . . . . . . . . . . . . . 11
Unlocking and locking . . . . . . . . . . . . . . . . . . . . 11
Before driving . . . . . . . . . . . . . . . . . . . . . . . . . . . 15
Airbags . . . . . . . . . . . . . . . . . . . . . . . . . . . . . . . . 17
Child seats . . . . . . . . . . . . . . . . . . . . . . . . . . . . . 20
Starting the vehicle . . . . . . . . . . . . . . . . . . . . . . 24
Lights and visibility . . . . . . . . . . . . . . . . . . . . . . 25
Easy Connect . . . . . . . . . . . . . . . . . . . . . . . . . . . 28
Driver information system . . . . . . . . . . . . . . . . . 31
Journey data . . . . . . . . . . . . . . . . . . . . . . . . . . . . 35
Cruise control . . . . . . . . . . . . . . . . . . . . . . . . . . . 40
Warning lamps . . . . . . . . . . . . . . . . . . . . . . . . . . 41
Gearbox lever . . . . . . . . . . . . . . . . . . . . . . . . . . . 43
Air conditioning . . . . . . . . . . . . . . . . . . . . . . . . . 45
Level control . . . . . . . . . . . . . . . . . . . . . . . . . . . . 51
Emergencies . . . . . . . . . . . . . . . . . . . . . . . . . . . . 55
Fuses . . . . . . . . . . . . . . . . . . . . . . . . . . . . . . . . . . 55
Bulbs . . . . . . . . . . . . . . . . . . . . . . . . . . . . . . . . . . 56
Action in the event of a puncture . . . . . . . . . . . 56
Changing a wheel . . . . . . . . . . . . . . . . . . . . . . . 58
Snow chains . . . . . . . . . . . . . . . . . . . . . . . . . . . . 61
Emergency towing of the vehicle . . . . . . . . . . . 61
How to jump start . . . . . . . . . . . . . . . . . . . . . . . . 62
Changing the wiper blades . . . . . . . . . . . . . . . . 64
Safety . . . . . . . . . . . . . . . . . . . . . . . . . . . . . . . . 66
Safe driving . . . . . . . . . . . . . . . . . . . . . . . . . . . . 66
Safety first! . . . . . . . . . . . . . . . . . . . . . . . . . . . . . 66
Advice about driving . . . . . . . . . . . . . . . . . . . . . 66 Correct position for passengers . . . . . . . . . . . . 67
Pedal area . . . . . . . . . . . . . . . . . . . . . . . . . . . . . . 71
Seat belts
. . . . . . . . . . . . . . . . . . . . . . . . . . . . . . 72
Why wear a seat belt? . . . . . . . . . . . . . . . . . . . . 72
How to properly adjust your seatbelt . . . . . . . . 75
Seat belt tensioners . . . . . . . . . . . . . . . . . . . . . . 76
Airbag system . . . . . . . . . . . . . . . . . . . . . . . . . . 77
Brief introduction . . . . . . . . . . . . . . . . . . . . . . . . 77
Airbag safety instructions . . . . . . . . . . . . . . . . . 79
Deactivating airbags . . . . . . . . . . . . . . . . . . . . . 81
Transporting children safely . . . . . . . . . . . . . . . 83
Safety for children . . . . . . . . . . . . . . . . . . . . . . . 83
Child seats . . . . . . . . . . . . . . . . . . . . . . . . . . . . . 85
Emergencies . . . . . . . . . . . . . . . . . . . . . . . . . . 86
Self-help . . . . . . . . . . . . . . . . . . . . . . . . . . . . . . . 86
Vehicle tool kit anti-puncture kit* . . . . . . . . . . . 86
Tyre repair . . . . . . . . . . . . . . . . . . . . . . . . . . . . . . 86
Manual unlocking/locking . . . . . . . . . . . . . . . . . 88
Changing the windscreen wiper blades . . . . . . 88
Towing and tow-starting the vehicle . . . . . . . . . 89
Fuses and bulbs . . . . . . . . . . . . . . . . . . . . . . . . . 91
Fuses . . . . . . . . . . . . . . . . . . . . . . . . . . . . . . . . . . 91
Bulbs . . . . . . . . . . . . . . . . . . . . . . . . . . . . . . . . . . 94
Changing bulbs in headlight unit . . . . . . . . . . . 95
Changing front fog light bulbs* . . . . . . . . . . . . 96
Changing the rear light bulbs (on the side pan-
el) . . . . . . . . . . . . . . . . . . . . . . . . . . . . . . . . . . . . 97
Chan
ging the rear light bulbs (on the rear
lid) . . . . . . . . . . . . . . . . . . . . . . . . . . . . . . . . . . . . 99
Operation . . . . . . . . . . . . . . . . . . . . . . . . . . . . .
103
Controls and displays . . . . . . . . . . . . . . . . . . . . 103
General instrument panel . . . . . . . . . . . . . . . . . 102
Instruments and warning/control lamps . . . . . 104
Instruments . . . . . . . . . . . . . . . . . . . . . . . . . . . . 104
Control lamps . . . . . . . . . . . . . . . . . . . . . . . . . . . 108 Introduction to the Easy Connect system*
. . . . 110
System settings (CAR)* . . . . . . . . . . . . . . . . . . . 110
Communications and multimedia . . . . . . . . . . . 111
Steering wheel controls* . . . . . . . . . . . . . . . . . . 111
Multimedia . . . . . . . . . . . . . . . . . . . . . . . . . . . . . 115
Opening and closing . . . . . . . . . . . . . . . . . . . . . 116
Central locking system . . . . . . . . . . . . . . . . . . . . 116
Anti-theft alarm system* . . . . . . . . . . . . . . . . . . 121
Rear lid (luggage compartment) . . . . . . . . . . . . 123
Electric windows . . . . . . . . . . . . . . . . . . . . . . . . . 124
Panoramic sliding sunroof* . . . . . . . . . . . . . . . . 126
Lights and visibility . . . . . . . . . . . . . . . . . . . . . . 128
Lights . . . . . . . . . . . . . . . . . . . . . . . . . . . . . . . . . 128
Visibility . . . . . . . . . . . . . . . . . . . . . . . . . . . . . . . 135
Windscreen wiper and window wiper sys-
tems . . . . . . . . . . . . . . . . . . . . . . . . . . . . . . . . . . 136
R
ear vision mirror . . . . . . . . . . . . . . . . . . . . . . . . 138
Seats and head restraints . . . . . . . . . . . . . . . . . 140
Adjusting the seats and headrests . . . . . . . . . . 140
Seat functions . . . . . . . . . . . . . . . . . . . . . . . . . . 141
Transport and practical equipment . . . . . . . . . 145
Storage compartments . . . . . . . . . . . . . . . . . . . 145
Storing objects . . . . . . . . . . . . . . . . . . . . . . . . . . 148
Roof carrier . . . . . . . . . . . . . . . . . . . . . . . . . . . . . 157
Air conditioning . . . . . . . . . . . . . . . . . . . . . . . . . 159
Heating, ventilation and cooling . . . . . . . . . . . . 159
Driving . . . . . . . . . . . . . . . . . . . . . . . . . . . . . . . . 164
Ignition lock . . . . . . . . . . . . . . . . . . . . . . . . . . . . 164
Braking and parking . . . . . . . . . . . . . . . . . . . . . 166
Manual gearbox . . . . . . . . . . . . . . . . . . . . . . . . . 167
Automatic gearbox/DSG automatic gear-
box* . . . . . . . . . . . . . . . . . . . . . . . . . . . . . . . . . . . 167
R
un-in and economical driving . . . . . . . . . . . . . 175
Driver assistance systems . . . . . . . . . . . . . . . . . 178
Braking and stability systems . . . . . . . . . . . . . . 178
Start-Stop system* . . . . . . . . . . . . . . . . . . . . . . . 183
Cruise control system (GRA)* . . . . . . . . . . . . . . 185
Adaptive Cruise Control ACC* . . . . . . . . . . . . . . 187 5
Page 16 of 308
The essentials
● The bonnet c
an be opened. R
elease the
bonnet stay and secure it in the fixture de-
signed for this in the bonnet.
››› in Work in the engine compartment
on page 246
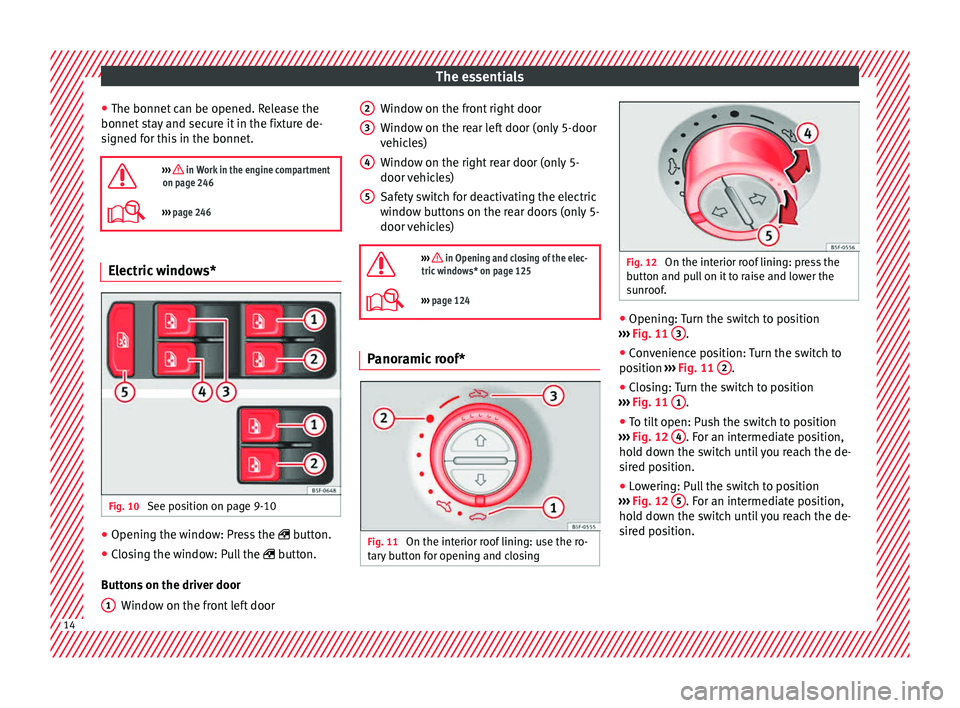
››› page 246 Electric windows*
Fig. 10
See position on page 9-10 ●
Opening the window: Press the butt
on.
● C
losing the window: Pull the button.
B
uttons on the driver door Window on the front left door
1 Window on the front right door
W
indo
w on the r
ear left door (only 5-door
vehicles)
Window on the right rear door (only 5-
door vehicles)
Safety switch for deactivating the electric
window buttons on the rear doors (only 5-
door vehicles)
››› in Opening and closing of the elec-
tric windows* on page 125
››› page 124 Panoramic roof*
Fig. 11
On the interior roof lining: use the ro-
t ar
y
button for opening and closing 2
3
4
5
Fig. 12
On the interior roof lining: press the
b utt
on and p
ull on it to raise and lower the
sunroof. ●
Opening: Turn the switch to position
› ›
›
Fig. 11 3 .
● Convenience position: Turn the switch to
po s
ition ›
›› Fig. 11 2 .
● Closing: Turn the switch to position
› ›
›
Fig. 11 1 .
● To tilt open: Push the switch to position
› ›
›
Fig. 12 4 . For an intermediate position,
ho l
d do
wn the switch until you reach the de-
sired position.
● Lowering: Pull the switch to position
›››
Fig. 12 5 . For an intermediate position,
ho l
d do
wn the switch until you reach the de-
sired position. 14
Page 29 of 308
The essentials
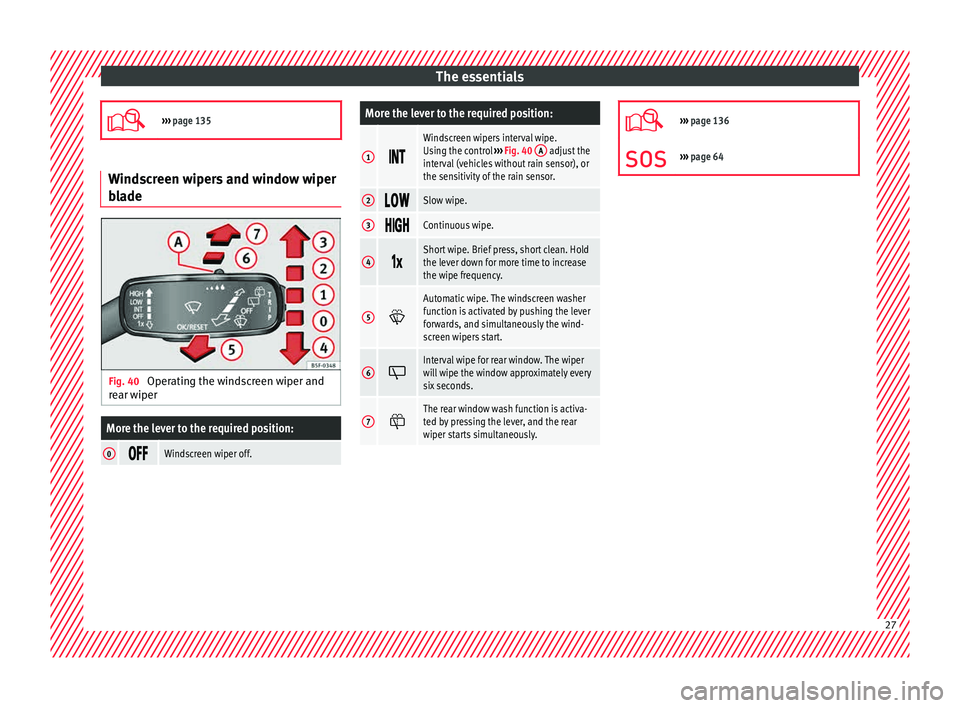
››› page 135 Windscreen wipers and window wiper
bla
de Fig. 40
Operating the windscreen wiper and
r e
ar w
iper
More the lever to the required position:
0 Windscreen wiper off.
More the lever to the required position:
1
Windscreen wipers interval wipe.
Using the control
››› Fig. 40 A adjust the
interval (vehicles without rain sensor), or
the sensitivity of the rain sensor.
2 Slow wipe.
3
Continuous wipe.
4
Short wipe. Brief press, short clean. Hold
the lever down for more time to increase
the wipe frequency.
5
Automatic wipe. The windscreen washer
function is activated by pushing the lever
forwards, and simultaneously the wind-
screen wipers start.
6
Interval wipe for rear window. The wiper
will wipe the window approximately every
six seconds.
7
The rear window wash function is activa-
ted by pressing the lever, and the rear
wiper starts simultaneously.
›››
page 136
››› page 64 27
Page 48 of 308
The essentials
To switch a specific function on, press the ap-
pr opri
at
e button. Press the button again to
switch off the function. The LED on each control lights up to indicate
that the r
espective function of a control has
been switched on.
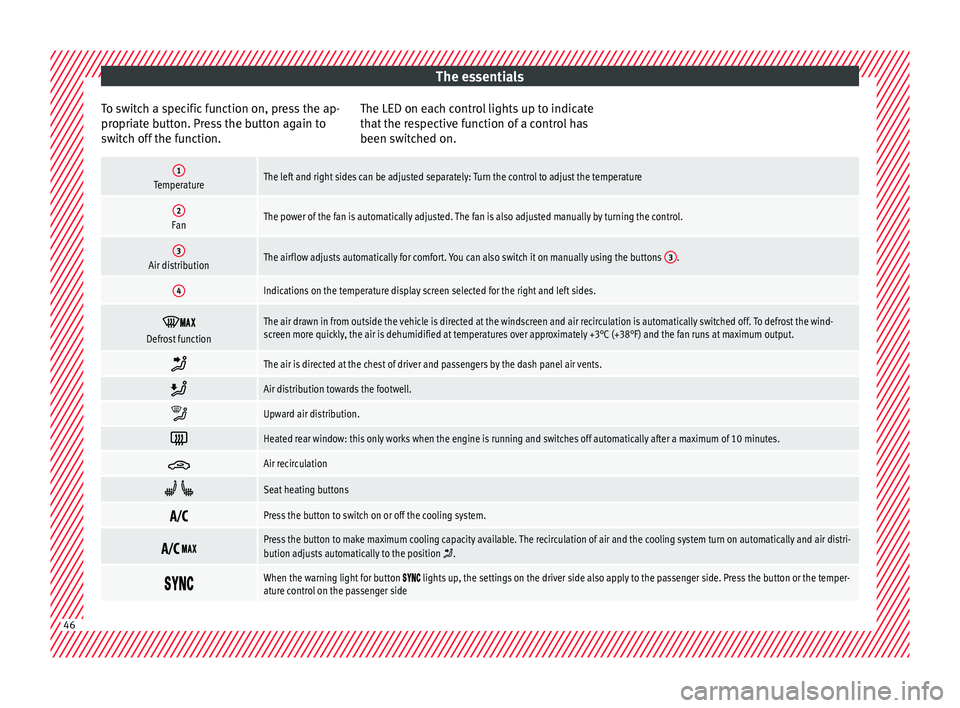
1TemperatureThe left and right sides can be adjusted separately: Turn the control to adjust the temperature
2FanThe power of the fan is automatically adjusted. The fan is also adjusted manually by turning the control.
3Air distributionThe airflow adjusts automatically for comfort. You can also switch it on manually using the buttons 3.
4Indications on the temperature display screen selected for the right and left sides.
Defrost functionThe air drawn in from outside the vehicle is directed at the windscreen and air recirculation is automatically switched off. To defrost the wind-
screen more quickly, the air is dehumidified at temperatures over approximately +3°C (+38°F) and the fan runs at maximum output.
The air is directed at the chest of driver and passengers by the dash panel air vents.
Air distribution towards the footwell.
Upward air distribution.
Heated rear window: this only works when the engine is running and switches off automatically after a maximum of 10 minutes.
Air recirculation
Seat heating buttons
Press the button to switch on or off the cooling system.
Press the button to make maximum cooling capacity available. The recirculation of air and the cooling system turn on automatically and air distri-
bution adjusts automatically to the position .
When the warning light for button lights up, the settings on the driver side also apply to the passenger side. Press the button or the temper-
ature control on the passenger side 46
Page 50 of 308
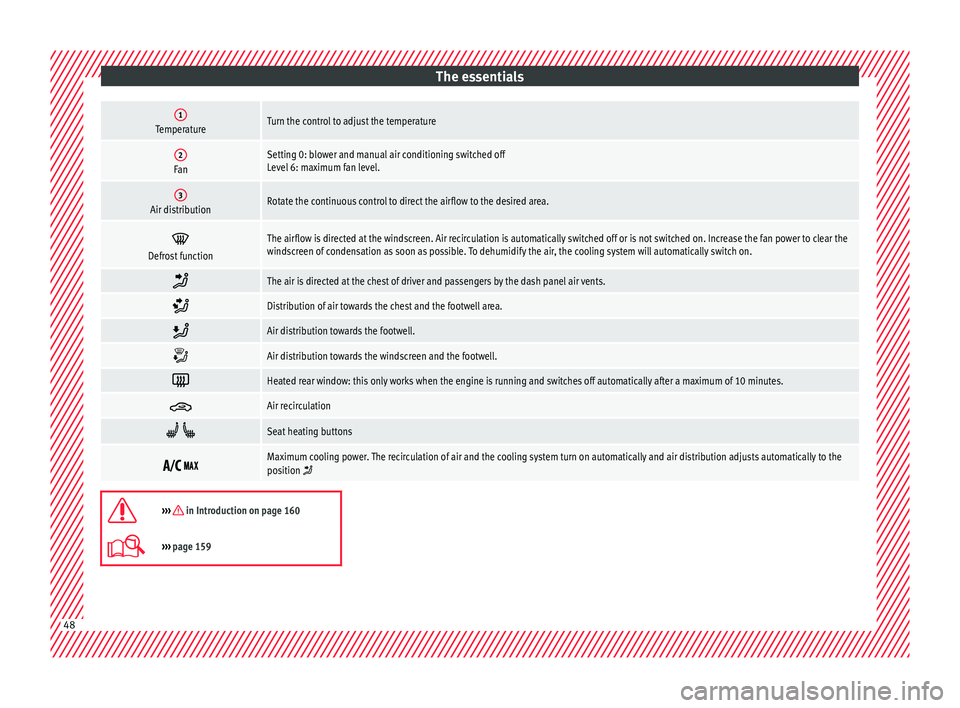
The essentials1TemperatureTurn the control to adjust the temperature
2FanSetting 0: blower and manual air conditioning switched off
Level 6: maximum fan level.
3Air distributionRotate the continuous control to direct the airflow to the desired area.
Defrost functionThe airflow is directed at the windscreen. Air recirculation is automatically switched off or is not switched on. Increase the fan power to clear the
windscreen of condensation as soon as possible. To dehumidify the air, the cooling system will automatically switch on.
The air is directed at the chest of driver and passengers by the dash panel air vents.
Distribution of air towards the chest and the footwell area.
Air distribution towards the footwell.
Air distribution towards the windscreen and the footwell.
Heated rear window: this only works when the engine is running and switches off automatically after a maximum of 10 minutes.
Air recirculation
Seat heating buttons
Maximum cooling power. The recirculation of air and the cooling system turn on automatically and air distribution adjusts automatically to the
position
››› in Introduction on page 160
›››
page 159 48
Page 52 of 308

The essentials
Air distribution towards the footwell.
Air distribution towards the windscreen and the footwell.
Heated rear window: this only works when the engine is running and switches off automatically after a maximum of 10 minutes
Air recirculation
››› page 163
Seat heating buttons
››› in Introduction on page 160
›››
page 159 50
Page 65 of 308

The essentials
Jump leads must comply with standard DIN
72553 (see c ab
l
e manufacturer's instruc-
tions). The wire cross section must be at least
25 mm 2
for petrol engines and at least
35 mm 2
for diesel engines. Note
● The v ehic
les must not touch each other,
otherwise electricity could flow as soon as
the positive terminals are connected.
● The discharged battery must be properly
connected t
o the on-board network. How to jump start: description
Fig. 78
Diagram of connections for vehicles
w ithout
Start Stop system Fig. 79
Diagram of connections for vehicles
with St
art Stop system Jump lead terminal connections
1. Switch off the ignition of both vehicles
››
›
.
2. Connect one end of the re
d
jump lead to
the positive + terminal of the vehicle
w ith the fl
at
battery A
› ›
› Fig. 78 .
3. Connect the other end of the red
jump
lead to the positive terminal + in the ve-
hic l
e pr
oviding assistance B .
4. For vehicles without Start-Stop system:
connect
one end of
the black jump lead to
the negative terminal – of the vehicle
pr o
v
iding the current B
› ›
› Fig. 78 .
– For vehicles with Start-Stop system: con-
nect one end of
the black jump lead X to a
s uit
ab
le ground terminal, to a solid piece of
metal in the engine block, or to the engine
block itself ››› Fig. 79. 5. Connect the other end of the
black
jump
lead X to a solid metal component bolted
t o the en
gine b
lock or to the engine block
itself of the vehicle with the flat battery.
Do not connect it to a point near the bat-
tery A .
6. Position the leads in such a way that they cannot
c
ome into contact with any moving
parts in the engine compartment.
Starting
7. Start the engine of the vehicle with the boostin
g battery and let it run at idling
speed.
8. Start the engine of the vehicle with the flat batter
y and wait for 2 or 3 minutes until
the engine is running.
Removing the jump leads
9. Before you remove the jump leads, switch off the dipped be
am headlights if they are
switched on.
10.
Turn on the heater blower and heated rear
window in the vehicle with the flat battery.
This helps minimise voltage peaks which
are generated when the leads are discon-
nected.
11.When the engine is running, disconnect the lea
ds in reverse order to the details
given above. » 63
Page 67 of 308

The essentials
Changing the windscreen and rear
w indo
w w
iper bladesFig. 81
Changing the windscreen wiper
b l
a
des Fig. 82
Changing the rear wiper blade Raising and lowering windscreen wiper arms
● Place the windscreen wipers in the service
po s
ition ›
›› page 64.
● Grip the wiper arms only b
y the blade's fas-
tening point. Cleaning windscreen wiper blades
●
Raise the wiper arms.
● Use a soft cloth to remove dust and dirt
from the wind
screen wiper blades.
● If the blades are very dirty, a sponge or
damp cloth m
ay be used ››› in Changing
the w ind
s
creen and rear window wiper
blades on page 89.
Changing the windscreen wiper blades
● Lift and unfold the wiper arms.
● Press and hold release button ›››
Fig. 81 1 and pull gently on the wiper blade in the di-
r
ection of
the arr
ow.
● Fit a new wiper blade of the same len
gth
and design on to the wiper arm and hook it
into place.
● Rest the wiper arms back onto the wind-
scr
een.
Changing the rear wiper blade
● Raising/lowering the wiper arm.
● Turn the blade slightly ›››
Fig. 82 (arrow
A ).
● Hold down the release button 1 while
g ently
p
ulling the blade in the direction of ar-
row B .
● Insert a new blade of the same l
en
gth and
type in the rear wiper arm in the opposite di-
rection to the arrow B and hook into place
b utt
on 1 .●
Rep
l
ace the wiper arm on the rear window.
››› in Changing the windscreen and
rear window wiper blades on page 89
››› page 88 65
Page 68 of 308
Safety
Safety
Saf e driv
in
g
Safety first! WARNING
● This m
anual contains important informa-
tion about the operation of the vehicle, both
for the driver and the passengers. The other
sections of the on-board documentation also
contain further information that you should
be aware of for your own safety and for the
safety of your passengers.
● Ensure that the on-board documentation is
kept in the
vehicle at all times. This is espe-
cially important when lending or selling the
vehicle to another person. Advice about driving
B ef
or
e starting every trip For your own safety and the safety of your
p
a
s
sengers, always note the following points
before every trip:
– Make sure that the vehicle's lights and turn
signal
s are working properly.
– Check tyre pressure. –
Ensur
e that all windows provide a clear and
good view of the surroundings.
– Make sure all luggage is secured
›››
page 148.
– Make sure that no objects can interfere
with the pedal
s.
– Adjust front seat, head restraint and rear vi-
sion mirror
s properly according to your
size.
– Ensure that the passengers in the rear
seats alw
ays have the head restraints in
the in-use position ››› page 70.
– Instruct passengers to adjust the head re-
straints
according to their height.
– Protect children with appropriate child
seats and pr
operly applied seat belts
››› page 83.
– Assume the correct sitting position. Instruct
your pa
ssengers also to assume a proper
sitting position. ››› page 67.
– Fasten your seat belt securely. Instruct your
pas
sengers also to fasten their seat belts
properly. ››› page 72.
What affects driving safety? As a driver, you are responsible for yourself
and
your p
assengers. When your concentra-
tion or driving safety is affected by any cir- cumstance, you endanger yourself as well as
others on the r
oad ››› , for this reason:
– Always pay attention to traffic and do not
g et
di
stracted by passengers or telephone
calls.
– Never drive when your driving ability is im-
paired (e.
g. by medication, alcohol, drugs).
– Observe traffic laws and speed limits.
– Always reduce your speed as appropriate
for ro
ad, traffic and weather conditions.
– When travelling long distances, take
break
s regularly - at least every two hours.
– If possible, avoid driving when you are tired
or stre
ssed. WARNING
When driving safety is impaired during a trip,
the risk of
injury and accidents increases. Safety equipment
Never put your safety or the safety of your
p
a
s
sengers in danger. In the event of an acci-
dent, the safety equipment may reduce the
risk of injury. The following list includes most
of the safety equipment in your SEAT:
● Three-point seat belts
● belt tension limiters for the front and rear
side seats,
66
Page 71 of 308

Safe driving
dash panel, out the window or on the seat. An
incorr
ect
sitting position exposes you to an
increased risk of injury in case of a sudden
braking or an accident. If the airbag is trig-
gered, you could sustain severe injuries due
to an incorrect sitting position.
● To reduce the risk of injury to the front pas-
senger in ev
ents such as sudden braking ma-
noeuvres or an accident, never travel with the
backrest tilted far back! The airbag system
and seat belts can only provide optimal pro-
tection when the backrest is in an upright po-
sition and the front passenger is wearing his
or her seat belt properly. The further the seat
backrests are tilted to the rear, the greater
the risk of injury due to incorrect positioning
of the belt web or to the incorrect sitting po-
sition!
● Adjust the head restraint correctly in order
to achiev
e maximum protection. Correct sitting position for rear seat
p
as
sengers To reduce the risk of injury in the event of a
s
ud
den br
aking manoeuvre or an accident,
passengers on the rear seat bench must con-
sider the following:
– Sit up straight.
– Adjust the head restraint to the correct po-
sition ››
› page 70. –
Alwa
ys keep both feet in the footwell in
front of the rear seat.
– Fasten your seat belt securely ›››
page 72.
– Use an appropriate child restraint system
when you t
ake children in the vehicle
››› page 83. WARNING
● If the p a
ssengers in the rear seats are not
sitting properly, they could sustain severe in-
juries.
● Adjust the head restraint correctly in order
to achiev
e maximum protection.
● Seat belts can only provide optimal protec-
tion when seat b
ackrests are in an upright
position and the vehicle occupants are wear-
ing their seat belts correctly. If passengers In
the rear seats are not sitting in an upright po-
sition, the risk of injury due to incorrect posi-
tioning of the seat belt increases. Examples of incorrect sitting posi-
tion
s Seat belts can provide optimal protection on-
ly
when the belt
w
ebs are properly posi-
tioned. Incorrect sitting positions substan-
tially reduce the protective function of seat
belts and increase the risk of injury due to in-
correct seat belt position. As the driver, you
are responsible for all passengers, especially
children. –
Never allo
w anyone to assume an incorrect
sitting position in the vehicle while travel-
ling ››› .
The f o
l
lowing list contains examples of sit-
ting positions that could be dangerous for all
vehicle occupants. The list is not complete,
but we would like to make you aware of this
issue.
Therefore, whenever the vehicle is in motion:
● Never stand in the vehicle.
● Never stand on the seats.
● Never kneel on the seats.
● Never tilt your seat backrest far to the rear.
● Never lean against the dash panel.
● Never lie on the rear bench.
● Never sit on the front edge of a seat.
● Never sit sideways.
● Never lean out of a window.
● Never put your feet out of a window.
● Never put your feet on the dash panel.
● Never put your feet on the surface of a seat.
● Do not allow anyone to travel in the foot-
well
.
● Never travel without wearing the seat belt.
● Do not allow anyone to travel in the lug-
gage c
ompartment. »
69
Technical data
Advice
Operation
Emergencies
Safety