change time Seat Leon 5D 2016 MEDIA SYSTEM PLUS - NAVI SYSTEM - NAVI SYSTEM PLUS
[x] Cancel search | Manufacturer: SEAT, Model Year: 2016, Model line: Leon 5D, Model: Seat Leon 5D 2016Pages: 96, PDF Size: 2.6 MB
Page 38 of 96
Audio and Media Mode
imported from different data storage devices
t o the
jukebox and thi
s used to play them.
The files will only be copied when the engine
is running. Copying copy-protected CDs and
DVDs is prohibited
Importing files
● In Media mode, press the SETUP function
b utt
on and then sel
ect Manage jukebox .
● Press the IMPOR
T function button.
● Select the desired source from the Select
source menu.
The d at
a s
torage device is prepared. This op-
eration may take a few seconds.
● Activate the checkboxes to the right of the
file
s or folders to be imported.
● If Select al
l is activated, all files and folders
on the d at
a s
torage device will be imported.
● Press the IMPORT function button.
D ependin
g on the sel
ection, all files and fold-
ers will be imported with the indicated name
to the Jukebox .
If no track information is available, the audio
files will be placed in the following folders:
Audio data CD
■ Album ■
Unknown albums
■ Track. mp31)
■ Artists
■ Unknown artists
■Unknown albums
■ Track. mp31)
Function
s and progress display during the
copying operation
While copying, an animation is displayed
along with the progress percentage on the
import screen.
Audio data CD: It is not possible to copy and
play files at the same time.
● Press the Cancel function button to end the
impor t
of
the whole track that is currently be-
ing imported.
● To obtain information on the status of the
import, pre
ss the Information function button.
● Press the B
A
CK
function button to close
the impor t
s
creen with the progress informa-
tion.
● When the file import ends, a notification
wil
l appear.
Deleting files
● In Media mode, press the SETUP function
b utt on and then sel
ect Manage jukebox .●
Pr e
s
s the DELETE
function button.
● Activate the checkboxes to the right of the
fi l
e
s or folders to be deleted.
● If Select al
l is activated, all the files and
f o
l
ders on the data storage device will be de-
leted.
● Press the DELETE
function button. The
fi l
e
s and folders will be deleted according to
the selection made.
● When the files have been deleted, a notifi-
cation wi
ll appear.
● Press the BACK
function button to close
the menu.
Openin g s
t
ored audio and video files
● Change to Jukebox (SSD) cont
ent
››› page 30.
When storing the tracks, they are stored un-
der different categories and lists according to
the information available.
The tracks saved can be checked and opened
from these lists according to different catego-
ries.
Jukebox
● Playlist
● Artist
● Album 1)
The name and extension of the file are examples.
36
Page 40 of 96
Audio and Media Mode
switch on/off the mobile hotspot and ac-
c e
ss the Configuration of the WLAN net-
work.
● Press the Configuration function b
utton
to configure the WLAN network.
Function button: function
Mobile hotspot: To switch the WLAN network on/off.
Security level: To select the code type (encryption),
choose WAP2 or No security level . An 8-charac-
ter network key is automatically generated.
Network key: Network key automatically generated.
Press the function button to manually change the
network key. The network key must have a minimum
of 8 characters and a maximum of 63.
SSID: Name of the Infotainment system WLAN net-
work.
Do not send network name (SSID): Activate the check-
box to deactivate the visibility of the WLAN network. To save the changes made to the mobile hot-
s
pot
c
onfiguration, press the STORE button.DVD video mode 3 Only available for the model: Navi System Plus
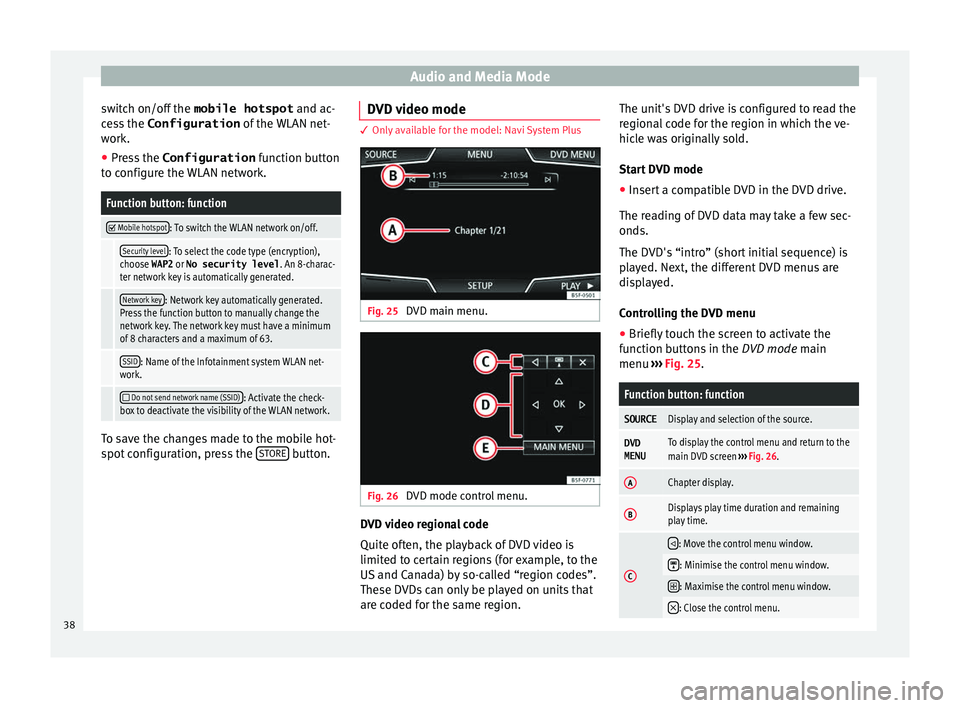
Fig. 25
DVD main menu. Fig. 26
DVD mode control menu. DVD video regional code
Quit
e of
t
en, the playback of DVD video is
limited to certain regions (for example, to the
US and Canada) by so-called “region codes”.
These DVDs can only be played on units that
are coded for the same region. The unit's DVD drive is configured to read the
region
al code for the region in which the ve-
hicle was originally sold.
Start DVD mode
● Insert a compatible DVD in the DVD drive.
The rea
ding of DVD data may take a few sec-
onds.
The DVD's “intro” (short initial sequence) is
played. Next, the different DVD menus are
displayed.
Controlling the DVD menu
● Briefly touch the screen to activate the
function b
uttons in the DVD mode main
menu ››› Fig. 25.
Function button: function
SOURCEDisplay and selection of the source.
DVD
MENUTo display the control menu and return to the
main DVD screen ››› Fig. 26.
AChapter display.
BDisplays play time duration and remaining
play time.
C
: Move the control menu window.
: Minimise the control menu window.
: Maximise the control menu window.
: Close the control menu.
38
Page 47 of 96
Navigation›››
Fig. 29
AAllows you to select a search that is local or
along the route.
BPress to open the cursor buttons (, ), which
allow you to move within the text. Address
Aft
er ent
ering a country and a town, you can
start navigating towards the centre of the se-
lected town.
When narrowing down the destination ad-
dress, please note that every entry restricts
the available range of subsequent selections.
For instance, if the street you are looking for
is not in the postcode area you have selected
in a previous window, you will not be able to
find the street at the street selection stage.
Function button: function
Country: To select the desired country.
City: To enter the desired city or postcode.
Street: To enter the desired street name.
House number: To enter the desired house number.
Junction: To select the desired intersection.
Last destinations: Open My destinations menu
››› page 46.
Start: Start route guidance to the selected address. Using the
● Select the destination on the map or enter
it u
s
ing GPS coordinates and confirm with
OK .
Function button: function
Save: To save the selected point of interest in the desti-
nation memory ››› page 46.
Edit: To edit a destination or to enter another destina-
tion.
Route options: To adjust route options, see Navigation
Setup ››› page 53.
Start: Starts guided navigation to the selected point of
interest. After starting route guidance
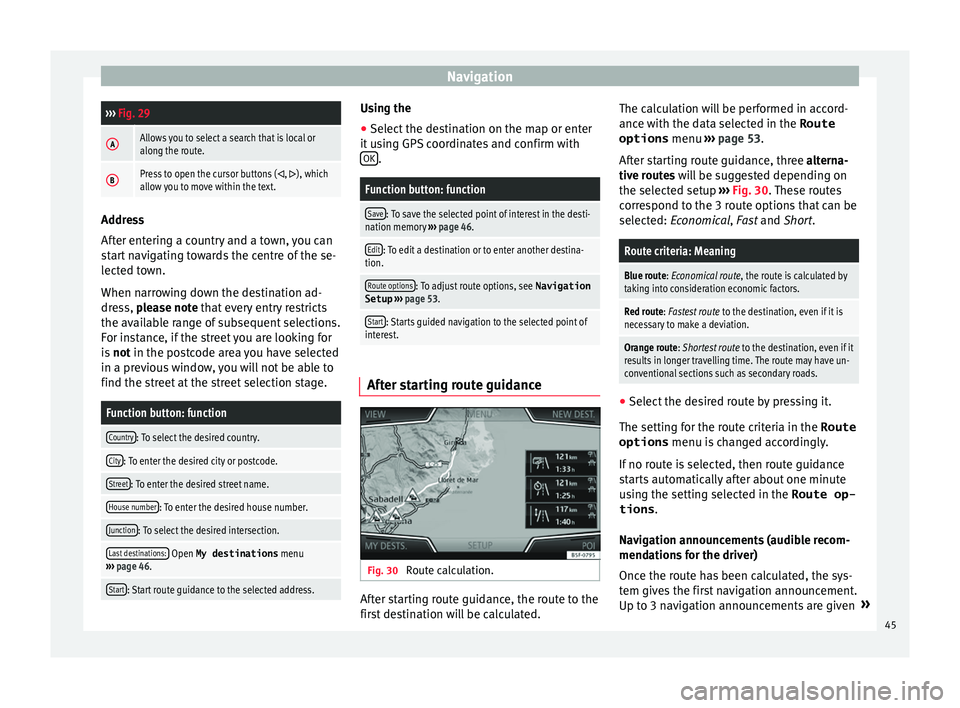
Fig. 30
Route calculation. After starting route guidance, the route to the
fir
s
t
destination will be calculated. The calculation will be performed in accord-
ance with the d
ata selected in the Route
options menu ››› page 53.
After starting route guidance, three alterna-
tive routes will be suggested depending on
the selected setup ››› Fig. 30. These routes
correspond to the 3 route options that can be
selected: Economical, Fast and Short.
Route criteria: Meaning
Blue route: Economical route, the route is calculated by taking into consideration economic factors.
Red route: Fastest route to the destination, even if it is
necessary to make a deviation.
Orange route: Shortest route to the destination, even if it
results in longer travelling time. The route may have un-
conventional sections such as secondary roads. ●
Select the desired route by pressing it.
The settin g f
or the r
oute criteria in the Route
options menu is changed accordingly.
If no route is selected, then route guidance
starts automatically after about one minute
using the setting selected in the Route op- tions .
Navigation announcements (audible recom-
mendations for the driver)
Once the route has been calculated, the sys-
tem gives the first navigation announcement.
Up to 3 navigation announcements are given »
45
Page 52 of 96
NavigationFunction button: function
Demo mode start (only when demo mode is active)
Map display
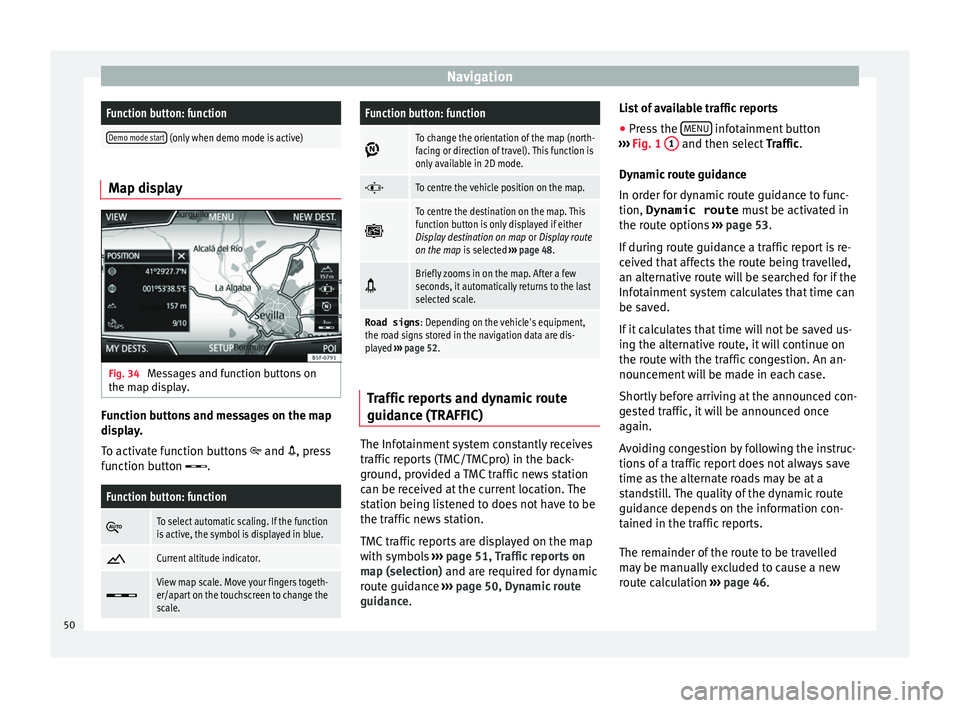
Fig. 34
Messages and function buttons on
the m ap di
s
play. Function buttons and messages on the map
di
s
p
lay.
To activate function buttons
and , press
function button .
Function button: function
To select automatic scaling. If the function
is active, the symbol is displayed in blue.
Current altitude indicator.
View map scale. Move your fingers togeth-
er/apart on the touchscreen to change the
scale.
Function button: function
To change the orientation of the map (north-
facing or direction of travel). This function is
only available in 2D mode.
To centre the vehicle position on the map.
To centre the destination on the map. This
function button is only displayed if either
Display destination on map
or Display route
on the map is selected ››› page 48.
Briefly zooms in on the map. After a few
seconds, it automatically returns to the last
selected scale.
Road signs
: Depending on the vehicle's equipment,
the road signs stored in the navigation data are dis-
played ››› page 52. Traffic reports and dynamic route
guid
anc
e (TRAFFIC) The Infotainment system constantly receives
tr
affic
r
eports (TMC/TMCpro) in the back-
ground, provided a TMC traffic news station
can be received at the current location. The
station being listened to does not have to be
the traffic news station.
TMC traffic reports are displayed on the map
with symbols ›››
page 51, Traffic reports on
map (selection) and are required for dynamic
route guidance ››› page 50, Dynamic route
guidance. List of available traffic reports
● Press the MENU infotainment button
› ›
›
Fig. 1 1 and then select
Tr
affic .
Dynamic route guidance
In order for dynamic route guidance to func-
tion, Dynamic route must be activated in
the route options ››› page 53.
If during route guidance a traffic report is re-
ceived that affects the route being travelled,
an alternative route will be searched for if the
Infotainment system calculates that time can
be saved.
If it calculates that time will not be saved us-
ing the alternative route, it will continue on
the route with the traffic congestion. An an-
nouncement will be made in each case.
Shortly before arriving at the announced con-
gested traffic, it will be announced once
again.
Avoiding congestion by following the instruc-
tions of a traffic report does not always save
time as the alternate roads may be at a
standstill. The quality of the dynamic route
guidance depends on the information con-
tained in the traffic reports.
The remainder of the route to be travelled
may be manually excluded to cause a new
route calculation ››› page 46.
50
Page 59 of 96
CAR menu
CAR menu Intr oduction t
o m
anaging the
CAR menu
CAR menu Press the
MENU infotainment button
›››
Fig. 1
1 and then select
Vehicl e to access the
main menu with the following options:
● VIEW
● MINIPLAYER, in the top right corner (Radio
or Medi a f
unction if the HDC descent control*
is not active).
● PREVIOUS-NEXT (to change screen)
● SETUP ›››
Booklet Instruction Manual,
chapter System setup (CAR)
With the function button View you can access
the f o
l
lowing information:
● SPORT*
● OFFROAD*
● CONSUMERS
● DRIVING DATA
● ECOTRAINER* ●
VEHICLE S
TATUS
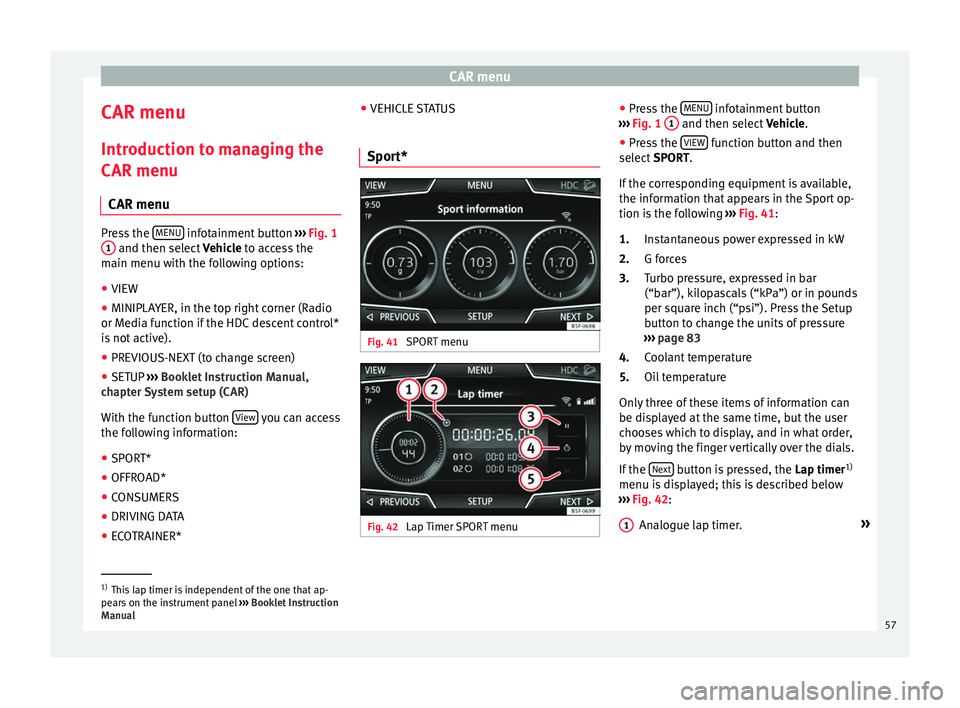
Sport* Fig. 41
SPORT menu Fig. 42
Lap Timer SPORT menu ●
Pr e
s
s the MENU infotainment button
› ›
›
Fig. 1 1 and then select
Vehic
l e.
● Press the VIEW function button and then
sel ect
S
PORT.
If the corresponding equipment is available,
the information that appears in the Sport op-
tion is the following ››› Fig. 41:
Instantaneous power expressed in kW
G forces
Turbo pressure, expressed in bar
(“bar”), kilopascals (“kPa”) or in pounds
per square inch (“psi”). Press the Setup
button to change the units of pressure
››› page 83
Coolant temperature
Oil temperature
Only three of these items of information can
be displayed at the same time, but the user
chooses which to display, and in what order,
by moving the finger vertically over the dials.
If the Next button is pressed, the
Lap timer1)
menu i s
di
splayed; this is described below
››› Fig. 42:
Analogue lap timer. »
1.
2.
3.
4.
5.
1 1)
This lap timer is independent of the one that ap-
pear s
on the instrument panel ››› Booklet Instruction
Manual 57
Page 68 of 96
Telephone management system (PHONE)
After the first connection, it will take a few
minut e
s
for the data from the phonebook of
the linked mobile phone to be available in
the Infotainment system. The next time that
the mobile telephone is connected (e.g. on
the next journey) the phonebook is updated
automatically.
If any entries in the mobile phonebook have
been modified while connected, a manual
update of the phonebook data can be initi-
ated from the User profile settings
menu ››› page 72.
Telephone management can store a maxi-
mum of 4 user profiles for mobile tele-
phones. If you wish to link/connect another
mobile phone, the oldest user profile will au-
tomatically be replaced.
Telephone management system function but-
tons ● Press the MENU infotainment button
› ›
›
Fig. 1 1 and then select
Tel
ephone to ac-
cess the PHONE main menu.
Function button: function
1Name of connected mobile telephone.
Press the icon to the left to connect or
pair with another mobile telephone.
2Speed dial buttons, to which telephone
numbers from the phonebook may be as-
signed respectively ››› page 71.
Function button: function
3
Change to another connected telephone:
Allows user to change between connec-
ted telephones as hands-free. This but-
ton will only be visible when there are
two telephones connected as hands-free.
The active user profile corresponds to the
telephone appearing on the screen.
DIAL NO.To open the number pad and enter a tele-
phone number ››› page 67.
CONTACTSTo open the phonebook of the connected
mobile telephone ››› page 68.
SMSTo open the menu for SMS messages
››› page 69.
CALLSTo open call lists of the connected mobile
telephone ››› page 70.
SETUPTo open the Telephone settings
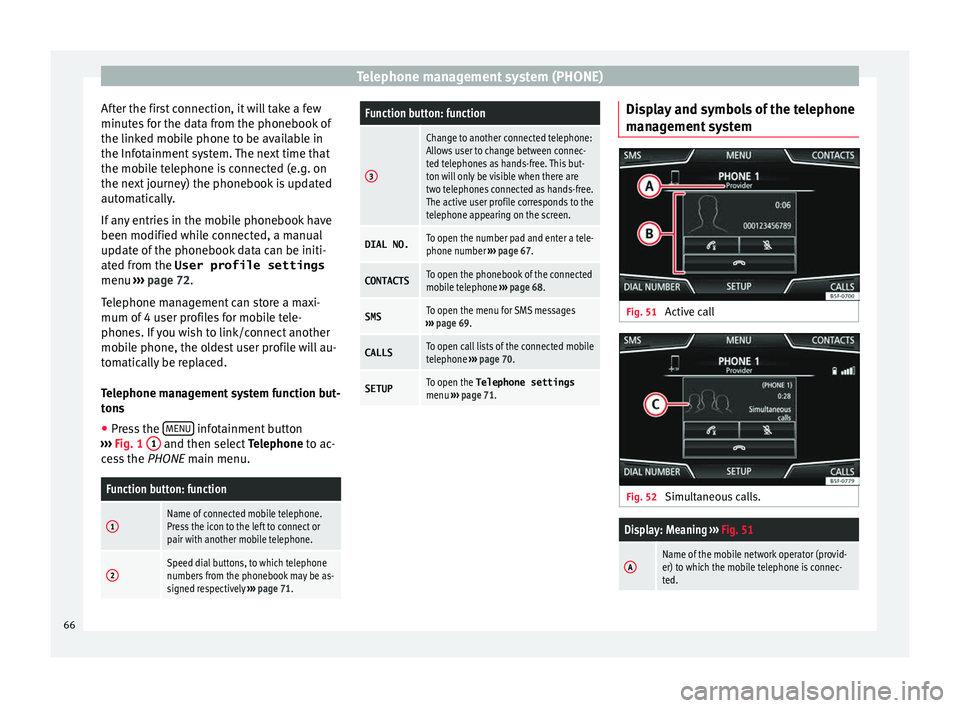
menu ››› page 71. Display and symbols of the telephone
m
an
ag
ement system Fig. 51
Active call Fig. 52
Simultaneous calls.
Display: Meaning ››› Fig. 51
AName of the mobile network operator (provid-
er) to which the mobile telephone is connec-
ted.66
Page 80 of 96
Full Link*
Pairing of portable devices supporting
the Mirr orLink®
, Andr oid Aut
o™
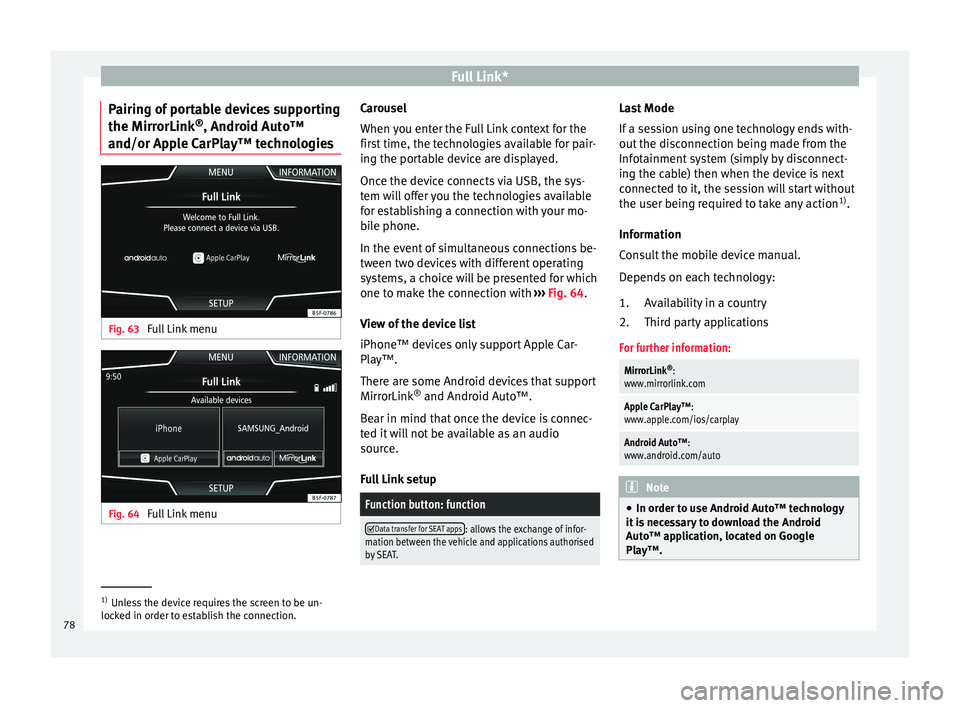
and/or Apple CarPlay™ technologies Fig. 63
Full Link menu Fig. 64
Full Link menu Carousel
When
y
ou ent
er the Full Link context for the
first time, the technologies available for pair-
ing the portable device are displayed.
Once the device connects via USB, the sys-
tem will offer you the technologies available
for establishing a connection with your mo- bile phone.
In the event of simultaneous connections be-
tween two devices with different operating
systems, a choice will be presented for which
one to make the connection with ››› Fig. 64.
View of the device list
iPhone™ devices only support Apple Car-
Play™.
There are some Android devices that support
MirrorLink ®
and Android Auto™.
Bear in mind that once the device is connec-
ted it will not be available as an audio
source.
Full Link setup
Function button: function
Data transfer for SEAT apps: allows the exchange of infor-
mation between the vehicle and applications authorised
by SEAT. Last Mode
If
a se
s
sion using one technology ends with-
out the disconnection being made from the
Infotainment system (simply by disconnect-
ing the cable) then when the device is next
connected to it, the session will start without
the user being required to take any action 1)
.
Information
Consult the mobile device manual.
Depends on each technology: Availability in a country
Third party applications
For further information:
MirrorLink ®
:
www.mirrorlink.com
Apple CarPlay™:
www.apple.com/ios/carplay
Android Auto™:
www.android.com/auto Note
● In order t o u
se Android Auto™ technology
it is necessary to download the Android
Auto™ application, located on Google
Play™. 1.
2.
1)
Unless the device requires the screen to be un-
lock ed in or
der to establish the connection.
78
Page 85 of 96
Setup
Setup
M enu and sy
s
tem settings
Main menu System settings
›› ›
table on page 2
The selection of possible settings will de-
pend on the country, the unit in question and
the vehicle equipment.
● Press the MENU infotainment button
› ›
›
Fig. 1 1 and then select
Setting
s .
● To adjust the settings for a certain function,
pres
s the appropriate function button in the
main menu. Changes are automatically stor-
ed when a menu is closed.
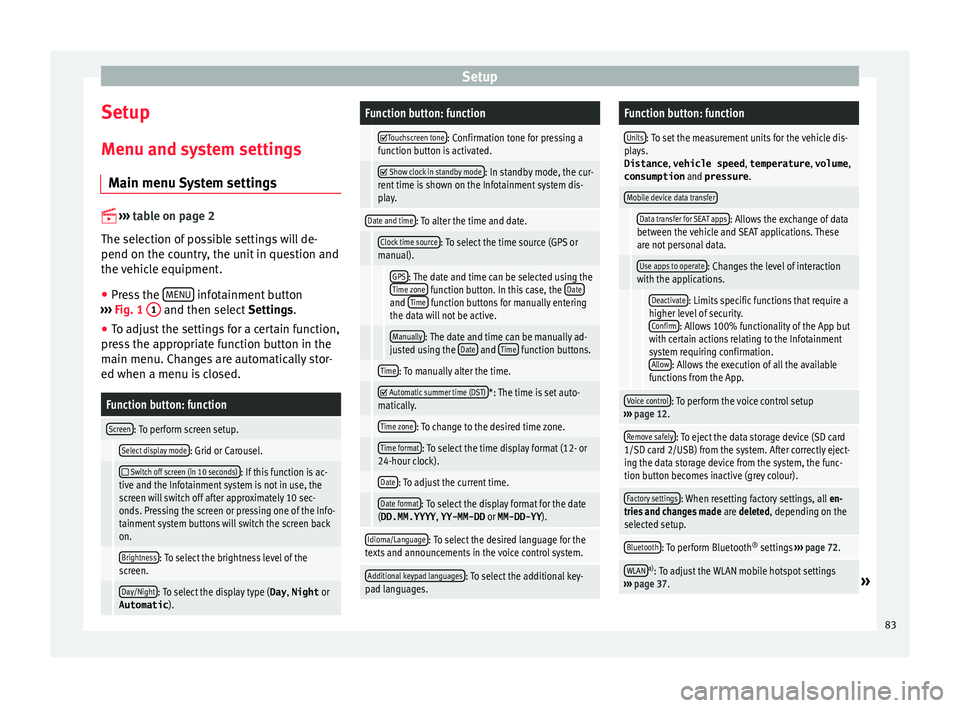
Function button: function
Screen: To perform screen setup.
Select display mode: Grid or Carousel.
Switch off screen (in 10 seconds): If this function is ac-
tive and the Infotainment system is not in use, the
screen will switch off after approximately 10 sec-
onds. Pressing the screen or pressing one of the Info-
tainment system buttons will switch the screen back
on.
Brightness: To select the brightness level of the
screen.
Day/Night: To select the display type ( Day, Night or
Automatic ).
Function button: function
Touchscreen tone: Confirmation tone for pressing a
function button is activated.
Show clock in standby mode: In standby mode, the cur-
rent time is shown on the Infotainment system dis-
play.
Date and time: To alter the time and date.
Clock time source: To select the time source (GPS or
manual).
GPS: The date and time can be selected using the
Time zone function button. In this case, the Dateand Time function buttons for manually entering
the data will not be active.
Manually: The date and time can be manually ad-
justed using the Date and Time function buttons.
Time: To manually alter the time.
Automatic summer time (DST)*: The time is set auto-
matically.
Time zone: To change to the desired time zone.
Time format: To select the time display format (12- or
24-hour clock).
Date: To adjust the current time.
Date format: To select the display format for the date
(DD.MM.YYYY , YY-MM-DD or MM-DD-YY ).
Idioma/Language: To select the desired language for the
texts and announcements in the voice control system.
Additional keypad languages: To select the additional key-
pad languages.
Function button: function
Units: To set the measurement units for the vehicle dis-
plays.
Distance , vehicle speed , temperature, volume,
consumption and pressure .
Mobile device data transfer
Data transfer for SEAT apps: Allows the exchange of data
between the vehicle and SEAT applications. These
are not personal data.
Use apps to operate: Changes the level of interaction
with the applications.
Deactivate: Limits specific functions that require a
higher level of security. Confirm
: Allows 100% functionality of the App but
with certain actions relating to the Infotainment
system requiring confirmation. Allow
: Allows the execution of all the available
functions from the App.
Voice control: To perform the voice control setup
››› page 12.
Remove safely: To eject the data storage device (SD card
1/SD card 2/USB) from the system. After correctly eject-
ing the data storage device from the system, the func-
tion button becomes inactive (grey colour).
Factory settings: When resetting factory settings, all en-
tries and changes made are deleted, depending on the
selected setup.
Bluetooth: To perform Bluetooth ®
settings ››› page 72.
WLANa)
: To adjust the WLAN mobile hotspot settings
››› page 37.» 83
Page 86 of 96
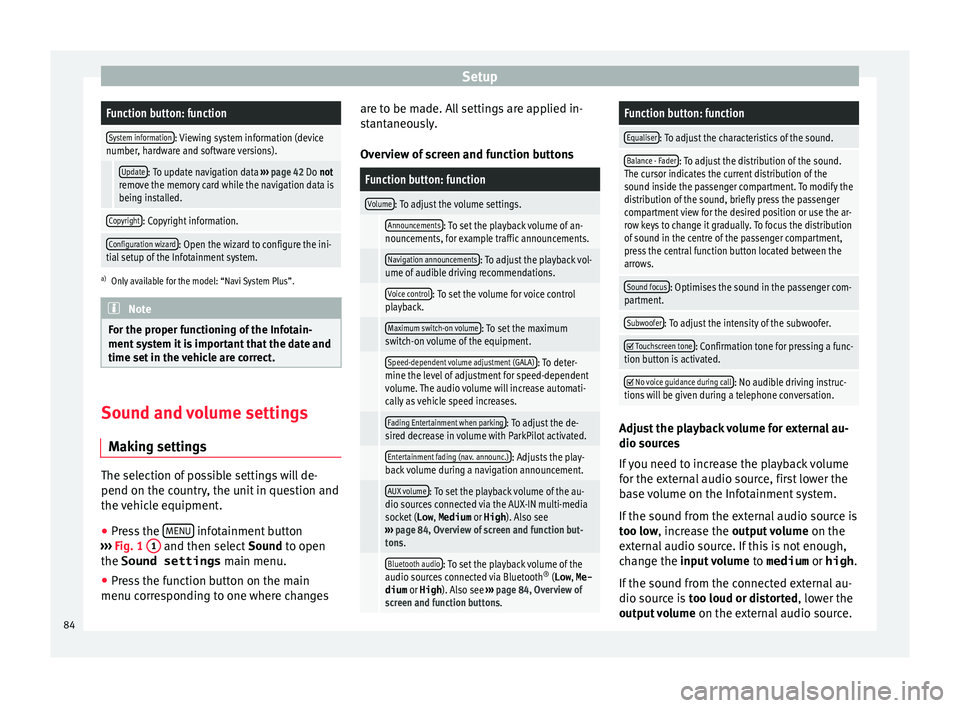
SetupFunction button: function
System information: Viewing system information (device
number, hardware and software versions).
Update: To update navigation data ››› page 42 Do not
remove the memory card while the navigation data is
being installed.
Copyright: Copyright information.
Configuration wizard: Open the wizard to configure the ini-
tial setup of the Infotainment system.
a) Only available for the model: “Navi System Plus”. Note
For the proper functioning of the Infotain-
ment sy s
tem it is important that the date and
time set in the vehicle are correct. Sound and volume settings
M ak
in
g settings The selection of possible settings will de-
pend on the c
ou
ntr
y, the unit in question and
the vehicle equipment.
● Press the MENU infotainment button
› ›
›
Fig. 1 1 and then select
Sound
t o open
the Sound settings main menu.
● Press the function button on the main
menu corre
sponding to one where changes are to be made. All settings are applied in-
stant
aneously.
Overview of screen and function buttons
Function button: function
Volume: To adjust the volume settings.
Announcements: To set the playback volume of an-
nouncements, for example traffic announcements.
Navigation announcements: To adjust the playback vol-
ume of audible driving recommendations.
Voice control: To set the volume for voice control
playback.
Maximum switch-on volume: To set the maximum
switch-on volume of the equipment.
Speed-dependent volume adjustment (GALA): To deter-
mine the level of adjustment for speed-dependent
volume. The audio volume will increase automati-
cally as vehicle speed increases.
Fading Entertainment when parking: To adjust the de-
sired decrease in volume with ParkPilot activated.
Entertainment fading (nav. announc.): Adjusts the play-
back volume during a navigation announcement.
AUX volume: To set the playback volume of the au-
dio sources connected via the AUX-IN multi-media
socket ( Low, Medium or High). Also see
››› page 84, Overview of screen and function but-
tons.
Bluetooth audio: To set the playback volume of the
audio sources connected via Bluetooth ®
(Low , Me-
dium or High ). Also see ››› page 84, Overview of
screen and function buttons.
Function button: function
Equaliser: To adjust the characteristics of the sound.
Balance - Fader: To adjust the distribution of the sound.
The cursor indicates the current distribution of the
sound inside the passenger compartment. To modify the
distribution of the sound, briefly press the passenger
compartment view for the desired position or use the ar-
row keys to change it gradually. To focus the distribution
of sound in the centre of the passenger compartment,
press the central function button located between the
arrows.
Sound focus: Optimises the sound in the passenger com-
partment.
Subwoofer: To adjust the intensity of the subwoofer.
Touchscreen tone: Confirmation tone for pressing a func-
tion button is activated.
No voice guidance during call: No audible driving instruc-
tions will be given during a telephone conversation. Adjust the playback volume for external au-
dio sour
c
e
s
If you need to increase the playback volume
for the external audio source, first lower the
base volume on the Infotainment system.
If the sound from the external audio source is
too low, increase the output volume on the
external audio source. If this is not enough,
change the input volume to medium or high.
If the sound from the connected external au-
dio source is too loud or distorted, lower the
output volume on the external audio source.
84
Page 89 of 96
Index
Index
A
Af t
er s
tarting route guidance . . . . . . . . . . . . . . . . 45
AM . . . . . . . . . . . . . . . . . . . . . . . . . . . . . . . . . . . . . . 15
Android Auto™ . . . . . . . . . . . . . . . . . . . . . . . . . . . . 78
Apple CarPlay™ . . . . . . . . . . . . . . . . . . . . . . . . . . . 78
Areas where special regulations apply . . . . . . . . . 63
AUX-IN . . . . . . . . . . . . . . . . . . . . . . . . . . . . . . . . . . . 34 AUX-IN multimedia socket . . . . . . . . . . . . . . . . . 34
external audio source . . . . . . . . . . . . . . . . . . . . . 34
AUX-IN multimedia socket . . . . . . . . . . . . . . . . . . . 34
Avoid congestion . . . . . . . . . . . . . . . . . . . . . . . . . . 50
B Base volume . . . . . . . . . . . . . . . . . . . . . . . . . . . . . . . 8 change . . . . . . . . . . . . . . . . . . . . . . . . . . . . . . . . . 8
sound suppression (mute) . . . . . . . . . . . . . . . . . . 8
Bluetooth connect audio source . . . . . . . . . . . . . . . . . . . . . 34
profiles . . . . . . . . . . . . . . . . . . . . . . . . . . . . . . . . 63
select Bluetooth audio . . . . . . . . . . . . . . . . . . . . 29
settings . . . . . . . . . . . . . . . . . . . . . . . . . . . . . . . . 72
Buttons . . . . . . . . . . . . . . . . . . . . . . . . . . . . . . . . . . . 9
C
Call lists . . . . . . . . . . . . . . . . . . . . . . . . . . . . . . . . . 70
Call mailbox . . . . . . . . . . . . . . . . . . . . . . . . . . . . . . 68
CAR . . . . . . . . . . . . . . . . . . . . . . . . . . . . . . . . . . . . . 57
CAR menu management . . . . . . . . . . . . . . . . . . . . . . . . . . . . 57
CD/DVD select . . . . . . . . . . . . . . . . . . . . . . . . . . . . . . . . . . 28
CD and DVD mode . . . . . . . . . . . . . . . . . . . . . . . . . . . . . . . . . . 32 CD or DVD
insert and eject . . . . . . . . . . . . . . . . . . . . . . . . . . 32
Check boxes . . . . . . . . . . . . . . . . . . . . . . . . . . . . . . . 9
Communication between the Infotainment sys- tem and mobile devices . . . . . . . . . . . . . . . . . . . 74
Connectivity Box . . . . . . . . . . . . . . . . . . . . . . . . . . . 72
Controls . . . . . . . . . . . . . . . . . . . . . . . . . . . . . . . . . . . 3
Copyright . . . . . . . . . . . . . . . . . . . . . . . . . . . . . . . . 23 information . . . . . . . . . . . . . . . . . . . . . . . . . . . . . 84
Cursor . . . . . . . . . . . . . . . . . . . . . . . . . . . . . . . . . . . 10
D
DAB . . . . . . . . . . . . . . . . . . . . . . . . . . . . . . . . . . . . . 15 see: RADIO . . . . . . . . . . . . . . . . . . . . . . . . . . . . . 17
Delayed switch off (waiting time) . . . . . . . . . . . . . . 8
Delete all entries . . . . . . . . . . . . . . . . . . . . . . . . . . . . . . 83
user entries . . . . . . . . . . . . . . . . . . . . . . . . . . . . . 83
Delete data . . . . . . . . . . . . . . . . . . . . . . . . . . . . . . . 83
Delete entries . . . . . . . . . . . . . . . . . . . . . . . . . . . . . 83
Demo mode navigation . . . . . . . . . . . . . . . . . . . . . . . . . . . . . . 52
Destination memory . . . . . . . . . . . . . . . . . . . . . . . . 46
Dial number . . . . . . . . . . . . . . . . . . . . . . . . . . . . . . 67
Dial (telephone number) . . . . . . . . . . . . . . . . . . . . 67
Display use . . . . . . . . . . . . . . . . . . . . . . . . . . . . . . . . . . . . . 9
DVD . . . . . . . . . . . . . . . . . . . . . . . . . . . . . . . . . . . . . 38 control . . . . . . . . . . . . . . . . . . . . . . . . . . . . . . . . . 38
DVD video mode . . . . . . . . . . . . . . . . . . . . . . . . . 38
main menu . . . . . . . . . . . . . . . . . . . . . . . . . . . . . 38
mode . . . . . . . . . . . . . . . . . . . . . . . . . . . . . . . . . . 32
regional code . . . . . . . . . . . . . . . . . . . . . . . . . . . 38
settings . . . . . . . . . . . . . . . . . . . . . . . . . . . . . . . . 39
start . . . . . . . . . . . . . . . . . . . . . . . . . . . . . . . . . . . 38
Dynamic route guidance . . . . . . . . . . . . . . . . . . . . 50 E
Eject
see: CD or DVD
. . . . . . . . . . . . . . . . . . . . . . . . . . 32
EON . . . . . . . . . . . . . . . . . . . . . . . . . . . . . . . . . . . . . 20
Explosion risk areas telephone . . . . . . . . . . . . . . . . . . . . . . . . . . . . . . 63
External audio source . . . . . . . . . . . . . . . . . . . . . . 34 adjust the playback volume . . . . . . . . . . . . . . . . 84
Bluetooth audio . . . . . . . . . . . . . . . . . . . . . . . . . 34
MEDIA-IN . . . . . . . . . . . . . . . . . . . . . . . . . . . . . . . 33
WLAN audio . . . . . . . . . . . . . . . . . . . . . . . . . . . . 37
External data storage device MEDIA-IN . . . . . . . . . . . . . . . . . . . . . . . . . . . . . . . 33
USB . . . . . . . . . . . . . . . . . . . . . . . . . . . . . . . . . . . 33
F Factory settings . . . . . . . . . . . . . . . . . . . . . . . . . . . 83
Favourites (speed dial buttons) see PHONE . . . . . . . . . . . . . . . . . . . . . . . . . . . . . 71
FM . . . . . . . . . . . . . . . . . . . . . . . . . . . . . . . . . . . . . . 15
Frequency wavelength AM . . . . . . . . . . . . . . . . . . . . . . . . . . . . . . . . . . . . 15
change . . . . . . . . . . . . . . . . . . . . . . . . . . . . . . . . 15
DAB . . . . . . . . . . . . . . . . . . . . . . . . . . . . . . . . . . . 15
FM . . . . . . . . . . . . . . . . . . . . . . . . . . . . . . . . . . . . 15
Full Link . . . . . . . . . . . . . . . . . . . . . . . . . . . . . . . . . . 74 pairing . . . . . . . . . . . . . . . . . . . . . . . . . . . . . . . . . 78
setup . . . . . . . . . . . . . . . . . . . . . . . . . . . . . . . . . . 78
Function buttons . . . . . . . . . . . . . . . . . . . . . . . . . . . 9 images main menu . . . . . . . . . . . . . . . . . . . . . . . 40
MEDIA main menu . . . . . . . . . . . . . . . . . . . . . . . 27
RADIO main menu . . . . . . . . . . . . . . . . . . . . . . . 15
G
GALA . . . . . . . . . . . . . . . . . . . . . . . . . . . . . . . . . . . . 84
87