display Seat Leon 5D 2016 MEDIA SYSTEM PLUS - NAVI SYSTEM - NAVI SYSTEM PLUS
[x] Cancel search | Manufacturer: SEAT, Model Year: 2016, Model line: Leon 5D, Model: Seat Leon 5D 2016Pages: 96, PDF Size: 2.6 MB
Page 33 of 96
Audio and Media ModeFunction button: function
B
Indicates the media source being explored.
If pressed it goes to the root folder of the
device indicated on the icon.
JUKEBOXa)
: Internal hard drive of the Info-
tainment system (SSD) ››› page 35.
CD/DVDb)
: Internal CD and DVD drive
››› page 32.
SD CARD 1, SD CARD 2*: SD memory card
››› page 32.
USB 1, USB 2*: External data storage device
connected to the USB port ››› page 33.
BT AUDIO: External media player connected
by Bluetooth ®
››› page 34.
AUX: Audio source connected to the AUX-IN
socket ››› page 34
WLANa)
: External audio source connected
by WLAN ››› page 37
CPress the function button to open the top
folder of the media source.
Starts playback of the first track.
Function button: function
Repeat all tracks.
Repeats all the tracks that are on the same
memory level as the track being played at
that moment. If in the
Media Settings
menu
Mix/Repeat including subfolders is acti-
vated, it also includes the subfolders
››› page 39.
Random play.
Includes all the tracks that are on the same
memory level as the track being played at
that moment. If in the
Media Settings
menu
Mix/Repeat including subfolders is acti-
vated, it also includes the subfolders
››› page 39.
CLOSE ×To close the track list.
a)
Only available for the model: “Navi System Plus”.
b) The DVD drive is only available for the model: “Navi System
Plus”. Note
The tracks, folders and playlists can also be
select ed b
y turning the setup button, and can
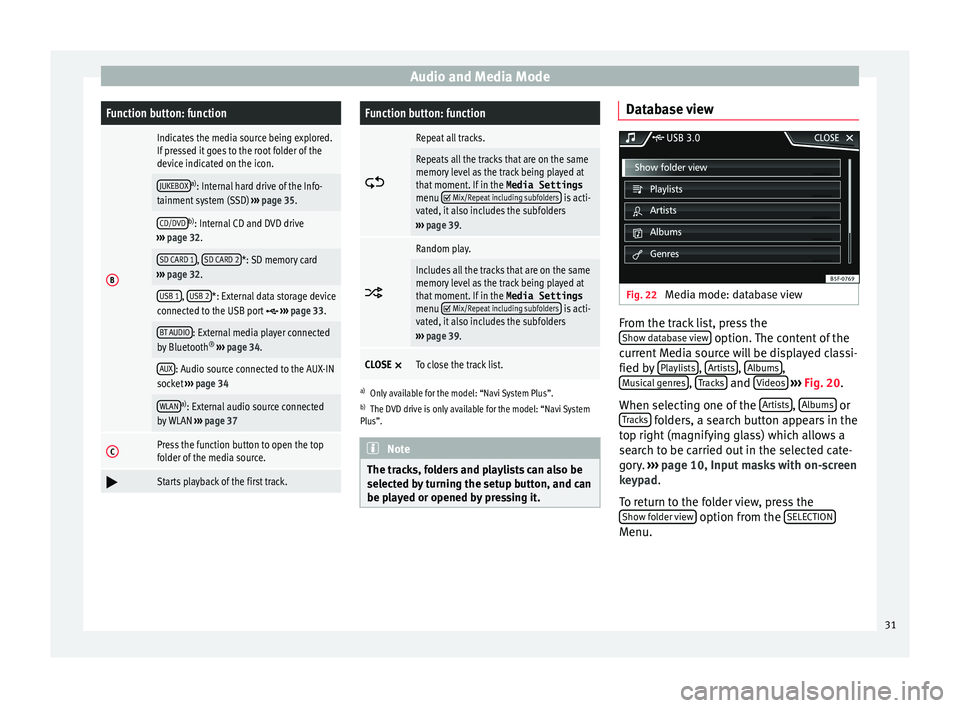
be played or opened by pressing it. Database view
Fig. 22
Media mode: database view From the track list, press the
Sho w d
at
abase view option. The content of the
c urr
ent
Media source will be displayed classi-
fied by Playlists ,
Ar
ti
s
ts ,
A
l
b ums ,
M u
s
ical genres ,
T
r
ac ks and
V
ideo
s
› ›
› Fig. 20 .
When selecting one of the Artists ,
A
l
b
ums or
T r
ac
ks folders, a search button appears in the
t op right
(m
agnifying glass) which allows a
search to be carried out in the selected cate-
gory. ››› page 10, Input masks with on-screen
keypad.
To return to the folder view, press the Show folder view option from the
S
ELE
CTION Menu.
31
Page 34 of 96
Audio and Media Mode
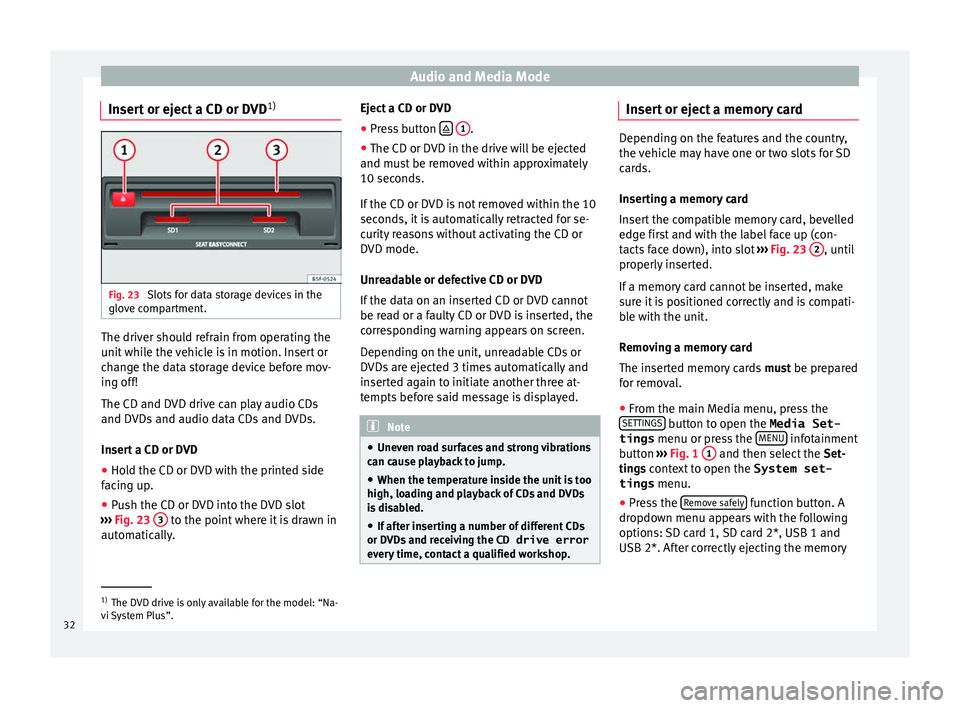
Insert or eject a CD or DVD 1)Fig. 23
Slots for data storage devices in the
glo v
e c
ompartment. The driver should refrain from operating the
u
nit
whi
le the vehicle is in motion. Insert or
change the data storage device before mov-
ing off!
The CD and DVD drive can play audio CDs
and DVDs and audio data CDs and DVDs.
Insert a CD or DVD
● Hold the CD or DVD with the printed side
facin
g up.
● Push the CD or DVD into the DVD slot
›››
Fig. 23 3 to the point where it is drawn in
aut om
atic
ally. Eject a CD or DVD
●
Press button
1 .
● The CD or DVD in the drive will be ejected
and mu s
t
be removed within approximately
10 seconds.
If the CD or DVD is not removed within the 10
seconds, it is automatically retracted for se-
curity reasons without activating the CD or
DVD mode.
Unreadable or defective CD or DVD
If the data on an inserted CD or DVD cannot
be read or a faulty CD or DVD is inserted, the
corresponding warning appears on screen.
Depending on the unit, unreadable CDs or
DVDs are ejected 3 times automatically and
inserted again to initiate another three at-
tempts before said message is displayed. Note
● Uneven r o
ad surfaces and strong vibrations
can cause playback to jump.
● When the temperature inside the unit is too
high, loadin
g and playback of CDs and DVDs
is disabled.
● If after inserting a number of different CDs
or DVDs
and receiving the CD drive error
every time, contact a qualified workshop. Insert or eject a memory card
Depending on the features and the country,
the v
ehic
le may have one or two slots for SD
cards.
Inserting a memory card
Insert the compatible memory card, bevelled
edge first and with the label face up (con-
tacts face down), into slot ››› Fig. 23 2 , until
properly in
serted.
If a memory card cannot be inserted, make
sure it is positioned correctly and is compati-
ble with the unit.
Removing a memory card
The inserted memory cards must be prepared
for removal.
● From the main Media menu, press the
SET TINGS button to open the Media Set-
tings menu or pr e
s
s the MENU infotainment
b utt
on ›
›› Fig. 1 1 and then select the
Set-
tin g
s context to open the System set-
tings menu.
● Press the Remov
e safely function button. A
dr opdo
wn menu ap
pears with the following
options: SD card 1, SD card 2*, USB 1 and
USB 2*. After correctly ejecting the memory 1)
The DVD drive is only available for the model: “Na-
vi S
ystem Plus”.
32
Page 35 of 96
Audio and Media Mode
card from the system, the function button be-
c ome
s
inactive (grey colour).
● Press the inserted memory card. The mem-
ory c
ard “jumps” to the eject position.
● Remove the memory card.
Unrea
dable memory card
If a memory card is inserted and the data
cannot be read, the relevant warning ap-
pears.
External data storage device connec-
ted to USB por
t Depending on the features and the country,
the
v
ehic
le may have one or two USB connec-
tions. For their location consult the ››› Book-
let Instruction Manual.
Audio files on an external data storage de-
vice connected to the USB port can be
played and controlled via the Infotainment
system.
Where this manual refers to external data
storage devices, this means USB mass stor-
age devices containing supported audio
files, such as MP3 players, iPods™ and USB
sticks.
Only supported audio files are displayed and
played. Other files are ignored. Further operation of the external data medi-
um (chan
ging track, selecting tracks and
playback modes) is described in the appro-
priate chapters of this manual ››› page 23.
Instructions and restrictions
Compatibility with Apple™ devices and other
media players depends on the unit.
The USB port supplies the usual USB volt-
age of 5 volts for a USB connection.
External hard disks with a capacity greater
than 32 GB must be reformatted for the
FAT32 file system in some circumstances. You
will find the necessary software and informa-
tion on the Internet.
Take into account all other instructions and
limitations regarding requirements for media
sources ››› page 23.
iPod™, iPad™ and iPhone™
Depending on the country and the equip-
ment, iPods™, iPads™ or iPhones™ can be
connected using the device's USB cable to
the USB port of the vehicle and used as
audio sources.
After connecting an iPod™, iPad™ or
iPhone™, the specific list views of the iPod
are displayed in the upper selection level
( Playlists , Artists, Albums ,
Tracks , Podcasts etc.). Possible error messages after connecting an
extern
al data storage device
Error mes-
sageCauseProcedure
The device
is not
compatibleThe external
data carrier
cannot be
played or com-
munication is
not possible
with the adapt-
er cable being
used.Check the connec-
tion and make sure
the external data
medium is working
correctly.
If possible, update
the data storage de-
vice software.
The device
does not
workCommunication
fault.Check the connec-
tion and make sure
the external data
medium is working
correctly.
Due to the large number of different data storage devi-
ces and various iPod™, iPad™ and iPhone™ genera-
tions available, it is not possible to guarantee fault-free
operation of all functions described here. Disconnecting
An
y
c
onnected data storage devices must be
prepared before their disconnection in order
to remove them.
● From the main Media menu, press the
SETTINGS button to open the Media Set-
tings menu or pr e
s
s the MENU infotainment
b utt
on ›
›› Fig. 1 1 and then select the
Set-
tin g
s context to open the System set-
tings menu. »
33
Page 38 of 96
Audio and Media Mode
imported from different data storage devices
t o the
jukebox and thi
s used to play them.
The files will only be copied when the engine
is running. Copying copy-protected CDs and
DVDs is prohibited
Importing files
● In Media mode, press the SETUP function
b utt
on and then sel
ect Manage jukebox .
● Press the IMPOR
T function button.
● Select the desired source from the Select
source menu.
The d at
a s
torage device is prepared. This op-
eration may take a few seconds.
● Activate the checkboxes to the right of the
file
s or folders to be imported.
● If Select al
l is activated, all files and folders
on the d at
a s
torage device will be imported.
● Press the IMPORT function button.
D ependin
g on the sel
ection, all files and fold-
ers will be imported with the indicated name
to the Jukebox .
If no track information is available, the audio
files will be placed in the following folders:
Audio data CD
■ Album ■
Unknown albums
■ Track. mp31)
■ Artists
■ Unknown artists
■Unknown albums
■ Track. mp31)
Function
s and progress display during the
copying operation
While copying, an animation is displayed
along with the progress percentage on the
import screen.
Audio data CD: It is not possible to copy and
play files at the same time.
● Press the Cancel function button to end the
impor t
of
the whole track that is currently be-
ing imported.
● To obtain information on the status of the
import, pre
ss the Information function button.
● Press the B
A
CK
function button to close
the impor t
s
creen with the progress informa-
tion.
● When the file import ends, a notification
wil
l appear.
Deleting files
● In Media mode, press the SETUP function
b utt on and then sel
ect Manage jukebox .●
Pr e
s
s the DELETE
function button.
● Activate the checkboxes to the right of the
fi l
e
s or folders to be deleted.
● If Select al
l is activated, all the files and
f o
l
ders on the data storage device will be de-
leted.
● Press the DELETE
function button. The
fi l
e
s and folders will be deleted according to
the selection made.
● When the files have been deleted, a notifi-
cation wi
ll appear.
● Press the BACK
function button to close
the menu.
Openin g s
t
ored audio and video files
● Change to Jukebox (SSD) cont
ent
››› page 30.
When storing the tracks, they are stored un-
der different categories and lists according to
the information available.
The tracks saved can be checked and opened
from these lists according to different catego-
ries.
Jukebox
● Playlist
● Artist
● Album 1)
The name and extension of the file are examples.
36
Page 40 of 96
Audio and Media Mode
switch on/off the mobile hotspot and ac-
c e
ss the Configuration of the WLAN net-
work.
● Press the Configuration function b
utton
to configure the WLAN network.
Function button: function
Mobile hotspot: To switch the WLAN network on/off.
Security level: To select the code type (encryption),
choose WAP2 or No security level . An 8-charac-
ter network key is automatically generated.
Network key: Network key automatically generated.
Press the function button to manually change the
network key. The network key must have a minimum
of 8 characters and a maximum of 63.
SSID: Name of the Infotainment system WLAN net-
work.
Do not send network name (SSID): Activate the check-
box to deactivate the visibility of the WLAN network. To save the changes made to the mobile hot-
s
pot
c
onfiguration, press the STORE button.DVD video mode 3 Only available for the model: Navi System Plus
Fig. 25
DVD main menu. Fig. 26
DVD mode control menu. DVD video regional code
Quit
e of
t
en, the playback of DVD video is
limited to certain regions (for example, to the
US and Canada) by so-called “region codes”.
These DVDs can only be played on units that
are coded for the same region. The unit's DVD drive is configured to read the
region
al code for the region in which the ve-
hicle was originally sold.
Start DVD mode
● Insert a compatible DVD in the DVD drive.
The rea
ding of DVD data may take a few sec-
onds.
The DVD's “intro” (short initial sequence) is
played. Next, the different DVD menus are
displayed.
Controlling the DVD menu
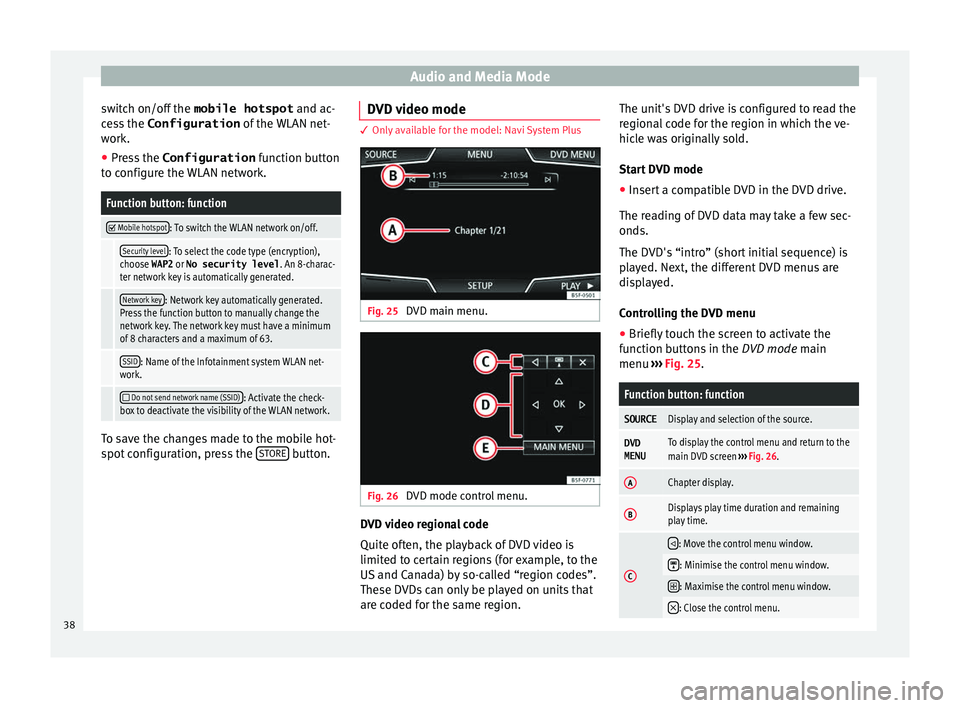
● Briefly touch the screen to activate the
function b
uttons in the DVD mode main
menu ››› Fig. 25.
Function button: function
SOURCEDisplay and selection of the source.
DVD
MENUTo display the control menu and return to the
main DVD screen ››› Fig. 26.
AChapter display.
BDisplays play time duration and remaining
play time.
C
: Move the control menu window.
: Minimise the control menu window.
: Maximise the control menu window.
: Close the control menu.
38
Page 42 of 96
Audio and Media Mode
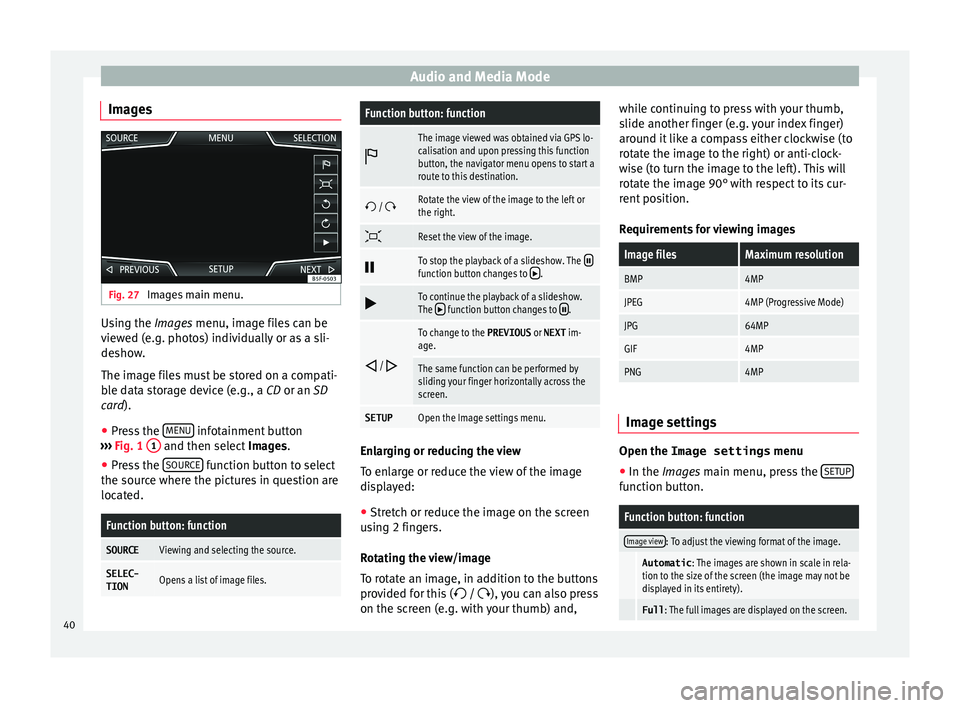
Images Fig. 27
Images main menu. Using the Ima
ge
s menu, image files can be
viewed (e.g. photos) individually or as a sli-
deshow.
The image files must be stored on a compati-
ble data storage device (e.g., a CD or an SD
card).
● Press the MENU infotainment button
› ›
›
Fig. 1 1 and then select
Imag
e s.
● Press the SOURCE function button to select
the sour c
e wher
e the pictures in question are
located.
Function button: function
SOURCEViewing and selecting the source.
SELEC-
TIONOpens a list of image files.
Function button: function
The image viewed was obtained via GPS lo-
calisation and upon pressing this function
button, the navigator menu opens to start a
route to this destination.
/ Rotate the view of the image to the left or
the right.
Reset the view of the image.
To stop the playback of a slideshow. The function button changes to .
To continue the playback of a slideshow.
The function button changes to .
/
To change to the PREVIOUS
or NEXT im-
age.
The same function can be performed by
sliding your finger horizontally across the
screen.
SETUPOpen the Image settings menu. Enlarging or reducing the view
T
o en
l
arge or reduce the view of the image
displayed:
● Stretch or reduce the image on the screen
usin
g 2 fingers.
Rotating the view/image
To rotate an image, in addition to the buttons
provided for this ( / ), you can also press
on the screen (e.g. with your thumb) and, while continuing to press with your thumb,
slide another fing
er (e.g. your index finger)
around it like a compass either clockwise (to
rotate the image to the right) or anti-clock-
wise (to turn the image to the left). This will
rotate the image 90° with respect to its cur-
rent position.
Requirements for viewing images
Image filesMaximum resolution
BMP4MP
JPEG4MP (Progressive Mode)
JPG64MP
GIF4MP
PNG4MP Image settings
Open the Image settings
menu
● In the Ima ges main menu, press the S
ETUP function button.
Function button: function
Image view: To adjust the viewing format of the image.
Automatic
: The images are shown in scale in rela-
tion to the size of the screen (the image may not be
displayed in its entirety).
Full : The full images are displayed on the screen.40
Page 43 of 96
Audio and Media ModeFunction button: function
Display time: To adjust the display time of the images
during a slideshow.
Repeat slideshow: The active slideshow will be repeated
indefinitely. 41
Page 45 of 96
Navigation
Note
● The inser t
ed memory card must be pre-
pared before it is ejected ››› page 32.
● Press the MENU infotainment button
›› ›
Fig. 1 1 and then select the Settings con-
te xt
to open the menu System settings .
● Navigation is not possible without the SD
card.
● Do not
remove the memory card while the
navig
ation data is in use. This could damage
the memory card!
● The navigation memory card may not be
used as
memory for other files. The infotain-
ment system will not recognise the files
saved.
● SEAT recommends only using original SEAT
memory c
ards to use navigation data. The
use of other memory cards could limit its op-
eration. Updating and installing navigation
d
at
a 3 Only
available for the model: Navi System Plus
The Inf
otainment system is equipped with an
internal navigation data memory. The re-
quired navigation data are already installed
on the system. The Infotainment system always requires the
nav
ig
ation data that is currently valid for this
unit in order to allow all functions to be used
in full. Using an old version may lead to er-
rors during navigation.
Updating navigation data
To update navigation data visit our website:
www.seat.com.
The navigation data must be installed after
downloading. Navigation is not possible from
the memory card.
Installing navigation data
The installation process takes about 2 hours.
If the Infotainment system is switched off, the
installation process is paused and will auto-
matically resume when switched back on.
● Switch the ignition on.
● Insert the memory card containing the navi-
gation dat
a ››› page 32.
● Press the MENU infotainment button
› ›
›
Fig. 1 1 and then select
Setting
s .
● In the System settings menu, pres
s the
System information function button.
● Press U
pd
at
e software to import the stored
n av
ig
ation data. ●
Fol
low the instructions displayed on the
screen.
Once installed, the memory card can be re-
moved. The memory card must be prepared
for removal ››› page 32. CAUTION
Do not remove the memory card while the
nav ig
ation data is being installed. The memo-
ry card may be irreparably damaged! Note
● The nav ig
ation memory card may not be
used as memory storage for other files. The
Infotainment system will not recognise the
files saved on it.
● SEAT recommends a CLASS 10 1)
memory
car
d for the use of navigation data. The use of
other memory cards could limit its operation. 1)
The speed class of an SD card.
43
Page 46 of 96
Navigation
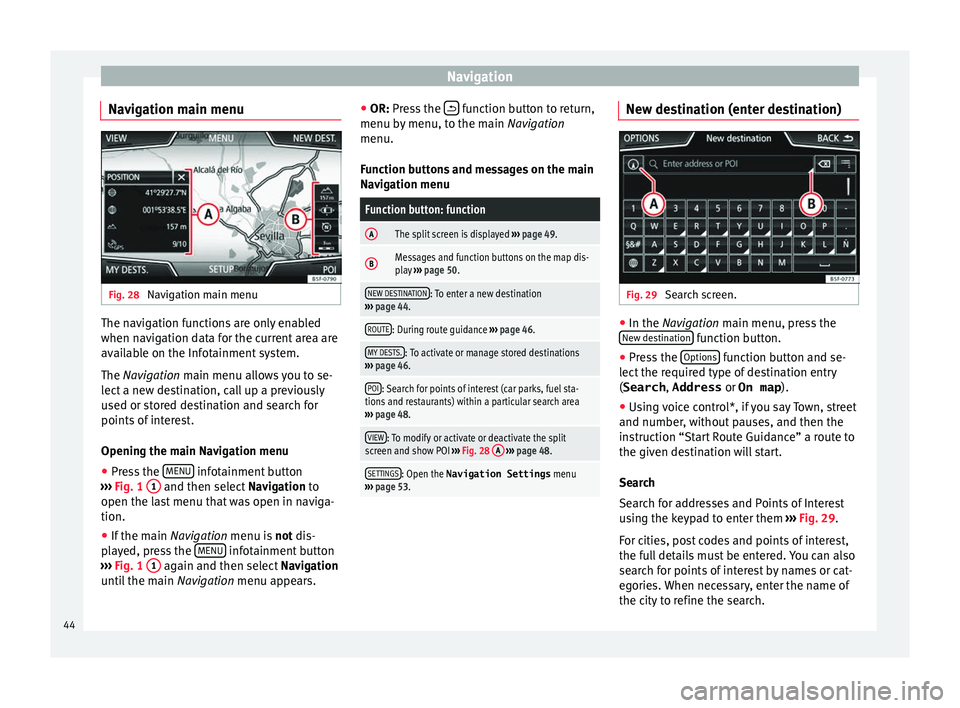
Navigation main menu Fig. 28
Navigation main menu The navigation functions are only enabled
when n
av
ig
ation data for the current area are
available on the Infotainment system.
The Navigation main menu allows you to se-
lect a new destination, call up a previously
used or stored destination and search for
points of interest.
Opening the main Navigation menu
● Press the MENU infotainment button
› ›
›
Fig. 1 1 and then select
Navig
ation to
open the last menu that was open in naviga-
tion.
● If the main Navigation menu i
s not dis-
played, press the MENU infotainment button
› ›
›
Fig. 1 1 again and then select
Navig
ation
u
ntil the main Navigation menu appears. ●
OR: Pres
s the function button to return,
menu b y
menu, t
o the main Navigation
menu.
Function buttons and messages on the main
Navigation menu
Function button: function
AThe split screen is displayed ››› page 49.
BMessages and function buttons on the map dis-
play ››› page 50.
NEW DESTINATION: To enter a new destination
››› page 44.
ROUTE: During route guidance ››› page 46.
MY DESTS.: To activate or manage stored destinations
››› page 46.
POI: Search for points of interest (car parks, fuel sta-
tions and restaurants) within a particular search area
››› page 48.
VIEW: To modify or activate or deactivate the split
screen and show POI ››› Fig. 28 A
››› page 48.
SETTINGS: Open the Navigation Settings menu
››› page 53. New destination (enter destination)
Fig. 29
Search screen. ●
In the Na vigation main menu, press the
New de s
tination function button.
● Press the Option
s function button and se-
l ect
the r
equired type of destination entry
(Search , Address or On map ).
● Using voice control*, if you say Town, street
and number, without
pauses, and then the
instruction “Start Route Guidance” a route to
the given destination will start.
Search
Search for addresses and Points of Interest
using the keypad to enter them ››› Fig. 29.
For cities, post codes and points of interest,
the full details must be entered. You can also
search for points of interest by names or cat-
egories. When necessary, enter the name of
the city to refine the search.
44
Page 48 of 96
Navigation
before a turn, e.g. “Prepare to turn left”,
“T urn l
ef
t in 300 metres” and “Now turn left”.
● Press the right-hand thumbwheel on the
multi-fu
nction steering wheel to listen to the
last navigation instruction.
The distances indicated largely depend on
the type of road and the speed at which you
are driving. For instance, navigation an-
nouncements are given much earlier on mo-
torways than on urban roads.
Appropriate navigation announcements are
also given on multi-lane roads, branching
roads and at roundabouts, for example: “At
the roundabout, take the second exit.”
A navigation announcement informs you
when you have reached your “destination”.
A navigation announcement informing you
that you have reached the “destination area”
is given if the exact destination cannot be
reached because it is located in a non-digi-
tised area. It also indicates the cardinal point
and the distance to the previously defined
destination. Navigation resumes “offroad”.
During dynamic route guidance , you receive
information about reported traffic congestion
on the route. An additional navigation an-
nouncement is given if the route is recalcula-
ted due to traffic congestion.
During a navigation announcement, you can
change its volume using the volume control up to a defined minimum or maximum vol-
ume. The f
ollowing navigation recommenda-
tions will then be made at the adjusted vol-
ume.
For other adjustments to the navigation rec-
ommendations, see Navigation an-
nouncements settings. ››› page 53. Note
If you miss a turning during route guidance
and are c urr
ently unable to turn back, keep
on driving until the navigation system offers
a new route. Note
The quality of the navigation recommenda-
tions giv
en by the Infotainment system de-
pends on the navigation data available and
any reported traffic problems. Route
In the Navigation main menu, press the
Route function
button.
The Route function button is only displayed with route
guidance activated.
Function button: function
Stop route guidance: Aborts current route guidance.
Function button: function
Enter destination: To enter a new destination or a new
stopover ››› page 44.
Congestion ahead: To exclude a section (of 0.2 to 10 km in
length) from the current route, e.g. to avoid congestion.
To cancel the exclusion, press the Route
function button
and then Cancel congestion.
Change routea)
: The map of the calculated route appears
and by holding a finger on the route and dragging the
finger across said map, the route is changed to the
road(s) that you want and the new route is then recalcu-
lated.
Route details: View route information for current route.
a) Only available for the model: Navi System Plus
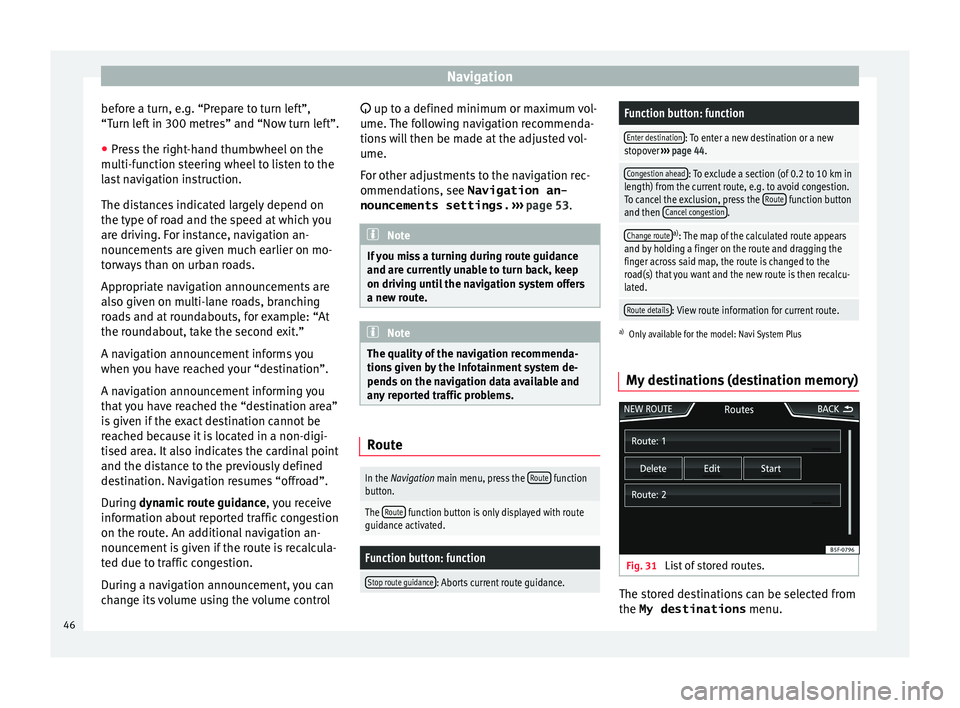
My destinations (destination memory) Fig. 31
List of stored routes. The stored destinations can be selected from
the My destinations
menu.
46