oil Seat Leon 5D 2016 Owner's manual
[x] Cancel search | Manufacturer: SEAT, Model Year: 2016, Model line: Leon 5D, Model: Seat Leon 5D 2016Pages: 324, PDF Size: 6.93 MB
Page 1 of 324
SEAT recommends
SEAT GENUINE OIL
SEAT recommends
Castrol EDGE Professional
OWNERŌĆÖS
MANUAL
Leon
5F0012720BG
Ingl├®s
5F0012720BG (11.16)
Leon
Ingl├®s (11.16)
Page 8 of 324
Table of Contents
Front Assist system including City emergency
br ak
in
g and pedestrian monitoring* . . . . . . . . 207
Lane Assist system* . . . . . . . . . . . . . . . . . . . . . . 213
Traffic Jam Assist . . . . . . . . . . . . . . . . . . . . . . . . 216
Emergency Assist . . . . . . . . . . . . . . . . . . . . . . . . 217
SEAT Drive Profile* . . . . . . . . . . . . . . . . . . . . . . . 219
Traffic sign detection system . . . . . . . . . . . . . . . 222
Fatigue detection (break recommendation)* . . 224
Parking aid . . . . . . . . . . . . . . . . . . . . . . . . . . . . . 225
Rear Assist ŌĆ£Rear View CameraŌĆØ* . . . . . . . . . . . 231
Towing bracket device . . . . . . . . . . . . . . . . . . . . 234
Towing bracket device* . . . . . . . . . . . . . . . . . . . 234
Trailer towing . . . . . . . . . . . . . . . . . . . . . . . . . . . 239
Advice . . . . . . . . . . . . . . . . . . . . . . . . . . . . . . . . 245
Care and maintenance . . . . . . . . . . . . . . . . . . . . 245
Accessories and modifications to the vehi-
cle
. . . . . . . . . . . . . . . . . . . . . . . . . . . . . . . . . . . . 245
Care and cleaning . . . . . . . . . . . . . . . . . . . . . . . 246
Vehicle exterior care . . . . . . . . . . . . . . . . . . . . . . 246
Caring for the vehicle interior . . . . . . . . . . . . . . 250
Intelligent technology . . . . . . . . . . . . . . . . . . . . 253
Electromechanical steering . . . . . . . . . . . . . . . . 253
Progressive steering . . . . . . . . . . . . . . . . . . . . . 254
Four-wheel drive . . . . . . . . . . . . . . . . . . . . . . . . . 254
Power Management . . . . . . . . . . . . . . . . . . . . . . 255
Checking and refilling levels . . . . . . . . . . . . . . . 256
Filling the tank . . . . . . . . . . . . . . . . . . . . . . . . . . 256
Fuel . . . . . . . . . . . . . . . . . . . . . . . . . . . . . . . . . . . 258
Engine compartment . . . . . . . . . . . . . . . . . . . . . 262
Engine oil . . . . . . . . . . . . . . . . . . . . . . . . . . . . . . 264
Cooling system . . . . . . . . . . . . . . . . . . . . . . . . . . 266
Brake fluid . . . . . . . . . . . . . . . . . . . . . . . . . . . . . 267
Windscreen washer reservoir . . . . . . . . . . . . . . 268
Battery . . . . . . . . . . . . . . . . . . . . . . . . . . . . . . . . . 269
Wheels . . . . . . . . . . . . . . . . . . . . . . . . . . . . . . . . 271
Wheels and tyres . . . . . . . . . . . . . . . . . . . . . . . . 271
Tyre monitoring systems . . . . . . . . . . . . . . . . . . 275 Temporary spare wheel . . . . . . . . . . . . . . . . . . . 278
Winter service . . . . . . . . . . . . . . . . . . . . . . . . . . . 279
Technical data . . . . . . . . . . . . . . . . . . . . . . . . 281
Technical specifications . . . . . . . . . . . . . . . . . . 281
Important . . . . . . . . . . . . . . . . . . . . . . . . . . . . . . 281
Vehicle identification data . . . . . . . . . . . . . . . . . 281
Information on fuel consumption . . . . . . . . . . . 282
Trailer mode . . . . . . . . . . . . . . . . . . . . . . . . . . . . 282
Wheels . . . . . . . . . . . . . . . . . . . . . . . . . . . . . . . . 283
Engine data . . . . . . . . . . . . . . . . . . . . . . . . . . . . . 284
Dimensions . . . . . . . . . . . . . . . . . . . . . . . . . . . . . 305
Index . . . . . . . . . . . . . . . . . . . . . . . . . . . . . . . . . 307
6
Page 31 of 324
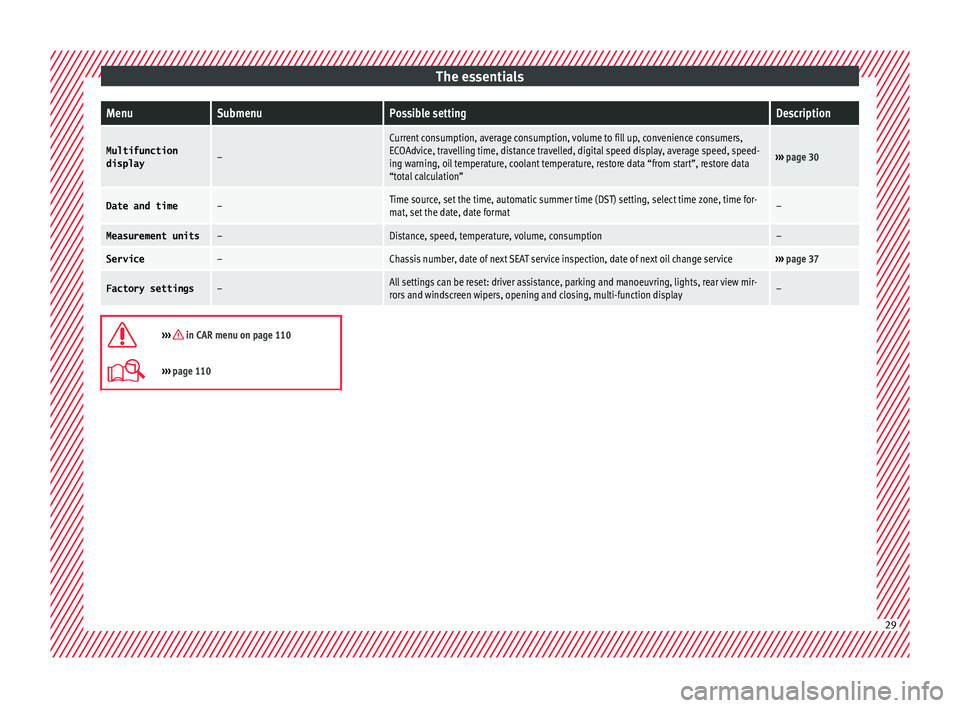
The essentialsMenuSubmenuPossible settingDescription
Multifunction
displayŌĆō
Current consumption, average consumption, volume to fill up, convenience consumers,
ECOAdvice, travelling time, distance travelled, digital speed display, average speed, speed-
ing warning, oil temperature, coolant temperature, restore data ŌĆ£from startŌĆØ, restore data
ŌĆ£total calculationŌĆØ
ŌĆ║ŌĆ║ŌĆ║ page 30
Date and timeŌĆōTime source, set the time, automatic summer time (DST) setting, select time zone, time for-
mat, set the date, date formatŌĆō
Measurement unitsŌĆōDistance, speed, temperature, volume, consumptionŌĆō
ServiceŌĆōChassis number, date of next SEAT service inspection, date of next oil change serviceŌĆ║ŌĆ║ŌĆ║ page 37
Factory settingsŌĆōAll settings can be reset: driver assistance, parking and manoeuvring, lights, rear view mir-
rors and windscreen wipers, opening and closing, multi-function displayŌĆō ’Ƭ
ŌĆ║ŌĆ║ŌĆ║ in CAR menu on page 110
’Ć®ŌĆ║ŌĆ║ŌĆ║
page 110 29
Page 37 of 324
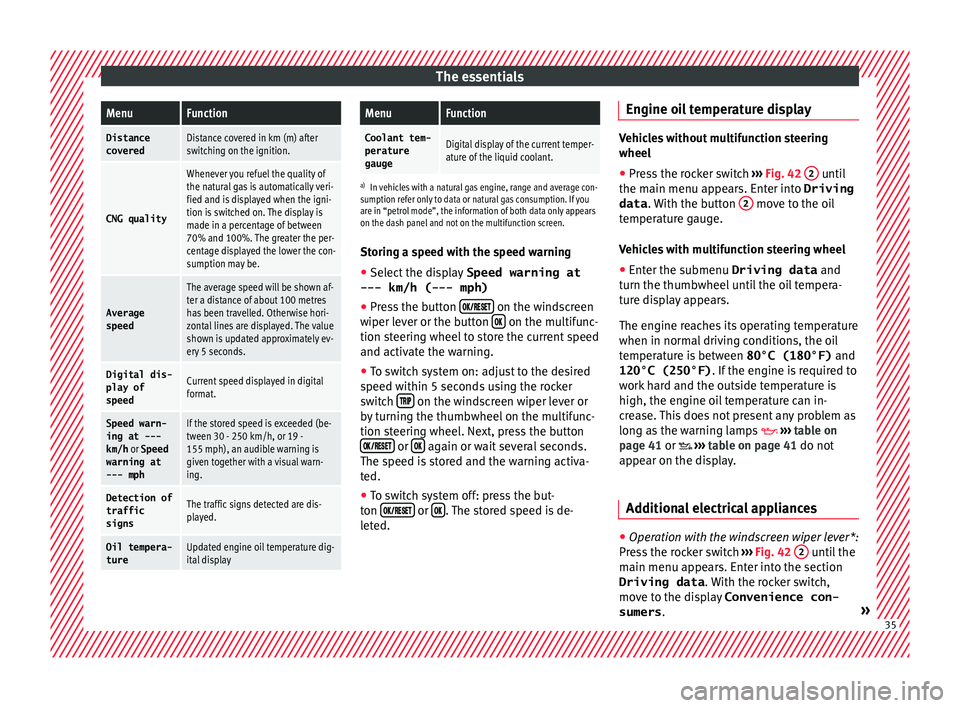
The essentialsMenuFunction
Distance
coveredDistance covered in km (m) after
switching on the ignition.
CNG quality
Whenever you refuel the quality of
the natural gas is automatically veri-
fied and is displayed when the igni-
tion is switched on. The display is
made in a percentage of between
70% and 100%. The greater the per-
centage displayed the lower the con-
sumption may be.
Average
speed
The average speed will be shown af-
ter a distance of about 100 metres
has been travelled. Otherwise hori-
zontal lines are displayed. The value
shown is updated approximately ev-
ery 5 seconds.
Digital dis- play of
speedCurrent speed displayed in digital
format.
Speed warn-
ing at ---
km/h or Speed
warning at
--- mphIf the stored speed is exceeded (be-
tween 30 - 250 km/h, or 19 -
155 mph), an audible warning is
given together with a visual warn-
ing.
Detection of
traffic
signsThe traffic signs detected are dis-
played.
Oil tempera- tureUpdated engine oil temperature dig-
ital display
MenuFunction
Coolant tem-perature
gaugeDigital display of the current temper-
ature of the liquid coolant.
a) In vehicles with a natural gas engine, range and average con-
sumption refer only to data or natural gas consumption. If you
are in ŌĆ£petrol modeŌĆØ, the information of both data only appears
on the dash panel and not on the multifunction screen.
Storing a speed with the speed warning
ŌŚÅ Select the display Speed warning at
--- km/h (---
mph)
ŌŚÅ Press the button ’üÅ’üŗ’āł’üÆ’üģ’üō
’üģ
’üö on the windscreen
w iper l
ev
er or the button ’üÅ’üŗ on the multifunc-
tion s t
eerin
g wheel to store the current speed
and activate the warning.
ŌŚÅ To switch system on: adjust to the desired
speed within 5 sec
onds using the rocker
switch ’üö’üÆ’üē’üÉ on the windscreen wiper lever or
b y
t
urning the thumbwheel on the multifunc-
tion steering wheel. Next, press the button ’üÅ’üŗ’āł’üÆ’üģ’üō’üģ’üö or
’üÅ’üŗ again or wait several seconds.
The s peed i
s
stored and the warning activa-
ted.
ŌŚÅ To switch system off: press the but-
ton ’üÅ’üŗ’āł’üÆ’üģ’üō’üģ’üö or
’üÅ’üŗ . The stored speed is de-
l et
ed. En
gine oil temperature display Vehicles without multifunction steering
wheel
ŌŚÅ Press the rocker switch ŌĆ║ŌĆ║ŌĆ║
Fig. 42 2 until
the main menu ap pe
ars. Enter into Driving
data . With the button 2 move to the oil
temper at
ure gauge.
Vehicles with multifunction steering wheel
ŌŚÅ Enter the submenu Driving data and
turn the thumbwheel
until the oil tempera-
ture display appears.
The engine reaches its operating temperature
when in normal driving conditions, the oil
temperature is between 80┬░C (180┬░F) and
120┬░C (250┬░F) . If the engine is required to
work hard and the outside temperature is
high, the engine oil temperature can in-
crease. This does not present any problem as
long as the warning lamps ’üź ŌĆ║ŌĆ║ŌĆ║
table on
page 41 or ’éż ŌĆ║ŌĆ║ŌĆ║
table on page 41 do not
appear on the display.
Additional electrical appliances ŌŚÅ
Operation with the windscreen wiper lever*:
Pr e
s
s the rocker switch ŌĆ║ŌĆ║ŌĆ║
Fig. 42 2 until the
m ain menu ap
pe
ars. Enter into the section
Driving data . With the rocker switch,
move to the display Convenience con-
sumers . ┬╗ 35
Page 39 of 324
The essentialsMenu ŌĆ£Partial timeŌĆØ
Partial
timeFor about 5 seconds a partial time is dis-
played. The timer continues in parallel.
New lap
The timer of the current lap stops and a
new lap starts immediately. The time for
the lap you have just completed is inclu-
ded in the statistics.
StopThe current lap timer will be interrupted.
The lap does not end. The
Pause menu
is displayed.
Menu ŌĆ£Long-term StatisticsŌĆØ
View of the latest lap times:
ŌĆō total time
ŌĆō best lap time
ŌĆō worst lap time
ŌĆō average lap duration
A maximum of 10 laps is possible, and a
total duration of 99 hours, 59 minutes
and 59 seconds.
If one of the 2 limits is reached, you will
have to reset the statistics in order to be-
gin a new timer.
BackThis returns to the previous menu.
Resetting
to zeroAll the memorised statistical data are re-
set. WARNING
Do your best to avoid handling the timer
whil e driv
ing.
ŌŚÅ Only set the timer or consult statistics
when the vehic
le is stationary. ŌŚÅ
Whil e driv
ing, do not handle the timer in
complicated driving situations. Speed warning device
The speed warning device warns the driver
when they h
av
e exceeded the pre-set speed
limit by 3 km/h (2 mph). An audible warning
signal sounds, and the warning lamp ’é® and
the driver message Speed limit excee-
ded! will be displayed simultaneously on the
instrument panel. The warning lamp ’é®
switches off when reducing speed below the
stored maximum limit.
Speed warning programming is recommen-
ded if you wish to be reminded of a maxi-
mum speed, such as when travelling in a
country with different speed limits or for a
maximum speed for winter tyres.
Setting speed limit warning
You can use the radio or the Easy Connect* to
set, alter or cancel the speed limit warning.
ŌŚÅ Vehicles with radio : pres
s the button SETUP > control button ’āŻ Driver Assistant
>
Speed warning .
ŌŚÅ Vehicles with Easy Connect : pre
s
s the but-
ton Systems or else Vehicle systems >
Driver assistant > Speed warning.The warning limit can be set from 30 to
240 km/h (20 to 149 mph). The a
djustment
is made at 10 km/h (5 mph) intervals. Note
ŌŚÅ Ple a
se bear in mind that, even with the
speed warning function, it is still important
to keep an eye on the vehicle speed with the
speedometer and to observe the legal speed
limits.
ŌŚÅ The speed limit warning function in the ver-
sion for some c
ountries warns you at a speed
of 120 km/h (75 mph). This is a factory-set
speed limit. Service intervals
The service interval indication appears on the
in
s
trument
panel display ŌĆ║ŌĆ║ŌĆ║
’Ć® Fig. 120
3 .
S EA
T di
stinguishes between services with en-
gine oil change (e.g. Oil change service) and
services without engine oil change (e.g. In-
spection).
In vehicles with Services established by time
or mileage, the service intervals are already
pre-defined.
In vehicles with LongLife Service , the inter-
vals are determined individually. Thanks to
technological progress, maintenance work
has been greatly reduced. Because of the
technology used by SEAT, with this service ┬╗ 37
Page 40 of 324
The essentials
you only need to change the oil when the ve-
hic l
e so r
equires. To calculate this change
(max. 2 years), the vehicle's conditions of
use and individual driving styles are consid-
ered. The advance warning first appears 20
days before the date established for the cor-
responding service. The kilometres (miles)
remaining until the next service are always
rounded up to the nearest 100 km (miles)
and the time is given in complete days. The
current service message cannot be viewed
until 500 km after the last service. Prior to
this, only lines are visible on the display.
Inspection reminder
When the Service date is approaching, when
the ignition is switched on a Service remind-
er is displayed.
Vehicles without text messages : a span-
ner ’üż will be displayed on the instrument
panel plus an indication in km.
The kilometres indicated are the maximum
number of kilometres that can be travelled
until the next service. After a few seconds,
the display mode changes. A clock symbol
appears and the number of days until the
next service is due.
Vehicles with text messages : Service in
--- km or --- days will be shown on the
instrument panel display. Service due
When the servic
e date is due, an audible
warning is given when the ignition is switch-
ed on and the spanner displayed on the
screen flashes for a few seconds ’üż.
Vehicles with text messages : Service now
will be shown on the instrument panel dis-
play.
Reading a service notification
With the ignition switched on, the engine off
and the vehicle at a standstill, the current
service notification can be read:
Press and hold the button ŌĆ║ŌĆ║ŌĆ║
’Ć® Fig. 120
4 for more than 5 seconds to consult the serv-
ic
e me
s
sage.
When the service date has passed , a minus
sign is displayed in front of the number of kil-
ometres or days.
Vehicles with text messages : the following
message is displayed: Service --- km
(miles) or --- days ago .
The time can also be set via the ’üā’üü’üÆ button
and S
ETUP function button in the Easy Con-
nect sy
s
tem ŌĆ║ŌĆ║ŌĆ║
’Ć® page 110.
Resetting service interval display
If the service was not carried out by a SEAT
dealership, the display can be reset as fol-
lows: ŌŚÅ
Switc
h off the ignition, press and hold but-
ton ŌĆ║ŌĆ║ŌĆ║
’Ć® Fig. 120
4 .
ŌŚÅ Switch ignition back on.
ŌŚÅ Release the 4
ŌĆ║ ŌĆ║ŌĆ║
’Ć® Fig. 120
b
utton and
press it again for the next 20 seconds. Note
ŌŚÅ The serv ic
e message disappears after a few
seconds, when the engine is started or when OK/RESET is pressed on the windscreen wiper
lev er
, or OK on the multifunction steering
wheel.
ŌŚÅ In v
ehicles with the LongLife system in
which the batt
ery has been disconnected for
a long period of time, it is not possible to cal-
culate the date of the next service. Therefore
the service interval display may not be cor- rect. In this case, bear in mind the maximum
service intervals permitted in the ŌĆ║ŌĆ║ŌĆ║ Book-
let Maintenance Programme.
ŌŚÅ If you reset the display manually, the next
servic
e interval will be indicated as in vehi-
cles with fixed service intervals. For this rea-
son we recommend that the service interval
display be reset by a SEAT authorised Dealer. 38
Page 44 of 324
The essentials
’üź ’é▓ Do not continue driving!
Engine oil pressure too low. If
the warning lamp flashes, stop
driving, even if the oil level is
correct. Do not even run the en-
gine at idle speed!
ŌĆ║ŌĆ║ŌĆ║ page
264 ’ü”
Fault in the battery.ŌĆ║ŌĆ║ŌĆ║
page
269 ’ĆĮ
Driving light totally or partially
faulty.ŌĆ║ŌĆ║ŌĆ║
page
93
Fault in the cornering light sys-
tem.ŌĆ║ŌĆ║ŌĆ║ page
131 ’āĘ
Diesel particulate filter blockedŌĆ║ŌĆ║ŌĆ║
page
190 ’ü╣
Level of windscreen washer fluid
too low.ŌĆ║ŌĆ║ŌĆ║
page
139 ’Ʀ
Flashing: Fault in the oil level de-
tection. Control manually.ŌĆ║ŌĆ║ŌĆ║
page
264
Ignition: Insufficient engine oil. ’āü
Fault in the gearbox.ŌĆ║ŌĆ║ŌĆ║
page
187 ’üć
Light Assist on.ŌĆ║ŌĆ║ŌĆ║
page
132 ’üō’üü’üå’üģ
Immobiliser active.
’üż
Service interval displayŌĆ║ŌĆ║ŌĆ║
page
37 ’Ƭ
Mobile telephone is connected
via Bluetooth to the original tele-
phone device.ŌĆ║ŌĆ║ŌĆ║
Book-
let Radio
or
ŌĆ║ŌĆ║ŌĆ║ Book-
let Navi-
gation
system ’üģ
Mobile telephone battery charge
meter. Available only for devices
pre-installed in factory.
’üø
Freezing warning. The outside
temperature is lower than +4┬░C
(+39┬░F).ŌĆ║ŌĆ║ŌĆ║
page
32 ’ā”
Start-Stop system activated.ŌĆ║ŌĆ║ŌĆ║
page
191 ’é¦
Start-Stop system unavailable.
’üģ’üā’üÅ
Low consumption driving statusŌĆ║ŌĆ║ŌĆ║
page
31 On the instrument panel
Fig. 51
Warning lamp for disabling the front
p a
s
senger airbag. ’üÅ’üå’üå
’Ć╣
Front passenger front airbag is
disabled (’üÉ’üü’üō’üō’üģ’üÄ’üć’üģ’üÆ ’üü’üē’üÆ ’üé’üü’üć
’üÅ’üå’üå ’Ć╣).
ŌĆ║ŌĆ║ŌĆ║ page
76 ’üÅ’üÄ
’éČ
The front passenger front airbag
is activated (’üÉ’üü’üō’üō’üģ’üÄ’üć’üģ’üÆ ’üü’üē’üÆ ’üé’üü’üć
’üÅ’üÄ ’éČ).
ŌĆ║ŌĆ║ŌĆ║ page
76 ’Ƭ
ŌĆ║ŌĆ║ŌĆ║ in Warning and control lamps on
page 109
’Ć®ŌĆ║ŌĆ║ŌĆ║ page 109 Gearbox lever
M anua
l
gearbox Fig. 52
Gear shift pattern of a 5 or 6-speed
m anual
g
earbox The position of the gears is indicated on the
g
e
arbo
x lever ŌĆ║ŌĆ║ŌĆ║ Fig. 52.42
Page 52 of 324
The essentials
Fluid Level control Fi l
lin
g capacities
Tank level
Petrol and diesel
engines50 l, of which, approx. 7 l reserveVehicles with all-wheel-drive :
55 l, of which, approx. 8.5 l re- serve
Natural gas en-
ginea)approx. 15 kg
a)
The capacity depends on the efficacy and characteristics of
the natural gas pumps. The capacity indicated is based on a
minimum loading pressure of 200 bar.
Capacity of the windscreen washer fluid container
Versions without
headlight washer
systemapprox. 3 litres
Versions with
headlight washer
systemapprox. 5 litres Fuel
Fig. 58
Fuel tank flap with tank cap attached. The flap that covers the tank cap is unlocked
and loc
k
ed aut
omatically using the central
locking.
Opening the fuel tank cap
ŌŚÅ Open the fuel tank flap by pressing on the
left
side.
ŌŚÅ Unscrew the cap by turning it to the left.
ŌŚÅ Place it in the space on the hinge of the
open flap ŌĆ║ŌĆ║
ŌĆ║ Fig. 58.
Closing the fuel tank cap
ŌŚÅ Unscrew the cap by turning it to the right as
far as
it will go.
ŌŚÅ Close the lid. ’Ƭ
ŌĆ║ŌĆ║ŌĆ║ in Filling up on page 257
’Ć®ŌĆ║ŌĆ║ŌĆ║
page 256 Oil
Fig. 59
Engine oil dipstick. Fig. 60
In the engine compartment: Engine
oi l
fi
ller cap 50
Page 53 of 324

The essentials
The level is measured using the dipstick loca-
t ed in the en
gine c
ompartment
ŌĆ║ŌĆ║ŌĆ║ ’Ć® page 262.
The oil should leave a mark between zones A and
C . It should never exceed zone
A .
ŌŚÅ Zone A : Do not add oil.
ŌŚÅ Zone B : You can add oil but keep the level
in th at
zone.
ŌŚÅ Zone C : Add oil up to zone
B .
T op
pin
g up engine oil
ŌŚÅ Unscrew cap from oil filler opening.
ŌŚÅ Add oil slowly.
ŌŚÅ At the same time, check the level to ensure
you do not a
dd too much.
ŌŚÅ When the oil level reaches at least zone B ,
u n
s
crew the engine oil filler cap carefully.
Oil properties
Engine typeSpecification
Petrol without flexible
service intervalVW 502 00/VW 504 00
Petrol with flexible serv-
ice interval (LongLife)VW 504 00
Diesel. Engines without
Particulate filter (DPF)VW 505 01/VW 506 01/VW
507 00
Engine typeSpecification
Diesel. Particulate Filter
Engines (DPF).
With or without flexible
service interval (with
and without LongLife) a)VW 507 00
Natural gas enginesVW 502 00
a)
Only use recommended oils, otherwise you may damage the
engine.
Engine oil additives
No type of additive should be mixed with the
engine oil. The deterioration caused by these
additives is not covered by the warranty.
’Ƭ
ŌĆ║ŌĆ║ŌĆ║ in Changing engine oil on page 266
’Ć®ŌĆ║ŌĆ║ŌĆ║ page 264 Coolant
Fig. 61
Engine compartment: coolant expan-
s ion t
ank
cap. The coolant tank is located in the engine
c
omp
ar
tment ŌĆ║ŌĆ║ŌĆ║
’Ć® page 262.
When the engine is cold, replace the coolant
when the level is below ’üŹ’üē’üÄ.
Coolant specifications
The engine cooling system is supplied from
the factory with a specially treated mixture of
water and at least 40 % of the additive G13
(TL-VW 774 J), purple. This mixture gives the
necessary frost protection down to -25┬░C
(-13┬░F) and protects the light alloy parts of
the engine cooling system against corrosion.
It also prevents scaling and considerably rai-
ses the boiling point of the coolant.
To protect the cooling system, the percentage
of additive must always be at least 40 %, ┬╗ 51
Page 90 of 324
Emergencies
they should be changed if they are damaged,
or c l
e
aned if they are dirty ŌĆ║ŌĆ║ŌĆ║ .
Dam ag
ed w
iper blades should be replaced
immediately. These are available from quali-
fied workshops. WARNING
Worn or dirty wiper blades reduce visibility
and incr e
ase the risk of accident and serious
injury.
ŌŚÅ Always replace damaged or worn blades or
bla
des which do not clean the windscreen
correctly. CAUTION
ŌŚÅ Damag ed or dir
ty windscreen wipers could
scratch the glass.
ŌŚÅ If products containing solvents, rough
spong
es or sharp objects are used to clean
the blades, the graphite layer will be dam-
aged.
ŌŚÅ Never use fuel, nail varnish remover, paint
thinner or simil
ar products to clean the win-
dows.
ŌŚÅ In icy conditions, always check that the
wiper bl
ades are not frozen to the glass be-
fore using the wipers. In cold weather, it may
help to leave the vehicle parked with the wip-
ers in service position ŌĆ║ŌĆ║ŌĆ║
’Ć© page 63. CAUTION
ŌŚÅ To pr ev
ent damage to the bonnet and the
wiper arms, only leave them in the service
position.
ŌŚÅ Before driving, always lower the wiper
arms. Towing and tow-starting the ve-
hicl
e
Gener
al information Read the additional information carefully
ŌĆ║ ŌĆ║
ŌĆ║
’Ć© page 60.
Tow-starting means starting the engine of
the vehicle while another pulls it.
Towing means one vehicle pulling another
that is not roadworthy.
If the vehicle comes with the Keyless Access
system, towing is only allowed with the igni-
tion on!
The vehicle battery drains if the vehicle is
towed with the engine switched off and the
ignition connected. Depending on the battery
charge status, the drop in voltage may be so
large, even after just a few minutes, that no
electrical device in the vehicle may work e.g.
the hazard warning lights. In vehicles with the Keyless Access system, the steering
wheel cou
ld lock up. WARNING
If the vehicle has no electrical power, the
brak e light
s, turn signals and all other lights
will no longer function. Do not have the vehi-
cle towed away. Failure to follow this instruc-
tion could result in an accident. WARNING
The risk of accidents is high when tow-start-
ing, f or e
xample, the towed vehicle can easily
be driven into the towing vehicle. CAUTION
If there is no oil in the gearbox or no lubricant
in the autom atic
transmission the car may
only be towed with the driven wheels lifted
clear of the road, or transported on a special
car transporter or trailer. CAUTION
Do not tow a vehicle for more than 50 m in at-
tempt t
o start it. There is risk of damage to
the catalytic converter. Note
ŌŚÅ Ple a
se observe related legal requirements.88