wheel Seat Leon 5D 2016 Owner's manual
[x] Cancel search | Manufacturer: SEAT, Model Year: 2016, Model line: Leon 5D, Model: Seat Leon 5D 2016Pages: 324, PDF Size: 6.93 MB
Page 5 of 324
SEAT Drive Profile››› page 219
Active cylinder management
(ACT®)››› page 188
Dynamic chassis control DCC››› page 219
Adaptive cruise control ACC››› page 196
Driving style CUPRA››› page 220
All-wheel drive››› page 254
CNG natural gas››› page 260
Page 7 of 324
Table of Contents
Table of Contents
The e s
senti
als . . . . . . . . . . . . . . . . . . . . . . . . 7
Exterior view . . . . . . . . . . . . . . . . . . . . . . . . . . . . 7
Exterior view . . . . . . . . . . . . . . . . . . . . . . . . . . . . 8
Interior view (left-hand drive) . . . . . . . . . . . . . . 9
How it works . . . . . . . . . . . . . . . . . . . . . . . . . . . . 10
Unlocking and locking . . . . . . . . . . . . . . . . . . . . 10
Before driving . . . . . . . . . . . . . . . . . . . . . . . . . . . 14
Airbags . . . . . . . . . . . . . . . . . . . . . . . . . . . . . . . . 16
Child seats . . . . . . . . . . . . . . . . . . . . . . . . . . . . . 19
Starting the vehicle . . . . . . . . . . . . . . . . . . . . . . 24
Lights and visibility . . . . . . . . . . . . . . . . . . . . . . 24
Easy Connect . . . . . . . . . . . . . . . . . . . . . . . . . . . 27
Driver information system . . . . . . . . . . . . . . . . . 30
Driving data . . . . . . . . . . . . . . . . . . . . . . . . . . . . 34
Cruise control . . . . . . . . . . . . . . . . . . . . . . . . . . . 39
Warning lamps . . . . . . . . . . . . . . . . . . . . . . . . . . 40
Gearbox lever . . . . . . . . . . . . . . . . . . . . . . . . . . . 42
Air conditioning . . . . . . . . . . . . . . . . . . . . . . . . . 45
Fluid Level control . . . . . . . . . . . . . . . . . . . . . . . 50
Emergencies . . . . . . . . . . . . . . . . . . . . . . . . . . . . 54
Fuses . . . . . . . . . . . . . . . . . . . . . . . . . . . . . . . . . . 54
Bulbs . . . . . . . . . . . . . . . . . . . . . . . . . . . . . . . . . . 55
Action in the event of a puncture . . . . . . . . . . . 55
Changing a wheel . . . . . . . . . . . . . . . . . . . . . . . 57
Snow chains . . . . . . . . . . . . . . . . . . . . . . . . . . . . 60
Emergency towing of the vehicle . . . . . . . . . . . 60
How to jump start . . . . . . . . . . . . . . . . . . . . . . . . 61
Changing the wiper blades . . . . . . . . . . . . . . . . 63
Safety . . . . . . . . . . . . . . . . . . . . . . . . . . . . . . . . 65
Safe driving . . . . . . . . . . . . . . . . . . . . . . . . . . . . 65
Safety first! . . . . . . . . . . . . . . . . . . . . . . . . . . . . . 65
Advice about driving . . . . . . . . . . . . . . . . . . . . . 65
Correct position for passengers . . . . . . . . . . . . 66
Pedal area . . . . . . . . . . . . . . . . . . . . . . . . . . . . . . 70 Seat belts
. . . . . . . . . . . . . . . . . . . . . . . . . . . . . . 71
Why wear a seat belt? . . . . . . . . . . . . . . . . . . . . 71
How to properly adjust your seatbelt . . . . . . . . 74
Seat belt tensioners . . . . . . . . . . . . . . . . . . . . . . 75
Airbag system . . . . . . . . . . . . . . . . . . . . . . . . . . 76
Brief introduction . . . . . . . . . . . . . . . . . . . . . . . . 76
Airbag safety instructions . . . . . . . . . . . . . . . . . 78
Deactivating airbags . . . . . . . . . . . . . . . . . . . . . 80
Transporting children safely . . . . . . . . . . . . . . . 82
Safety for children . . . . . . . . . . . . . . . . . . . . . . . 82
Child seats . . . . . . . . . . . . . . . . . . . . . . . . . . . . . 84
Emergencies . . . . . . . . . . . . . . . . . . . . . . . . . . 85
Self-help . . . . . . . . . . . . . . . . . . . . . . . . . . . . . . . 85
Vehicle tool kit anti-puncture kit* . . . . . . . . . . . 85
Tyre repair . . . . . . . . . . . . . . . . . . . . . . . . . . . . . . 85
Manual unlocking/locking . . . . . . . . . . . . . . . . . 87
Changing the windscreen wiper blades . . . . . . 87
Towing and tow-starting the vehicle . . . . . . . . . 88
Fuses and bulbs . . . . . . . . . . . . . . . . . . . . . . . . . 91
Fuses . . . . . . . . . . . . . . . . . . . . . . . . . . . . . . . . . . 91
Changing bulbs . . . . . . . . . . . . . . . . . . . . . . . . . 93
Change the front bulbs . . . . . . . . . . . . . . . . . . . 95
Changing incandescent rear light bulbs . . . . . . 97
Operation . . . . . . . . . . . . . . . . . . . . . . . . . . . . . 103
Controls and displays . . . . . . . . . . . . . . . . . . . . 103
General instrument panel . . . . . . . . . . . . . . . . . 102
Instruments and warning/control lamps . . . . . 104
Instruments . . . . . . . . . . . . . . . . . . . . . . . . . . . . 104
Control lamps . . . . . . . . . . . . . . . . . . . . . . . . . . . 109
Introduction to the Easy Connect system* . . . . 110
System settings (CAR)* . . . . . . . . . . . . . . . . . . . 110
Communications and multimedia . . . . . . . . . . . 111
Steering wheel controls* . . . . . . . . . . . . . . . . . . 111
Multimedia . . . . . . . . . . . . . . . . . . . . . . . . . . . . . 115 Opening and closing
. . . . . . . . . . . . . . . . . . . . . 116
Central locking system . . . . . . . . . . . . . . . . . . . . 116
Anti-theft alarm system* . . . . . . . . . . . . . . . . . . 124
Rear lid (luggage compartment) . . . . . . . . . . . . 126
Electric windows . . . . . . . . . . . . . . . . . . . . . . . . . 127
Panoramic sliding sunroof* . . . . . . . . . . . . . . . . 129
Lights and visibility . . . . . . . . . . . . . . . . . . . . . . 131
Lights . . . . . . . . . . . . . . . . . . . . . . . . . . . . . . . . . 131
Visibility . . . . . . . . . . . . . . . . . . . . . . . . . . . . . . . 138
Windscreen wiper and window wiper sys-
tems . . . . . . . . . . . . . . . . . . . . . . . . . . . . . . . . . . 139
Mirr
or . . . . . . . . . . . . . . . . . . . . . . . . . . . . . . . . . 141
Seats and head restraints . . . . . . . . . . . . . . . . . 143
Adjusting the seats and headrests . . . . . . . . . . 143
Seat functions . . . . . . . . . . . . . . . . . . . . . . . . . . 144
Transport and practical equipment . . . . . . . . . 148
Storage compartments . . . . . . . . . . . . . . . . . . . 148
Storing objects . . . . . . . . . . . . . . . . . . . . . . . . . . 151
Roof carrier . . . . . . . . . . . . . . . . . . . . . . . . . . . . . 160
Air conditioning . . . . . . . . . . . . . . . . . . . . . . . . . 163
Heating, ventilation and cooling . . . . . . . . . . . . 163
Driving . . . . . . . . . . . . . . . . . . . . . . . . . . . . . . . . 167
Ignition lock . . . . . . . . . . . . . . . . . . . . . . . . . . . . 167
Braking and parking . . . . . . . . . . . . . . . . . . . . . 172
Braking and stability systems . . . . . . . . . . . . . . 176
Manual gearbox . . . . . . . . . . . . . . . . . . . . . . . . . 179
Automatic gearbox/DSG automatic gear-
box* . . . . . . . . . . . . . . . . . . . . . . . . . . . . . . . . . . . 180
R
un-in and economical driving . . . . . . . . . . . . . 187
Engine management and exhaust gas purifica-
tion syst
em . . . . . . . . . . . . . . . . . . . . . . . . . . . . . 189
Driving tips . . . . . . . . . . . . . . . . . . . . . . . . . . . . . 191
Driver assistance systems . . . . . . . . . . . . . . . . . 191
Start-Stop system* . . . . . . . . . . . . . . . . . . . . . . . 191
Auto Hold Function* . . . . . . . . . . . . . . . . . . . . . . 194
Cruise control system (CCS)* . . . . . . . . . . . . . . . 195
Adaptive Cruise Control ACC* . . . . . . . . . . . . . . 196
5
Page 8 of 324
Table of Contents
Front Assist system including City emergency
br ak
in
g and pedestrian monitoring* . . . . . . . . 207
Lane Assist system* . . . . . . . . . . . . . . . . . . . . . . 213
Traffic Jam Assist . . . . . . . . . . . . . . . . . . . . . . . . 216
Emergency Assist . . . . . . . . . . . . . . . . . . . . . . . . 217
SEAT Drive Profile* . . . . . . . . . . . . . . . . . . . . . . . 219
Traffic sign detection system . . . . . . . . . . . . . . . 222
Fatigue detection (break recommendation)* . . 224
Parking aid . . . . . . . . . . . . . . . . . . . . . . . . . . . . . 225
Rear Assist “Rear View Camera”* . . . . . . . . . . . 231
Towing bracket device . . . . . . . . . . . . . . . . . . . . 234
Towing bracket device* . . . . . . . . . . . . . . . . . . . 234
Trailer towing . . . . . . . . . . . . . . . . . . . . . . . . . . . 239
Advice . . . . . . . . . . . . . . . . . . . . . . . . . . . . . . . . 245
Care and maintenance . . . . . . . . . . . . . . . . . . . . 245
Accessories and modifications to the vehi-
cle
. . . . . . . . . . . . . . . . . . . . . . . . . . . . . . . . . . . . 245
Care and cleaning . . . . . . . . . . . . . . . . . . . . . . . 246
Vehicle exterior care . . . . . . . . . . . . . . . . . . . . . . 246
Caring for the vehicle interior . . . . . . . . . . . . . . 250
Intelligent technology . . . . . . . . . . . . . . . . . . . . 253
Electromechanical steering . . . . . . . . . . . . . . . . 253
Progressive steering . . . . . . . . . . . . . . . . . . . . . 254
Four-wheel drive . . . . . . . . . . . . . . . . . . . . . . . . . 254
Power Management . . . . . . . . . . . . . . . . . . . . . . 255
Checking and refilling levels . . . . . . . . . . . . . . . 256
Filling the tank . . . . . . . . . . . . . . . . . . . . . . . . . . 256
Fuel . . . . . . . . . . . . . . . . . . . . . . . . . . . . . . . . . . . 258
Engine compartment . . . . . . . . . . . . . . . . . . . . . 262
Engine oil . . . . . . . . . . . . . . . . . . . . . . . . . . . . . . 264
Cooling system . . . . . . . . . . . . . . . . . . . . . . . . . . 266
Brake fluid . . . . . . . . . . . . . . . . . . . . . . . . . . . . . 267
Windscreen washer reservoir . . . . . . . . . . . . . . 268
Battery . . . . . . . . . . . . . . . . . . . . . . . . . . . . . . . . . 269
Wheels . . . . . . . . . . . . . . . . . . . . . . . . . . . . . . . . 271
Wheels and tyres . . . . . . . . . . . . . . . . . . . . . . . . 271
Tyre monitoring systems . . . . . . . . . . . . . . . . . . 275 Temporary spare wheel . . . . . . . . . . . . . . . . . . . 278
Winter service . . . . . . . . . . . . . . . . . . . . . . . . . . . 279
Technical data . . . . . . . . . . . . . . . . . . . . . . . . 281
Technical specifications . . . . . . . . . . . . . . . . . . 281
Important . . . . . . . . . . . . . . . . . . . . . . . . . . . . . . 281
Vehicle identification data . . . . . . . . . . . . . . . . . 281
Information on fuel consumption . . . . . . . . . . . 282
Trailer mode . . . . . . . . . . . . . . . . . . . . . . . . . . . . 282
Wheels . . . . . . . . . . . . . . . . . . . . . . . . . . . . . . . . 283
Engine data . . . . . . . . . . . . . . . . . . . . . . . . . . . . . 284
Dimensions . . . . . . . . . . . . . . . . . . . . . . . . . . . . . 305
Index . . . . . . . . . . . . . . . . . . . . . . . . . . . . . . . . . 307
6
Page 16 of 324
The essentials
››› in Opening or closing the panoramic
sliding sunroof on page 129
››› page 129 Before driving
M anua
l
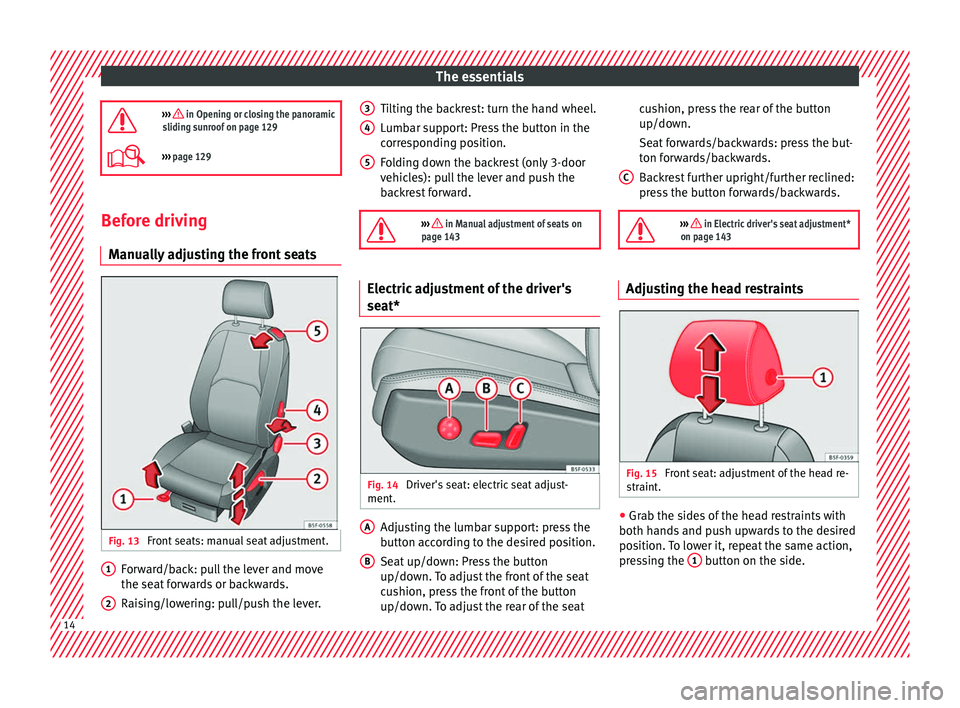
ly adjusting the front seats Fig. 13
Front seats: manual seat adjustment. Forward/back: pull the lever and move
the se
at
f
orwards or backwards.
Raising/lowering: pull/push the lever.
1 2 Tilting the backrest: turn the hand wheel.
L
umb
ar s
upport: Press the button in the
corresponding position.
Folding down the backrest (only 3-door
vehicles): pull the lever and push the
backrest forward.
››› in Manual adjustment of seats on
page 143 Electric adjustment of the driver's
se
at* Fig. 14
Driver's seat: electric seat adjust-
ment . Adjusting the lumbar support: press the
b
utt
on ac
cording to the desired position.
Seat up/down: Press the button
up/down. To adjust the front of the seat
cushion, press the front of the button
up/down. To adjust the rear of the seat
3 4
5
A
B cushion, press the rear of the button
up/do
wn.
Se at
forwards/backwards: press the but-
ton forwards/backwards.
Backrest further upright/further reclined:
press the button forwards/backwards.
››› in Electric driver's seat adjustment*
on page 143 Adjusting the head restraints
Fig. 15
Front seat: adjustment of the head re-
s tr
aint
. ●
Grab the sides of the head restraints with
both h and
s
and push upwards to the desired
position. To lower it, repeat the same action,
pressing the 1 button on the side.
C
14
Page 18 of 324
The essentials
side (L, left) and the passenger side (R,
right) t o the dir
ection de
sired.
Depending on the equipment fitted on
the vehicle, the mirrors may be heated
according to the outside temperature.
Folding in mirrors.
››› in Adjusting the exterior rear view
mirrors on page 142
››› page 142 Adjusting the steering wheel
Fig. 19
Lever in the lower left side of the
s t
eerin
g column. ●
Adjusting the position of the steering
wheel: P u
l
l the ››› Fig. 19 1 lever down,
mo v
e the s
teering wheel to the desired posi-
tion and lift the lever back up until it locks.
››› in Adjusting the steering wheel po-
sition on page 67 Airbags
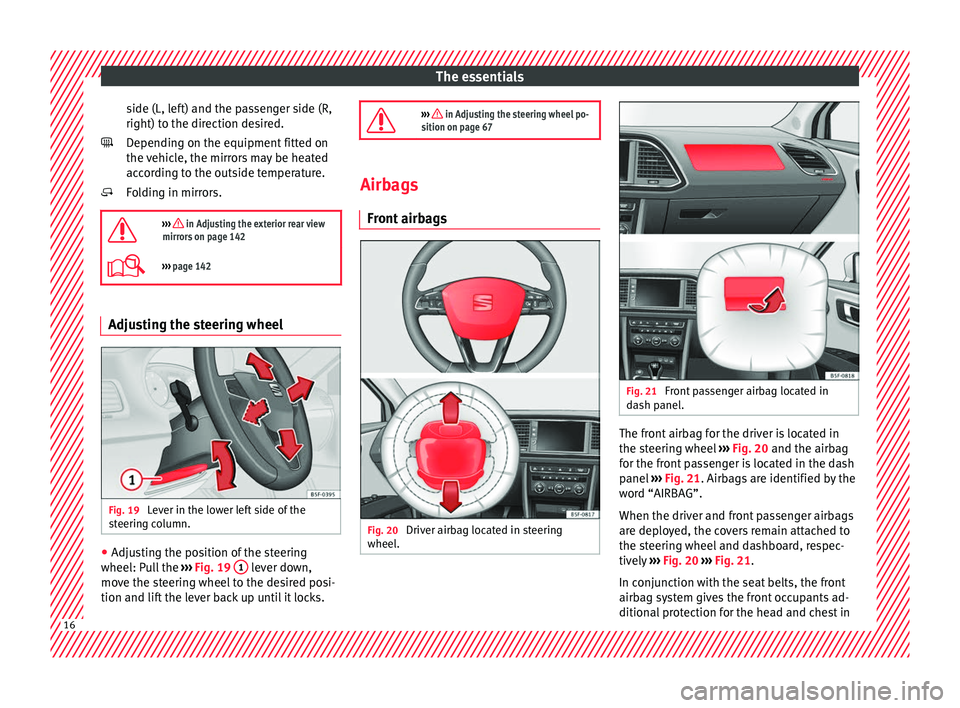
Front airb
ags Fig. 20
Driver airbag located in steering
wheel . Fig. 21
Front passenger airbag located in
d ash p
anel. The front airbag for the driver is located in
the s
t
eerin
g wheel ››› Fig. 20 and the airbag
for the front passenger is located in the dash
panel ››› Fig. 21. Airbags are identified by the
word “AIRBAG”.
When the driver and front passenger airbags
are deployed, the covers remain attached to
the steering wheel and dashboard, respec-
tively ››› Fig. 20 ››› Fig. 21.
In conjunction with the seat belts, the front
airbag system gives the front occupants ad-
ditional protection for the head and chest in 16
Page 26 of 324
The essentials
● Pu
sh the loc
k and release it from the an-
choring support.
››› in Safety instructions on page 84 Starting the vehicle
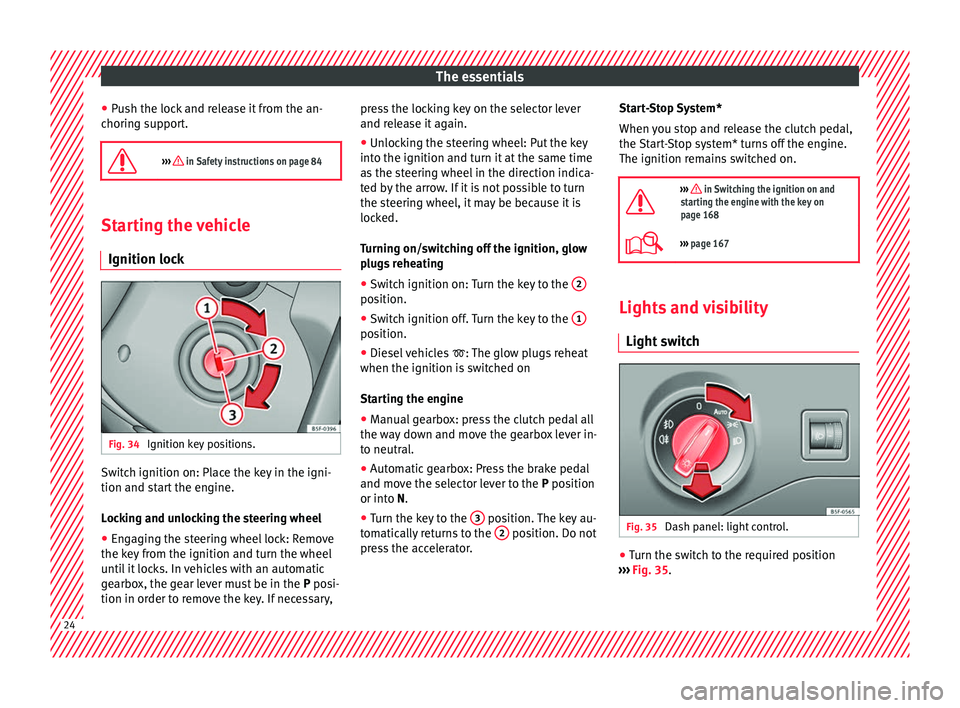
Ignition lock Fig. 34
Ignition key positions. Switch ignition on: Place the key in the igni-
tion and s
t
ar
t the engine.
Locking and unlocking the steering wheel
● Engaging the steering wheel lock: Remove
the key fr
om the ignition and turn the wheel
until it locks. In vehicles with an automatic
gearbox, the gear lever must be in the P posi-
tion in order to remove the key. If necessary, press the locking key on the selector lever
and rele
ase it again.
● Unlocking the steering wheel: Put the key
into the ignition and turn it
at the same time
as the steering wheel in the direction indica-
ted by the arrow. If it is not possible to turn
the steering wheel, it may be because it is
locked.
Turning on/switching off the ignition, glow
plugs reheating
● Switch ignition on: Turn the key to the 2 position.
●
Switch ignition off. Turn the key to the 1 position.
●
Diesel vehicles : The glo
w p
lugs reheat
when the ignition is switched on
Starting the engine
● Manual gearbox: press the clutch pedal all
the way
down and move the gearbox lever in-
to neutral.
● Automatic gearbox: Press the brake pedal
and move the sel
ector lever to the P position
or into N.
● Turn the key to the 3 position. The key au-
t om
atic
ally returns to the 2 position. Do not
pr e
s
s the accelerator. Start-Stop System*
When you s
top and release the clutch pedal,
the Start-Stop system* turns off the engine.
The ignition remains switched on.
››› in Switching the ignition on and
starting the engine with the key on
page 168
››› page 167 Lights and visibility
Light sw
it
ch Fig. 35
Dash panel: light control. ●
Turn the switch to the required position
› ›
›
Fig. 35. 24
Page 32 of 324

The essentials
Driver information system Intr oduction With the ignition switched on, it is possible
to r
e
ad the different functions of the display
by scrolling through the menus.
In vehicles with multifunction steering wheel,
the multifunction display can only be operat-
ed with the steering wheel buttons.
The number of menus displayed on the in-
strument panel will vary according to the ve-
hicle electronics and equipment.
A specialised workshop will be able to pro-
gramme or modify additional functions, ac-
cording to the vehicle equipment. SEAT rec-
ommends visiting a SEAT Official Service.
Some menu options can only be read when
the vehicle is at a standstill.
As long as a priority 1 warning is displayed, it
will not be possible to read the menus. Some
warning messages can be confirmed and
made to disappear with the windscreen wiper
lever button or the multifunction steering
wheel button.
The information system also provides the fol-
lowing information and displays (depending
on the vehicle's equipment):
Driving data ›››
page 34
■ Vehicle status ■
MFD from dep ar
ture
■ MFD from refuelling
■ MFD total calculation
Assist systems ››› table on page 31
■ Activate/deactivate Lane Assist
■ Reverse (optional)
Navigation ››› Booklet Navigation system
Audio ››› Booklet Radio or ››› Booklet Naviga-
tion system
Telephone ››› Booklet Radio or ››› Book-
let Navigation system
Vehicle ››› table on page 31 WARNING
Any distraction may lead to an accident, with
the risk of
injury.
● Do not operate the instrument panel con-
trol
s when driving. Using the menus on the instrument
p
anel Fig. 42
Windscreen wiper lever: control but-
t on
s. Fig. 43
Right side of multifunction steering
wheel: c ontr
o
l buttons. The driver information system is controlled
w
ith the mu
ltif
unction steering wheel buttons
››› Fig. 43 or with the windscreen wiper lever
››› Fig. 42 (if the vehicle is not equipped with
multifunction steering wheel). 30
Page 33 of 324
The essentials
Enabling the main menu
● Switch the ignition on.
● If a message or vehicle pictogram appears,
pr e
s
s button ››› Fig. 42 1 on the windscreen
w iper l
ev
er or button on the multifunction
s t
eerin
g wheel ››› Fig. 43.
● If managed from the windscreen wiper lev-
er: to dis
play the main screen ››› page 31 or
to return to the main menu from another
menu hold down the rocker button ››› Fig. 42
2 .
● If managed from the multifunction steering
whe e
l:
the main menu list is not displayed.
To go from point to point in the main menu,
press button
or
several times
› ›
›
Fig. 43.
Select a submenu ● Press the rocker switch ›››
Fig. 42 2 on the
w ind
s
creen wiper lever up or down or turn
the thumbwheel of the multifunction steering
wheel ››› Fig. 43 until the desired option ap-
pears marked on the menu.
● The selected option is displayed between
two horizont
al lines. In addition, a triangle is
displayed on the right:
● To consult the submenu option, press but-
ton ››
› Fig. 42 1 on the windscreen wiper
l ev
er or b
utton on the multifunction steer-
in g wheel
›
›› Fig. 43. Making changes according to the menu
● With the rocker switch on the windscreen
wiper lev
er or the thumbwheel of the multi-
function steering wheel, make the desired
changes. To increase or decrease the values
more quickly, turn the thumbwheel faster.
● Mark or confirm the selection with button
›››
Fig. 42 1 on the windscreen wiper lever
or b utt
on on the multifunction steering
wheel
›
›
› Fig. 43.
Button for the driver assistance sys-
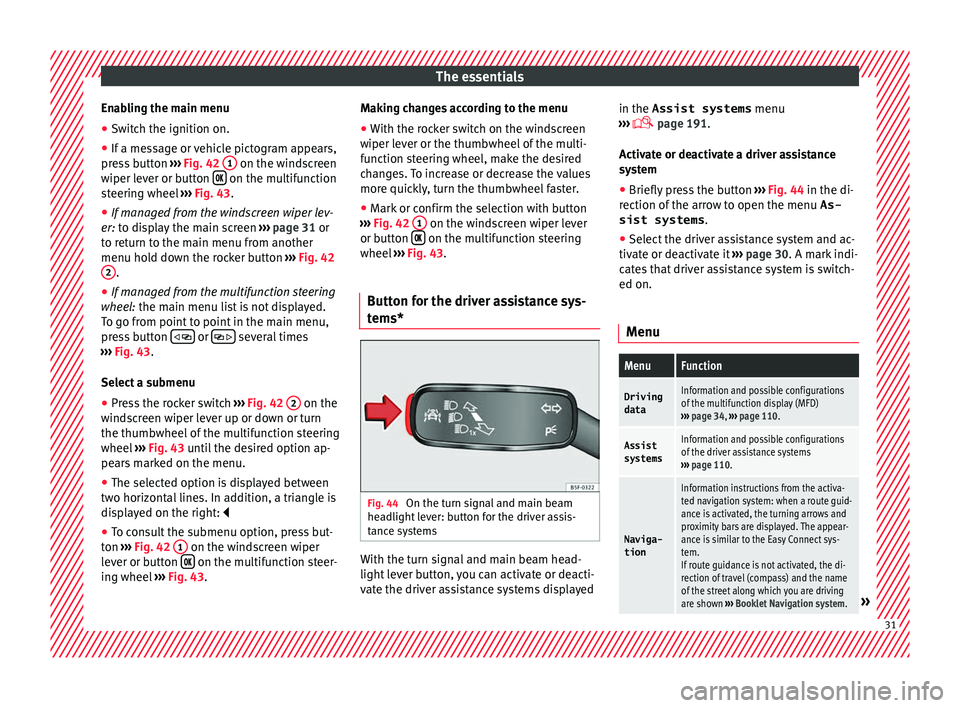
tems* Fig. 44
On the turn signal and main beam
he a
dlight
lever: button for the driver assis-
tance systems With the turn signal and main beam head-
light
l
ev
er button, you can activate or deacti-
vate the driver assistance systems displayed in the Assist systems
menu
›››
page 191.
Activate or deactivate a driver assistance
system ● Briefly press the button ›››
Fig. 44 in the di-
rection of the arrow to open the menu As-
sist systems .
● Select the driver assistance system and ac-
tivate or de
activate it ››› page 30. A mark indi-
cates that driver assistance system is switch-
ed on.
Menu
MenuFunction
DrivingdataInformation and possible configurations
of the multifunction display (MFD)
››› page 34, ››› page 110.
Assist
systemsInformation and possible configurations
of the driver assistance systems
››› page 110.
Naviga-
tion
Information instructions from the activa-
ted navigation system: when a route guid-
ance is activated, the turning arrows and
proximity bars are displayed. The appear-
ance is similar to the Easy Connect sys-
tem.
If route guidance is not activated, the di-
rection of travel (compass) and the name
of the street along which you are driving
are shown ››› Booklet Navigation system.
» 31
Page 36 of 324
The essentials
Driving data M emor
y The MFD (multifunction display) shows differ-
ent
v
alues for the journey and the consump-
tion.
Changing between display modes on the
MFD
● In vehicles without multifunction steering
wheel:
Press the rocker switch on the
wind s
creen wiper lever ›››
Fig. 42.
● Vehicles with a multifunction steering
whee l:
turn the thumbwheel ›››
Fig. 43.
Multifunction display memory
The multifunction display is equipped with
three memories that work automatically: MFD
from departure, MFD from refuelling and MFD
total calculation. On the screen display, you
can read which memory is currently dis-
played.
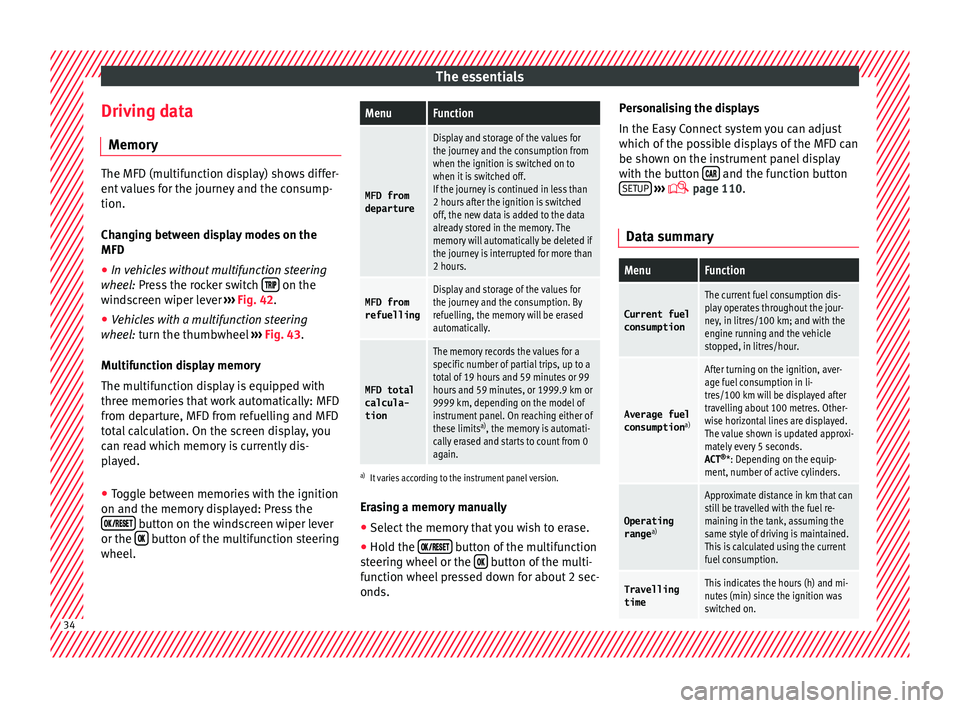
● Toggle between memories with the ignition
on and the memory di
splayed: Press the
button on the windscreen wiper lever
or the button of the multifunction steering
wheel .
MenuFunction
MFD from
departure
Display and storage of the values for
the journey and the consumption from
when the ignition is switched on to
when it is switched off.
If the journey is continued in less than
2 hours after the ignition is switched
off, the new data is added to the data
already stored in the memory. The
memory will automatically be deleted if
the journey is interrupted for more than
2 hours.
MFD from refuellingDisplay and storage of the values for
the journey and the consumption. By
refuelling, the memory will be erased
automatically.
MFD total
calcula-
tion
The memory records the values for a
specific number of partial trips, up to a
total of 19 hours and 59 minutes or 99
hours and 59 minutes, or 1999.9 km or
9999 km, depending on the model of
instrument panel. On reaching either of
these limits a)
, the memory is automati-
cally erased and starts to count from 0
again.
a) It varies according to the instrument panel version.
Erasing a memory manually
● Select the memory that you wish to erase.
● Hold the button of the multifunction
s t
eerin
g wheel or the button of the multi-
f u nction wheel
pressed down for about 2 sec-
onds. Personalising the displays
In the Easy
Connect system you can adjust
which of the possible displays of the MFD can
be shown on the instrument panel display
with the button and the function button
S ETUP
› ››
p
age 110.
Dat
a summary
MenuFunction
Current fuel
consumption
The current fuel consumption dis-
play operates throughout the jour-
ney, in litres/100 km; and with the
engine running and the vehicle
stopped, in litres/hour.
Average fuel consumption a)
After turning on the ignition, aver-
age fuel consumption in li-
tres/100 km will be displayed after
travelling about 100 metres. Other-
wise horizontal lines are displayed.
The value shown is updated approxi-
mately every 5 seconds.
ACT®
*: Depending on the equip-
ment, number of active cylinders.
Operating range a)
Approximate distance in km that can
still be travelled with the fuel re-
maining in the tank, assuming the
same style of driving is maintained.
This is calculated using the current
fuel consumption.
Travelling
timeThis indicates the hours (h) and mi-
nutes (min) since the ignition was
switched on. 34
Page 37 of 324
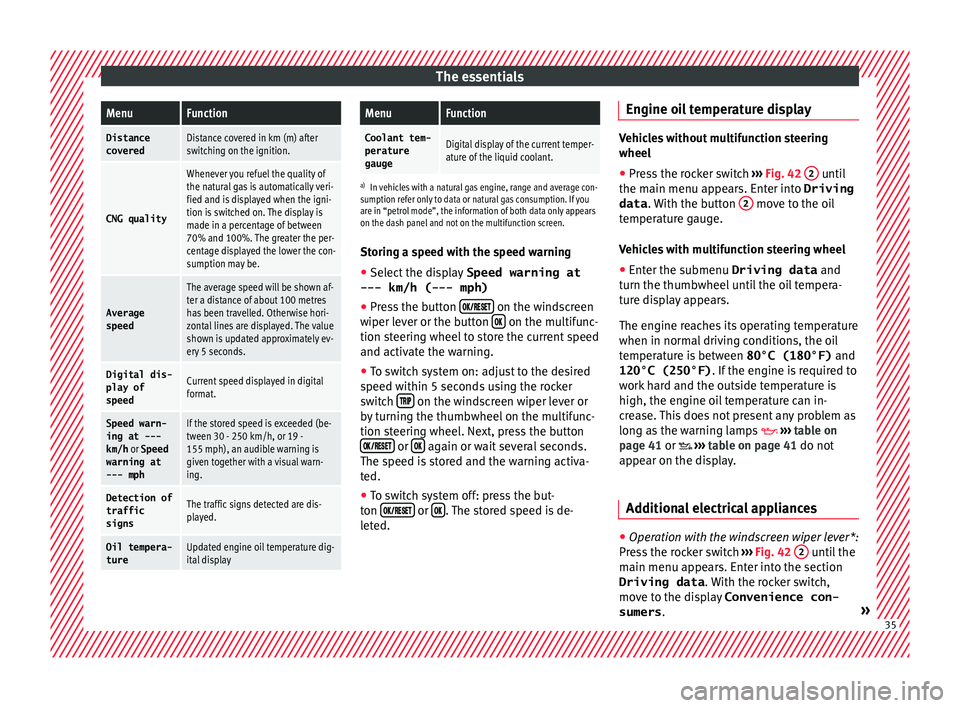
The essentialsMenuFunction
Distance
coveredDistance covered in km (m) after
switching on the ignition.
CNG quality
Whenever you refuel the quality of
the natural gas is automatically veri-
fied and is displayed when the igni-
tion is switched on. The display is
made in a percentage of between
70% and 100%. The greater the per-
centage displayed the lower the con-
sumption may be.
Average
speed
The average speed will be shown af-
ter a distance of about 100 metres
has been travelled. Otherwise hori-
zontal lines are displayed. The value
shown is updated approximately ev-
ery 5 seconds.
Digital dis- play of
speedCurrent speed displayed in digital
format.
Speed warn-
ing at ---
km/h or Speed
warning at
--- mphIf the stored speed is exceeded (be-
tween 30 - 250 km/h, or 19 -
155 mph), an audible warning is
given together with a visual warn-
ing.
Detection of
traffic
signsThe traffic signs detected are dis-
played.
Oil tempera- tureUpdated engine oil temperature dig-
ital display
MenuFunction
Coolant tem-perature
gaugeDigital display of the current temper-
ature of the liquid coolant.
a) In vehicles with a natural gas engine, range and average con-
sumption refer only to data or natural gas consumption. If you
are in “petrol mode”, the information of both data only appears
on the dash panel and not on the multifunction screen.
Storing a speed with the speed warning
● Select the display Speed warning at
--- km/h (---
mph)
● Press the button
on the windscreen
w iper l
ev
er or the button on the multifunc-
tion s t
eerin
g wheel to store the current speed
and activate the warning.
● To switch system on: adjust to the desired
speed within 5 sec
onds using the rocker
switch on the windscreen wiper lever or
b y
t
urning the thumbwheel on the multifunc-
tion steering wheel. Next, press the button or
again or wait several seconds.
The s peed i
s
stored and the warning activa-
ted.
● To switch system off: press the but-
ton or
. The stored speed is de-
l et
ed. En
gine oil temperature display Vehicles without multifunction steering
wheel
● Press the rocker switch ›››
Fig. 42 2 until
the main menu ap pe
ars. Enter into Driving
data . With the button 2 move to the oil
temper at
ure gauge.
Vehicles with multifunction steering wheel
● Enter the submenu Driving data and
turn the thumbwheel
until the oil tempera-
ture display appears.
The engine reaches its operating temperature
when in normal driving conditions, the oil
temperature is between 80°C (180°F) and
120°C (250°F) . If the engine is required to
work hard and the outside temperature is
high, the engine oil temperature can in-
crease. This does not present any problem as
long as the warning lamps ›››
table on
page 41 or ›››
table on page 41 do not
appear on the display.
Additional electrical appliances ●
Operation with the windscreen wiper lever*:
Pr e
s
s the rocker switch ›››
Fig. 42 2 until the
m ain menu ap
pe
ars. Enter into the section
Driving data . With the rocker switch,
move to the display Convenience con-
sumers . » 35