warning Seat Leon 5D 2017 MEDIA SYSTEM PLUS - NAVI SYSTEM - NAVI SYSTEM PLUS
[x] Cancel search | Manufacturer: SEAT, Model Year: 2017, Model line: Leon 5D, Model: Seat Leon 5D 2017Pages: 104, PDF Size: 2.7 MB
Page 72 of 104
Navigation
● In the O ffr
o
ad Navigation menu, press the
ADD WAYPOINT function button. The tour way-
points defined m
anual
ly are shown on the
map by a marker.
Ending recording
● Press the STOP RE
CORDING function button in
the m ain O
ffr
oad Navigation menu.
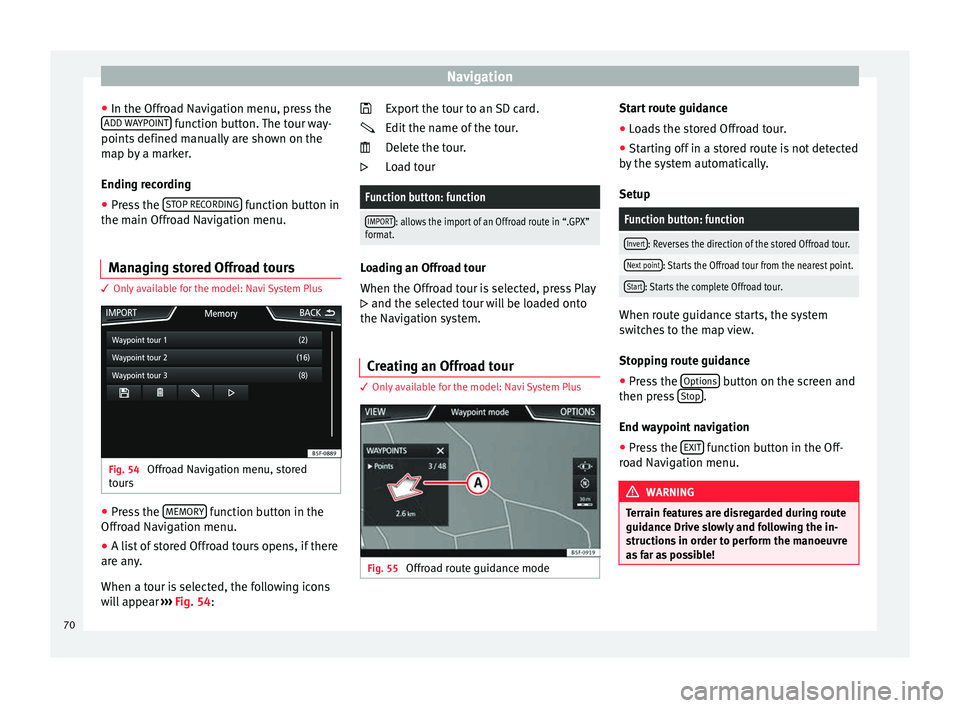
Managing stored Offroad tours 3 Only
available for the model: Navi System Plus Fig. 54
Offroad Navigation menu, stored
t our
s ●
Press the MEMORY function button in the
O ffr
o
ad Navigation menu.
● A list of stored Offroad tours opens, if there
are any
.
When a tour is selected, the following icons
will appear ››› Fig. 54: Export the tour to an SD card.
Edit the n
ame of the tour.
Delete the tour.
Load tour
Function button: function
IMPORT: allows the import of an Offroad route in “.GPX”
format. Loading an Offroad tour
When the Offr
o
ad tour is selected, press Play
and the selected tour will be loaded onto
the Navigation system.
Creating an Offroad tour 3 Only
available for the model: Navi System Plus Fig. 55
Offroad route guidance mode
Start route guidance
● Loads the stored Offroad tour.
● Starting off in a stored route is not detected
b y
the sy
stem automatically.
Setup
Function button: function
Invert: Reverses the direction of the stored Offroad tour.
Next point: Starts the Offroad tour from the nearest point.
Start: Starts the complete Offroad tour. When route guidance starts, the system
sw
itc
hes to the map view.
Stopping route guidance ● Press the Options button on the screen and
then pr e
s
s Stop .
End w a
y
point navigation
● Press the EXIT function button in the Off-
r o
a
d Navigation menu. WARNING
Terrain features are disregarded during route
guidanc e Driv
e slowly and following the in-
structions in order to perform the manoeuvre
as far as possible! 70
Page 79 of 104
Telephone management system (PHONE)
Telephone management sys-
t em (PHONE)
Intr oduction t
o the telephone
management system
Related video Fig. 65
Telephone man-
agement sy
stem General information
The Telephone functions described below
c
an be u
sed thr
ough the Infotainment system
if there is a mobile telephone connected to it
via Bluetooth ®
›››
page 79.
In order for the mobile telephone to be able
to connect to the Infotainment system the tel-
ephone must be equipped with Bluetooth®
.
If there is no mobile telephone connected to
the Infotainment system, the telephone man-
agement system will not be available. The instructions shown on the screen for the
telephone menu
s will depend on the mobile
telephone used. There may be variations.
Only use compatible Bluetooth ®
devices. For
further information on compatible Blue-
tooth ®
products, ask your nearest SEAT deal-
er or check on the internet.
Use the instruction manual of the mobile tel-
ephone and of any accessories.
If you detect any operating issues between
your mobile telephone and the Infotainment
system, restart your mobile by switching it off
and on again.
You may experience poor reception or may be
cut off in areas where the signal is weak.
Most electronic devices are shielded against
HF (high-frequency) signals. In any case, the
electronic equipment may not be protected
from the HF signals of the telephone man-
agement system. This may cause interfer-
ence. WARNING
Speaking by telephone and operating the mo-
bi l
e telephone whilst driving can distract you
from the road and cause an accident.
● Always drive carefully and responsibly.
● Select volume settings that allow you to
eas
ily hear signals from outside the vehicle
at all times (e.g. emergency services sirens
and horns). ●
In are a
s of little or no coverage or, in some
cases, in a tunnel, garage or underpass, your
call may be cut off and you may not be able to
make even emergency calls. WARNING
If a mobile telephone is not secured or is in-
c orr ectly
secured in the vehicle, it could move
around the passenger compartment in the
event of a sudden driving manoeuvre or emer-
gency stop, resulting in injury.
● While the vehicle is in motion, always se-
cure the mo
bile telephone properly outside
the airbag deployment zone. WARNING
Mobile telephones may interfere with and al-
ter the c orr
ect operation of pacemakers if
they are carried directly over them.
● Maintain a minimum distance of at least
20 centimetre
s between the aerials of the
mobile telephone and the pacemaker, as mo-
bile phones may affect the functioning of
pacemakers.
● Do not carry your switched-on mobile tele-
phone in your br
east pocket directly over the
pacemaker.
● If you suspect interference, switch off the
mobi
le telephone immediately. » 77
Page 80 of 104
Telephone management system (PHONE)
CAUTION
High speeds, poor weather or road conditions
and the quality of
reception can all affect the
quality of a telephone conversation in the ve-
hicle. Note
● Re s
trictions on the use of devices using
Bluetooth ®
technology may apply in some
countries. For further information, contact the
local authorities.
● If you wish to connect a device to the tele-
phone manag
ement system via Bluetooth ®
technology, consult the safety warnings in its
instruction manual. Only use compatible
Bluetooth ®
devices. Areas where special regulations apply
Switch off the mobile telephone and the mo-
b
i
l
e Bluetooth function in places with a risk
of explosion. In the majority of cases, these
places are signposted, but not always clearly
››› in General information on page 77.
They
inc lude, f
or example:
● the vicinity of chemical pipelines and tanks
● The lower decks of boats and ferries.
● In the proximity of vehicles that run on liq-
uid gas
(such as propane or butane). ●
plac
es where the air is laden with chemi-
cals or particles such as flour, dust or metal
powder.
● all other places where the vehicle engine
must
be switched off. WARNING
Switch off the mobile phone in areas with a
risk of
explosion! The mobile telephone can
automatically connect to the mobile tele-
phone network again if it loses the Blue-
tooth ®
connection to the telephone manage-
ment system. CAUTION
In areas where special regulations apply or
the use of mo
bile telephones is prohibited,
both the telephone and the telephone man-
agement system must be switched off. The
radiation produced by the mobile telephone
when switched on may interfere with sensi-
tive technical and medical equipment, possi-
bly resulting in a malfunction or damage to
the equipment. Bluetooth
® Bluetooth
®
tec
hno
logy allows a mobile tele-
phone to be connected to your vehicle's tele-
phone management system. In order to use
the telephone management system with a
mobile telephone with Bluetooth ®
technolo-
gy, it is first necessary to pair them. Some Bluetooth
®
mobi
le telephones detect
and automatically connect when turning on
the ignition if a connection has been previ-
ously established. For this to take place the
telephone must be switched on and its Blue-
tooth ®
function activated, and there must be
no active Bluetooth ®
connection with other
devices.
Bluetooth ®
connections are free.
Bluetooth ®
is a registered trademark of
Bluetooth ®
SIG, Inc.
Bluetooth profiles ®
When a mobile phone is connected to the tel-
ephone management system, a data ex-
change takes place via one of the Bluetooth ®
profiles.
● Hands-free Bluetooth profile (HFP): If a mo-
bi
le telephone is connected to the telephone
manager through the HFP, calls can be made
wirelessly through the hands-free device.
This function also requires other Bluetooth
profiles such as the phonebook download
and instant messaging.
● Audio profile (A2DP): Bluetooth profi
le for
transmitting audio signals with stereo quali-
ty. This function can also connect other addi-
tional Bluetooth profiles for viewing tracks
and for controlling playback on the mobile
device.
78
Page 85 of 104
Telephone management system (PHONE)
WARNING
Remember that the driver must not operate
the mob i
le telephone while driving. Note
Multiple call and simultaneous call functions
are s ub
ject to the services associated with
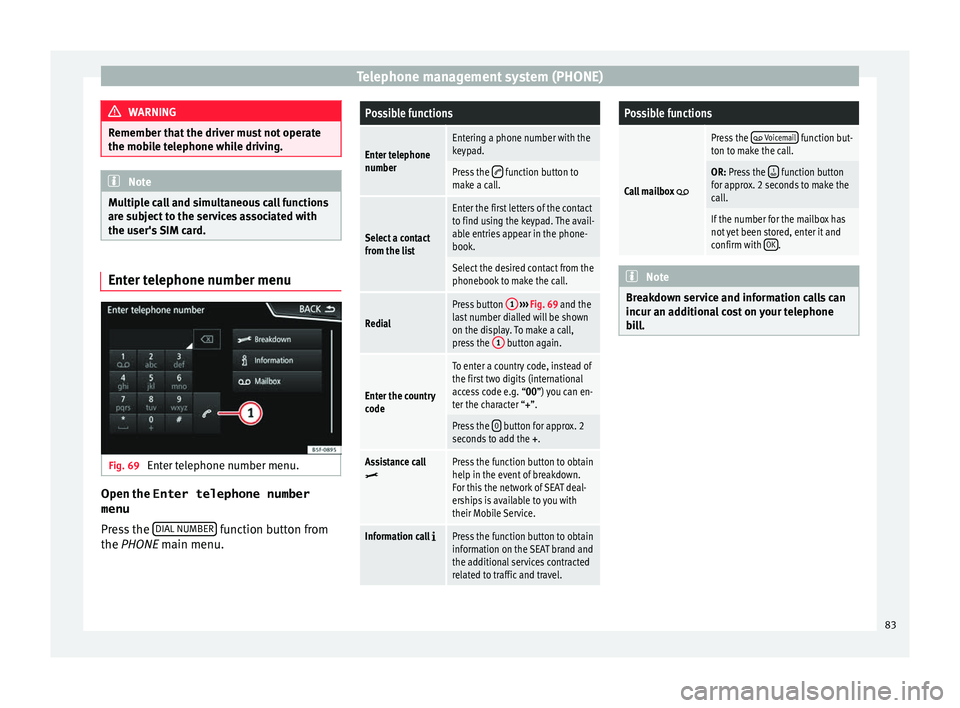
the user's SIM card. Enter telephone number menu
Fig. 69
Enter telephone number menu. Open the
Enter telephone number
menu
Pr e
s
s the DIAL NUMBER function button from
the PHONE m ain menu.
Possible functions
Enter telephone
numberEntering a phone number with the
keypad.
Press the function button to
make a call.
Select a contact
from the list
Enter the first letters of the contact
to find using the keypad. The avail-
able entries appear in the phone-
book.
Select the desired contact from the
phonebook to make the call.
Redial
Press button 1
››› Fig. 69 and the
last number dialled will be shown
on the display. To make a call,
press the 1
button again.
Enter the country
code
To enter a country code, instead of
the first two digits (international
access code e.g. “00
”) you can en-
ter the character “+”.
Press the 0 button for approx. 2
seconds to add the +.
Assistance callPress the function button to obtain
help in the event of breakdown.
For this the network of SEAT deal-
erships is available to you with
their Mobile Service.
Information call Press the function button to obtain
information on the SEAT brand and
the additional services contracted
related to traffic and travel.
Possible functions
Call mailbox
Press the Voicemail function but-
ton to make the call.
OR: Press the function button
for approx. 2 seconds to make the
call.
If the number for the mailbox has
not yet been stored, enter it and
confirm with OK
. Note
Breakdown service and information calls can
incur an ad
ditional cost on your telephone
bill. 83
Page 90 of 104
Telephone management system (PHONE)
Note
Some telephones need to be restarted to re-
down lo
ad the most recent contacts added. Connectivity Box* / Wireless Charger*
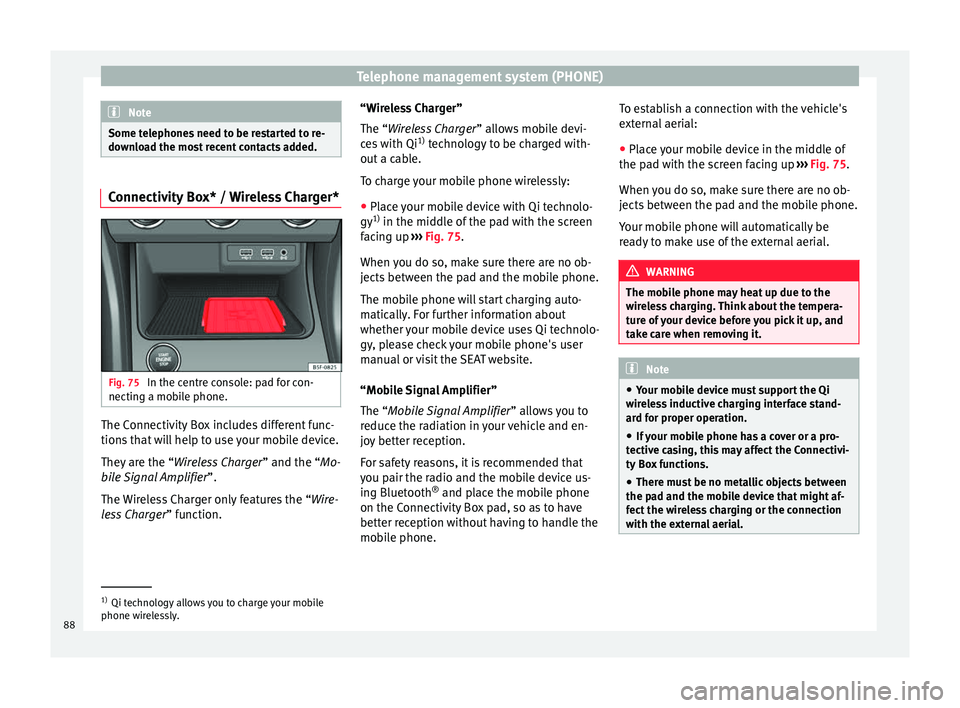
Fig. 75
In the centre console: pad for con-
nectin g a mo
b
ile phone. The Connectivity Box includes different func-
tion
s
th
at will help to use your mobile device.
They are the “Wireless Charger ” and the “Mo-
bile Signal Amplifier”.
The Wireless Charger only features the “Wire-
less Charger ” function. “Wireless Charger”
The “Wire
less Charger ” allows mobile devi-
ces with Qi 1)
technology to be charged with-
out a cable.
To charge your mobile phone wirelessly:
● Place your mobile device with Qi technolo-
gy 1)
in the middl
e of the pad with the screen
facing up ››› Fig. 75.
When you do so, make sure there are no ob-
jects between the pad and the mobile phone.
The mobile phone will start charging auto-
matically. For further information about
whether your mobile device uses Qi technolo-
gy, please check your mobile phone's user
manual or visit the SEAT website.
“Mobile Signal Amplifier”
The “Mobile Signal Amplifier” allows you to
reduce the radiation in your vehicle and en-
joy better reception.
For safety reasons, it is recommended that
you pair the radio and the mobile device us-
ing Bluetooth ®
and place the mobile phone
on the Connectivity Box pad, so as to have
better reception without having to handle the
mobile phone. To establish a connection with the vehicle's
extern
al aerial:
● Place your mobile device in the middle of
the pad w
ith the screen facing up ››› Fig. 75.
When you do so, make sure there are no ob-
jects between the pad and the mobile phone.
Your mobile phone will automatically be
ready to make use of the external aerial. WARNING
The mobile phone may heat up due to the
wir el
ess charging. Think about the tempera-
ture of your device before you pick it up, and
take care when removing it. Note
● Your mo b
ile device must support the Qi
wireless inductive charging interface stand-
ard for proper operation.
● If your mobile phone has a cover or a pro-
tective c
asing, this may affect the Connectivi-
ty Box functions.
● There must be no metallic objects between
the pad and the mo
bile device that might af-
fect the wireless charging or the connection
with the external aerial. 1)
Qi technology allows you to charge your mobile
phone wir el
essly.
88
Page 103 of 104

SEAT S.A. is permanently concerned about continuous development of its t\
ypes and models. For this reason we ask you to under-
stand, that at any given time, changes regarding shape, equipment and te\
chnique may take place on the car delivered. For this reason
no right at all may derive based on the data, drawings and descriptions \
in this current handbook.
All texts, illustrations and standards in this handbook are based on the\
status of information at the time of printing. Except for error
or omission, the information included in the current handbook is valid a\
s of the date of closing print.
Re-printing, copying or translating, whether total or partial is not all\
owed unless SEAT allows it in written form.
SEAT reserves all rights in accordance with the “Copyright” Act.
All rights on changes are reserved.
❀This paper has been manufactured using bleached non-chlorine cellulose.
© SEAT S.A. - Reprint: 15.11.17
About this manual
This manual contains information, recommen -
dations, advice and warnings related to your
radio system. The other publications in the
vehicle documentation contain further infor -
mation of which you should be aware for your
own safety and for that of your passengers.
Ensure that the onboard documentation is
kept in the vehicle at all times. This is espe -
cially important when lending or selling the
vehicle to another person.
This manual contains a description of the
equipment supplied with the vehicle at the
time of press. Some of the units described
herein will not be available until a later date or
is only available in certain markets.
The illustrations are intended as a general
guide and may vary from the equipment �tted
in your vehicle in some details.
The screen colour and the colour of the infor -
mation displayed on it can vary according to
vehicle model. Directions and positions
of components (e.g.
right, left, front, rear) are always relative to the
direction of travel of the vehicle unless other -
wise stated.
The audiovisual material only is intended to
help users to understand certain car function -
alities better. It does not replace the instruc -
tion manual. Please use the instruction manu -
al to obtain more comprehensive information
and indications.
The equipment marked with an aster -
isk* is �tted as standard only in certain
versions, and is only supplied as op -
tional extras for some versions, or are
only offered in certain countries.
® All registered marks are indicated with
®. Although the copyright symbol does
not appear, it is a copyrighted mark.
>> The section is continued on the follow -
ing page.
WARNING
Texts preceded by this symbol contain infor -
mation on safety. They warn you about possi -
ble dangers of accident or injury.
CAUTION
Texts with this symbol draw your attention to
potential sources of damage to your vehicle.
For the sake of the environment
Texts preceded by this symbol contain rele-
vant information concerning environmental
protection.
Note
Texts preceded by this symbol contain additio -
nal information.