language Seat Leon 5D 2017 MEDIA SYSTEM PLUS - NAVI SYSTEM - NAVI SYSTEM PLUS
[x] Cancel search | Manufacturer: SEAT, Model Year: 2017, Model line: Leon 5D, Model: Seat Leon 5D 2017Pages: 104, PDF Size: 2.7 MB
Page 14 of 104
Introduction
The input line with cursor is located in the
t op b
ar of
the screen. All inputs are displayed
here.
Input windows for “free text input”
In the input masks for open text, you may en-
ter letters, numbers and special characters in
any combination.
Input windows for selecting a saved entry
(e.g. selection of a destination address)
It is only possible to select a sequence of let-
ters, numbers and special characters that
matches a stored entry.
Suggestions for matching destinations ap-
pear depending on the characters entered in
the input line ››› Fig. 8 4 . In the case of com-
pou nd n
ame
s, it is necessary to enter a
space.
If there are fewer than 99 selectable entries,
the number of remaining entries is displayed
after the input line 3 . Pressing this function
b utt
on di
splays these remaining entries in a
list.
Overview of the function buttons
Icon and function text: operation and effect
Letters
and dig-
itsPress them to copy them into the input line.
Icon and function text: operation and effect
1
Press to change the keypad to another lan-
guage. Keypad languages can be selected
from the menu system setup
››› page 90.
2Press to show symbols on the keypad.
3Displays the number and opens the list of
remaining selectable entries that match the
entered text.
4Scroll bar, the size of which depends on the
number of matching entries.
5
Hold and press to display a pop-up window
with the special characters based on said
letter. Press the desired character to enter it.
Some special characters can be written out
instead (e.g. “AE” for “Ä”).
Press to enter a space.
Press to delete characters in the input line
from right to left.
Press and hold to delete several characters.
BACK Press to close the input window.
Additional displays and display op-
tion
s The displays appearing on the screen may
v
ar y
depending on the settings, and may dif-
fer from those described here. The status bar on the screen can display, for
examp
le, the current time and outside tem-
perature.
All displays can be viewed only after com-
pletely restarting the Infotainment system.
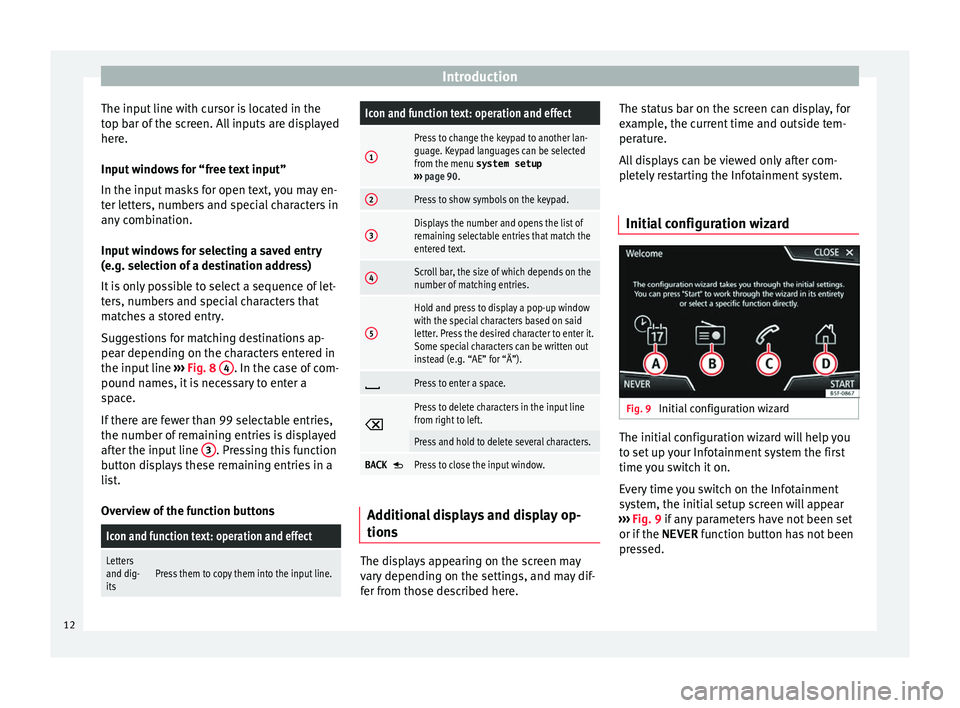
Initial configuration wizard Fig. 9
Initial configuration wizard The initial configuration wizard will help you
t
o set
up
your Infotainment system the first
time you switch it on.
Every time you switch on the Infotainment
system, the initial setup screen will appear
››› Fig. 9 if any parameters have not been set
or if the NEVER function button has not been
pressed.
12
Page 15 of 104
IntroductionFunction
buttonFunction
CLOSE
Closes the Configuration Wizard, and the
main menu or last mode in which you
used the Infotainment system will ap-
pear. The next time you switch on the
system, the Configuration Wizard will
start up again.
NEVER
Disables the possibility of changing the
settings of the Infotainment system. If
you want to perform the initial system
setup, you must enter via
System set-
up and select Configuration Wiz-
ard ››› page 90.
STARTStarts up the Configuration Wizard.
APress to configure the time and date (if it
has a navigation system it will be config-
ured automatically with the GPS).
BPress to search and store to memory the
radio stations that have the best recep-
tion at that moment.
CPress to link your mobile telephone to
the Infotainment system.
Da)Press to select your home address using
your current position or by manually en-
tering an address.
Function
buttonFunction
PREVIOUS
NEXT
To go to the previous or next parameter
to set.
When a parameter has been set, the only
way to reset it is from the main menu,
clicking on it, and not using the Previ-
ous/Next buttons.
When setting any parameter, a confirma-
tion mark will appear on it
.
FINISH
Once one or more settings have been ap-
plied, click on this in the main menu of
the wizard to confirm and finalize the
settings.
If there are any parameters you have not
set, the next time you connect the Info-
tainment system, the Initial Configura-
tion Wizard will start up.
a) Only valid for Navi System and Navi System Plus.
Voice control
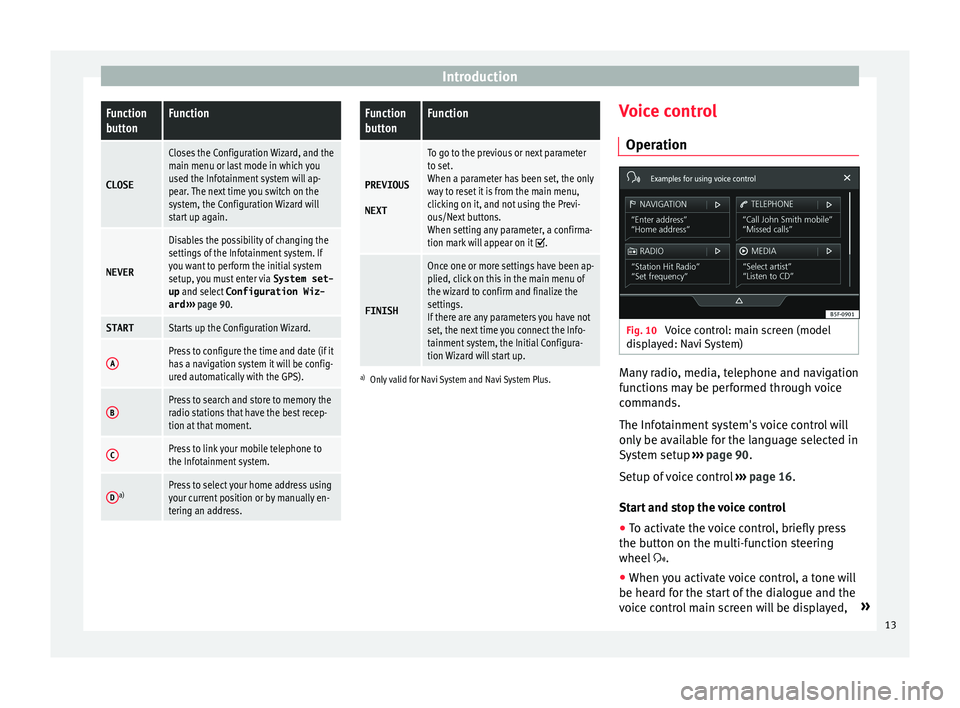
Operation Fig. 10
Voice control: main screen (model
di s
p
layed: Navi System) Many radio, media, telephone and navigation
f
u
nction
s may be performed through voice
commands.
The Infotainment system's voice control will
only be available for the language selected in
System setup ››› page 90.
Setup of voice control ››› page 16.
Start and stop the voice control
● To activate the voice control, briefly press
the button on the mu
lti-function steering
wheel .
● When you activate voice control, a tone will
be heard f
or the start of the dialogue and the
voice control main screen will be displayed, »
13
Page 16 of 104
Introduction
››› Fig. 10, (the m ain s
c reen will appear in the
format selected in Voice control settings
››› page 16). The spoken instructions will
guide you through the following “dialogue”.
● Pronounce the desired order and follow the
instruction
s of the “dialogue”. A function can
often be activated with different spoken com-
mands. If in doubt, try giving a command or
say Help.
● When an action is performed (e.g. calling a
contact), the
voice control automatically de-
activates and must be reactivated again
when needed. There are certain commands
after which the voice control does not end
and waits with What do you wish to do
now? .
● To finish voice control manually, either
pres
s and hold the button on the multi-
function steering wheel until the correspond-
ing confirmation signal is heard, or give two
quick presses on the button on the steer-
ing wheel, or press the function button in
the top right corner of the screen.
● Voice control can also be ended by giving
the fol
lowing orders: End Voice Control or
Cancel.
Help with voice control
Listening to Help when using voice control for
the first time is recommended.
● Switch on the speech control system .●
Give the Help
command in the language
established in the System setup , and fol-
low the dialogue instructions. The Help com-
mand can also be spoken followed by the in-
fotainment system function, for example,
“Help with the navigation”.
Interaction with the dialogue mode
Icons in the top left corner:
The system is expecting a command
from the user.
The system has recognised a command
and will act shortly.
The system is sending a spoken com-
mand and confirms the command given.
The system is in pause mode. (max. 3
minutes).Hide or show the voice control menu
››› Fig. 10.
Operation during the dialogue
While the infotainment system transmits a
spoken indication, the display will show the
symbol .
● The announcement can be stopped by
pres
sing the upper left icon on the screen or
the button on the steering wheel and
voice recognition for the user will resume.
/ IMPORTANT: The system will ONLY recognise
a command when the
symbol is displayed
as “active” on the display or touch screen.
If you make a mistake when giving a com-
mand or give an incomplete command, and it
has no effect, you can repeat the command.
The symbol remains active.
● Briefly press the button t
o repeat the
command.
Instructions for voice control
For optimum functioning of the voice control,
follow these instructions:
● Speak slowly and clearly, as far as possi-
ble.
The system will not recognise words that
are not pronounced clearly, or words and fig-
ures in which syllables are omitted.
● Telephone numbers must be given digit by
digit or in bloc
ks of numbers in ones, tens or
hundreds.
● Speak at a normal volume, without exag-
gerat
ed intonation or long pauses.
● Avoid noise from the exterior and nearby
(for ex
ample, conversations inside the vehi-
cle). Close all doors, windows and the sliding
roof.
● Do not aim the air from the diffusers at the
roof of
the passenger compartment.
● If you are driving very fast, speak a little
louder.
14
Page 55 of 104
Audio and Media ModeFunction button: function
DUse the arrow buttons to browse the DVD
menu. Confirm the selection by pressing
OK.
EPress to open the DVD main menu.
/ To move to the next or previous chapter.
Playback stops. The function button
changes to .
Playback is resumed. The function button
changes to .
SET-
TINGSThis menu contains the Video (DVD) settings
››› page 53. Note
● The v i
sual appearance of the DVD film me-
nus and the menu options which it offers are
the responsibility of the DVD manufacturer.
● The difference in behaviour of some films
when usin
g the same mode is the responsi-
bility of the DVD manufacturer.
● You may not be able to play video DVDs
which y
ou have burned yourself.
● The Infotainment system screen only dis-
pla
ys the image when the vehicle is stopped.
Whilst in motion, the screen disconnects (the
image), but the audio remains active. Video settings (DVD)
3 Only available for the model: Navi System Plus
In the D
VD mode main menu, press the
SETTINGS function button and then select the
option V ideo settin
gs (DVD).
Function button: function
Format: To select the screen format. If Automatic is se-
lected, it adjusts automatically to the optimal format for
the screen.
Audio channel: select language for acoustic voice output.
Subtitles: To select the subtitle language.
Enter/change PIN for parental settings: Parental settings pass-
word.
Parental settings: To select the level of protection for DVD
playback. The options in the Video setup (DVD) menu
m
a
y
vary depending on the DVD or the chap-
ter currently being played.
The available audio language channels and
subtitles depend on the inserted DVD.
All or a part of the DVD video content may be
protected by means of a password (PIN) if the
DVD is compatible with parental settings. Fur-
thermore, the level of protection can be set
according to age with 1 being the least re-
strictive (appropriate for all audiences) and
8, the most restrictive (adults). Media settings ●
Select the MEDIA main menu b y
pressing
the Infotainment MENU button
››› Fig. 1 1 and then selecting the Medi
a
context.
● Press the SETTINGS function button to open
the Media Settings menu.
Function button: function
Sound: Sound settings ››› page 91.
Manage jukeboxa)
: To import files to the jukebox or delete
stored files ››› page 49.
Mix/Repeat including subfolders: Subfolders will be inclu-
ded in the selected playback mode ››› page 37.
Bluetooth: Bluetooth ®
settings ››› page 87
WLANa)
: WLAN settings ››› page 51.
Video settings: Settings for playback of DVD videos or
files.
Remove safely: In order to prepare the external data stor-
age devices for their removal or disconnection. See also
››› page 46, Insert or eject a memory card and
››› page 47, External data storage device connected to
USB port
.
Traffic programme (TP): The TP function (traffic news sta-
tion tracking) is active ››› page 34.
a)
Only available for the model: “Navi System Plus”.
53
Page 92 of 104
Setup
Setup
M enu and sy
s
tem settings
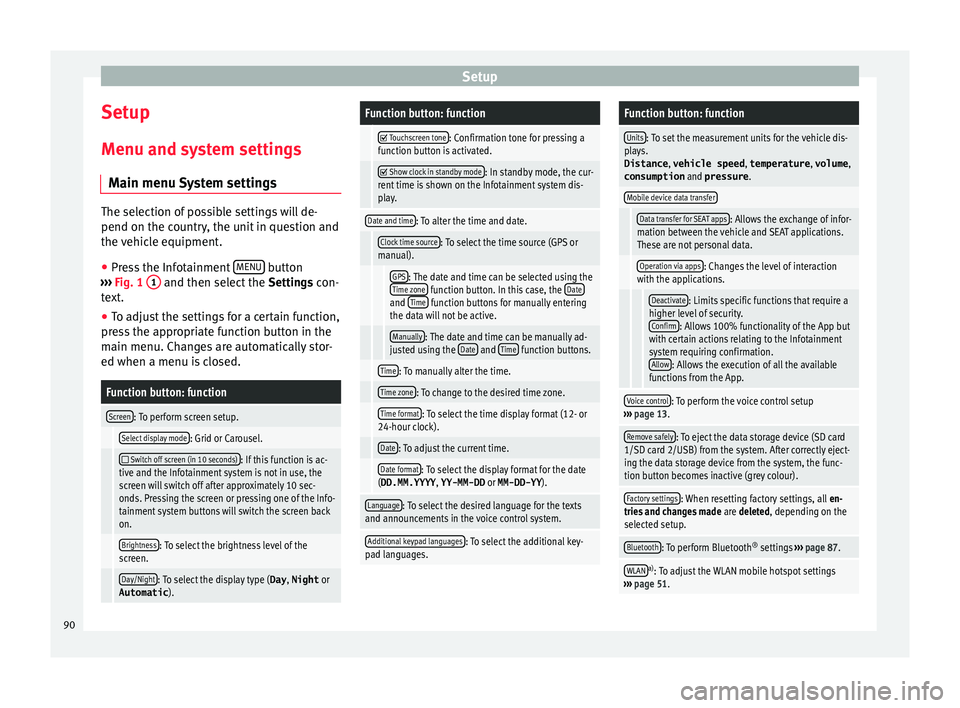
Main menu System settings The selection of possible settings will de-
pend on the cou
ntr
y, the unit in question and
the vehicle equipment.
● Press the Infotainment MENU button
›› ›
Fig. 1 1 and then select the
Settings con-
text.
● To adjust the settings for a certain function,
pre s
s the appropriate function button in the
main menu. Changes are automatically stor-
ed when a menu is closed.
Function button: function
Screen: To perform screen setup.
Select display mode: Grid or Carousel.
Switch off screen (in 10 seconds): If this function is ac-
tive and the Infotainment system is not in use, the
screen will switch off after approximately 10 sec-
onds. Pressing the screen or pressing one of the Info-
tainment system buttons will switch the screen back
on.
Brightness: To select the brightness level of the
screen.
Day/Night: To select the display type ( Day, Night or
Automatic ).
Function button: function
Touchscreen tone: Confirmation tone for pressing a
function button is activated.
Show clock in standby mode: In standby mode, the cur-
rent time is shown on the Infotainment system dis-
play.
Date and time: To alter the time and date.
Clock time source: To select the time source (GPS or
manual).
GPS: The date and time can be selected using the
Time zone function button. In this case, the Dateand Time function buttons for manually entering
the data will not be active.
Manually: The date and time can be manually ad-
justed using the Date and Time function buttons.
Time: To manually alter the time.
Time zone: To change to the desired time zone.
Time format: To select the time display format (12- or
24-hour clock).
Date: To adjust the current time.
Date format: To select the display format for the date
(DD.MM.YYYY , YY-MM-DD or MM-DD-YY ).
Language: To select the desired language for the texts
and announcements in the voice control system.
Additional keypad languages: To select the additional key-
pad languages.
Function button: function
Units: To set the measurement units for the vehicle dis-
plays.
Distance , vehicle speed , temperature, volume,
consumption and pressure .
Mobile device data transfer
Data transfer for SEAT apps: Allows the exchange of infor-
mation between the vehicle and SEAT applications.
These are not personal data.
Operation via apps: Changes the level of interaction
with the applications.
Deactivate: Limits specific functions that require a
higher level of security. Confirm
: Allows 100% functionality of the App but
with certain actions relating to the Infotainment
system requiring confirmation. Allow
: Allows the execution of all the available
functions from the App.
Voice control: To perform the voice control setup
››› page 13.
Remove safely: To eject the data storage device (SD card
1/SD card 2/USB) from the system. After correctly eject-
ing the data storage device from the system, the func-
tion button becomes inactive (grey colour).
Factory settings: When resetting factory settings, all en-
tries and changes made are deleted, depending on the
selected setup.
Bluetooth: To perform Bluetooth ®
settings ››› page 87.
WLANa)
: To adjust the WLAN mobile hotspot settings
››› page 51. 90
Page 101 of 104
Index
voice control . . . . . . . . . . . . . . . . . . . . . . . . . . . . 16
v o
lume
. . . . . . . . . . . . . . . . . . . . . . . . . . . . . . . . 91
WLAN . . . . . . . . . . . . . . . . . . . . . . . . . . . . . . . . . . 51
Setup AM . . . . . . . . . . . . . . . . . . . . . . . . . . . . . . . . . . . . 35
FM . . . . . . . . . . . . . . . . . . . . . . . . . . . . . . . . . . . . 35
Short messages (SMS) . . . . . . . . . . . . . . . . . . . . . . 85
Show clock . . . . . . . . . . . . . . . . . . . . . . . . . . . . . . . 90
Slider . . . . . . . . . . . . . . . . . . . . . . . . . . . . . . . . . . . . 11
Slide (screen) . . . . . . . . . . . . . . . . . . . . . . . . . . . . . 11
SMS . . . . . . . . . . . . . . . . . . . . . . . . . . . . . . . . . . . . . 85
Sound distribution (Balance and Fader) . . . . . . . . 91
Sound settings (bass and treble) . . . . . . . . . . . . . 91
Sound suppression . . . . . . . . . . . . . . . . . . . . . . . . . 9
Sound suppression (mute) . . . . . . . . . . . . . . . . . . . 9
Special features displays . . . . . . . . . . . . . . . . . . . . . . . . . . . . . . . . 12
lowering the volume . . . . . . . . . . . . . . . . . . . . . . . 8
store station logos . . . . . . . . . . . . . . . . . . . . . . . 32
Speed-dependent volume . . . . . . . . . . . . . . . . . . . 91
Speed dial buttons see PHONE . . . . . . . . . . . . . . . . . . . . . . . . . . . . . 86
Split screen NAV (navigation) . . . . . . . . . . . . . . . . . . . . . . . . . 63
SSD (Media mode) see Jukebox (SSD) . . . . . . . . . . . . . . . . . . . . . . . 49
Station select . . . . . . . . . . . . . . . . . . . . . . . . . . . . . . . . . . 33
setting a station name . . . . . . . . . . . . . . . . . . . . 30
store . . . . . . . . . . . . . . . . . . . . . . . . . . . . . . . . . . 33
tune . . . . . . . . . . . . . . . . . . . . . . . . . . . . . . . . . . . 33
Station logos store . . . . . . . . . . . . . . . . . . . . . . . . . . . . . . . . . . 32
store automatically . . . . . . . . . . . . . . . . . . . . . . . 32
Station names . . . . . . . . . . . . . . . . . . . . . . . . . . . . 30
Stations SCAN function . . . . . . . . . . . . . . . . . . . . . . . . . . . 34 Station search . . . . . . . . . . . . . . . . . . . . . . . . . . . . 34
Station trac
king . . . . . . . . . . . . . . . . . . . . . . . . . . . 30
Store audio files (jukebox SSD) . . . . . . . . . . . . . . . . . . 49
Switch off . . . . . . . . . . . . . . . . . . . . . . . . . . . . . . . . . 9
Switch on . . . . . . . . . . . . . . . . . . . . . . . . . . . . . . . . . 9
T Text entry . . . . . . . . . . . . . . . . . . . . . . . . . . . . . . . . 11
Things to note AUX mode . . . . . . . . . . . . . . . . . . . . . . . . . . . . . . 48
TMCpro traffic reports . . . . . . . . . . . . . . . . . . . . . . 64
TMC traffic reports . . . . . . . . . . . . . . . . . . . . . . . . . 64
TP (traffic news) activate and deactivate . . . . . . . . . . . . . . . . . . . 34
EON . . . . . . . . . . . . . . . . . . . . . . . . . . . . . . . . . . . 34
TP (Traffic programme) traffic announcement (INFO) . . . . . . . . . . . . . . . 34
Track list . . . . . . . . . . . . . . . . . . . . . . . . . . . . . . . . . 44
Traffic announcement (INFO) . . . . . . . . . . . . . . . . . 34
Traffic news see: TP (traffic news) . . . . . . . . . . . . . . . . . . . . . 34
Traffic reports . . . . . . . . . . . . . . . . . . . . . . . . . . . . . 64 online . . . . . . . . . . . . . . . . . . . . . . . . . . . . . . . . . 64
on the map . . . . . . . . . . . . . . . . . . . . . . . . . . . . . 64
symbols . . . . . . . . . . . . . . . . . . . . . . . . . . . . . . . . 64
TMC/TMCpro . . . . . . . . . . . . . . . . . . . . . . . . . . . . 64
Traffic sign recognition . . . . . . . . . . . . . . . . . . . . . 67
U
Unit buttons . . . . . . . . . . . . . . . . . . . . . . . . . . . . . . . 9
Unit buttons overview . . . . . . . . . . . . . . . . . . . . . . . 4
Unit overview . . . . . . . . . . . . . . . . . . . . . . . . . . . . . . 4
USB connect an external data storage device . . . . . 47
disconnect . . . . . . . . . . . . . . . . . . . . . . . . . . . . . 47
error messages . . . . . . . . . . . . . . . . . . . . . . . . . . 47 faults . . . . . . . . . . . . . . . . . . . . . . . . . . . . . . . . . . 47
select . . . . . . . . . . . . . . . . . . . . . . . . . . . . . . . . . . 42
u
nreadable . . . . . . . . . . . . . . . . . . . . . . . . . . . . . 47
USB port
iPad management . . . . . . . . . . . . . . . . . . . . . . . 47
iPhone management . . . . . . . . . . . . . . . . . . . . . 47
USB port iPod management . . . . . . . . . . . . . . . . . . . . . . . 47
Use check boxes . . . . . . . . . . . . . . . . . . . . . . . . . . . . 10
User profile settings . . . . . . . . . . . . . . . . . . . . . . . . . . . . . . . . 87
V
vCards importing . . . . . . . . . . . . . . . . . . . . . . . . . . . . . . 66
video settings . . . . . . . . . . . . . . . . . . . . . . . . . . . . . . . . 53
View NAV (navigation) . . . . . . . . . . . . . . . . . . . . . . . . . 63
Virtual buttons see: Function buttons . . . . . . . . . . . . . . . . . . . . . 10
Voice control . . . . . . . . . . . . . . . . . . . . . . . . . . . . . . 13 languages available . . . . . . . . . . . . . . . . . . . . . . 13
Volume announcements . . . . . . . . . . . . . . . . . . . . . . . . . 91
base volume . . . . . . . . . . . . . . . . . . . . . . . . . . . . . 9
change . . . . . . . . . . . . . . . . . . . . . . . . . . . . . . . . . 9
set for external audio sources . . . . . . . . . . . . . . 91
speed-dependent volume adjustment (GALA) . 91
Volume distribution (Balance and Fader) . . . . . . . 91
W Waiting time . . . . . . . . . . . . . . . . . . . . . . . . . . . . . . . 9
Wireless Charger . . . . . . . . . . . . . . . . . . . . . . . . . . 88
99