ESP Seat Leon SC 2013 MEDIA SYSTEM 2.2
[x] Cancel search | Manufacturer: SEAT, Model Year: 2013, Model line: Leon SC, Model: Seat Leon SC 2013Pages: 112, PDF Size: 2.15 MB
Page 49 of 112
48Navigation
Navigation main menu
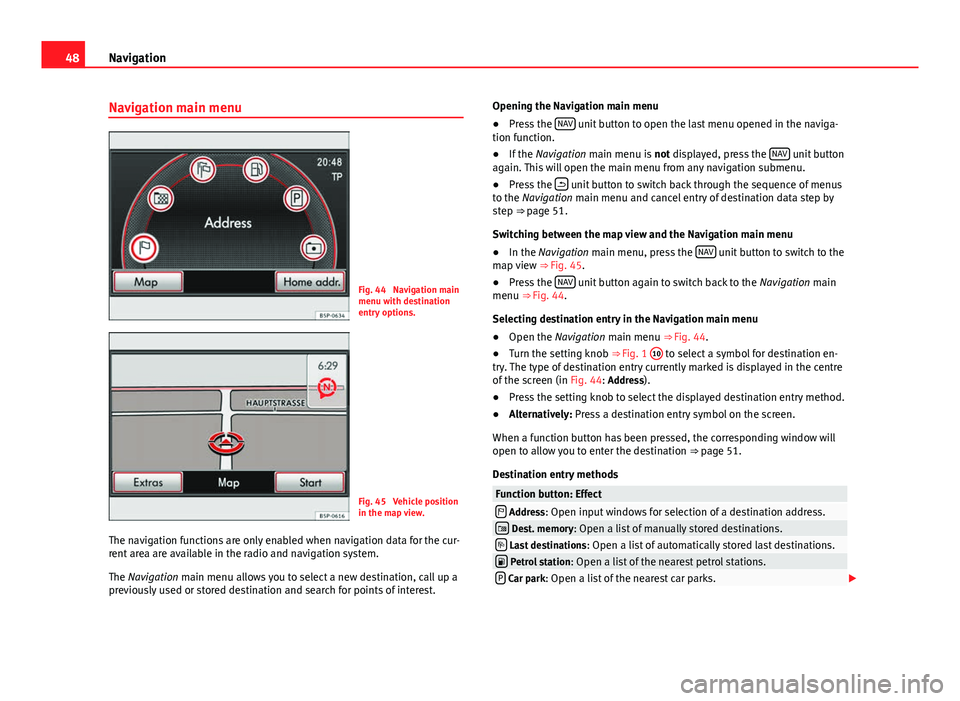
Fig. 44 Navigation main
menu with destination
entry options.
Fig. 45 Vehicle position
in the map view.
The navigation functions are only enabled when navigation data for the cur-
rent area are available in the radio and navigation system.
The Navigation main menu allows you to select a new destination, call up a
previously used or stored destination and search for points of interest. Opening the Navigation main menu
●
Press the NAV
unit button to open the last menu opened in the naviga-
tion function.
● If the Navigation main menu is not displayed, press the NAV
unit button
again. This will open the main menu from any navigation submenu.
● Press the
unit button to switch back through the sequence of menus
to the Navigation main menu and cancel entry of destination data step by
step ⇒ page 51.
Switching between the map view and the Navigation main menu
● In the Navigation main menu, press the NAV
unit button to switch to the
map view ⇒ Fig. 45.
● Press the NAV
unit button again to switch back to the
Navigation main
menu ⇒ Fig. 44.
Selecting destination entry in the Navigation main menu
● Open the Navigation main menu ⇒ Fig. 44.
● Turn the setting knob ⇒ Fig. 1 10
to select a symbol for destination en-
try. The type of destination entry currently marked is displayed in the centre
of the screen (in Fig. 44: Address).
● Press the setting knob to select the displayed destination entry method.
● Alternatively: Press a destination entry symbol on the screen.
When a function button has been pressed, the corresponding window will
open to allow you to enter the destination ⇒ page 51.
Destination entry methods
Function button: Effect Address: Open input windows for selection of a destination address. Dest. memory: Open a list of manually stored destinations. Last destinations : Open a list of automatically stored last destinations. Petrol station: Open a list of the nearest petrol stations.P Car park: Open a list of the nearest car parks.
Page 66 of 112
65
Navigation
Selecting the map view mode
The map view mode can be changed.
● In the map, briefly press the bottom-right or bottom-left area of the
screen to display the function buttons again.
● Press the Extras
function button ⇒ Fig. 66.
● Select one of the playback modes displayed in the pop-up window.
2D North
: two dimensions, map oriented to North.
2D Heading
: two dimension, map oriented to vehicle heading.
3D Heading
: three dimensions, birds-eye view of map.
Alternatively, it is possible to switch between the three map views by press-
ing on the compass shown on the map.
During route guidance, the calculated route can also be shown on an over-
view map.
● Press Overview map
in the pop-up window to display current position and
destination.
The scale of the overview map cannot be changed.
● Press Route list
to calculate the route list.
● Place Route list within the button.
● Press the function button Back to return to the last shown map view.
Displaying speed limits
If there is a speed limit stored in the navigation data for the road along
which you are travelling, this will be displayed on the map. During route
guidance, the arrow indicating a change of direction takes precedence over
the speed limit display.
Please remember that the navigation data may not be up-to-date and that
the system has limitations ⇒ page 45! The speed limit display is activated in the navigation system settings
⇒ page 72.
Points of interest on map
Depending on the programmed settings, points of interest (petrol stations,
car parks, Technical Services) will be displayed as symbols on the map
⇒ page 72.
Note
If you miss a turning during route guidance and are currently unable to turn
back, keep on driving until the navigation system offers a new route.
Note
The quality of the instructions given by the unit will depend on the naviga-
tion data used.
Note
In addition, the route is optimised with the TMC traffic news received
⇒ page 69. The radio stations broadcasting this information are responsi-
ble for the content and the quality of the TMC traffic reports.
Page 71 of 112
70Navigation
Traffic incidents displayed on the map
Traffic incidents reported via TMC that are on the route are shown on the
map by a red symbol. Incidents that are not on the route are shown on the
map by a grey symbol. The positioning of the TMC symbol indicates the inci-
dent and the direction if both are clearly defined in the TMC traffic message.
If route guidance is not active, all traffic incidents are coloured grey.
Dynamic route guidance
If the Dynamic route
function button is activated and a diversion to avoid
traffic congestion on the route is likely to save time, the navigation system
automatically calculates an alternative route.
An announcement is given when the route is recalculated. The same an-
nouncement is given if the traffic incident that was present when the route
was originally calculated is now no longer reported.
Note
Avoiding an incident based on TMC traffic reports may not always save time,
if, for instance, there is also heavy traffic on the alternative route.
Note
If a traffic incident is located on a route section further ahead, it is possible
to exclude the section manually if the TMC traffic report has not yet been
received.
Note
The quality of traffic messages depends on the station broadcasting the
traffic reports. This station is responsible for the content of the traffic re-
ports. Displaying TMC traffic reports (TRAFFIC)
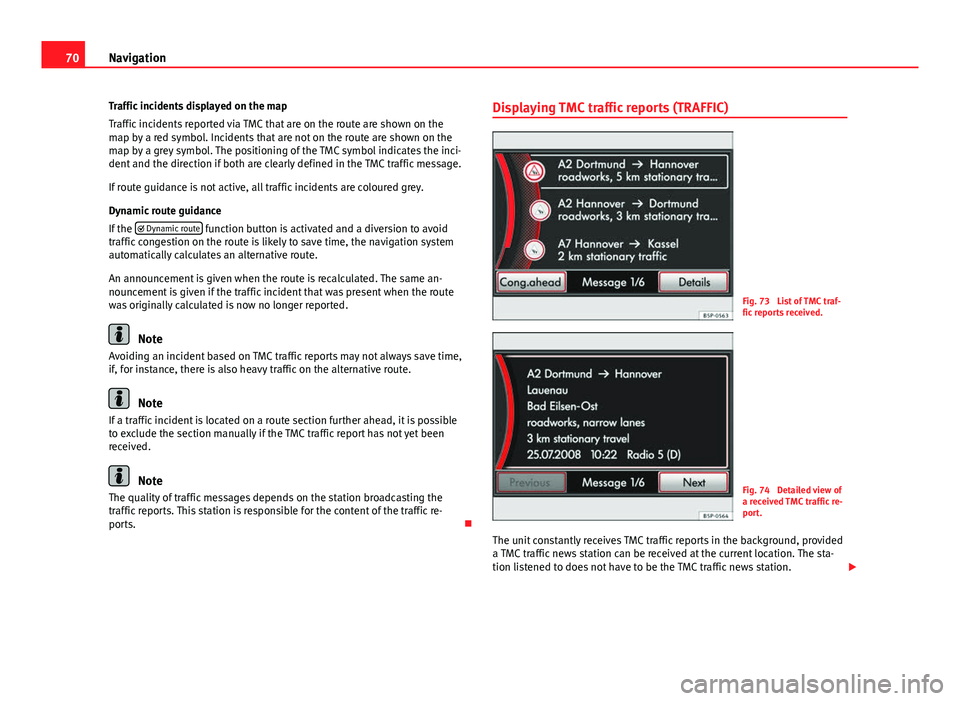
Fig. 73 List of TMC traf-
fic reports received.
Fig. 74 Detailed view of
a received TMC traffic re-
port.
The unit constantly receives TMC traffic reports in the background, provided
a TMC traffic news station can be received at the current location. The sta-
tion listened to does not have to be the TMC traffic news station.
Page 72 of 112
71
Navigation
The unit only processes and displays TMC traffic reports affecting the area
within a radius of roughly 100 km from the current vehicle position.
TMC traffic reports are required for dynamic route guidance and are dis-
played on the map ⇒ page 69.
Display TMC traffic reports
● Press the TRAFFIC
unit button to display the list of the current TMC traffic
reports ⇒ Fig. 73.
● Press one of the TMC traffic reports on the screen to open the detailed
view ⇒ Fig. 74.
● Alternatively: select the TMC report by turning setting button ⇒ Fig. 1 10
and press to open a detailed view
⇒ Fig. 74.
● In the detailed view, you can browse through the TMC traffic reports us-
ing the function buttons Previous
and Next.
Display TMC traffic news stations
● Open the list of the current TMC traffic reports.
● Press the
⇒ Fig. 1
7 unit button to open the information window. The
current TMC traffic news station is displayed.
● Press the
unit button again to close the information window.
Note
By using the Congestion ahead ⇒ Fig. 73 function button it is possible to enter
a manual exclusion from the vehicle position ⇒ page 69.
Note
The radio-navigation system can only process and store TMC traffic reports
if the unit has access to navigation data for the area you are currently travel-
ling through.
Note
The quality of the dynamic route guidance depends on the information con-
tained in the TMC traffic reports. The radio stations are responsible for the
content of the news broadcast.
Route guidance in demo mode
If demo mode is activated in the Navigation setup menu ⇒ page 72, an ad-
ditional pop-up window opens when you start route guidance.
● Pressing the Demo
function button starts a “virtual route guidance” to
the destination you have entered.
● If you press the Normal
function button, a “real route guidance” starts.
The sequence of events and the operations in virtual route guidance are
similar to those in real route guidance.
Virtual route guidance is repeated when you reach the fictitious destination
and always starts again from the starting point if it is interrupted.
If the starting point for demo mode has been defined manually in the Navi-
gation setup menu, virtual route guidance will start from this position.
If the vehicle is moved and the unit can determine its current location by
GPS, any manually entered starting point will be overwritten with the current
vehicle location ⇒ page 72.
When real route guidance is started following virtual route guidance in
demo mode, the unit first has to reorient itself. This may take some time,
depending on the number of satellites the unit can currently receive. Mov-
ing the vehicle may speed up the reorientation process.
Page 75 of 112
74Telephone control (Phone)
Telephone control (Phone)
Introduction
Introduction
The telephone functions described below may be controlled using the radio
and navigation system, and by voice control, provided that there is a mobile
phone switched on and with the BT function on. In addition, the mobile
must be connected and paired via Bluetooth to the radio and navigation
system.
For the connection between the mobile phone and the radio and navigation
system, the mobile phone must have Bluetooth®
and it must be activated.
If no mobile phone is connected to the radio and navigation system, tele-
phone control from the navigator and voice control will not be available.
● Pair and connect the mobile phone to the radio and navigation system
⇒ page 77.
When the mobile phone has been paired with the navigation system, the
phone can be controlled via the navigation system and the multifunction
controls on the steering wheel using the vehicle instrument panel. Func-
tions available include making calls in hands-free mode, access to the mo-
bile phone book, access to the list of calls received, missed and recently di-
alled, and control of these functions using the voice recognition system.
The hands-free device means that the telephone can be used inside the ve-
hicle; the driver will not have to remove their hands from the steering wheel
nor will be distracted from traffic.
Please observe instructions concerning the use of mobile phones in vehi-
cles without an external aerial ⇒ page 76.
WARNING
Telephone calls and the use of the mobile phone pre-installation while
driving may distract the driver from the road and result in accident.
● Always stay alert and drive responsibly.
● Select volume settings that allow you to easily hear signals from out-
side the vehicle at all times, e.g. emergency service sirens.
● Your call may be cut off or you may be unable to make calls if you are
in an area with no mobile phone network coverage, an area where the
network is very weak or, in some cases, in a tunnel, garage or underpass.
This also means that no emergency calls can be made.
WARNING
If the mobile phone is not securely fastened in position, it could be sent
flying around the vehicle in the event of sharp braking, sudden manoeu-
vres or accident, causing injury.
● While the vehicle is in motion, always secure the mobile phone prop-
erly outside the airbag deployment zone.
WARNING
Mobile phones may affect the operation of pacemakers. Always maintain
a suitable distance between the phone and the pacemaker.
● Maintain a gap of roughly 20 centimetres between the aerials of the
mobile phone and the pacemaker, as mobile phones may affect the func-
tioning of pacemakers.
Page 79 of 112
78Telephone control (Phone)
It will be necessary to enter information using the telephone keypad during
the connection process. Therefore, the mobile phone should be to hand.
This is followed by the synchronisation process between the two devices.
The mobile phone book and the list of received, missed and last dialled
calls are automatically loaded into the navigation system.
Start active connection of the mobile phone
When making an active connection, any existing connections to other mo-
bile phones are ended.
● Press the PHONE
unit button.
● Press the SETUP unit button.
● Press the Bluetooth Settings function button.
● Press the Find devices function button.
The search process may last 15 to 20 seconds. On completion, the names of
any mobile phones found are displayed on the screen. Sometimes the
search process is unable to find the device it wishes to pair to the radio and
navigation system. It may be necessary to repeat the search several times.
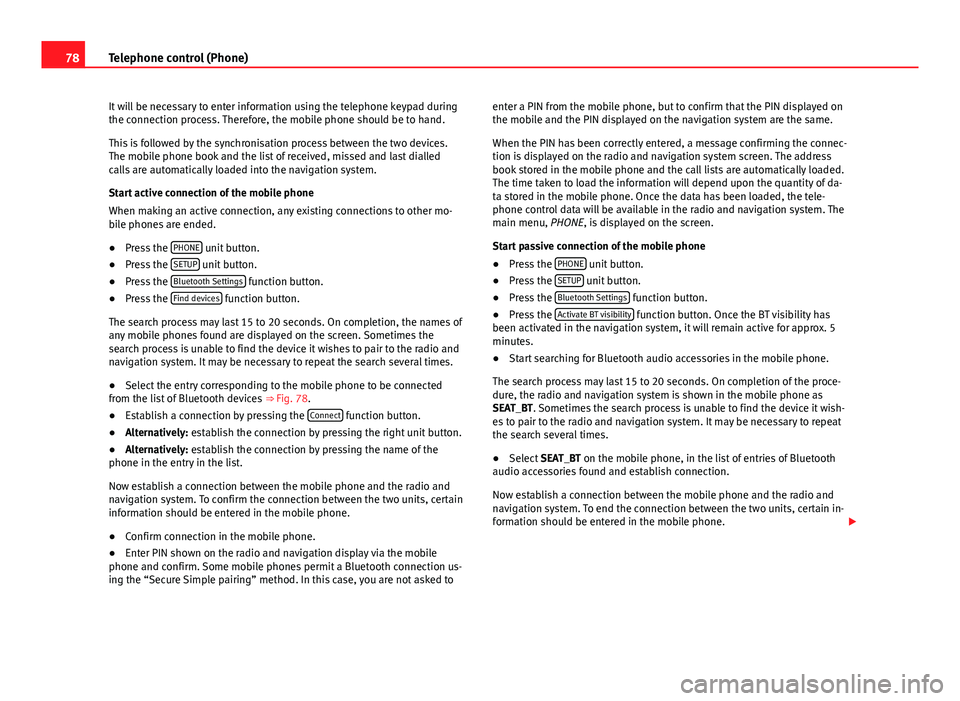
● Select the entry corresponding to the mobile phone to be connected
from the list of Bluetooth devices ⇒ Fig. 78.
● Establish a connection by pressing the Connect
function button.
● Alternatively: establish the connection by pressing the right unit button.
● Alternatively: establish the connection by pressing the name of the
phone in the entry in the list.
Now establish a connection between the mobile phone and the radio and
navigation system. To confirm the connection between the two units, certain
information should be entered in the mobile phone.
● Confirm connection in the mobile phone.
● Enter PIN shown on the radio and navigation display via the mobile
phone and confirm. Some mobile phones permit a Bluetooth connection us-
ing the “Secure Simple pairing” method. In this case, you are not asked to enter a PIN from the mobile phone, but to confirm that the PIN displayed on
the mobile and the PIN displayed on the navigation system are the same.
When the PIN has been correctly entered, a message confirming the connec-
tion is displayed on the radio and navigation system screen. The address
book stored in the mobile phone and the call lists are automatically loaded.
The time taken to load the information will depend upon the quantity of da-
ta stored in the mobile phone. Once the data has been loaded, the tele-
phone control data will be available in the radio and navigation system. The
main menu, PHONE, is displayed on the screen.
Start passive connection of the mobile phone
●
Press the PHONE
unit button.
● Press the SETUP unit button.
● Press the Bluetooth Settings function button.
● Press the Activate BT visibility function button. Once the BT visibility has
been activated in the navigation system, it will remain active for approx. 5
minutes.
● Start searching for Bluetooth audio accessories in the mobile phone.
The search process may last 15 to 20 seconds. On completion of the proce-
dure, the radio and navigation system is shown in the mobile phone as
SEAT_BT. Sometimes the search process is unable to find the device it wish-
es to pair to the radio and navigation system. It may be necessary to repeat
the search several times.
● Select SEAT_BT on the mobile phone, in the list of entries of Bluetooth
audio accessories found and establish connection.
Now establish a connection between the mobile phone and the radio and
navigation system. To end the connection between the two units, certain in-
formation should be entered in the mobile phone.
Page 81 of 112
80Telephone control (Phone)
Note
When a mobile phone is connected for the first time from the navigation
system telephone menu, the phone is paired as a telephone and as a media
player (for playing music stored in the phone via Bluetooth). With a mobile
phone that has already been paired with the navigation system:
● If you try to pair a second mobile phone with the telephone menu, the
first mobile phone will be completely disconnected from the navigation sys-
tem.
● If you try to pair a second mobile phone from the media menu, the first
mobile phone will only be disconnected as a media player, but will continue
to be paired as a mobile phone. This means that the first mobile phone will
operate as a telephone, while the music played will be taken from the song
list on the second mobile phone.
Automatic pairing
When the telephone has been connected and the corresponding user pro-
file created, your telephone will automatically link up with the SEAT tele-
phone system under the following conditions:
● The mobile phone is switched on and the Bluetooth function and visibili-
ty are activated. The mobile phone must be close to the vehicle.
● Whenever automatic connection was selected in the questions posed
during the first pairing, and provided that the mobile phone user profile has
not been deleted. Main menu
PHONE main menu
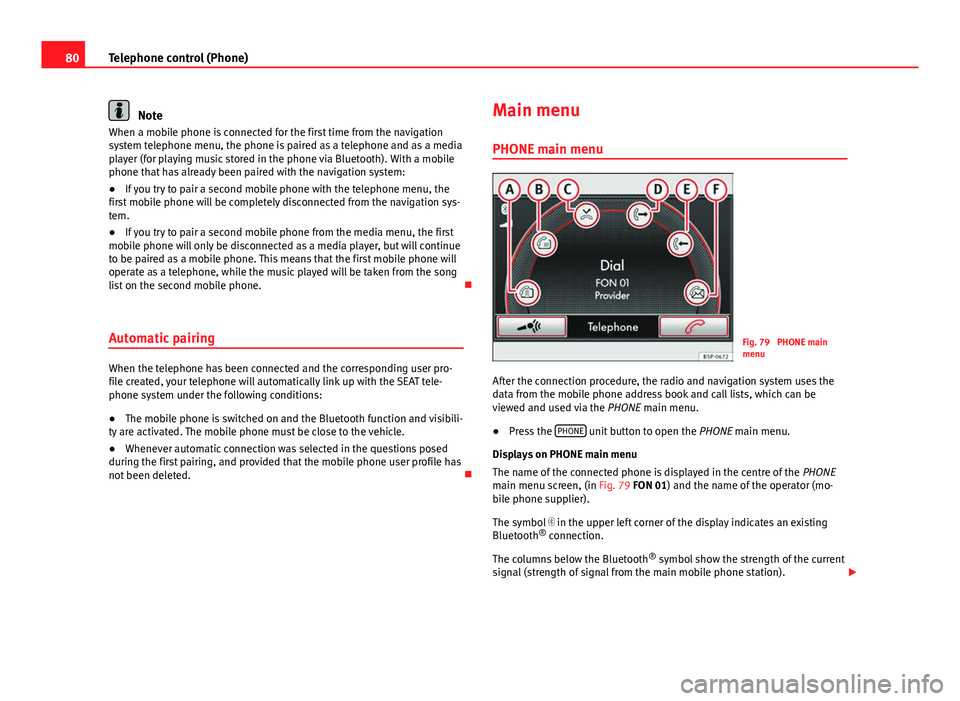
Fig. 79 PHONE main
menu
After the connection procedure, the radio and navigation system uses the
data from the mobile phone address book and call lists, which can be
viewed and used via the PHONE main menu.
● Press the PHONE
unit button to open the
PHONE main menu.
Displays on PHONE main menu
The name of the connected phone is displayed in the centre of the PHONE
main menu screen, (in Fig. 79 FON 01) and the name of the operator (mo-
bile phone supplier).
The symbol in the upper left corner of the display indicates an existing
Bluetooth ®
connection.
The columns below the Bluetooth ®
symbol show the strength of the current
signal (strength of signal from the main mobile phone station).
Page 90 of 112
89
Telephone control (Phone)
Searching for an entry in the phone book
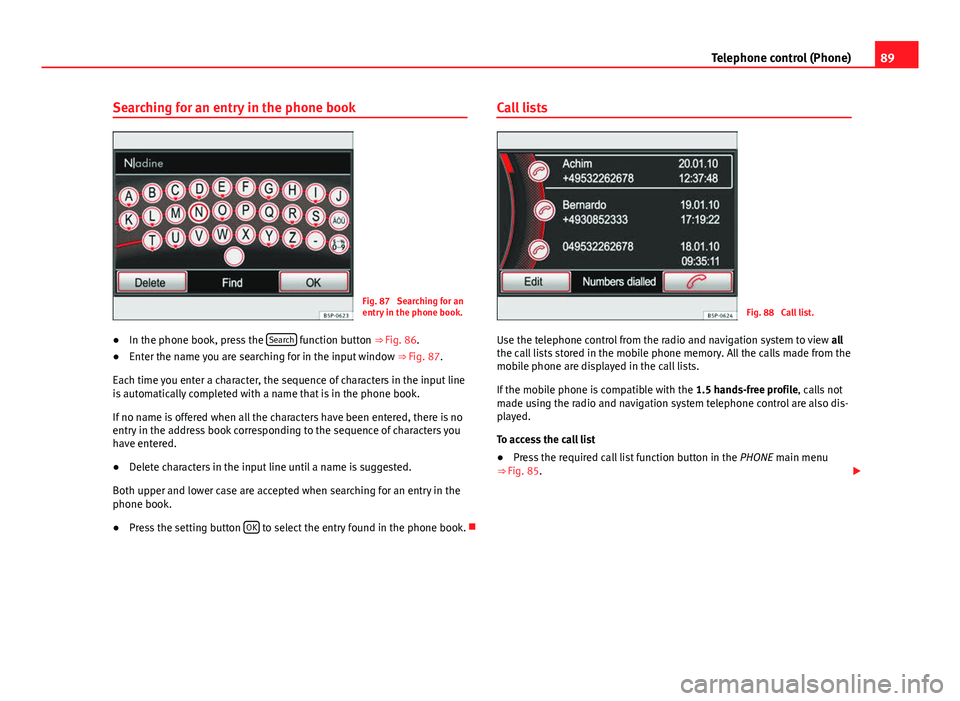
Fig. 87 Searching for an
entry in the phone book.
● In the phone book, press the Search
function button
⇒ Fig. 86.
● Enter the name you are searching for in the input window
⇒ Fig. 87.
Each time you enter a character, the sequence of characters in the input line
is automatically completed with a name that is in the phone book.
If no name is offered when all the characters have been entered, there is no
entry in the address book corresponding to the sequence of characters you
have entered.
● Delete characters in the input line until a name is suggested.
Both upper and lower case are accepted when searching for an entry in the
phone book.
● Press the setting button OK
to select the entry found in the phone book. Call lists
Fig. 88 Call list.
Use the telephone control from the radio and navigation system to view all
the call lists stored in the mobile phone memory. All the calls made from the
mobile phone are displayed in the call lists.
If the mobile phone is compatible with the 1.5 hands-free profile, calls not
made using the radio and navigation system telephone control are also dis-
played.
To access the call list
● Press the required call list function button in the PHONE main menu
⇒ Fig. 85.
Page 97 of 112
96Telephone control (Phone)
● At high speeds, you might need to speak louder to drown out back-
ground noises.
● To make a call when there is heavy background noise we recommend us-
ing the speech controlled telephone book instead of speaking individual
digits. This will help avoid mistakes when specifying telephone numbers.
Voice control commands
Voice control is available in the following languages: Spanish, German, English, Italian, French, Portuguese, Czech, Rus-
sian and Dutch.
It is often possible to activate the same function using different spoken in-
structions. If in doubt, just try giving a command.
Basic commands, valid anywhere in the menu
HELPAfter this command, the system repeats all the possible
commands
CANCELThe dialogue ends
Commands from the main menu for using the system
If the user does not give a COMMAND (user silence), there are three TIME-
OUTS, after which the system informs the user of the available options: The system starts the assistance cue with the following DIALOGUE: “The
available commands are: dial number, redial, other options, or say call
followed by a contact, for example, call Mary Smith at home
”.
If the user still does not give a COMMAND, the system starts the second
assistance cue with the DIALOGUE: “For other commands, say Help ”.
If the user still does not say a COMMAND, the “Operation cancelled”
dialogue is started.
TIMEOUTS are considered each time that the system is waiting for a verbal
instruction from the user and the user remains silent.
“HELP” command
● With this COMMAND the user asks the system for help about the availa-
ble options.
● When this command is given, the system starts the DIALOGUE “Say call
followed by the name of the contact you wish to call, for example, call Mary
Smith on her mobile, or say dial number, redial or other options. If you say
cancel, you will leave the voice control system ”
● The system is waiting for a new COMMAND from the user.
● If the user gives the new COMMAND, and this is correctly recognised by
the system, it goes to the corresponding menu.
● If the user remains silent for a time (TIMEOUT T1), the system starts an
initial assistance cue with the DIALOGUE: “The available commands are: di-
al number, redial, other options, or say call followed by a contact, for exam-
ple, call Mary Smith at home ”. If the user remains silent for a time (T2), the
system starts a second assistance cue with the DIALOGUE: “For other com-
mands, say Help ”. If the user remains silent for a time (T3), the system
starts the DIALOGUE: “Operation cancelled”, and the voice recognition sys-
tem is switched off.
“CALL + Name” command
With this COMMAND, the user requests a call to be made, and gives the
name of the person they wish to call. It is essential that the name is pro-
nounced exactly as it is stored in the mobile phone book.
T1
T2
T3
Page 101 of 112
100Settings (SETUP)
Opening the Sound main menu ● Press the SETUP
unit button from any menu.
● Press the Sound function button at the bottom-left of the screen to open
the menu for changing sound and volume settings ⇒ Fig. 96.
The currently selected settings are indicated in the overview by the scale in
the circle next to the respective menu item ⇒ Fig. 96.
Changing the balance and fader settings
● Press the function buttons Treble
, Mid or Bass to open the respective
settings menus for adjusting the “tone” ⇒ Fig. 97.
● Turn the setting knob ⇒ Fig. 1 10
or press the function button
or to
alter the current setting.
● Press the function button Balance
or Fader to open the settings menu for
changing the sound focus to the left or right (balance) or to the front or rear
(fader).
● Turn the setting knob or press the appropriate function button to alter
the current setting.
Changing the volume settings and adjustments
The volume settings and adjustments can be pre-defined.
While volume settings are being adjusted, the currently active audio source
is played at the level of the setting as it changes.
● In the Sound main menu, press the Volume
function button ⇒
Fig. 96.
● Press the function button Max. switch-on volume, Traffic announcements (TP)⇒ page 21, Navigation volume or Speed-dependent vol. adjustment to open the cor-
responding settings menu.
● Turn the setting knob or press the
or function button.
● Pressing the Vol. reduction function button opens a pop-up window in
which you can set the automatic audio volume reduction applied when the
parking distance warning system (PDC) is active. When reverse gear is en-
gaged, the volume of the radio and navigation system is lowered to make
manoeuvring easier and so that acoustic warnings are audible. If the maximum start-up volume is set very low, the navigation system an-
nouncements will also be lowered to this level. This may mean that the vol-
ume of the navigation system requires turning up each time the unit is
switched on.
Functional description of speed-dependent volume adjustment (GALA)
The speed dependent volume adjustment automatically increases the vol-
ume as the vehicle speed increases.
The degree to which the volume increases with speed is adjusted on a scale
between 1 and 7.
If a low value is set, the volume increases only slightly as the speed of the
vehicle increases. At a high setting the volume increases further. At
0
speed-dependent volume control is switched off (display: Off).
System settings
● Press the SETUP unit button and the System function button to open the
settings menu.
Resetting to factory settings
The restoration of the original settings deletes all the previous entries, des-
tinations and other settings .
● In the System settings menu , press the Factory settings
function button.
● Confirm the prompt by pressing Yes to reset the unit to its original set-
tings.
Other system settings
Function button: EffectLanguage: Press to select the desired language for text and voice output. OR: select Automatic to select the language programmed in the instru-
ment panel.