set clock Seat Leon SC 2013 MEDIA SYSTEM 2.2
[x] Cancel search | Manufacturer: SEAT, Model Year: 2013, Model line: Leon SC, Model: Seat Leon SC 2013Pages: 112, PDF Size: 2.15 MB
Page 10 of 112

9
Introduction
If the vehicle battery has been disconnected, switch on the ignition before
re-connecting the unit.
Adjusting the base volume
effectActionIncrease the vol-
ume.On the radio: Turn the volume control ⇒ Fig. 1 1clockwise.
On the multifunction steering wheel:
Turn the volume
control up or press the corresponding button (depend-
ing on equipment fitted) ⇒ Booklet Instruction Manual
Lower the vol-
ume.On the radio: Turn the volume control ⇒ Fig. 1 1 an-
ticlockwise.
On the multifunction steering wheel: Turn the volume
control down or press the corresponding button (de-
pending on equipment fitted) ⇒ Booklet Instruction
Manual
Changes to the volume are indicated by a “bar” on the screen. During this
time the unit cannot be operated.
At “0” the unit is muted (display: ) and the current Media source is stop-
ped.
It is possible to preset certain volume settings and adjustments
⇒ page 99.
WARNING
Your attention may be distracted from the traffic if you use the radio and
navigation system while driving, resulting in accident.
● Always stay alert and drive responsibly.
WARNING (Continued)
● Select volume settings that allow you to easily hear signals from out-
side the vehicle at all times (e.g. emergency service sirens).
● If the volume is too high, you could damage your hearing. Even if the
volume is too loud for a short period only.
CAUTION
The vehicle loudspeakers may be damaged if the volume is too high or the
sound is distorted.
Note
If the base volume has been turned up high to play an audio source
(e.g. due to very quiet audio output from an external audio source), lower
the volume again before switching audio source.
Additional information and display options
The text displayed on the screen may vary depending on the settings and
may not match the illustrations shown here.
All displays appear only after the radio-navigation system has completed
start-up.
Depending on the vehicle, the changes to the air conditioning settings or
the texts relating to driver assistance systems fitted at the factory are dis-
played. These displays disappear automatically when they are no longer re-
quired.
Page 65 of 112

64Navigation
Visual recommendations on the map
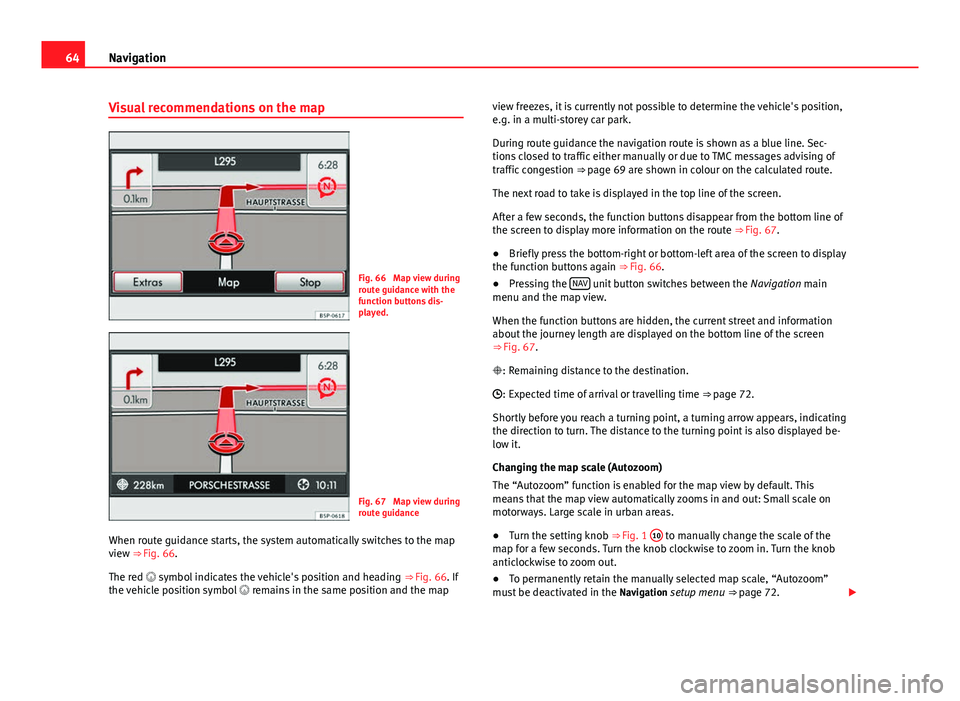
Fig. 66 Map view during
route guidance with the
function buttons dis-
played.
Fig. 67 Map view during
route guidance
When route guidance starts, the system automatically switches to the map
view ⇒ Fig. 66. The red symbol indicates the vehicle's position and heading ⇒ Fig. 66. If
the vehicle position symbol remains in the same position and the map view freezes, it is currently not possible to determine the vehicle's position,
e.g. in a multi-storey car park.
During route guidance the navigation route is shown as a blue line. Sec-
tions closed to traffic either manually or due to TMC messages advising of
traffic congestion
⇒ page 69 are shown in colour on the calculated route.
The next road to take is displayed in the top line of the screen.
After a few seconds, the function buttons disappear from the bottom line of
the screen to display more information on the route ⇒ Fig. 67.
● Briefly press the bottom-right or bottom-left area of the screen to display
the function buttons again ⇒ Fig. 66.
● Pressing the NAV
unit button switches between the
Navigation main
menu and the map view.
When the function buttons are hidden, the current street and information
about the journey length are displayed on the bottom line of the screen
⇒ Fig. 67.
: Remaining distance to the destination.
: Expected time of arrival or travelling time ⇒ page 72.
Shortly before you reach a turning point, a turning arrow appears, indicating
the direction to turn. The distance to the turning point is also displayed be-
low it.
Changing the map scale (Autozoom)
The “Autozoom” function is enabled for the map view by default. This
means that the map view automatically zooms in and out: Small scale on
motorways. Large scale in urban areas.
● Turn the setting knob ⇒ Fig. 1 10
to manually change the scale of the
map for a few seconds. Turn the knob clockwise to zoom in. Turn the knob
anticlockwise to zoom out.
● To permanently retain the manually selected map scale, “Autozoom”
must be deactivated in the Navigation setup menu ⇒ page 72.
Page 102 of 112

101
Settings (SETUP)
Function button: EffectView of keyboard ABC: The keyboard in input windows has an alphabetic layout. QWERTY: The keyboard in input windows has the usual computer layout.Screen: Change display settings. Brightness: press to select the screen brightness setting. Day/Night: changes the map view.
Automatic: the map view changes when the dipped beams are switch-
ed on.
Day: the map view remains in daytime mode (bright). Night: the map view remains in night-time mode (dark).
Acoustic feedback signal: Switch the confirmation tone for pressing a func-
tion button on or off.
Factory settings: restore the unit to its original factory settings.Air conditioning announcements
3 s, 5 s, 10 s Changes to the air conditioning are displayed on the
screen for approximately 3, 5 or 10 seconds.
Off: Changes to the air conditioning settings are not displayed on the
screen.
Clock Display: Switch time display on or off ⇒ page 9.Status of the SD card: Display whether the memory card contains navigation
data.
Remove the SD card: In some units the memory card inserted in the unit must
be prepared before extracting it.
Note
The system of units used in the navigation menu (metric or imperial) is set
on the instrument panel.