length Seat Leon SC 2014 MEDIA SYSTEM 2.2
[x] Cancel search | Manufacturer: SEAT, Model Year: 2014, Model line: Leon SC, Model: Seat Leon SC 2014Pages: 114, PDF Size: 2.47 MB
Page 20 of 114
19
Audio mode
RDS radio data and TP (Traffic Programme)
services
Introduction
The RDS (Radio Data System) offers additional information in FM such as the
visualisation of the station name, automatic station tracking (Alternative
Frequencies), text emitted by radio (Radio Text) and traffic reports (TP).
Not all units have RDS, not all the FM stations offer this service and nor can
the infrastructure of all the countries permit it.
Without RDS it is not possible to obtain radio data services .
Additional Information:
● Safety notes ⇒ page 4
● Unit overview ⇒ page 6
● Radio mode ⇒ page 12
Note
The radio station is responsible for the content of the broadcast informa-
tion. RDS and radio text
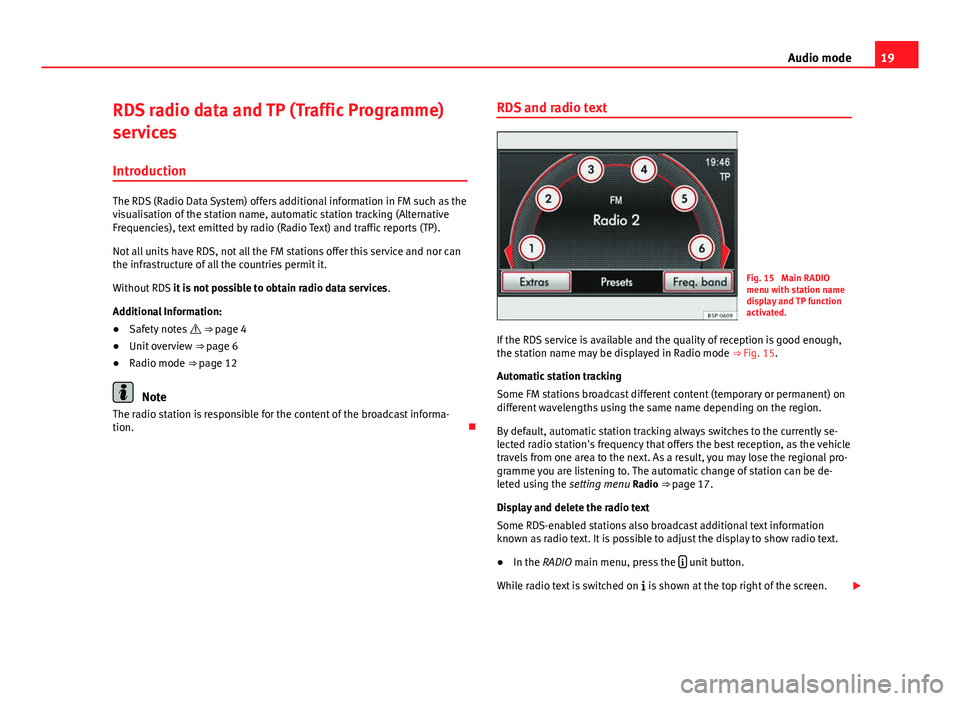
Fig. 15 Main RADIO
menu with station name
display and TP function
activated.
If the RDS service is available and the quality of reception is good enough,
the station name may be displayed in Radio mode ⇒ Fig. 15.
Automatic station tracking
Some FM stations broadcast different content (temporary or permanent) on
different wavelengths using the same name depending on the region.
By default, automatic station tracking always switches to the currently se-
lected radio station's frequency that offers the best reception, as the vehicle
travels from one area to the next. As a result, you may lose the regional pro-
gramme you are listening to. The automatic change of station can be de-
leted using the setting menu Radio ⇒ page 17.
Display and delete the radio text
Some RDS-enabled stations also broadcast additional text information
known as radio text. It is possible to adjust the display to show radio text.
● In the RADIO main menu, press the
unit button.
While radio text is switched on is shown at the top right of the screen.
Page 64 of 114
63
Navigation
Visual recommendations on the map
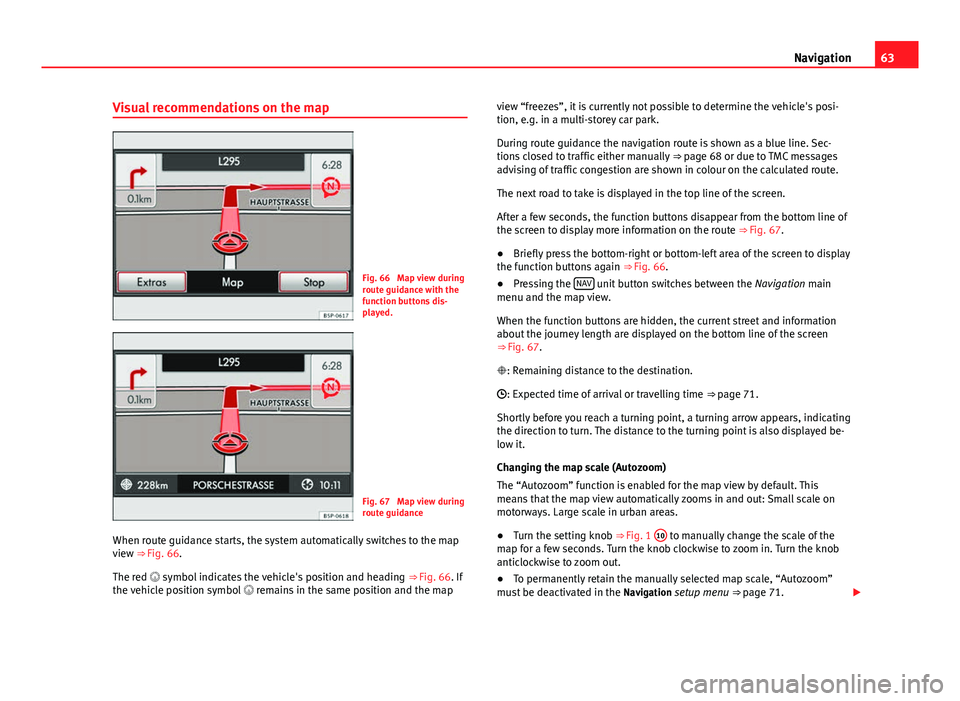
Fig. 66 Map view during
route guidance with the
function buttons dis-
played.
Fig. 67 Map view during
route guidance
When route guidance starts, the system automatically switches to the map
view ⇒ Fig. 66.
The red symbol indicates the vehicle's position and heading ⇒ Fig. 66. If
the vehicle position symbol remains in the same position and the map view “freezes”, it is currently not possible to determine the vehicle's posi-
tion, e.g. in a multi-storey car park.
During route guidance the navigation route is shown as a blue line. Sec-
tions closed to traffic either manually ⇒ page 68 or due to TMC messages
advising of traffic congestion are shown in colour on the calculated route.
The next road to take is displayed in the top line of the screen.
After a few seconds, the function buttons disappear from the bottom line of
the screen to display more information on the route ⇒ Fig. 67.
● Briefly press the bottom-right or bottom-left area of the screen to display
the function buttons again ⇒ Fig. 66.
● Pressing the NAV
unit button switches between the
Navigation main
menu and the map view.
When the function buttons are hidden, the current street and information
about the journey length are displayed on the bottom line of the screen
⇒ Fig. 67.
: Remaining distance to the destination.
: Expected time of arrival or travelling time ⇒ page 71.
Shortly before you reach a turning point, a turning arrow appears, indicating
the direction to turn. The distance to the turning point is also displayed be-
low it.
Changing the map scale (Autozoom)
The “Autozoom” function is enabled for the map view by default. This
means that the map view automatically zooms in and out: Small scale on
motorways. Large scale in urban areas.
● Turn the setting knob ⇒ Fig. 1 10
to manually change the scale of the
map for a few seconds. Turn the knob clockwise to zoom in. Turn the knob
anticlockwise to zoom out.
● To permanently retain the manually selected map scale, “Autozoom”
must be deactivated in the Navigation setup menu ⇒ page 71.
Page 69 of 114
68Navigation
Directly excluding a route section further ahead
(congestion)
During a route guidance, the route section of the remaining stretch of route
can be excluded manually.
● Press the unit button
in any of the navigation menus (except SETUP).
● In the information window, press the Route function button.
● Press the Congestion ahead function button in the pop-up window.
● Enter the length of the section to be excluded by turning the setting
knob ⇒ Fig. 1 10
.
The length indicated for the route section is shown on the lower line of the
screen. If (Max) is displayed, this indicates that the maximum permitted
length for exclusion has been reached.
● Press the OK
setting knob or function button to confirm the exclusion.
The excluded route section is displayed on the map.
Route guidance will start again when the navigation system has calculated
an alternative route to the excluded section.
Re-opening a section
● Press the unit button
in any of the navigation menus (except SETUP).
● In the information window, press the Route function button.
● Press the Lift cong. excl. function button in the pop-up window.
Note
It is also possible to enter or cancel an exclusion while viewing the TMC traf-
fic announcements using the function button Congestion ahead
⇒ page 69.
Note
Information on manually excluding route sections further ahead ⇒ page 67.Dynamic route guidance with TMC (Traffic Message
Channel)
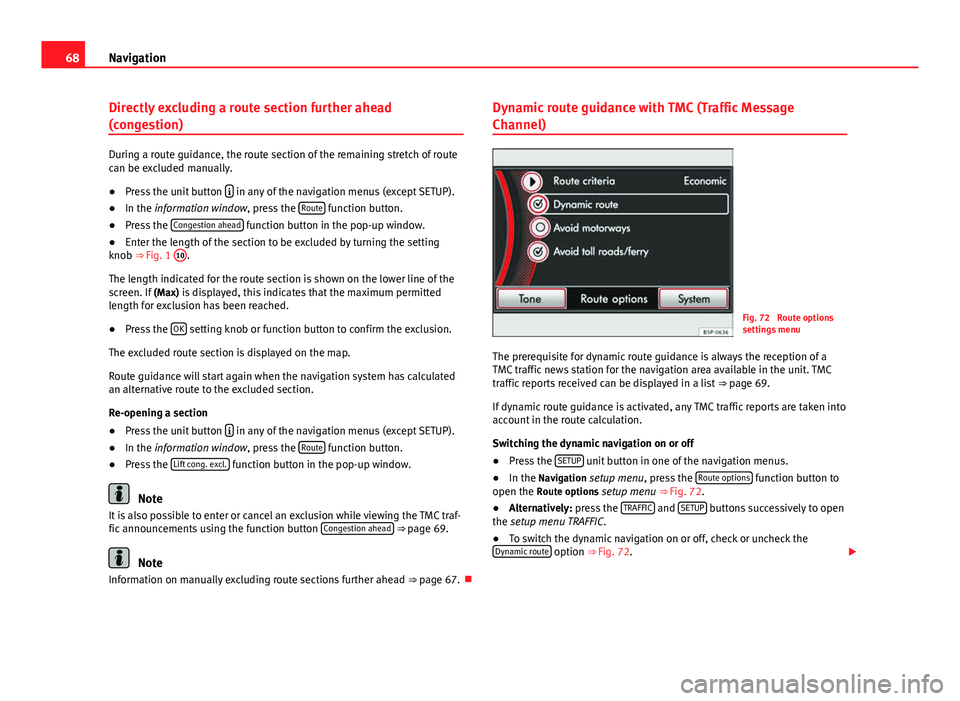
Fig. 72 Route options
settings menu
The prerequisite for dynamic route guidance is always the reception of a
TMC traffic news station for the navigation area available in the unit. TMC
traffic reports received can be displayed in a list ⇒ page 69.
If dynamic route guidance is activated, any TMC traffic reports are taken into
account in the route calculation.
Switching the dynamic navigation on or off
● Press the SETUP
unit button in one of the navigation menus.
● In the Navigation setup menu, press the Route options function button to
open the Route options setup menu ⇒ Fig. 72.
● Alternatively: press the TRAFFIC
and SETUP buttons successively to open
the setup menu TRAFFIC.
● To switch the dynamic navigation on or off, check or uncheck the
Dynamic route
option ⇒ Fig. 72.
Page 85 of 114
84Telephone control (Phone)
Active connection display
During a phone call, the number of the caller and the length of the conver-
sation are displayed on the screen.
If the phone number has been saved in the phone book, the name allocated
to the number is displayed instead of the number.
Muting the call
To prevent the caller listening to conversations inside the car during an ac-
tive connection, the sound transfer to the other phone can be temporarily
disconnected.
● Press the Extras
function button while the connection is active.
● Press the Mute function button in the pop-up window to disconnect
sound transmission to the other caller.
● Press the Mute
function button in the pop-up window again to restore
sound transmission to the other caller.
Making a call from the call list
● Open the call list in the PHONE main menu.
● Select the required entry in the list by turning the setting knob
⇒ Fig. 1 10
.
● Press the setting knob to dial the number.
● OR: Press the required entry to make the call.
● Alternatively: press the
function button or the lower unit button to
make the call. Accepting and alternating with an additional call
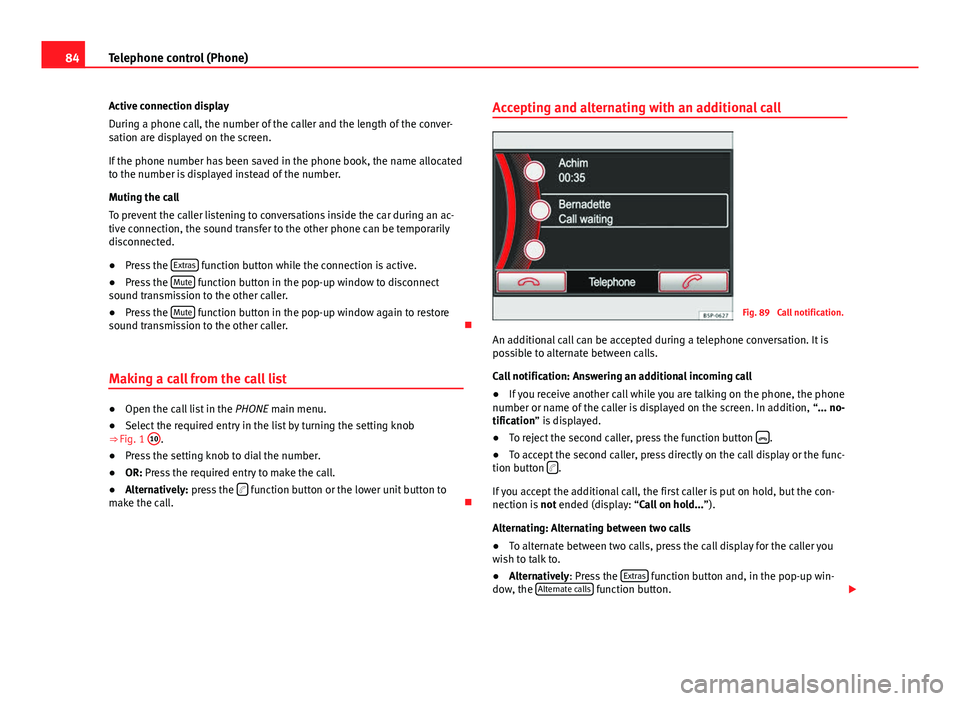
Fig. 89 Call notification.
An additional call can be accepted during a telephone conversation. It is
possible to alternate between calls.
Call notification: Answering an additional incoming call
● If you receive another call while you are talking on the phone, the phone
number or name of the caller is displayed on the screen. In addition, “... no-
tification” is displayed.
● To reject the second caller, press the function button
.
● To accept the second caller, press directly on the call display or the func-
tion button
.
If you accept the additional call, the first caller is put on hold, but the con-
nection is not ended (display: “Call on hold... ”).
Alternating: Alternating between two calls
● To alternate between two calls, press the call display for the caller you
wish to talk to.
● Alternatively: Press the Extras
function button and, in the pop-up win-
dow, the Alternate calls function button.
Page 99 of 114
98Bluetooth System
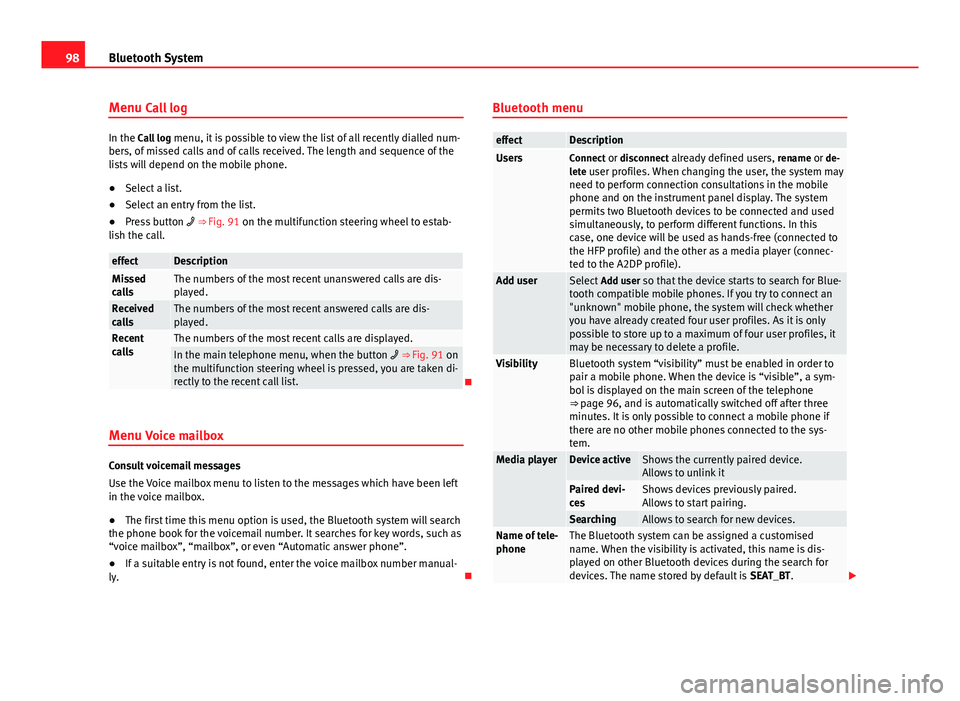
Menu Call log
In the Call log menu, it is possible to view the list of all recently dialled num-
bers, of missed calls and of calls received. The length and sequence of the
lists will depend on the mobile phone.
● Select a list.
● Select an entry from the list.
● Press button ⇒ Fig. 91 on the multifunction steering wheel to estab-
lish the call.
effectDescriptionMissed
callsThe numbers of the most recent unanswered calls are dis-
played.
Received
callsThe numbers of the most recent answered calls are dis-
played.
Recent
callsThe numbers of the most recent calls are displayed.In the main telephone menu, when the button ⇒ Fig. 91 on
the multifunction steering wheel is pressed, you are taken di-
rectly to the recent call list.
Menu Voice mailbox
Consult voicemail messages
Use the Voice mailbox menu to listen to the messages which have been left
in the voice mailbox.
● The first time this menu option is used, the Bluetooth system will search
the phone book for the voicemail number. It searches for key words, such as
“voice mailbox”, “mailbox”, or even “Automatic answer phone”.
● If a suitable entry is not found, enter the voice mailbox number manual-
ly. Bluetooth menu
effectDescriptionUsersConnect or disconnect already defined users,
rename or de-
lete user profiles. When changing the user, the system may need to perform connection consultations in the mobile
phone and on the instrument panel display. The system
permits two Bluetooth devices to be connected and used
simultaneously, to perform different functions. In this
case, one device will be used as hands-free (connected to
the HFP profile) and the other as a media player (connec-
ted to the A2DP profile).
Add userSelect Add user so that the device starts to search for Blue-
tooth compatible mobile phones. If you try to connect an
"unknown" mobile phone, the system will check whether
you have already created four user profiles. As it is only
possible to store up to a maximum of four user profiles, it
may be necessary to delete a profile.
VisibilityBluetooth system “visibility” must be enabled in order to
pair a mobile phone. When the device is “visible”, a sym-
bol is displayed on the main screen of the telephone
⇒ page 96, and is automatically switched off after three
minutes. It is only possible to connect a mobile phone if
there are no other mobile phones connected to the sys-
tem.
Media playerDevice activeShows the currently paired device.
Allows to unlink it
Paired devi-
cesShows devices previously paired.
Allows to start pairing.
SearchingAllows to search for new devices.Name of tele-
phoneThe Bluetooth system can be assigned a customised
name. When the visibility is activated, this name is dis-
played on other Bluetooth devices during the search for
devices. The name stored by default is SEAT_BT.