navigation Seat Leon SC 2014 NAVI SYSTEM PLUS
[x] Cancel search | Manufacturer: SEAT, Model Year: 2014, Model line: Leon SC, Model: Seat Leon SC 2014Pages: 84, PDF Size: 2.08 MB
Page 45 of 84
Navigation
The calculation will be performed in accord-
ance with the data selected in the Route op- tions menu ››› page 49 .
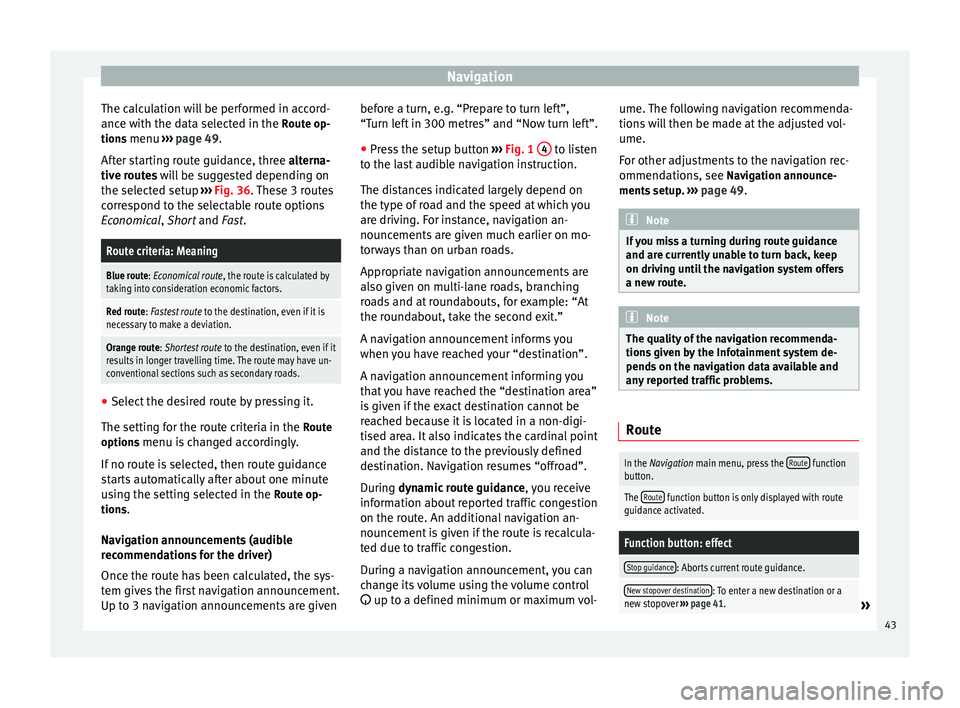
Af t
er starting route guidance, three
alterna-
tive routes will be suggested depending on
the selected setup ››› Fig. 36. These 3 routes
correspond to the selectable route options
Economical
, Short and Fast.
Route criteria: Meaning
Blue route: Economical route, the route is calculated by taking into consideration economic factors.
Red route: Fastest route to the destination, even if it is
necessary to make a deviation.
Orange route: Shortest route to the destination, even if it
results in longer travelling time. The route may have un-
conventional sections such as secondary roads. ●
Select the desired route by pressing it.
The setting for the route criteria in the Route
options menu is changed accordingly.
If no route is selected, then route guidance
starts automatically after about one minute
using the setting selected in the Route op-
tions .
Navigation announcements (audible
recommendations for the driver)
Once the route has been calculated, the sys-
tem gives the first navigation announcement.
Up to 3 navigation announcements are given before a turn, e.g. “Prepare to turn left”,
“Turn left in 300 metres” and “Now turn left”.
● Press the setup button ››› Fig. 1 4 to listen
to the last audible navigation instruction.
The distances indicated largely depend on
the type of road and the speed at which you
are driving. For instance, navigation an-
nouncements are given much earlier on mo-
torways than on urban roads.
Appropriate navigation announcements are
also given on multi-lane roads, branching
roads and at roundabouts, for example: “At
the roundabout, take the second exit.”
A navigation announcement informs you
when you have reached your “destination”.
A navigation announcement informing you
that you have reached the “destination area”
is given if the exact destination cannot be
reached because it is located in a non-digi-
tised area. It also indicates the cardinal point
and the distance to the previously defined
destination. Navigation resumes “offroad”.
During dynamic route guidance
,
y
ou receive
information about reported traffic congestion
on the route. An additional navigation an-
nouncement is given if the route is recalcula-
ted due to traffic congestion.
During a navigation announcement, you can
change its volume using the volume control
up to a defined minimum or maximum vol- ume. The following navigation recommenda-
tions will then be made at the adjusted vol-
ume.
For other adjustments to the navigation rec-
ommendations, see Navigation announce-
ments
setup. ››› page 49. Note
If you miss a turning during route guidance
and are currently unable to turn back, keep
on driving until the navigation system offers
a new route. Note
The quality of the navigation recommenda-
tions given by the Infotainment system de-
pends on the navigation data available and
any reported traffic problems. Route
In the Navigation main menu, press the
Route function
button.
The Route function button is only displayed with route
guidance activated.
Function button: effect
Stop guidance: Aborts current route guidance.
New stopover destination: To enter a new destination or a
new stopover ››› page 41.» 43
Page 46 of 84
NavigationFunction button: effect
Route information: View route information for current
route.
Store destination: To store the selected destina-
tion in the destination memory.
Congestion ahead: To exclude a section (of 0.2 to 10 km in
length) from the current route, e.g. to avoid congestion.
To cancel the exclusion, press the Route
function button
and then Cancel congestion.
Change route: The map of the calculated route appears
and by holding a finger on the route and dragging the
finger across said map, the route is changed to the
road(s) that you want and the new route is then recalcu-
lated. My destinations (destination memory)
The stored destinations can be selected from
the My destinations
menu.
● Press the My destinations function button in
the main Navigation
menu.
● Sel
ect the desired function button.
Store position ,
Destinations or
Home address .
Store position ● By pressing the Store position function but-
ton, the indicated position is stored as Flag-
ged destination in the Destination memory.
To permanently retain the position stored as
a Flagged destination, it must be renamed in the Destination memory. Otherwise the stored
position will be overwritten the next time a
flagged destination is stored.
● Mark the Flagged destination in the Destina-
tion memory.
● Press the Save function button.
The name can be changed in the following in-
put window. Press the function button to
store the destination.
Destinations and contacts
● Select the desired function button.
Function button: effect
Recent destinations: View of destinations for which a route
has already been started.
Dest. memory: View of destinations stored manually and
from imported vCards ››› page 48, Importing vCards
(electronic business cards) .
Favourites: View of destinations stored as favourites.
Contacts: View of entries in the phonebook that have a
stored address (postal address). Home address
Only one address or position can be stored
as the home address at any one time. The
stored home address can be edited or over-
written.If a home address has already been stored,
route guidance will be started to the stored
home address.
If a home address has not yet been stored,
an address can be assigned as the home ad-
dress.
Assigning the home address for the first time:
Position: Press to store the vehicle's current position as
the home address.
Address: Press to enter the home address manually.
Editing the home address:
The home address can be edited in the Navigation setup
menu ››› page 49.
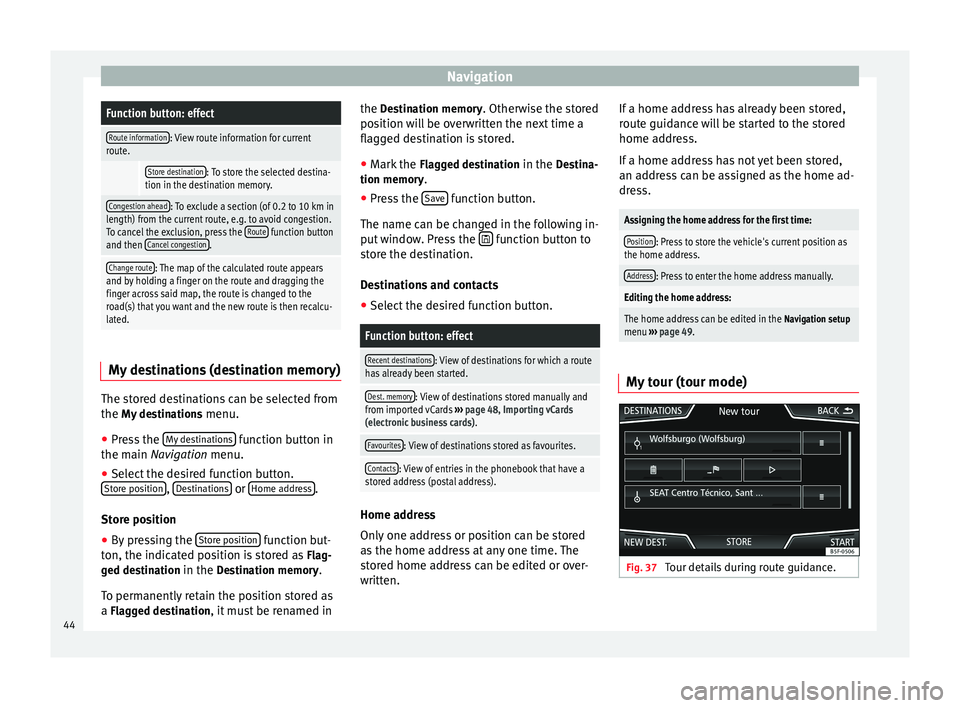
My tour (tour mode) Fig. 37
Tour details during route guidance.44
Page 47 of 84
Navigation
Several destinations can be defined in tour
mode. A trip with multiple destinations is
called a “Tour”.
The “starting point” of a tour is always the
vehicle position determined by the Infotain-
ment system. The “destination” is the end
point of a tour. “Stopover destinations” are
driven to before the destination.
● Press the My tours function button in the
main Navigation
menu.
● Sel
ect the desired function button ( Edit
tour, New tour or Tour Memory).
Function buttons on the My tours pop-up
window
Function button: effect
Edit waypoint toura) : To edit and store the active tour.
New tour: To create a new tour.
Tour memory: To Delete, Edit or Start a stored tour.
a)
This function button is only displayed when route guidance is
activated in tour mode.
Display and function buttons on the New tour
and Edit tour
menu
Function button or message: function or meaning
Stopover.
Destination.
...Estimated time of arrival at destination.
...Calculated distance to destination.
Press on the destination to display the function but-
tons.
Delete destination.
To start guidance direct to the selected
destination. Destinations that come before
the selected destination are ignored.
To open the detailed view of the destina-
tion in question.
Available function buttons.
New desti-
nationTo add a new destination to the tour.
My desti-
nationsTo add a new destination from My destina-
tions to the tour.
StoringTo store the created tour in the tour memo-
ry.
StartTo start route guidance.
CalculateTo update calculated distance and estima-
ted arrival time. a)
StopTo stop route guidance to the active desti-
nation.b)
To move a stopover or a destination to an-
other position on the list. Press and drag
to move the destination.
a)
This function button is only displayed with route guidance ac-
tivated and when a destination has been added to the tour.
b) This function button is only displayed with route guidance ac-
tivated.
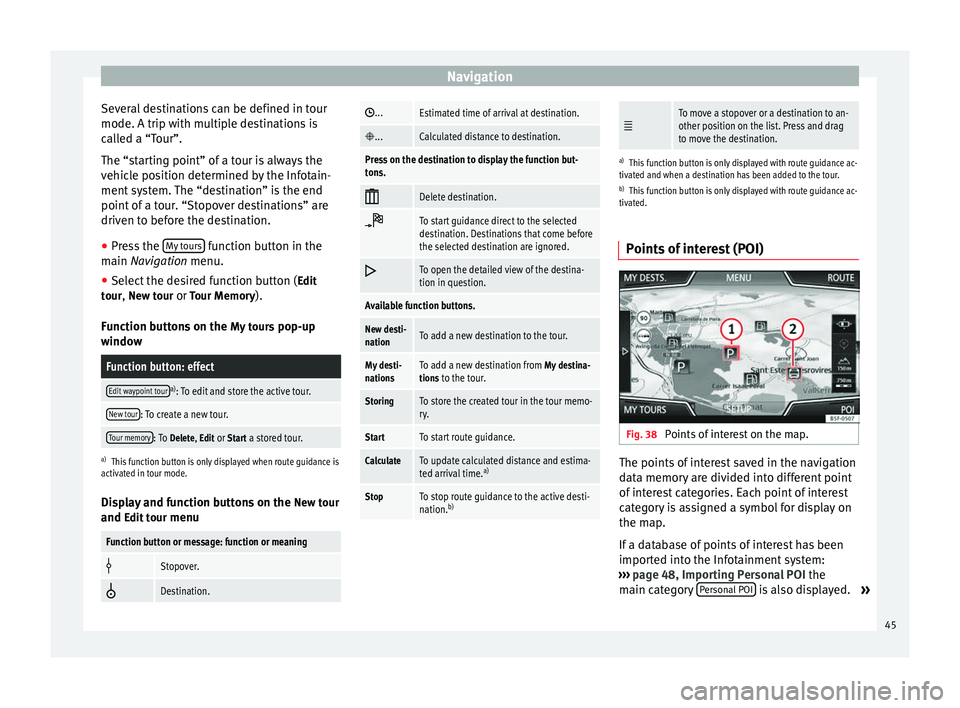
Points of interest (POI) Fig. 38
Points of interest on the map. The points of interest saved in the navigation
data memory are divided into different point
of interest categories. Each point of interest
category is assigned a symbol for display on
the map.
If a database of points of interest has been
imported into the Infotainment system:
››› page 48, Importing Personal POI the
main category Personal POI is also displayed.
»
45
Page 48 of 84
Navigation
In the Map setup menu, the categories of
points of
interest to display on the map can
be configured ››› page 49. Up to 10 catego-
ries
of points of interest can be selected.
Selecting a point of interest on the map
Function button: effect
1There are several points of interest in the area.
Press this symbol to open a list of points of inter-
est.
2The only point of interest in this zone. Press the
symbol to open the detailed view of the point of
interest. Search for point of interest
●
In the main Navigation menu, press the
POI function button and then
Other POI .
● Press the Options
function button and se-
lect the search type for the desired points of
interest.
View Press the
function button in the main Nav-
igation menu.
Function button: effect
2D Map display in two dimensions (conven-
tional).
Function button: effect
3D
Map display in three dimensions (bird's
eye view).
Buildings are also displayed in three di-
mensions. The places of interest and
well-known buildings are shown in detail
and in colour.
a)To display the destination on the map.
a)To display the route on the map.
Auto/
Day/NightTo change between day and night for-
mat.
Split screenPress to display the split screen
››› page 46.
Show POIDisplay points of interest on the map.
a)
This function button is only displayed with route guidance ac-
tivated.
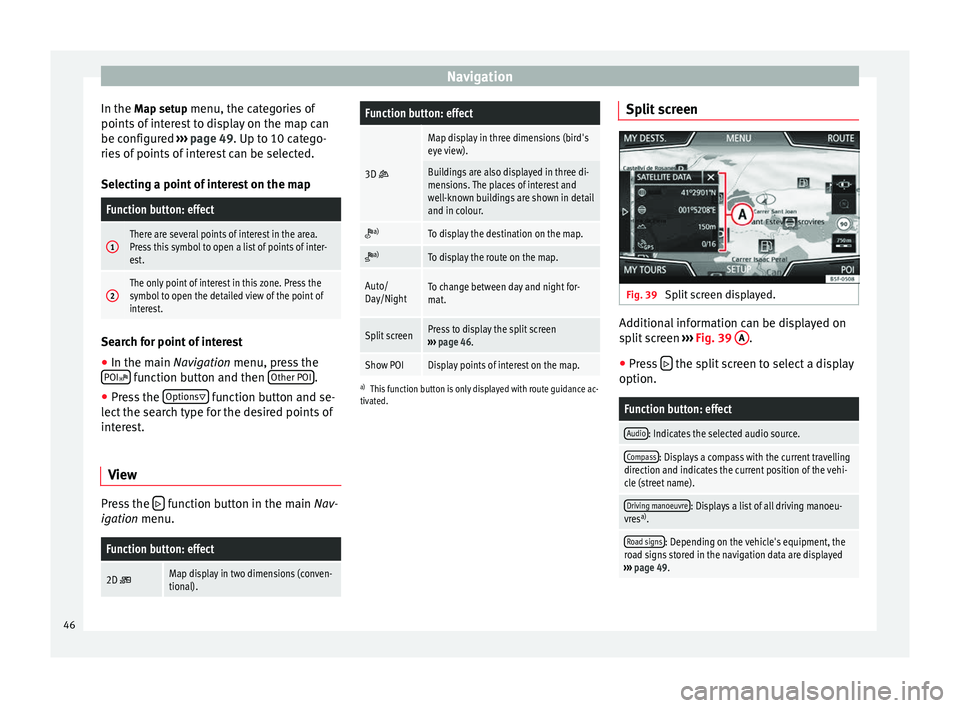
Split screen Fig. 39
Split screen displayed. Additional information can be displayed on
split screen
››› Fig. 39 A .
● Press the split screen to select a display
option.
Function button: effect
Audio: Indicates the selected audio source.
Compass: Displays a compass with the current travelling
direction and indicates the current position of the vehi-
cle (street name).
Driving manoeuvre: Displays a list of all driving manoeu-
vres a)
.
Road signs: Depending on the vehicle's equipment, the
road signs stored in the navigation data are displayed
››› page 49. 46
Page 49 of 84

NavigationFunction button: effect
Satellite data: current vehicle position in coordinates and
GPS status (satellite reception).
a) This function button is only displayed with route guidance ac-
tivated.
Press the function button to deactivate the
split screen.
Map display Fig. 40
Messages and function buttons on
the map display. Function buttons and messages on the map
display.
To activate function buttons
and , press
function button .
Function button: effect
To select automatic scaling. If the function is
active, the symbol is displayed in blue.
Current altitude indicator.
View map scale. Turn the setup button to mod-
ify the scale of the map.
To change the orientation of the map (north-
facing or direction of travel). This function is
only available in 2D mode.
To centre the vehicle position on the map.
To centre the destination on the map. This
function button is only displayed if
Display
destination on map is selected ››› page 46.
Briefly zooms in on the map. After a few sec-
onds, it automatically returns to the last selec-
ted scale.
Traffic reports and dynamic route
guidance (TRAFFIC)
The Infotainment system constantly receives
traffic reports (TMC/TMCpro) in the back-
ground, provided a TMC traffic news station
can be received at the current location. The
station being listened to does not have to be
the traffic news station.
TMC traffic reports are displayed on the map
with symbols
››› page 48, Traffic reports on
map (selection) and are required for dynamic r
out
e guidance
››› page 47, Dynamic route
guidance
.
List of available traffic reports
● Press the TRAFFIC button on the Infotain-
ment system to display a list of the current
traffic reports.
● Press the OPTIONS function button and
then select All or Route.
Function button: effect
All: This will display all the traffic reports received.
Route: This will display the traffic reports received that
affect the calculated route. Dynamic route guidance
In order for dynamic route guidance to func-
tion,
Dynamic route
must be activated in the
route options ›››
page 49.
If during route guidance a traffic report is re-
ceived that affects the route being travelled,
an alternative route will be searched for if the
Infotainment system calculates that time can
be saved.
If it calculates that time will not be saved us-
ing the alternative route, it will continue on
the route with the traffic congestion. An an-
nouncement will be made in each case. »
47
Page 50 of 84
Navigation
Shortly before arriving at the announced con-
gested traffic, it will be announced once
again.
Avoiding congestion by following the instruc-
tions of a traffic report does not always save
time as the alternate roads may be at a
standstill. The quality of the dynamic route
guidance depends on the information con-
tained in the traffic reports.
The remainder of the route to be travelled
may be manually excluded to cause a new
route calculation ››› page 43.
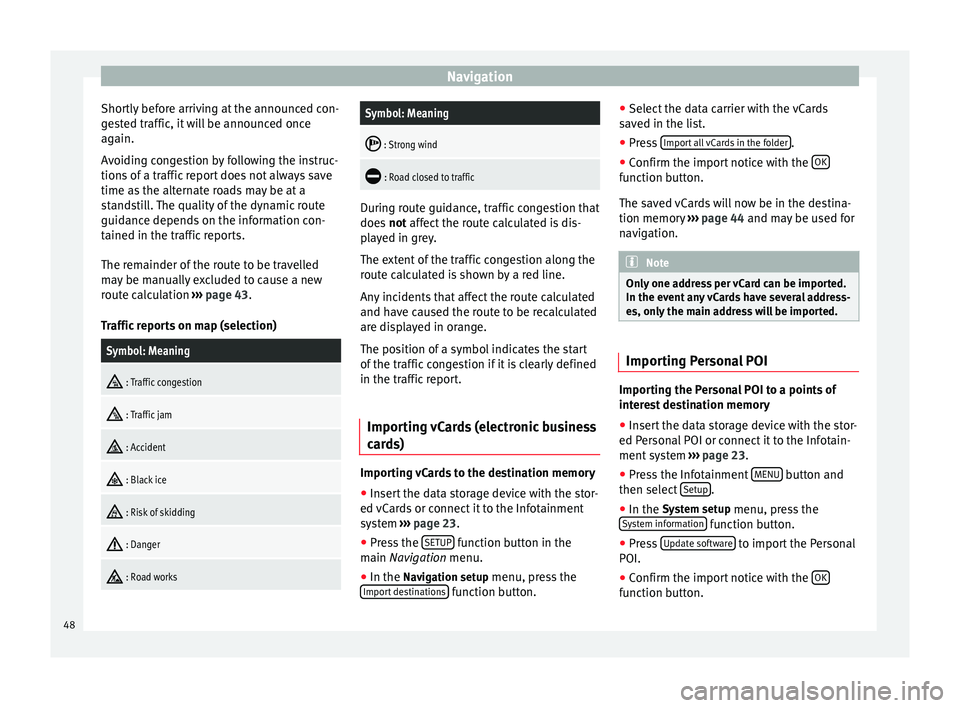
Traffic reports on map (selection)Symbol: Meaning
: Traffic congestion
: Traffic jam
: Accident
: Black ice
: Risk of skidding
: Danger
: Road works
Symbol: Meaning
: Strong wind
: Road closed to traffic
During route guidance, traffic congestion that
does
not affect the route calculated is dis-
p l
ayed in grey.
The extent of the traffic congestion along the
route calculated is shown by a red line.
Any incidents that affect the route calculated
and have caused the route to be recalculated
are displayed in orange.
The position of a symbol indicates the start
of the traffic congestion if it is clearly defined
in the traffic report.
Importing vCards (electronic business
cards) Importing vCards to the destination memory
● Insert the data storage device with the stor-
ed vCards or connect it to the Infotainment
system ›››
page 23 .
● Pr e
ss the SETUP function button in the
main Navigation
menu.
● In the Nav
igation setup menu, press the
Import destinations function button.●
Select the data carrier with the vCards
saved in the list.
● Press Import all vCards in the folder .
● Confirm the import notice with the OK function button.
The saved vCards will now be in the destina-
tion memory
››› page 44 and may be used for
n av
igation. Note
Only one address per vCard can be imported.
In the event any vCards have several address-
es, only the main address will be imported. Importing Personal POI
Importing the Personal POI to a points of
interest destination memory
● Insert the data storage device with the stor-
ed Personal POI or connect it to the Infotain-
ment system ›››
page 23 .
● Pr e
ss the Infotainment MENU button and
then select Setup .
● In the System setup
menu, press the
System information function button.
● Press Update software to import the Personal
POI.
● Confirm the import notice with the OK function button.
48
Page 51 of 84

Navigation
The stored Personal POI are now in the points
of interest destination memory ››› page 45
and can be used for navigation purposes.
The stored Personal POI can be deleted in the
Navigation Setup menu ››› page 49.
Navigation with images Fig. 41
Images main menu. Selecting an image and starting route
guidance
Bear in mind the requirements and formats of
the compatible images
››› page 23.
● Insert the data storage device with the stor-
ed images or connect it to the Infotainment
system.
● Press the Infotainment system MENU but-
ton and then select Images .●
Press the SOURCE
››› Fig. 41 function button
and sel ect
the data storage device where the
images are stored.
● Select the desired image.
● If the image displayed was taken using GPS
localisation, the function button will ap-
pear. Press to start route guidance.
Road sign indicators The road sign indicators must be active in the
Navigation Setup menu ››› page 49.
If road signs for the road being travelled are
stored in the navigation data, the system can
show them on the map display (e.g. a speed
restriction).
Please bear in mind how recent the naviga-
tion data is and the limitations of the system
››› page 40
!
R out
e guidance in demo mode If demo mode is activated in the
Setup Navi-
gation menu ›››
page 49 , an additional pop-
up w indo
w opens when you start route guid-
ance.
● Pressing the Demo mode function button
starts a “virtual route guidance” to the desti-
nation you have entered. ●
If you press the Normal function button, a
“real route guidance” starts.
The sequence of events and the operations in
virtual route guidance are similar to those in
real route guidance.
Virtual route guidance is repeated when you
reach the fictitious destination and always
starts again from the starting point if not
aborted beforehand.
If the starting point for demo mode has been
defined manually in the Setup Navigation
menu, virtual route guidance will start from
the position set.
A manually entered starting point is overwrit-
ten with the current vehicle location if the ve-
hicle moves off. Note
Disable demo mode after use, otherwise you
will be prompted to choose between virtual
and normal route guidance each time you
start route guidance. Navigation setup
●
Press the SETUP function button in the
main Navigation
menu.
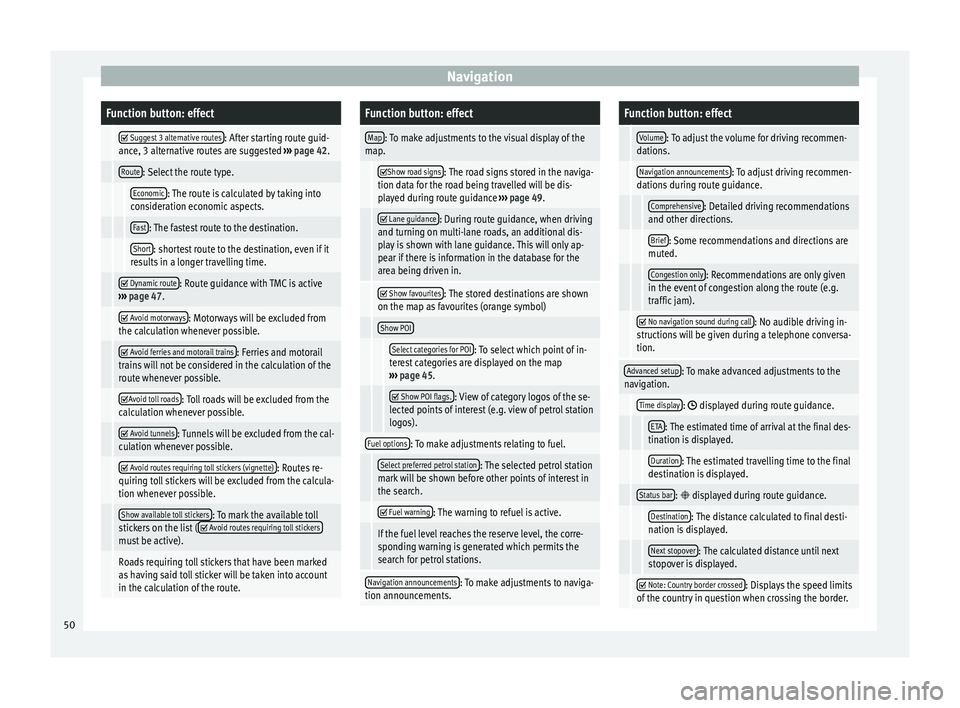
Function button: effect
Route options: To make adjustments to route calculation.» 49
Page 52 of 84
NavigationFunction button: effect
Suggest 3 alternative routes: After starting route guid-
ance, 3 alternative routes are suggested ››› page 42.
Route: Select the route type.
Economic: The route is calculated by taking into
consideration economic aspects.
Fast: The fastest route to the destination.
Short: shortest route to the destination, even if it
results in a longer travelling time.
Dynamic route: Route guidance with TMC is active
››› page 47.
Avoid motorways: Motorways will be excluded from
the calculation whenever possible.
Avoid ferries and motorail trains: Ferries and motorail
trains will not be considered in the calculation of the
route whenever possible.
Avoid toll roads: Toll roads will be excluded from the
calculation whenever possible.
Avoid tunnels: Tunnels will be excluded from the cal-
culation whenever possible.
Avoid routes requiring toll stickers (vignette): Routes re-
quiring toll stickers will be excluded from the calcula-
tion whenever possible.
Show available toll stickers: To mark the available toll
stickers on the list ( Avoid routes requiring toll stickersmust be active).
Roads requiring toll stickers that have been marked
as having said toll sticker will be taken into account
in the calculation of the route.
Function button: effect
Map: To make adjustments to the visual display of the
map.
Show road signs: The road signs stored in the naviga-
tion data for the road being travelled will be dis-
played during route guidance ››› page 49.
Lane guidance: During route guidance, when driving
and turning on multi-lane roads, an additional dis-
play is shown with lane guidance. This will only ap-
pear if there is information in the database for the
area being driven in.
Show favourites: The stored destinations are shown
on the map as favourites (orange symbol)
Show POI
Select categories for POI: To select which point of in-
terest categories are displayed on the map
››› page 45.
Show POI flags.: View of category logos of the se-
lected points of interest (e.g. view of petrol station
logos).
Fuel options: To make adjustments relating to fuel.
Select preferred petrol station: The selected petrol station
mark will be shown before other points of interest in
the search.
Fuel warning: The warning to refuel is active.
If the fuel level reaches the reserve level, the corre-
sponding warning is generated which permits the
search for petrol stations.
Navigation announcements: To make adjustments to naviga-
tion announcements.
Function button: effect
Volume: To adjust the volume for driving recommen-
dations.
Navigation announcements: To adjust driving recommen-
dations during route guidance.
Comprehensive: Detailed driving recommendations
and other directions.
Brief: Some recommendations and directions are
muted.
Congestion only: Recommendations are only given
in the event of congestion along the route (e.g.
traffic jam).
No navigation sound during call: No audible driving in-
structions will be given during a telephone conversa-
tion.
Advanced setup: To make advanced adjustments to the
navigation.
Time display: displayed during route guidance.
ETA: The estimated time of arrival at the final des-
tination is displayed.
Duration: The estimated travelling time to the final
destination is displayed.
Status bar: displayed during route guidance.
Destination: The distance calculated to final desti-
nation is displayed.
Next stopover: The calculated distance until next
stopover is displayed.
Note: Country border crossed: Displays the speed limits
of the country in question when crossing the border. 50
Page 53 of 84
NavigationFunction button: effect
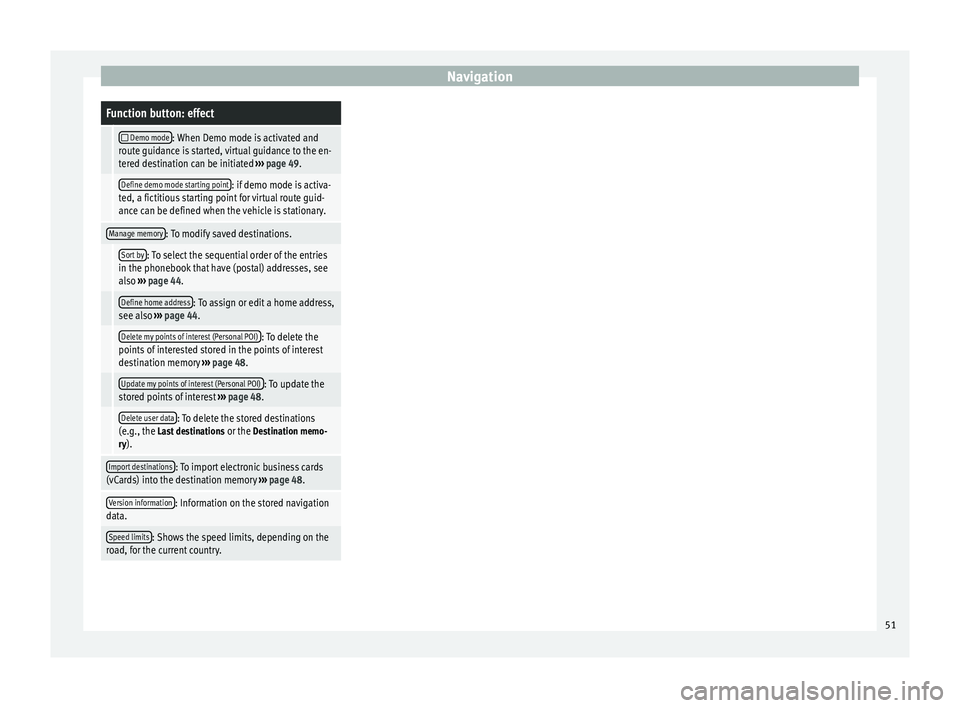
Demo mode: When Demo mode is activated and
route guidance is started, virtual guidance to the en-
tered destination can be initiated ››› page 49.
Define demo mode starting point: if demo mode is activa-
ted, a fictitious starting point for virtual route guid-
ance can be defined when the vehicle is stationary.
Manage memory: To modify saved destinations.
Sort by: To select the sequential order of the entries
in the phonebook that have (postal) addresses, see
also ››› page 44.
Define home address: To assign or edit a home address,
see also ››› page 44.
Delete my points of interest (Personal POI): To delete the
points of interested stored in the points of interest
destination memory ››› page 48.
Update my points of interest (Personal POI): To update the
stored points of interest ››› page 48.
Delete user data: To delete the stored destinations
(e.g., the Last destinations or the Destination memo-
ry).
Import destinations: To import electronic business cards
(vCards) into the destination memory ››› page 48.
Version information: Information on the stored navigation
data.
Speed limits: Shows the speed limits, depending on the
road, for the current country. 51
Page 68 of 84
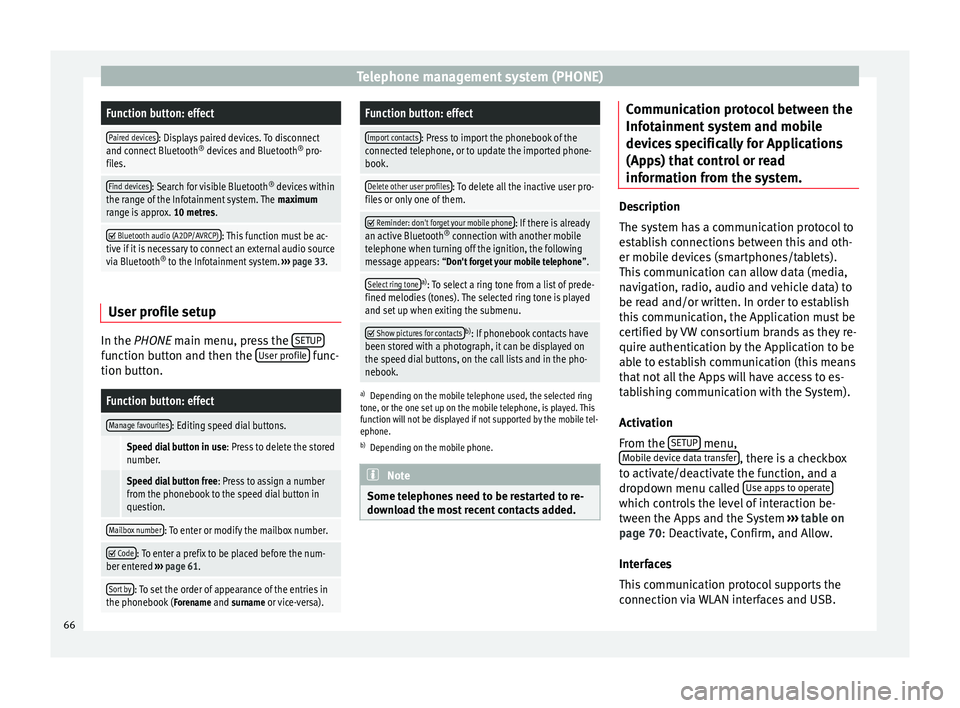
Telephone management system (PHONE)Function button: effect
Paired devices: Displays paired devices. To disconnect
and connect Bluetooth ®
devices and Bluetooth ®
pro-
files.
Find devices: Search for visible Bluetooth ®
devices within
the range of the Infotainment system. The maximum
range is approx. 10 metres.
Bluetooth audio (A2DP/AVRCP): This function must be ac-
tive if it is necessary to connect an external audio source
via Bluetooth ®
to the Infotainment system. ››› page 33. User profile setup
In the
PHONE
main menu, press the S
ETUPfunction button and then the
User profile func-
tion button.
Function button: effect
Manage favourites: Editing speed dial buttons.
Speed dial button in use : Press to delete the stored
number.
Speed dial button free : Press to assign a number
from the phonebook to the speed dial button in
question.
Mailbox number: To enter or modify the mailbox number.
Code: To enter a prefix to be placed before the num-
ber entered ››› page 61.
Sort by: To set the order of appearance of the entries in
the phonebook ( Forename and surname or vice-versa).
Function button: effect
Import contacts: Press to import the phonebook of the
connected telephone, or to update the imported phone-
book.
Delete other user profiles: To delete all the inactive user pro-
files or only one of them.
Reminder: don't forget your mobile phone: If there is already
an active Bluetooth ®
connection with another mobile
telephone when turning off the ignition, the following
message appears: “Don't forget your mobile telephone ”.
Select ring tonea)
: To select a ring tone from a list of prede-
fined melodies (tones). The selected ring tone is played
and set up when exiting the submenu.
Show pictures for contactsb)
: If phonebook contacts have
been stored with a photograph, it can be displayed on
the speed dial buttons, on the call lists and in the pho-
nebook.
a) Depending on the mobile telephone used, the selected ring
tone, or the one set up on the mobile telephone, is played. This
function will not be displayed if not supported by the mobile tel-
ephone.
b) Depending on the mobile phone. Note
Some telephones need to be restarted to re-
download the most recent contacts added. Communication protocol between the
Infotainment system and mobile
devices specifically for Applications
(Apps) that control or read
information from the system.
Description
The system has a communication protocol to
establish connections between this and oth-
er mobile devices (smartphones/tablets).
This communication can allow data (media,
navigation, radio, audio and vehicle data) to
be read and/or written. In order to establish
this communication, the Application must be
certified by VW consortium brands as they re-
quire authentication by the Application to be
able to establish communication (this means
that not all the Apps will have access to es-
tablishing communication with the System).
Activation
From the
SETUP menu,
Mobile device data transfer , there is a checkbox
to activate/deactivate the function, and a
dropdown menu called Use apps to operate which controls the level of interaction be-
tween the Apps and the System
›››
table on
page 70 : Deactivate, Confirm, and Allow.
Int er
faces
This communication protocol supports the
connection via WLAN interfaces and USB.
66