display Seat Leon SC 2014 NAVI SYSTEM PLUS
[x] Cancel search | Manufacturer: SEAT, Model Year: 2014, Model line: Leon SC, Model: Seat Leon SC 2014Pages: 84, PDF Size: 2.08 MB
Page 32 of 84
Audio and Media Mode
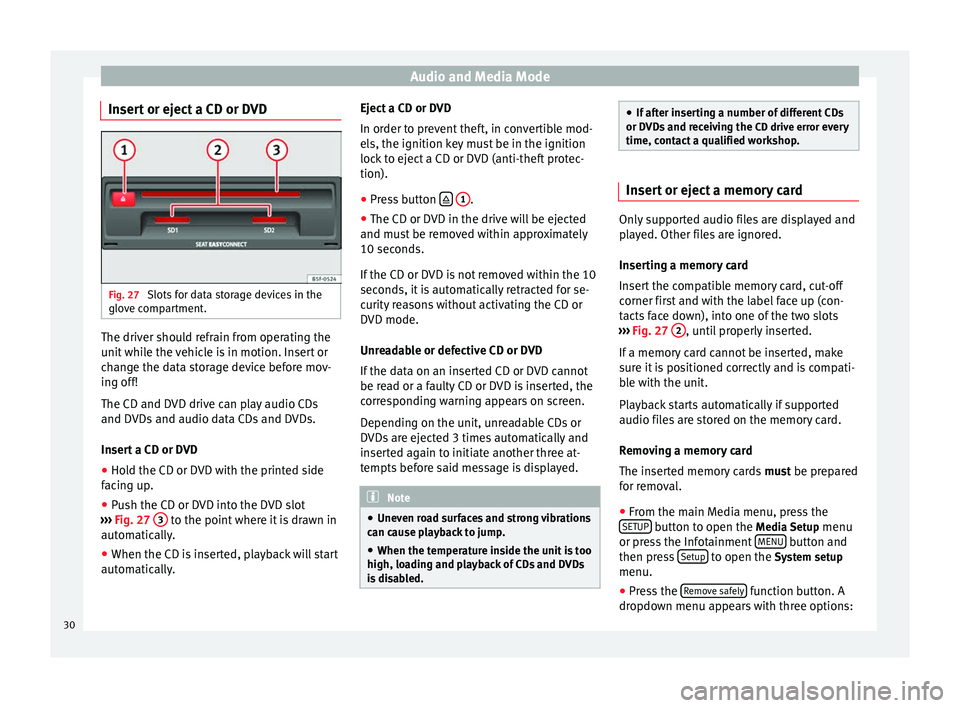
Insert or eject a CD or DVD Fig. 27
Slots for data storage devices in the
glove compartment. The driver should refrain from operating the
unit while the vehicle is in motion. Insert or
change the data storage device before mov-
ing off!
The CD and DVD drive can play audio CDs
and DVDs and audio data CDs and DVDs.
Insert a CD or DVD
● Hold the CD or DVD with the printed side
facing up.
● Push the CD or DVD into the DVD slot
››› Fig. 27 3 to the point where it is drawn in
automatically.
● When the CD is inserted, playback will start
automatically. Eject a CD or DVD
In order to prevent theft, in convertible mod-
els, the ignition key must be in the ignition
lock to eject a CD or DVD (anti-theft protec-
tion).
●
Press button
1 .
● The CD or DVD in the drive will be ejected
and must be removed within approximately
10 seconds.
If the CD or DVD is not removed within the 10
seconds, it is automatically retracted for se-
curity reasons without activating the CD or
DVD mode.
Unreadable or defective CD or DVD
If the data on an inserted CD or DVD cannot
be read or a faulty CD or DVD is inserted, the
corresponding warning appears on screen.
Depending on the unit, unreadable CDs or
DVDs are ejected 3 times automatically and
inserted again to initiate another three at-
tempts before said message is displayed. Note
● Uneven road surfaces and strong vibrations
can cause playback to jump.
● When the temperature inside the unit is too
high, loading and playback of CDs and DVDs
is disabled. ●
If after inserting a number of different CDs
or DVDs and receiving the CD drive error every
time, contact a qualified workshop. Insert or eject a memory card
Only supported audio files are displayed and
played. Other files are ignored.
Inserting a memory card
Insert the compatible memory card, cut-off
corner first and with the label face up (con-
tacts face down), into one of the two slots
››› Fig. 27 2 , until properly inserted.
If a memory card cannot be inserted, make
sure it is positioned correctly and is compati-
ble with the unit.
Playback starts automatically if supported
audio files are stored on the memory card.
Removing a memory card
The inserted memory cards must be prepared
for removal.
● From the main Media menu, press the
SETUP button to open the Media Setup
menu
or press the Infotainment MENU button and
then press Setup to open the System setup
menu.
● Press the Remove safely function button. A
dropdown menu appears with three options:
30
Page 33 of 84
Audio and Media Mode
SD Card1, SD Card 2 and USB. After correctly
ejecting the memory card from the system,
the function button becomes inactive (grey
colour).
● Press the inserted memory card. The mem-
ory card “jumps” to the eject position.
● Remove the memory card.
Unreadable memory card
If a memory card is inserted and the data
cannot be read, the following warning ap-
pears: There are no playable files.
External data storage device
connected to USB port Depending on the equipment and the coun-
try, there may be a USB port in the glove box
(car instruction manual)
Audio files on an external data storage de-
vice connected to the USB port
can be
played and controlled via the Infotainment
system.
Where this manual refers to external data
storage devices, this means USB mass stor-
age devices containing supported audio
files, such as MP3 players, iPods™ and USB
sticks.
Only supported audio files are displayed and
played. Other files are ignored. Playback starts automatically if there are sup-
ported and readable audio files on the data
storage device.
Further operation of the external data medi-
um (changing track, selecting tracks and
playback modes) is described in the appro-
priate chapters of this manual
››› page 23.
Notes and restrictions
Compatibility with Apple™ devices and other
media players depends on the unit.
The USB port supplies the usual USB volt-
age of 5 volts for a USB connection.
External hard disks with a capacity greater
than 32 GB must be reformatted for the
FAT32 file system in some circumstances. You
will find the necessary software and informa-
tion on the Internet.
Take into account all other instructions and
limitations regarding requirements for media
sources ››› page 23 . R
equir ements
Compatible data me-
diaReadable files and for-
mats
Data storage device with
specification compliant
with USB 2.0.
Data storage device
FAT16 (< 2 GB) or FAT32 (> 2 GB) file system.
iPods™ a)
, iPads™ a)
and
iPhones™ a)
from differ-
ent generations.
MTP players with the
“PlaysForSure” or “Ready-
ForVista” trademarks.– MP3 files (.mp3) with bit
rates of between
32 and 320 kbit/s or with
variable transfer rates.
– WMA files(.wma) up to
9.2 mono/stereo without
copy protection.
– AAC files
(.m4a, .m4b, .mp4
and .aac).
– Playlists in M3U, PLS,
ASX and WPL formats.
– Playlists must not exceed
20 kB or more than 1000
entries.
– File names and paths
must not exceed 256 char-
acters.
Read and bear in mind the manufacturer's instruction
manual for the external data storage device.
a) iPod™, iPad™ and iPhone™ are registered trademarks of Ap-
ple Inc.
iPod™, iPad™ and iPhone™
Depending on the country and the equip-
ment, iPods™, iPads™ or iPhones™ can be
connected using the device's USB cable to
the USB port
of the vehicle and used as
audio sources.
After connecting an iPod™, iPad™ or
iPhone™, the specific list views of the iPod »
31
Page 34 of 84
Audio and Media Mode
are displayed in the upper selection level
( Playlists,
Ar
ti sts, Albums, Tracks,
P
odcasts etc.).
Files cannot be imported from an iPod™,
iPa
d™ or an iPhone™.
Possible error messages after connecting an
external data storage device
Error mes-
sageCauseProcedure
The device is
not compati-
bleThe external
data carrier
cannot be
played or com-
munication is
not possible
with the adapt-
er cable being
used.Check the connec-
tion and make sure
the external data
medium is working
correctly.
If possible, update
the data storage de-
vice software.
The device
does not workCommunication
fault.Check the connec-
tion and make sure
the external data
medium is working
correctly.
Due to the large number of different data storage devi-
ces and various iPod™, iPad™ and iPhone™ genera-
tions available, it is not possible to guarantee fault-free
operation of all functions described here. Disconnecting
Any connected data storage devices
must be
prepared before their disconnection in order
to remove them. ●
From the main Media menu, press the
SETUP button to open the
Media Setup
menu
or pr e
ss the Infotainment MENU button and
then press Setup to open the System setup
menu.
● Press the Remove safely function button. A
dropdown menu appears with three options:
SD Card1, SD Card 2 and USB. After correctly
ejecting the data storage device from the sys-
tem, the function button becomes inactive
(grey colour).
● Now the data storage device can be discon-
nected. Note
● Do not connect an external media player at
the same time to play music via Bluetooth ®
and via the USB port with the Infotain-
ment system, as this could cause playback
limitations.
● If the external player is an Apple device™,
it cannot be simultaneously connected by
USB and by Bluetooth.
● If a connected device is not recognised, dis-
connect all the connected devices and try
connecting the device again.
● Do not use memory card adaptors, USB ex-
tension cords or USB hubs! External audio source connected to
the AUX-IN multimedia socket
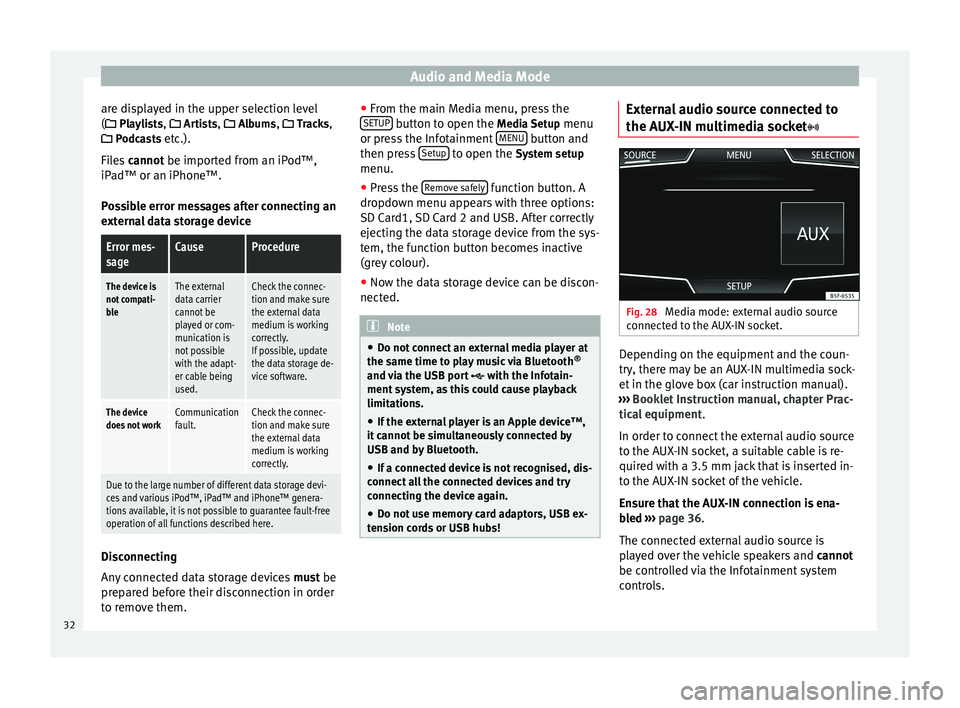
Fig. 28
Media mode: external audio source
connected to the AUX-IN socket. Depending on the equipment and the coun-
try, there may be an AUX-IN multimedia sock-
et in the glove box (car instruction manual).
››› Booklet Instruction manual, chapter Prac-
tical equipment .
In order to connect the external audio source
to the AUX-IN socket, a suitable cable is re-
quired with a 3.5 mm jack that is inserted in-
to the AUX-IN socket of the vehicle.
Ensure that the AUX-IN connection is ena-
bled
›
›› p
age 36.
The connected external audio source is
played over the vehicle speakers and cannot
be controlled via the Infotainment system
controls.
32
Page 37 of 84
Audio and Media Mode
■ Track. mp3 1)
■ Artists
■Unknown artists
■ Unknown albums
■ Track. mp3 1)
Functions and progress display during the
copying operation
While copying, an animation is displayed
along with the progress percentage on the
import screen.
Audio data CD : It is not possible to copy and
p l
ay files at the same time.
● Press the Cancel function button to end the
import of the whole track that is currently be-
ing imported.
● To obtain information on the status of the
import, press the Information function button.
● Press the BACK function button to close
the import screen with the progress informa-
tion.
● When the file import ends, the following
message will appear: All files imported.
Deleting files
● In Media mode, press the SETUP function
button and then select Manage jukebox .●
Press the DELETE function button.
● Activate the check boxes to the right of the
files or folders to be deleted.
● If Select all is activated, all the files and
folders on the data storage device will be de-
leted.
● Press the DELETE function button. The files
and folders will be deleted according to the
selection made.
● When the files have been deleted, the fol-
lowing message will appear: All files deleted.
● Press the BACK function button to close
the menu.
Opening stored audio and video files
● Change to Jukebox (SSD) content
››› page 28 .
When s t
oring the tracks, they are stored un-
der different categories and lists according to
the information available.
The tracks saved can be checked and opened
from these lists according to different catego-
ries.
Jukebox
● Track list
● Artist ●
Album
● Music genre
● Title
● Video
● Unreadable files (an unsupported file has
been imported). Note
● If the Infotainment system cancels a copy-
ing operation, check the storage space on the
internal hard drive and check the data stor-
age device.
● Due to copyright laws, before any change in
ownership of the Infotainment system, all
files stored on the jukebox must be deleted. 1)
The name and extension of the file are examples.
35
Page 39 of 84
Audio and Media Mode
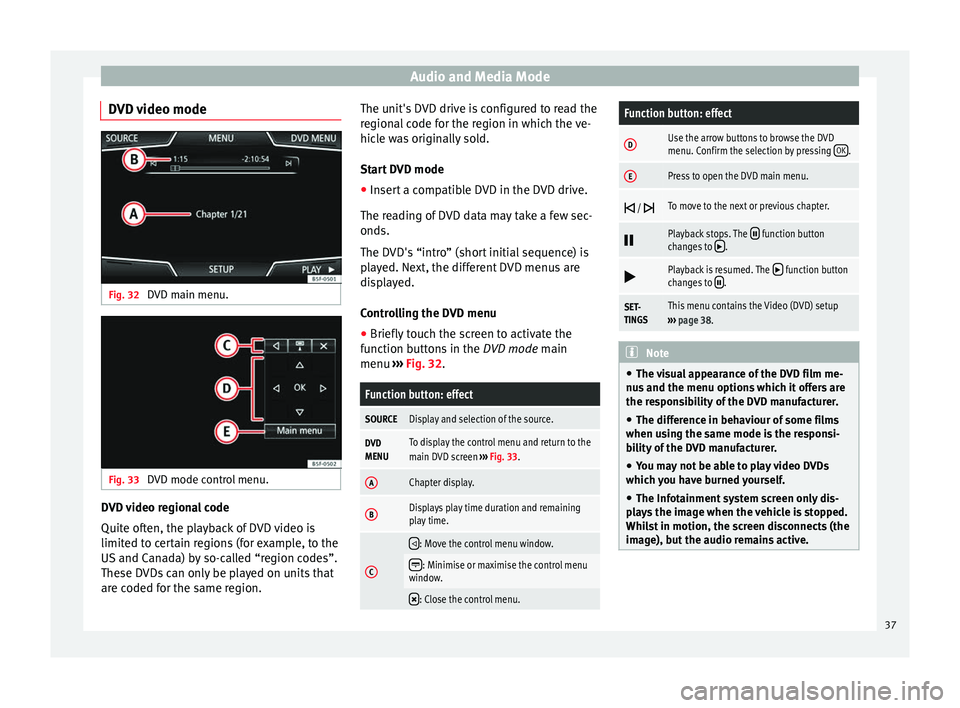
DVD video mode Fig. 32
DVD main menu. Fig. 33
DVD mode control menu. DVD video regional code
Quite often, the playback of DVD video is
limited to certain regions (for example, to the
US and Canada) by so-called “region codes”.
These DVDs can only be played on units that
are coded for the same region. The unit's DVD drive is configured to read the
regional code for the region in which the ve-
hicle was originally sold.
Start DVD mode
● Insert a compatible DVD in the DVD drive.
The reading of DVD data may take a few sec-
onds.
The DVD's “intro” (short initial sequence) is
played. Next, the different DVD menus are
displayed.
Controlling the DVD menu
● Briefly touch the screen to activate the
function buttons in the DVD mode main
menu ›
›
› Fig. 32.
Function button: effect
SOURCEDisplay and selection of the source.
DVD
MENUTo display the control menu and return to the
main DVD screen ››› Fig. 33.
AChapter display.
BDisplays play time duration and remaining
play time.
C
: Move the control menu window.
: Minimise or maximise the control menu
window.
: Close the control menu.
Function button: effect
DUse the arrow buttons to browse the DVD
menu. Confirm the selection by pressing
OK.
EPress to open the DVD main menu.
/ To move to the next or previous chapter.
Playback stops. The function button
changes to .
Playback is resumed. The function button
changes to .
SET-
TINGSThis menu contains the Video (DVD) setup
››› page 38. Note
● The visual appearance of the DVD film me-
nus and the menu options which it offers are
the responsibility of the DVD manufacturer.
● The difference in behaviour of some films
when using the same mode is the responsi-
bility of the DVD manufacturer.
● You may not be able to play video DVDs
which you have burned yourself.
● The Infotainment system screen only dis-
plays the image when the vehicle is stopped.
Whilst in motion, the screen disconnects (the
image), but the audio remains active. 37
Page 40 of 84
Audio and Media Mode
DVD video setup On the DVD mode
main menu, press the
S
ETUP function and then select the option
Video setup (DVD).
Function button: effect
Format: To select the screen format. If Automatic is selec-
ted, it adjusts automatically to the optimal format for the
screen.
Audio channel: select language for acoustic voice output.
Subtitles: To select the subtitle language.
Enter/change PIN for parental settings: Parental settings pass-
word.
Parental settings: To select the level of protection for DVD
playback. The options in the Video setup (DVD) menu
may vary depending on the DVD or the chap-
ter currently being played.
The available audio language channels and
subtitles depend on the inserted DVD.
All or a part of the DVD video content may be
protected by means of a password (PIN) if the
DVD is compatible with parental settings. Fur-
thermore, the level of protection can be set
according to age with 1 being the least re-
strictive (appropriate for all audiences) and
8, the most restrictive (adults). Images
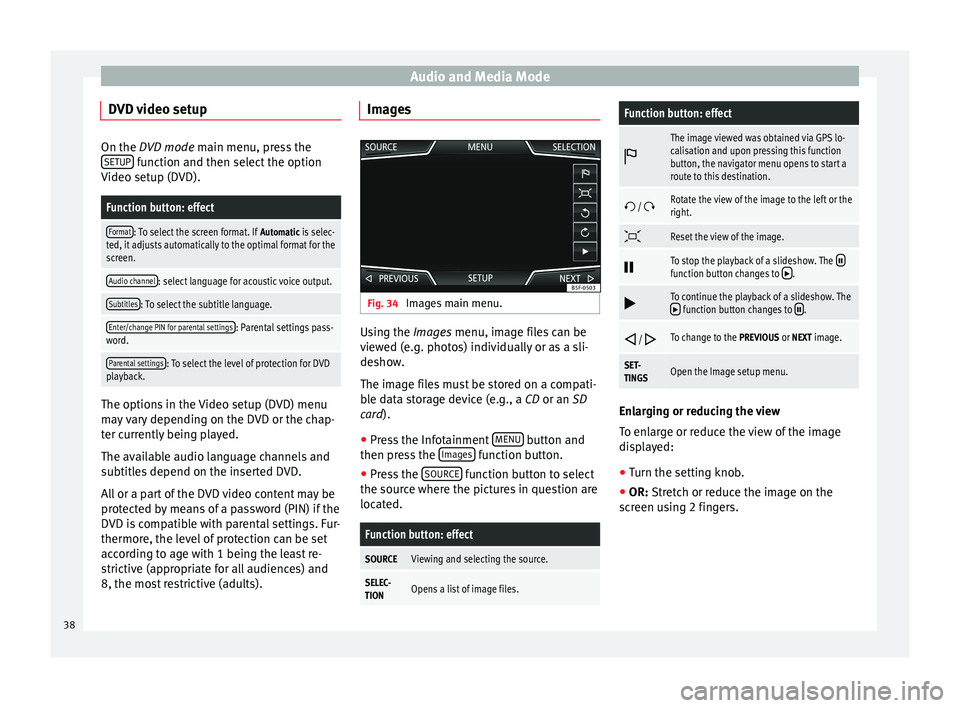
Fig. 34
Images main menu. Using the
Images
menu, image files can be
v
iewed (e.g. photos) individually or as a sli-
deshow.
The image files must be stored on a compati-
ble data storage device (e.g., a
CD or an SD
card).
● Press the Infotainment MENU button and
then press the Images function button.
● Press the SOURCE function button to select
the source where the pictures in question are
located.
Function button: effect
SOURCEViewing and selecting the source.
SELEC-
TIONOpens a list of image files.
Function button: effect
The image viewed was obtained via GPS lo-
calisation and upon pressing this function
button, the navigator menu opens to start a
route to this destination.
/ Rotate the view of the image to the left or the
right.
Reset the view of the image.
To stop the playback of a slideshow. The function button changes to .
To continue the playback of a slideshow. The function button changes to .
/ To change to the PREVIOUS or NEXT image.
SET-
TINGSOpen the Image setup menu.
Enlarging or reducing the view
To enlarge or reduce the view of the image
displayed:
●
Turn the setting knob.
● OR: Stretch or reduce the image on the
s c
reen using 2 fingers.
38
Page 41 of 84
Audio and Media Mode
Image setup Open the Image setup menu
● In the Images main menu, press the SETUPfunction button.
Function button: effect
View image: To adjust the viewing format of the image.
Automatic: The images are shown in scale in rela-
tion to the size of the screen (the image may not be
displayed in its entirety).
Complete: The full images are displayed on the
screen.
Display time: To adjust the display time of the images
during a slideshow.
Repeat slideshow: The active slideshow will be repeated
indefinitely. 39
Page 43 of 84
Navigation
● In the System setup menu, press the
S y
stem information function button.
● Press Update software to import the stored
navigation data.
● Follow the instructions displayed on the
screen.
Once installed, the memory card can be re-
moved. The memory card must be prepared
for removal ››› page 23. CAUTION
Do not remove the memory card while the
navigation data is being installed. The memo-
ry card may be irreparably damaged! Note
● The navigation memory card may not be
used as memory storage for other files. The
Infotainment system will not recognise the
files saved on it.
● SEAT recommends a CLASS 10 1)
memory
card for the use of navigation data. The use of
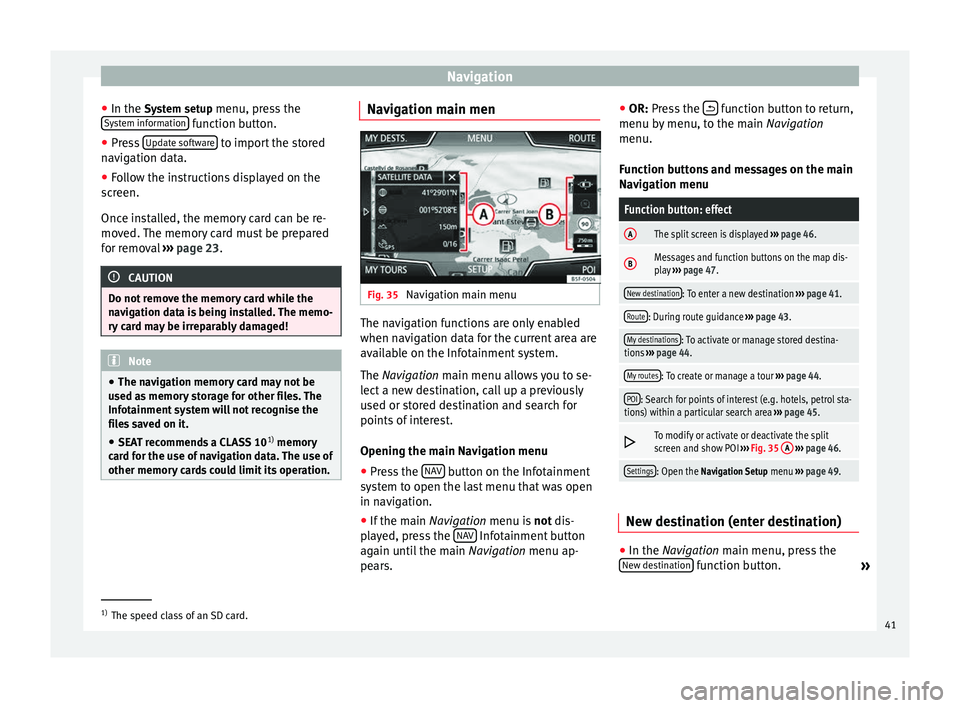
other memory cards could limit its operation. Navigation main men
Fig. 35
Navigation main menu The navigation functions are only enabled
when navigation data for the current area are
available on the Infotainment system.
The
Navigation
main menu allows you to se-
l
ect a new destination, call up a previously
used or stored destination and search for
points of interest.
Opening the main Navigation menu
● Press the NAV button on the Infotainment
system to open the last menu that was open
in navigation.
● If the main Navigation menu is
not
dis-
p
layed, press the NAV Infotainment button
again until the main Navigation menu ap-
pe ar
s. ●
OR: Press the function button to return,
menu by menu, to the main Navigation
menu.
Function buttons and messages on the main
Navigation menu
Function button: effect
AThe split screen is displayed ››› page 46.
BMessages and function buttons on the map dis-
play ››› page 47.
New destination: To enter a new destination ››› page 41.
Route: During route guidance ››› page 43.
My destinations: To activate or manage stored destina-
tions ››› page 44.
My routes: To create or manage a tour ››› page 44.
POI: Search for points of interest (e.g. hotels, petrol sta-
tions) within a particular search area ››› page 45.
To modify or activate or deactivate the split
screen and show POI
››› Fig. 35 A
››› page 46.
Settings: Open the Navigation Setup menu ››› page 49. New destination (enter destination)
●
In the Navigation
main menu, press the
New de
stination function button.
»1)
The speed class of an SD card.
41
Page 44 of 84
Navigation
● Press the Options function button and se-
lect the required type of destination entry
( Address, Point of Interest
or On the map).
Ad dr
ess
After entering a country and a town, you can
start navigating towards the centre of the se-
lected town.
When narrowing down the destination ad-
dress, please note that every entry restricts
the av
ailable range of subsequent selections.
For instance, if the street you are looking for
is not
in the postcode area you have selected
in a previous window, you will not be able to
find the street at the street selection stage.
Function button: effect
Country: To select the desired country.
Location: To enter the desired town or postcode.
Street: To enter the desired street name.
House number: To enter the desired house number.
Dipped beam: To select the desired intersection.
Last destinations: Open the My destinations menu
››› page 44.
Start: Start route guidance to the selected address. Points of Interest (POI)
Start route guidance to a point of interest.
Function button: effect
Search area: To select the search area for the points of in-
terest.
Near current location: The points of interest are
searched for near the current location.
Near destinationa) : The points of interest are
searched for near the destination.
Along the routea) : The points of interest are searched
for along the route.
Near address: The points of interest are searched for
near the address.
Select on map: The points of interest are searched
for near the destination selected on the map. To se-
lect a destination on the map, press the Edit
func-
tion button.
Search category: Select the main category (e.g. Vehicle
and travel), the category (e.g. Airports) and then the de-
sired entry from the list.
Save: To save the selected point of interest in the
destination memory ››› page 44.
Dial number: Establishes a telephone connection to
the number registered under the point of interest.
Start: Starts guided navigation to the selected
point of interest.
Find name: To search for a point of interest by entering
the name or by means of synonyms of categories (e.g.
“Sleep” for hotels and hostels).
a) This function button is only displayed with route guidance ac-
tivated.
Using the
● Select the destination on the map or enter
the GPS coordinates and confirm with OK .
Function button: effect
Save: To save the selected point of interest in the desti-
nation memory ››› page 44.
Edit: To edit a destination or to enter another destina-
tion.
Route options: To adjust route options, see Navigation
Setup ››› page 49.
Start: Starts guided navigation to the selected point of
interest. After starting route guidance
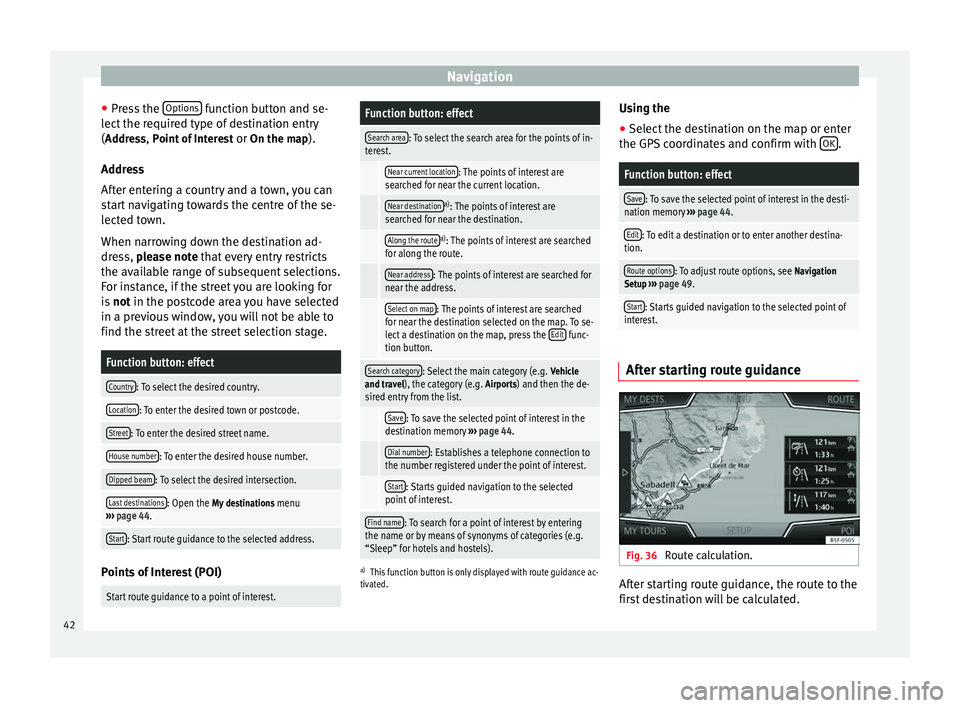
Fig. 36
Route calculation. After starting route guidance, the route to the
first destination will be calculated.
42
Page 45 of 84
Navigation
The calculation will be performed in accord-
ance with the data selected in the Route op- tions menu ››› page 49 .
Af t
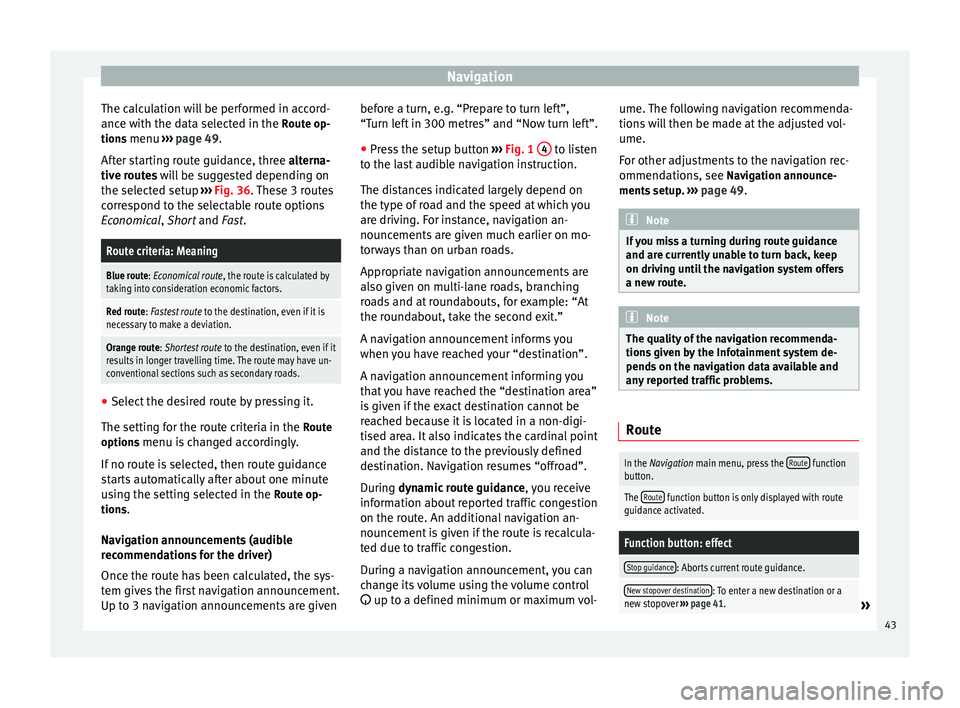
er starting route guidance, three
alterna-
tive routes will be suggested depending on
the selected setup ››› Fig. 36. These 3 routes
correspond to the selectable route options
Economical
, Short and Fast.
Route criteria: Meaning
Blue route: Economical route, the route is calculated by taking into consideration economic factors.
Red route: Fastest route to the destination, even if it is
necessary to make a deviation.
Orange route: Shortest route to the destination, even if it
results in longer travelling time. The route may have un-
conventional sections such as secondary roads. ●
Select the desired route by pressing it.
The setting for the route criteria in the Route
options menu is changed accordingly.
If no route is selected, then route guidance
starts automatically after about one minute
using the setting selected in the Route op-
tions .
Navigation announcements (audible
recommendations for the driver)
Once the route has been calculated, the sys-
tem gives the first navigation announcement.
Up to 3 navigation announcements are given before a turn, e.g. “Prepare to turn left”,
“Turn left in 300 metres” and “Now turn left”.
● Press the setup button ››› Fig. 1 4 to listen
to the last audible navigation instruction.
The distances indicated largely depend on
the type of road and the speed at which you
are driving. For instance, navigation an-
nouncements are given much earlier on mo-
torways than on urban roads.
Appropriate navigation announcements are
also given on multi-lane roads, branching
roads and at roundabouts, for example: “At
the roundabout, take the second exit.”
A navigation announcement informs you
when you have reached your “destination”.
A navigation announcement informing you
that you have reached the “destination area”
is given if the exact destination cannot be
reached because it is located in a non-digi-
tised area. It also indicates the cardinal point
and the distance to the previously defined
destination. Navigation resumes “offroad”.
During dynamic route guidance
,
y
ou receive
information about reported traffic congestion
on the route. An additional navigation an-
nouncement is given if the route is recalcula-
ted due to traffic congestion.
During a navigation announcement, you can
change its volume using the volume control
up to a defined minimum or maximum vol- ume. The following navigation recommenda-
tions will then be made at the adjusted vol-
ume.
For other adjustments to the navigation rec-
ommendations, see Navigation announce-
ments
setup. ››› page 49. Note
If you miss a turning during route guidance
and are currently unable to turn back, keep
on driving until the navigation system offers
a new route. Note
The quality of the navigation recommenda-
tions given by the Infotainment system de-
pends on the navigation data available and
any reported traffic problems. Route
In the Navigation main menu, press the
Route function
button.
The Route function button is only displayed with route
guidance activated.
Function button: effect
Stop guidance: Aborts current route guidance.
New stopover destination: To enter a new destination or a
new stopover ››› page 41.» 43