fuel Seat Leon SC 2014 Owner's Guide
[x] Cancel search | Manufacturer: SEAT, Model Year: 2014, Model line: Leon SC, Model: Seat Leon SC 2014Pages: 284, PDF Size: 5.85 MB
Page 180 of 284
Operation
to be reduced accordingly. The weight of the
vehicle and trailer combination must be re-
duced by 10% for every further 1000 m (or
part thereof). The gross combination weight
is the actual weight of the laden vehicle plus
the actual weight of the laden trailer. When
possible, operate the trailer with the maxi-
mum permitted drawbar load on the ball joint
of the t
owing bracket, but do not exceed the
specified limit.
The figures for trailer weights
and drawbar
loads that are given on the data plate of the
to
wing bracket are for certification purposes
only. The correct figures for your specific
model, which may be lower than these fig-
ures for the towing bracket, are given in the
vehicle documentation or in ››› chapter Tech-
nical Data .
Distributing the load
Distribute loads in the trailer so that heavy
objects are as near to the axle as possible.
Loads carried in the trailer must be secured
to prevent them moving.
Tyre pressure
Set tyre pressure to the maximum permissi-
ble pressure shown on the sticker on the in-
side of the fuel tank flap. Set the tyre pres-
sure of the trailer tyres in accordance with the
trailer manufacturer's recommendations. Exterior mirrors
Check whether you can see enough of the
road behind the trailer with the standard rear
vision mirrors. If this is not the case, you
should have additional exterior mirrors fitted.
Both exterior mirrors should be mounted on
hinged extension brackets. Adjust the mirrors
to give sufficient vision to the rear.
Tow rope
Always use a cable between the vehicle and
the trailer
››› page 178.
Tr
ailer rear lights
The trailer's rear lights should comply with
the statutory safety regulations ››› page 178. WARNING
Never transport people in a trailer. This could
result in fatal accidents. Note
● Towing a trailer places additional demands
on the vehicle. We recommend additional
services between the normal inspection inter-
vals if the vehicle is used frequently for tow-
ing a trailer.
● Find out whether special regulations apply
to towing a trailer in your country. Hitching and connecting the trailer
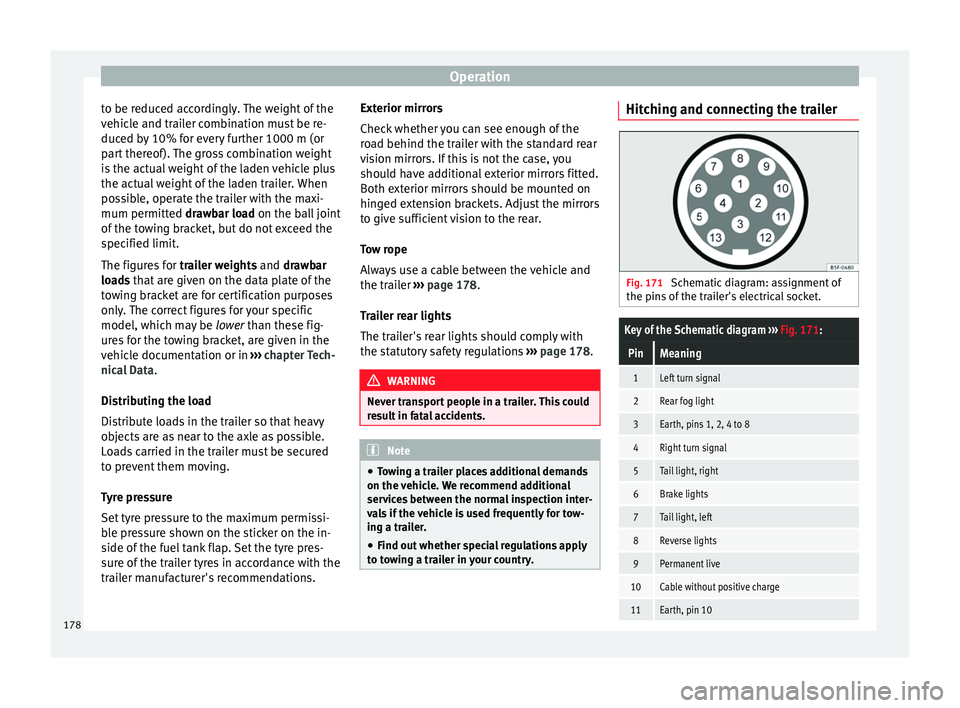
Fig. 171
Schematic diagram: assignment of
the pins of the trailer's electrical socket.
Key of the Schematic diagram ››› Fig. 171:
PinMeaning
1Left turn signal
2Rear fog light
3Earth, pins 1, 2, 4 to 8
4Right turn signal
5Tail light, right
6Brake lights
7Tail light, left
8Reverse lights
9Permanent live
10Cable without positive charge
11Earth, pin 10178
Page 186 of 284

Advice
Automatic car washes
Before going through a car wash, be sure to
take the usual precautions such as closing
the windows and roof. If the vehicle has spe-
cial accessories such as spoilers or a roof
rack or two-way radio aerial, etc., it is advisa-
ble to consult the car wash tunnel operator.
It is best to use a car wash without revolving
bristles if possible.
Washing the vehicle with a high pressure
cleaner
When washing the vehicle with a high-pres-
sure cleaner, always follow the operating in-
structions for the equipment. This applies
particularly to the operating pressure and the
spraying distance . Do not hold the nozzle too
c lo
se to soft materials such as rubber hoses
or seals. The same applies to the parking aid
sensors*, which are located in the rear bump-
er.
Do not use a nozzle that sprays the water out
in a
direct stream or one that has a rotating
jet for forcing off dirt.
Washing the car by hand
When washing the car by hand, use plenty of
water to soften the dirt first, and rinse off as
well as possible.
Then clean the vehicle with a soft sponge,
glove
or brush using only slight pressure.
You should start on the roof and work down. Special car
soap
should only be used for very
persistent dirt.
Rinse the sponge or glove thoroughly and of-
ten.
Wheels, sills and similar should be cleaned
last. Use a second sponge for this. WARNING
● The vehicle should only be washed with the
ignition switched off. Failure to follow this in-
struction could result in an accident.
● Do not clean the underside of chassis, the
inside of wheel arches or wheel trims without
protecting your hands and arms. You may cut
yourself on sharp-edged metal parts. Other-
wise, there is a risk of sustaining cuts.
● When washing the car during the winter
season: water and ice in the brake system
can reduce braking effectiveness: risk of acci-
dent! CAUTION
● Do not wash the vehicle in direct sunlight –
otherwise the paint can be damaged.
● Do not use sponges, abrasive household
sponges or similar to clean insect remains.
This could damage the surface.
● Clean off stubborn dirt (insects, etc.) from
the headlights at regular intervals, for in-
stance when filling the fuel tank. The head-
lights should only be washed with water, do not wipe them with a dry cloth or sponge. It
is best to use soapy water.
● Never wash tyres with a jet that sprays the
water out in a direct stream. This could dam-
age the tyres even if the spray is kept at a
distance and only used for a very short time.
● Before washing the vehicle in an automatic
car wash, please make sure to retract the ex-
terior mirrors to prevent them from being
damaged. Electrically retractable exterior
mirrors must not be folded in or out by hand,
always use the electrical power control. CAUTION
● Before washing the vehicle in an automatic
car wash, please proceed as follows to lock
the wiper arms so that they are not moved to-
wards the top of the windscreen:
–the bonnet must be closed.
– switch the ignition on and off.
– press the windscreen wiper lever forward
briefly (windscreen washer function).
This will lock the wiper arms. For the sake of the environment
The car should only be washed in special
wash bays. These areas are prepared to pre-
vent oily water from getting into the public
drains. In some places, washing vehicles out-
side the areas intended for this purpose is
prohibited. 184
Page 195 of 284
Checking and refilling levels
especially if the battery is not fully charged
initially.
To restore the necessary energy balance, the
system will then temporarily shut off the elec-
trical devices that are using a lot of power, or
reduce the current they are consuming. Heat-
ing systems in particular use a large amount
of electrical power. If you notice, for instance,
that the seat heating* or the rear window
heater is not working, they may have been
temporarily switched off or regulated to a
lower heat output. These systems will be
available again as soon as sufficient electri-
cal power is available.
You may also notice that the engine runs at a
slightly faster idling speed when necessary.
This is quite normal, and no cause for con-
cern. The increased idling speed allows the
alternator to meet the greater power require-
ment and charge the battery at the same
time. Checking and refilling levels
Refuelling Filling the tank Read the additional information carefully
››› page 31
If the automatic filler nozzle is operated cor-
rectly, it will switch itself off as soon as the
fuel tank is “full”. Do not try to put in more
fuel after the nozzle cuts out, as this will fill
the expansion chamber in the fuel tank.
The correct fuel grade for your vehicle is giv-
en on a sticker on the inside of the fuel tank
flap. Further notes on fuel can be found at
››› page 195 .
The c ap
acity of the fuel tank is listed in the
vehicle
technical specifications ›››
page 268. WARNING
Fuel is highly flammable and can cause seri-
ous burns and other injuries.
● Do not smoke when filling the fuel tank or a
canister. Naked flames are forbidden in the
vicinity due to the risk of explosion.
● Observe legislation governing the use,
storage and carrying of a spare fuel canister
in the vehicle.
● For safety reasons we do not recommend
carrying a spare fuel canister in the vehicle. In an accident the canister could be damaged
and could leak.
●
If, in exceptional circumstances, you have
to carry a spare fuel canister, please observe
the following points:
– Never fill fuel into the spare fuel canister
if it is inside or on top of the vehicle. An
electrostatic charge could build up during
filling, causing the fuel vapour to ignite.
Danger of explosion. Always place the
canister on the ground to fill it.
– Insert the filling nozzle as far as possible
into the spare fuel canister.
– If the spare fuel canister is made of met-
al, the filling nozzle must be in contact
with the canister during filling. This
helps prevent an electrostatic charge
building up.
– Never spill fuel in the vehicle or in the
luggage compartment. Fuel vapour is ex-
plosive. Risk of fatal accident! CAUTION
● If any fuel is spilt onto the vehicle, it
should be removed immediately. It could oth-
erwise damage the paintwork.
● Never run the tank completely dry. An irreg-
ular fuel supply could cause misfiring. As a
result, unburnt fuel could enter the exhaust
system and damage the catalytic converter.
● When filling the fuel tank after having run it
completely dry on a vehicle with a diesel en-
gine, the ignition must be switched on for at » 193
Technical specifications
Advice
Operation
Safety
The essentials
Page 196 of 284
Advice
least 30 seconds before starting the engine.
When you then start the engine it may take
longer than normal (up to one minute) to
start firing. This is because air needs to be
bled from the fuel system while starting.
For the sake of the environment
Do not overfill the fuel tank, it may cause the
fuel to overflow if it becomes warm. Note
Diesel vehicles are fitted with a protective de-
vice that prevents the insertion of the wrong
fuel hose 1)
. It is only possible to refuel with
Diesel nozzles.
● If the pump nozzle is worn, damaged, or if
it is very small, it is possible that it will not
be able to open the protective device. Before
trying to insert the pump nozzle by turning it,
try a different pump or request specialist
help.
● If you fill the tank from a reserve fuel canis-
ter, the protective device will not open. One
way to resolve this is to pour the fuel in very
slowly. Refuelling with natural gas
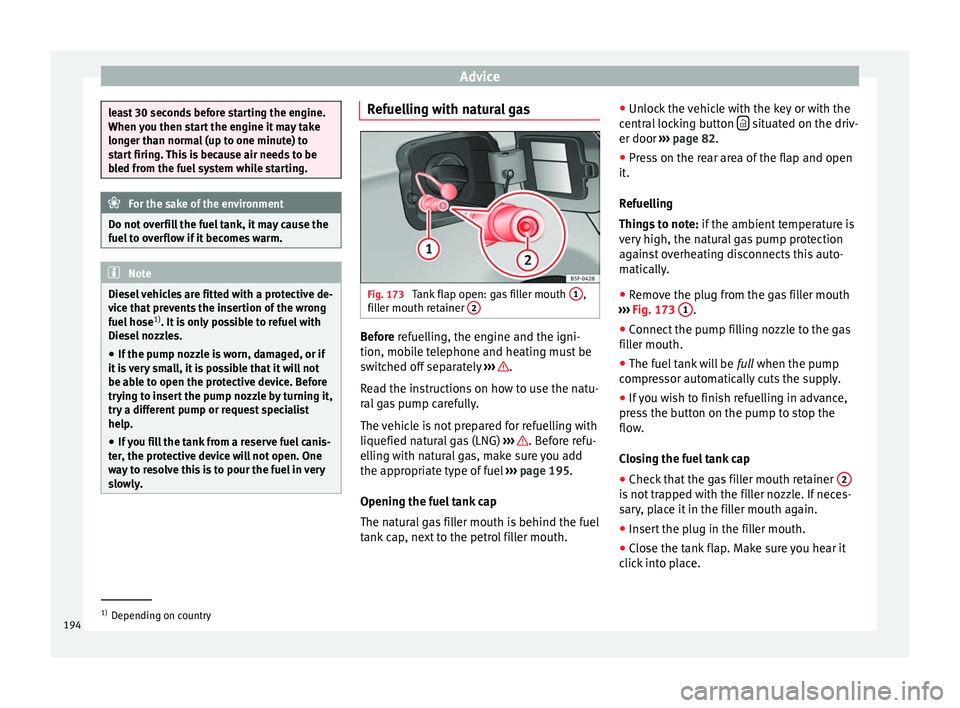
Fig. 173
Tank flap open: gas filler mouth 1 ,
filler mouth retainer 2 Before refuelling, the engine and the igni-
tion, mobile telephone and heating must be
switched off separately
››› .
Read the instructions on how to use the natu-
ral gas pump carefully.
The vehicle is not prepared for refuelling with
liquefied natural gas (LNG) ››› . Before refu-
elling with natural gas, make sure you add
the appropriate type of fuel ››› page 195.
Opening the fuel tank cap
The natural gas filler mouth is behind the fuel
tank cap, next to the petrol filler mouth. ●
Unlock the vehicle with the key or with the
central locking button situated on the driv-
er door ››› page 82 .
● Pr e
ss on the rear area of the flap and open
it.
Refuelling
Things to note: if the ambient temperature is
very high, the natural gas pump protection
against overheating disconnects this auto-
matically.
● Remove the plug from the gas filler mouth
››› Fig. 173 1 .
● Connect the pump filling nozzle to the gas
filler mouth.
● The fuel tank will be full when the pump
c ompr
essor automatically cuts the supply.
● If you wish to finish refuelling in advance,
press the button on the pump to stop the
flow.
Closing the fuel tank cap
● Check that the gas filler mouth retainer 2 is not trapped with the filler nozzle. If neces-
sary, place it in the filler mouth again.
●
Insert the plug in the filler mouth.
● Close the tank flap. Make sure you hear it
click into place. 1)
Depending on country
194
Page 197 of 284
Checking and refilling levels
WARNING
Natural gas is a highly explosive, easily flam-
mable substance. Incorrect handling of the
natural gas can cause accidents serious
burns and other injuries.
● Before refuelling with natural gas, engage
the filling mouth correctly. If you can smell
gas, stop refuelling immediately. WARNING
The vehicle is not prepared to use liquefied
natural gas (LNG), and this fuel must not be
added under any circumstances. Liquefied
natural gas can cause the natural gas tank to
explode, resulting in serious injury. Note
● The filling nozzles of natural gas pumps
can differ in the way they are operated. If you
do not know, ask a qualified employee at the
petrol station to do the refuelling.
● Noises heard when refuelling are normal
and do not indicate the presence of a fault in
the system.
● The vehicle natural gas system is prepared
both for refuelling with a small compressor
(slow refuel) and a large compressor (fast re-
fuel) in natural gas service stations. Fuel
Types of petrol The correct grade of petrol is listed inside the
fuel tank flap.
The vehicle is equipped with a catalytic con-
verter and must only be run on
unleaded pet-
rol. The petrol must comply with European
St and
ard EN 228 or German standard DIN
51626-1 and must be unleaded. You can re-
fuel with a maximum ethanol proportion of
10 % (E10). The types of petrol are differenti-
ated by their octane rating (RON).
The f o
llowing titles appear on the corre-
sponding adhesive on the fuel tank flap:
Super unleaded 95 octane or normal 91
octane unleaded petrol
We recommend you use super 95 octane pet-
rol. If this is not available: normal 91 octane
petrol, with a slight decrease in power.
Super unleaded petrol with a minimum of 95
octanes
You should use super petrol with a minimum
of 95 octanes.
If super is not available, in an emergency you
may refuel with normal 91 octane petrol. In
this case only use moderate engine speeds
and a light throttle. Refuel with super as soon
as possible. Super unleaded 98 octane or super 95
octane unleaded petrol
We recommend you use super plus 98 octane
petrol. If this is not available: super 95 oc-
tane petrol, with a slight decrease in power.
If super is not available,
in an emergency you
may refuel with normal 91 octane petrol. In
this case only use moderate engine speeds
and a light throttle. Refuel with super as soon
as possible.
Petrol additives
The quality of the fuel influences the behav-
iour, power and service life of the engine.
This is why the petrol you use should carry
suitable additives already included by the
petrol industry, free of metals. These addi-
tives will help to prevent corrosion, keep the
fuel system clean and prevent deposits from
building up in the engine.
If good-quality petrol with metal-free addi-
tives is not available or engine problems
arise, the necessary additives must be added
when refuelling ››› .
Not all petrol additives have been shown to
be effective. The use of unsuitable petrol ad-
ditives may cause significant damage to the
engine and the catalytic converter. Metal ad-
ditives should never be used. Metal additives
may also be contained in petrol additives for
improving anti-detonation ratings or octane
ratings ››› .
»
195
Technical specifications
Advice
Operation
Safety
The essentials
Page 198 of 284
Advice
SEAT recommends “genuine Volkswagen
Group Fuel Additives for petrol engines”.
These additives can be bought at SEAT deal-
ers, where information on how to use them
can also be obtained. CAUTION
● Do not refuel if the filler indicates that the
fuel contains metal. LRP ( lead replacement
petrol) fuels contain high concentrations of
met a
l additives. Using them may damage the
engine!
● Never refuel with fuels containing a large
proportion of ethanol (for example, E50, E85).
This could damage the fuel system.
● Just filling one full tank of leaded fuel or
fuel containing other metal additives would
seriously impair the efficiency of the catalytic
converter.
● Only use fuel additives that have been ap-
proved by SEAT. Octane boosting or anti-
knock additives may contain metal additives
that could seriously damage the engine or
the catalytic converter. These additives must
not be used.
● High engine speed and full throttle can
damage the engine when using petrol with an
octane rating lower than the correct grade for
the engine. Note
● You may use petrol with a high octane num-
ber than the one recommended for your en-
gine.
● In those countries where unleaded petrol is
not available, you may refuel with a fuel with
a low lead content. Diesel Fuel
Please note the information on the inside of
the fuel tank flap.
We recommend the use of
diesel fuel which
c omp
lies to European standard EN 590. If
diesel fuel which meets European standard
EN 590 is not available, the Cetane number
(CZ) must, at minimum, be 51. If the engine
is equipped with a particulate filter, the sul-
phur content of the fuel must be below 50
parts per million.
Winter-grade diesel
Summer fuel becomes thicker in winter and it
is more difficult to start the engine. For this
reason, petrol stations in some countries al-
so offer winter diesel with improved fluidity
when cold (winter-grade diesel). Water in the fuel filter
1)
If your vehicle has a diesel engine and is
equipped with a
fuel filter with a water sepa-
rator, the instrument panel may display the
following warning: Water in the fuel filter.
If thi
s is the case, take the vehicle to a speci-
alised workshop so that they can drain the
fuel filter. CAUTION
● The vehicle is not designed for the use of
FAME fuel (biodiesel). The fuel system would
be damaged if you used biodiesel.
● Do not mix fuel additives, the so-called
“thinners”, petrol or similar additives with
diesel fuel.
● If poor-quality diesel fuel is used, it may be
necessary to drain the fuel filter more fre-
quently than is specified in the Maintenance
Programme. We recommend having this done
by a specialised workshop. If water is allowed
to collect in the filter, this can cause engine
performance problems. Natural gas
Natural gas
Natural gas can be compressed or in liquid
form, addition to others.
1)
Valid for the market: Algeria.
196
Page 199 of 284
Checking and refilling levels
Liquefied natural gas (LNG) is the result of
heavy cooling of natural gas. Therefore its
volume is considerably reduced compared
with compressed natural gas (CNG). In vehi-
cles with a natural gas engine, liquefied nat-
ural gas cannot be directly refilled, as the gas
would expand excessively in the vehicle gas
tank.
Therefore, vehicles with a natural gas engine
must only be refuelled using compressed
natural gas ››› .
Natural gas quality and consumption
Natural gas is divided into the groups H and
L depending on its quality.
Gas type H has a superior heating power and
inferior nitrogen and carbon dioxide content
than type L. The higher the heating power of
the natural gas, the lower the consumption
will be.
However, the heating power and the propor-
tion of nitrogen and carbon dioxide can fluc-
tuate within the quality groups. Therefore, ve-
hicle consumption can also vary when using
a single type of gas only.
The engine management automatically
adapts to the natural gas used according to
its quality. Therefore, different quality gases
can be mixed in the tank, without the need
for comprehensive draining before applying a
different quality gas. Updated information relating to natural gas
quality is displayed on the instrument panel
››› page 72 .
Nat ur
al gas and safety
If you can smell gas or suspect that there is a
leak ››› :
● Stop the vehicle immediately.
● Switch the ignition off.
● Open the doors to appropriately ventilate
the vehicle.
● Extinguish cigarettes immediately.
● Move away from the vehicle or switch off
objects that may cause sparks or a fire.
● If you continue to smell gas, do not contin-
ue driving!
● Seek specialist assistance. Have the fault
repaired. WARNING
Failure to act when you can smell gas in the
vehicle or when refuelling can cause serious
injuries.
● Carry out the necessary operations.
● Leave the danger zone.
● If necessary, warn the emergency services. WARNING
The vehicle is not prepared to use liquefied
natural gas (LNG) and this fuel must not be
added under any circumstances. Liquefied
natural gas can cause the natural gas tank to
explode, resulting in serious injury. Note
Have the natural gas system checked regular-
ly by a specialised workshop, according to
the Maintenance Programme. 197
Technical specifications
Advice
Operation
Safety
The essentials
Page 201 of 284
Checking and refilling levels
●
Take care not to cause short circuits in the
electrical system, especially when working
on the battery.
● If working inside the engine compartment,
remember that, even when the ignition is
switched off, the radiator fan may start up au-
tomatically, and therefore there is a risk of in-
jury.
● Never cover the engine with additional in-
sulating materials such as a blanket. Risk of
fire!
● Do not unscrew the cap on the coolant ex-
pansion tank when the engine is hot. The
cooling system is under pressure.
● Protect face, hands and arms by covering
the cap with a large, thick rag to protect
against escaping coolant and steam.
● If it is necessary to work in the engine com-
partment while the engine is running, the ro-
tating components (for example, poly-V belt,
alternator, radiator fan) and the high voltage
ignition system are an additional hazard.
● Observe the following additional warnings
if work on the fuel system or the electrical
system is necessary:
– Always disconnect the battery from the
on-board network.
– Do not smoke.
– Never work near naked flames.
– Always keep an approved fire extinguish-
er immediately available. CAUTION
When topping up fluids make sure the correct
fluid is put into the correct filler opening, oth-
erwise this can cause serious malfunctions or
engine damage. For the sake of the environment
Inspect the ground underneath your vehicle
regularly so that any leaks are detected at an
early stage. If you find spots of oil or other
fluids in the area where it was parked, have
your vehicle inspected at the workshop. Note
On right-hand drive vehicles* some of the
containers/reservoirs mentioned below are
located on the other side of the engine com-
partment. Opening the bonnet
Read the additional information carefully
››› page 10
The bonnet is released from inside the vehi-
cle.
Check that the windscreen wiper arms are
not unfolded. Otherwise the paint may be
damaged.
The bonnet can only be unlocked when the
driver door is open. WARNING
Never open the bonnet if you see steam or
drips of coolant being released from the en-
gine compartment. Failure to comply could
result in burns. Wait until no steam or coolant
can be seen before opening the bonnet. Closing the bonnet
–
Slightly lift the bonnet.
– Release the bonnet stay before pressing it
back into its support.
– Carefully close the bonnet.
– Press the bonnet down until it locks into
place.
– Make sure that the bonnet catches onto its
clasp. Do not press down too hard › › › .
WARNING
● For safety reasons the bonnet must always
be completely closed when the vehicle is
moving. Therefore, after closing the bonnet,
always check that the locking element is
properly engaged. This is the case if the bon-
net is flush with the adjacent body panels.
● Should you notice that the bonnet is not
safely secured when the vehicle is moving,
stop the vehicle immediately and close the
bonnet. Failure to follow this instruction
could result in an accident. 199
Technical specifications
Advice
Operation
Safety
The essentials
Page 210 of 284
Advice
Wheels
Wheels and tyres General notes –
When driving with new tyres, be especially
car
eful during the first 500 km (300 miles).
– If you have to drive over a kerb or similar
obstacle, drive very slowly and as near as
possible at a right angle to the obstacle.
– Check from time to time if the tyres are
damaged (punctures, cuts, cracks or
dents). Remove any foreign objects embed-
ded in the treads.
– Damaged wheels and tyres must be re-
placed immediately.
– Keep grease, oil and fuel off the tyres.
– Replace any missing valve caps as soon as
possible.
– Mark the wheels before taking them off so
that they rotate in the same direction when
put back.
– When removed, the wheels or tyres should
be stored in a cool, dry and preferably dark
place.
New tyres
New tyres do not give maximum grip straight
a w
ay and should therefore be “run in” by driving carefully and at moderate speeds for
about the first 500 km (300 miles). This will
also increase the useful life of the tyres.
The tread depth of new tyres may
v
ary, ac-
cording to the type and make of tyre and the
tread pattern.
Concealed damage
Damage to tyres and rims is often not readily
visible. If you notice unusual vibration
or the
car pulling to one side, this may indicate that
one of the tyres is damaged. Reduce speed
immediately if there is any reason to suspect
that damage may have occurred. Inspect the
tyres for damage. If no external damage is
visible, drive slowly and carefully to the near-
est specialised workshop and have the car
inspected.
Tyres with directional tread pattern
An arrow on the tyre sidewall indicates the di-
rection of rotation on single drive tyres. Al-
ways note the direction of rotation indicated
when mounting the wheel. This guarantees
optimum grip and helps to avoid aquaplan-
ing, excessive noise and wear.
Retrofitting Accessories
If you wish to change or fit wheels, rims or
wheel trims, we recommend that you consult
with a SEAT Official Service centre for advice
regarding current techniques. Useful life of tyres Correct inflation pressures and sensible driv-
ing habits will increase the useful life of your
tyres.
– Check tyre pressure at least once a month,
and also prior to any long trip.
– The tyre pressure should only be checked
when the tyres are cold. Do not reduce the
pressure of warm tyres.
– Adjust tyre pressure to the load being car-
ried by the vehicle.
– In vehicles with a tyre pressure indicator,
save the pressure of modified tyres
››› page 212 , ››
›
page 208.
– Avoid fast cornering and hard acceleration.
– Inspect the tyres for irregular wear from
time to time.
The useful life of your tyres depends on the
following factors:
Tyre pressure
Tyre pressure values are indicated on the
sticker on the inside of the fuel tank flap.
Insufficient or excessive pressure greatly re-
duces the useful life of the tyres and adverse-
ly affects vehicle performance and ride. Cor-
rect inflation pressures are very important,
especially at high speeds.
208
Page 211 of 284
Wheels
Depending on the vehicle, tyre pressure can
be adjusted (“comfort” tyre pressure) to in-
crease driving comfort. When driving with
comfort tyre pressure fuel consumption may
increase slightly.
The tyre pressure must be adjusted according
to the load the vehicle is carrying. If the vehi-
cle is going to carry the maximum load, the
tyre pressure should be increased to maxi-
mum value indicated on the sticker on the in-
side of the fuel tank flap.
Do not forget the spare wheel when checking
the tyre pressures: Keep this spare wheel in-
flated to the highest pressure required for the
road wheels.
In the case of a minimised temporary spare
wheel (125/70 R16 or 125/70 R18) inflate to
a pressure of 4.2 bar as indicated on the tyre
pressure label on the fuel tank flap.
Driving style
Fast cornering, heavy acceleration and hard
braking (squealing tyres) all increase tyre
wear.
Wheel balance
The wheels on new vehicles are balanced.
However, certain circumstances may lead to
imbalance (run-out), which is detected as vi-
brations in the steering wheel. Unbalanced wheels should be rebalanced, as
they otherwise cause excessive wear on
steering, suspension and tyres. A wheel must
also be rebalanced when a new tyre is fitted
or if a tyre is repaired.
Incorrect wheel alignment
Incorrect wheel alignment causes excessive
tyre wear, impairing the safety of the vehicle.
If you notice excessive tyre wear, you should
check wheel alignment at a SEAT Official
Service.
WARNING
● Always adapt the tyre pressure accordingly
when the vehicle load changes.
● A tyre with low air pressure has to flex a lot
more when the vehicle is heavily loaded or at
high speeds, therefore causing overheating
to occur. Under these conditions, the tyre
bead may be released or the tyre may burst.
Risk of accident! For the sake of the environment
Under-inflated tyres will increase fuel con-
sumption. Wear indicators
Fig. 177
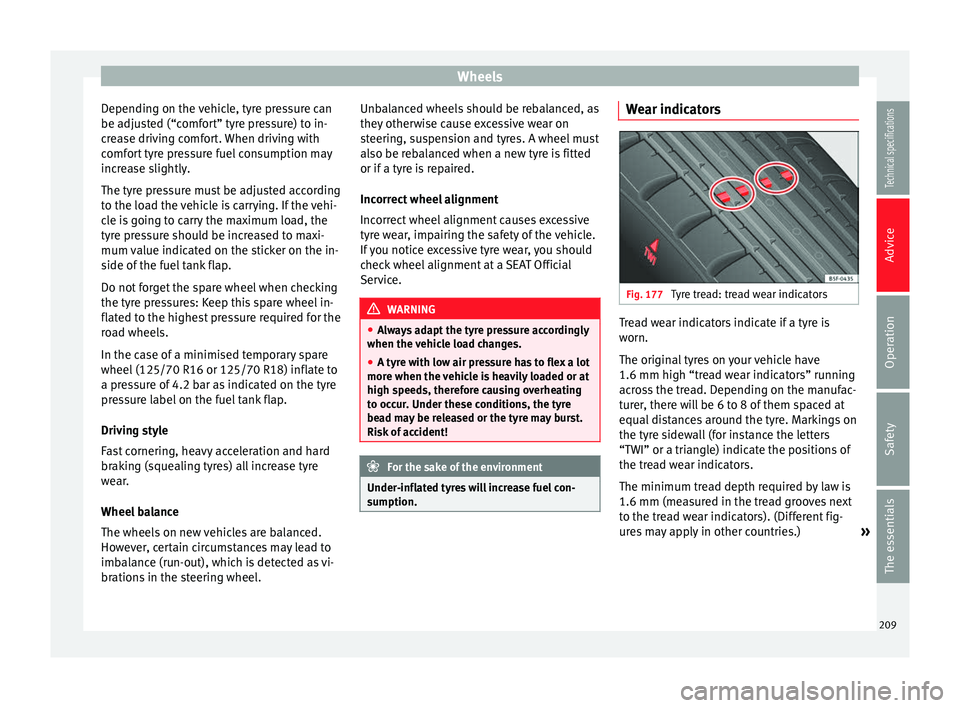
Tyre tread: tread wear indicators Tread wear indicators indicate if a tyre is
worn.
The original tyres on your vehicle have
1.6 mm high “tread wear indicators” running
across the tread. Depending on the manufac-
turer, there will be 6 to 8 of them spaced at
equal distances around the tyre. Markings on
the tyre sidewall (for instance the letters
“TWI” or a triangle) indicate the positions of
the tread wear indicators.
The minimum tread depth required by law is
1.6 mm (measured in the tread grooves next
to the tread wear indicators). (Different fig-
ures may apply in other countries.)
»
209Technical specifications
Advice
Operation
Safety
The essentials