brake light Seat Leon SC 2014 Owner's manual
[x] Cancel search | Manufacturer: SEAT, Model Year: 2014, Model line: Leon SC, Model: Seat Leon SC 2014Pages: 284, PDF Size: 5.85 MB
Page 5 of 284
Table of Contents
Table of Contents
The essentials . . . . . . . . . . . . . . . . . . . . . . . . 5
Exterior view . . . . . . . . . . . . . . . . . . . . . . . . . . . . 5
Interior view . . . . . . . . . . . . . . . . . . . . . . . . . . . . 7
How it works . . . . . . . . . . . . . . . . . . . . . . . . . . . . 9
Unlocking and locking . . . . . . . . . . . . . . . . . . . . 9
Before driving . . . . . . . . . . . . . . . . . . . . . . . . . . . 11
Starting the vehicle . . . . . . . . . . . . . . . . . . . . . . 14
Lights and visibility . . . . . . . . . . . . . . . . . . . . . . 15
Easy Connect . . . . . . . . . . . . . . . . . . . . . . . . . . . 17
Driver information system . . . . . . . . . . . . . . . . . 19
Cruise control . . . . . . . . . . . . . . . . . . . . . . . . . . . 21
Warning lamps . . . . . . . . . . . . . . . . . . . . . . . . . . 22
Gearbox lever . . . . . . . . . . . . . . . . . . . . . . . . . . . 24
Air conditioning . . . . . . . . . . . . . . . . . . . . . . . . . 26
Level control . . . . . . . . . . . . . . . . . . . . . . . . . . . . 31
Action in the event of a puncture . . . . . . . . . . . 33
Emergency towing of the vehicle . . . . . . . . . . . 35
Safety . . . . . . . . . . . . . . . . . . . . . . . . . . . . . . . . 37
Safe driving . . . . . . . . . . . . . . . . . . . . . . . . . . . . 37
Safety first! . . . . . . . . . . . . . . . . . . . . . . . . . . . . . 37
Advice about driving . . . . . . . . . . . . . . . . . . . . . 37
Sitting position for vehicle occupants . . . . . . . 38
Pedal area . . . . . . . . . . . . . . . . . . . . . . . . . . . . . . 42
Seat belts . . . . . . . . . . . . . . . . . . . . . . . . . . . . . . 43
The reasons why we should wear seat belts . . 43
How to properly adjust your seatbelt . . . . . . . . 46
Seat belt tensioners . . . . . . . . . . . . . . . . . . . . . . 47
Airbag system . . . . . . . . . . . . . . . . . . . . . . . . . . 48
Brief introduction . . . . . . . . . . . . . . . . . . . . . . . . 48
Airbag overview . . . . . . . . . . . . . . . . . . . . . . . . . 50
Deactivating airbags . . . . . . . . . . . . . . . . . . . . . 54
Transporting children safety . . . . . . . . . . . . . . . 56
Safety for children . . . . . . . . . . . . . . . . . . . . . . . 56
Child seats . . . . . . . . . . . . . . . . . . . . . . . . . . . . . 58 Operation
. . . . . . . . . . . . . . . . . . . . . . . . . . . . . 65
Controls and displays . . . . . . . . . . . . . . . . . . . . 65
Overview . . . . . . . . . . . . . . . . . . . . . . . . . . . . . . . 64
Instruments and warning/control lamps . . . . . 66
Instruments . . . . . . . . . . . . . . . . . . . . . . . . . . . . 66
Control lamps . . . . . . . . . . . . . . . . . . . . . . . . . . . 71
Driver information system . . . . . . . . . . . . . . . . . 72
Information system . . . . . . . . . . . . . . . . . . . . . . 72
Driving data . . . . . . . . . . . . . . . . . . . . . . . . . . . . 76
Speed warning function . . . . . . . . . . . . . . . . . . . 79
Service interval display . . . . . . . . . . . . . . . . . . . 80
Introduction to the Easy Connect system* . . . . 81
System Settings (CAR)* . . . . . . . . . . . . . . . . . . . 81
Opening and closing . . . . . . . . . . . . . . . . . . . . . 82
Central locking system . . . . . . . . . . . . . . . . . . . . 82
Anti-theft alarm system* . . . . . . . . . . . . . . . . . . 87
Rear lid (luggage compartment) . . . . . . . . . . . . 89
Electric windows . . . . . . . . . . . . . . . . . . . . . . . . . 90
Panoramic sliding sunroof* . . . . . . . . . . . . . . . . 92
Lights and visibility . . . . . . . . . . . . . . . . . . . . . . 94
Lights . . . . . . . . . . . . . . . . . . . . . . . . . . . . . . . . . 94
Visibility . . . . . . . . . . . . . . . . . . . . . . . . . . . . . . . 101
Windscreen wiper and window wiper systems . 102
Rear vision mirror . . . . . . . . . . . . . . . . . . . . . . . . 104
Seats and head restraints . . . . . . . . . . . . . . . . . 106
Adjusting the seats and headrests . . . . . . . . . . 106
Seat functions . . . . . . . . . . . . . . . . . . . . . . . . . . 107
Transport and practical equipment . . . . . . . . . 111
Storage compartments . . . . . . . . . . . . . . . . . . . 111
Storing objects . . . . . . . . . . . . . . . . . . . . . . . . . . 114
Roof carrier . . . . . . . . . . . . . . . . . . . . . . . . . . . . . 122
Air conditioning . . . . . . . . . . . . . . . . . . . . . . . . . 124
Heating, ventilation and cooling . . . . . . . . . . . . 124
Driving . . . . . . . . . . . . . . . . . . . . . . . . . . . . . . . . 129
Ignition lock . . . . . . . . . . . . . . . . . . . . . . . . . . . . 129
Braking and parking . . . . . . . . . . . . . . . . . . . . . 131
Manual gearbox . . . . . . . . . . . . . . . . . . . . . . . . . 132 Automatic gearbox/DSG automatic gearbox* . 132
Run-in and economical driving . . . . . . . . . . . . . 140
Driver assistance systems
. . . . . . . . . . . . . . . . . 143
Braking and stability systems . . . . . . . . . . . . . . 143
Start-Stop system* . . . . . . . . . . . . . . . . . . . . . . . 148
Cruise control system (CCS)* . . . . . . . . . . . . . . . 150
Adaptive Cruise Control ACC* . . . . . . . . . . . . . . 151
Monitoring system Front Assist* . . . . . . . . . . . . 161
Lane Assist system* . . . . . . . . . . . . . . . . . . . . . . 166
SEAT driving modes (SEAT Drive Profile)* . . . . . 169
Tiredness detection (break recommendation)* 172
Parking aid . . . . . . . . . . . . . . . . . . . . . . . . . . . . . 173
Towing bracket device . . . . . . . . . . . . . . . . . . . . 177
Trailer towing . . . . . . . . . . . . . . . . . . . . . . . . . . . 177
Advice . . . . . . . . . . . . . . . . . . . . . . . . . . . . . . . . 182
Care and maintenance . . . . . . . . . . . . . . . . . . . . 182
Accessories and modifications to the vehicle . 182
Care and cleaning . . . . . . . . . . . . . . . . . . . . . . . 183
Vehicle exterior care . . . . . . . . . . . . . . . . . . . . . . 183
Care of the vehicle interior . . . . . . . . . . . . . . . . . 187
Intelligent technology . . . . . . . . . . . . . . . . . . . . 190
Electro-mechanical steering . . . . . . . . . . . . . . . 190
Progressive steering . . . . . . . . . . . . . . . . . . . . . 190
Four-wheel drive . . . . . . . . . . . . . . . . . . . . . . . . . 191
Power Management . . . . . . . . . . . . . . . . . . . . . . 191
Checking and refilling levels . . . . . . . . . . . . . . . 193
Refuelling . . . . . . . . . . . . . . . . . . . . . . . . . . . . . . 193
Fuel . . . . . . . . . . . . . . . . . . . . . . . . . . . . . . . . . . . 195
Bonnet . . . . . . . . . . . . . . . . . . . . . . . . . . . . . . . . 198
Engine oil . . . . . . . . . . . . . . . . . . . . . . . . . . . . . . 200
Cooling system . . . . . . . . . . . . . . . . . . . . . . . . . . 203
Brake fluid . . . . . . . . . . . . . . . . . . . . . . . . . . . . . 204
Windscreen washer reservoir . . . . . . . . . . . . . . 204
Battery . . . . . . . . . . . . . . . . . . . . . . . . . . . . . . . . . 205
Wheels . . . . . . . . . . . . . . . . . . . . . . . . . . . . . . . . 208
Wheels and tyres . . . . . . . . . . . . . . . . . . . . . . . . 208
Tyre monitoring systems . . . . . . . . . . . . . . . . . . 212
3
Page 25 of 284
The essentials
Front brake pads worn.
›››
page
143
it lights up:
Fault in the ESC, or dis-
connection caused by the system.
flashes: ESC or ASR activated.
ASR manually deactivated.
ABS faulty or does not work.
Rear fog light switched on.›››
page
94
lights up or flashes:
fault in the
emission control system.–
it lights up:
pre-ignition of diesel
engine.
››› page
71
flashes: fault in the diesel engine
management.
fault in the petrol engine manage-
ment.›››
page
71
lights up or flashes:
fault in the
steering system.››› page
190
Tyre pressure too low, or fault in
the tyre pressure monitoring sys-
tem.›››
page
212
Fuel tank almost empty.›››
page
66
Fault in airbag system and seat
belt tensioners.›››
page
48
Lane Assist is switched on, but not
active.›››
page
166 Other warning lamps
Left or right turn signal.›››
page
94
Hazard warning lights on.››› page
99
Trailer turn signals›››
page
177
it lights up:
Press the foot brake!
flashes: the selector lever locking
button has not engaged.››› page
132
it lights up:
cruise control activated
or speed limiter switched on and
active.
››› page
150
flashes: the speed set by the
speed limiter has been exceeded.
Lane Assist is switched on and ac-
tive.›››
page
166
Main beam on or flasher on.›››
page
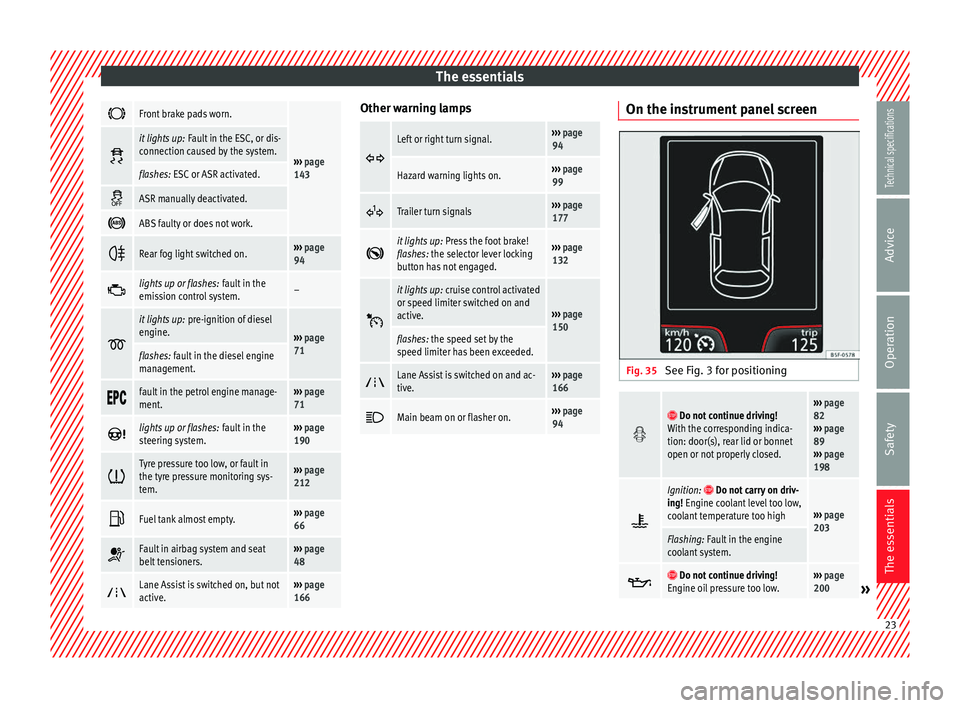
94 On the instrument panel screen
Fig. 35
See Fig. 3 for positioning Do not continue driving!
With the corresponding indica-
tion: door(s), rear lid or bonnet
open or not properly closed.››› page
82
››› page
89
››› page
198
Ignition: Do not carry on driv-
ing! Engine coolant level too low,
coolant temperature too high
››› page
203
Flashing: Fault in the engine
coolant system.
Do not continue driving!
Engine oil pressure too low.››› page
200» 23
Technical specifications
Advice
Operation
Safety
The essentials
Page 37 of 284
The essentials
Wire hook for pulling off the wheel cov-
ers*/wheel bolt cap clip.
● Take out the spare wheel and the tools that
are located under the floor panel in the lug-
gage compartment.
● Take out the wheel cover or the bolt caps.
● Loosen the bolts with the box spanner (1
turn to the left).
● Mount the jack on the support points de-
signed for this purpose on the strut
››› Fig. 52 .
● Rai
se the vehicle, turning the jack until it is
slightly lifted off the ground.
● Unscrew the bolts completely and remove
the punctured wheel.
● Put the spare wheel in place. Screw on the
bolts and tighten them loosely with the box
spanner.
● Lower the vehicle with the jack. Finish tight-
ening the bolts with the box spanner.
››› in What to do first on page 217
››› page 217 6
Emergency towing of the
vehicle
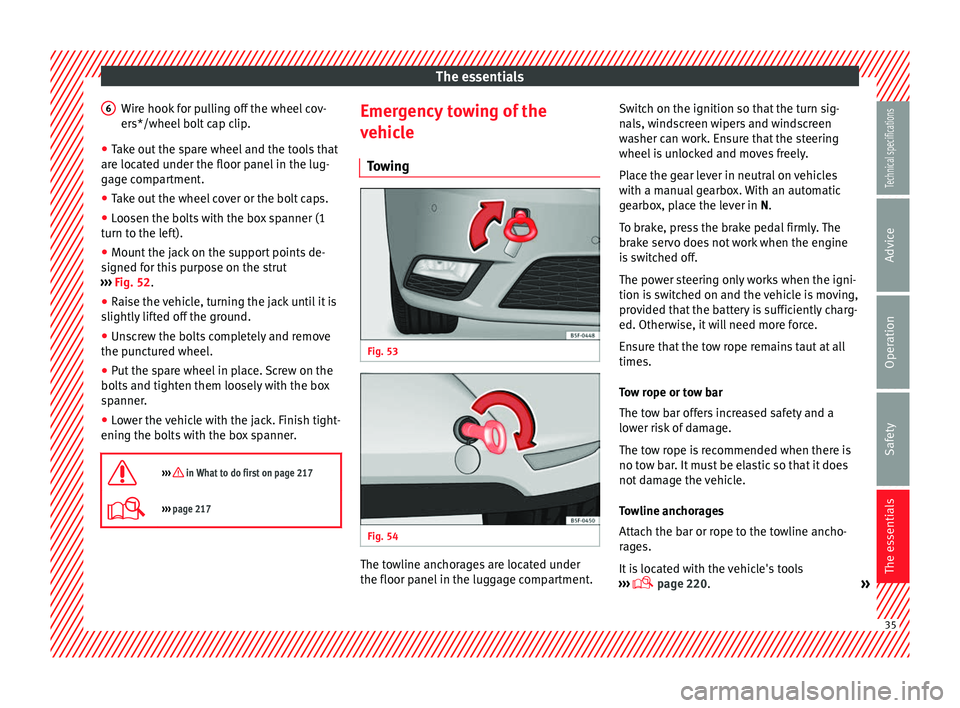
Towing Fig. 53
Fig. 54
The towline anchorages are located under
the floor panel in the luggage compartment.Switch on the ignition so that the turn sig-
nals, windscreen wipers and windscreen
washer can work. Ensure that the steering
wheel is unlocked and moves freely.
Place the gear lever in neutral on vehicles
with a manual gearbox. With an automatic
gearbox, place the lever in N.
To brake, press the brake pedal firmly. The
brake servo does not work when the engine
is switched off.
The power steering only works when the igni-
tion is switched on and the vehicle is moving,
provided that the battery is sufficiently charg-
ed. Otherwise, it will need more force.
Ensure that the tow rope remains taut at all
times.
Tow rope or tow bar
The tow bar offers increased safety and a
lower risk of damage.
The tow rope is recommended when there is
no tow bar. It must be elastic so that it does
not damage the vehicle.
Towline anchorages
Attach the bar or rope to the towline ancho-
rages.
It is located with the vehicle's tools
››› page 220
.
» 35
Technical specifications
Advice
Operation
Safety
The essentials
Page 40 of 284
Safety
● Belt tensioners for the front seats
● Front airbags
● knee airbags,
● Side airbags in the front seat backrests
● Side airbags in the rear seat backrests*
● Head-protection airbags
● “ISOFIX” anchor points for child seats in
the rear side seats with the “ISOFIX” system,
● Height-adjustable front head restraints
● Rear head restraints with in-use position
and non-use position
● Adjustable steering column
The safety equipment mentioned above
works together to provide you and your pas-
sengers with the best possible protection in
the event of an accident. However, these
safety systems can only be effective if you
and your passengers are sitting in a correct
position and use this equipment properly.
Safety is everyone's business! Sitting position for vehicle
occupants
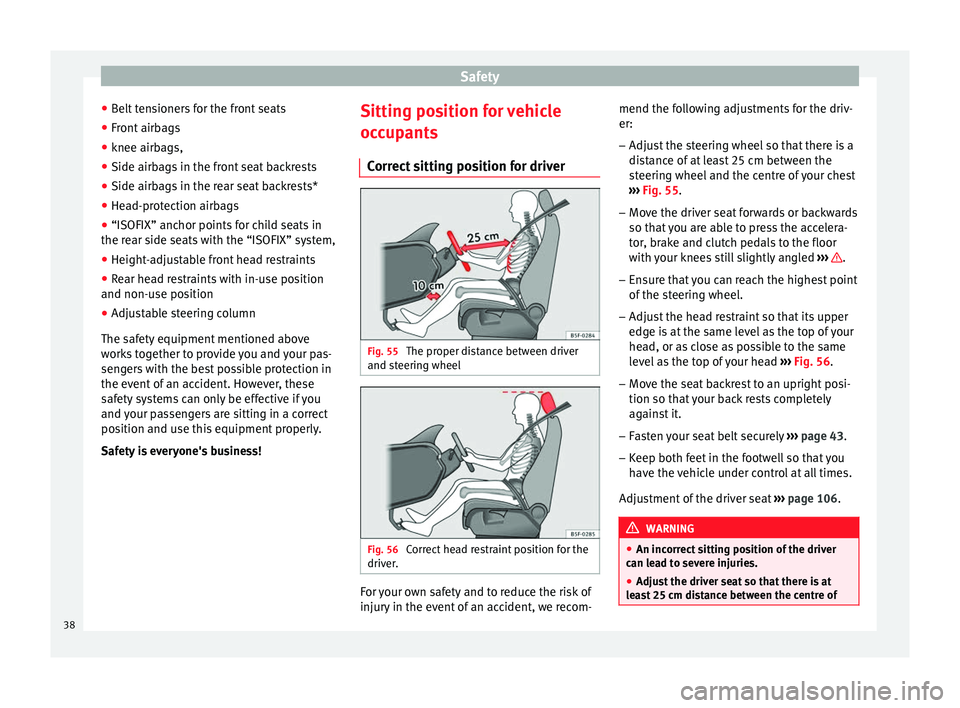
Correct sitting position for driver Fig. 55
The proper distance between driver
and steering wheel Fig. 56
Correct head restraint position for the
driver. For your own safety and to reduce the risk of
injury in the event of an accident, we recom-mend the following adjustments for the driv-
er:
– Adjust the steering wheel so that there is a
distance of at least 25 cm between the
steering wheel and the centre of your chest
››› Fig. 55 .
– Mo v
e the driver seat forwards or backwards
so that you are able to press the accelera-
tor, brake and clutch pedals to the floor
with your knees still slightly angled ››› .
– Ensure that you can reach the highest point
of the steering wheel.
– Adjust the head restraint so that its upper
edge is at the same level as the top of your
head, or as close as possible to the same
level as the top of your head ››› Fig. 56 .
– Mo v
e the seat backrest to an upright posi-
tion so that your back rests completely
against it.
– Fasten your seat belt securely ››› page 43.
– Keep both feet in the footwell so that you
have the vehicle under control at all times.
Adjustment of the driver seat ››› page 106. WARNING
● An incorrect sitting position of the driver
can lead to severe injuries.
● Adjust the driver seat so that there is at
least 25 cm distance between the centre of 38
Page 67 of 284
Controls and displays
Operation
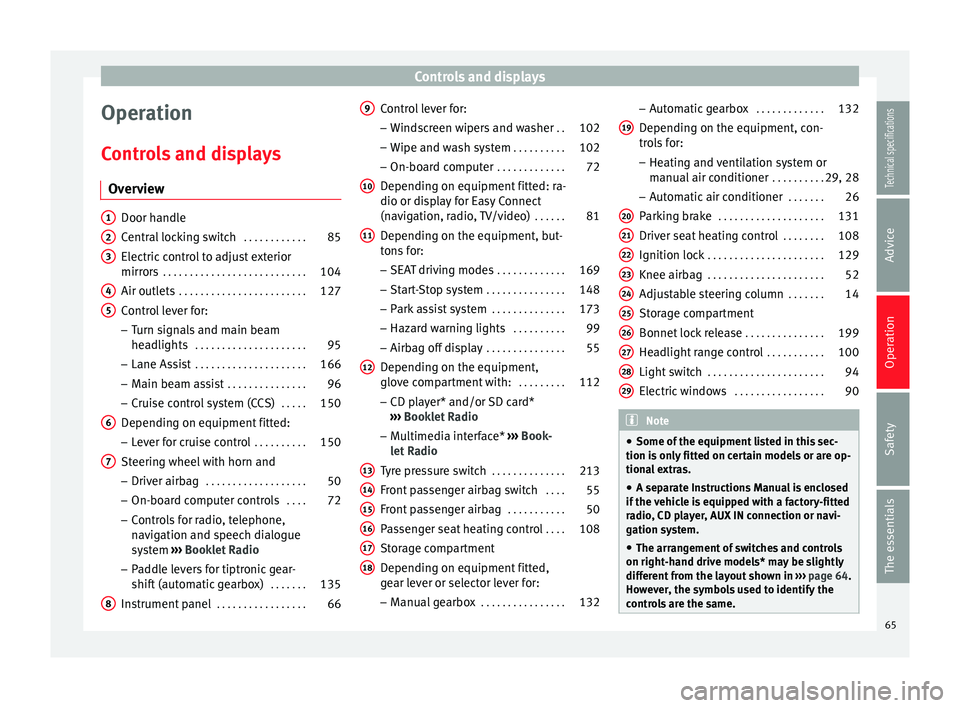
Controls and displays Overview Door handle
Central locking switch
. . . . . . . . . . . .85
Electric control to adjust exterior
mirrors . . . . . . . . . . . . . . . . . . . . . . . . . . . 104
Air outlets . . . . . . . . . . . . . . . . . . . . . . . . 127
Control lever for:
– Turn signals and main beam
headlights . . . . . . . . . . . . . . . . . . . . . 95
– Lane Assist . . . . . . . . . . . . . . . . . . . . . 166
– Main beam assist . . . . . . . . . . . . . . . 96
– Cruise control system (CCS) . . . . .150
Depending on equipment fitted:
– Lever for cruise control . . . . . . . . . .150
Steering wheel with horn and – Driver airbag . . . . . . . . . . . . . . . . . . . 50
– On-board computer controls . . . .72
– Controls for radio, telephone,
navigation and speech dialogue
system ›››
Booklet Radio
– Paddle levers for tiptronic gear-
shift (automatic gearbox) . . . . . . .135
Instrument panel . . . . . . . . . . . . . . . . . 66
1 2
3
4
5
6
7
8 Control lever for:
– Windscreen wipers and washer . .102
– Wipe and wash system . . . . . . . . . .102
– On-board computer . . . . . . . . . . . . .72
Depending on equipment fitted: ra-
dio or display for Easy Connect
(navigation, radio, TV/video) . . . . . .81
Depending on the equipment, but-
tons for:
– SEAT driving modes . . . . . . . . . . . . .169
– Start-Stop system . . . . . . . . . . . . . . . 148
– Park assist system . . . . . . . . . . . . . .173
– Hazard warning lights . . . . . . . . . .99
– Airbag off display . . . . . . . . . . . . . . . 55
Depending on the equipment,
glove compartment with: . . . . . . . . .112
– CD player* and/or SD card*
››› Booklet Radio
– Multimedia interface* ››› Book-
let Radio
Tyre pressure switch . . . . . . . . . . . . . .213
Front passenger airbag switch . . . .55
Front passenger airbag . . . . . . . . . . .50
Passenger seat heating control . . . .108
Storage compartment
Depending on equipment fitted,
gear lever or selector lever for:
– Manual gearbox . . . . . . . . . . . . . . . . 132
9
10
11
12
13
14
15
16
17
18 –
Automatic gearbox . . . . . . . . . . . . .132
Depending on the equipment, con-
trols for: – Heating and ventilation system or
manual air conditioner . . . . . . . . . .29, 28
– Automatic air conditioner . . . . . . .26
Parking brake . . . . . . . . . . . . . . . . . . . . 131
Driver seat heating control . . . . . . . .108
Ignition lock . . . . . . . . . . . . . . . . . . . . . . 129
Knee airbag . . . . . . . . . . . . . . . . . . . . . . 52
Adjustable steering column . . . . . . .14
Storage compartment
Bonnet lock release . . . . . . . . . . . . . . .199
Headlight range control . . . . . . . . . . .100
Light switch . . . . . . . . . . . . . . . . . . . . . . 94
Electric windows . . . . . . . . . . . . . . . . . 90 Note
● Some of the equipment listed in this sec-
tion is only fitted on certain models or are op-
tional extras.
● A separate Instructions Manual is enclosed
if the vehicle is equipped with a factory-fitted
radio, CD player, AUX IN connection or navi-
gation system.
● The arrangement of switches and controls
on right-hand drive models* may be slightly
different from the layout shown in ››› page 64.
However, the symbols used to identify the
controls are the same. 19
20
21
22
23
24
25
26
27
28
29
65Technical specifications
Advice
Operation
Safety
The essentials
Page 101 of 284
Lights and visibility
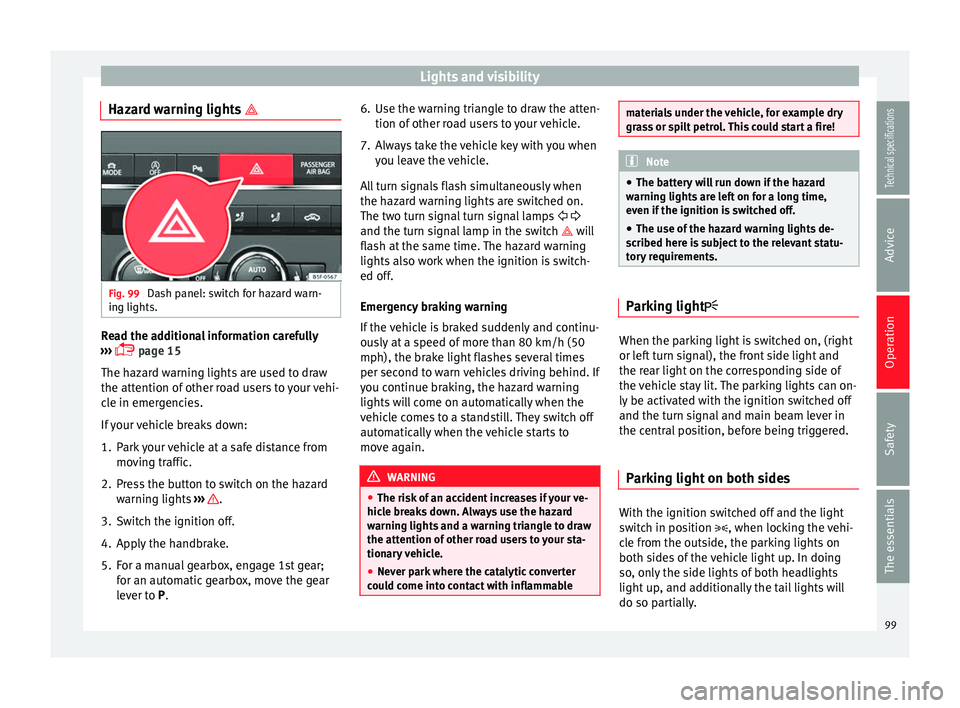
Hazard warning lights Fig. 99
Dash panel: switch for hazard warn-
ing lights. Read the additional information carefully
››› page 15
The hazard warning lights are used to draw
the attention of other road users to your vehi-
cle in emergencies.
If your vehicle breaks down:
1. Park your vehicle at a safe distance from moving traffic.
2. Press the button to switch on the hazard warning lights ››› .
3. Switch the ignition off.
4. Apply the handbrake.
5. For a manual gearbox, engage 1st gear; for an automatic gearbox, move the gear
lever to P
. 6. Use the warning triangle to draw the atten-
tion of other road users to your vehicle.
7. Always take the vehicle key with you when you leave the vehicle.
All turn signals flash simultaneously when
the hazard warning lights are switched on.
The two turn signal turn signal lamps
and the t
urn signal lamp in the switch will
flash at the same time. The hazard warning
lights also work when the ignition is switch-
ed off.
Emergency braking warning
If the vehicle is braked suddenly and continu-
ously at a speed of more than 80 km/h (50
mph), the brake light flashes several times
per second to warn vehicles driving behind. If
you continue braking, the hazard warning
lights will come on automatically when the
vehicle comes to a standstill. They switch off
automatically when the vehicle starts to
move again. WARNING
● The risk of an accident increases if your ve-
hicle breaks down. Always use the hazard
warning lights and a warning triangle to draw
the attention of other road users to your sta-
tionary vehicle.
● Never park where the catalytic converter
could come into contact with inflammable materials under the vehicle, for example dry
grass or spilt petrol. This could start a fire!
Note
● The battery will run down if the hazard
warning lights are left on for a long time,
even if the ignition is switched off.
● The use of the hazard warning lights de-
scribed here is subject to the relevant statu-
tory requirements. Parking light
When the parking light is switched on, (right
or left turn signal), the front side light and
the rear light on the corresponding side of
the vehicle stay lit. The parking lights can on-
ly be activated with the ignition switched off
and the turn signal and main beam lever in
the central position, before being triggered.
Parking light on both sides With the ignition switched off and the light
switch in position
, when locking the vehi-
cle from the outside, the parking lights on
both sides of the vehicle light up. In doing
so, only the side lights of both headlights
light up, and additionally the tail lights will
do so partially.
99
Technical specifications
Advice
Operation
Safety
The essentials
Page 131 of 284
Driving
Driving Ignition lock Switching on the ignition and starting
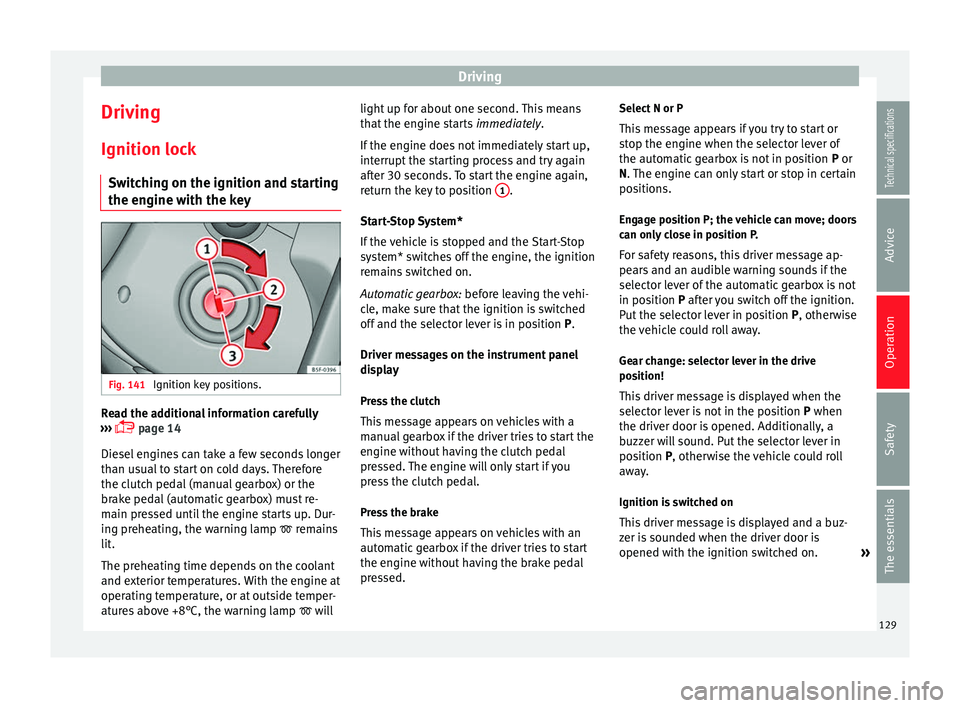
the engine with the key Fig. 141
Ignition key positions. Read the additional information carefully
››› page 14
Diesel engines can take a few seconds longer
than usual to start on cold days. Therefore
the clutch pedal (manual gearbox) or the
brake pedal (automatic gearbox) must re-
main pressed until the engine starts up. Dur-
ing preheating, the warning lamp remains
lit.
The preheating time depends on the coolant
and exterior temperatures. With the engine at
operating temperature, or at outside temper-
atures above +8°C, the warning lamp will light up for about one second. This means
that the engine starts
immediately.
If the engine does not immediately start up,
interrupt the starting process and try again
after 30 seconds. To start the engine again,
return the key to position 1 .
Start-Stop System*
If the vehicle is stopped and the Start-Stop
system* switches off the engine, the ignition
remains switched on.
Automatic gearbox: before leaving the vehi-
cle, make sure that the ignition is switched
off and the selector lever is in position P.
Driv er me
ssages on the instrument panel
display
Press the clutch
This message appears on vehicles with a
manual gearbox if the driver tries to start the
engine without having the clutch pedal
pressed. The engine will only start if you
press the clutch pedal.
Press the brake
This message appears on vehicles with an
automatic gearbox if the driver tries to start
the engine without having the brake pedal
pressed. Select N or P
This message appears if you try to start or
stop the engine when the selector lever of
the automatic gearbox is not in position P or
N. The engine can only start or stop in certain
po
sitions.
Engage position P; the vehicle can move; doors
can only close in position P.
For safety reasons, this driver message ap-
pears and an audible warning sounds if the
selector lever of the automatic gearbox is not
in position P after you switch off the ignition.
P
ut the selector lever in position P, otherwise
the vehicle could roll away.
Gear change: selector lever in the drive
position! This driver message is displayed when the
selector lever is not in the position P when
the driver door i
s opened. Additionally, a
buzzer will sound. Put the selector lever in
position
P, otherwise the vehicle could roll
away.
Ignition is switched on
This driver message is displayed and a buz-
zer is sounded when the driver door is
opened with the ignition switched on. »
129
Technical specifications
Advice
Operation
Safety
The essentials
Page 133 of 284
Driving
remains switched on. Make sure that the igni-
tion is switched off before leaving the
vehicle, otherwise the battery could dis-
charge.
Braking and parking
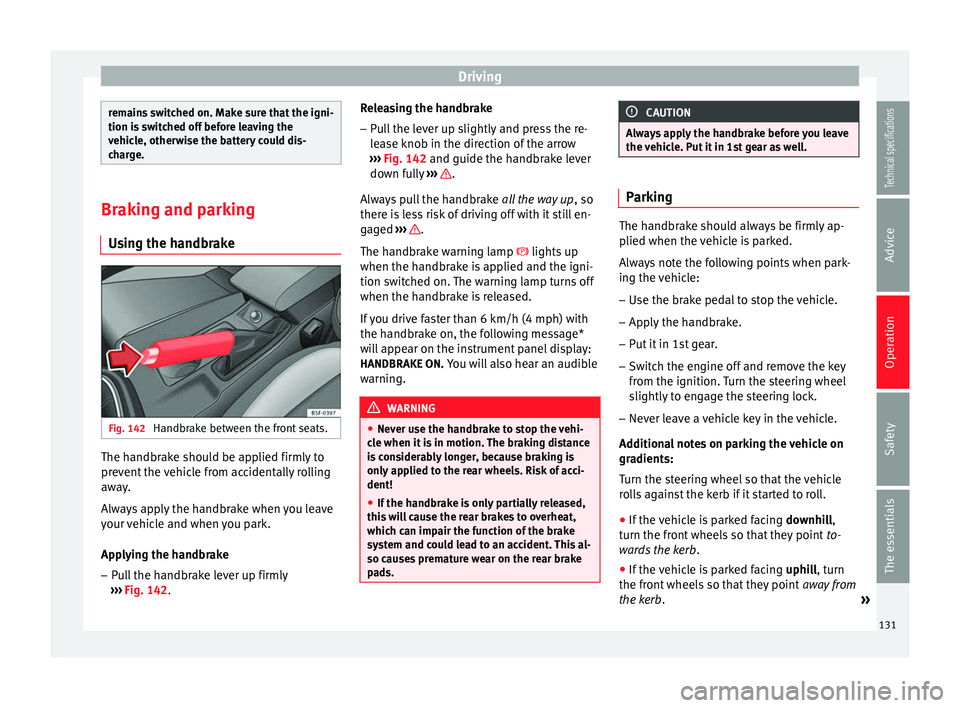
Using the handbrake Fig. 142
Handbrake between the front seats. The handbrake should be applied firmly to
prevent the vehicle from accidentally rolling
away.
Always apply the handbrake when you leave
your vehicle and when you park.
Applying the handbrake
– Pull the handbrake lever up firmly
››› Fig. 142 . R
el easing the handbrake
– Pull the lever up slightly and press the re-
lease knob in the direction of the arrow
››› Fig. 142 and guide the handbrake lever
down f
ully ››› .
Always pull the handbrake all the way up, so
there is less risk of driving off with it still en-
gaged ››› .
The handbrake warning lamp lights up
when the handbrake is applied and the igni-
tion switched on. The warning lamp turns off
when the handbrake is released.
If you drive faster than 6 km/h (4 mph) with
the handbrake on, the following message*
will appear on the instrument panel display: HANDBRAKE ON. You will also hear an audible
warning. WARNING
● Never use the handbrake to stop the vehi-
cle when it is in motion. The braking distance
is considerably longer, because braking is
only applied to the rear wheels. Risk of acci-
dent!
● If the handbrake is only partially released,
this will cause the rear brakes to overheat,
which can impair the function of the brake
system and could lead to an accident. This al-
so causes premature wear on the rear brake
pads. CAUTION
Always apply the handbrake before you leave
the vehicle. Put it in 1st gear as well. Parking
The handbrake should always be firmly ap-
plied when the vehicle is parked.
Always note the following points when park-
ing the vehicle:
– Use the brake pedal to stop the vehicle.
– Apply the handbrake.
– Put it in 1st gear.
– Switch the engine off and remove the key
from the ignition. Turn the steering wheel
slightly to engage the steering lock.
– Never leave a vehicle key in the vehicle.
Additional notes on parking the vehicle on
gradients:
Turn the steering wheel so that the vehicle
rolls against the kerb if it started to roll. ● If the vehicle is parked facing downhill,
turn the front wheels so that they point to-
wards the kerb .
● If the vehicle is parked facing uphill
, turn
the fr ont
wheels so that they point away from
the kerb
. »
131
Technical specifications
Advice
Operation
Safety
The essentials
Page 135 of 284
Driving
smooth, uninterrupted acceleration of the
vehicle.
The tiptronic
system allows the driver to
c
hange gears manually if desired
››› page 135, Changing gears in tiptronic
mode*.
Select
or lever positions Read the additional information carefully
››› page 25
The selector lever position engaged is high-
lighted on the display in the instrument clus-
ter. With the selector lever in the manual
gearbox positions G, D, E and S, the engaged
gear is also indicated on the display.
P – Parking lock
When the selector lever is in this position,
the driven wheels are locked mechanically.
The parking lock must be engaged only when
the vehicle is stationary
› ›
› .
The interlock button (the button on the selec-
tor lever handle) must be pressed in and si-
mu lt
aneously the brake pedal must be de-
pressed before moving the selector lever ei-
ther in or out of position P. R – Reverse gear
Reverse gear must be engaged only when the
vehicle is
stationary
and the engine is idling
››› .
To move the selector lever to position R, the
interlock button must be pressed in and at
the s ame time the br
ake pedal must be de-
pressed. The reverse lights come on when
the selector lever is in the R position with the
ignition on.
N – Neutral (idling)
With the selector lever in this position, the
gear is in neutral.
D/S – Permanent drive (forward) position
The selector lever in the D/S position enables
the gears to be controlled in normal mode (D)
or Sport (S). To select Sport mode (S), move
the selector lever backwards. Moving the lev-
er again will select normal mode (D). The se-
lected driving mode is shown on the instru-
ment panel display.
In
normal mode (D), the gearbox automatical-
ly selects the best gear ratio. This depends
on the engine load, the road speed and the
dynamic gear control programme (DCP).
Sport mode (S) must be selected for a sporty
driving style. This setting makes use of the
engine's maximum power output. When ac-
celerating the gear shifts will be noticeable. The brake pedal must be pressed when mov-
ing the selector lever from D/S to N if the ve-
hicle is stationary or at speeds below 5 km/h
(3 mph)
››› .
Under certain circumstances (e.g. when driv-
ing in mountains) it can be advantageous to
switch temporarily to tiptronic mode
››› page 135 , in order to
manually select g
ear
ratios to suit the driving conditions. WARNING
● Take care not to accidentally press the ac-
celerator pedal when the vehicle is stopped.
The vehicle could otherwise start moving im-
mediately (in some cases even if the parking
brake is engaged) resulting in the risk of an
accident.
● Never move the selector lever to R or P
when driving. Failure to follow this instruc-
tion could result in an accident.
● With selector lever in any position (except
P) the vehicle must always be held with the
foot brake when the engine is running. This is
because an automatic gearbox still transmits
power even at idling speed, and the vehicle
tends to “creep”). The accelerator pedal must
on no account be pressed inadvertently when
a gear is engaged with the vehicle stationary.
The vehicle could otherwise start moving im-
mediately (in some cases even if the parking
brake is engaged) resulting in the risk of an
accident. » 133
Technical specifications
Advice
Operation
Safety
The essentials
Page 136 of 284
Operation
●
While you are selecting a gear and the vehi-
cle is stopped with the engine running, do
not accelerate. Failure to follow this instruc-
tion could result in an accident.
● As a driver you should never leave your ve-
hicle if the engine is running and a gear is en-
gaged. If you have to leave your vehicle while
the engine is running, you must apply the
handbrake and engage the parking lock (P).
● To avoid accidents, apply the handbrake
and put the selector lever in position P before
opening the bonnet and working on the vehi-
cle with the engine running. Please always
observe the important safety warnings
››› page 198, Work in the engine compart-
ment. Note
● If the selector lever is moved accidentally
to N when driving, release the accelerator and
let the engine speed drop to idling before se-
lecting gear range D or S again.
● Should the power supply to the selector
lever be interrupted in position P, the selector
lever will be locked. If this should happen the
manual release can be used ››› page 229. Selector lever lock
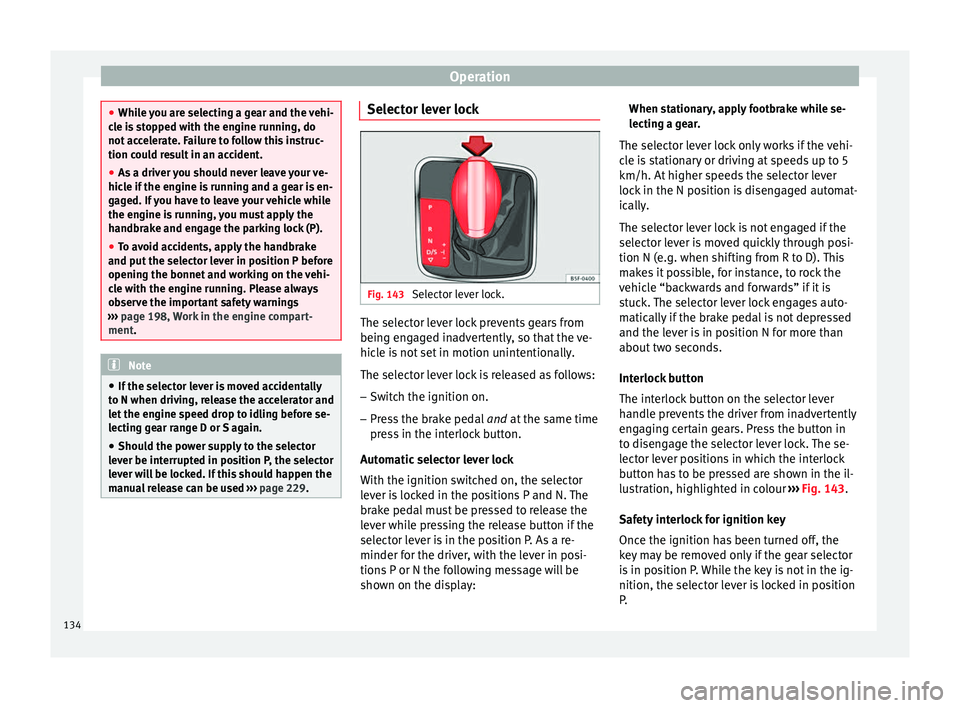
Fig. 143
Selector lever lock. The selector lever lock prevents gears from
being engaged inadvertently, so that the ve-
hicle is not set in motion unintentionally.
The selector lever lock is released as follows:
– Switch the ignition on.
– Press the brake pedal and at the same time
pr e
ss in the interlock button.
Automatic selector lever lock
With the ignition switched on, the selector
lever is locked in the positions P and N. The
brake pedal must be pressed to release the
lever while pressing the release button if the
selector lever is in the position P. As a re-
minder for the driver, with the lever in posi-
tions P or N the following message will be
shown on the display: When stationary, apply footbrake while se-
lecting a gear.
The selector lever lock only works if the vehi-
cle is stationary or driving at speeds up to 5
km/h. At higher speeds the selector lever
lock in the N position is disengaged automat-
ically.
The selector lever lock is not engaged if the
selector lever is moved quickly through posi-
tion N (e.g. when shifting from R to D). This
makes it possible, for instance, to rock the
vehicle “backwards and forwards” if it is
stuck. The selector lever lock engages auto-
matically if the brake pedal is not depressed
and the lever is in position N for more than
about two seconds.
Interlock button
The interlock button on the selector lever
handle prevents the driver from inadvertently
engaging certain gears. Press the button in
to disengage the selector lever lock. The se-
lector lever positions in which the interlock
button has to be pressed are shown in the il-
lustration, highlighted in colour ››› Fig. 143.
Safety
interlock for ignition key
Once the ignition has been turned off, the
key may be removed only if the gear selector
is in position P. While the key is not in the ig-
nition, the selector lever is locked in position
P.
134