window Seat Leon SC 2015 NAVI SYSTEM PLUS
[x] Cancel search | Manufacturer: SEAT, Model Year: 2015, Model line: Leon SC, Model: Seat Leon SC 2015Pages: 96, PDF Size: 2.48 MB
Page 11 of 96
Introduction
Operation of the function buttons and
the in s
truction
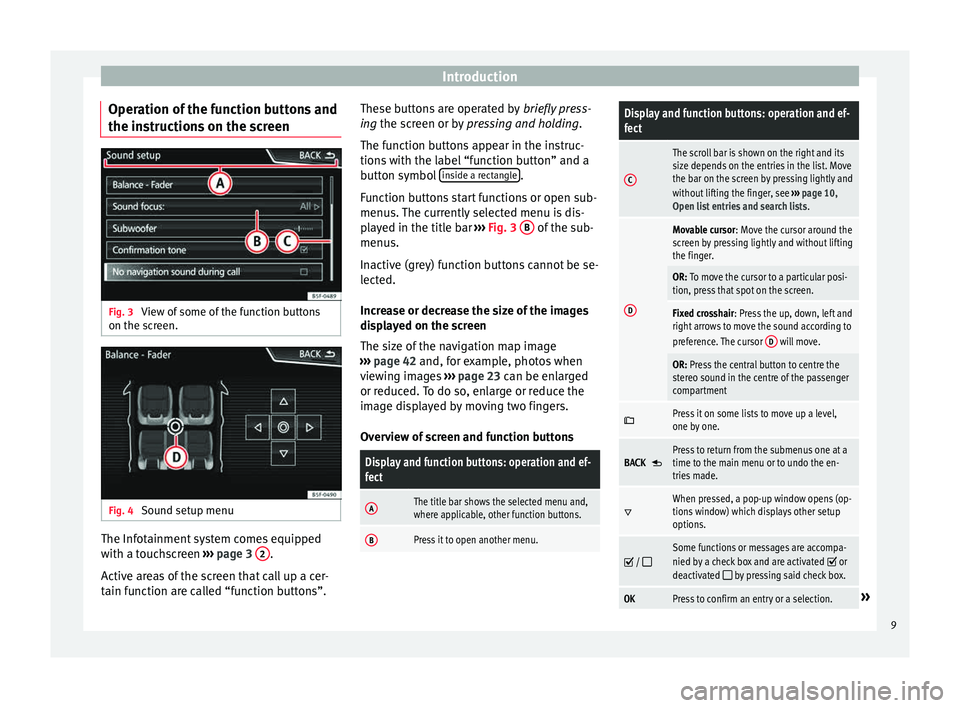
s on the screenFig. 3
View of some of the function buttons
on the s c
r
een. Fig. 4
Sound setup menu The Infotainment system comes equipped
w ith a t
ouc
hscreen ››› page 3 2 .
A ctiv
e ar
eas of the screen that call up a cer-
tain function are called “function buttons”. These buttons are operated by
briefly
press-
ing the screen or by pressing and holding.
The function buttons appear in the instruc-
tions with the label “function button” and a
button symbol inside a rectangle .
F u
nction b
uttons start functions or open sub-
menus. The currently selected menu is dis-
played in the title bar ››› Fig. 3 B of the sub-
menu s.
In activ
e (grey) function buttons cannot be se-
lected.
Increase or decrease the size of the images
displayed on the screen
The size of the navigation map image
››› page 42 and, for example, photos when
viewing images ››› page 23 can be enlarged
or reduced. To do so, enlarge or reduce the
image displayed by moving two fingers.
Overview of screen and function buttons
Display and function buttons: operation and ef-
fect
AThe title bar shows the selected menu and,
where applicable, other function buttons.
BPress it to open another menu.
Display and function buttons: operation and ef-
fect
C
The scroll bar is shown on the right and its
size depends on the entries in the list. Move
the bar on the screen by pressing lightly and
without lifting the finger, see ››› page 10,
Open list entries and search lists .
D
Movable cursor: Move the cursor around the
screen by pressing lightly and without lifting
the finger.
OR: To move the cursor to a particular posi-
tion, press that spot on the screen.
Fixed crosshair: Press the up, down, left and
right arrows to move the sound according to
preference. The cursor D
will move.
OR: Press the central button to centre the
stereo sound in the centre of the passenger
compartment
Press it on some lists to move up a level,
one by one.
BACK Press to return from the submenus one at a
time to the main menu or to undo the en-
tries made.
When pressed, a pop-up window opens (op-
tions window) which displays other setup
options.
/ Some functions or messages are accompa-
nied by a check box and are activated or
deactivated by pressing said check box.
OKPress to confirm an entry or a selection.» 9
Page 12 of 96
IntroductionDisplay and function buttons: operation and ef-
fect
×
Press to close a pop-up window or an input
window.
/ Press them to change the setup adjustments
one at a time.
Move the slider around the screen by press-
ing it lightly and without lifting your finger.
Open list entries and search lists
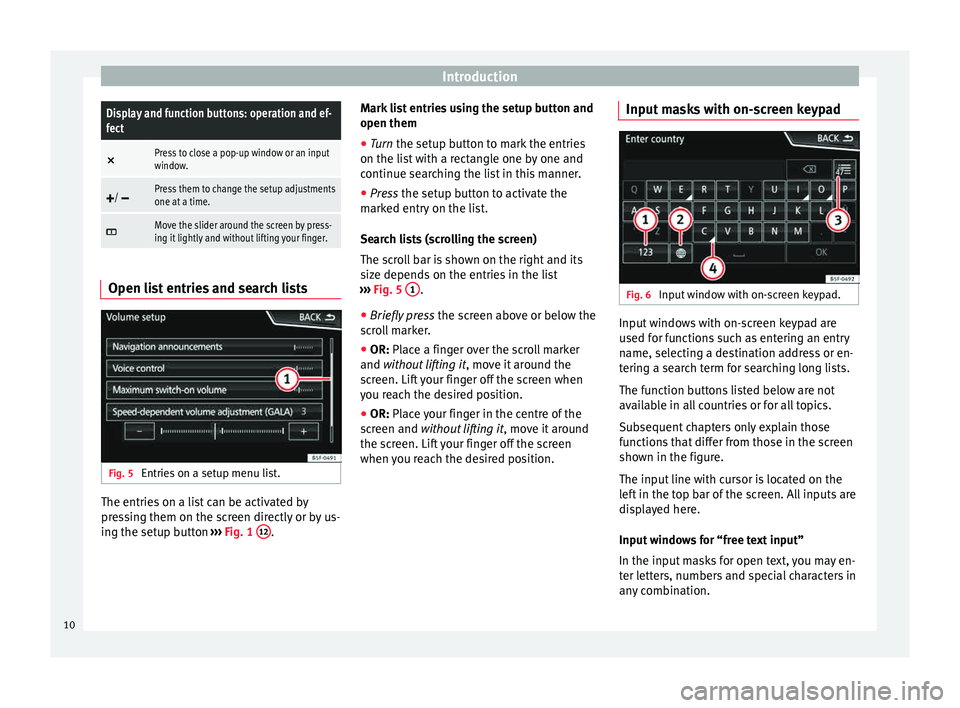
Fig. 5
Entries on a setup menu list. The entries on a list can be activated by
pr
e
s
sing them on the screen directly or by us-
ing the setup button ›››
Fig. 1 12 .Mark list entries using the setup button and
open them
●
Turn the set up button to mark the entries
on the li s
t with a rectangle one by one and
continue searching the list in this manner.
● Press the setup butt
on to activate the
marked entry on the list.
Search lists (scrolling the screen)
The scroll bar is shown on the right and its
size depends on the entries in the list
››› Fig. 5 1 .
● Briefly press the sc
r
een above or below the
scroll marker.
● OR: Place a finger over the scroll marker
and without
lifting it, move it around the
screen. Lift your finger off the screen when
you reach the desired position.
● OR: Place your finger in the centre of the
sc
reen and without lifting it , move it around
the screen. Lift your finger off the screen
when you reach the desired position. Input masks with on-screen keypad Fig. 6
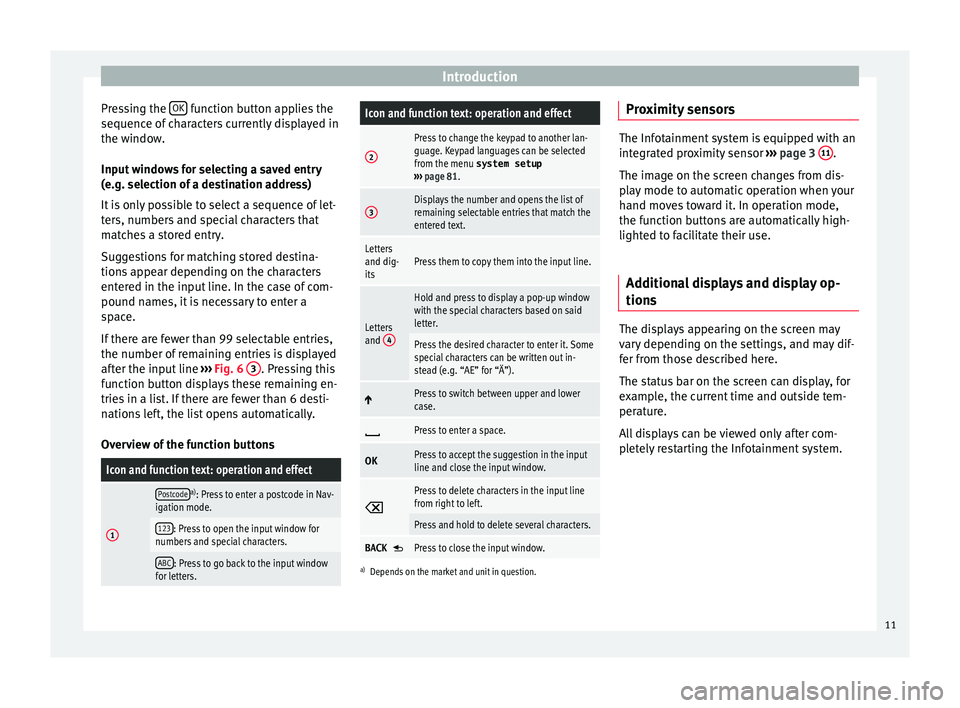
Input window with on-screen keypad. Input windows with on-screen keypad are
u
sed f
or f
unctions such as entering an entry
name, selecting a destination address or en-
tering a search term for searching long lists.
The function buttons listed below are not
available in all countries or for all topics.
Subsequent chapters only explain those
functions that differ from those in the screen
shown in the figure.
The input line with cursor is located on the
left in the top bar of the screen. All inputs are
displayed here.
Input windows for “free text input”
In the input masks for open text, you may en-
ter letters, numbers and special characters in
any combination.
10
Page 13 of 96
Introduction
Pressing the OK function button applies the
sequenc e of
c
haracters currently displayed in
the window.
Input windows for selecting a saved entry
(e.g. selection of a destination address)
It is only possible to select a sequence of let-
ters, numbers and special characters that
matches a stored entry.
Suggestions for matching stored destina-
tions appear depending on the characters
entered in the input line. In the case of com-
pound names, it is necessary to enter a
space.
If there are fewer than 99 selectable entries,
the number of remaining entries is displayed
after the input line ››› Fig. 6 3 . Pressing this
f u
nction b
utton displays these remaining en-
tries in a list. If there are fewer than 6 desti-
nations left, the list opens automatically.
Overview of the function buttons
Icon and function text: operation and effect
1
Postcodea) : Press to enter a postcode in Nav-
igation mode.
123: Press to open the input window for
numbers and special characters.
ABC: Press to go back to the input window
for letters.
Icon and function text: operation and effect
2
Press to change the keypad to another lan-
guage. Keypad languages can be selected
from the menu system setup
››› page 81.
3Displays the number and opens the list of
remaining selectable entries that match the
entered text.
Letters
and dig-
itsPress them to copy them into the input line.
Letters
and 4
Hold and press to display a pop-up window
with the special characters based on said
letter.
Press the desired character to enter it. Some
special characters can be written out in-
stead (e.g. “AE” for “Ä”).
Press to switch between upper and lower
case.
Press to enter a space.
OKPress to accept the suggestion in the input
line and close the input window.
Press to delete characters in the input line
from right to left.
Press and hold to delete several characters.
BACK Press to close the input window.
a)
Depends on the market and unit in question.
Proximity sensors The Infotainment system is equipped with an
inte
gr
ated proximity sensor ››› page 3 11 .
The imag e on the s
creen changes from dis-
play mode to automatic operation when your
hand moves toward it. In operation mode,
the function buttons are automatically high-
lighted to facilitate their use.
Additional displays and display op-
tions The displays appearing on the screen may
v
ar
y
depending on the settings, and may dif-
fer from those described here.
The status bar on the screen can display, for
example, the current time and outside tem-
perature.
All displays can be viewed only after com-
pletely restarting the Infotainment system.
11
Page 15 of 96
Introduction
● Briefly pr
e
ss the button of the multi-
function steering wheel to repeat the com-
mand.
Instructions for voice control
For optimum functioning of the voice control,
follow these instructions:
● Speak slowly and clearly, as far as possi-
ble.
The system will not recognise words that
are not pronounced clearly, or words and fig-
ures in which syllables are omitted.
● Telephone numbers must be given digit by
digit or in bloc
ks of numbers in ones, tens or
hundreds.
● Speak at a normal volume, without exag-
gerat
ed intonation or long pauses.
● Avoid noise from the exterior and nearby
(for ex
ample, conversations inside the vehi-
cle). Close all doors, windows and the sliding
roof.
● Do not aim the air from the diffusers at the
roof of
the passenger compartment.
● If you are driving very fast, speak a little
louder.
You c
an access the instructions by saying:
“Instructions/tutorial/introduction”. You can
also listen to the instructions in parts. These
are divided into 7 blocks. To access them,
give any of the previous commands followed
by “part +
part 1 ”. Voice control (RADIO) – Red
But-
tonMain radio commands (FM)
Next station
Previous station
Radio station
Wavelength
Scan mode
Voice control (MEDIA) – Red
But-
tonMain media commands
Next source
Previous source
Next track
Previous track
Mix Mode
Repeat track mode
Repeat all mode
Select
Source (Jukebox/USB/CD/SD)
Pause/play Voice control (PHONE) - Green
But-
tonMain Telephone commands
Dial number
Call name
Call
Call voice mail
Redial
Read contacts
See calls
Missed calls
Received calls
Dialled numbers»
13
Page 17 of 96
Audio and Media Mode
Audio and Media Mode
R a
dio Mode
RADIO m
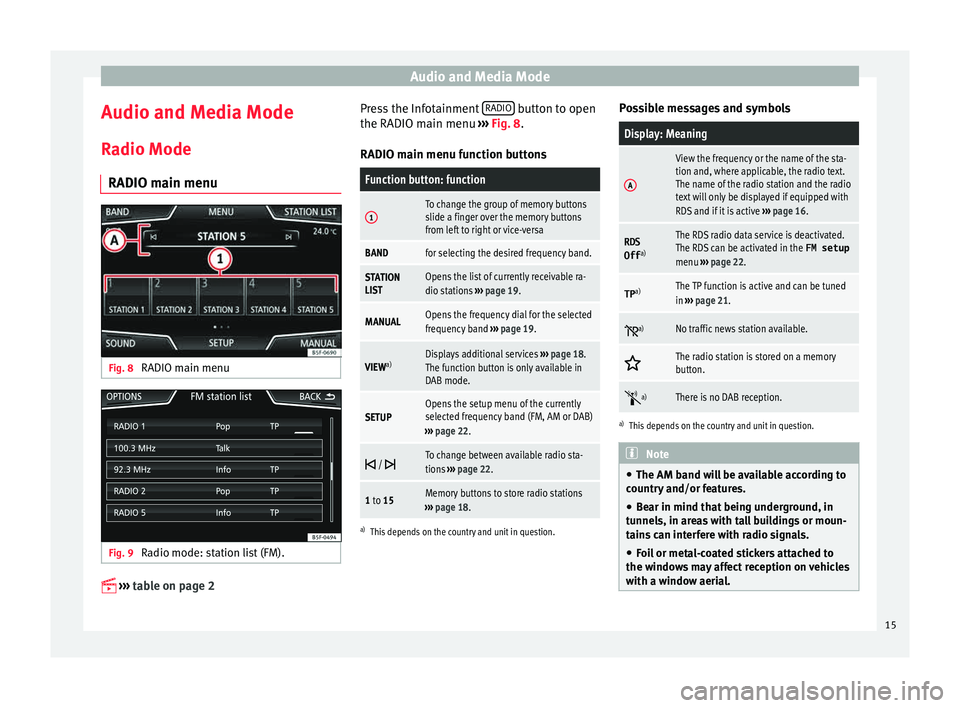
ain menuFig. 8
RADIO main menu Fig. 9
Radio mode: station list (FM).
›› ›
table on page 2 Press the Infotainment
RADIO button to open
the RADIO m ain menu
›
›
› Fig. 8.
RADIO main menu function buttons
Function button: function
1To change the group of memory buttons
slide a finger over the memory buttons
from left to right or vice-versa
BANDfor selecting the desired frequency band.
STATION
LISTOpens the list of currently receivable ra-
dio stations ››› page 19.
MANUALOpens the frequency dial for the selected
frequency band ››› page 19.
VIEW a)Displays additional services
››› page 18.
The function button is only available in
DAB mode.
SETUPOpens the setup menu of the currently
selected frequency band (FM, AM or DAB)
››› page 22.
/ To change between available radio sta-
tions
››› page 22.
1 to 15Memory buttons to store radio stations
››› page 18.
a)
This depends on the country and unit in question.
Possible messages and symbols
Display: Meaning
A
View the frequency or the name of the sta-
tion and, where applicable, the radio text.
The name of the radio station and the radio
text will only be displayed if equipped with
RDS and if it is active ››› page 16.
RDS
Off a)The RDS radio data service is deactivated.
The RDS can be activated in the
FM setup
menu ››› page 22.
TP a)The TP function is active and can be tuned
in
››› page 21.
a)No traffic news station available.
The radio station is stored on a memory
button.
a)There is no DAB reception.
a)
This depends on the country and unit in question. Note
● The AM band w i
ll be available according to
country and/or features.
● Bear in mind that being underground, in
tunnel
s, in areas with tall buildings or moun-
tains can interfere with radio signals.
● Foil or metal-coated stickers attached to
the window
s may affect reception on vehicles
with a window aerial. 15
Page 24 of 96
Audio and Media Mode
Incoming traffic announcement In active Audio mode, an incoming traffic an-
nounc
ement
will play automatically.
During the traffic announcement, a pop-up
window is displayed and the radio changes,
depending on the case, to the traffic news
station (EON).
The media mode is paused and the volume is
adjusted to the preset level ››› page 82.
The volume of the traffic announcement can
be modified with the volume control . The
adjusted volume setting will be applied to
subsequent announcements.
● Press the Canc
el function button to end the
c urr
ent
traffic announcement. The TP function
remains switched on.
● OR: Press the De
activate function button to
end the tr affic
annou
ncement and disconnect
the TP function permanently.
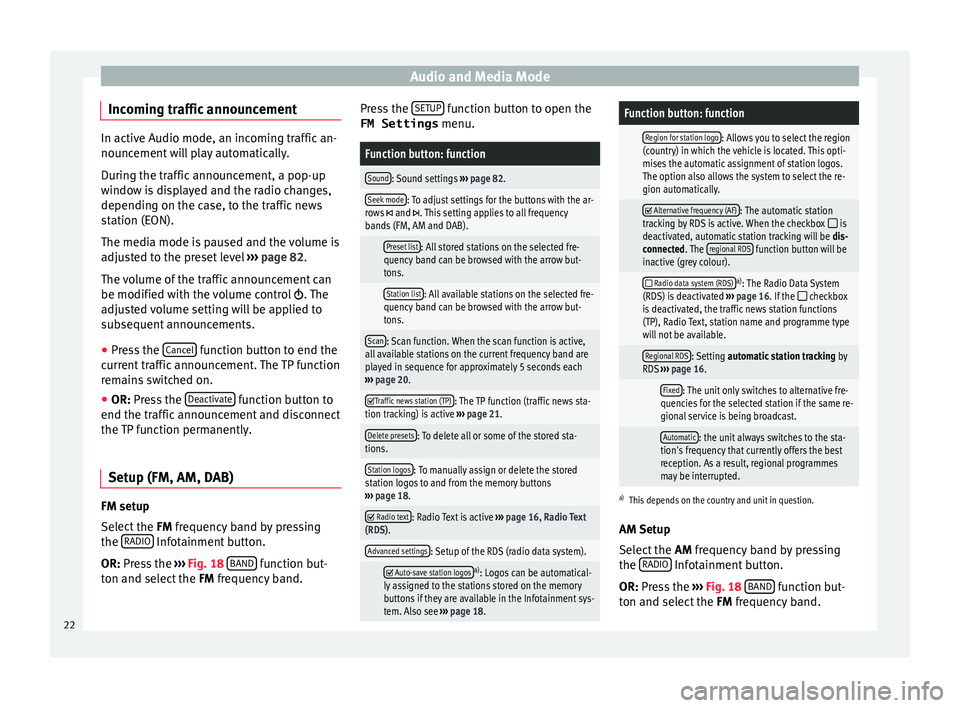
Setup (FM, AM, DAB) FM setup
Sel
ect
the FM
frequency band by pressing
the RADIO Infotainment button.
OR: Pr e
s
s the ›››
Fig. 18 BAND function but-
t on and sel
ect
the FM frequency band. Press the
SETUP function button to open the
FM Settings menu.
Function button: function
Sound: Sound settings ››› page 82.
Seek mode: To adjust settings for the buttons with the ar-
rows and . This setting applies to all frequency
bands (FM, AM and DAB).
Preset list: All stored stations on the selected fre-
quency band can be browsed with the arrow but-
tons.
Station list: All available stations on the selected fre-
quency band can be browsed with the arrow but-
tons.
Scan: Scan function. When the scan function is active,
all available stations on the current frequency band are
played in sequence for approximately 5 seconds each
››› page 20.
Traffic news station (TP): The TP function (traffic news sta-
tion tracking) is active ››› page 21.
Delete presets: To delete all or some of the stored sta-
tions.
Station logos: To manually assign or delete the stored
station logos to and from the memory buttons
››› page 18.
Radio text: Radio Text is active
››› page 16, Radio Text
(RDS).
Advanced settings: Setup of the RDS (radio data system).
Auto-save station logosa)
: Logos can be automatical-
ly assigned to the stations stored on the memory
buttons if they are available in the Infotainment sys-
tem. Also see ››› page 18.
Function button: function
Region for station logo: Allows you to select the region
(country) in which the vehicle is located. This opti-
mises the automatic assignment of station logos.
The option also allows the system to select the re-
gion automatically.
Alternative frequency (AF): The automatic station
tracking by RDS is active. When the checkbox is
deactivated, automatic station tracking will be dis-
connected. The regional RDS
function button will be
inactive (grey colour).
Radio data system (RDS)a)
: The Radio Data System
(RDS) is deactivated ››› page 16. If the checkbox
is deactivated, the traffic news station functions
(TP), Radio Text, station name and programme type
will not be available.
Regional RDS: Setting automatic station tracking by
RDS ››› page 16.
Fixed: The unit only switches to alternative fre-
quencies for the selected station if the same re-
gional service is being broadcast.
Automatic: the unit always switches to the sta-
tion's frequency that currently offers the best
reception. As a result, regional programmes
may be interrupted.
a) This depends on the country and unit in question.
AM Setup
Select the AM frequency band by pressing
the RADIO Infotainment button.
OR: Pr e
s
s the ››› Fig. 18 BAND function but-
t on and sel
ect
the FM frequency band.
22
Page 27 of 96
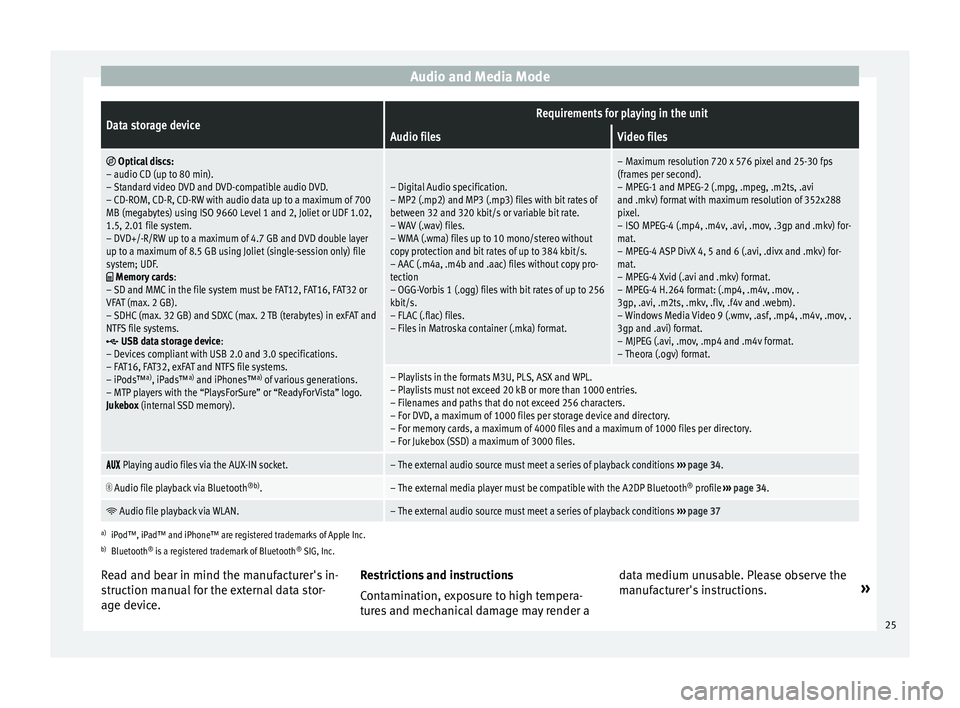
Audio and Media ModeData storage deviceRequirements for playing in the unit
Audio filesVideo files
Optical discs:
– audio CD (up to 80 min).
– Standard video DVD and DVD-compatible audio DVD.
– CD-ROM, CD-R, CD-RW with audio data up to a maximum of 700
MB (megabytes) using ISO 9660 Level 1 and 2, Joliet or UDF 1.02,
1.5, 2.01 file system.
– DVD+/-R/RW up to a maximum of 4.7 GB and DVD double layer
up to a maximum of 8.5 GB using Joliet (single-session only) file
system; UDF.
Memory cards :
– SD and MMC in the file system must be FAT12, FAT16, FAT32 or
VFAT (max. 2 GB).
– SDHC (max. 32 GB) and SDXC (max. 2 TB (terabytes) in exFAT and
NTFS file systems.
USB data storage device:
– Devices compliant with USB 2.0 and 3.0 specifications.
– FAT16, FAT32, exFAT and NTFS file systems.
– iPods™ a)
, iPads™ a)
and iPhones™ a)
of various generations.
– MTP players with the “PlaysForSure” or “ReadyForVista” logo.
Jukebox (internal SSD memory).
– Digital Audio specification.
– MP2 (.mp2) and MP3 (.mp3) files with bit rates of
between 32 and 320 kbit/s or variable bit rate.
– WAV (.wav) files.
– WMA (.wma) files up to 10 mono/stereo without
copy protection and bit rates of up to 384 kbit/s.
– AAC (.m4a, .m4b and .aac) files without copy pro-
tection
– OGG-Vorbis 1 (.ogg) files with bit rates of up to 256
kbit/s.
– FLAC (.flac) files.
– Files in Matroska container (.mka) format.
– Maximum resolution 720 x 576 pixel and 25-30 fps
(frames per second).
– MPEG-1 and MPEG-2 (.mpg, .mpeg, .m2ts, .avi
and .mkv) format with maximum resolution of 352x288
pixel.
– ISO MPEG-4 (.mp4, .m4v, .avi, .mov, .3gp and .mkv) for-
mat.
– MPEG-4 ASP DivX 4, 5 and 6 (.avi, .divx and .mkv) for-
mat.
– MPEG-4 Xvid (.avi and .mkv) format.
– MPEG-4 H.264 format: (.mp4, .m4v, .mov, .
3gp, .avi, .m2ts, .mkv, .flv, .f4v and .webm).
– Windows Media Video 9 (.wmv, .asf, .mp4, .m4v, .mov, .
3gp and .avi) format.
– MJPEG (.avi, .mov, .mp4 and .m4v format.
– Theora (.ogv) format.
– Playlists in the formats M3U, PLS, ASX and WPL.
– Playlists must not exceed 20 kB or more than 1000 entries.
– Filenames and paths that do not exceed 256 characters.
– For DVD, a maximum of 1000 files per storage device and directory.
– For memory cards, a maximum of 4000 files and a maximum of 1000 files per directory.
– For Jukebox (SSD) a maximum of 3000 files.
Playing audio files via the AUX-IN socket.– The external audio source must meet a series of playback conditions
››› page 34.
Audio file playback via Bluetooth
®b)
.– The external media player must be compatible with the A2DP Bluetooth ®
profile ››› page 34.
Audio file playback via WLAN.– The external audio source must meet a series of playback conditions
››› page 37
a)
iPod™, iPad™ and iPhone™ are registered trademarks of Apple Inc.
b) Bluetooth ®
is a registered trademark of Bluetooth ®
SIG, Inc.
Read and bear in mind the manufacturer's in-
struction manual for the external data stor-
age device. Restrictions and instructions
Contamin
ation, exposure to high tempera-
tures and mechanical damage may render a data medium unusable. Please observe the
manufact
urer's instructions. »
25
Page 30 of 96
Audio and Media Mode
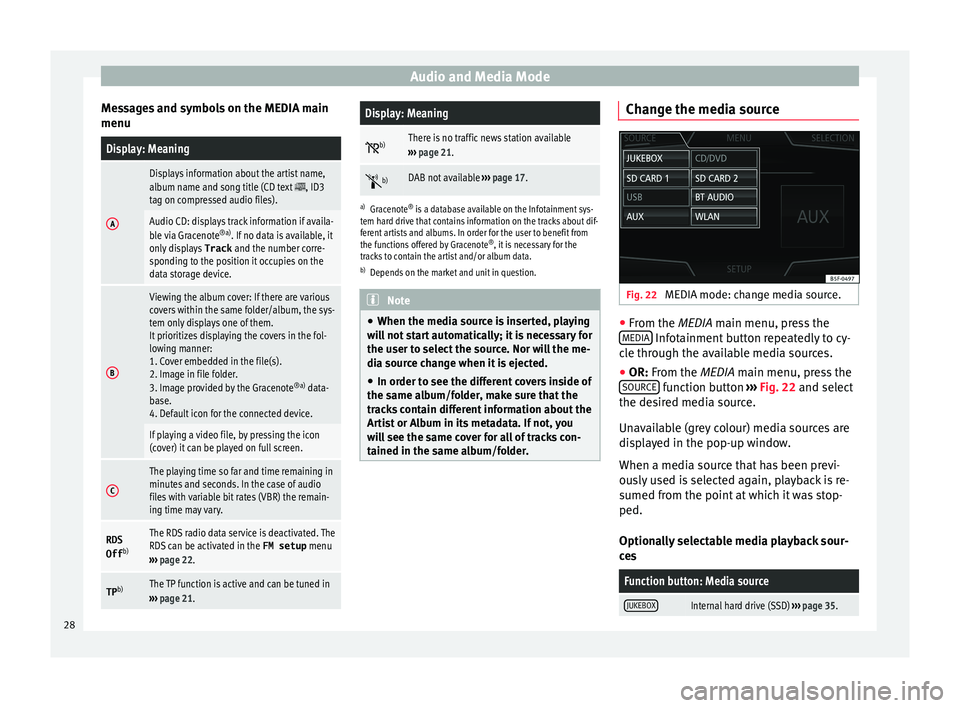
Messages and symbols on the MEDIA main
menuDisplay: Meaning
A
Displays information about the artist name,
album name and song title (CD text , ID3
tag on compressed audio files).
Audio CD: displays track information if availa-
ble via Gracenote ®a)
. If no data is available, it
only displays Track and the number corre-
sponding to the position it occupies on the
data storage device.
B
Viewing the album cover: If there are various
covers within the same folder/album, the sys-
tem only displays one of them.
It prioritizes displaying the covers in the fol-
lowing manner:
1. Cover embedded in the file(s).
2. Image in file folder.
3. Image provided by the Gracenote ®a)
data-
base.
4. Default icon for the connected device.
If playing a video file, by pressing the icon
(cover) it can be played on full screen.
C
The playing time so far and time remaining in
minutes and seconds. In the case of audio
files with variable bit rates (VBR) the remain-
ing time may vary.
RDS
Off b)The RDS radio data service is deactivated. The
RDS can be activated in the
FM setup menu
››› page 22.
TP b)The TP function is active and can be tuned in
››› page 21.
Display: Meaning
b)There is no traffic news station available
››› page 21.
b)DAB not available
››› page 17.
a)
Gracenote ®
is a database available on the Infotainment sys-
tem hard drive that contains information on the tracks about dif-
ferent artists and albums. In order for the user to benefit from
the functions offered by Gracenote ®
, it is necessary for the
tracks to contain the artist and/or album data.
b) Depends on the market and unit in question. Note
● When the media sour c
e is inserted, playing
will not start automatically; it is necessary for
the user to select the source. Nor will the me-
dia source change when it is ejected.
● In order to see the different covers inside of
the same al
bum/folder, make sure that the
tracks contain different information about the
Artist or Album in its metadata. If not, you
will see the same cover for all of tracks con-
tained in the same album/folder. Change the media source
Fig. 22
MEDIA mode: change media source. ●
From the MEDIA m ain menu, pr
e
ss the
MEDIA Infotainment button repeatedly to cy-
c l
e thr
ough the available media sources.
● OR: From the MEDIA main menu, press the
SOURCE function button
››
›
Fig. 22 and select
the desired media source.
Unavailable (grey colour) media sources are
displayed in the pop-up window.
When a media source that has been previ-
ously used is selected again, playback is re-
sumed from the point at which it was stop-
ped.
Optionally selectable media playback sour-
ces
Function button: Media source
JUKEBOXInternal hard drive (SSD) ››› page 35. 28
Page 41 of 96
Audio and Media Mode
Controlling the DVD menu
● Briefly touch the screen to activate the
f u
nction b
uttons in the DVD mode main
menu ››› Fig. 33.
Function button: function
SOURCEDisplay and selection of the source.
DVD
MENUTo display the control menu and return to the
main DVD screen ››› Fig. 34.
AChapter display.
BDisplays play time duration and remaining
play time.
C
: Move the control menu window.
: Minimise or maximise the control menu
window.
: Close the control menu.
DUse the arrow buttons to browse the DVD
menu. Confirm the selection by pressing
OK.
EPress to open the DVD main menu.
/ To move to the next or previous chapter.
Playback stops. The function button
changes to .
Playback is resumed. The function button
changes to .
SETUPThis menu contains the Video (DVD) settings
››› page 39. Note
● The v i
sual appearance of the DVD film me-
nus and the menu options which it offers are
the responsibility of the DVD manufacturer.
● The difference in behaviour of some films
when usin
g the same mode is the responsi-
bility of the DVD manufacturer.
● You may not be able to play video DVDs
which y
ou have burned yourself.
● The Infotainment system screen only dis-
pla
ys the image when the vehicle is stopped.
Whilst in motion, the screen disconnects (the
image), but the audio remains active. Video settings
On the D
VD mode main menu, press the
S ETUP function and then select the option
V ideo settin
g
s (DVD).
Function button: function
Format: To select the screen format. If Automatic is se-
lected, it adjusts automatically to the optimal format for
the screen.
Audio channel: select language for acoustic voice output.
Subtitles: To select the subtitle language.
Enter/change PIN for parental settings: Parental settings pass-
word.
Function button: function
Parental settings: To select the level of protection for DVD
playback. The options in the Video setup (DVD) menu
ma
y
vary depending on the DVD or the chap-
ter currently being played.
The available audio language channels and
subtitles depend on the inserted DVD.
All or a part of the DVD video content may be
protected by means of a password (PIN) if the
DVD is compatible with parental settings. Fur-
thermore, the level of protection can be set
according to age with 1 being the least re-
strictive (appropriate for all audiences) and
8, the most restrictive (adults).
Media settings ●
Select the MEDIA main menu b
y
pressing
the Infotainment MEDIA button.
● Press the S
ETUP function button to open
the Media Settings menu.
Function button: function
Sound: Sound settings ››› page 82.
Manage jukebox: To import files to the jukebox or delete
stored files ››› page 35.» 39
Page 46 of 96
Navigation
New destination (enter destination) ●
In the Navigation main menu, press the
New de s
tination function button.
● Press the Options function button and se-
lect the r
equired type of destination entry
(Address , POI or On the map ).
● Using voice control*, if you say Town, street
and number, without
pauses, and then the
instruction “Start Route Guidance” a route to
the given destination will start.
Address
After entering a country and a town, you can
start navigating towards the centre of the se-
lected town.
When narrowing down the destination ad-
dress, please note that every entry restricts
the available range of subsequent selections.
For instance, if the street you are looking for
is not in the postcode area you have selected
in a previous window, you will not be able to
find the street at the street selection stage.
Function button: function
Country: To select the desired country.
City: To enter the desired city or postcode.
Street: To enter the desired street name.
House number: To enter the desired house number.
Junction: To select the desired intersection.
Function button: function
Last destinations: Open My destinations menu
››› page 46.
Start: Start route guidance to the selected address. Points of Interest (POI)
Start route guidance to a point of interest.
Function button: function
Search area: To select the search area for the points of in-
terest.
Near current location: The points of interest are
searched for near the current location.
Near destinationa) : The points of interest are
searched for near the destination.
Along the routea) : The points of interest are searched
for along the route.
Near address: The points of interest are searched for
near the address.
Select on map: The points of interest are searched
for near the destination selected on the map. To se-
lect a destination on the map, press the Edit
func-
tion button.
Categories: Select the main category (e.g. Vehicle and
travel ), the category (e.g. Airports) and then the
desired entry from the list.
Save: To save the selected point of interest in the
destination memory ››› page 46.
Function button: function
Dial number: Establishes a telephone connection to
the number registered under the point of interest.
Start: Starts guided navigation to the selected
point of interest.
Find: To search for a point of interest by entering the
name or by means of synonyms of categories (e.g.
“Sleep” for hotels and hostels).
a) This function button is only displayed with route guidance ac-
tivated.
Using the
● Select the destination on the map or enter
the GPS c
oordinates and confirm with OK .
Function button: function
Save: To save the selected point of interest in the desti-
nation memory ››› page 46.
Edit: To edit a destination or to enter another destina-
tion.
Route options: To adjust route options, see Navigation
Setup ››› page 54.
Start: Starts guided navigation to the selected point of
interest. 44