stop start Seat Leon SC 2015 User Guide
[x] Cancel search | Manufacturer: SEAT, Model Year: 2015, Model line: Leon SC, Model: Seat Leon SC 2015Pages: 308, PDF Size: 5.93 MB
Page 107 of 308
Instruments and warning/control lamps
CAUTION
● To pr ev
ent damage to the engine, the rev
counter needle should only remain in the red
zone for a short period of time.
● When the engine is cold, avoid high revs
and heavy ac
celeration and do not make the
engine work hard. For the sake of the environment
Changing up a gear in time reduces fuel con-
sumption and noi se.Rev counter
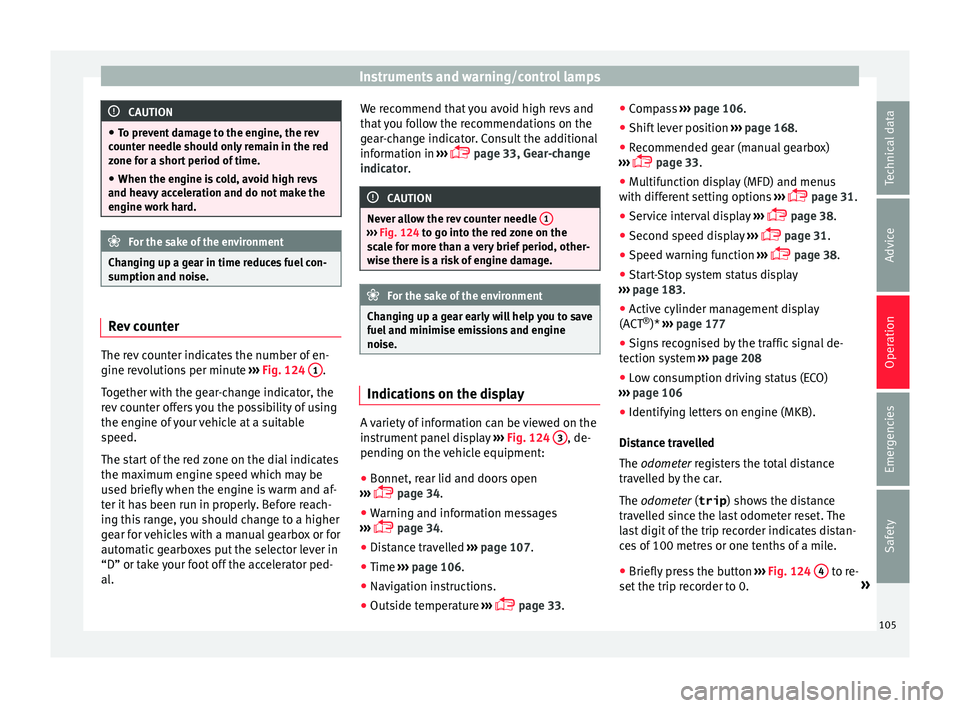
The rev counter indicates the number of en-
gine r
ev
o
lutions per minute ›››
Fig. 124 1 .
T og
ether w
ith the gear-change indicator, the
rev counter offers you the possibility of using
the engine of your vehicle at a suitable
speed.
The start of the red zone on the dial indicates
the maximum engine speed which may be
used briefly when the engine is warm and af-
ter it has been run in properly. Before reach-
ing this range, you should change to a higher
gear for vehicles with a manual gearbox or for
automatic gearboxes put the selector lever in
“D” or take your foot off the accelerator ped-
al. We recommend that you avoid high revs and
that
you follow the recommendations on the
gear-change indicator. Consult the additional
information in ›››
page 33, Gear-change
indicator. CAUTION
Never allow the rev counter needle 1 ›››
Fig. 124 to g o int
o the red zone on the
scale for more than a very brief period, other-
wise there is a risk of engine damage. For the sake of the environment
Changing up a gear early will help you to save
fuel and minimi
se emissions and engine
noise. Indications on the display
A variety of information can be viewed on the
in
s
trument
panel display ›››
Fig. 124 3 , de-
pendin g on the
v
ehicle equipment:
● Bonnet, rear lid and doors open
›››
page 34.
● Warning and information messages
›››
page 34.
● Distance travelled ›››
page 107.
● Time ›››
page 106.
● Navigation instructions.
● Outside temperature ›››
page 33. ●
Compa
ss ››› page 106.
● Shift lever position ›››
page 168.
● Recommended gear (manual gearbox)
›››
page 33.
● Multifunction display (MFD) and menus
with differ
ent setting options ›››
page 31.
● Service interval display ›››
page 38.
● Second speed display ›››
page 31.
● Speed warning function ›››
page 38.
● Start-Stop system status display
›››
page 183.
● Active cylinder management display
(ACT ®
)* ››
› page 177
● Signs recognised by the traffic signal de-
tection sys
tem ››› page 208
● Low consumption driving status (ECO)
›››
page 106
● Identifying letters on engine (MKB).
Dist
ance travelled
The odometer registers the total distance
travelled by the car.
The odometer (trip ) shows the distance
travelled since the last odometer reset. The
last digit of the trip recorder indicates distan-
ces of 100 metres or one tenths of a mile.
● Briefly press the button ›››
Fig. 124 4 to re-
set the trip r
ec
order to 0. »
105
Technical data
Advice
Operation
Emergencies
Safety
Page 108 of 308
Operation
● Keep the b
utt
on 4 pressed for about 3
sec ond
s
and the previous value will be dis-
played.
Time
● To set the time, keep the button ›››
Fig. 124
4 pressed for more than 3 seconds to select
the hour or minut e di
s
play.
● To continue setting the time, press the up-
per or lower p
art of the button 4 . Hold but-
t on do
wn t
o scroll through the numbers
quickly.
● Press the button 4 again in order to finish
settin g the time.
The time c an al
so be set via the key and
Set up function button in the Easy Connect
sy s
t
em ››› page 110.
Compass
With the ignition on and the navigation sys-
tem on, the cardinal point corresponding to
the direction of travel of the vehicle is dis-
played on the instrument panel.
Selector lever position
The selected gear is displayed on the side of
the selector lever and on the instrument pan-
el display. In positions D and S, and with the
Tiptronic, the corresponding gear is also dis-
played. Recommended gear (manual gearbox)
The recommended g
ear in order to save fuel
is displayed on the instrument panel while
you are driving ›››
page 33.
Second speed display (mph or km/h)
In addition to the speedometer, the speed
can also be displayed in a different unit of
measurement (in miles or in km per hour).
This option cannot be deactivated in models
destined for countries in which the second
speed must always be visible.
The second speed display can be adjusted in
the Easy Connect system via the key and
the Set
up function button
››
›
page 110.
Speed warning
When the speed setting is exceeded, this will
be indicated on the instrument panel display.
This is very useful, for example when using
winter tyres that are not designed for driving
at the maximum speed of the vehicle
››› page 38.
The speed warning settings can be adjusted
in the Easy Connect system via the key
and the Set
up function button
››
›
page 110.
Start-Stop operating display
Updated information relating to the status is
displayed on the instrument panel
››› page 183. Low consumption driving status (ECO)*
Depending on the equipment, when driv
ing,
the “ECO ” display appears on the instrument
panel when the vehicle is in low consump-
tion status due to active cylinder manage-
ment (ACT ®
)* ››› page 177.
Identifying letters on engine (MKB)
Hold the button ››› Fig. 124 4 down for more
th an 15 sec
ond
s to display the identifying
letters of the vehicle engine (MKB). To do
this, the ignition must be switched on and
the engine switched off. WARNING
Observe the safety warnings ›››
in Warning
and indication l amp
s on page 109. WARNING
Even though outside temperatures are above
freez in
g, some roads and bridges may be icy.
● At outside temperatures above +4°C
(+39°F), even when the “ice c
rystal symbol”
is not visible, there may still be patches of ice
on the road.
● Do not rely on the outside temperature in-
dicator! Note
● Differ ent
versions of the instrument panel
are available and therefore the versions and 106
Page 111 of 308

Instruments and warning/control lamps
Depending on the model, additional text
me s
s
ages may be viewed on the instrument
panel display. These may be purely informa-
tive or they may be advising of the need for
action ››› page 104, Instruments.
Depending upon the equipment fitted in the
vehicle, instead of a warning lamp, some-
times a symbol may be displayed on the in-
strument panel.
When certain control and warning lamps are
lit, an audible warning is also heard. WARNING
If the warning lamps and messages are ignor-
ed, the v ehic
le may stall in traffic, or may
cause accidents and severe injuries.
● Never ignore the warning lamps or text
mess
ages.
● Stop the vehicle safely as soon as possible.
● Park the vehicle away from traffic and en-
sure th
at there are no highly flammable ma-
terials under the vehicle that could come into
contact with the exhaust system (e.g. dry
grass, fuel).
● A faulty vehicle represents a risk of acci-
dent for the driv
er and for other road users. If
necessary, switch on the hazard warning
lamps and put out the warning triangle to ad-
vise other drivers.
● Before opening the bonnet, switch off the
engine and al
low it to cool. ●
In any
vehicle, the engine compartment is a
hazardous area and could cause severe inju-
ries ››› page 246. CAUTION
Failure to heed the control lamps and text
me ss
ages when they appear may result in
faults in the vehicle. Engine management*
This warning lamp monitors the engine man-
ag
ement
sy
stem for petrol engines.
The warning lamp (Electronic Power Con-
trol) lights up when the ignition is switched
on while system operation is being verified. It
should go out once the engine is started.
If there is a fault in the electronic engine
management system while you are driving,
this warning lamp will light up. Stop the vehi-
cle and seek technical assistance.
Engine pre-heating/fault system* The warning lamp lights up to show that the
glo
w p
lug
s are preheating the diesel engine.
The control lamp lights up
If the control lamp lights up when the en-
gine is started it means that the glow plugs are preheating. When the warning lamp goes
off, the engine shou
ld be started straight
away.
Control lamp flashes
If a fault develops in the engine management
system while you are driving, the glow plug
system lamp will flash . Take the vehicle to
a specialised workshop as soon as possible
and have the engine checked. 109
Technical data
Advice
Operation
Emergencies
Safety
Page 127 of 308

Opening and closing
Safety switch * (only
in 5-door vehicles)
Safety switch 5 on the driver door can be
u sed t
o di
sable the electric window buttons
in the rear doors.
Safety switch not pressed: buttons on rear
doors are activated.
Safety switch pressed: buttons on rear doors
are deactivated.
The safety control symbol lights up in yel-
low if the buttons on the rear door are switch-
ed off. WARNING
Observe the safety warnings ›››
in Intro-
duction on pag e 88
.
● Incorrect use of the electric windows can
res
ult in injury.
● Never close the rear lid without observing
and ensurin
g it is clear, to do otherwise could
cause serious injury to you and third parties.
Make sure that no one is in the path of a win-
dow.
● The engine may accidentally be started and
be out of c
ontrol.
● If the ignition is switched on, the electric
equipment cou
ld be activated with risk of in-
jury, for example, in the electric windows.
● The doors can be locked using the remote
contro
l key. This could become an obstacle
for assistance in an emergency situation. ●
Alw a
ys take the key with you when you
leave the vehicle.
● The electric windows will work until the ig-
nition has
been switched off and one of the
front doors has been opened.
● If necessary, use the safety switch to disa-
ble the r
ear electric windows. Make sure that
they have been disabled. Note
If the window is not able to close because it
i s s
tiff or because of an obstruction, the win-
dow will automatically open again
››› page 125. If this happens, check why the
window could not be closed before attempt-
ing to close it again. Roll-back function
The roll-back function reduces the risk of in-
jur
y
when the el
ectric windows close.
● If a window is obstructed when closing au-
tomatic
ally, the window stops at this point
and lowers immediately ››› .
● Next, check why the window does not close
bef or
e att
empting it again.
● If you try within the following 10 seconds
and the window c
loses again with difficulty
or there is an obstruction, the automatic clos-
ing will stop working for 10 seconds. ●
If the windo
w is still obstructed, the win-
dow will stop at this point.
● If there is no obvious reason why the win-
dow cannot
be closed, try to close it again by
pulling the tab within ten seconds. The win-
dow closes with maximum force. The roll-
back function is now deactivated.
● If more than 10 seconds pass, the window
wil
l open fully when you operate one of the
buttons. One-touch closing is reactivated. WARNING
Observe the safety warnings ›››
in Opening
and clo s
ing of the electric windows* on
page 125.
● The roll-back function does not prevent fin-
gers
or other parts of the body getting
pinched against the window frame. Risk of
accident. Convenience opening/closing
Use the convenience opening/closing func-
tion t
o e
a
sily open/close all the windows and
the sliding/tilting sunroof* from the outside.
Convenience open function
– Press and hold button on the remote
c ontr
o
l key until all the windows and the
sliding/tilting sunroof* have reached the
desired position, or »
125
Technical data
Advice
Operation
Emergencies
Safety
Page 139 of 308
Lights and visibility
Windscreen wiper functionsWindscreen wiper performance in different sit-
uations
If the vehicle is at a
standstillThe activated position provision-
ally changes to the previous posi-
tion.
During automatic
wipe
The air conditioner comes on for
approximately 30 seconds in air
recirculation mode to prevent the
smell of the windscreen washer
fluid entering the inside the vehi-
cle.
For the interval wipe
Intervals between wipes depend
on the vehicle's speed. The high-
er the vehicle speed the shorter
the intervals. Heated windscreen washer jets
The he
atin
g on
ly thaws the frozen jets, it
does not thaw the water in the washer hoses.
When the ignition is switched on the heated
windscreen washer jets automatically adjust
the heat depending on the ambient tempera-
ture.
Headlight wash/wipe system
The headlight washers/wipers clean the
headlight lenses.
After the ignition is switched on, the first and
every fifth time the windscreen washer is
switched on, the headlights are also washed. Therefore, the windscreen wiper lever should
be pul
led towards the steering wheel when
the dipped beam or main beam are on. Any
incrusted dirt (such as insects) should be
cleaned regularly (e.g. when refuelling).
To ensure the headlight washers work cor-
rectly in winter, any snow which has got into
the bumper jet supports should be cleaned
away. If necessary, remove snow with an anti-
icing spray. Note
The wiper will try to wipe away any obstacles
that ar
e on the windscreen. The wiper will
stop moving if the obstacle blocks its path.
Remove the obstacle and switch the wiper
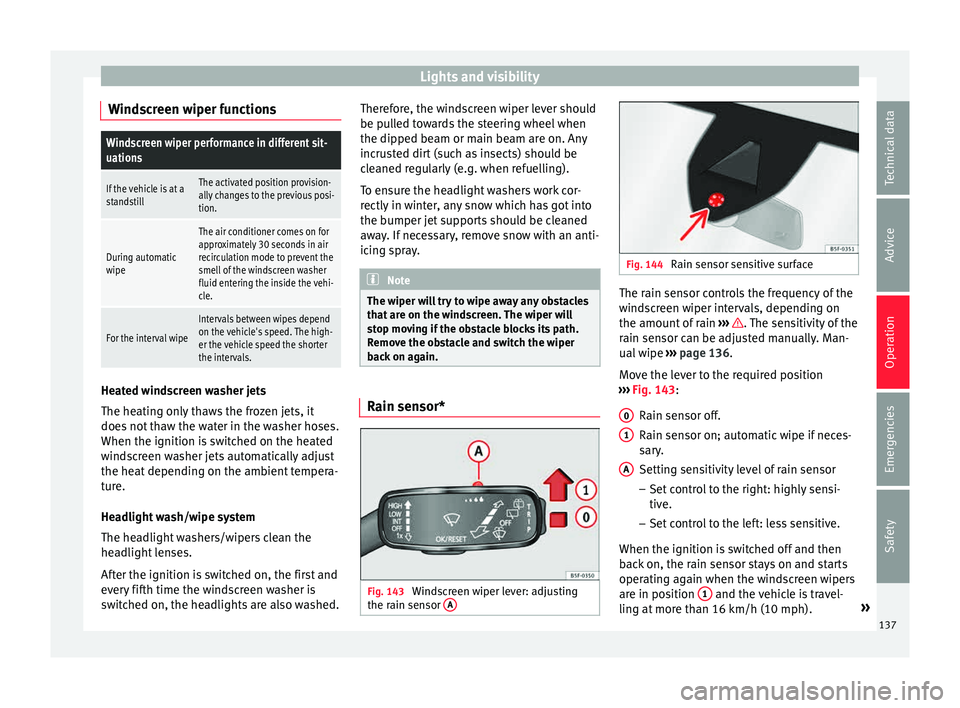
back on again. Rain sensor*
Fig. 143
Windscreen wiper lever: adjusting
the r ain sen
sor A Fig. 144
Rain sensor sensitive surface The rain sensor controls the frequency of the
w
ind
s
creen wiper intervals, depending on
the amount of rain ››› . The sensitivity of the
r ain sen
sor c
an be adjusted manually. Man-
ual wipe ››› page 136.
Move the lever to the required position
››› Fig. 143:
Rain sensor off.
Rain sensor on; automatic wipe if neces-
sary.
Setting sensitivity level of rain sensor
– Set control to the right: highly sensi-
tive.
– Set control to the left: less sensitive.
When the ignition is switched off and then
back on, the rain sensor stays on and starts
operating again when the windscreen wipers
are in position 1 and the vehicle is travel-
lin g at
mor
e than 16 km/h (10 mph). »
0 1
A
137
Technical data
Advice
Operation
Emergencies
Safety
Page 142 of 308

Operation
when changing lane, you could misjudge the
dis
t
ance. Risk of accident! CAUTION
● If one of the mirr
or housings is knocked out
of position (e.g. when parking), the mirrors
must first be fully retracted with the electric
control. Do not readjust the mirror housing by
hand, as this will interfere with the mirror ad-
juster function.
● Before washing the vehicle in an automatic
car wa
sh, please make sure to retract the ex-
terior mirrors to prevent them from being
damaged. Electrically retractable exterior
mirrors must not be folded in or out by hand.
Always use the electrical power control. Note
If the electrical adjustment should fail to op-
erat e, both of
the mirrors can be adjusted by
hand by lightly pressing the edge of the mir-
ror glass. Seats and head restraints
Adju
s
tin
g the seats and headr-
ests
Manual adjustment of seats Read the additional information carefully
›› ›
page 15 WARNING
The safe driving chapter contains important
inform ation, tip
s, suggestions and warnings
that you should read and observe for your
own safety and the safety of your passengers
››› page 66. WARNING
● Adjus t
the front seats only when the vehi-
cle is stationary. Failure to follow this instruc-
tion could result in an accident.
● Be careful when adjusting the seat height.
Carel
ess or uncontrolled adjustment can
cause injuries.
● The front seat backrests must not be re-
clined for driv
ing. Otherwise, seat belts and
the airbag system might not protect as they
should, with the subsequent danger of injury. Electric driver seat adjustment*
Read the additional information carefully
›› ›
page 15 WARNING
● If the el ectric
front seats are used negli-
gently or without paying due attention, it can
cause serious injury.
● The front seats can also be electrically ad-
just
ed when the ignition is switched off. Nev-
er leave a child or any other person who may
need help in the vehicle.
● In the event of an emergency, electrical ad-
justment
can be stopped by pressing any
control. CAUTION
To avoid damaging the electrical components
of the fr ont
seats, please refrain from kneel-
ing on the seat or applying sharp pressure at
a single point to the seat cushion and back-
rest. Note
● It m a
y not be possible to electrically adjust
the seat if the vehicle battery is very low.
● If the engine is started while the seats are
being electric
ally adjusted, the adjustment
will stop. 140
Page 166 of 308
Operation
Driving Ignition loc k
Sw it
ching the ignition on and starting
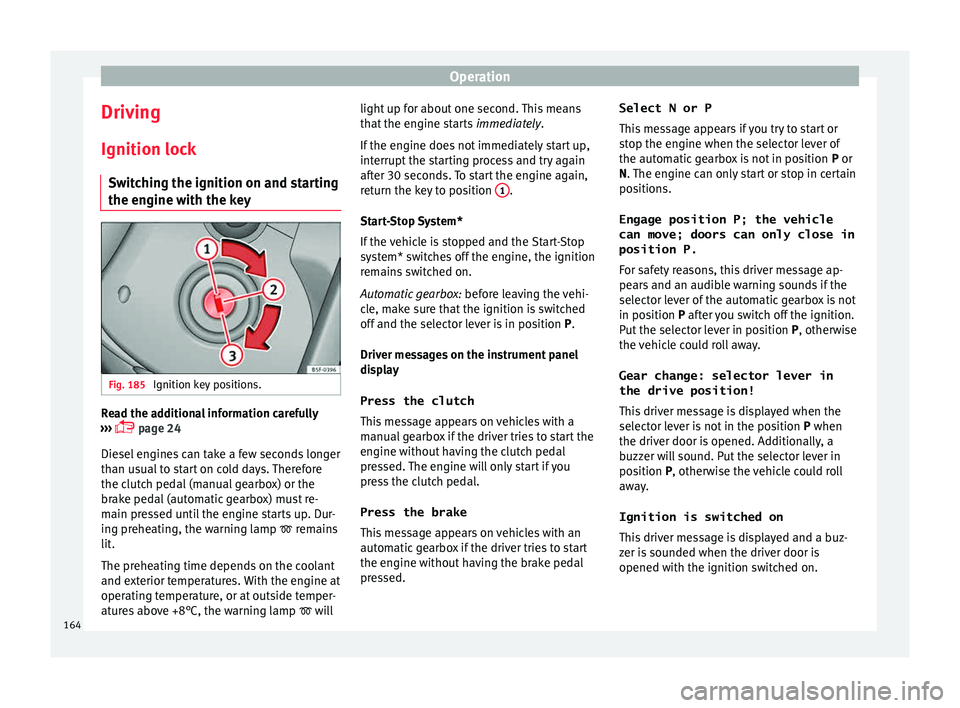
the engine with the key Fig. 185
Ignition key positions. Read the additional information carefully
› ›
›
page 24
Diesel engines can take a few seconds longer
than usual to start on cold days. Therefore
the clutch pedal (manual gearbox) or the
brake pedal (automatic gearbox) must re-
main pressed until the engine starts up. Dur-
ing preheating, the warning lamp remains
lit.
The preheating time depends on the coolant
and exterior temperatures. With the engine at
operating temperature, or at outside temper-
atures above +8°C, the warning lamp will light up for about one second. This means
that the en
gine starts immediately.
If the engine does not immediately start up,
interrupt the starting process and try again
after 30 seconds. To start the engine again,
return the key to position 1 .
St ar
t
-Stop System*
If the vehicle is stopped and the Start-Stop
system* switches off the engine, the ignition
remains switched on.
Automatic gearbox: before leaving the vehi-
cle, make sure that the ignition is switched
off and the selector lever is in position P.
Driver messages on the instrument panel
display
Press the clutch
This message appears on vehicles with a
manual gearbox if the driver tries to start the
engine without having the clutch pedal
pressed. The engine will only start if you
press the clutch pedal.
Press the brake This message appears on vehicles with an
automatic gearbox if the driver tries to start
the engine without having the brake pedal
pressed. Select N or P
This me
ssage appears if you try to start or
stop the engine when the selector lever of
the automatic gearbox is not in position P or
N. The engine can only start or stop in certain
positions.
Engage position P; the vehicle
can move; doors can only close in
position P.For safety reasons, this driver message ap-
pears and an audible warning sounds if the
selector lever of the automatic gearbox is not
in position P after you switch off the ignition.
Put the selector lever in position P, otherwise
the vehicle could roll away.
Gear change: selector lever in
the drive position! This driver message is displayed when the
selector lever is not in the position P when
the driver door is opened. Additionally, a
buzzer will sound. Put the selector lever in
position P, otherwise the vehicle could roll
away.
Ignition is switched on
This driver message is displayed and a buz-
zer is sounded when the driver door is
opened with the ignition switched on.
164
Page 167 of 308
Driving
WARNING
● Never ru n the en
gine in confined spaces, as
the exhaust gases are poisonous. CAUTION
Avoid high engine speeds, full throttle and
extr eme lo
ad conditions until the engine has
reached its normal operating temperature,
otherwise this can damage the engine. For the sake of the environment
Do not warm up the engine by idling it. You
shoul d driv
e off as soon as you start the en-
gine. This will help avoid unnecessary ex-
haust emissions. Note
● If it i
s difficult to turn the ignition key to
the position 1 , turn the steering wheel to
both side s
to release the steering lock.
● When starting from cold, the engine may be
a little noisy
for the first few seconds until oil
pressure has built up in the hydraulic valve
lifters. This is quite normal, and no cause for
concern.
● If the vehicle battery is disconnected and
reconnect
ed, the key must remain in the posi-
tion 1 for around 5 seconds before starting
up.
● Vehic
les with automatic gearbox: after
switc
hing off the ignition, you can only re-
move the ignition key if the selector lever is in position “P” (parking lock). Next, the se-
lect
or l
ever is locked. Switching off the engine with the key
Switching off the engine
– Stop the vehicle.
– Turn the ignition key to position 1 ›››
Fig. 185.
Eng agin
g the steering wheel lock
In vehicles with automatic gearbox, the igni-
tion key can only be removed when the selec-
tor lever is in position P.
– Remove the key from the ignition in posi-
tion 1
› ›
› Fig. 185
››› .
– Turn the steering wheel until you hear it en-
gag
e.
P
ossible vehicle theft is prevented with the
steering lock engaged. WARNING
● Never sw it
ch the engine off until the vehi-
cle is stationary. The brake servo and power
steering functions will not be completely cov-
ered under warranty. More force may also be
needed to turn the steering wheel or to brake.
As you cannot steer and brake in the normal
manner, there is a greater risk of accidents
and serious injury. ●
Never r emo
ve the key from the ignition if
the vehicle is in motion. Otherwise, the steer-
ing could suddenly lock, making it impossible
to steer the vehicle: risk of accident!
● Always take the key with you when you
leav
e the vehicle. This is particularly impor-
tant if there are children in the vehicle, as
they might otherwise be able to start the en-
gine or use power-operated equipment (e.g.
the electric windows), which could cause in-
juries. CAUTION
If the engine has been running under high
loa d f
or a long time, there is a risk of heat
building up in the engine compartment after
it has been switched off; this could cause en-
gine damage. For this reason, you should idle
the engine for approximately 2 minutes be-
fore you switch it off. Note
● Aft er the en
gine is switched off the radiator
fan may run on for up to 10 minutes, even if
the ignition is switched off. It is also possible
that the fan turns itself on once more if the
coolant temperature increases due to the
heat accumulated in the engine compartment
or due to its prolonged exposure to solar ra-
diation.
● If the vehicle is stopped and the Start-Stop
syst
em* switches off the engine, the ignition » 165
Technical data
Advice
Operation
Emergencies
Safety
Page 168 of 308
Operation
remains switched on. Make sure that the igni-
tion is
sw
itched off before leaving the
vehicle, otherwise the battery could dis-
charge. Braking and parking
Us in
g the handbrake Fig. 186
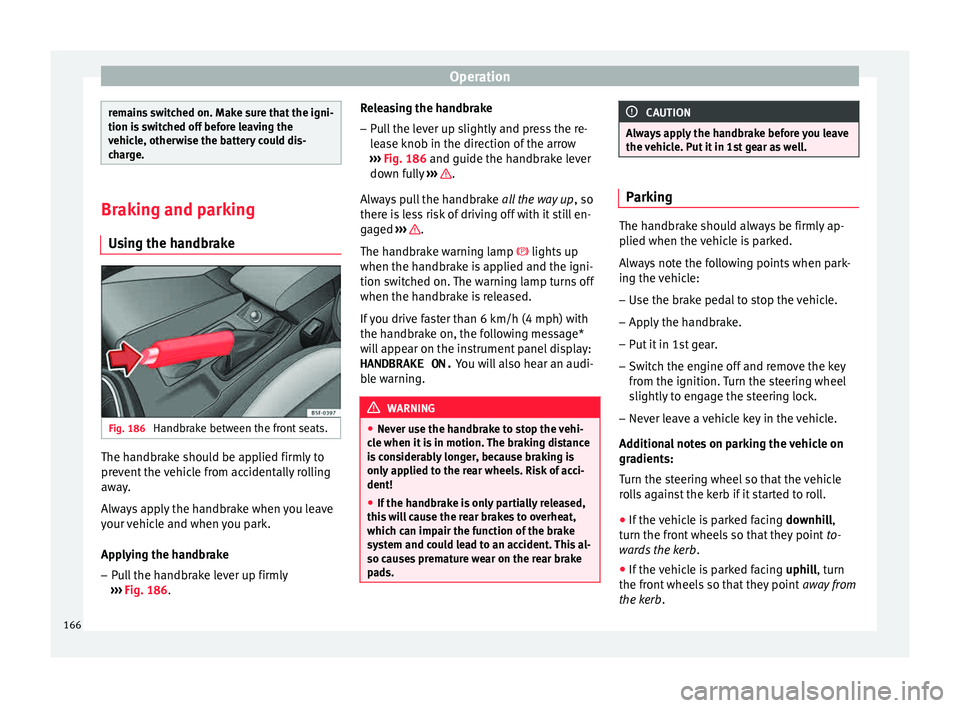
Handbrake between the front seats. The handbrake should be applied firmly to
pr
ev
ent
the vehicle from accidentally rolling
away.
Always apply the handbrake when you leave
your vehicle and when you park.
Applying the handbrake
– Pull the handbrake lever up firmly
›››
Fig. 186. Releasing the handbrake
– Pull the lever up slightly and press the re-
lea
se knob in the direction of the arrow
››› Fig. 186 and guide the handbrake lever
down fully ››› .
A lw
a
ys pull the handbrake all the way up, so
there is less risk of driving off with it still en-
gaged ››› .
The h andbr
ak
e warning lamp lights up
when the handbrake is applied and the igni-
tion switched on. The warning lamp turns off
when the handbrake is released.
If you drive faster than 6 km/h (4 mph) with
the handbrake on, the following message*
will appear on the instrument panel display: HANDBRAKE ON. You will also hear an audi-
ble warning. WARNING
● Never u se the h
andbrake to stop the vehi-
cle when it is in motion. The braking distance
is considerably longer, because braking is
only applied to the rear wheels. Risk of acci-
dent!
● If the handbrake is only partially released,
this w
ill cause the rear brakes to overheat,
which can impair the function of the brake
system and could lead to an accident. This al-
so causes premature wear on the rear brake
pads. CAUTION
Always apply the handbrake before you leave
the v ehic
le. Put it in 1st gear as well. Parking
The handbrake should always be firmly ap-
plied when the
v
ehicle is parked.
Always note the following points when park-
ing the vehicle: – Use the brake pedal to stop the vehicle.
– Apply the handbrake.
– Put it in 1st gear.
– Switch the engine off and remove the key
from the ignition. T
urn the steering wheel
slightly to engage the steering lock.
– Never leave a vehicle key in the vehicle.
Additiona
l notes on parking the vehicle on
gradients:
Turn the steering wheel so that the vehicle
rolls against the kerb if it started to roll.
● If the vehicle is parked facing downhil
l,
turn the front wheels so that they point to-
wards the kerb .
● If the vehicle is parked facing uphill
, turn
the front wheels so that they point away from
the kerb.
166
Page 170 of 308

Operation
conventional automatic gearboxes and allow
f or smooth, u
nint
errupted acceleration of the
vehicle.
The tiptronic system allows the driver to
change gears manually if desired
››› page 170, Changing gears in tiptronic
mode*.
Selector lever positions Read the additional information carefully
›› ›
page 44
The selector lever position engaged is high-
lighted on the display in the instrument clus-
ter. With the selector lever in the manual
gearbox positions G, D, E and S, the engaged
gear is also indicated on the display.
P – Parking lock
When the selector lever is in this position,
the driven wheels are locked mechanically.
The parking lock must be engaged only when
the vehicle is stationary ››› .
The int erloc
k
button (the button on the selec-
tor lever handle) must be pressed in and si-
multaneously the brake pedal must be de-
pressed before moving the selector lever ei-
ther in or out of position P. R – Reverse gear
Rever
se gear must be engaged only when the
vehicle is stationary and the engine is idling
››› .
T o mo
v
e the selector lever to position R, the
interlock button must be pressed in and at
the same time the brake pedal must be de-
pressed. The reverse lights come on when
the selector lever is in the R position with the
ignition on.
N – Neutral (idling)
With the selector lever in this position, the
gear is in neutral.
D/S – Permanent drive (forward) position
The selector lever in the D/S position enables
the gears to be controlled in normal mode (D)
or Sport (S). To select Sport mode (S), move
the selector lever backwards. Moving the lev-
er again will select normal mode (D). The se-
lected driving mode is shown on the instru-
ment panel display.
In normal mode (D), the gearbox automatical-
ly selects the best gear ratio. This depends
on the engine load, the road speed and the
dynamic gear control programme (DCP).
Sport mode (S) must be selected for a sporty
driving style. This setting makes use of the
engine's maximum power output. When ac-
celerating the gear shifts will be noticeable. The brake pedal must be pressed when mov-
ing the select
or lever from D/S to N if the ve-
hicle is stationary or at speeds below 5 km/h
(3 mph) ››› .
Under c er
t
ain circumstances (e.g. when driv-
ing in mountains) it can be advantageous to
switch temporarily to tiptronic mode
››› page 170, in order to manually select gear
ratios to suit the driving conditions. WARNING
● Tak e c
are not to accidentally press the ac-
celerator pedal when the vehicle is stopped.
The vehicle could otherwise start moving im-
mediately (in some cases even if the parking
brake is engaged) resulting in the risk of an
accident.
● Never move the selector lever to R or P
when driving. F
ailure to follow this instruc-
tion could result in an accident.
● With selector lever in any position (except
P) the vehic
le must always be held with the
foot brake when the engine is running. This is
because an automatic gearbox still transmits
power even at idling speed, and the vehicle
tends to “creep”). The accelerator pedal must
on no account be pressed inadvertently when
a gear is engaged with the vehicle stationary.
The vehicle could otherwise start moving im-
mediately (in some cases even if the parking
brake is engaged) resulting in the risk of an
accident.
● While you are selecting a gear and the vehi-
cle i
s stopped with the engine running, do 168