navigation update Seat Leon SC 2017 MEDIA SYSTEM PLUS - NAVI SYSTEM - NAVI SYSTEM PLUS
[x] Cancel search | Manufacturer: SEAT, Model Year: 2017, Model line: Leon SC, Model: Seat Leon SC 2017Pages: 104, PDF Size: 2.7 MB
Page 27 of 104
Connectivity
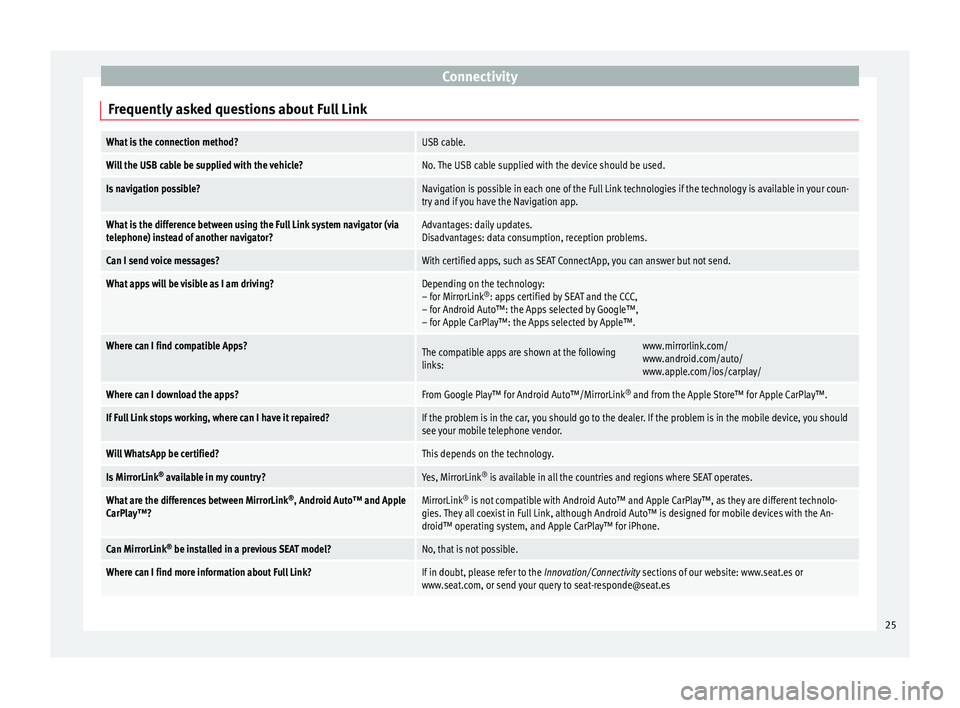
Frequently asked questions about Full LinkWhat is the connection method?USB cable.
Will the USB cable be supplied with the vehicle?No. The USB cable supplied with the device should be used.
Is navigation possible?Navigation is possible in each one of the Full Link technologies if the technology is available in your coun-
try and if you have the Navigation app.
What is the difference between using the Full Link system navigator (via
telephone) instead of another navigator?Advantages: daily updates.
Disadvantages: data consumption, reception problems.
Can I send voice messages?With certified apps, such as SEAT ConnectApp, you can answer but not send.
What apps will be visible as I am driving?Depending on the technology:
– for MirrorLink ®
: apps certified by SEAT and the CCC,
– for Android Auto™: the Apps selected by Google™,
– for Apple CarPlay™: the Apps selected by Apple™.
Where can I find compatible Apps?The compatible apps are shown at the following
links:www.mirrorlink.com/
www.android.com/auto/
www.apple.com/ios/carplay/
Where can I download the apps?From Google Play™ for Android Auto™/MirrorLink ®
and from the Apple Store™ for Apple CarPlay™.
If Full Link stops working, where can I have it repaired?If the problem is in the car, you should go to the dealer. If the problem is in the mobile device, you should
see your mobile telephone vendor.
Will WhatsApp be certified?This depends on the technology.
Is MirrorLink ®
available in my country?Yes, MirrorLink ®
is available in all the countries and regions where SEAT operates.
What are the differences between MirrorLink ®
, Android Auto™ and Apple
CarPlay™?MirrorLink ®
is not compatible with Android Auto™ and Apple CarPlay™, as they are different technolo-
gies. They all coexist in Full Link, although Android Auto™ is designed for mobile devices with the An-
droid™ operating system, and Apple CarPlay™ for iPhone.
Can MirrorLink ®
be installed in a previous SEAT model?No, that is not possible.
Where can I find more information about Full Link?If in doubt, please refer to the Innovation/Connectivity sections of our website: www.seat.es or
www.seat.com, or send your query to [email protected] 25
Page 58 of 104
Navigation
Navigation 1)
Nav ig
ation, entr
y and control
Related video Fig. 41
Navigation Introduction
General information
The c
urr
ent
vehicle position is determined by
means of the GPS satellite system (Global Po-
sitioning System). Sensors in the vehicle
measure distances that have been driven.
The measurement values are compared with
the detailed map data and the road informa-
tion stored therein. Traffic reports, if any, will
also be taken into account in the route calcu-
lation (dynamic route guidance
››› page 64). Using all the data available,
the Infotainment system calculates the opti-
mum route to the destination. The destination is defined by entering an ad-
dres
s or a point of interest, e.g. a petrol sta-
tion or hotel.
Spoken instructions and visual guidance on
the navigation unit and on the instrument
panel will direct you to your destination.
Depending on the country, some infotain-
ment system functions can no longer be se-
lected when the vehicle is travelling above a
certain speed. This is not a malfunction, but
simply a legal requirement.
Navigation messages When the Infotainment system is unable to
r
ec
eiv
e any data from GPS satellites (due to a
dense tree canopy, underground car park),
navigation can still continue using the vehi-
cle sensors.
Possible navigation limitations
In areas that are not or are only partially digi-
tised on the data storage device (e.g. insuffi-
cient definition of one-way streets and road
categories), the Infotainment system will still
attempt to provide route guidance.
If navigation data are unavailable or incom-
plete, the navigation system may be unable
to determine the exact vehicle position. As a result, the navigation may not be as exact as
usual
.
Navigation area and updating of navigation
data
Roads and streets are subject to constant
change (e.g. new roads, changes to street
names and building numbers). Therefore, if
the navigation data is not updated, then er-
rors or inaccuracies may occur during guid-
ance.
SEAT recommends updating navigation data
on a regular basis. Up to date navigation da-
ta can be acquired at a SEAT dealer.
Use navigation data from a memory
card. 3 Only
available for the model: Navi System
The
SD card is initially to be found inserted in
SD card slot 2.
To update navigation data visit our website:
www.seat.com.
● Insert the memory card ›››
page 46 .
● Do not remove the memory card while test-
ing. W
ait for the testing icon to disappear. 1)
Valid for: Navi System and Navi System Plus.
56
Page 59 of 104
Navigation
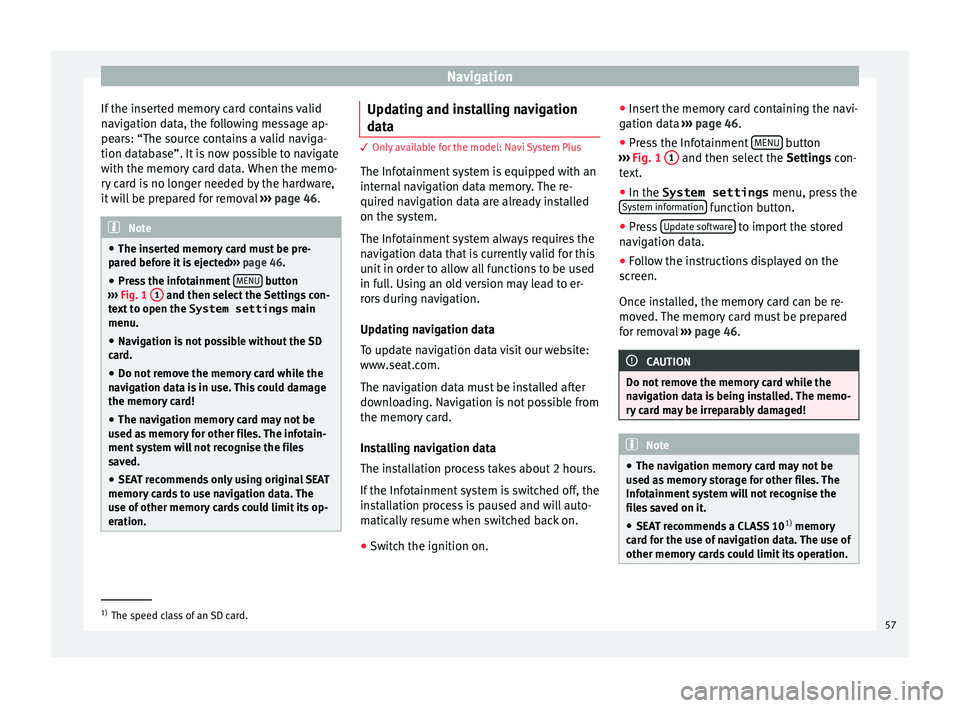
If the inserted memory card contains valid
n av
ig
ation data, the following message ap-
pears: “The source contains a valid naviga-
tion database”. It is now possible to navigate
with the memory card data. When the memo-
ry card is no longer needed by the hardware,
it will be prepared for removal ››› page 46. Note
● The inser t
ed memory card must be pre-
pared before it is ejected ››› page 46.
● Press the infotainment MENU button
›› ›
Fig. 1 1 and then select the Settings con-
te xt
to open the System settings main
menu.
● Navigation is not possible without the SD
card.
● Do not
remove the memory card while the
navig
ation data is in use. This could damage
the memory card!
● The navigation memory card may not be
used as
memory for other files. The infotain-
ment system will not recognise the files
saved.
● SEAT recommends only using original SEAT
memory c
ards to use navigation data. The
use of other memory cards could limit its op-
eration. Updating and installing navigation
d
at
a 3 Only available for the model: Navi System Plus
The Inf ot
ainment system is equipped with an
internal navigation data memory. The re-
quired navigation data are already installed
on the system.
The Infotainment system always requires the
navigation data that is currently valid for this
unit in order to allow all functions to be used
in full. Using an old version may lead to er-
rors during navigation.
Updating navigation data
To update navigation data visit our website:
www.seat.com.
The navigation data must be installed after
downloading. Navigation is not possible from
the memory card.
Installing navigation data
The installation process takes about 2 hours.
If the Infotainment system is switched off, the
installation process is paused and will auto-
matically resume when switched back on.
● Switch the ignition on. ●
Inser t
the memory card containing the navi-
gation data ››› page 46.
● Press the Infotainment MENU button
› ›
›
Fig. 1 1 and then select the
Setting
s con-
text.
● In the System settings menu, pres
s the
System information function button.
● Press U
pd
at
e software to import the stored
n av
ig
ation data.
● Follow the instructions displayed on the
scr
een.
Once installed, the memory card can be re-
moved. The memory card must be prepared
for removal ››› page 46. CAUTION
Do not remove the memory card while the
nav ig
ation data is being installed. The memo-
ry card may be irreparably damaged! Note
● The nav ig
ation memory card may not be
used as memory storage for other files. The
Infotainment system will not recognise the
files saved on it.
● SEAT recommends a CLASS 10 1)
memory
car
d for the use of navigation data. The use of
other memory cards could limit its operation. 1)
The speed class of an SD card.
57
Page 63 of 104
Navigation
● Pr e
s
s the My dests. function button in the
m ain
Na
vigation menu.
● Select the desired function button.
Store po
sition ,
R
out
e s ,
D
e
s tinations ,
La s
t
destinations or
Home a
d
dr ess .
St or
e po
sition
● By pressing the Store po
sition function but-
t on, the
v
ehicle's current position is stored
as a Flagged destination in the destina-
tion memory.
To permanently store the saved position as a
Flagged destination , it must be re-
named in the destination memory. Otherwise
the stored position will be overwritten the
next time a flagged destination is stored.
● Mark the Flagged destination in the
destin
ation memory.
● Press the Store function button.
The n ame c
an be c
hanged in the following in-
put window. Press the function button to
s t
or
e the destination.
Routes
In the Route mode, you can define various
destinations (final destination and stop-
overs).
The starting point of a route is always the
current vehicle position determined by the In-
fotainment system. The destination is the end point of a route.
Stopov
er destinations
are driven to before the destination.
● In the Navigation main menu, press the
My
Dests. function button.
● Press the R
out
e
s function button. The
r out
e
s stored previously will appear
››› Fig. 45.
If you have not stored any routes or want to
create a new route, press the New route func-
tion b utt
on and then f
ollow the instructions
as for a new destination, before pressing Store .
Pr e
s
sing on a stored route brings up the fol-
lowing function buttons:
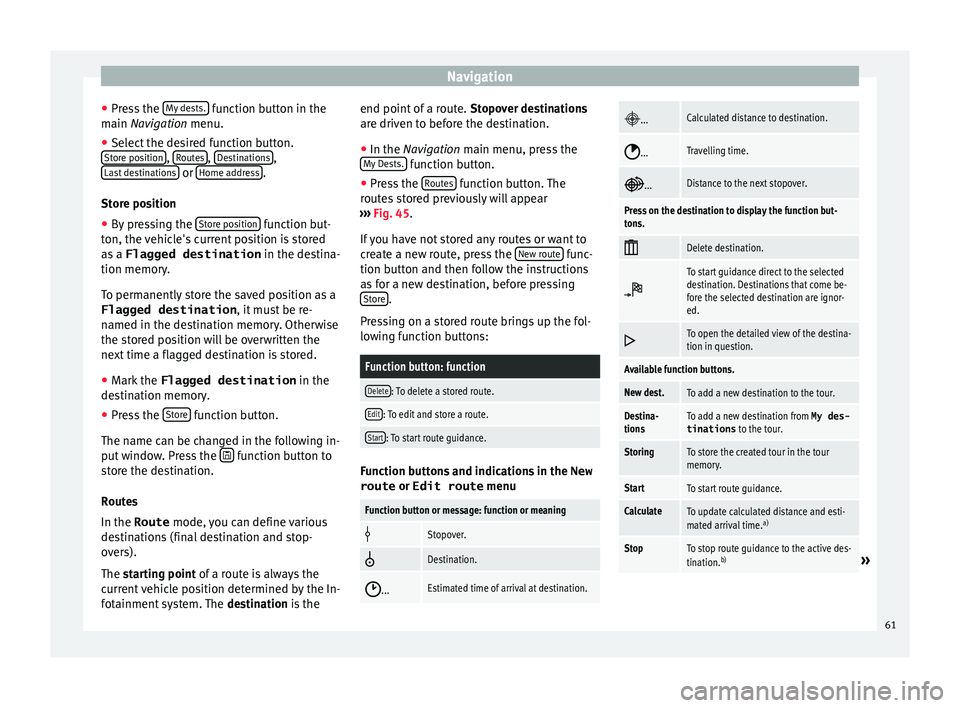
Function button: function
Delete: To delete a stored route.
Edit: To edit and store a route.
Start: To start route guidance. Function buttons and indications in the
New
route or Edit route menu
Function button or message: function or meaning
Stopover.
Destination.
...Estimated time of arrival at destination.
...Calculated distance to destination.
...Travelling time.
...Distance to the next stopover.
Press on the destination to display the function but-
tons.
Delete destination.
To start guidance direct to the selected
destination. Destinations that come be-
fore the selected destination are ignor-
ed.
To open the detailed view of the destina-
tion in question.
Available function buttons.
New dest.To add a new destination to the tour.
Destina-
tionsTo add a new destination from My des-
tinations
to the tour.
StoringTo store the created tour in the tour
memory.
StartTo start route guidance.
CalculateTo update calculated distance and esti-
mated arrival time. a)
StopTo stop route guidance to the active des-
tination.b)» 61
Page 70 of 104
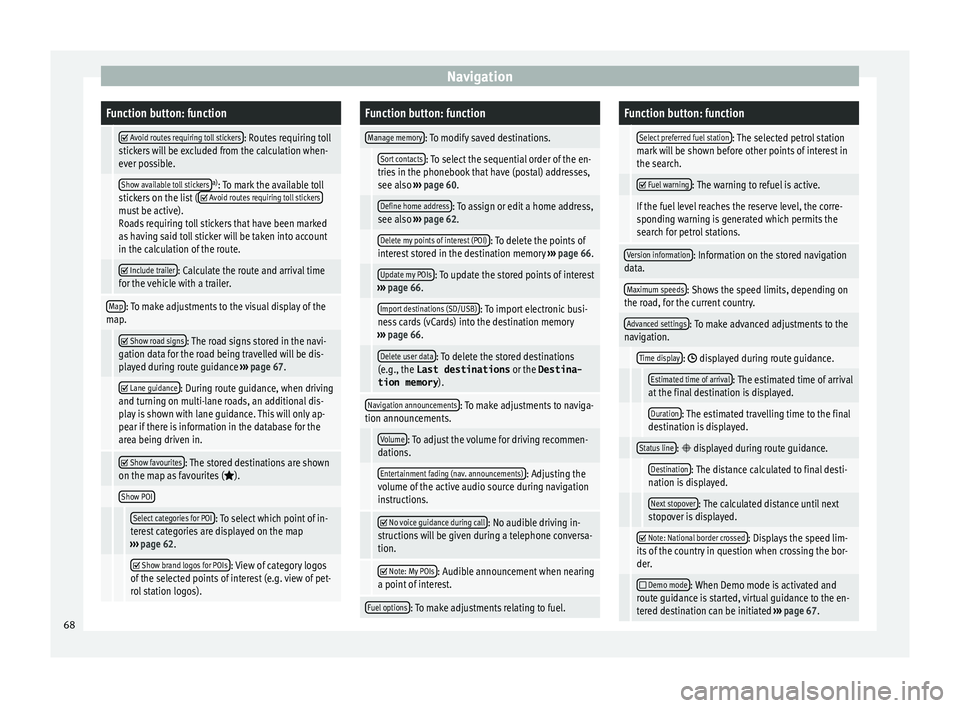
NavigationFunction button: function
Avoid routes requiring toll stickers: Routes requiring toll
stickers will be excluded from the calculation when-
ever possible.
Show available toll stickersa) : To mark the available toll
stickers on the list ( Avoid routes requiring toll stickersmust be active).
Roads requiring toll stickers that have been marked
as having said toll sticker will be taken into account
in the calculation of the route.
Include trailer: Calculate the route and arrival time
for the vehicle with a trailer.
Map: To make adjustments to the visual display of the
map.
Show road signs: The road signs stored in the navi-
gation data for the road being travelled will be dis-
played during route guidance ››› page 67.
Lane guidance: During route guidance, when driving
and turning on multi-lane roads, an additional dis-
play is shown with lane guidance. This will only ap-
pear if there is information in the database for the
area being driven in.
Show favourites: The stored destinations are shown
on the map as favourites ().
Show POI
Select categories for POI: To select which point of in-
terest categories are displayed on the map
››› page 62.
Show brand logos for POIs: View of category logos
of the selected points of interest (e.g. view of pet-
rol station logos).
Function button: function
Manage memory: To modify saved destinations.
Sort contacts: To select the sequential order of the en-
tries in the phonebook that have (postal) addresses,
see also ››› page 60.
Define home address: To assign or edit a home address,
see also ››› page 62.
Delete my points of interest (POI): To delete the points of
interest stored in the destination memory ››› page 66.
Update my POIs: To update the stored points of interest
››› page 66.
Import destinations (SD/USB): To import electronic busi-
ness cards (vCards) into the destination memory
››› page 66.
Delete user data: To delete the stored destinations
(e.g., the Last destinations or the Destina-
tion memory ).
Navigation announcements: To make adjustments to naviga-
tion announcements.
Volume: To adjust the volume for driving recommen-
dations.
Entertainment fading (nav. announcements): Adjusting the
volume of the active audio source during navigation
instructions.
No voice guidance during call: No audible driving in-
structions will be given during a telephone conversa-
tion.
Note: My POIs: Audible announcement when nearing
a point of interest.
Fuel options: To make adjustments relating to fuel.
Function button: function
Select preferred fuel station: The selected petrol station
mark will be shown before other points of interest in
the search.
Fuel warning: The warning to refuel is active.
If the fuel level reaches the reserve level, the corre-
sponding warning is generated which permits the
search for petrol stations.
Version information: Information on the stored navigation
data.
Maximum speeds: Shows the speed limits, depending on
the road, for the current country.
Advanced settings: To make advanced adjustments to the
navigation.
Time display: displayed during route guidance.
Estimated time of arrival: The estimated time of arrival
at the final destination is displayed.
Duration: The estimated travelling time to the final
destination is displayed.
Status line: displayed during route guidance.
Destination: The distance calculated to final desti-
nation is displayed.
Next stopover: The calculated distance until next
stopover is displayed.
Note: National border crossed: Displays the speed lim-
its of the country in question when crossing the bor-
der.
Demo mode: When Demo mode is activated and
route guidance is started, virtual guidance to the en-
tered destination can be initiated ››› page 67. 68
Page 93 of 104
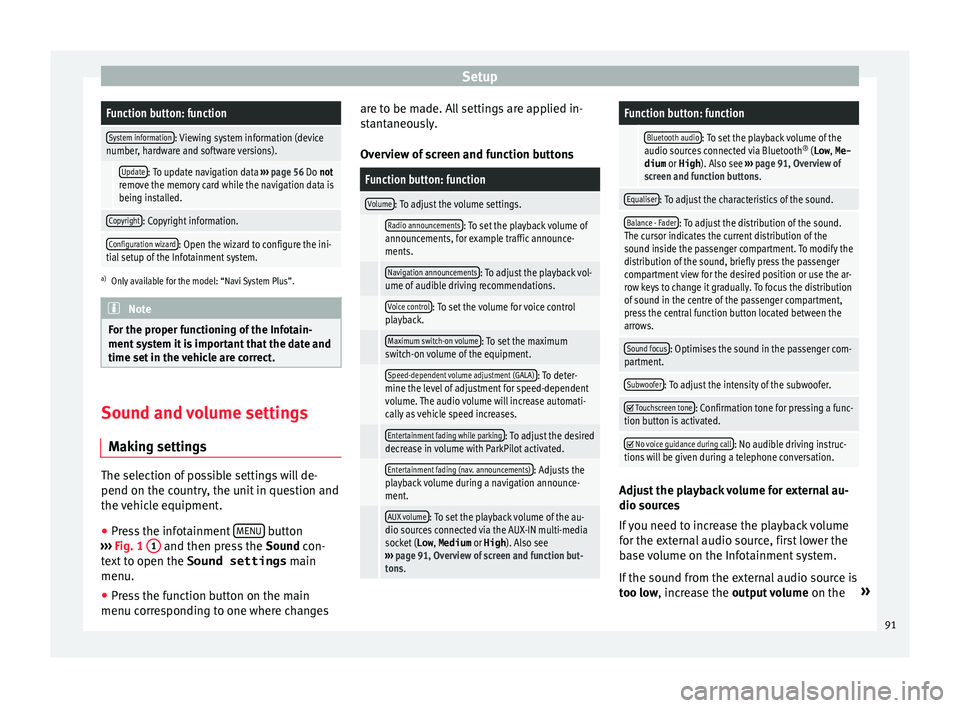
SetupFunction button: function
System information: Viewing system information (device
number, hardware and software versions).
Update: To update navigation data ››› page 56 Do not
remove the memory card while the navigation data is
being installed.
Copyright: Copyright information.
Configuration wizard: Open the wizard to configure the ini-
tial setup of the Infotainment system.
a) Only available for the model: “Navi System Plus”. Note
For the proper functioning of the Infotain-
ment sy s
tem it is important that the date and
time set in the vehicle are correct. Sound and volume settings
M ak
in
g settings The selection of possible settings will de-
pend on the c
ou
ntr
y, the unit in question and
the vehicle equipment.
● Press the infotainment MENU button
› ›
›
Fig. 1 1 and then press the
Sound
c on-
text to open the Sound settings main
menu.
● Press the function button on the main
menu corre
sponding to one where changes are to be made. All settings are applied in-
stant
aneously.
Overview of screen and function buttons
Function button: function
Volume: To adjust the volume settings.
Radio announcements: To set the playback volume of
announcements, for example traffic announce-
ments.
Navigation announcements: To adjust the playback vol-
ume of audible driving recommendations.
Voice control: To set the volume for voice control
playback.
Maximum switch-on volume: To set the maximum
switch-on volume of the equipment.
Speed-dependent volume adjustment (GALA): To deter-
mine the level of adjustment for speed-dependent
volume. The audio volume will increase automati-
cally as vehicle speed increases.
Entertainment fading while parking: To adjust the desired
decrease in volume with ParkPilot activated.
Entertainment fading (nav. announcements): Adjusts the
playback volume during a navigation announce-
ment.
AUX volume: To set the playback volume of the au-
dio sources connected via the AUX-IN multi-media
socket ( Low, Medium or High). Also see
››› page 91, Overview of screen and function but-
tons.
Function button: function
Bluetooth audio: To set the playback volume of the
audio sources connected via Bluetooth ®
(Low , Me-
dium or High ). Also see ››› page 91, Overview of
screen and function buttons.
Equaliser: To adjust the characteristics of the sound.
Balance - Fader: To adjust the distribution of the sound.
The cursor indicates the current distribution of the
sound inside the passenger compartment. To modify the
distribution of the sound, briefly press the passenger
compartment view for the desired position or use the ar-
row keys to change it gradually. To focus the distribution
of sound in the centre of the passenger compartment,
press the central function button located between the
arrows.
Sound focus: Optimises the sound in the passenger com-
partment.
Subwoofer: To adjust the intensity of the subwoofer.
Touchscreen tone: Confirmation tone for pressing a func-
tion button is activated.
No voice guidance during call: No audible driving instruc-
tions will be given during a telephone conversation. Adjust the playback volume for external au-
dio sour
c
e
s
If you need to increase the playback volume
for the external audio source, first lower the
base volume on the Infotainment system.
If the sound from the external audio source is
too low, increase the output volume on the»
91
Page 99 of 104
Index
MirrorLink . . . . . . . . . . . . . . . . . . . . . . . . . . . . . . . . 22
Mo b
i
le Signal Amplifier . . . . . . . . . . . . . . . . . . . . . 88
Mute . . . . . . . . . . . . . . . . . . . . . . . . . . . . . . . . . . . . . 9
My destinations . . . . . . . . . . . . . . . . . . . . . . . . . . . 60
N Navigation announcements . . . . . . . . . . . . . . . . . 59
Navigation data . . . . . . . . . . . . . . . . . . . . . . . . . . . 57 data update . . . . . . . . . . . . . . . . . . . . . . . . . . . . 56
install . . . . . . . . . . . . . . . . . . . . . . . . . . . . . . . . . 57
NAV (navigation) . . . . . . . . . . . . . . . . . . . . . . . . . . 56 after starting route guidance . . . . . . . . . . . . . . . 59
areas not fully digitalised . . . . . . . . . . . . . . . . . 56
avoid congestion . . . . . . . . . . . . . . . . . . . . . . . . 65
change destination . . . . . . . . . . . . . . . . . . . . . . 60
change view . . . . . . . . . . . . . . . . . . . . . . . . . . . . 63
compass display . . . . . . . . . . . . . . . . . . . . . . . . . 63
congestion ahead . . . . . . . . . . . . . . . . . . . . . . . . 60
contacts . . . . . . . . . . . . . . . . . . . . . . . . . . . . . . . . 60
data update . . . . . . . . . . . . . . . . . . . . . . . . . . . . 56
demo mode . . . . . . . . . . . . . . . . . . . . . . . . . . . . . 67
destination memory . . . . . . . . . . . . . . . . . . . . . . 60
display traffic disruptions . . . . . . . . . . . . . . . . . 64
dynamic route guidance . . . . . . . . . . . . . . . 59, 65
entering destination . . . . . . . . . . . . . . . . . . . . . . 58
entering the home address . . . . . . . . . . . . . . . . 62
enter new destination . . . . . . . . . . . . . . . . . . . . 59
enter stopover . . . . . . . . . . . . . . . . . . . . . . . . . . . 60
exclude section . . . . . . . . . . . . . . . . . . . . . . . . . . 60
fast search for a POI . . . . . . . . . . . . . . . . . . . . . . 62
function buttons . . . . . . . . . . . . . . . . . . . . . . . . . 58
importing Personal POI . . . . . . . . . . . . . . . . . . . 66
importing vCards . . . . . . . . . . . . . . . . . . . . . . . . 66
installing navigation data . . . . . . . . . . . . . . . . . 57
list of driving manoeuvres . . . . . . . . . . . . . . . . . 63
map display . . . . . . . . . . . . . . . . . . . . . . . . . . . . 64
map, select the destination on the map . . . . . . 59 messages and symbols . . . . . . . . . . . . . . . . . . . 58
my de
stinations . . . . . . . . . . . . . . . . . . . . . . 60, 62
navigation announcements . . . . . . . . . . . . . . . . 59
navigation area . . . . . . . . . . . . . . . . . . . . . . . . . . 56
navigation main menu . . . . . . . . . . . . . . . . . . . . 58
navigation messages . . . . . . . . . . . . . . . . . . . . . 56
opening the main menu . . . . . . . . . . . . . . . . . . . 58
points of interest . . . . . . . . . . . . . . . . . . . . . . . . 62
possible limitations . . . . . . . . . . . . . . . . . . . . . . 56
road sign indicators . . . . . . . . . . . . . . . . . . . . . . 67
route information . . . . . . . . . . . . . . . . . . . . . . . . 60
route list . . . . . . . . . . . . . . . . . . . . . . . . . . . . . . . 60
search . . . . . . . . . . . . . . . . . . . . . . . . . . . . . . . . . 58
settings . . . . . . . . . . . . . . . . . . . . . . . . . . . . . . . . 67
split screen . . . . . . . . . . . . . . . . . . . . . . . . . . . . . 63
stop route guidance . . . . . . . . . . . . . . . . . . . . . . 60
store position . . . . . . . . . . . . . . . . . . . . . . . . . . . 61
TRAFFIC . . . . . . . . . . . . . . . . . . . . . . . . . . . . . . . . 64
traffic reports . . . . . . . . . . . . . . . . . . . . . . . . . . . 64
updating navigation data . . . . . . . . . . . . . . . . . 57
O
On-screen keypad . . . . . . . . . . . . . . . . . . . . . . . . . 11
Online traffic information . . . . . . . . . . . . . . . . . . . 64
Operation additional displays . . . . . . . . . . . . . . . . . . . . . . . 12
changing the volume . . . . . . . . . . . . . . . . . . . . . . 9
function buttons . . . . . . . . . . . . . . . . . . . . . . . . . 10
general instructions for use . . . . . . . . . . . . . . . . . 8
Infotainment system buttons . . . . . . . . . . . . . . . . 9
input . . . . . . . . . . . . . . . . . . . . . . . . . . . . . . . . . . 11
input mask . . . . . . . . . . . . . . . . . . . . . . . . . . . . . 11
on-screen keypad . . . . . . . . . . . . . . . . . . . . . . . . 11
PHONE . . . . . . . . . . . . . . . . . . . . . . . . . . . . . . 77, 80
RADIO . . . . . . . . . . . . . . . . . . . . . . . . . . . . . . . . . 29
rotary knobs . . . . . . . . . . . . . . . . . . . . . . . . . . . . . 9
search lists . . . . . . . . . . . . . . . . . . . . . . . . . . . . . 11 slider . . . . . . . . . . . . . . . . . . . . . . . . . . . . . . . . . . 11
slide (sc
reen) . . . . . . . . . . . . . . . . . . . . . . . . . . . 11
sound suppression (mute) . . . . . . . . . . . . . . . . . . 9
switch on and switch off . . . . . . . . . . . . . . . . . . . 9
touchscreen . . . . . . . . . . . . . . . . . . . . . . . . . . . . 10
voice control . . . . . . . . . . . . . . . . . . . . . . . . . . . . 13
P Personal POI importing . . . . . . . . . . . . . . . . . . . . . . . . . . . . . . 66
PHONE A2DP . . . . . . . . . . . . . . . . . . . . . . . . . . . . . . . . . . 78
areas where special regulations apply . . . . . . . 78
bluetooth profiles . . . . . . . . . . . . . . . . . . . . . . . . 78
bluetooth settings . . . . . . . . . . . . . . . . . . . . . . . 87
call lists . . . . . . . . . . . . . . . . . . . . . . . . . . . . . . . . 86
call mailbox . . . . . . . . . . . . . . . . . . . . . . . . . . . . . 83
connect and disconnect the telephone man-agement system . . . . . . . . . . . . . . . . . . . . . . . 87
connection via the Infotainment system . . . . . . 79
contacts . . . . . . . . . . . . . . . . . . . . . . . . . . . . . . . . 84
description of the function . . . . . . . . . . . . . . . . 78
dial . . . . . . . . . . . . . . . . . . . . . . . . . . . . . . . . 83, 84
display and symbols . . . . . . . . . . . . . . . . . . . . . 82
enter telephone number . . . . . . . . . . . . . . . . . . 83
explosion risk areas . . . . . . . . . . . . . . . . . . . . . . 78
favourites (speed dial buttons) . . . . . . . . . . . . . 86
general information . . . . . . . . . . . . . . . . . . . . . . 77
GSM network . . . . . . . . . . . . . . . . . . . . . . . . . . . 78
HFP . . . . . . . . . . . . . . . . . . . . . . . . . . . . . . . . . . . 78
main menu . . . . . . . . . . . . . . . . . . . . . . . . . . . . . 81
mobile telephone pairing . . . . . . . . . . . . . . . . . 79
pairing of mobile telephone . . . . . . . . . . . . . . . 79
pairing via the Infotainment system . . . . . . . . . 79
phonebook . . . . . . . . . . . . . . . . . . . . . . . . . . . . . 84
settings . . . . . . . . . . . . . . . . . . . . . . . . . . . . . . . . 87
97