navigation system Seat Leon SC 2017 Owner's manual
[x] Cancel search | Manufacturer: SEAT, Model Year: 2017, Model line: Leon SC, Model: Seat Leon SC 2017Pages: 332, PDF Size: 7.25 MB
Page 4 of 332
Related videos
Safety: traffic jam assist, adaptive cruise control with city safety assist, front and rear parking sensors and rear view
camera.
www.seat.com/youtube-af/leon/tech-safety››› page 214
››› page 227
››› page 237
››› page 243
Technology: Kessy keyless access and starting system, with My Beat function, navigation system, wireless charger
and Full Link technology.
www.seat.com/youtube-af/leon/tech-tech››› page 123
››› page 129
››› page 183
››› Booklet Navigation system
Page 38 of 332
The essentials
Driver information System Intr oduction With the ignition switched on, it is possible
to r
e
ad the different functions of the display
by scrolling through the menus.
In vehicles with multifunction steering wheel,
the multifunction display can only be operat-
ed with the steering wheel buttons.
The number of menus displayed on the in-
strument panel will vary according to the ve-
hicle electronics and equipment.
A specialised workshop will be able to pro-
gramme or modify additional functions, ac-
cording to the vehicle equipment. SEAT rec-
ommends visiting a SEAT Official Service.
Some menu options can only be read when
the vehicle is at a standstill.
As long as a priority 1 warning is displayed, it
will not be possible to read the menus
››› page 41. Some warning messages can
be confirmed and made to disappear with the
windscreen wiper lever button or the multi-
function steering wheel button.
The information system also provides the fol-
lowing information and displays (depending
on the vehicle's equipment):
Driving data ›››
page 38
■ MFD from departure ■
MFD from r ef
uelling
■ MFD total calculation
Assist systems ››› page 40
Navigation ››› Booklet Navigation system
Audio ››› Booklet Radio or ››› Booklet Naviga-
tion system
Telephone ››› Booklet Radio or ››› Booklet
Navigation system
Vehicle status ››› page 41 WARNING
Any distraction may lead to an accident, with
the risk of
injury.
● Do not operate the instrument panel con-
trol
s when driving. Using the menus on the instrument
p
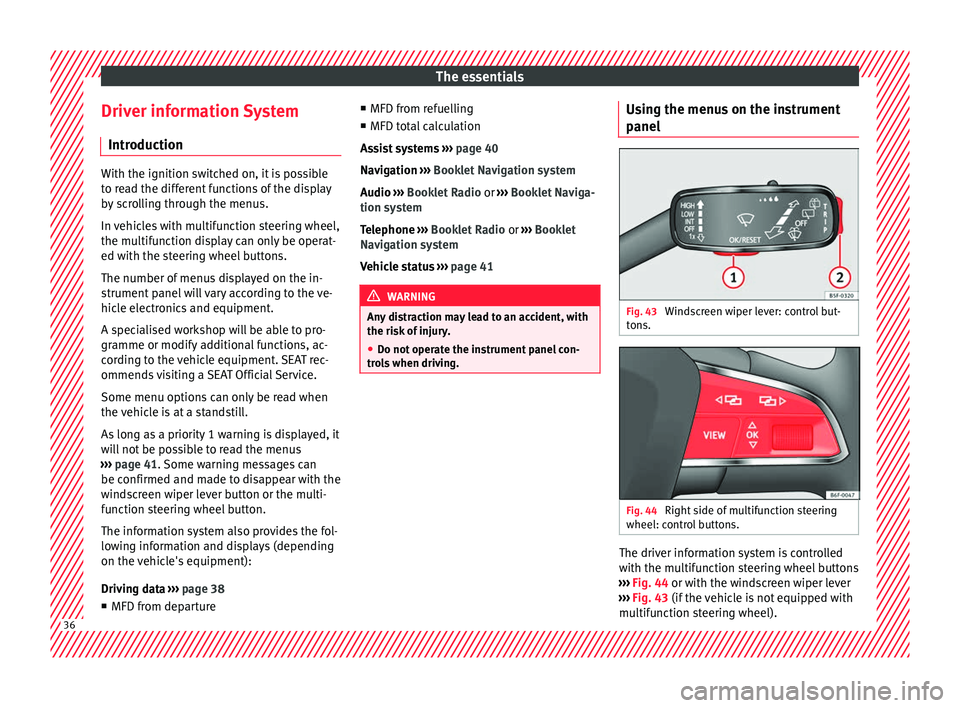
anel Fig. 43
Windscreen wiper lever: control but-
t on
s. Fig. 44
Right side of multifunction steering
wheel: c ontr
o
l buttons. The driver information system is controlled
w
ith the mu
ltif
unction steering wheel buttons
››› Fig. 44 or with the windscreen wiper lever
››› Fig. 43 (if the vehicle is not equipped with
multifunction steering wheel). 36
Page 40 of 332
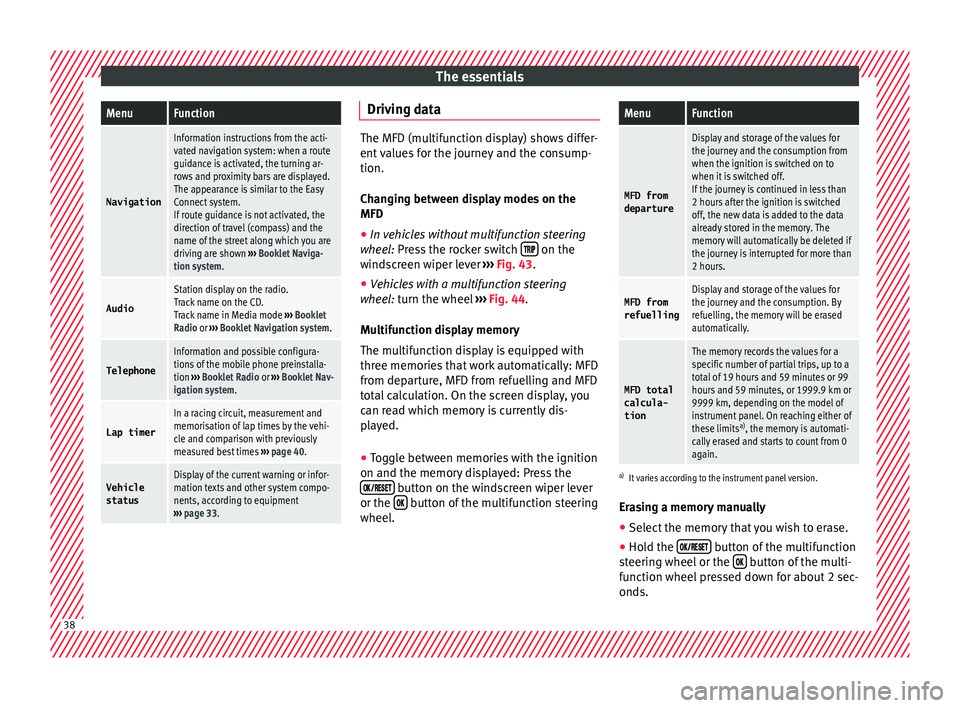
The essentialsMenuFunction
Navigation
Information instructions from the acti-
vated navigation system: when a route
guidance is activated, the turning ar-
rows and proximity bars are displayed.
The appearance is similar to the Easy
Connect system.
If route guidance is not activated, the
direction of travel (compass) and the
name of the street along which you are
driving are shown
››› Booklet Naviga-
tion system.
Audio
Station display on the radio.
Track name on the CD.
Track name in Media mode ››› Booklet
Radio or ››› Booklet Navigation system.
Telephone
Information and possible configura-
tions of the mobile phone preinstalla-
tion ››› Booklet Radio or ››› Booklet Nav-
igation system.
Lap timer
In a racing circuit, measurement and
memorisation of lap times by the vehi-
cle and comparison with previously
measured best times ››› page 40.
Vehicle
statusDisplay of the current warning or infor-
mation texts and other system compo-
nents, according to equipment
››› page 33. Driving data
The MFD (multifunction display) shows differ-
ent
v
alues for the journey and the consump-
tion.
Changing between display modes on the
MFD
● In vehicles without multifunction steering
wheel:
Press the rocker switch on the
wind s
creen wiper lever ››› Fig. 43.
● Vehicles with a multifunction steering
wheel:
turn the wheel ››› Fig. 44.
Multifunction display memory
The multifunction display is equipped with
three memories that work automatically: MFD
from departure, MFD from refuelling and MFD
total calculation. On the screen display, you
can read which memory is currently dis-
played.
● Toggle between memories with the ignition
on and the memory di
splayed: Press the
button on the windscreen wiper lever
or the button of the multifunction steering
wheel .
MenuFunction
MFD from
departure
Display and storage of the values for
the journey and the consumption from
when the ignition is switched on to
when it is switched off.
If the journey is continued in less than
2 hours after the ignition is switched
off, the new data is added to the data
already stored in the memory. The
memory will automatically be deleted if
the journey is interrupted for more than
2 hours.
MFD from refuellingDisplay and storage of the values for
the journey and the consumption. By
refuelling, the memory will be erased
automatically.
MFD total
calcula-
tion
The memory records the values for a
specific number of partial trips, up to a
total of 19 hours and 59 minutes or 99
hours and 59 minutes, or 1999.9 km or
9999 km, depending on the model of
instrument panel. On reaching either of
these limits a)
, the memory is automati-
cally erased and starts to count from 0
again.
a) It varies according to the instrument panel version.
Erasing a memory manually
● Select the memory that you wish to erase.
● Hold the button of the multifunction
s t
eerin
g wheel or the button of the multi-
f u nction wheel
pressed down for about 2 sec-
onds. 38
Page 51 of 332
The essentials
Ignition: Do not carry on
driving! Engine coolant level
too low, coolant temperature
too high
››› page
274
Flashing: Fault in the engine
coolant system.
Do not continue driving!
Engine oil pressure too low. If
the warning lamp flashes,
stop driving, even if the oil
level is correct. Do not even
run the engine at idle speed!
››› page
272
Fault in the battery.›››
page
277
Driving light totally or partially
faulty.›››
page
103
Fault in the cornering light
system.››› page
140
Diesel particulate filter
blocked›››
page
203
Level of windscreen washer
fluid too low.›››
page
148
Flashing: Fault in the oil level
detection. Control manually.
›››
page
272
Ignition: Insufficient engine
oil.
Fault in the gearbox.›››
page
198
Light Assist on.›››
page
142
Immobiliser active.›››
page
131
Service interval display›››
page 44
Mobile telephone is connec-
ted via Bluetooth to the origi-
nal telephone device.›››
page
121
››› page
123
››› Booklet
Audio or
navigation
system
Mobile telephone battery
charge meter. Available only
for devices pre-installed in fac-
tory.
Freezing warning. The outside
temperature is lower than
+4°C (+39°F).›››
page 42
Start-Stop system activated.›››
page
205
Start-Stop system unavailable.
Low consumption driving sta-
tus›››
page
115
›››
page 115 On the instrument panel
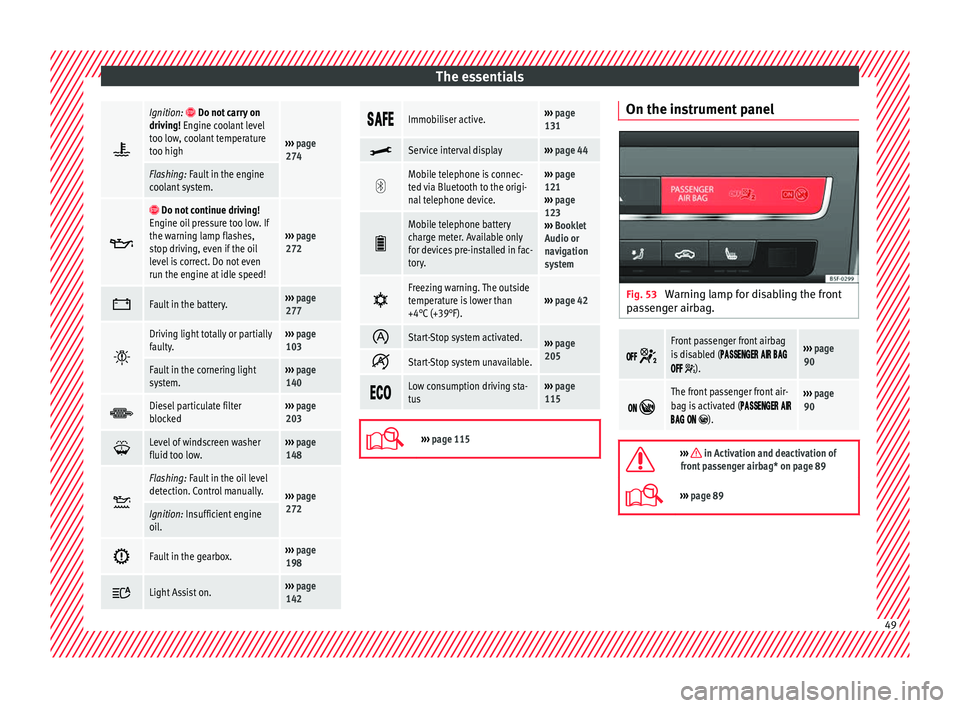
Fig. 53
Warning lamp for disabling the front
p a
s
senger airbag.
Front passenger front airbag
is disabled (
).
››› page
90
The front passenger front air-
bag is activated (
).
››› page
90
››› in Activation and deactivation of
front passenger airbag* on page 89
››› page 89 49
Page 115 of 332
Controls and displays
Operation
C ontr
o
ls and displays
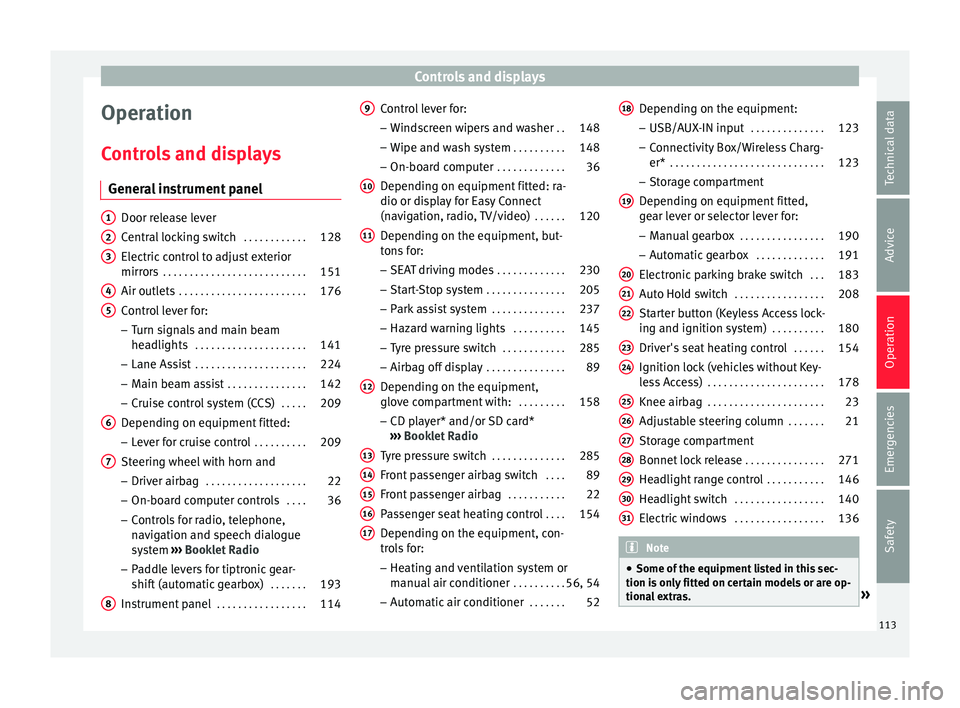
General instrument panel Door release lever
Centr
al
locking switch . . . . . . . . . . . .128
Electric control to adjust exterior
mirrors . . . . . . . . . . . . . . . . . . . . . . . . . . . 151
Air outl
ets . . . . . . . . . . . . . . . . . . . . . . . . 176
Control lever for:
– Turn s ign
als and main beam
headlights . . . . . . . . . . . . . . . . . . . . . 141
– Lane Ass i
st . . . . . . . . . . . . . . . . . . . . . 224
– Main beam a
ssist . . . . . . . . . . . . . . . 142
– Cruise c
ontrol system (CCS) . . . . .209
Depending on equipment fitted:
– Lev er f
or cruise control . . . . . . . . . .209
Steering wheel with horn and – Driver airbag . . . . . . . . . . . . . . . . . . . 22
– On-boar d c
omputer controls . . . .36
– Contro
ls for radio, telephone,
navigation and speech dialogue
system ›››
Booklet Radio
– Paddle levers for tiptronic gear-
shift (automatic gearbox) . . . . . . .193
Instrument panel . . . . . . . . . . . . . . . . . 114
1 2
3
4
5
6
7
8 Control lever for:
– Wind
s
creen wipers and washer . .148
– Wipe and wa
sh system . . . . . . . . . . 148
– On-board c
omputer . . . . . . . . . . . . . 36
Depending on equipment fitted: ra-
dio or disp
lay for Easy Connect
(navigation, radio, TV/video) . . . . . .120
Depending on the equipment, but-
tons
for:
– SEAT driving modes . . . . . . . . . . . . .230
– Star t
-Stop system . . . . . . . . . . . . . . . 205
– Park a
ssist system . . . . . . . . . . . . . . 237
– Hazard w
arning lights . . . . . . . . . .145
– Tyr
e pressure switch . . . . . . . . . . . .285
– Airbag off di
splay . . . . . . . . . . . . . . . 89
Depending on the equipment,
glov e c
ompartment with: . . . . . . . . .158
– CD pl a
yer* and/or SD card*
››› Booklet Radio
Tyre pressure switch . . . . . . . . . . . . . .285
Front passenger airbag switch . . . .89
Front passenger airbag . . . . . . . . . . .22
Passenger seat heating control . . . .154
Depending on the equipment, con-
tro l
s for:
– Heating and ventilation system or
manual air conditioner . . . . . . . . . .56, 54
– Autom atic
air conditioner . . . . . . .52
9
10
11
12
13
14
15
16
17 Depending on the equipment:
– USB/A UX
-IN inp
ut . . . . . . . . . . . . . . 123
– Connectivity
Box/Wireless Charg-
er* . . . . . . . . . . . . . . . . . . . . . . . . . . . . . 123
– Storag
e compartment
Depending on equipment fitted,
gear lever or selector lever for:
– Manual gearbox . . . . . . . . . . . . . . . . 190
– Automatic
gearbox . . . . . . . . . . . . . 191
Electronic parking brake switch . . .183
Auto Hold switch . . . . . . . . . . . . . . . . . 208
Starter button (Keyless Access lock-
ing and ignition sys
tem) . . . . . . . . . . 180
Driver's seat heating control . . . . . .154
Ignition lock (vehicles without Key-
les
s Access) . . . . . . . . . . . . . . . . . . . . . . 178
Knee airbag . . . . . . . . . . . . . . . . . . . . . . 23
Adjustable steering column . . . . . . .21
Storage compartment
Bonnet lock
release . . . . . . . . . . . . . . . 271
Headlight range control . . . . . . . . . . .146
Headlight switch . . . . . . . . . . . . . . . . . 140
Electric windows . . . . . . . . . . . . . . . . . 136 Note
● Some of the equipment li
sted in this sec-
tion is only fitted on certain models or are op-
tional extras. » 18
19
20
21
22
23
24
25
26
27
28
29
30
31
113
Technical data
Advice
Operation
Emergencies
Safety
Page 118 of 332
Operation
● Sec ond s
peed di
splay ››› page 116 .
● Speed warning function ›››
page 43.
● Start-Stop system status display
›››
page 205.
● Active cylinder management display
(ACT ®
)* ››
› page 200
● Signs recognised by the traffic signal de-
tection sys
tem ››› page 233
● Low consumption driving status (ECO)
›››
page 117
● Engine code (MKB) ›››
page 117.
Distance travelled
The odometer registers the total distance
travelled by the car.
The odometer (trip ) shows the distance
travelled since the last odometer reset. The
last digit of the trip recorder indicates distan-
ces of 100 metres or one tenths of a mile.
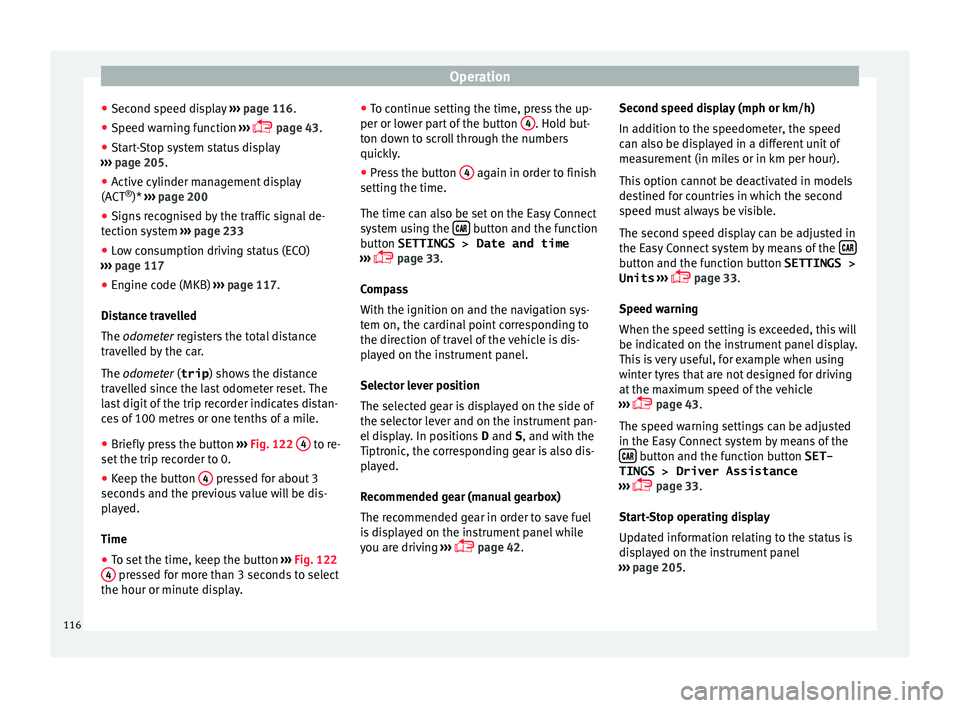
● Briefly press the button ›››
Fig. 122 4 to re-
set the trip r
ec
order to 0.
● Keep the button 4 pressed for about 3
sec ond
s
and the previous value will be dis-
played.
Time
● To set the time, keep the button ›››
Fig. 122
4 pressed for more than 3 seconds to select
the hour or minut e di
s
play. ●
To continue settin
g the time, press the up-
per or lower part of the button 4 . Hold but-
t on do
wn t
o scroll through the numbers
quickly.
● Press the button 4 again in order to finish
settin g the time.
The time c an al
so be set on the Easy Connect
system using the button and the function
b utt
on
SETTINGS > Date and time
››› page 33.
Compass
With the ignition on and the navigation sys-
tem on, the cardinal point corresponding to
the direction of travel of the vehicle is dis-
played on the instrument panel.
Selector lever position
The selected gear is displayed on the side of
the selector lever and on the instrument pan-
el display. In positions D and S, and with the
Tiptronic, the corresponding gear is also dis-
played.
Recommended gear (manual gearbox)
The recommended gear in order to save fuel
is displayed on the instrument panel while
you are driving ›››
page 42. Second speed display (mph or km/h)
In addition t
o the speedometer, the speed
can also be displayed in a different unit of
measurement (in miles or in km per hour).
This option cannot be deactivated in models
destined for countries in which the second
speed must always be visible.
The second speed display can be adjusted in
the Easy Connect system by means of the button and the function button SETTINGS >
Units › ›
›
page 33.
Speed warning
When the speed setting is exceeded, this will
be indicated on the instrument panel display.
This is very useful, for example when using
winter tyres that are not designed for driving
at the maximum speed of the vehicle
››› page 43.
The speed warning settings can be adjusted
in the Easy Connect system by means of the button and the function button SET-
TINGS > Driver Assistance
› ›
›
page 33.
Start-Stop operating display
Updated information relating to the status is
displayed on the instrument panel
››› page 205.
116
Page 123 of 332
Communications and multimedia
Communications and multimedia
St eerin
g wheel
controls*
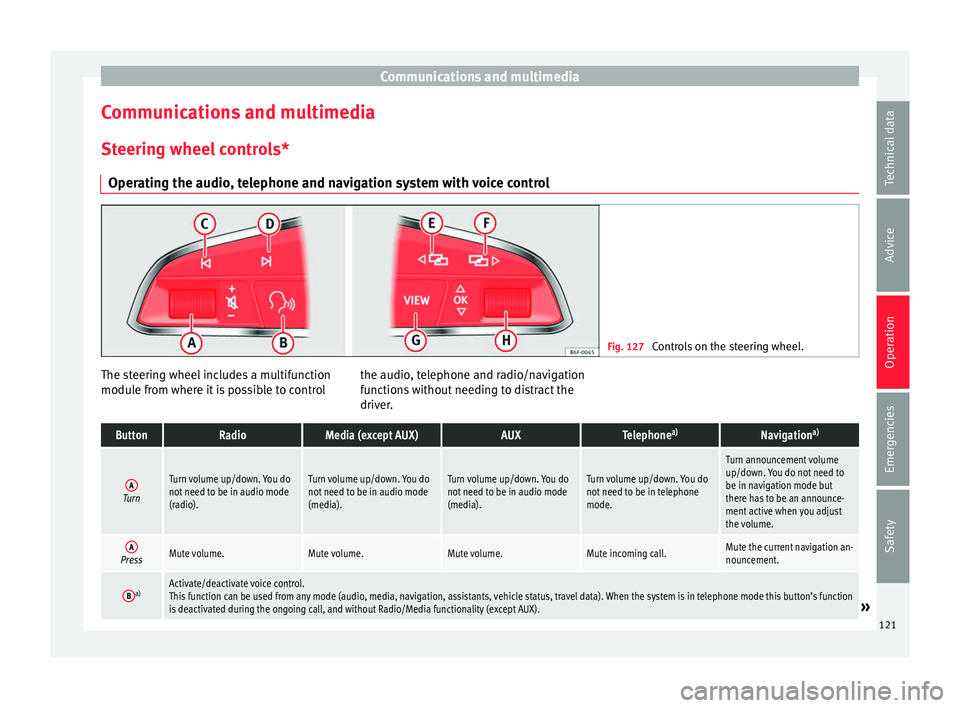
Operating the audio, telephone and navigation system with voice control Fig. 127
Controls on the steering wheel. The steering wheel includes a multifunction
modu
l
e fr
om where it is possible to control the audio, telephone and radio/navigation
function
s without needing to distract the
driver.
ButtonRadioMedia (except AUX)AUXTelephone a)Navigation a)
ATurn
Turn volume up/down. You do
not need to be in audio mode
(radio).Turn volume up/down. You do
not need to be in audio mode
(media).Turn volume up/down. You do
not need to be in audio mode
(media).Turn volume up/down. You do
not need to be in telephone
mode.
Turn announcement volume
up/down. You do not need to
be in navigation mode but
there has to be an announce-
ment active when you adjust
the volume.
APressMute volume.Mute volume.Mute volume.Mute incoming call.Mute the current navigation an-
nouncement.
Ba)Activate/deactivate voice control.
This function can be used from any mode (audio, media, navigation, assistants, vehicle status, travel data). When the system is in telephone mode this button’s function
is deactivated during the ongoing call, and without Radio/Media functionality (except AUX).
» 121
Technical data
Advice
Operation
Emergencies
Safety
Page 125 of 332
Communications and multimedia
Multimedia USB/A UX
-INP
ortFig. 128
Centre console: USB/AUX-IN input. Fig. 129
Centre console, rear section: USB
c onnect
or
s. Depending on the special characteristics and
the c
ou
ntr
y, the vehicle may have a
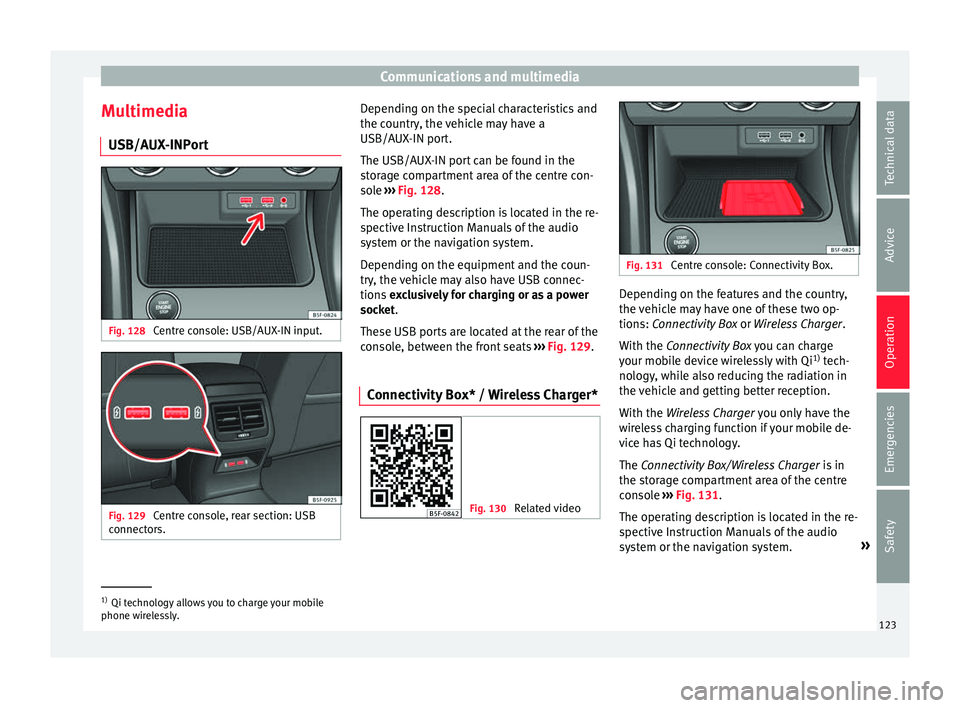
USB/AUX-IN port.
The USB/AUX-IN port can be found in the
storage compartment area of the centre con-
sole ››› Fig. 128.
The operating description is located in the re-
spective Instruction Manuals of the audio
system or the navigation system.
Depending on the equipment and the coun-
try, the vehicle may also have USB connec-
tions exclusively for charging or as a power
socket.
These USB ports are located at the rear of the
console, between the front seats ››› Fig. 129.
Connectivity Box* / Wireless Charger* Fig. 130
Related video Fig. 131
Centre console: Connectivity Box. Depending on the features and the country,
the
v
ehic
le may have one of these two op-
tions: Connectivity Box or Wireless Charger.
With the Connectivity Box you can charge
your mobile device wirelessly with Qi 1)
tech-
nology, while also reducing the radiation in
the vehicle and getting better reception.
With the Wireless Charger you only have the
wireless charging function if your mobile de-
vice has Qi technology.
The Connectivity Box/Wireless Charger is in
the storage compartment area of the centre
console ››› Fig. 131.
The operating description is located in the re-
spective Instruction Manuals of the audio
system or the navigation system. »1)
Qi technology allows you to charge your mobile
phone wir el
essly. 123
Technical data
Advice
Operation
Emergencies
Safety
Page 177 of 332
Air conditioning
In the Easy Connect system it is also possible
t o per
form
various adjustments to the Clima-
tronic ››› Fig. 189.
Open the air conditioner menu
● Press the button on the Climatronic
c ontr
ol
panel.
On the top of the screen you can see and
change the current settings, such as, for ex-
ample, the temperature set for the driver side
and for that of passenger. Temperatures up
to +22°C (+72°F) are shown with blue arrows,
and temperatures over +22°C (+72°F) with
red arrows.
To switch a function on or off, or to select a
submenu, you must press the corresponding
function button.
Function button: function
OFFClimatronic is switched off.
ONClimatronic is switched on.
SYNCSynchronise driver and front passenger
temperatures.
Function button: function
SETTINGS
The air conditioning settings submenu
is opened. The following settings can al-
so be adjusted:
Air conditioning profile. : Ad-
just the power of the fan in AUTO mode.
You can choose between low, medium
and high.
Automatic air recirculation :
Switching automatic air recirculation on
and off ››› page 176.
Automatic supplementary heat-
er : Activate/deactivate the automatic
activation of the auxiliary heater for
colder countries (only for engines with
auxiliary heater). With the option deacti-
vated, depending on the outside tem-
perature the heating may need more
time than normal to reach a comfortable
temperature.
BACK : Close the submenu. Air conditioning user instructions
The interior cooling system only works when
the en
gine i
s ru
nning and fan is switched on.
The air conditioner operates most effectively
with the windows and the panoramic sliding
sunroof closed. However, if the vehicle has
heated up after standing in the sun for some
time, the air inside can be cooled more quick- ly by opening the windows and the panoram-
ic sliding s
unroof briefly.
Climatronic: change the temperature unit on
the screen of the radio or on the factory-fit-
ted navigation system
Changing the temperature display from Cel-
sius to Fahrenheit on radio or on the factory-
fitted navigation system is done using the
menu on the instrument panel
››› page 36.
The cooling system cannot be activated
If the air conditioning system cannot be
switched on, this may be caused by the fol-
lowing:
● The engine is not running.
● The fan is switched off.
● The air conditioner fuse has blown.
● The outside temperature is lower than ap-
proxim
ately +3°C (+38°F).
● The air conditioner compressor has been
temporarily
switched off because the engine
coolant temperature is too high.
● Another fault in the vehicle. Have the air
conditioner check
ed by a specialised work-
shop.
Special Characteristics
If the humidity and temperature outside the
vehicle are high, condensation can drip off »
175
Technical data
Advice
Operation
Emergencies
Safety
Page 235 of 332
Driver assistance systems
Traffic sign detection system* 1)
Intr oduction The traffic sign detection system records the
st
and
ard traffic signs in front of the vehicle
with a camera located on the base of the in-
terior mirror and provides information about
speed limits and overtaking prohibitions.
Within its limitations, the system also dis-
plays additional signals, such as time-specif-
ic prohibitions, signs for vehicles towing trail-
ers ›››
page 246 or limitations that only apply
in the event of rain. Even on journeys without
signs, the system may display any applicable
speed limits.
In Germany, on motorways and vehicle roads,
besides speed limits and overtaking provi-
sions the system also displays the end of
prohibition signs. The valid speed limit at the
time in other countries is always shown. WARNING
The technology in the traffic sign detection
sys t
em cannot change the limits imposed by
the laws of physics and only works within the
system's limits. Do not let the extra conven-
ience afforded by the traffic sign detection
system tempt you into taking any risks when
driving. The system is not a replacement for
driver awareness. ●
Adapt
your speed and driving style to suit
visibility, weather, road and traffic condi-
tions.
● Poor visibility, darkness, snow, rain and fog
may
lead to the system failing to display traf-
fic signs or not displaying them correctly.
● If the camera's field of vision is dirty, cov-
ered or dam
aged, system operation may be
impaired. WARNING
The driving recommendations and traffic indi-
c ation s
shown on the traffic sign detection
system may differ from the actual current
traffic situation.
● The system may not detect or correctly
show al
l the traffic signs.
● Traffic signs and traffic regulations have
priority ov
er the recommendations and dis-
plays provided by the system. Note
In order not to compromise the system's op-
eration, p l
ease take the following points into
account:
● Regularly clean the area of vision of the
camera and k
eep it in a clean state, without
snow or ice. ●
Do not c o
ver the field of vision of the cam-
era.
● Always replace damaged or worn blades
when required t
o avoid lines on the camera's
field of vision.
● Check that the windscreen is not damaged
in the area of
the camera's field of vision. Note
● The u se of out
dated maps on the naviga-
tion system may cause the system to show
traffic signs incorrectly.
● In the waypoints mode of the navigation
syst
em, the traffic sign detection system is
only partly available. 1)
System available depending on the country.
233
Technical data
Advice
Operation
Emergencies
Safety