window Seat Leon Sportstourer 2013 Owner's Guide
[x] Cancel search | Manufacturer: SEAT, Model Year: 2013, Model line: Leon Sportstourer, Model: Seat Leon Sportstourer 2013Pages: 339, PDF Size: 4.8 MB
Page 121 of 339
119
Lights and visibility
Sun visors
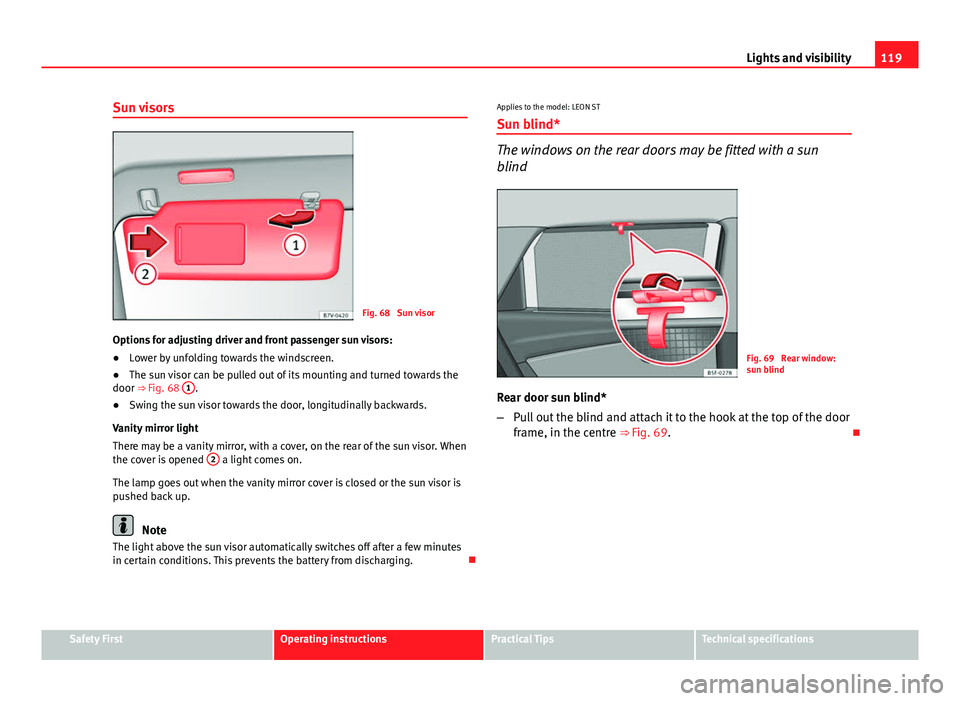
Fig. 68 Sun visor
Options for adjusting driver and front passenger sun visors:
● Lower by unfolding towards the windscreen.
● The sun visor can be pulled out of its mounting and turned towards the
door ⇒ Fig. 68 1
.
● Swing the sun visor towards the door, longitudinally backwards.
Vanity mirror light
There may be a vanity mirror, with a cover, on the rear of the sun visor. When
the cover is opened 2
a light comes on.
The lamp goes out when the vanity mirror cover is closed or the sun visor is
pushed back up.
Note
The light above the sun visor automatically switches off after a few minutes
in certain conditions. This prevents the battery from discharging. Applies to the model: LEON ST
Sun blind*
The windows on the rear doors may be fitted with a sun
blind
Fig. 69 Rear window:
sun blind
Rear door sun blind*
– Pull out the blind and attach it to the hook at the top of the door
frame, in the centre ⇒ Fig. 69.
Safety FirstOperating instructionsPractical TipsTechnical specifications
Page 122 of 339
120Lights and visibility
Windscreen wiper and rear wiper systems
Introduction
Additional information and warnings:
● Changing wheels round
● Heating, ventilation, cooling
● Caring for and cleaning the vehicle exterior
WARNING
If the water from the windscreen washer does not contain enough anti-
freeze, it may freeze on the windscreen and rear window, reducing for-
ward and rear visibility.
● In winter, ensure the windscreen washer contains enough anti-freeze.
● In cold conditions, you should not use the wash/wipe system unless
you have warmed the windscreen with the ventilation system. The anti-
freeze could freeze on the windscreen and reduce visibility.
WARNING
Worn or dirty wiper blades reduce visibility and increase the risk of acci-
dent and serious injury.
● Always replace damaged or worn blades or blades which do not clean
the windscreen correctly.
CAUTION
In icy conditions, always check that the wiper blades are not frozen to the
glass before using the wipers. In cold weather, it may help to leave the vehi-
cle parked with the wipers in service position ⇒ page 122. Control lamp
lights upPossible causeSolution
Windscreen wiper fluid level
too lowTop up the windscreen wiper
reservoir as soon as possible
⇒ page 124.
Several warning and control lamps should light up for a few seconds when
the ignition is switched on, signalling that the function is being verified.
They will switch off after a few seconds.
CAUTION
Failure to heed the control lamps and text messages when they appear may
result in faults in the vehicle.
Page 123 of 339
121
Lights and visibility
Window wiper lever
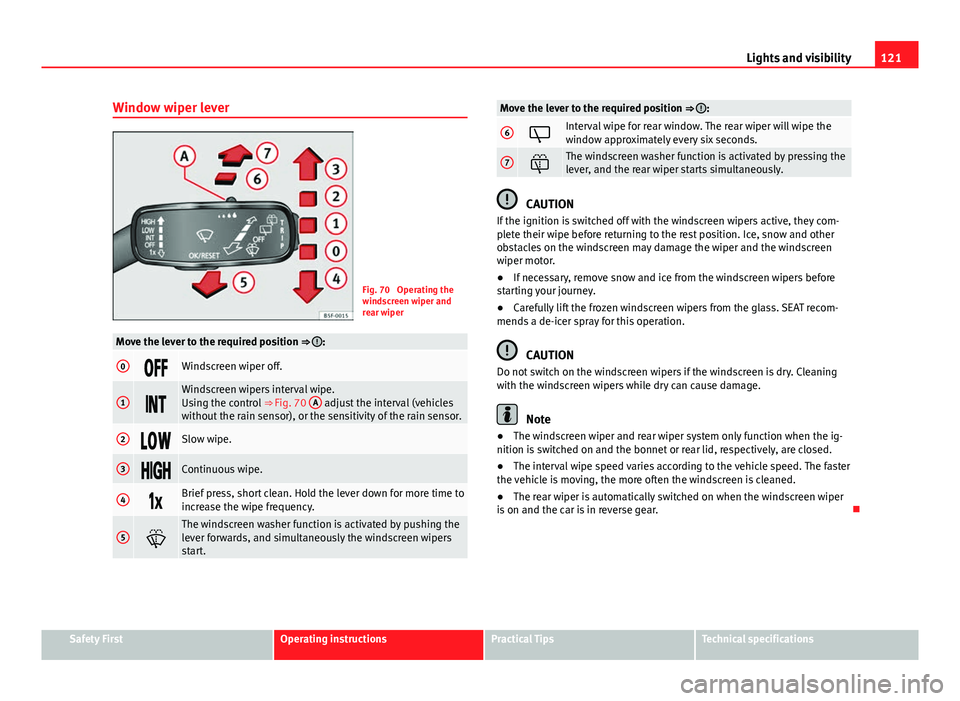
Fig. 70 Operating the
windscreen wiper and
rear wiper
Move the lever to the required position ⇒ :
0Windscreen wiper off.
1
Windscreen wipers interval wipe.
Using the control ⇒ Fig. 70 A adjust the interval (vehicles
without the rain sensor), or the sensitivity of the rain sensor.
2Slow wipe.
3Continuous wipe.
4Brief press, short clean. Hold the lever down for more time to
increase the wipe frequency.
5
The windscreen washer function is activated by pushing the
lever forwards, and simultaneously the windscreen wipers
start.
Move the lever to the required position ⇒ :
6Interval wipe for rear window. The rear wiper will wipe the
window approximately every six seconds.
7The windscreen washer function is activated by pressing the
lever, and the rear wiper starts simultaneously.
CAUTION
If the ignition is switched off with the windscreen wipers active, they com-
plete their wipe before returning to the rest position. Ice, snow and other
obstacles on the windscreen may damage the wiper and the windscreen
wiper motor.
● If necessary, remove snow and ice from the windscreen wipers before
starting your journey.
● Carefully lift the frozen windscreen wipers from the glass. SEAT recom-
mends a de-icer spray for this operation.
CAUTION
Do not switch on the windscreen wipers if the windscreen is dry. Cleaning
with the windscreen wipers while dry can cause damage.
Note
● The windscreen wiper and rear wiper system only function when the ig-
nition is switched on and the bonnet or rear lid, respectively, are closed.
● The interval wipe speed varies according to the vehicle speed. The faster
the vehicle is moving, the more often the windscreen is cleaned.
● The rear wiper is automatically switched on when the windscreen wiper
is on and the car is in reverse gear.
Safety FirstOperating instructionsPractical TipsTechnical specifications
Page 126 of 339
124Lights and visibility
● Damaged blades: A film of water on the damaged blades may lengthen
the activation time, reduce the washing intervals or result in a fast and con-
tinuous wipe.
● Insects: insects on the sensor may trigger the windscreen washer.
● Salt on roads: in winter, salt spread in the roads may cause an extra
long wipe when the windscreen is almost dry.
● Dirt: dry dust, wax, coating on glass (Lotus effect) or traces of detergent
(car wash) may reduce the effectiveness of the rain sensor or make it react
more slowly, later or not at all.
● Cracked windscreen: the impact of a stone will trigger a single wipe cy-
cle with the rain sensor on. Next the rain sensor detects the reduction in the
sensitive surface area and adapts accordingly. The behaviour of the sensor
will vary with the size of the damage caused by the stone.
WARNING
The rain sensor may not detect enough rain to switch on the wipers.
● If necessary, switch on the wipers manually when water on the wind-
screen obstructs visibility.
Note
● Clean the sensitive surface of the rain sensor regularly and check the
blades for damage ⇒ Fig. 73 (arrow).
● To remove wax and coatings, we recommend a window cleaner contain-
ing alcohol. Checking and topping up the windscreen washer reservoir
with water
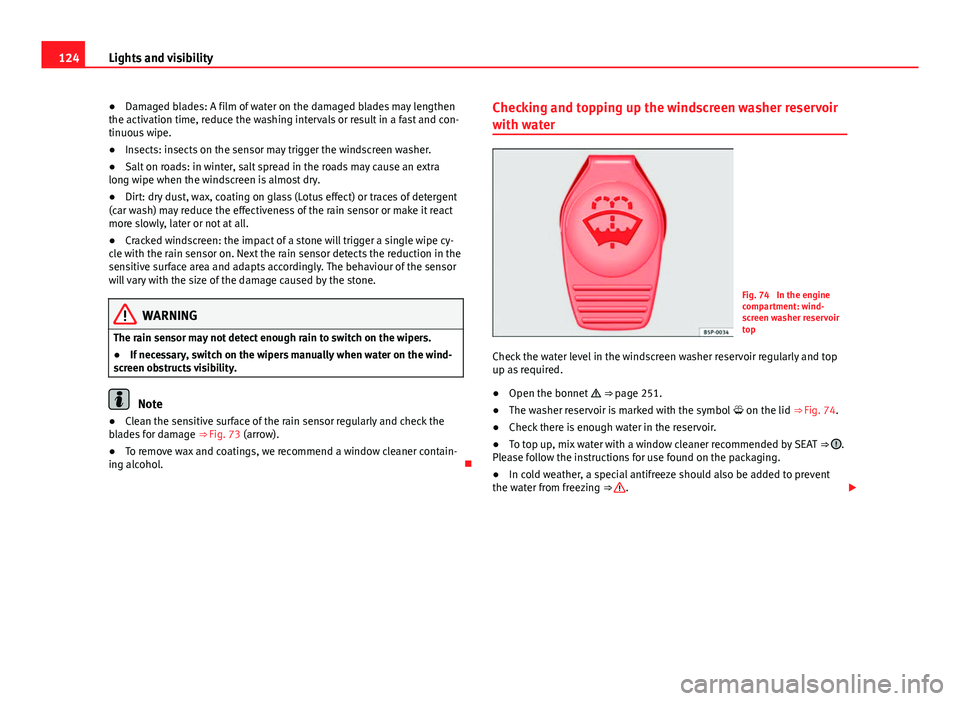
Fig. 74 In the engine
compartment: wind-
screen washer reservoir
top
Check the water level in the windscreen washer reservoir regularly and top
up as required.
● Open the bonnet
⇒ page 251.
● The washer reservoir is marked with the symbol on the lid
⇒ Fig. 74.
● Check there is enough water in the reservoir.
● To top up, mix water with a window cleaner recommended by SEAT
⇒
.
Please follow the instructions for use found on the packaging.
● In cold weather, a special antifreeze should also be added to prevent
the water from freezing ⇒
.
Page 127 of 339
125
Lights and visibility
Recommended windscreen wipers
● For the hottest seasons we recommend summer G 052 184 A1 for clear
glass. Proportions of the mixture in the washer fluid tank: 1:100 (1 part con-
centrate per 100 parts water).
● All year round, G 052 164 A2 for clear glass. Approximate proportion of
the winter mixture, up to -18 °C (0 °F): 1:2 (1 part concentrate per 2 parts
water); otherwise, a 1:4 proportion of mixture in the washer fluid tank.
Reservoir capacity
The reservoir holds approximately 3 - 4 litres; in vehicles with headlight
washer, it is approximately 3 -6 litres.
WARNING
Never mix an unsuitable antifreeze or other similar additives with the
windscreen washer water. A greasy layer may be formed on the wind-
screen which will impair visibility.
● Use clean water with a window cleaner recommended by SEAT.
● If necessary, add a suitable antifreeze to the water in the reservoir.
CAUTION
● Do not mix cleaning products recommended by SEAT with other prod-
ucts. This could lead to flocculation and may block the windscreen washer
jets.
● When topping up service fluids, make absolutely certain that you fill the
fluids into the correct reservoirs. Using the wrong fluids could cause serious
malfunctions and engine damage! Rear vision mirror
Adjusting the exterior mirrors
Fig. 75 Driver door: con-
trol for the exterior mirror
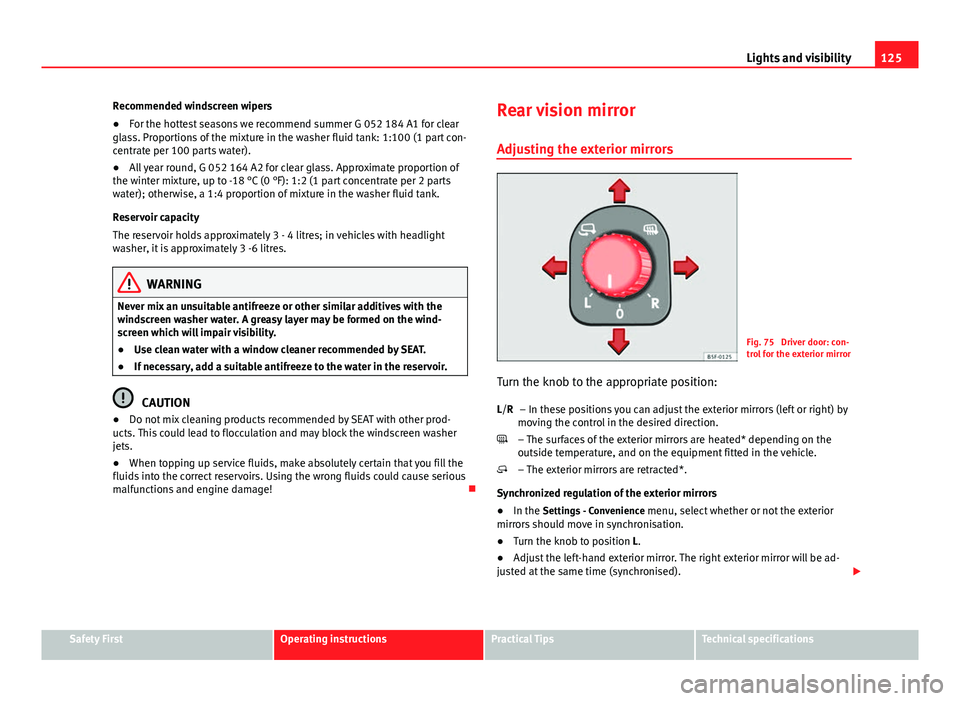
Turn the knob to the appropriate position: – In these positions you can adjust the exterior mirrors (left or right) by
moving the control in the desired direction.
– The surfaces of the exterior mirrors are heated* depending on the
outside temperature, and on the equipment fitted in the vehicle.
– The exterior mirrors are retracted*.
Synchronized regulation of the exterior mirrors
● In the Settings - Convenience menu, select whether or not the exterior
mirrors should move in synchronisation.
● Turn the knob to position L.
● Adjust the left-hand exterior mirror. The right exterior mirror will be ad-
justed at the same time (synchronised).
L/R
Safety FirstOperating instructionsPractical TipsTechnical specifications
Page 155 of 339
153
Air conditioning
Air conditioning Heating, ventilation, cooling
Introduction
Viewing Climatronic information
On the screen of Climatronic control unit and on the screen of the factory-
fitted Easy Connect system, the theoretical values of the temperature zones
are shown.
The unit of temperature measurement can be changed in the Easy Connect
system.
Dust and pollen filter
The dust and pollen filter with its activated charcoal cartridge serves as a
barrier against impurities in the air taken into the vehicle interior.
The dust and pollen filter must be changed regularly so that air conditioner
performance is not adversely affected.
If the filter loses efficiency prematurely due to use in areas with very high
levels of air pollution, the filter must be changed more frequently than sta-
ted in the Service Schedule.
Additional information and warnings:
● Easy Connect system
● Seat functions
● Windscreen wipers and washers
● Caring for and cleaning the vehicle exterior
WARNING
Reduced visibility through the windows increases the risk of serious acci-
dents.
● Always ensure that all windows are free of ice and snow, and that
they are not fogged, so as to maintain good visibility of everything out-
side.
● The maximum heat output required to defrost windows as quickly as
possible is only available when the engine has reached its normal run-
ning temperature. Only drive when you have good visibility.
● Always ensure that you use the heating system, fresh air system, air
conditioner and the heated rear window to maintain good visibility to the
outside.
● Never leave the air recirculation on for a long period of time. If the
cooling system is switched off and air recirculation mode switched on,
the windows can mist over very quickly, considerably limiting visibility.
● Switch air recirculation mode off when it is not required.
WARNING
Stuffy or used air will increase fatigue and reduce driver concentration
possibly resulting in a serious accident.
● Never leave the fresh air fan turned off or use the air recirculation for
long periods of time; the air in the vehicle interior will not be refreshed.
Safety FirstOperating instructionsPractical TipsTechnical specifications
Page 156 of 339
154Air conditioning
CAUTION
● Switch the air conditioner off if you think it may be broken. This will
avoid additional damage. Have the air conditioner checked by a specialised
workshop.
● Repairs to the air conditioner require specialist knowledge and special
tools. SEAT recommends visiting a SEAT Official Service.
Note
● When the cooling system is turned off, air coming from the outside will
not be dried. To prevent fogging of the windows, SEAT recommends leaving
the cooling system (compressor) turned on. To do this, press the button
.
The button lamp should light up.
● The maximum heat output required to defrost windows as quickly as
possible is only available when the engine has reached its normal running
temperature.
● Keep the air intake slots in front of the windscreen free of snow, ice and
leaves to ensure heating and cooling are not impaired, and to prevent the
windows from misting over. Air conditioner controls
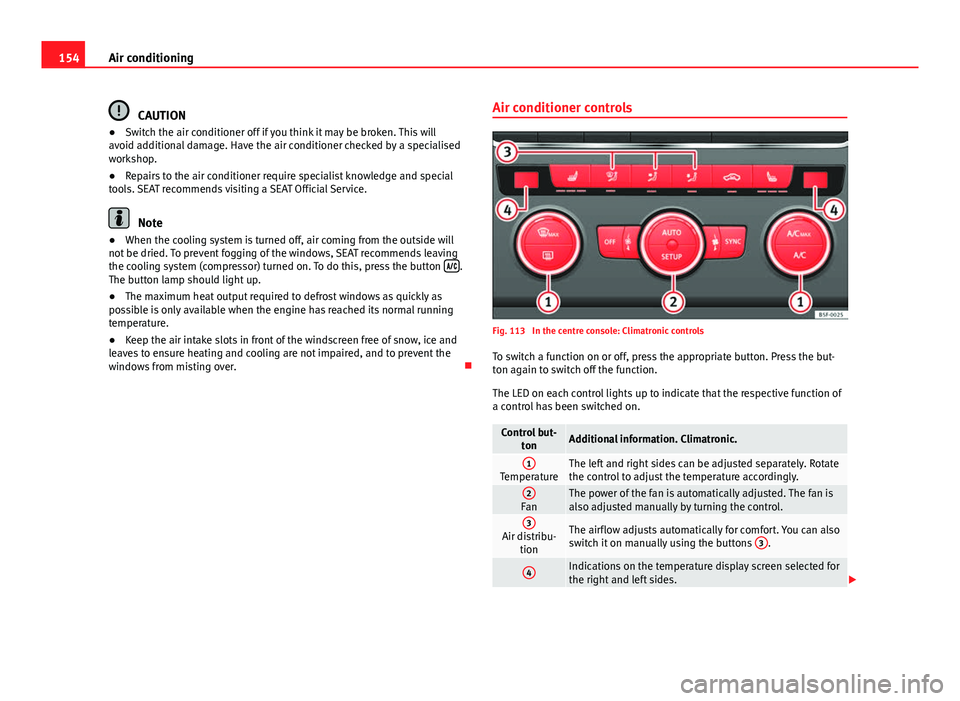
Fig. 113 In the centre console: Climatronic controls
To switch a function on or off, press the appropriate button. Press the but-
ton again to switch off the function.
The LED on each control lights up to indicate that the respective function of
a control has been switched on.
Control but- tonAdditional information. Climatronic.
1TemperatureThe left and right sides can be adjusted separately. Rotate
the control to adjust the temperature accordingly.
2FanThe power of the fan is automatically adjusted. The fan is
also adjusted manually by turning the control.
3Air distribu-tionThe airflow adjusts automatically for comfort. You can also
switch it on manually using the buttons 3.
4Indications on the temperature display screen selected for
the right and left sides.
Page 157 of 339
155
Air conditioning
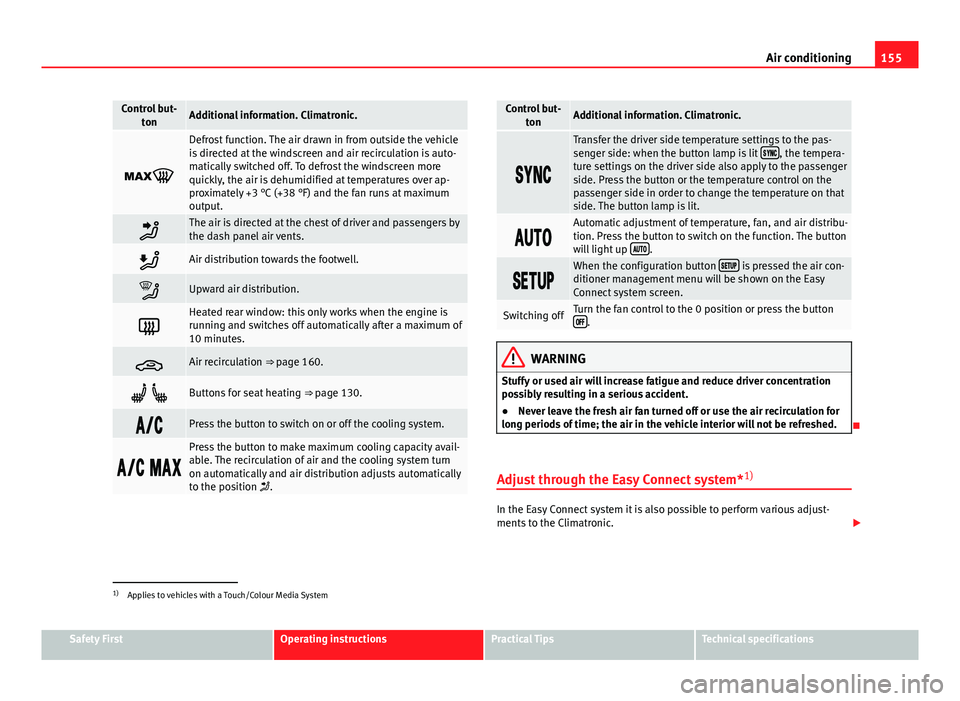
Control but-
tonAdditional information. Climatronic.
Defrost function. The air drawn in from outside the vehicle
is directed at the windscreen and air recirculation is auto-
matically switched off. To defrost the windscreen more
quickly, the air is dehumidified at temperatures over ap-
proximately +3 °C (+38 °F) and the fan runs at maximum
output.
The air is directed at the chest of driver and passengers by
the dash panel air vents.
Air distribution towards the footwell.
Upward air distribution.
Heated rear window: this only works when the engine is
running and switches off automatically after a maximum of
10 minutes.
Air recirculation ⇒ page 160.
Buttons for seat heating ⇒ page 130.
Press the button to switch on or off the cooling system.
Press the button to make maximum cooling capacity avail-
able. The recirculation of air and the cooling system turn
on automatically and air distribution adjusts automatically
to the position .
Control but-
tonAdditional information. Climatronic.
Transfer the driver side temperature settings to the pas-
senger side: when the button lamp is lit , the tempera-
ture settings on the driver side also apply to the passenger
side. Press the button or the temperature control on the
passenger side in order to change the temperature on that
side. The button lamp is lit.
Automatic adjustment of temperature, fan, and air distribu-
tion. Press the button to switch on the function. The button
will light up
.
When the configuration button is pressed the air con-
ditioner management menu will be shown on the Easy
Connect system screen.
Switching offTurn the fan control to the 0 position or press the button .
WARNING
Stuffy or used air will increase fatigue and reduce driver concentration
possibly resulting in a serious accident.
● Never leave the fresh air fan turned off or use the air recirculation for
long periods of time; the air in the vehicle interior will not be refreshed.
Adjust through the Easy Connect system* 1)
In the Easy Connect system it is also possible to perform various adjust-
ments to the Climatronic.
1)
Applies to vehicles with a Touch/Colour Media System
Safety FirstOperating instructionsPractical TipsTechnical specifications
Page 159 of 339
157
Air conditioning
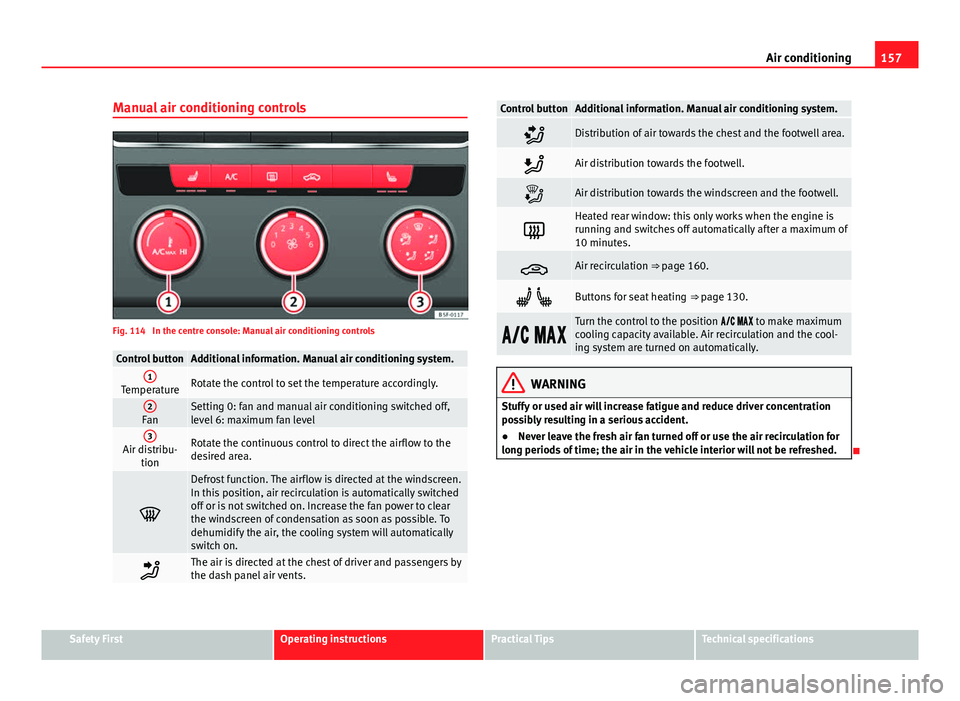
Manual air conditioning controls
Fig. 114 In the centre console: Manual air conditioning controls
Control buttonAdditional information. Manual air conditioning system.1TemperatureRotate the control to set the temperature accordingly.
2FanSetting 0: fan and manual air conditioning switched off,
level 6: maximum fan level
3Air distribu- tionRotate the continuous control to direct the airflow to the
desired area.
Defrost function. The airflow is directed at the windscreen.
In this position, air recirculation is automatically switched
off or is not switched on. Increase the fan power to clear
the windscreen of condensation as soon as possible. To
dehumidify the air, the cooling system will automatically
switch on.
The air is directed at the chest of driver and passengers by
the dash panel air vents.
Control buttonAdditional information. Manual air conditioning system.
Distribution of air towards the chest and the footwell area.
Air distribution towards the footwell.
Air distribution towards the windscreen and the footwell.
Heated rear window: this only works when the engine is
running and switches off automatically after a maximum of
10 minutes.
Air recirculation ⇒ page 160.
Buttons for seat heating ⇒ page 130.
Turn the control to the position to make maximum
cooling capacity available. Air recirculation and the cool-
ing system are turned on automatically.
WARNING
Stuffy or used air will increase fatigue and reduce driver concentration
possibly resulting in a serious accident.
● Never leave the fresh air fan turned off or use the air recirculation for
long periods of time; the air in the vehicle interior will not be refreshed.
Safety FirstOperating instructionsPractical TipsTechnical specifications
Page 160 of 339
158Air conditioning
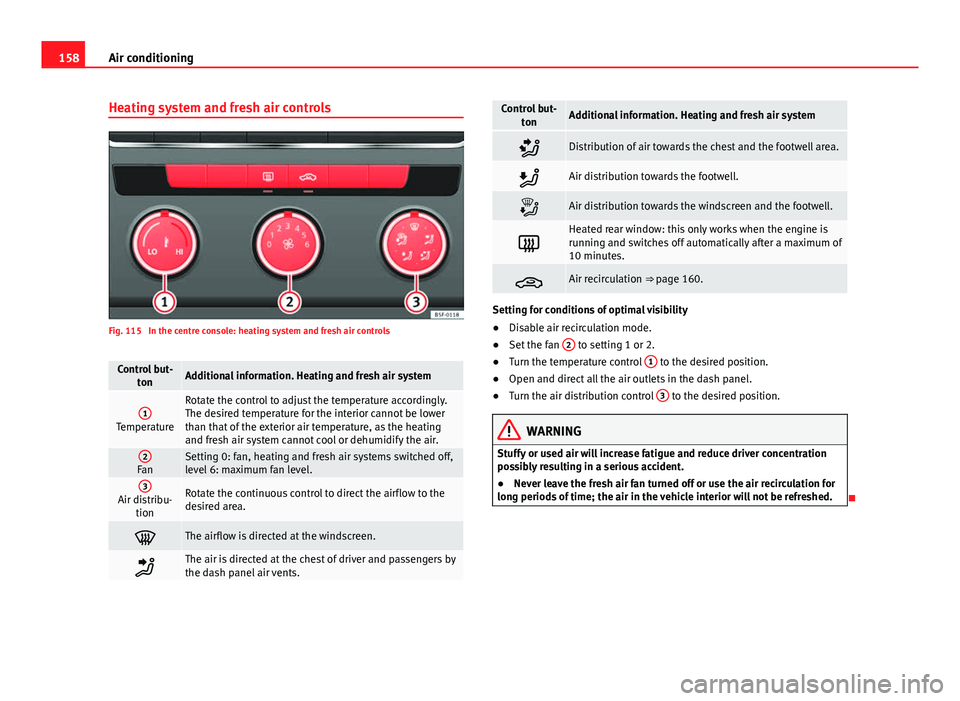
Heating system and fresh air controls
Fig. 115 In the centre console: heating system and fresh air controls
Control but-
tonAdditional information. Heating and fresh air system
1Temperature
Rotate the control to adjust the temperature accordingly.
The desired temperature for the interior cannot be lower
than that of the exterior air temperature, as the heating
and fresh air system cannot cool or dehumidify the air.
2FanSetting 0: fan, heating and fresh air systems switched off,
level 6: maximum fan level.
3Air distribu-tionRotate the continuous control to direct the airflow to the
desired area.
The airflow is directed at the windscreen.
The air is directed at the chest of driver and passengers by
the dash panel air vents.
Control but- tonAdditional information. Heating and fresh air system
Distribution of air towards the chest and the footwell area.
Air distribution towards the footwell.
Air distribution towards the windscreen and the footwell.
Heated rear window: this only works when the engine is
running and switches off automatically after a maximum of
10 minutes.
Air recirculation ⇒ page 160.
Setting for conditions of optimal visibility
●Disable air recirculation mode.
● Set the fan 2
to setting 1 or 2.
● Turn the temperature control 1 to the desired position.
● Open and direct all the air outlets in the dash panel.
● Turn the air distribution control 3
to the desired position.
WARNING
Stuffy or used air will increase fatigue and reduce driver concentration
possibly resulting in a serious accident.
● Never leave the fresh air fan turned off or use the air recirculation for
long periods of time; the air in the vehicle interior will not be refreshed.