mirror Seat Leon Sportstourer 2015 User Guide
[x] Cancel search | Manufacturer: SEAT, Model Year: 2015, Model line: Leon Sportstourer, Model: Seat Leon Sportstourer 2015Pages: 308, PDF Size: 5.93 MB
Page 140 of 308
Operation
Rain sensor modified behaviour
P o
s
sible causes of faults and mistaken read-
ings on the sensitive surface ››› Fig. 144 of
the rain sensor include:
● Damaged blades: a film of water on the
damag
ed blades may lengthen the activation
time, reduce the washing intervals or result
in a fast and continuous wipe.
● Insects: insects on the sensor may trigger
the winds
creen wiper.
● Salt on roads: in winter, salt spread in the
roa
ds may cause an extra long wipe when the
windscreen is almost dry.
● Dirt: dry dust, wax, coating on glass (Lotus
effect) or trac
es of detergent (car wash) may
reduce the effectiveness of the rain sensor or
make it react more slowly, later or not at all.
● Cracked windscreen: the impact of a stone
wil
l trigger a single wipe cycle with the rain
sensor on. Next the rain sensor detects the
reduction in the sensitive surface area and
adapts accordingly. The behaviour of the sen-
sor will vary with the size of the damage
caused by the stone. WARNING
The rain sensor may not detect enough rain
to sw it
ch on the wipers.
● If necessary, switch on the wipers manually
when water on the w
indscreen obstructs visi-
bility. Note
● Cle
an the sensitive surface of the rain sen-
sor regularly and check the blades for dam-
age ››› Fig. 144 (arrow).
● To remove wax and coatings, we recom-
mend a window c
leaner containing alcohol. Rear vision mirror
Anti-dazz l
e rear vision mirrors Read the additional information carefully
› ›
›
page 17
Your vehicle is fitted with an interior rear vi-
sion mirror with a manual or automatic* con-
trol for anti-dazzle position.
Interior rear vision mirror with manual set-
ting for anti-dazzle position
– Position the small lever of the lower edge
of the mirror t
o face towards the rear. WARNING
In the event that an automatic anti-dazzle
re ar
vision mirror breaks, an electrolyte fluid
may leak. This could cause irritation to the
skin, eyes and respiratory organs. If you
come into contact with this liquid, it must be
rinsed with large quantities of water. If neces-
sary, get medial help. CAUTION
In the event that an automatic anti-dazzle
re ar
vision mirror breaks, an electrolyte fluid
may leak. This liquid attacks plastic surfaces.
Clean it with a wet sponge as soon as possi-
ble. Note
● If the light inc
ident in the interior rear vi-
sion mirror is obstructed (e.g. with the sun
blind*, the anti-dazzle rear vision mirror with
automatic setting will not operate perfectly.
● When the interior lights are on or reverse
gear en
gaged, the rear vision mirrors do not
darken with automatic adjustment for anti-
dazzle position. 138
Page 141 of 308
Lights and visibility
Adjusting the exterior rear view mir-
r or
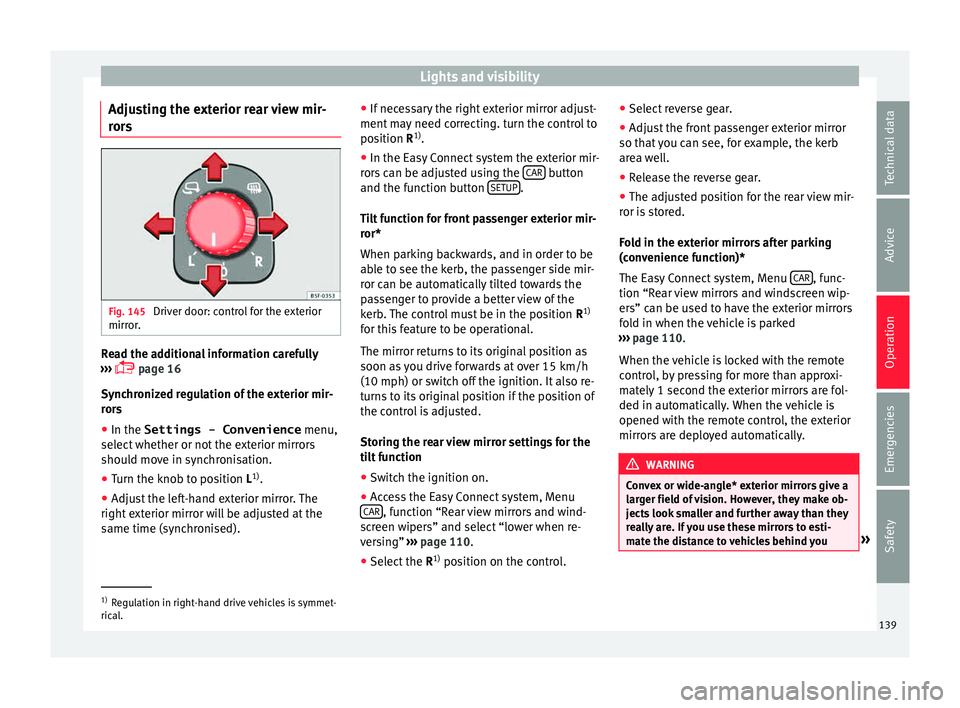
s Fig. 145
Driver door: control for the exterior
mirr or
. Read the additional information carefully
› ›
›
page 16
Synchronized regulation of the exterior mir-
rors
● In the Settings - Convenience menu,
select whether or not
the exterior mirrors
should move in synchronisation.
● Turn the knob to position L 1)
.
● Adjust the left-hand exterior mirror. The
right ext
erior mirror will be adjusted at the
same time (synchronised). ●
If nece
ssary the right exterior mirror adjust-
ment may need correcting. turn the control to
position R 1)
.
● In the Easy Connect system the exterior mir-
rors
can be adjusted using the CAR button
and the f u
nction b
utton SETUP .
Ti lt
f
unction for front passenger exterior mir-
ror*
When parking backwards, and in order to be
able to see the kerb, the passenger side mir-
ror can be automatically tilted towards the
passenger to provide a better view of the
kerb. The control must be in the position R1)
for this feature to be operational.
The mirror returns to its original position as
soon as you drive forwards at over 15 km/h
(10 mph) or switch off the ignition. It also re-
turns to its original position if the position of
the control is adjusted.
Storing the rear view mirror settings for the
tilt function
● Switch the ignition on.
● Access the Easy Connect system, Menu
CAR , function “Rear view mirrors and wind-
s c
r
een wipers” and select “lower when re-
versing” ›››
page 110.
● Select the R1)
position on the c
ontrol.●
Select r
everse gear.
● Adjust the front passenger exterior mirror
so that
you can see, for example, the kerb
area well.
● Release the reverse gear.
● The adjusted position for the rear view mir-
ror is
stored.
Fold in the exterior mirrors after parking
(convenience function)*
The Easy Connect system, Menu CAR , func-
tion “R e
ar
view mirrors and windscreen wip-
ers” can be used to have the exterior mirrors
fold in when the vehicle is parked
››› page 110.
When the vehicle is locked with the remote
control, by pressing for more than approxi-
mately 1 second the exterior mirrors are fol-
ded in automatically. When the vehicle is
opened with the remote control, the exterior
mirrors are deployed automatically. WARNING
Convex or wide-angle* exterior mirrors give a
lar g
er field of vision. However, they make ob-
jects look smaller and further away than they
really are. If you use these mirrors to esti-
mate the distance to vehicles behind you »1)
Regulation in right-hand drive vehicles is symmet-
rical .
139
Technical data
Advice
Operation
Emergencies
Safety
Page 142 of 308
Operation
when changing lane, you could misjudge the
dis
t
ance. Risk of accident! CAUTION
● If one of the mirr
or housings is knocked out
of position (e.g. when parking), the mirrors
must first be fully retracted with the electric
control. Do not readjust the mirror housing by
hand, as this will interfere with the mirror ad-
juster function.
● Before washing the vehicle in an automatic
car wa
sh, please make sure to retract the ex-
terior mirrors to prevent them from being
damaged. Electrically retractable exterior
mirrors must not be folded in or out by hand.
Always use the electrical power control. Note
If the electrical adjustment should fail to op-
erat e, both of
the mirrors can be adjusted by
hand by lightly pressing the edge of the mir-
ror glass. Seats and head restraints
Adju
s
tin
g the seats and headr-
ests
Manual adjustment of seats Read the additional information carefully
›› ›
page 15 WARNING
The safe driving chapter contains important
inform ation, tip
s, suggestions and warnings
that you should read and observe for your
own safety and the safety of your passengers
››› page 66. WARNING
● Adjus t
the front seats only when the vehi-
cle is stationary. Failure to follow this instruc-
tion could result in an accident.
● Be careful when adjusting the seat height.
Carel
ess or uncontrolled adjustment can
cause injuries.
● The front seat backrests must not be re-
clined for driv
ing. Otherwise, seat belts and
the airbag system might not protect as they
should, with the subsequent danger of injury. Electric driver seat adjustment*
Read the additional information carefully
›› ›
page 15 WARNING
● If the el ectric
front seats are used negli-
gently or without paying due attention, it can
cause serious injury.
● The front seats can also be electrically ad-
just
ed when the ignition is switched off. Nev-
er leave a child or any other person who may
need help in the vehicle.
● In the event of an emergency, electrical ad-
justment
can be stopped by pressing any
control. CAUTION
To avoid damaging the electrical components
of the fr ont
seats, please refrain from kneel-
ing on the seat or applying sharp pressure at
a single point to the seat cushion and back-
rest. Note
● It m a
y not be possible to electrically adjust
the seat if the vehicle battery is very low.
● If the engine is started while the seats are
being electric
ally adjusted, the adjustment
will stop. 140
Page 211 of 308
Driver assistance systems
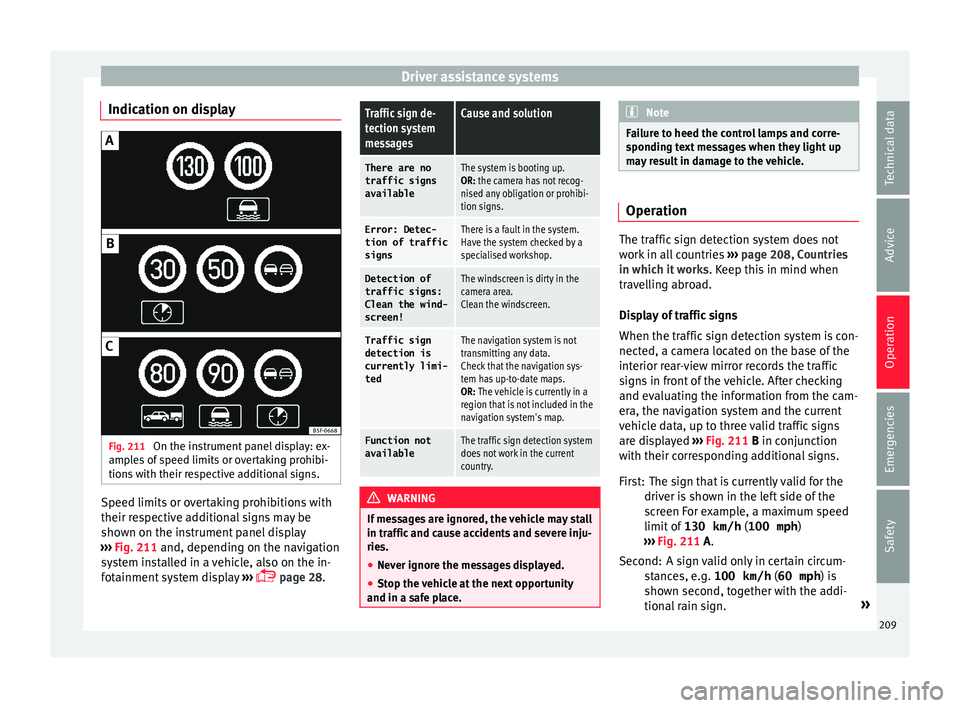
Indication on display Fig. 211
On the instrument panel display: ex-
amp l
e
s of speed limits or overtaking prohibi-
tions with their respective additional signs. Speed limits or overtaking prohibitions with
their r
e
s
pective additional signs may be
shown on the instrument panel display
››› Fig. 211 and, depending on the navigation
system installed in a vehicle, also on the in-
fotainment system display ›››
page 28.
Traffic sign de-
tection system
messagesCause and solution
There are no
traffic signs
availableThe system is booting up.
OR: the camera has not recog-
nised any obligation or prohibi-
tion signs.
Error: Detec-
tion of traffic
signsThere is a fault in the system.
Have the system checked by a
specialised workshop.
Detection of traffic signs:
Clean the wind-
screen!The windscreen is dirty in the
camera area.
Clean the windscreen.
Traffic sign
detection is
currently limi-
tedThe navigation system is not
transmitting any data.
Check that the navigation sys-
tem has up-to-date maps.
OR: The vehicle is currently in a
region that is not included in the
navigation system's map.
Function not
availableThe traffic sign detection system
does not work in the current
country. WARNING
If messages are ignored, the vehicle may stall
in traffic and c
ause accidents and severe inju-
ries.
● Never ignore the messages displayed.
● Stop the vehicle at the next opportunity
and in a safe p
lace. Note
Failure to heed the control lamps and corre-
spondin g t
ext messages when they light up
may result in damage to the vehicle. Operation
The traffic sign detection system does not
work
in al
l countries ››› page 208, Countries
in which it works . Keep this in mind when
travelling abroad.
Display of traffic signs
When the traffic sign detection system is con-
nected, a camera located on the base of the
interior rear-view mirror records the traffic
signs in front of the vehicle. After checking
and evaluating the information from the cam-
era, the navigation system and the current
vehicle data, up to three valid traffic signs
are displayed ›››
Fig. 211 B in conjunction
with their corresponding additional signs.
The sign that is currently valid for the
driver is shown in the left side of the
screen For example, a maximum speed
limit of 130 km/h (100 mph)
››› Fig. 211 A.
A sign valid only in certain circum-
stances, e.g. 100 km/h (60 mph) is
shown second, together with the addi-
tional rain sign. »
First:
Second:
209
Technical data
Advice
Operation
Emergencies
Safety
Page 214 of 308
Operation
WARNING
● Alw a
ys pay attention, also when looking
straight ahead, to traffic and the vehicle
surroundings. The assistance systems are not
a replacement for driver awareness. When in-
serting or removing the vehicle from a park-
ing space, or when performing similar ma-
noeuvres the driver always assumes the re-
sponsibility.
● Adapt your speed and driving style at all
times t
o suit visibility, weather, road and traf-
fic conditions.
● The ultrasound sensors have blind spots in
which ob
stacles and people are not regis-
tered. Pay special attention to children and
animals.
● Always keep visual control of the vehicle
surrou
ndings: use the rear vision mirrors for
additional help. CAUTION
Parking Aid functions may be negatively af-
fect ed b
y different factors that may lead to
damage to the vehicle or its immediate sur-
rounds:
● Under certain circumstances, the system
does not
detect or display certain objects:
– Objects such as chains, trailer draw bars,
fences, posts and thin trees.
– Objects that are located above the sen-
sors, such as protrusions in a wall. –
Ob j
ects with certain surfaces or struc-
tures, such as wire mesh fences or pow-
der snow.
● Certain surfaces of objects and garments
do not refl
ect the ultrasound sensors' sig-
nals. The system cannot detect, at least cor-
rectly, these objects or people wearing such
clothes.
● Ultrasound sensor signals may be affected
by e
xternal sound sources. In certain circum-
stances this may prevent them from detect-
ing people or objects.
● Please note that low obstacles detected by
the syst
em may no longer be registered by
the sensors as the car moves closer, so the
system will not give any further warning. In
certain circumstances, objects such as high
kerbs that could damage the bottom of the
vehicle are not detected either.
● If the first warning from the Park Pilot is ig-
nored, the v
ehicle could suffer considerable
damage.
● The knocks or damage on the radiator
grill
e, bumper, wheel arch and vehicle under-
body can adjust the orientation of the sen-
sors. This can affect the parking aid function.
Have the function checked by a specialised
workshop. Note
● In cer t
ain situations, the system can give a
warning even though there is no obstacle in
the detected area, e.g: –
with r ough or c
obbled floors or ground
with long grass;
– with external ultrasound sources, such as
cleaning vehicles or other vehicles;
– In downpours, intense snow or dense ex-
haust gases;
– if the registration plate (front or rear) is
not properly affixed to the bumper sur-
face;
– or in locations such as the brow of a hill.
● In order to guarantee good system opera-
tion, keep the ultr
asound sensors clean, free
of snow or ice, and do not cover them with
adhesives or other objects.
● If you use high-pressure or vapour equip-
ment to c
lean the ultrasound sensors, apply
it directly only very briefly and always from a
distance of more than 10 cm.
● Retrofitting of accessories to the vehicle,
such a
s a bicycle carrier, may interfere with
the operation of the Parking Aid.
● In order to familiarise yourself with the sys-
tem, it i
s advised that you practice parking in
an area or car park that is free from traffic.
There must be good weather and light condi-
tions.
● The volume and tone of the warnings can
be modified, in addition t
o the indications
››› page 216.
● In vehicles without a driv
er information
system, these parameters can be modified in
a SEAT Official Service or in a specialised
workshop. 212
Page 221 of 308
Driver assistance systems
or removing the selector lever from the R po-
s ition (aut
om
atic gearbox). The system will
also disconnect immediately after the igni-
tion is switched off.
● The camera will stop transmitting images
above the s
peed of 15 km/h (9 mph) with re-
verse engaged.
In combination with the Parking System Plus
››› page 211, the camera image will cease to
be transmitted immediately when reverse
gear is disengaged or when the selector lever
is moved from the R position, and the optical
information provided by the Parking Aid sys-
tem will be displayed.
Also in combination with the system, the rear
assist image can also be concealed:
● By pressing one of the Infotainment system
button
s on the display.
● OR: By pressing the miniature vehicle that
appear
s on the left of the screen (which
switches to the full-screen mode of the Park-
ing System Plus's optical system).
If you wish to display the rear assist image
again: ●
Diseng
age reverse, or change the selector
lever's position, engage reverse again or
move the selector lever to position R.
● OR: Press the RVC function b
utton1)
Meaning of the orientation lines
››› Fig. 218
Side lines: extension of the vehicle (the
approximate width of the vehicle plus the
rear view mirrors) on the road surface.
End of the side lines: the area marked in
green ends approximately 2 m behind
the vehicle on the road surface.
Intermediate line: indicates a distance of
approximately 1 m behind the vehicle on
the road surface.
Red horizontal line: indicates a safe dis-
tance of approximately 40 cm at the rear
of the vehicle on the road surface.
Parking manoeuvre
● Place the vehicle in front of the parking
spac
e and engage reverse gear (manual
gearbox) or move the selector to the R posi-
tion (automatic gearbox). 1 2
3
4 ●
Rev
er
se slowly, and turn the steering wheel
so that the side orientation lines lead to-
wards the parking space.
● Guide the vehicle into the parking space so
that the s
ide orientation lines run parallel to
it. 1)
WARNING: the RVC function b
utton will only be ac-
tivated and available when the reverse gear is en-
gaged or the selector lever is set to position R.
219
Technical data
Advice
Operation
Emergencies
Safety
Page 227 of 308
Towing bracket device
Trailer towing Wh at
do
you need to bear in mind
when towing a trailer? Your vehicle may be used to tow a trailer
when fitted w
ith the c
orrect equipment.
If you wish to retrofit a towing bracket, con-
sult ››› page 228.
Connectors
Your vehicle is fitted with a 13-pin connector
for the electrical connection between the
trailer and the vehicle.
If the trailer has a 7-pin plug you will need to
use an adapter cable. It is available at any
Technical Service.
Trailer weight/drawbar load
Never exceed the authorised trailer weight. If
you do not load the trailer up to the maxi-
mum permitted trailer weight, you can then
climb correspondingly steeper slopes.
The maximum trailer weights listed are only
applicable for altitudes up to 1000 m above
sea level. With increasing altitude the engine
power and therefore the vehicle climbing
ability are impaired because of the reduced
air density. The maximum trailer weight has
to be reduced accordingly. The weight of the
vehicle and trailer combination must be re- duced by 10% for every further 1000 m (or
par
t
thereof). The gross combination weight
is the actual weight of the laden vehicle plus
the actual weight of the laden trailer. When
possible, operate the trailer with the maxi-
mum permitted drawbar load on the ball joint
of the towing bracket, but do not exceed the
specified limit.
The figures for trailer weights and drawbar
loads that are given on the data plate of the
towing bracket are for certification purposes
only. The correct figures for your specific
model, which may be lower than these fig-
ures for the towing bracket, are given in the
vehicle documentation or in ››› chapter Tech-
nical Data .
Distributing the load
Distribute loads in the trailer so that heavy
objects are as near to the axle as possible.
Loads carried in the trailer must be secured
to prevent them moving.
Tyre pressure
Set tyre pressure to the maximum permissi-
ble pressure shown on the sticker on the in-
side of the fuel tank flap. Set the tyre pres-
sure of the trailer tyres in accordance with the
trailer manufacturer's recommendations. Exterior mirrors
Check whether
you can see enough of the
road behind the trailer with the standard rear
vision mirrors. If this is not the case, you
should have additional exterior mirrors fitted.
Both exterior mirrors should be mounted on
hinged extension brackets. Adjust the mirrors
to give sufficient vision to the rear.
Tow rope
Always use a cable between the vehicle and
the trailer ››› page 226.
Trailer rear lights
The trailer's rear lights should comply with
the statutory safety regulations ››› page 226. WARNING
Never transport people in a trailer. This could
re s
ult in fatal accidents. Note
● To w
ing a trailer places additional demands
on the vehicle. We recommend additional
services between the normal inspection inter-
vals if the vehicle is used frequently for tow-
ing a trailer.
● Find out whether special regulations apply
to to
wing a trailer in your country. 225
Technical data
Advice
Operation
Emergencies
Safety
Page 234 of 308
Advice
Automatic car washes
B ef
or
e going through a car wash, be sure to
take the usual precautions such as closing
the windows and roof. If the vehicle has spe-
cial accessories such as spoilers or a roof
rack or two-way radio aerial, etc., it is advisa-
ble to consult the car wash tunnel operator.
It is best to use a car wash without revolving
bristles if possible.
Washing the vehicle with a high pressure
cleaner
When washing the vehicle with a high-pres-
sure cleaner, always follow the operating in-
structions for the equipment. This applies
particularly to the operating pressure and the
spraying distance. Do not hold the nozzle too
close to soft materials such as rubber hoses
or seals. The same applies to the parking aid
sensors*, which are located in the rear bump-
er.
Do not use a nozzle that sprays the water out
in a direct stream or one that has a rotating
jet for forcing off dirt.
Washing the car by hand
When washing the car by hand, use plenty of
water to soften the dirt first, and rinse off as
well as possible.
Then clean the vehicle with a soft sponge,
glove or brush using only slight pressure.
You should start on the roof and work down. Special car
soap shou ld only be used for very
persistent dirt.
Rinse the sponge or glove thoroughly and of-
ten.
Wheels, sills and similar should be cleaned
last. Use a second sponge for this. WARNING
● The v ehic
le should only be washed with the
ignition switched off. Failure to follow this in-
struction could result in an accident.
● Do not clean the underside of chassis, the
inside of
wheel arches or wheel trims without
protecting your hands and arms. You may cut
yourself on sharp-edged metal parts. Other-
wise, there is a risk of sustaining cuts.
● When washing the car during the winter
season: w
ater and ice in the brake system
can reduce braking effectiveness: risk of acci-
dent! CAUTION
● Do not w a
sh the vehicle in direct sunlight –
otherwise the paint can be damaged.
● Do not use sponges, abrasive household
spong
es or similar to clean insect remains.
This could damage the surface.
● Clean off stubborn dirt (insects, etc.) from
the headlight
s at regular intervals, for in-
stance when filling the fuel tank. The head-
lights should only be washed with water, do not wipe them with a dry cloth or sponge. It
is
be
st to use soapy water.
● Never wash tyres with a jet that sprays the
water out
in a direct stream. This could dam-
age the tyres even if the spray is kept at a
distance and only used for a very short time.
● Before washing the vehicle in an automatic
car wa
sh, please make sure to retract the ex-
terior mirrors to prevent them from being
damaged. Electrically retractable exterior
mirrors must not be folded in or out by hand,
always use the electrical power control. CAUTION
● Bef or
e washing the vehicle in an automatic
car wash, please proceed as follows to lock
the wiper arms so that they are not moved to-
wards the top of the windscreen:
–the bonnet must be closed.
– switch the ignition on and off.
– press the windscreen wiper lever forward
briefly (windscreen washer function).
This will lock the wiper arms. For the sake of the environment
The car should only be washed in special
wa sh b
ays. These areas are prepared to pre-
vent oily water from getting into the public
drains. In some places, washing vehicles out-
side the areas intended for this purpose is
prohibited. 232
Page 236 of 308
Advice
Carbon parts The carbon parts on your vehicle have a pain-
ted s
ur
face. They do not need any special
care and are cleaned just like any other pain-
ted part ››› page 231.
Paint damage Minor damage to the paint, such as scratches
or st
one c
hips, should be touched up without
delay before the metal starts to corrode. Suit-
able touch-up brushes or sprays for your car
can be obtained from a SEAT Official Service.
The number of the original paint finish on the
vehicle is given on the data sticker
››› page 265.
If corrosion is already visible it must be thor-
oughly removed by a specialised workshop.
Windows Clear vision is an essential safety factor.
The w
ind
s
creen must not be cleaned with in-
sect remover or wax, otherwise the wind-
screen wipers will not function properly (jud-
dering).
Traces of rubber, oil, grease or silicone can
be removed with a window cleaning solution
or a silicone remover. Wax residue can only be removed with a special cleaner. Your SEAT
Offici
al Service will be able to provide you
with more detailed information.
The windows should also be cleaned on the
inside at regular intervals.
Use a separate cloth or chamois to dry the
windows. Cloths used for waxing and polish-
ing contain residues that will cause smears
on the glass. WARNING
Do not use water-repellent coatings on the
wind s
creen. In bad visibility conditions (e.g.
in the rain, dark or with a low sun), these
coatings may cause dazzle: risk of accident!
Such coatings can also cause the windscreen
wiper blades to make noise. CAUTION
● Remo v
e snow and ice from windows and ex-
terior mirrors with a plastic scraper only. To
avoid scratches caused by dirt on the glass,
the scraper should only be pushed in one di-
rection and not moved to and fro.
● The heating element for the rear window is
located on the inner s
ide of the window. To
avoid damaging them, do not apply stickers
to these heating elements.
● Never use warm or hot water to remove
snow and ic
e from windows and mirrors. This
could cause the glass to crack! Wheels
The wheels require regular attention to pre-
serv
e their ap
pearance. It is important to re-
move road salt and brake dust by washing
the wheels at regular intervals, otherwise the
finish will be impaired.
After washing, the wheels should only be
cleaned with an "acid-free" cleaning agent
for alloy wheels. This is available from SEAT
Official Services and specialist retailers. Nev-
er leave the cleaning agent on the rims for
any longer than specified in the instructions
before rinsing it off. If the wheel cleaner fluid
contains acid it can attack the surfaces of the
wheel bolts.
Car polish or other abrasive agents should
not be used for maintaining the rims. If the
protective coating is damaged, e.g. by flying
stones, the damaged area should be re-
paired immediately. WARNING
Please note when cleaning the wheels that
wat er
, ice and road salt can impair the effec-
tiveness of the brakes; this can cause an acci-
dent. Exhaust tail pipe
It is important to remove road salt and brake
du
s
t
by washing the wheels at regular
234
Page 298 of 308
Index
Emergency operation pa
s
senger door . . . . . . . . . . . . . . . . . . . . . . . . . . 12
Selector lever . . . . . . . . . . . . . . . . . . . . . . . . . . . 44
Emissions data . . . . . . . . . . . . . . . . . . . . . . . . . . . 265
Engine assisted starting . . . . . . . . . . . . . . . . . . . . . . . . . 62
preheating . . . . . . . . . . . . . . . . . . . . . . . . . . . . 164
running in . . . . . . . . . . . . . . . . . . . . . . . . . . . . . 175
Start-Stop system . . . . . . . . . . . . . . . . . . . . . . . 183
starting . . . . . . . . . . . . . . . . . . . . . . . . . . . . . . . 164
switching off (key) . . . . . . . . . . . . . . . . . . . . . . 165
Engine compartment . . . . . . . . . . . . . . . . . . 13, 246 battery . . . . . . . . . . . . . . . . . . . . . . . . . . . . 53, 253
brake fluid . . . . . . . . . . . . . . . . . . . . . . . . . 53, 251
closing the bonnet . . . . . . . . . . . . . . . . . . . . . . 247
coolant . . . . . . . . . . . . . . . . . . . . . . . . . . . 52, 250
engine oil . . . . . . . . . . . . . . . . . . . . . . . . . 51, 249
opening the bonnet . . . . . . . . . . . . . . . . . . . . . 247
safety notes . . . . . . . . . . . . . . . . . . . . . . . . . . . 246
windscreen washer reservoir . . . . . . . . . . 53, 252
Engine coolant . . . . . . . . . . . . . . . . . . . . . . . . . . . . 52 G12 plus-plus . . . . . . . . . . . . . . . . . . . . . . . . . . . 52
G13 . . . . . . . . . . . . . . . . . . . . . . . . . . . . . . . . . . . 52
specifications . . . . . . . . . . . . . . . . . . . . . . . . . . . 52
Engine data . . . . . . . . . . . . . . . . . . . . . . . . . . . . . . 269
Engine fault control lamp . . . . . . . . . . . . . . . . . . . . . . . . . . . 109
Engine management control lamp . . . . . . . . . . . . . . . . . . . . . . . . . . . 109
Engine oil . . . . . . . . . . . . . . . . . . . . . . . . . . . 51, 248 changing . . . . . . . . . . . . . . . . . . . . . . . . . 248, 250
Checking oil level . . . . . . . . . . . . . . . . . . . . . . . 249
consumption . . . . . . . . . . . . . . . . . . . . . . . . . . . 249
dipstick . . . . . . . . . . . . . . . . . . . . . . . . . . . . . . . 249
inspection service . . . . . . . . . . . . . . . . . . . . . . 248
maintenance intervals . . . . . . . . . . . . . . . . . . . 248
Oil properties . . . . . . . . . . . . . . . . . . . . . . . . . . . 52 Specifications . . . . . . . . . . . . . . . . . . . . . . . . . . 248
temperat
ure display . . . . . . . . . . . . . . . . . . . . . . 36
topping up . . . . . . . . . . . . . . . . . . . . . . . . . . . . 249
Environment ecological driving . . . . . . . . . . . . . . . . . . . . . . . 177
Environmental compatibility . . . . . . . . . . . . . . 175
Environmental tips Filling the tank . . . . . . . . . . . . . . . . . . . . . . . . . 242
refuelling . . . . . . . . . . . . . . . . . . . . . . . . . . . . . . 241
Equipment . . . . . . . . . . . . . . . . . . . . . . . . . 147, 230
ESC electronic stability control . . . . . . . . . . . . . . . . 178
Multi-collision brake . . . . . . . . . . . . . . . . . . . . . 179
Sport Mode . . . . . . . . . . . . . . . . . . . . . . . . . . . . 180
Ethanol (fuel) . . . . . . . . . . . . . . . . . . . . . . . . . . . . 243
Exhaust gas filtration system catalytic converter . . . . . . . . . . . . . . . . . . . . . . 176
diesel particulate filter . . . . . . . . . . . . . . . . . . . 176
Exhaust pipe: Cleaning . . . . . . . . . . . . . . . . . . . . 234
Extending the luggage compartment . . . . . . . . . . . . . . . . 143
Exterior lighting changing a bulb . . . . . . . . . . . . . . . . . . . . . . . . . 94
Exterior mirrors adjusting . . . . . . . . . . . . . . . . . . . . . . . . . . . . . . . 16
Exterior rear view mirrors exterior . . . . . . . . . . . . . . . . . . . . . . . . . . . . . . . 139
heated . . . . . . . . . . . . . . . . . . . . . . . . . . . . . . . . 139
Exterior view . . . . . . . . . . . . . . . . . . . . . . . . . . . . . 7, 8
External aerial . . . . . . . . . . . . . . . . . . . . . . . . . . . . 230
F Fastening rings . . . . . . . . . . . . . . . . . . . . . . . . . . . 153
Filling the tank . . . . . . . . . . . . . . . . . . . . . . . . . . . 241
Floor mats . . . . . . . . . . . . . . . . . . . . . . . . . . . . . . . . 71
Fog-light bulb FR version . . . . . . . . . . . . . . . . . . . . . . . . . . . . . . 97 Folding table . . . . . . . . . . . . . . . . . . . . . . . . . . . . . 145
Four wheel driv
e . . . . . . . . . . . . . . . . . . . . . . . . . . 239
Front headrests . . . . . . . . . . . . . . . . . . . . . . . . . . . . . . 70
Front airbags . . . . . . . . . . . . . . . . . . . . . . . . . . 17, 79
Front armrest . . . . . . . . . . . . . . . . . . . . . . . . . . . . 142
Front Assist see Front Assist Monitoring system . . . . . . . . . 197
Front Assist Monitoring system city Emergency braking function . . . . . . . . . . . 201
Front Assist Monitoring System . . . . . . . . . . . . . . 197 malfunction . . . . . . . . . . . . . . . . . . . . . . . . . . . . 198
on-screen messages . . . . . . . . . . . . . . . . . . . . 198
operating . . . . . . . . . . . . . . . . . . . . . . . . . . . . . . 199
radar sensor . . . . . . . . . . . . . . . . . . . . . . . . . . . 198
switching off temporarily . . . . . . . . . . . . . . . . . 200
system limitations . . . . . . . . . . . . . . . . . . . . . . 200
Front fog light bulb . . . . . . . . . . . . . . . . . . . . . . . . . 96
Front passenger front airbag control lamp . . . . . . . . . . . . . . . . . . . . . . . . . . . . 82
deactivation . . . . . . . . . . . . . . . . . . . . . . . . . 18, 82
Front seat manual adjustment . . . . . . . . . . . . . . . . . . . . . . 15
Fuel . . . . . . . . . . . . . . . . . . . . . . . . . . . . . . . . 51, 243 consumption . . . . . . . . . . . . . . . . . . . . . . . . . . . 266
diesel . . . . . . . . . . . . . . . . . . . . . . . . . . . . . . . . . 244
Ethanol . . . . . . . . . . . . . . . . . . . . . . . . . . . . . . . 243
fuel gauge . . . . . . . . . . . . . . . . . . . . . . . . . . . . . 108
natural gas . . . . . . . . . . . . . . . . . . . . . . . . . . . . 245
refuelling . . . . . . . . . . . . . . . . . . . . . . . . . . . . . . 243
saving . . . . . . . . . . . . . . . . . . . . . . . . . . . . . . . . 177
Fuel consumption Switching off using inertia . . . . . . . . . . . . . . . . 177
Fuel tank cap opening and closing . . . . . . . . . . . . . . . . . . . . . 51
Fuel tank flap opening and closing . . . . . . . . . . . . . . . . . . . . . 51
296