turn signal Seat Leon Sportstourer 2015 Owner's manual
[x] Cancel search | Manufacturer: SEAT, Model Year: 2015, Model line: Leon Sportstourer, Model: Seat Leon Sportstourer 2015Pages: 308, PDF Size: 5.93 MB
Page 28 of 308
The essentials
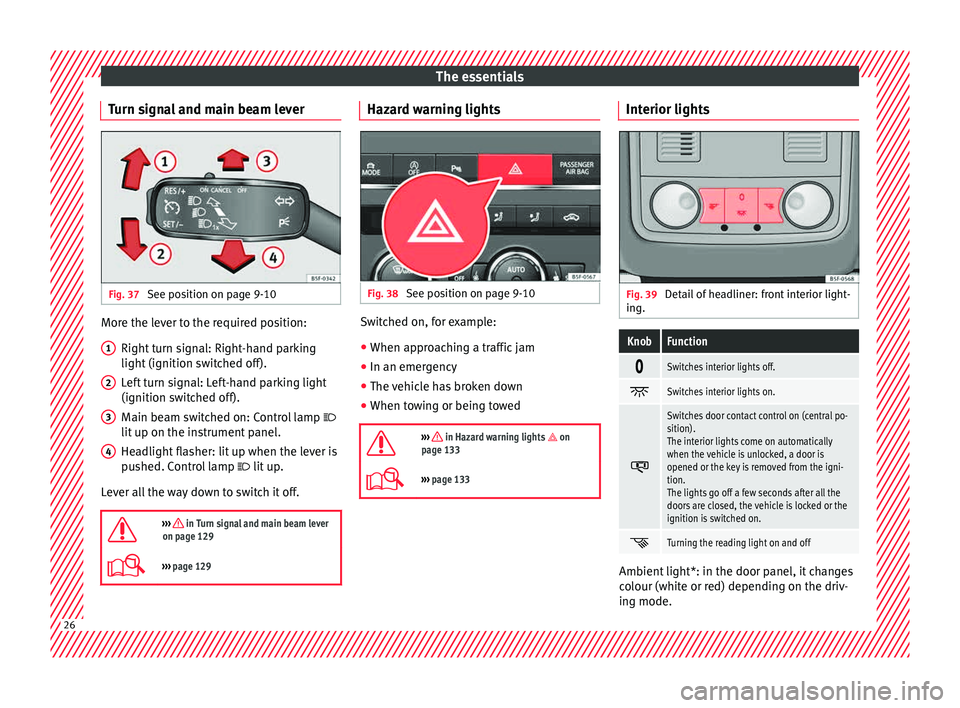
Turn signal and main beam lever Fig. 37
See position on page 9-10 More the lever to the required position:
Right t
urn s
ignal: Right-hand parking
light (ignition switched off).
Left turn signal: Left-hand parking light
(ignition switched off).
Main beam switched on: Control lamp
lit up on the instrument panel.
Headlight flasher: lit up when the lever is
pushed. Control lamp lit up.
Lever all the way down to switch it off.
››› in Turn signal and main beam lever
on page 129
››› page 129 1
2
3
4 Hazard warning lights
Fig. 38
See position on page 9-10 Switched on, for example:
● When approaching a traffic jam
● In an emergency
● The vehicle has broken down
● When towing or being towed
››› in Hazard warning lights on
page 133
››› page 133 Interior lights
Fig. 39
Detail of headliner: front interior light-
in g.
KnobFunction
Switches interior lights off.
Switches interior lights on.
Switches door contact control on (central po-
sition).
The interior lights come on automatically
when the vehicle is unlocked, a door is
opened or the key is removed from the igni-
tion.
The lights go off a few seconds after all the
doors are closed, the vehicle is locked or the
ignition is switched on.
Turning the reading light on and off
Ambient light*: in the door panel, it changes
c
o
lour (whit
e or red) depending on the driv-
ing mode. 26
Page 34 of 308
The essentials
Enabling the main menu
● Switch the ignition on.
● If a message or vehicle pictogram appears,
pr e
s
s button ››› Fig. 43 1 on the windscreen
w iper l
ev
er or button on the multifunction
s t
eerin
g wheel ››› Fig. 44.
● If managed from the windscreen wiper lev-
er: to dis
play the main screen ››› page 32 or
to return to the main menu from another
menu hold down the rocker button ››› Fig. 43
2 .
● If managed from the multifunction steering
whe e
l:
the main menu list is not displayed.
To go from point to point in the main menu,
press button
or
several times
› ›
›
Fig. 44.
Select a submenu ● Press the rocker switch ›››
Fig. 43 2 on the
w ind
s
creen wiper lever up or down or turn
the thumbwheel of the multifunction steering
wheel ››› Fig. 44 until the desired option ap-
pears marked on the menu.
● The selected option is displayed between
two horizont
al lines. In addition, a triangle is
displayed on the right:
● To consult the submenu option, press but-
ton ››
› Fig. 43 1 on the windscreen wiper
l ev
er or b
utton on the multifunction steer-
in g wheel
›
›› Fig. 44. Making changes according to the menu
● With the rocker switch on the windscreen
wiper lev
er or the thumbwheel of the multi-
function steering wheel, make the desired
changes. To increase or decrease the values
more quickly, turn the thumbwheel faster.
● Mark or confirm the selection with button
›››
Fig. 43 1 on the windscreen wiper lever
or b utt
on on the multifunction steering
wheel
›
›
› Fig. 44.
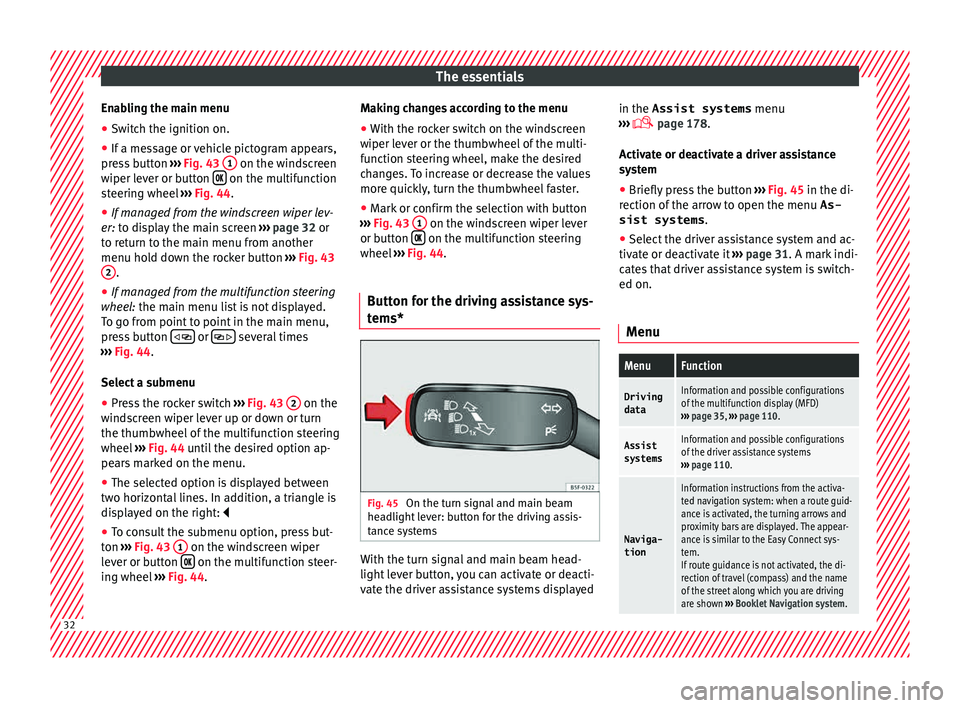
Button for the driving assistance sys-
tems* Fig. 45
On the turn signal and main beam
he a
dlight
lever: button for the driving assis-
tance systems With the turn signal and main beam head-
light
l
ev
er button, you can activate or deacti-
vate the driver assistance systems displayed in the Assist systems
menu
›››
page 178.
Activate or deactivate a driver assistance
system ● Briefly press the button ›››
Fig. 45 in the di-
rection of the arrow to open the menu As-
sist systems .
● Select the driver assistance system and ac-
tivate or de
activate it ››› page 31. A mark indi-
cates that driver assistance system is switch-
ed on.
Menu
MenuFunction
DrivingdataInformation and possible configurations
of the multifunction display (MFD)
››› page 35, ››› page 110.
Assist
systemsInformation and possible configurations
of the driver assistance systems
››› page 110.
Naviga-
tion
Information instructions from the activa-
ted navigation system: when a route guid-
ance is activated, the turning arrows and
proximity bars are displayed. The appear-
ance is similar to the Easy Connect sys-
tem.
If route guidance is not activated, the di-
rection of travel (compass) and the name
of the street along which you are driving
are shown ››› Booklet Navigation system. 32
Page 42 of 308
The essentials
Cruise control Oper atin
g the c
ruise control system
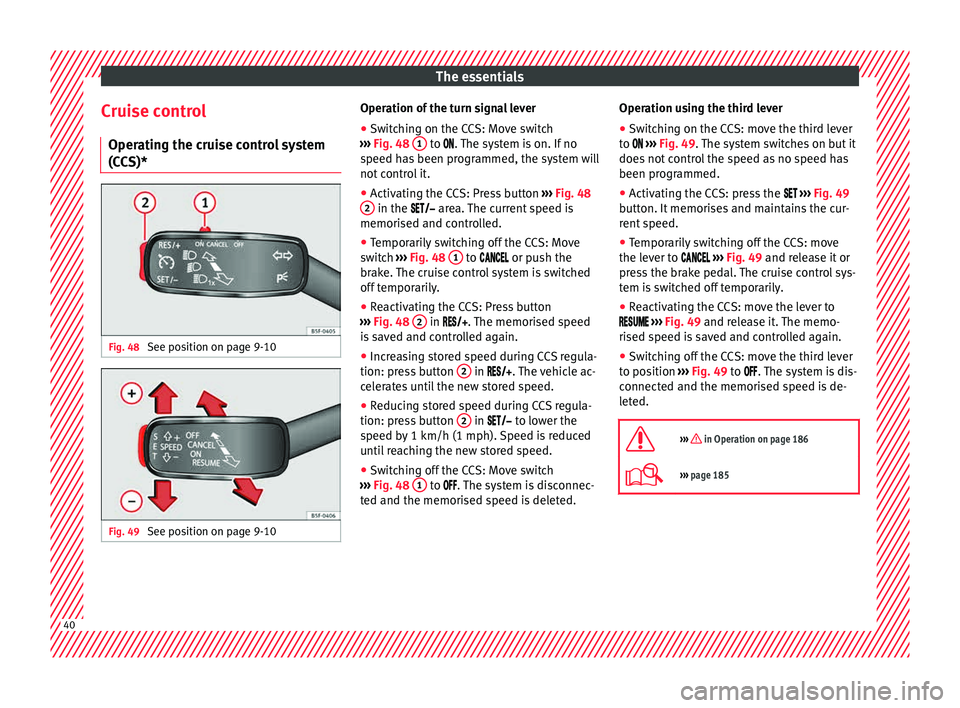
(CCS)* Fig. 48
See position on page 9-10 Fig. 49
See position on page 9-10 Operation of the turn signal lever
● Switching on the CCS: Move switch
› ›
›
Fig. 48 1 to .
The system is on. If no
s peed h
as been programmed, the system will
not control it.
● Activating the CCS: Press button ›››
Fig. 48
2 in the ar
e
a. The current speed is
memorised and controlled.
● Temporarily switching off the CCS: Move
switc
h ››› Fig. 48 1 to
or push the
br ak
e. The cruise control system is switched
off temporarily.
● Reactivating the CCS: Press button
›››
Fig. 48 2 in
. The memorised speed
i
s saved and controlled again.
● Increasing stored speed during CCS regula-
tion: pres
s button 2 in
. The vehicle ac-
c
elerates until the new stored speed.
● Reducing stored speed during CCS regula-
tion: pres
s button 2 in t
o lower the
s peed b
y 1 km/h (1 mph). Speed is reduced
until reaching the new stored speed.
● Switching off the CCS: Move switch
›››
Fig. 48 1 to .
The system is disconnec-
t ed and the memori
sed speed is deleted. Operation using the third lever
●
Switching on the CCS: move the third lever
to
››› Fig. 49. The system switches on but it
does not control the speed as no speed has
been programmed.
● Activating the CCS: press the ›››
Fig. 49
button. It memorises and maintains the cur-
rent speed.
● Temporarily switching off the CCS: move
the lever t
o ››› Fig. 49 and release it or
press the brake pedal. The cruise control sys-
tem is switched off temporarily.
● Reactivating the CCS: move the lever to
›
›› Fig. 49 and release it. The memo-
rised speed is saved and controlled again.
● Switching off the CCS: move the third lever
to pos
ition ››› Fig. 49 to . The system is dis-
connected and the memorised speed is de-
leted.
››› in Operation on page 186
››› page 185 40
Page 44 of 308
The essentials
Front brake pads worn.
›››
page
178
it lights up:
Fault in the ESC, or dis-
connection caused by the system.
flashes: ESC or ASR activated.
ASR manually deactivated.
ESC in Sport mode or OFF
ABS faulty or does not work.
Rear fog light switched on.›››
page
128
lights up or flashes:
fault in the
emission control system.–
it lights up:
pre-ignition of diesel
engine.
››› page
109
flashes: fault in the diesel engine
management.
fault in the petrol engine manage-
ment.›››
page
109
lights up or flashes:
fault in the
steering system.››› page
238
Tyre pressure too low, or fault in
the tyre pressure monitoring sys-
tem.›››
page
259
Fuel tank almost empty.›››
page
104
Fault in airbag system and seat
belt tensioners.›››
page
77
Lane Assist is switched on, but not
active.›››
page
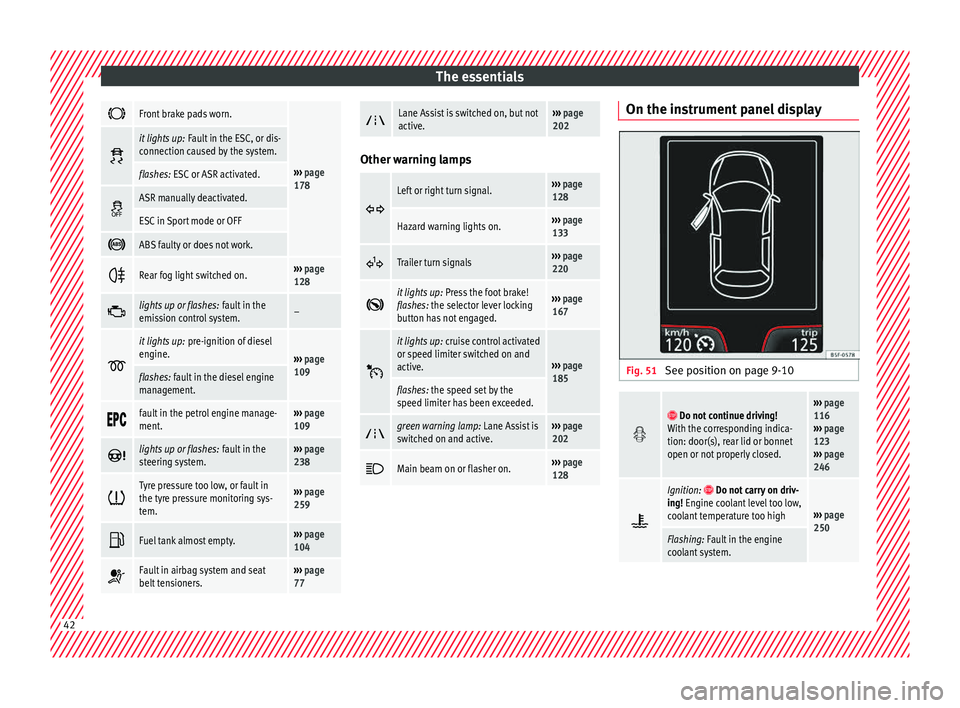
202 Other warning lamps
Left or right turn signal.›››
page
128
Hazard warning lights on.››› page
133
Trailer turn signals›››
page
220
it lights up:
Press the foot brake!
flashes: the selector lever locking
button has not engaged.››› page
167
it lights up:
cruise control activated
or speed limiter switched on and
active.
››› page
185
flashes: the speed set by the
speed limiter has been exceeded.
green warning lamp: Lane Assist is
switched on and active.›››
page
202
Main beam on or flasher on.›››
page
128 On the instrument panel display
Fig. 51
See position on page 9-10
Do not continue driving!
With the corresponding indica-
tion: door(s), rear lid or bonnet
open or not properly closed.››› page
116
››› page
123
››› page
246
Ignition: Do not carry on driv-
ing! Engine coolant level too low,
coolant temperature too high
››› page
250
Flashing: Fault in the engine
coolant system. 42
Page 58 of 308
The essentials
● Rep
l
ace the cover again or close the fuse
box lid.
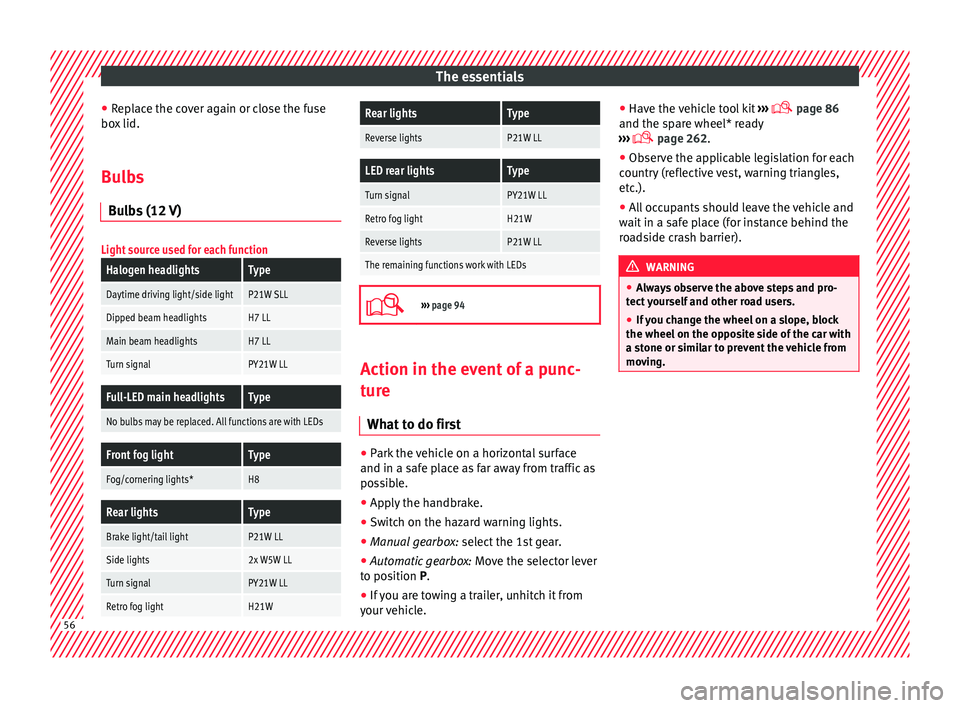
Bulbs Bul
bs (12 V)
Light source used for each function
Halogen headlightsType
Daytime driving light/side lightP21W SLL
Dipped beam headlightsH7 LL
Main beam headlightsH7 LL
Turn signalPY21W LL
Full-LED main headlightsType
No bulbs may be replaced. All functions are with LEDs
Front fog lightType
Fog/cornering lights*H8
Rear lightsType
Brake light/tail lightP21W LL
Side lights2x W5W LL
Turn signalPY21W LL
Retro fog lightH21W
Rear lightsType
Reverse lightsP21W LL
LED rear lightsType
Turn signalPY21W LL
Retro fog lightH21W
Reverse lightsP21W LL
The remaining functions work with LEDs
›››
page 94 Action in the event of a punc-
t
ur
e
Wh
at to do first ●
Park the vehicle on a horizontal surface
and in a s af
e p
lace as far away from traffic as
possible.
● Apply the handbrake.
● Switch on the hazard warning lights.
● Manual gearbox: select the 1s
t gear.
● Automatic gearbox: Move the sel
ector lever
to position P.
● If you are towing a trailer, unhitch it from
your v
ehicle. ●
Have the v
ehicle tool kit ›››
page 86
and the spare wheel* ready
››› page 262.
● Observe the applicable legislation for each
countr
y (reflective vest, warning triangles,
etc.).
● All occupants should leave the vehicle and
wait in a s
afe place (for instance behind the
roadside crash barrier). WARNING
● Alw a
ys observe the above steps and pro-
tect yourself and other road users.
● If you change the wheel on a slope, block
the wheel on the oppo
site side of the car with
a stone or similar to prevent the vehicle from
moving. 56
Page 68 of 308
Safety
Safety
Saf e driv
in
g
Safety first! WARNING
● This m
anual contains important informa-
tion about the operation of the vehicle, both
for the driver and the passengers. The other
sections of the on-board documentation also
contain further information that you should
be aware of for your own safety and for the
safety of your passengers.
● Ensure that the on-board documentation is
kept in the
vehicle at all times. This is espe-
cially important when lending or selling the
vehicle to another person. Advice about driving
B ef
or
e starting every trip For your own safety and the safety of your
p
a
s
sengers, always note the following points
before every trip:
– Make sure that the vehicle's lights and turn
signal
s are working properly.
– Check tyre pressure. –
Ensur
e that all windows provide a clear and
good view of the surroundings.
– Make sure all luggage is secured
›››
page 148.
– Make sure that no objects can interfere
with the pedal
s.
– Adjust front seat, head restraint and rear vi-
sion mirror
s properly according to your
size.
– Ensure that the passengers in the rear
seats alw
ays have the head restraints in
the in-use position ››› page 70.
– Instruct passengers to adjust the head re-
straints
according to their height.
– Protect children with appropriate child
seats and pr
operly applied seat belts
››› page 83.
– Assume the correct sitting position. Instruct
your pa
ssengers also to assume a proper
sitting position. ››› page 67.
– Fasten your seat belt securely. Instruct your
pas
sengers also to fasten their seat belts
properly. ››› page 72.
What affects driving safety? As a driver, you are responsible for yourself
and
your p
assengers. When your concentra-
tion or driving safety is affected by any cir- cumstance, you endanger yourself as well as
others on the r
oad ››› , for this reason:
– Always pay attention to traffic and do not
g et
di
stracted by passengers or telephone
calls.
– Never drive when your driving ability is im-
paired (e.
g. by medication, alcohol, drugs).
– Observe traffic laws and speed limits.
– Always reduce your speed as appropriate
for ro
ad, traffic and weather conditions.
– When travelling long distances, take
break
s regularly - at least every two hours.
– If possible, avoid driving when you are tired
or stre
ssed. WARNING
When driving safety is impaired during a trip,
the risk of
injury and accidents increases. Safety equipment
Never put your safety or the safety of your
p
a
s
sengers in danger. In the event of an acci-
dent, the safety equipment may reduce the
risk of injury. The following list includes most
of the safety equipment in your SEAT:
● Three-point seat belts
● belt tension limiters for the front and rear
side seats,
66
Page 83 of 308
Airbag system
●
The side and he a
d airbags are managed
through sensors located in the interior of the
front doors. To ensure the correct operation of
the side and curtain airbags neither the
doors nor the door panels should be modified
in any way (e.g. fitting loudspeakers). If the
front door is damaged, the airbag system
may not work correctly. All work carried out
on the front door must be done in a special-
ised workshop. Deactivating airbags
D e
activ
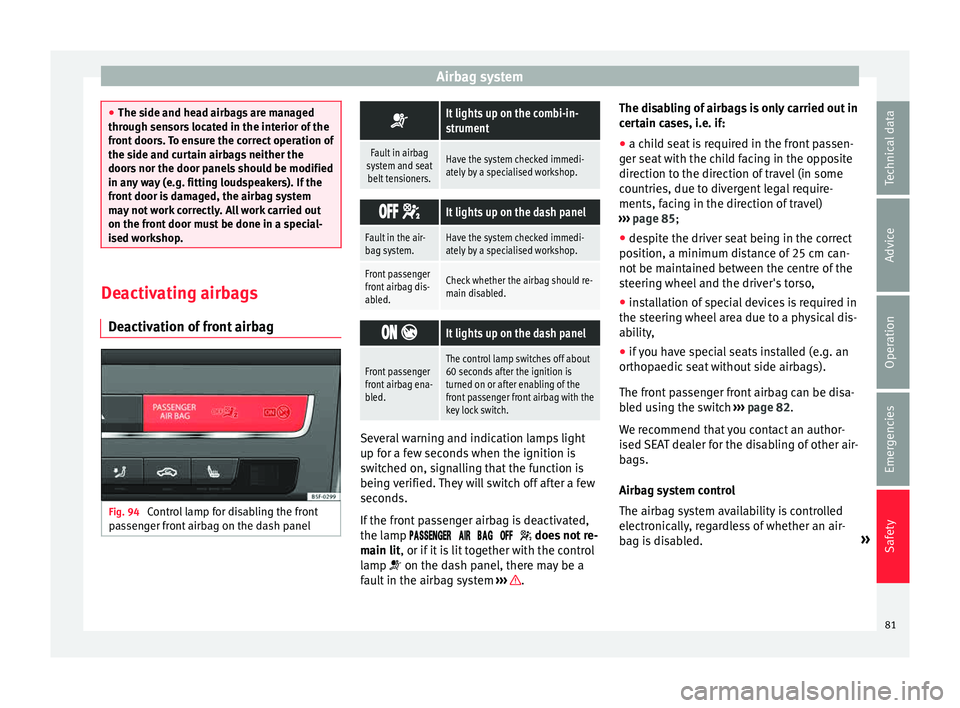
ation of front airbag Fig. 94
Control lamp for disabling the front
p a
s
senger front airbag on the dash panel
It lights up on the combi-in-
strument
Fault in airbag
system and seat belt tensioners.Have the system checked immedi-
ately by a specialised workshop.
It lights up on the dash panel
Fault in the air-
bag system.Have the system checked immedi-
ately by a specialised workshop.
Front passenger
front airbag dis-
abled.Check whether the airbag should re-
main disabled.
It lights up on the dash panel
Front passenger
front airbag ena-
bled.The control lamp switches off about
60 seconds after the ignition is
turned on or after enabling of the
front passenger front airbag with the
key lock switch. Several warning and indication lamps light
up f
or a f
ew sec
onds when the ignition is
switched on, signalling that the function is
being verified. They will switch off after a few
seconds.
If the front passenger airbag is deactivated,
the lamp does not re-
main lit, or if it is lit together with the control
lamp on the dash panel, there may be a
fault in the airbag system ››› .The disabling of airbags is only carried out in
c
er
t
ain cases, i.e. if:
● a child seat is required in the front passen-
ger seat
with the child facing in the opposite
direction to the direction of travel (in some
countries, due to divergent legal require-
ments, facing in the direction of travel)
››› page 85;
● despite the driver seat being in the correct
position, a minimum di
stance of 25 cm can-
not be maintained between the centre of the
steering wheel and the driver's torso,
● installation of special devices is required in
the steerin
g wheel area due to a physical dis-
ability,
● if you have special seats installed (e.g. an
orthopaedic
seat without side airbags).
The front passenger front airbag can be disa-
bled using the switch ››› page 82.
We recommend that you contact an author-
ised SEAT dealer for the disabling of other air-
bags.
Airbag system control
The airbag system availability is controlled
electronically, regardless of whether an air-
bag is disabled. »
81
Technical data
Advice
Operation
Emergencies
Safety
Page 84 of 308
Safety
If an airbag was disabled using a diagnostics
sy s
t
em:
● the airbag system warning lamp illumi-
n
ates after switching on the ignition for
about 4 seconds, and then flashes for about
12 seconds.
If the airbag has been disabled with the air-
bag switch on the side of the dash panel:
● the airbag control lamp wil
l illuminate
for about 4 seconds after the ignition is
switched on,
● The airbag is disabled, signalled with the
warning l
amp which lights up with the
word placed in the cen-
tre part of the dash panel ››› Fig. 95. WARNING
In the event of a fault in the airbag system,
the airbag m a
y not trigger correctly, may fail
to trigger or may even trigger unexpectedly,
leading to severe or fatal injuries.
● Have the airbag system checked immedi-
ately b
y a specialised workshop.
● Never mount a child seat in the front pas-
senger se
at or remove the mounted child
seat! The front passenger front airbag may
deploy during an accident in spite of the
fault. CAUTION
Always pay attention to any lit control lamps
and to the c orr
esponding descriptions and in-
structions to avoid damage to the vehicle. Note
● Fo l
low the current legislation in your coun-
try regarding the disabling of airbags.
● At your authorised SEAT dealer you can find
information on whic
h vehicle airbags can be
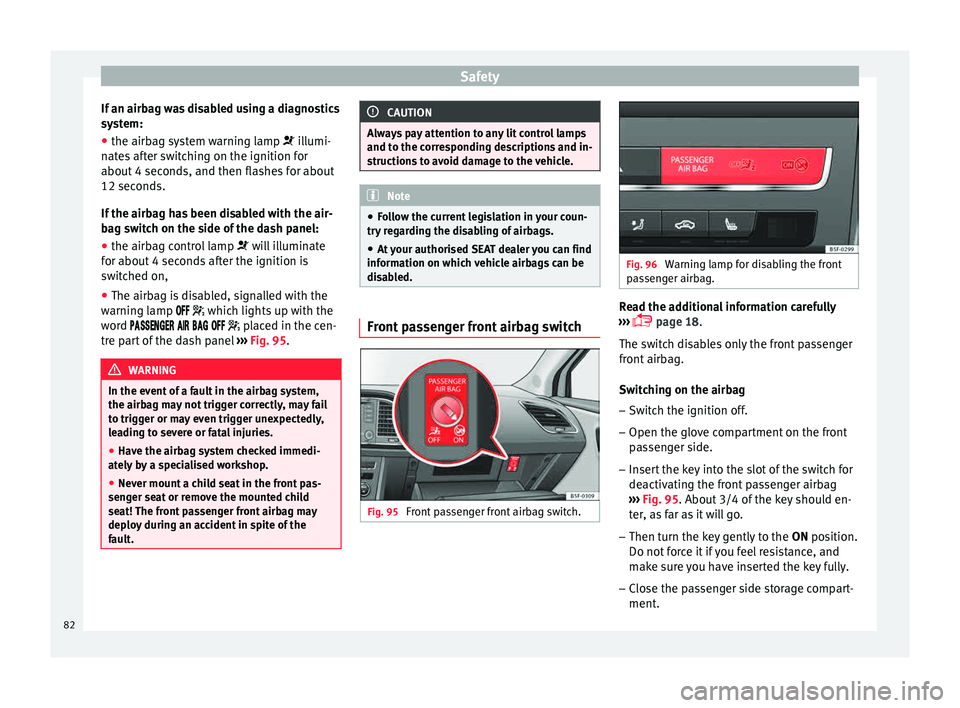
disabled. Front passenger front airbag switch
Fig. 95
Front passenger front airbag switch. Fig. 96
Warning lamp for disabling the front
pa s
senger airbag. Read the additional information carefully
› ›
›
page 18.
The switch disables only the front passenger
front airbag.
Switching on the airbag
– Switch the ignition off.
– Open the glove compartment on the front
pas
senger side.
– Insert the key into the slot of the switch for
deactivatin
g the front passenger airbag
››› Fig. 95. About 3/4 of the key should en-
ter, as far as it will go.
– Then turn the key gently to the ON position.
Do not
force it if you feel resistance, and
make sure you have inserted the key fully.
– Close the passenger side storage compart-
ment.
82
Page 91 of 308
Self-help
they should be changed if they are damaged,
or c l
e
aned if they are dirty ››› .
Dam ag
ed w
iper blades should be replaced
immediately. These are available from quali-
fied workshops. WARNING
Worn or dirty wiper blades reduce visibility
and incr e
ase the risk of accident and serious
injury.
● Always replace damaged or worn blades or
bla
des which do not clean the windscreen
correctly. CAUTION
● Damag ed or dir
ty windscreen wipers could
scratch the glass.
● If products containing solvents, rough
spong
es or sharp objects are used to clean
the blades, the graphite layer will be dam-
aged.
● Never use fuel, nail varnish remover, paint
thinner or simil
ar products to clean the win-
dows.
● In icy conditions, always check that the
wiper bl
ades are not frozen to the glass be-
fore using the wipers. In cold weather, it may
help to leave the vehicle parked with the wip-
ers in service position ›››
page 64. CAUTION
● To pr ev
ent damage to the bonnet and the
wiper arms, only leave them in the service
position.
● Before driving, always lower the wiper
arms. Towing and tow-starting the ve-
hicl
e
Gener
al information Read the additional information carefully
› ›
›
page 61. WARNING
If the vehicle has no electrical power, the
brak e light
s, turn signals and all other lights
will no longer function. Do not have the vehi-
cle towed away. Failure to follow this instruc-
tion could result in an accident. WARNING
The risk of accidents is high when tow-start-
ing, f or e
xample, the towed vehicle can easily
be driven into the towing vehicle. CAUTION
If there is no oil in the gearbox or no lubricant
in the autom atic
transmission the car may only be towed with the driven wheels lifted
cl
e
ar of the road, or transported on a special
car transporter or trailer. CAUTION
Do not tow a vehicle for more than 50 m in at-
t empt t
o start it. There is risk of damage to
the catalytic converter. Note
● Ple a
se observe related legal requirements.
● Switch on the hazard warning lights of both
vehicl
es. However, observe any regulations
to the contrary.
● The tow rope must not be twisted. Other-
wise the fr
ont tow line anchorage could be
pulled off the vehicle. 89
Technical data
Advice
Operation
Emergencies
Safety
Page 96 of 308
Emergencies
Note
● In the v ehic
le, there are more fuses than
those indicated in this chapter. These should
only be changed by a specialised workshop.
● Positions not containing a fuse do not ap-
pear in the fo
llowing tables.
● Some of the equipment listed in the tables
below pert
ain only to certain versions of the
model or are optional extras.
● Please note that the above lists, while cor-
rect at
the time of printing, are subject to
change. Bulbs
Ch an
gin
g a bulbRead the additional information carefully
› ›
›
page 56.
Changing bulbs requires a certain degree of
practical skill.
If you choose to change the engine compart-
ment lamps yourself, remember that it is a
dangerous area ››› in Work in the engine
c omp
ar
tment on page 246.
Always use identical bulbs with the same
designation. The name can be found on the
base of the bulb holder. Depending on how equipped the vehicle is,
there are diff
erent sets of headlights and tail
lights:
● Halogen headlights
● Full-LED main headlights*
● Rear bulb light
● LED rear light*
Ful
l-LED headlight system*
Full-LED headlights handle all light functions
(daylight, side light, turn signal, dipped
beam and route light) with light emitting di-
odes (LEDs) as a light source.
Full-LED headlights are designed to last the
lifetime of the car and light bulbs cannot be
replaced. In case of headlight failure, go to
an authorised workshop to have it replaced. WARNING
● Tak e p
articular care when working on com-
ponents in the engine compartment if the en-
gine is warm. Risk of burns.
● Bulbs are highly sensitive to pressure. The
glas
s can break when you touch the bulb,
causing injury.
● When changing bulbs, please take care not
to injure
yourself on sharp edges, in particu-
lar on the headlight housing. CAUTION
● Remo v
e the ignition key before working on
the electric system. Otherwise, a short circuit
could occur.
● Switch off the lights and the parking light
before c
hanging a bulb.
● Take good care to avoid damaging any com-
ponents. For the sake of the environment
Please ask your specialist retailer how to dis-
pose of u
sed bulbs in the proper manner. Note
● Ple a
se check at regular intervals that all
lighting (especially the exterior lighting) on
your vehicle is functioning properly. This is
not only in the interest of your own safety,
but also that of all other road users.
● Before changing a bulb, make sure you
have the c
orrect new bulb.
● Do not touch the glass part of the bulb with
your bar
e hands, use a cloth or paper towel
instead, since the fingerprints left on the
glass will vaporise as a result of the heat gen-
erated by the bulb, they will be deposited on
the reflector and will impair its surface. 94