oil pressure Seat Leon Sportstourer 2017 Owner's manual
[x] Cancel search | Manufacturer: SEAT, Model Year: 2017, Model line: Leon Sportstourer, Model: Seat Leon Sportstourer 2017Pages: 332, PDF Size: 7.25 MB
Page 5 of 332
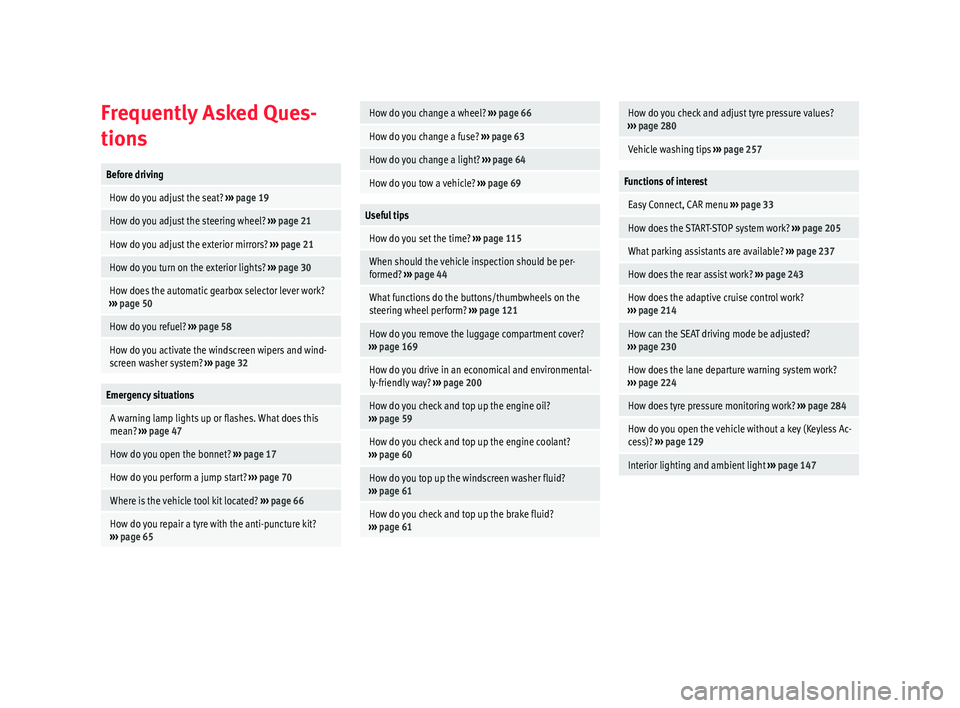
Frequently Asked Ques-
tion
sBefore driving
How do you adjust the seat?
››› page 19
How do you adjust the steering wheel? ››› page 21
How do you adjust the exterior mirrors? ››› page 21
How do you turn on the exterior lights? ››› page 30
How does the automatic gearbox selector lever work?
››› page 50
How do you refuel? ››› page 58
How do you activate the windscreen wipers and wind-
screen washer system? ››› page 32
Emergency situations
A warning lamp lights up or flashes. What does this
mean? ››› page 47
How do you open the bonnet? ››› page 17
How do you perform a jump start? ››› page 70
Where is the vehicle tool kit located? ››› page 66
How do you repair a tyre with the anti-puncture kit?
››› page 65
How do you change a wheel? ››› page 66
How do you change a fuse? ››› page 63
How do you change a light? ››› page 64
How do you tow a vehicle? ››› page 69
Useful tips
How do you set the time? ››› page 115
When should the vehicle inspection should be per-
formed? ››› page 44
What functions do the buttons/thumbwheels on the
steering wheel perform? ››› page 121
How do you remove the luggage compartment cover?
››› page 169
How do you drive in an economical and environmental-
ly-friendly way? ››› page 200
How do you check and top up the engine oil?
››› page 59
How do you check and top up the engine coolant?
››› page 60
How do you top up the windscreen washer fluid?
››› page 61
How do you check and top up the brake fluid?
››› page 61
How do you check and adjust tyre pressure values?
››› page 280
Vehicle washing tips ››› page 257
Functions of interest
Easy Connect, CAR menu ››› page 33
How does the START-STOP system work? ››› page 205
What parking assistants are available? ››› page 237
How does the rear assist work? ››› page 243
How does the adaptive cruise control work?
››› page 214
How can the SEAT driving mode be adjusted?
››› page 230
How does the lane departure warning system work?
››› page 224
How does tyre pressure monitoring work? ››› page 284
How do you open the vehicle without a key (Keyless Ac-
cess)? ››› page 129
Interior lighting and ambient light ››› page 147
Page 37 of 332
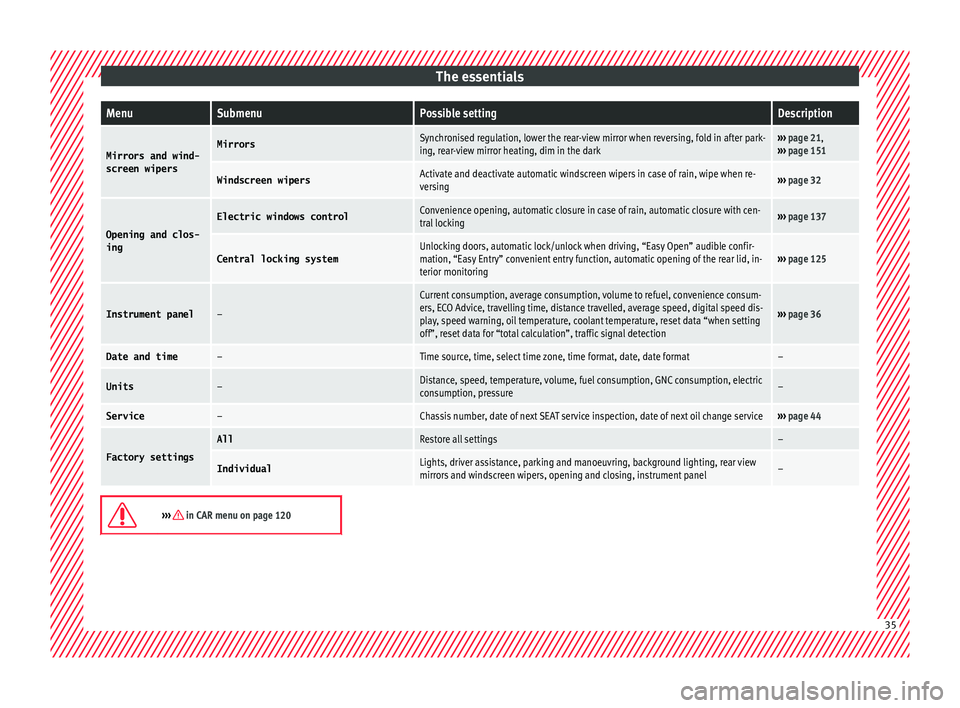
The essentialsMenuSubmenuPossible settingDescription
Mirrors and wind-
screen wipersMirrorsSynchronised regulation, lower the rear-view mirror when reversing, fold in after park-
ing, rear-view mirror heating, dim in the dark››› page 21,
››› page 151
Windscreen wipersActivate and deactivate automatic windscreen wipers in case of rain, wipe when re-
versing››› page 32
Opening and clos-
ing
Electric windows controlConvenience opening, automatic closure in case of rain, automatic closure with cen-
tral locking››› page 137
Central locking systemUnlocking doors, automatic lock/unlock when driving, “Easy Open” audible confir-
mation, “Easy Entry” convenient entry function, automatic opening of the rear lid, in-
terior monitoring››› page 125
Instrument panel–
Current consumption, average consumption, volume to refuel, convenience consum-
ers, ECO Advice, travelling time, distance travelled, average speed, digital speed dis-
play, speed warning, oil temperature, coolant temperature, reset data “when setting
off”, reset data for “total calculation”, traffic signal detection
››› page 36
Date and time–Time source, time, select time zone, time format, date, date format–
Units–Distance, speed, temperature, volume, fuel consumption, GNC consumption, electric
consumption, pressure–
Service–Chassis number, date of next SEAT service inspection, date of next oil change service››› page 44
Factory settings
AllRestore all settings–
IndividualLights, driver assistance, parking and manoeuvring, background lighting, rear view
mirrors and windscreen wipers, opening and closing, instrument panel–
››› in CAR menu on page 120
35
Page 51 of 332
The essentials
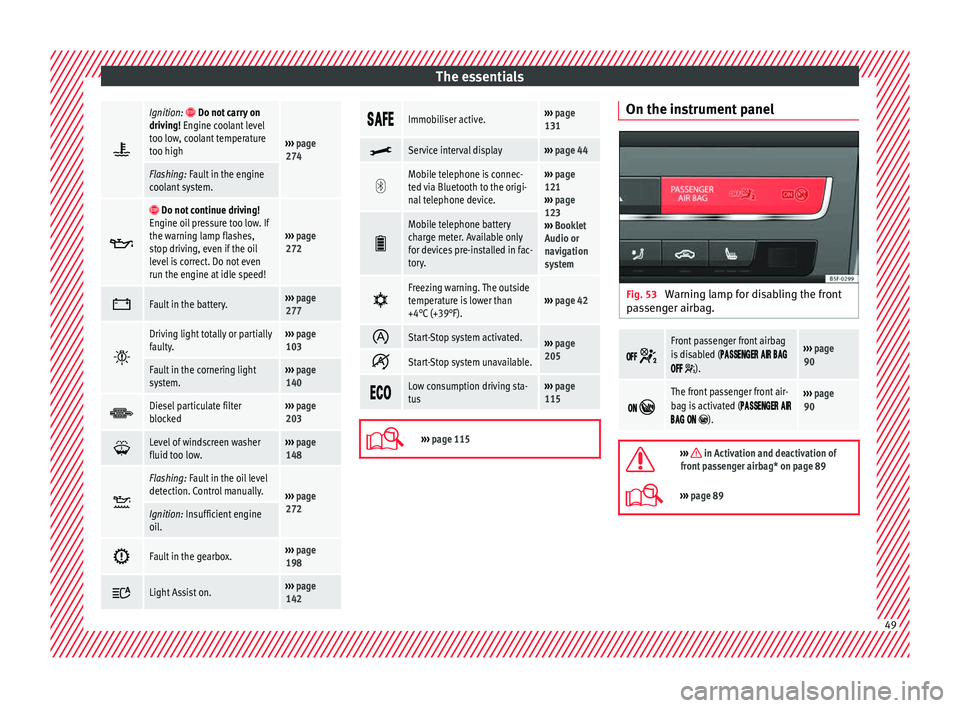
Ignition: Do not carry on
driving! Engine coolant level
too low, coolant temperature
too high
››› page
274
Flashing: Fault in the engine
coolant system.
Do not continue driving!
Engine oil pressure too low. If
the warning lamp flashes,
stop driving, even if the oil
level is correct. Do not even
run the engine at idle speed!
››› page
272
Fault in the battery.›››
page
277
Driving light totally or partially
faulty.›››
page
103
Fault in the cornering light
system.››› page
140
Diesel particulate filter
blocked›››
page
203
Level of windscreen washer
fluid too low.›››
page
148
Flashing: Fault in the oil level
detection. Control manually.
›››
page
272
Ignition: Insufficient engine
oil.
Fault in the gearbox.›››
page
198
Light Assist on.›››
page
142
Immobiliser active.›››
page
131
Service interval display›››
page 44
Mobile telephone is connec-
ted via Bluetooth to the origi-
nal telephone device.›››
page
121
››› page
123
››› Booklet
Audio or
navigation
system
Mobile telephone battery
charge meter. Available only
for devices pre-installed in fac-
tory.
Freezing warning. The outside
temperature is lower than
+4°C (+39°F).›››
page 42
Start-Stop system activated.›››
page
205
Start-Stop system unavailable.
Low consumption driving sta-
tus›››
page
115
›››
page 115 On the instrument panel
Fig. 53
Warning lamp for disabling the front
p a
s
senger airbag.
Front passenger front airbag
is disabled (
).
››› page
90
The front passenger front air-
bag is activated (
).
››› page
90
››› in Activation and deactivation of
front passenger airbag* on page 89
››› page 89 49
Page 181 of 332
Driving
WARNING
● Never ru n the en
gine in confined spaces, as
the exhaust gases are poisonous. CAUTION
Avoid high engine speeds, full throttle and
extr eme lo
ad conditions until the engine has
reached its normal operating temperature,
otherwise this can damage the engine. For the sake of the environment
Do not warm up the engine by idling it. You
shoul d driv
e off as soon as you start the en-
gine. This will help avoid unnecessary ex-
haust emissions. Note
● If it i
s difficult to turn the ignition key to
the position 1 , move the steering wheel to
both side s
to release the steering lock.
● When starting from cold, the engine may be
a little noisy
for the first few seconds until oil
pressure has built up in the hydraulic valve
lifters. This is quite normal, and no cause for
concern.
● If the vehicle battery is disconnected and
reconnect
ed, the key must remain in the posi-
tion 1 for around 5 seconds before starting
up.
● Vehic
les with automatic gearbox without
electronic
brake, depending on the country:
after switching off the ignition, you can only remove the ignition key if the selector lever is
in pos
ition “P” (p
arking lock). Next, the se-
lector lever is locked. Switching off the engine with the key
Switching off the engine
– Stop the vehicle.
– Turn the ignition key to position
›› ›
Fig. 191 1 .
Eng agin
g the steering wheel lock
In vehicles with automatic gearbox, the igni-
tion key can only be removed when the selec-
tor lever is in position P.
– Remove the key from the ignition in posi-
tion ›››
Fig. 191 1
› ›
› .
– Turn the steering wheel until you hear it en-
gag
e.
P
ossible vehicle theft is prevented with the
steering lock engaged. WARNING
● Never sw it
ch the engine off until the vehi-
cle is stationary. The brake servo and power
steering functions will not be completely cov-
ered under warranty. More force may also be
needed to turn the steering wheel or to brake.
As you cannot steer and brake in the normal manner, there is a greater risk of accidents
and serious
injur
y.
● Never remove the key from the ignition if
the vehic
le is in motion. Otherwise, the steer-
ing could suddenly lock, making it impossible
to steer the vehicle: risk of accident!
● Always take the key with you when you
leav
e the vehicle. This is particularly impor-
tant if there are children in the vehicle, as
they might otherwise be able to start the en-
gine or use power-operated equipment (e.g.
the electric windows), which could cause in-
juries. CAUTION
If the engine has been running under high
loa d f
or a long time, there is a risk of heat
building up in the engine compartment after
it has been switched off; this could cause en-
gine damage. For this reason, you should idle
the engine for approximately 2 minutes be-
fore you switch it off. Note
● Aft er the en
gine is switched off the radiator
fan may run on for up to 10 minutes, even if
the ignition is switched off. It is also possible
that the fan turns itself on once more if the
coolant temperature increases due to the
heat accumulated in the engine compartment
or due to its prolonged exposure to solar ra-
diation. » 179
Technical data
Advice
Operation
Emergencies
Safety
Page 260 of 332
Advice
Automatic car washes
B ef
or
e going through a car wash, be sure to
take the usual precautions (closing the win-
dows, roof and rear-view mirrors). If the vehi-
cle has special accessories such as spoilers
or a roof rack or two-way radio aerial, etc., it
is advisable to consult the car wash tunnel
operator.
It is best to use a car wash without revolving
bristles if possible.
Washing the vehicle with a high pressure
cleaner
When washing the vehicle with a high-pres-
sure cleaner, always follow the operating in-
structions for the equipment. This applies
particularly to the operating pressure and the
spraying distance. Do not hold the nozzle too
close to soft materials such as rubber hoses
or seals. The same applies to the parking aid
sensors*, which are located in the rear bump-
er.
Do not use a nozzle that sprays the water out
in a direct stream or one that has a rotating
jet for forcing off dirt.
Factory-fitted adhesive sheets
The following indications should be taken in-
to account to avoid damaging adhesive
sheets:
● Do not use high pressure cleaners. ●
Do not use s crapers to remove ice or snow
from the sheets.
● Do not polish the adhesive sheets.
● Do not use dirty cloths or sponges.
● It is preferable to wash them with a soft
spong
e and gentle neutral soap.
Washing the car by hand
When washing the car by hand, use plenty of
water to soften the dirt first, and rinse off as
well as possible.
Then clean the vehicle with a soft sponge,
glove or brush using only slight pressure.
You should start on the roof and work down.
Special car soap should only be used for very
persistent dirt.
Rinse the sponge or glove thoroughly and of-
ten.
Wheels, sills and similar should be cleaned
last. Use a second sponge for this. WARNING
● The v ehic
le should only be washed with the
ignition switched off. Failure to follow this in-
struction could result in an accident.
● Do not clean the underside of chassis, the
inside of
wheel arches or wheel trims without
protecting your hands and arms. You may cut
yourself on sharp-edged metal parts. Other-
wise, there is a risk of sustaining cuts. ●
When wa shin
g the car during the winter
season: water and ice in the brake system
can reduce braking effectiveness: risk of acci-
dent! CAUTION
● Do not wa
sh the vehicle in direct sunlight –
otherwise the paint can be damaged.
● Do not use sponges, abrasive household
spong
es or similar to clean insect remains.
This could damage the surface.
● Clean off stubborn dirt (insects, etc.) from
the headlight
s at regular intervals, for in-
stance when filling the fuel tank. The head-
lights should only be washed with water, do
not wipe them with a dry cloth or sponge. It
is best to use soapy water.
● Never wash tyres with a jet that sprays the
water out
in a direct stream. This could dam-
age the tyres even if the spray is kept at a
distance and only used for a very short time.
● Before washing the vehicle in an automatic
car wa
sh, please make sure to retract the ex-
terior mirrors to prevent them from being
damaged. Electrically retractable exterior
mirrors must not be folded in or out by hand,
always use the electrical power control. CAUTION
● Bef or
e washing the vehicle in an automatic
car wash, please proceed as follows to lock
the wiper arms so that they are not moved to-
wards the top of the windscreen: 258
Page 261 of 332
Care and maintenance
–
the bonnet mu s
t be closed.
– switch the ignition on and off.
– press the windscreen wiper lever forward
briefly (windscreen washer function).
This will lock the wiper arms. For the sake of the environment
The car should only be washed in special
w ash b
ays. These areas are prepared to pre-
vent oily water from getting into the public
drains. In some places, washing vehicles out-
side the areas intended for this purpose is
prohibited. Camera sensors and lenses
●
Use a small brush to remove snow and a
de-ic er s
pr
ay to remove ice.
● Clean the sensors with a solvent-free prod-
uct and a soft, dr
y cloth.
● Moisten the camera lens using a standard
alcohol-b
ased glass cleaning agent and
clean the lens with a dry cloth. In the active
lane assist*, the area in front of the lens is
normally cleaned with the windscreen wash-
er. CAUTION
● When y ou c
lean the vehicle with a pressure
washer: –
Sta y
a suitable distance from the sensors
on the front and rear bumpers.
– Do not clean the camera lenses or sur-
rounding area with the pressure washer.
● Never use warm or hot water to remove
snow and ic
e from the reverse camera lens,
as it could crack the lens.
● Never use abrasive cleaning agents on the
lens. Waxing and polishing
Care
W
ax
in
g protects the paintwork. It is time to
apply a coat of good wax when water no lon-
ger forms droplets and rolls off the clean
paintwork.
Even if a wax solution is used regularly in the
vehicle washing tunnel, it is advisable to pro-
tect the paint with a hard wax coating at least
twice a year.
In the summer, you will find it is much easier
to remove dead insects (which accumulate
on the bumper and the front of the bonnet) if
the car has been treated with care products
recently.
Polishing
Polishing is only necessary if the paint has
lost its shine, and the gloss cannot be
brought back by putting on wax. If the polish does not contain wax, a wax
product shou
ld be applied after polishing. CAUTION
● Do not u se po
lishes and hard wax on pain-
ted parts with a matt finish or on plastic
parts.
● Do not apply paint polishes to the side trim
that ru
ns around the panoramic roof and ends
on the windscreen. However, it can be treated
with hard wax. Trims
In respect for the environment, the silver-
p
l
at
ed trims on the body are made of pure
aluminium (they do not contain chrome).
Dirt or marks on the trim mouldings should
be removed with a cleaning product with a
neutral PH (do not use a chrome cleaner).
Body polish is also unsuitable for use on trim
mouldings. The intensive cleaning fluids of-
ten used before the car goes into a car wash
may contain alkaline substances, which can
cause dull or milky patches when they dry
out.
SEAT Official Services carry stocks of cleaning
products which have been tested for use on
your vehicle and are not harmful to the envi-
ronment.
259
Technical data
Advice
Operation
Emergencies
Safety
Page 273 of 332
Checking and refilling levels
●
Tak e c
are not to cause short circuits in the
electrical system, especially when working
on the battery.
● If working inside the engine compartment,
remember that, ev
en when the ignition is
switched off, the radiator fan may start up au-
tomatically, and therefore there is a risk of in-
jury.
● Never cover the engine with additional in-
sul
ating materials such as a blanket. Risk of
fire!
● Do not unscrew the cap on the coolant ex-
pans
ion tank when the engine is hot. The
cooling system is under pressure.
● Protect face, hands and arms by covering
the cap with a l
arge, thick rag to protect
against escaping coolant and steam.
● If it is necessary to work in the engine com-
partment
while the engine is running, the ro-
tating components (for example, poly-V belt,
alternator, radiator fan) and the high voltage
ignition system are an additional hazard.
● Observe the following additional warnings
if work
on the fuel system or the electrical
system is necessary:
– Always disconnect the battery from the
on-board network.
– Do not smoke.
– Never work near naked flames.
– Always keep an approved fire extinguish-
er immediately available. CAUTION
When topping up fluids make sure the correct
fluid is p
ut into the correct filler opening, oth-
erwise this can cause serious malfunctions or
engine damage. For the sake of the environment
Inspect the ground underneath your vehicle
re gu
larly so that any leaks are detected at an
early stage. If you find spots of oil or other
fluids in the area where it was parked, have
your vehicle inspected at the workshop. Note
In right-hand drive vehicles* some brake flu-
id re ser
voirs are on the other side of the en-
gine compartment ››› Fig. 247. Opening the bonnet
Read the additional information carefully
› ›
›
page 17
The bonnet is released from inside the vehi-
cle.
Check that the windscreen wiper arms are
not unfolded. Otherwise the paint may be
damaged.
The bonnet can only be unlocked when the
driver door is open. WARNING
Never open the bonnet if you see steam or
drips of
coolant being released from the en-
gine compartment. Failure to comply could
result in burns. Wait until no steam or coolant
can be seen before opening the bonnet. Closing the bonnet
–
Slightly lift the bonnet.
– Release the bonnet stay before pressing it
bac k
into its support.
– Carefully close the bonnet.
– Press the bonnet down until it locks into
plac
e.
– Make sure that the bonnet catches onto its
cla
sp. Do not press down too hard ››› .
WARNING
● For s af
ety reasons the bonnet must always
be completely closed when the vehicle is
moving. Therefore, after closing the bonnet,
always check that the locking element is
properly engaged. This is the case if the bon-
net is flush with the adjacent body panels.
● Should you notice that the bonnet is not
safely
secured when the vehicle is moving,
stop the vehicle immediately and close the
bonnet. Failure to follow this instruction
could result in an accident. 271
Technical data
Advice
Operation
Emergencies
Safety
Page 277 of 332
Checking and refilling levels
could d amage the engine. If there is no
c oo
lant in the expansion tank, do not con-
tinue driving. You should obtain professio-
nal assistance ››› .
– If there is still some coolant in the expan-
sion t
ank, t
op up to the upper mark.
– Top up with coolant until the level becomes
stab
le.
– Screw the cap back on correctly.
Any lo
ss of coolant fluid normally indicates a
leak in the cooling system. Take the vehicle
straight to a specialised workshop to have
the cooling system examined. If there are no
leaks in the engine cooling system, a loss of
coolant can only occur if the coolant boils
and is forced out of the system as a result of
overheating. WARNING
● The coo lin
g system is under pressure. Do
not unscrew the cap on the coolant expan-
sion tank when the engine is hot: risk of
burns!
● The antifreeze and coolant fluid can be a
health h
azard. Therefore, the antifreeze
should be stored in the original container in a
safe place out of reach of children. Failure to
comply could result in poisoning.
● If working inside the engine compartment,
remember that, ev
en when the ignition is
switched off, the radiator fan may start up au- tomatically, and therefore there is a risk of in-
jury
. WARNING
If there is not enough anti-freeze in the cool-
ant sys
tem, the engine may fail leading to se-
rious damage.
● Please make sure that the percentage of
additiv
e is correct with respect to the lowest
expected ambient temperature in the zone in
which the vehicle is to be used.
● When the outside temperature is very low,
the cool
ant could freeze and the vehicle
would be immobilised. In this case, the heat-
ing would not work either and inadequately
dressed passengers could die of cold. CAUTION
Do not top up the expansion tank with cool-
ant fluid if it
is empty! Air could enter the
cooling system. In this case, stop driving.
Seek specialist assistance. Otherwise, there
is a risk of engine damage. CAUTION
The original additives should never be mixed
with c oo
lants which are not approved by
SEAT. Otherwise, you run the risk of causing
severe damage to the engine and the engine
cooling system.
● If the fluid in the expansion tank is not pur-
ple b
ut is, for example, brown, this indicates that the G13 additive has been mixed with an
ina
dequat
e coolant. The coolant must be
changed as soon as possible if this is the
case! This could result in serious faults and
engine damage. For the sake of the environment
Coolants and additives can contaminate the
en vir
onment. If any fluids are spilled, they
should be collected and correctly disposed
of, with respect to the environment. Brake fluid
Top up br
ak
e fluid Read the additional information carefully
› ›
›
page 61
Checking the brake fluid level
The brake fluid level must be between the
MIN and MAX markings.
However, if the brake fluid level goes down
noticeably in a short time, or drops below the
MIN mark, there may be a leak in the brake
system. Seek specialist assistance. A warn-
ing light on the instrument panel display
monitors the brake fluid level ››› page 119. »
275
Technical data
Advice
Operation
Emergencies
Safety