headlights Seat Mii 2013 Owner's manual
[x] Cancel search | Manufacturer: SEAT, Model Year: 2013, Model line: Mii, Model: Seat Mii 2013Pages: 306, PDF Size: 4.3 MB
Page 13 of 306
11
Vehicle interior
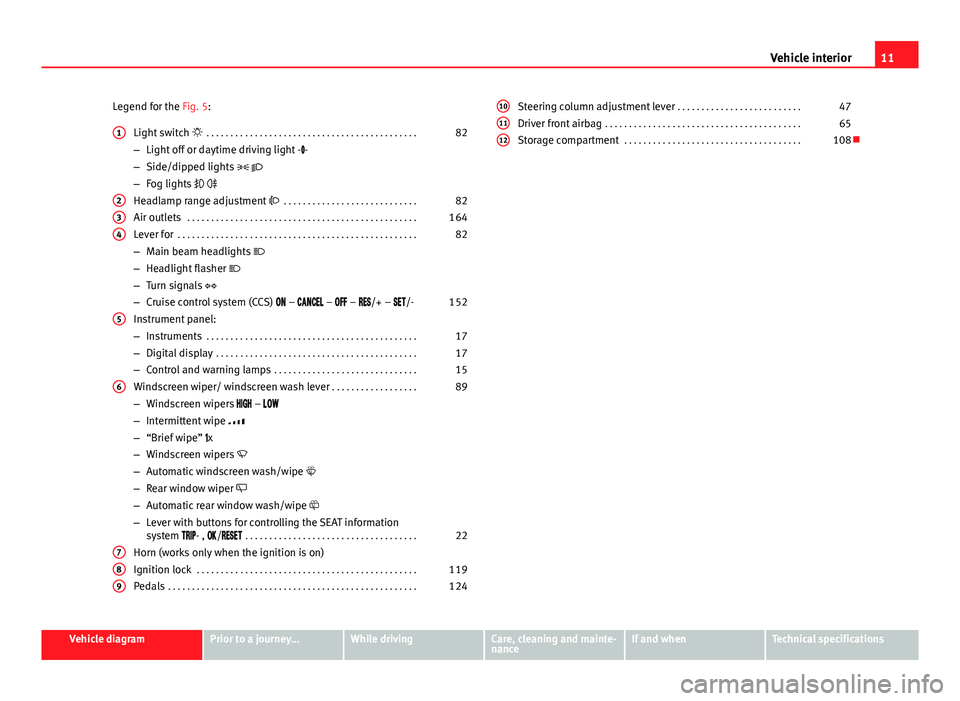
Legend for the Fig. 5: Light switch . . . . . . . . . . . . . . . . . . . . . . . . . . . . . . . . . . . . . . . . . . . . 82
– Light off or daytime driving light - -
– Side/dipped lights
– Fog lights
Headlamp range adjustment . . . . . . . . . . . . . . . . . . . . . . . . . . . . 82
Air outlets . . . . . . . . . . . . . . . . . . . . . . . . . . . . . . . . . . . . . . . . . . . . . . . . 164
Lever for . . . . . . . . . . . . . . . . . . . . . . . . . . . . . . . . . . . . . . . . . . . . . . . . . . 82
– Main beam headlights
– Headlight flasher
– Turn signals
– Cruise control system (CCS) – – – /+ – /- 152
Instrument panel:
– Instruments . . . . . . . . . . . . . . . . . . . . . . . . . . . . . . . . . . . . . . . . . . . . 17
– Digital display . . . . . . . . . . . . . . . . . . . . . . . . . . . . . . . . . . . . . . . . . . 17
– Control and warning lamps . . . . . . . . . . . . . . . . . . . . . . . . . . . . . . 15
Windscreen wiper/ windscreen wash lever . . . . . . . . . . . . . . . . . .89
– Windscreen wipers –
– Intermittent wipe
– “Brief wipe” x
– Windscreen wipers
– Automatic windscreen wash/wipe
– Rear window wiper
– Automatic rear window wash/wipe
– Lever with buttons for controlling the SEAT information
system - , / . . . . . . . . . . . . . . . . . . . . . . . . . . . . . . . . . . . . 22
Horn (works only when the ignition is on)
Ignition lock . . . . . . . . . . . . . . . . . . . . . . . . . . . . . . . . . . . . . . . . . . . . . . 119
Pedals . . . . . . . . . . . . . . . . . . . . . . . . . . . . . . . . . . . . . . . . . . . . . . . . . . . . 124
1
234
5
6
789
Steering column adjustment lever
. . . . . . . . . . . . . . . . . . . . . . . . . . 47
Driver front airbag . . . . . . . . . . . . . . . . . . . . . . . . . . . . . . . . . . . . . . . . . 65
Storage compartment . . . . . . . . . . . . . . . . . . . . . . . . . . . . . . . . . . . . . 108101112
Vehicle diagramPrior to a journey...While drivingCare, cleaning and mainte-
nanceIf and whenTechnical specifications
Page 84 of 306
82Lights and visibility
Lights and visibility
Lights Introduction
The legal requirements regarding the use of vehicle lights in each country
must be observed.
The driver is personally responsible for the correct use and adjustment of
the lights in all situations.
Additional information and warnings:
● Exterior detail ⇒ page 6
● SEAT information system ⇒ page 22
● Changing bulbs ⇒ page 266
WARNING
If the headlights are set too high and the main beam is not used correct-
ly, there is a risk of dazzling or distracting other road users. This could
result in a serious accident.
● Always make sure that the headlights are correctly adjusted.
● Never use the main beam or flashed headlamps as this could dazzle
other drivers.
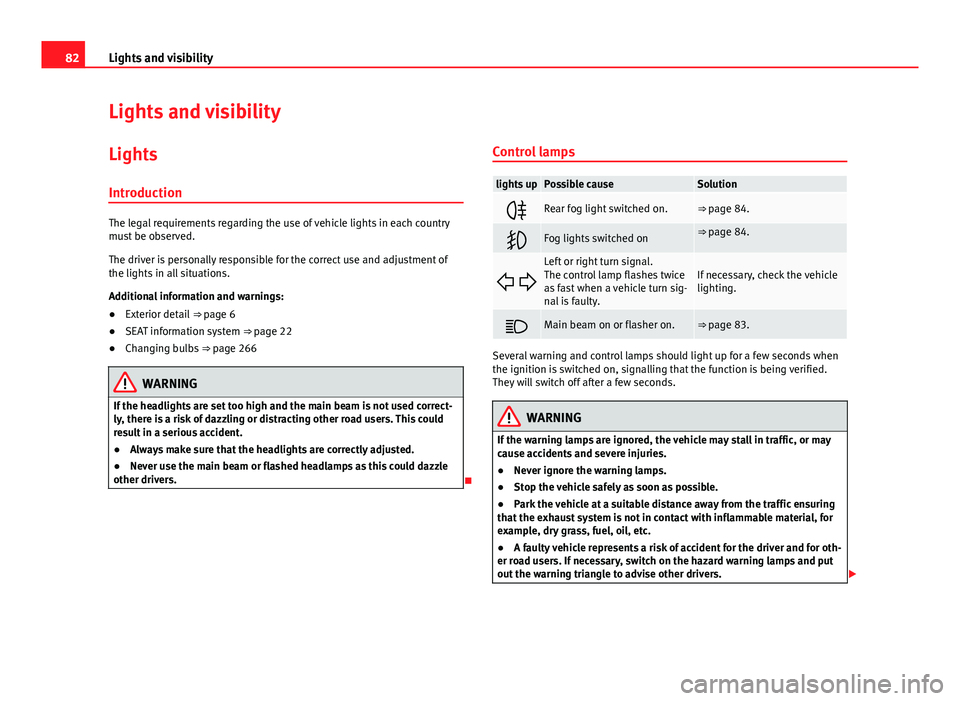
Control lamps
lights upPossible causeSolution
Rear fog light switched on.⇒ page 84.
Fog lights switched on⇒ page 84.
Left or right turn signal.
The control lamp flashes twice
as fast when a vehicle turn sig-
nal is faulty.If necessary, check the vehicle
lighting.
Main beam on or flasher on.⇒ page 83.
Several warning and control lamps should light up for a few seconds when
the ignition is switched on, signalling that the function is being verified.
They will switch off after a few seconds.
WARNING
If the warning lamps are ignored, the vehicle may stall in traffic, or may
cause accidents and severe injuries.
● Never ignore the warning lamps.
● Stop the vehicle safely as soon as possible.
● Park the vehicle at a suitable distance away from the traffic ensuring
that the exhaust system is not in contact with inflammable material, for
example, dry grass, fuel, oil, etc.
● A faulty vehicle represents a risk of accident for the driver and for oth-
er road users. If necessary, switch on the hazard warning lamps and put
out the warning triangle to advise other drivers.
Page 85 of 306
83
Lights and visibility
CAUTION
Failure to heed the warning lamps when they appear may result in faults in
the vehicle.
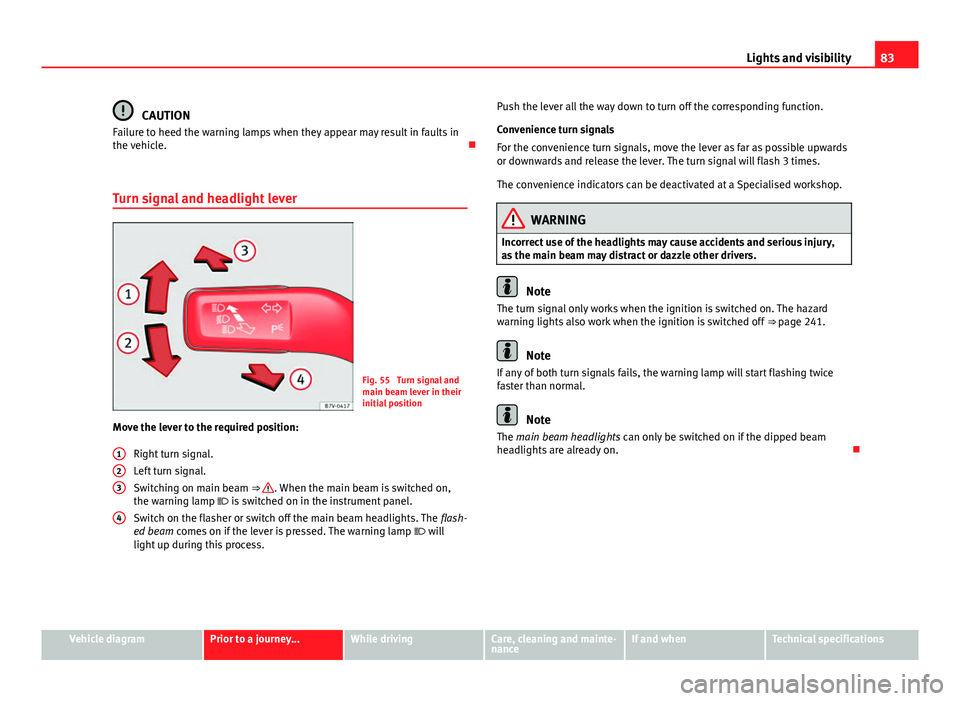
Turn signal and headlight lever
Fig. 55 Turn signal and
main beam lever in their
initial position
Move the lever to the required position:
Right turn signal.
Left turn signal.
Switching on main beam ⇒
. When the main beam is switched on,
the warning lamp is switched on in the instrument panel.
Switch on the flasher or switch off the main beam headlights. The flash-
ed beam comes on if the lever is pressed. The warning lamp will
light up during this process.
123
4
Push the lever all the way down to turn off the corresponding function.
Convenience turn signals
For the convenience turn signals, move the lever as far as possible upwards
or downwards and release the lever. The turn signal will flash 3 times.
The convenience indicators can be deactivated at a Specialised workshop.
WARNING
Incorrect use of the headlights may cause accidents and serious injury,
as the main beam may distract or dazzle other drivers.
Note
The turn signal only works when the ignition is switched on. The hazard
warning lights also work when the ignition is switched off ⇒ page 241.
Note
If any of both turn signals fails, the warning lamp will start flashing twice
faster than normal.
Note
The main beam headlights can only be switched on if the dipped beam
headlights are already on.
Vehicle diagramPrior to a journey...While drivingCare, cleaning and mainte-
nanceIf and whenTechnical specifications
Page 87 of 306
85
Lights and visibility
WARNING
The side lights or daytime driving lights are not bright enough to illumi-
nate the road ahead and to ensure that other road users are able to see
you.
● Always use your dipped beam head lights if it is raining or if visibility
is poor.
Lights and visibility: functions
Parking light remains on both sides
If when switching off the ignition, the light control remains in the posi-
tion and the vehicle is closed from outside, both headlights, in addition
to the side lights and the rear lights will light up.
Daytime driving light
The daytime driving light consists of individual lights in the front head-
lamps.
When the daytime driving light is switched on, only the individual lights
come on ⇒
.
The daytime lights are switched on each time the ignition is turned on if the
light switch is in position .
Switching the daytime driving light on and off
To switch the daytime driving light on or off, it is necessary to fit or remove
the corresponding fuse. Ask for professional assistance for this.
WARNING
If the road is not well-lit and the vehicle is not clearly visible to other
drivers, there is a risk of accident.
● Never use the daytime driving light if the road is not well-lit as a re-
sult of the weather conditions and poor visibility. The daytime driving
lights are not bright enough to illuminate the road ahead and to ensure
that other road users are able to see you.
● The rear lights do not come on with the daytime driving light. A vehi-
cle which does not have the rear lights on may not be visible to other
drivers in the darkness, if it is raining or in conditions of poor visibility.
Note
The headlights, rear lights and turn signals may mist up temporarily on the
inside in cool or damp weather. This is normal and in no way effects the
useful life of the vehicle lighting system.
Adjusting the headlights
In those countries where vehicles drive on the other side of the road to the
home country, the asymmetric dipped beam may dazzle drivers of oncom-
ing vehicles.
For this reason, stickers may need to be used to cover the headlights when
driving abroad. For further information, please refer to a specialised work-
shop. SEAT recommends visiting a Technical Service.
Note
The use of stickers to cover headlights is only permitted over a short period.
To modify the direction of the headlamps more permanently, please take
the vehicle to a specialised workshop. SEAT recommends visiting a Techni-
cal Service.
Vehicle diagramPrior to a journey...While drivingCare, cleaning and mainte-
nanceIf and whenTechnical specifications
Page 88 of 306
86Lights and visibility
Headlight range control, lighting of instruments and
controls
Fig. 57 Next to the
steering wheel: Head-
light range control
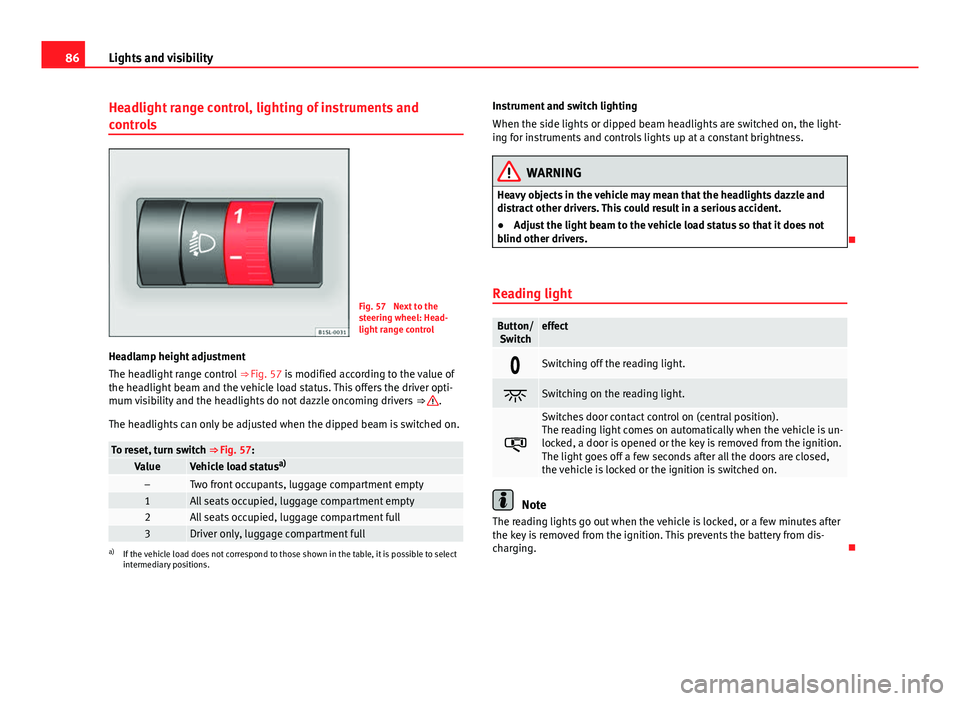
Headlamp height adjustment
The headlight range control ⇒ Fig. 57 is modified according to the value of
the headlight beam and the vehicle load status. This offers the driver opti-
mum visibility and the headlights do not dazzle oncoming drivers ⇒
.
The headlights can only be adjusted when the dipped beam is switched on.
To reset, turn switch ⇒ Fig. 57:ValueVehicle load status a)–Two front occupants, luggage compartment empty1All seats occupied, luggage compartment empty2All seats occupied, luggage compartment full3Driver only, luggage compartment fulla)
If the vehicle load does not correspond to those shown in the table, it is possible to select
intermediary positions. Instrument and switch lighting
When the side lights or dipped beam headlights are switched on, the light-
ing for instruments and controls lights up at a constant brightness.
WARNING
Heavy objects in the vehicle may mean that the headlights dazzle and
distract other drivers. This could result in a serious accident.
● Adjust the light beam to the vehicle load status so that it does not
blind other drivers.
Reading light
Button/ Switcheffect
Switching off the reading light.
Switching on the reading light.
Switches door contact control on (central position).
The reading light comes on automatically when the vehicle is un-
locked, a door is opened or the key is removed from the ignition.
The light goes off a few seconds after all the doors are closed,
the vehicle is locked or the ignition is switched on.
Note
The reading lights go out when the vehicle is locked, or a few minutes after
the key is removed from the ignition. This prevents the battery from dis-
charging.
Page 155 of 306
153
Driver assistance systems
Cruise control system operation
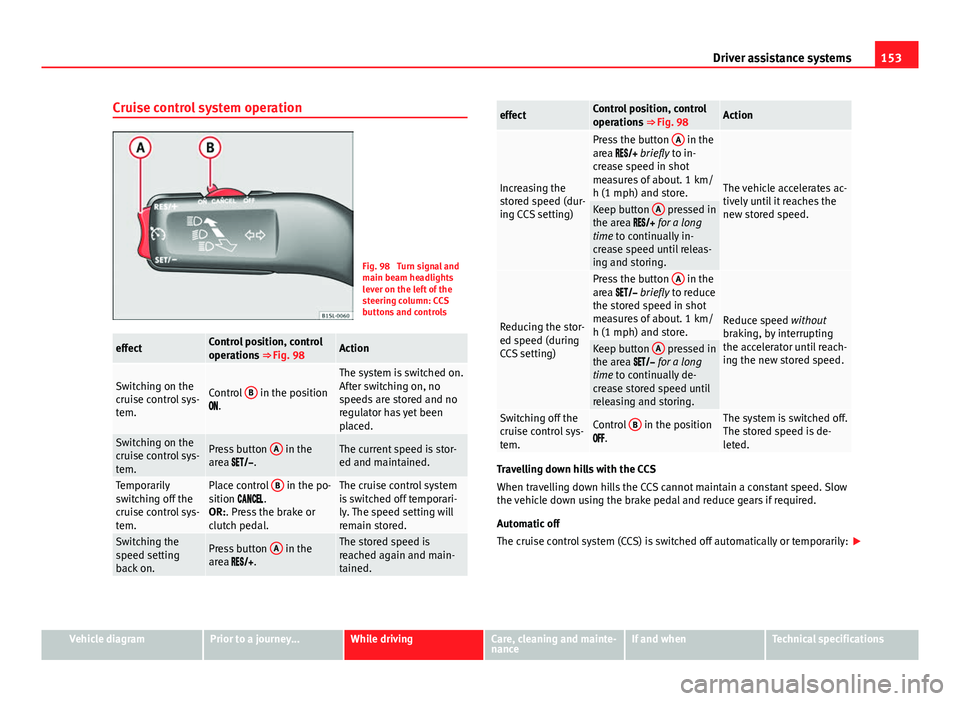
Fig. 98 Turn signal and
main beam headlights
lever on the left of the
steering column: CCS
buttons and controls
effectControl position, control
operations ⇒ Fig. 98Action
Switching on the
cruise control sys-
tem.Control B in the position
.
The system is switched on.
After switching on, no
speeds are stored and no
regulator has yet been
placed.
Switching on the
cruise control sys-
tem.Press button A in the
area .The current speed is stor-
ed and maintained.
Temporarily
switching off the
cruise control sys-
tem.Place control B in the po-
sition .
OR:. Press the brake or
clutch pedal.The cruise control system
is switched off temporari-
ly. The speed setting will
remain stored.
Switching the
speed setting
back on.Press button A in the
area .The stored speed is
reached again and main-
tained.
effectControl position, control
operations ⇒ Fig. 98Action
Increasing the
stored speed (dur-
ing CCS setting)
Press the button A in the
area briefly to in-
crease speed in shot
measures of about. 1 km/
h (1 mph) and store.
The vehicle accelerates ac-
tively until it reaches the
new stored speed.
Keep button A pressed in
the area for a long
time to continually in-
crease speed until releas-
ing and storing.
Reducing the stor-
ed speed (during
CCS setting)
Press the button A in the
area briefly to reduce
the stored speed in shot
measures of about. 1 km/
h (1 mph) and store.
Reduce speed without
braking, by interrupting
the accelerator until reach-
ing the new stored speed.
Keep button A pressed in
the area for a long
time to continually de-
crease stored speed until
releasing and storing.
Switching off the
cruise control sys-
tem.Control B in the position
.The system is switched off.
The stored speed is de-
leted.
Travelling down hills with the CCS
When travelling down hills the CCS cannot maintain a constant speed. Slow
the vehicle down using the brake pedal and reduce gears if required.
Automatic off
The cruise control system (CCS) is switched off automatically or temporarily:
Vehicle diagramPrior to a journey...While drivingCare, cleaning and mainte-
nanceIf and whenTechnical specifications
Page 178 of 306
176At the filling station
Note
● The filling nozzles of natural gas pumps can differ in the way they are
operated. If you are unacquainted with the pump, it is advisable that a
member of staff of the service station performs the refuelling operation.
● Noises heard when refuelling are normal and do not indicate the pres-
ence of a fault in the system.
● The vehicle natural gas system is prepared both for refuelling with a
small compressor (slow refuel) and a large compressor (fast refuel) in natu-
ral gas service stations.
Refilling precautions
Checklist
Never work on the engine or in the engine compartment if you are not famil-
iar with the operations to be carried out, the applicable safety standards
and if you do not have the instruments, liquids and tools necessary
⇒ page 180, Working in the engine compartment ! In such a case, have any
work carried out by a Specialised workshop. Check the following regularly,
preferably when you refuel:
Windscreen washer fluid level
⇒ page 89
Engine oil level
⇒ page 185
Engine coolant level
⇒ page 189
Brake fluid level
⇒ page 134
Tyre pressure ⇒ page 210
Vehicle lighting required to guarantee road safety:
– Turn signals
– Side lights, dipped beam headlights and main beam headlights
– Rear lights
– Brake lights
– Rear fog light ⇒ page 82
Information on bulb replacement ⇒ page 266.
Page 200 of 306
198Vehicle care and maintenance
For the sake of the environment
The remains of car care products should not be disposed of with ordinary
household waste. Observe information provided by the manufacturer.
Washing the vehicle
The longer substances such as insects, bird droppings, resinous tree sap,
road dirt, industrial deposits, tar, soot or road salt and other aggressive ma-
terials remain on the vehicle, the more damage they do to the paintwork.
High temperatures (for instance due to strong sunlight) further intensify the
corrosive effect. The vehicle undercarriage should also be thoroughly wash-
ed at regular intervals.
Automatic car washes
Always observe the instructions provided at the automatic car wash. The
standard precautionary measures prior to entering the car wash should be
taken to avoid damage to the vehicle (close all windows, fold in exterior mir-
rors). If the vehicle is fitted with additional components (spoiler, roof-rack,
aerial...), check with the car wash supervisor whether these can enter the
car wash ⇒
.
The vehicle paintwork is so durable that the vehicle can normally be washed
without problems in an automatic car wash tunnel. However, wear and dam-
age to the paintwork will depend on the type of car wash used. SEAT recom-
mends the use of car washed without brushes.
To remove traces of wax on windows and to prevent wiper blades from
scratching, please observe the following ⇒ page 200, Cleaning windows
and exterior mirrors.
Washing the car by hand
When washing the car by hand, use plenty of water to soften the dirt first,
and rinse off as well as possible. Then clean the vehicle with a soft
sponge, glove or brush using only slight
pressure. Start at the roof and work downwards. Special car shampoo
should only be used for very persistent dirt.
Rinse the sponge or glove thoroughly and often.
Wheels, sills and similar should be cleaned last. Use a second sponge for
this.
WARNING
Sharp components on the vehicle may cause injury.
● Protect arms and hands from sharp edges when cleaning the vehicle
undercarriage or the interior of the wheel hubs.
WARNING
After the vehicle has been washed, the braking effect will be reduced
(and the braking distance increased) due to moisture (and ice in winter)
on the brakes.
● Dry the brakes and remove ice by braking carefully. Ensure that you
are not endangering other road-users or breaking traffic regulations in
the process.
CAUTION
● The temperature of the water must not exceed +60 °C (+140 °F).
● To avoid damage to the paintwork, do not wash the vehicle in full sun.
● Do not use rough sponges or similar which could damage the surface to
clean away the traces of insects.
● Never wipe the headlights with a dry cloth or sponge, always moisten
first. It is best to use soapy water.
● Washing the vehicle in low temperatures: When washing the vehicle
with a hose, do not direct water into the lock cylinders or the gaps around
the doors, rear lid, or sunroof. Locks and seals could freeze!
Page 241 of 306
239
Practical information
If and when
Practical information
Frequently asked questions
If you suspect that the vehicle has a fault or is damaged when using it, be-
fore consulting a SEAT dealership or a specialised workshop, carefully read
the following instructions. Similarly, the terms in the alphabetical index
“Things to note” or “Checklist” may be of help.
ProblemPossible causes,
among othersPossible solution
The engine does
not start.
The vehicle battery is
flat.– Carry out the jump start
⇒ page 275.
– Charge the battery
⇒ page 193.
You are using an incor-
rect vehicle key.Use the correct key
⇒ page 28.
The fuel tank level is
insufficient.Refuel ⇒ page 171.
The vehicle cannot
be locked or un-
locked with the
key.
– Vehicle key battery is
flat.
– Too far away from
the vehicle.
– Buttons pressed out-
side the radius of
reach.– Change the battery
⇒ page 28.
– Move closer to the vehicle.
– Synchronize the vehicle
key ⇒ page 28.
– Manually lock or unlock
the vehicle ⇒ page 244.
Unusual noises.
Engine cold, City Safe-
ty Assist system, steer-
ing column electronic
lock.See entry “Noises” in the de-
tailed alphabetical index.
ProblemPossible causes,
among othersPossible solution
Handling is
strange.
Assistance systems ac-
tive.See entry “Assistance sys-
tems” in the detailed alpha-
betical index.
You are using an incor-
rect tyre pressure.Check the tyre pressure
⇒ page 210.
Damage to the wheel
trims or tyres.
Inspect wheel trims and
tyres regularly for damage
⇒ page 210 and replace
them if necessary
⇒ page 252.
Vehicle has no
jack, spare wheel
or tire mobility set
present.Equipment subject to
the vehicle.
No direct solution, depends
on the equipment. In this
case, you should contact a
SEAT Dealership
⇒ page 247.
Surface not correct-
ly illuminated.
– Headlights covered
for driving on the left-
hand side or right-
hand side.
– Headlight adjust-
ment too high.
– Faulty bulbs.
– Dipped headlights
switched off.– Cover the headlights for
driving on the left-hand side
or right-hand side
⇒ page 82.
– Adjust the headlight range
⇒ page 82.
– Change the bulbs
⇒ page 266.
– Switch on the dipped
headlights ⇒ page 82.
Vehicle diagramPrior to a journey...While drivingCare, cleaning and mainte-
nanceIf and whenTechnical specifications
Page 269 of 306
267
Practical information
Information for replacing bulbs
Checklist
To replace a bulb, carry out the following operations always in the order giv-
en ⇒
:
1. Park the vehicle a safe distance from traffic and on suitable ground.
2. Apply the handbrake firmly ⇒ page 134.
3. Turn the light switch to position 0 ⇒ page 82.
4. Move the gear lever into the neutral position ⇒ page 82.
5. Stop the engine and remove the key from the ignition ⇒ page 119.
6. Automatic gearbox: move the selector lever to position P
⇒ page 124.
7. Manual gearbox: Select a gear ⇒ page 124.
8. Allow the corresponding bulb to cool.
9. Visually inspect fuses to see if any are blown ⇒ page 263.
10. Replace the bulb according to the instructions ⇒
. Bulbs should
only be replaced by new identical models. Bulb information is dis-
played on the bulb socket or on the bulb itself.
11. In general, never touch the bulb glass directly. The heat of the bulb would cause the fingerprint to evaporate and condense on the reflec-
tor. This will impair the brightness of the headlight.
12. Check if the new bulb is working. If the bulb is not working, it maynot have been correctly fitted, it could be damaged or the connector
may not be correctly connected.
13. Every time a bulb for the headlights is replaced, visit a specialised workshop to check the headlights.
WARNING
Failure to follow the checklist prepared for your own safety could lead to
accidents and severe injuries.
● Always complete the operations given in the checklist and observe
the general rules of safety.
CAUTION
Always remove and fit headlights carefully to avoid damage to the paint-
work and other vehicle parts.
Vehicle diagramPrior to a journey...While drivingCare, cleaning and mainte-
nanceIf and whenTechnical specifications