seat adjustment Seat Mii 2013 Owner's manual
[x] Cancel search | Manufacturer: SEAT, Model Year: 2013, Model line: Mii, Model: Seat Mii 2013Pages: 306, PDF Size: 4.3 MB
Page 13 of 306
11
Vehicle interior
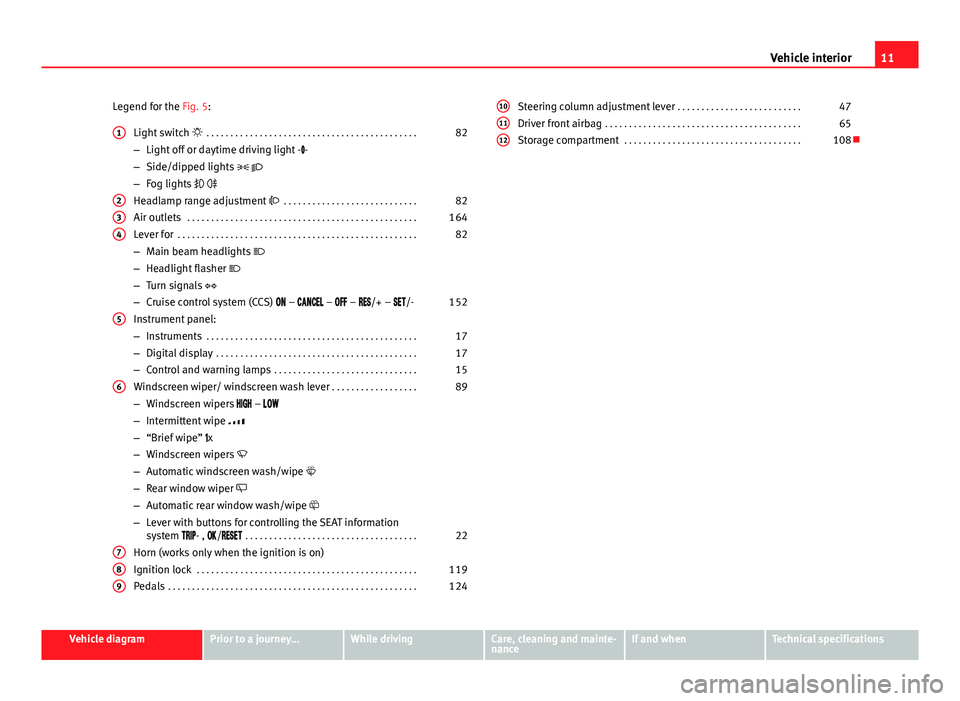
Legend for the Fig. 5: Light switch . . . . . . . . . . . . . . . . . . . . . . . . . . . . . . . . . . . . . . . . . . . . 82
– Light off or daytime driving light - -
– Side/dipped lights
– Fog lights
Headlamp range adjustment . . . . . . . . . . . . . . . . . . . . . . . . . . . . 82
Air outlets . . . . . . . . . . . . . . . . . . . . . . . . . . . . . . . . . . . . . . . . . . . . . . . . 164
Lever for . . . . . . . . . . . . . . . . . . . . . . . . . . . . . . . . . . . . . . . . . . . . . . . . . . 82
– Main beam headlights
– Headlight flasher
– Turn signals
– Cruise control system (CCS) – – – /+ – /- 152
Instrument panel:
– Instruments . . . . . . . . . . . . . . . . . . . . . . . . . . . . . . . . . . . . . . . . . . . . 17
– Digital display . . . . . . . . . . . . . . . . . . . . . . . . . . . . . . . . . . . . . . . . . . 17
– Control and warning lamps . . . . . . . . . . . . . . . . . . . . . . . . . . . . . . 15
Windscreen wiper/ windscreen wash lever . . . . . . . . . . . . . . . . . .89
– Windscreen wipers –
– Intermittent wipe
– “Brief wipe” x
– Windscreen wipers
– Automatic windscreen wash/wipe
– Rear window wiper
– Automatic rear window wash/wipe
– Lever with buttons for controlling the SEAT information
system - , / . . . . . . . . . . . . . . . . . . . . . . . . . . . . . . . . . . . . 22
Horn (works only when the ignition is on)
Ignition lock . . . . . . . . . . . . . . . . . . . . . . . . . . . . . . . . . . . . . . . . . . . . . . 119
Pedals . . . . . . . . . . . . . . . . . . . . . . . . . . . . . . . . . . . . . . . . . . . . . . . . . . . . 124
1
234
5
6
789
Steering column adjustment lever
. . . . . . . . . . . . . . . . . . . . . . . . . . 47
Driver front airbag . . . . . . . . . . . . . . . . . . . . . . . . . . . . . . . . . . . . . . . . . 65
Storage compartment . . . . . . . . . . . . . . . . . . . . . . . . . . . . . . . . . . . . . 108101112
Vehicle diagramPrior to a journey...While drivingCare, cleaning and mainte-
nanceIf and whenTechnical specifications
Page 28 of 306
26Before starting the engine
Check list (Continued)
Correctly fasten your seat belt before starting to drive and keep it se-
curely fastened throughout the journey. This applies to all
passengers in the vehicle
⇒ page 56.
Never carry more passengers than the number of available seats and
seat belts in your vehicle.
Never drive with impaired faculties (for example, due to medication,
alcohol or drugs).
Do not allow yourself to be distracted from the traffic, for example, to
reset or switch on a menu, by other passengers or to answer a phone
call.
Always try to adapt the speed of the vehicle and your style of driving
to the condition of the ground or the road and to weather and traffic
conditions.
Observe the highway code and speed limits.
On long journeys, rest at regular intervals (at least every 2 hours).
If carrying animals, make sure they are correctly restrained in accord-
ance with their weight and size.
WARNING
Always observe traffic regulations and speed limits and try to anticipate
traffic movements. Correctly anticipating traffic situations may mean the
difference between arriving safe and sound at your destination or having
a serious accident.
Note
Regular servicing of your vehicle not only helps to keep it in good working
order but also helps to ensure road safety. Therefore, please ensure the ve-
hicle is taken for service as indicated in the Maintenance Programme. If the
vehicle is subjected to hard use, it may require certain maintenance work
before the next service date. Hard use may involve frequent driving in traffic
jams or driving in dusty areas. For further information, please refer to a SEAT
dealership or a specialised workshop.
Driving abroad
Check list
In some countries, certain safety regulations and requirements are in force
relating to exhaust gas emissions, which differ from the technical character-
istics of the vehicle. Before travelling abroad, SEAT recommends you con-
sult a SEAT dealership about the legal requirements and the following
points:
Does the vehicle need technical modifications for driving abroad, for
example, adjustment of the headlamps?
Does the vehicle have all the tools, diagnostics equipment and
spare parts required for inspections and repairs?
Are there any SEAT dealers in the destination country?
For petrol vehicles: Is unleaded petrol available at the right octane
rating?
Are a suitable engine oil (
⇒ page 185) and other engine fluids com-
plying with SEAT specifications available in the destination country?
Does the Portable Navigation System (supplied by SEAT) function
⇒
page 222 in the destination country with the available navigation
information?
Are special tyres required in the destination country?
Page 30 of 306
28Opening and closing
Opening and closing
Vehicle key set
Introduction
Additional information and warnings:
● Adjustments to the SEAT information system ⇒ page 22
● Central locking and locking system ⇒ page 32
● Start and stop the engine ⇒ page 119
● Notes for the user ⇒ page 233
● Emergency locking and unlocking ⇒ page 244
WARNING
Swallowing batteries with a diameter of 20 mm or other types of lithium
battery may quickly result in serious injuries or even death.
● Always keep the vehicle keys and the key tab with the batteries,
spare batteries, flat batteries and other types of batteries larger than
20 mm out of the reach of children.
● Immediately seek medical assistance if you suspect the swallowing of
a battery.
WARNING
Careless or incorrect use of vehicle keys may result in severe injury and
accident.
● Always take all the keys with you whenever you leave the vehicle.
Children and unauthorised individuals could lock the doors or the rear
lid, start the engine or turn the ignition on activating electrical systems,
for example: the electric windows.
● Never leave children or disabled people alone in the car. They could
be trapped in the car in an emergency and will not be able to get them-
selves to safety. For example, depending on the time of the year, temper-
atures inside a locked and closed vehicle can be extremely high or ex-
tremely low resulting in serious injuries and illness or even death, partic-
ularly for young children.
● Never remove the key from the ignition if the vehicle is in motion. The
steering may lock and it will not be possible to turn the steering wheel.
Page 50 of 306
48Ensuring you are correctly and safely seated
WARNING (Continued)
● Keep your back straight and resting completely against the seat back-
rest and the front seats correctly adjusted. Never place any part of your
body in the area of the airbag or very close to it.
● If passengers on the rear seats are not sitting in an upright position,
the risk of severe injury due to incorrect positioning of the belt web in-
creases.
WARNING
Incorrect seat adjustment may lead to accidents and severe injuries.
● Only adjust the seats when the vehicle is stationary, as the seats
could move unexpectedly while the vehicle is in motion and you could
lose control of the vehicle. Furthermore, an incorrect position is adopted
when adjusting the seat.
● Only adjust the height, seat backrest and forwards or backwards po-
sition of the seat when there is nobody in the seat adjustment area.
● There must be no objects blocking the front seat adjustment area.
Danger of injuries due to an incorrect sitting position
If the seat belts are worn incorrectly or not at all, the risk of severe injuries
increases. Seat belts can provide optimal protection only if the belt web is
properly worn. The seat belt cannot offer its full protection if the belt web is
not positioned correctly. This could result in severe and even fatal injuries.
The risk of severe or fatal injuries is especially increased when a deploying
airbag strikes a vehicle occupant who has assumed an incorrect sitting po-
sition. The driver is responsible for all passengers in the vehicle, particularly
children.
The following list shows just some examples of incorrect sitting positions
which can be dangerous to all vehicle occupants. When the vehicle is in motion:
●
Never stand in the vehicle.
● Never stand on the seats.
● Never kneel on the seats.
● Never tilt your seat backrest too far to the rear.
● Never lean against the dash panel.
● Never lie on the rear seats.
● Never sit on the front edge of a seat.
● Never sit sideways.
● Never lean out of a window.
● Never put your feet out of a window.
● Never put your feet on the dash panel.
● Never put your feet on the surface of a seat or seat backrest.
● Never travel in a footwell.
● Never travel on a seat without wearing the seat belt.
● Never carry any person in the luggage compartment.
WARNING
Every incorrect sitting position increases the risk of severe or fatal inju-
ries in the event of accidents or sudden braking or manoeuvres.
● All passengers must assume the proper sitting position and be prop-
erly belted in while travelling.
● Vehicle occupants in incorrect sitting positions, not wearing their
seat belt or too close to the airbag run the risk of suffering severe or fatal
injuries, particularly if the airbag deploys and hits an occupant sitting in
an incorrect position.
Page 53 of 306
51
Ensuring you are correctly and safely seated
Adjust the rear head restraints
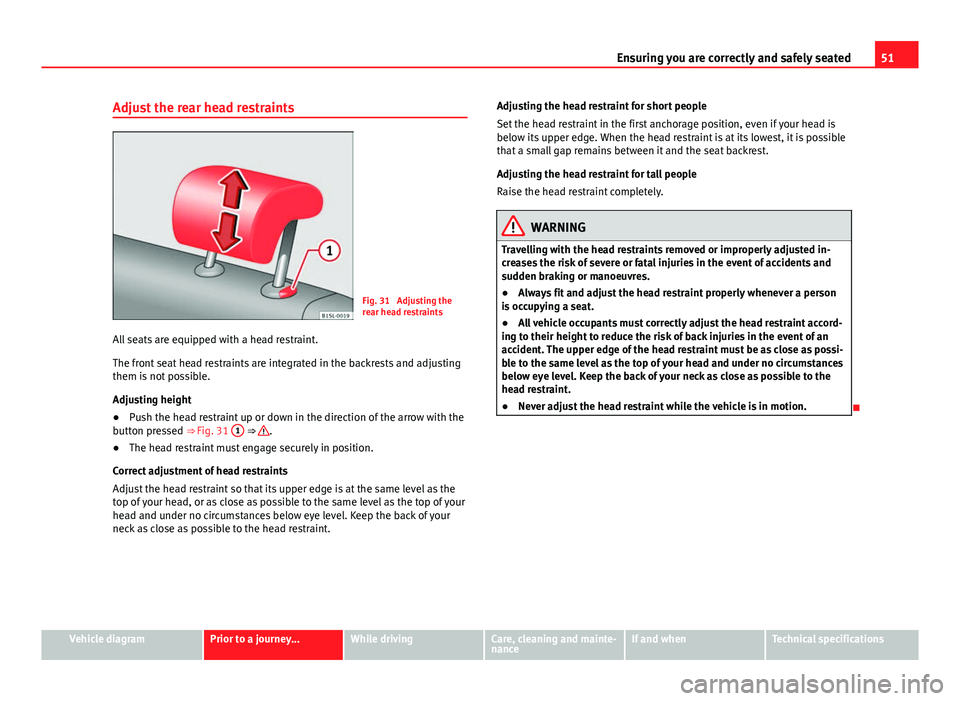
Fig. 31 Adjusting the
rear head restraints
All seats are equipped with a head restraint.
The front seat head restraints are integrated in the backrests and adjusting
them is not possible.
Adjusting height
● Push the head restraint up or down in the direction of the arrow with the
button pressed ⇒ Fig. 31 1
⇒ .
● The head restraint must engage securely in position.
Correct adjustment of head restraints
Adjust the head restraint so that its upper edge is at the same level as the
top of your head, or as close as possible to the same level as the top of your
head and under no circumstances below eye level. Keep the back of your
neck as close as possible to the head restraint. Adjusting the head restraint for short people
Set the head restraint in the first anchorage position, even if your head is
below its upper edge. When the head restraint is at its lowest, it is possible
that a small gap remains between it and the seat backrest.
Adjusting the head restraint for tall people
Raise the head restraint completely.
WARNING
Travelling with the head restraints removed or improperly adjusted in-
creases the risk of severe or fatal injuries in the event of accidents and
sudden braking or manoeuvres.
● Always fit and adjust the head restraint properly whenever a person
is occupying a seat.
● All vehicle occupants must correctly adjust the head restraint accord-
ing to their height to reduce the risk of back injuries in the event of an
accident. The upper edge of the head restraint must be as close as possi-
ble to the same level as the top of your head and under no circumstances
below eye level. Keep the back of your neck as close as possible to the
head restraint.
● Never adjust the head restraint while the vehicle is in motion.
Vehicle diagramPrior to a journey...While drivingCare, cleaning and mainte-
nanceIf and whenTechnical specifications
Page 55 of 306
53
Ensuring you are correctly and safely seated
Adjust the steering wheel before your trip and only when the vehicle is sta-
tionary.
● Push the lever ⇒ Fig. 33 1
downwards.
● Adjust the steering wheel so that you can hold onto the steering wheel
with both hands on the outside of the ring at the 9 o'clock and 3 o'clock
positions and your arms slightly bent.
● Push the lever firmly upwards until it is flush to the steering column
⇒
.
Adjust the correct distance between the driver and the steering wheel
⇒ Fig. 28 using the controls on the driver seat ⇒ page 50.
WARNING
Incorrect use of the steering wheel adjustment function and an incorrect
adjustment of the steering wheel can result in severe or fatal injury.
● After adjusting the steering column, push the lever ⇒ Fig. 33 1
firm-
ly upwards to ensure the steering wheel does not accidentally change po-
sition while driving.
● Never adjust the steering wheel while the vehicle is in motion. If you
need to adjust the steering wheel while the vehicle is in motion, stop
safely and make the proper adjustment.
● The adjusted steering wheel should be facing your chest and not your
face so as not to hinder the driver's front airbag protection in the event of
an accident.
● When driving, always hold the steering wheel with both hands on the
outside of the ring at the 9 o'clock and 3 o'clock positions to reduce inju-
ries when the driver's front airbag deploys.
● Never hold the steering wheel at the 12 o'clock position or in any oth-
er manner (e.g. in the centre of the steering wheel). In such cases, if the
driver's airbag deploys, you may sustain injuries to your arms, hands and
head.
Vehicle diagramPrior to a journey...While drivingCare, cleaning and mainte-
nanceIf and whenTechnical specifications
Page 56 of 306
54Ensuring you are correctly and safely seated
Seat functions
Introduction
Additional information and warnings:
● Adjust the seat position ⇒ page 47
● Seat belts ⇒ page 56
● Airbag system ⇒ page 65
● Child seats (accessories) ⇒ page 74
● Exterior mirrors ⇒ page 93
WARNING
Inappropriate use of the seat functions can cause severe injuries.
● Assume the proper sitting position before your trip and remain in it
throughout. This also applies to the other occupants.
● Keep hands, fingers, feet and other limbs away from the seat operat-
ing and adjustment radius.
Seat heating*
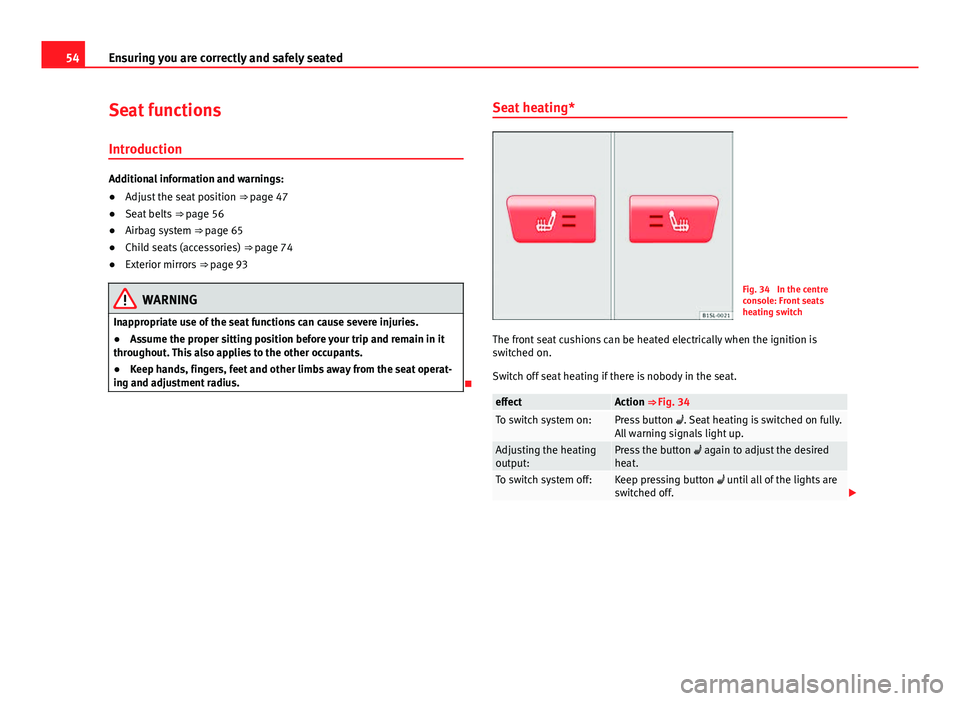
Fig. 34 In the centre
console: Front seats
heating switch
The front seat cushions can be heated electrically when the ignition is
switched on.
Switch off seat heating if there is nobody in the seat.
effectAction ⇒ Fig. 34To switch system on:Press button . Seat heating is switched on fully.
All warning signals light up.
Adjusting the heating
output:Press the button again to adjust the desired
heat.
To switch system off:Keep pressing button until all of the lights are
switched off.
Page 65 of 306
63
Ensuring you are correctly and safely seated
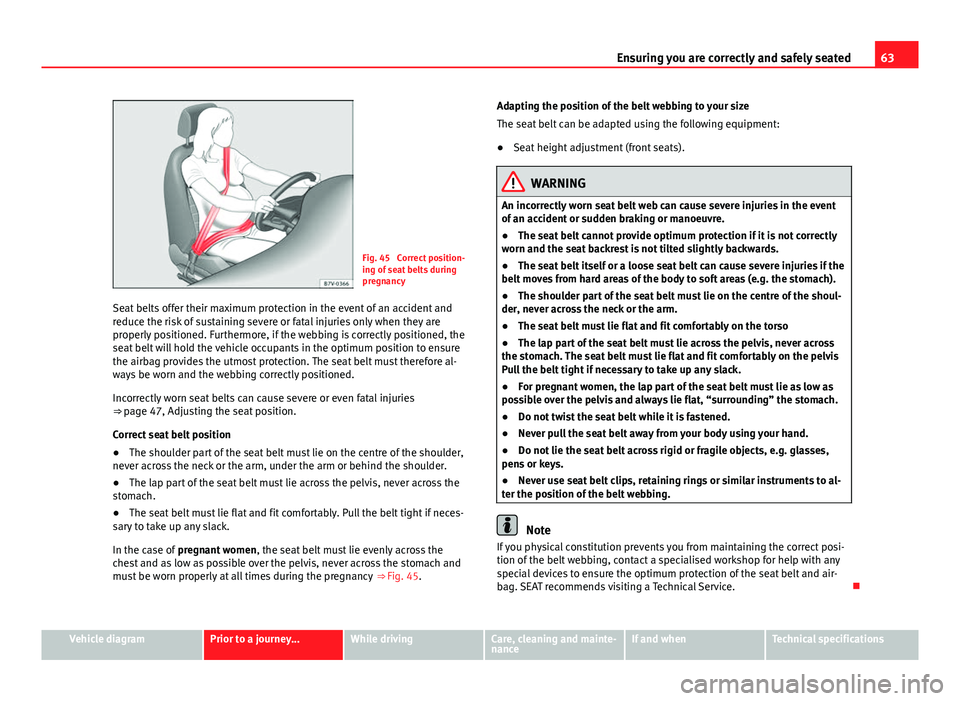
Fig. 45 Correct position-
ing of seat belts during
pregnancy
Seat belts offer their maximum protection in the event of an accident and
reduce the risk of sustaining severe or fatal injuries only when they are
properly positioned. Furthermore, if the webbing is correctly positioned, the
seat belt will hold the vehicle occupants in the optimum position to ensure
the airbag provides the utmost protection. The seat belt must therefore al-
ways be worn and the webbing correctly positioned.
Incorrectly worn seat belts can cause severe or even fatal injuries
⇒ page 47, Adjusting the seat position.
Correct seat belt position
● The shoulder part of the seat belt must lie on the centre of the shoulder,
never across the neck or the arm, under the arm or behind the shoulder.
● The lap part of the seat belt must lie across the pelvis, never across the
stomach.
● The seat belt must lie flat and fit comfortably. Pull the belt tight if neces-
sary to take up any slack.
In the case of pregnant women , the seat belt must lie evenly across the
chest and as low as possible over the pelvis, never across the stomach and
must be worn properly at all times during the pregnancy ⇒ Fig. 45. Adapting the position of the belt webbing to your size
The seat belt can be adapted using the following equipment:
●
Seat height adjustment (front seats).
WARNING
An incorrectly worn seat belt web can cause severe injuries in the event
of an accident or sudden braking or manoeuvre.
● The seat belt cannot provide optimum protection if it is not correctly
worn and the seat backrest is not tilted slightly backwards.
● The seat belt itself or a loose seat belt can cause severe injuries if the
belt moves from hard areas of the body to soft areas (e.g. the stomach).
● The shoulder part of the seat belt must lie on the centre of the shoul-
der, never across the neck or the arm.
● The seat belt must lie flat and fit comfortably on the torso
● The lap part of the seat belt must lie across the pelvis, never across
the stomach. The seat belt must lie flat and fit comfortably on the pelvis
Pull the belt tight if necessary to take up any slack.
● For pregnant women, the lap part of the seat belt must lie as low as
possible over the pelvis and always lie flat, “surrounding” the stomach.
● Do not twist the seat belt while it is fastened.
● Never pull the seat belt away from your body using your hand.
● Do not lie the seat belt across rigid or fragile objects, e.g. glasses,
pens or keys.
● Never use seat belt clips, retaining rings or similar instruments to al-
ter the position of the belt webbing.
Note
If you physical constitution prevents you from maintaining the correct posi-
tion of the belt webbing, contact a specialised workshop for help with any
special devices to ensure the optimum protection of the seat belt and air-
bag. SEAT recommends visiting a Technical Service.
Vehicle diagramPrior to a journey...While drivingCare, cleaning and mainte-
nanceIf and whenTechnical specifications
Page 82 of 306
80Ensuring you are correctly and safely seated
Group (weight category)
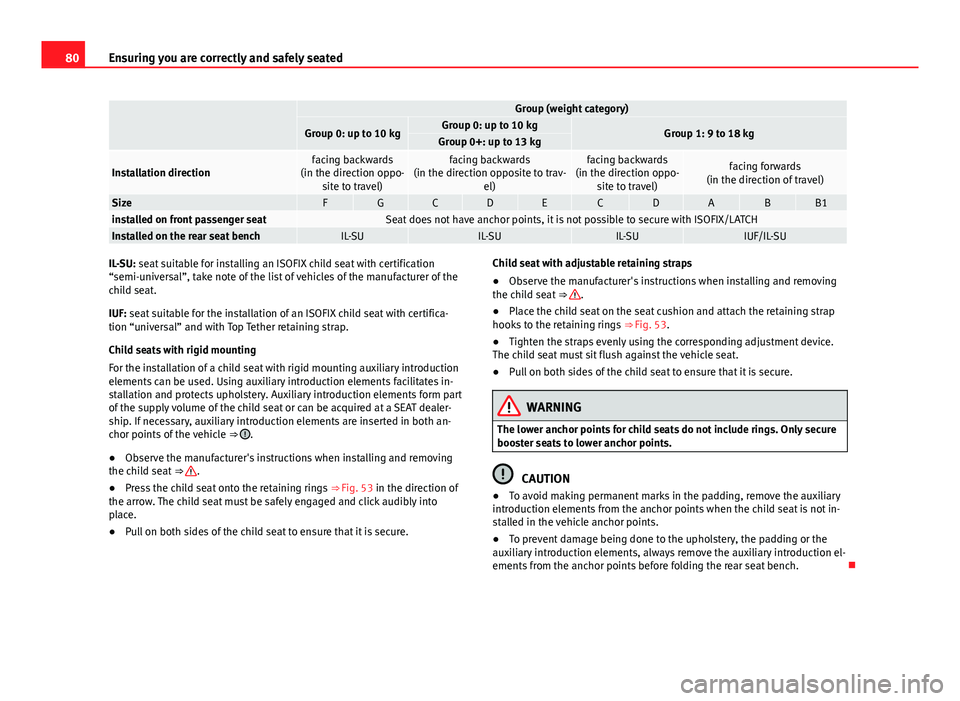
Group 0: up to 10 kgGroup 0: up to 10 kgGroup 1: 9 to 18 kgGroup 0+: up to 13 kg
Installation directionfacing backwards
(in the direction oppo- site to travel)facing backwards
(in the direction opposite to trav- el)facing backwards
(in the direction oppo- site to travel)facing forwards
(in the direction of travel)
SizeFGCDECDABB1installed on front passenger seatSeat does not have anchor points, it is not possible to secure with ISOFIX/LATCHInstalled on the rear seat benchIL-SUIL-SUIL-SUIUF/IL-SU
IL-SU: seat suitable for installing an ISOFIX child seat with certification
“semi-universal”, take note of the list of vehicles of the manufacturer of the
child seat.
IUF: seat suitable for the installation of an ISOFIX child seat with certifica-
tion “universal” and with Top Tether retaining strap.
Child seats with rigid mounting
For the installation of a child seat with rigid mounting auxiliary introduction
elements can be used. Using auxiliary introduction elements facilitates in-
stallation and protects upholstery. Auxiliary introduction elements form part
of the supply volume of the child seat or can be acquired at a SEAT dealer-
ship. If necessary, auxiliary introduction elements are inserted in both an-
chor points of the vehicle ⇒
.
● Observe the manufacturer's instructions when installing and removing
the child seat ⇒
.
● Press the child seat onto the retaining rings ⇒ Fig. 53 in the direction of
the arrow. The child seat must be safely engaged and click audibly into
place.
● Pull on both sides of the child seat to ensure that it is secure. Child seat with adjustable retaining straps
●
Observe the manufacturer's instructions when installing and removing
the child seat ⇒
.
● Place the child seat on the seat cushion and attach the retaining strap
hooks to the retaining rings ⇒ Fig. 53.
● Tighten the straps evenly using the corresponding adjustment device.
The child seat must sit flush against the vehicle seat.
● Pull on both sides of the child seat to ensure that it is secure.
WARNING
The lower anchor points for child seats do not include rings. Only secure
booster seats to lower anchor points.
CAUTION
● To avoid making permanent marks in the padding, remove the auxiliary
introduction elements from the anchor points when the child seat is not in-
stalled in the vehicle anchor points.
● To prevent damage being done to the upholstery, the padding or the
auxiliary introduction elements, always remove the auxiliary introduction el-
ements from the anchor points before folding the rear seat bench.
Page 84 of 306
82Lights and visibility
Lights and visibility
Lights Introduction
The legal requirements regarding the use of vehicle lights in each country
must be observed.
The driver is personally responsible for the correct use and adjustment of
the lights in all situations.
Additional information and warnings:
● Exterior detail ⇒ page 6
● SEAT information system ⇒ page 22
● Changing bulbs ⇒ page 266
WARNING
If the headlights are set too high and the main beam is not used correct-
ly, there is a risk of dazzling or distracting other road users. This could
result in a serious accident.
● Always make sure that the headlights are correctly adjusted.
● Never use the main beam or flashed headlamps as this could dazzle
other drivers.
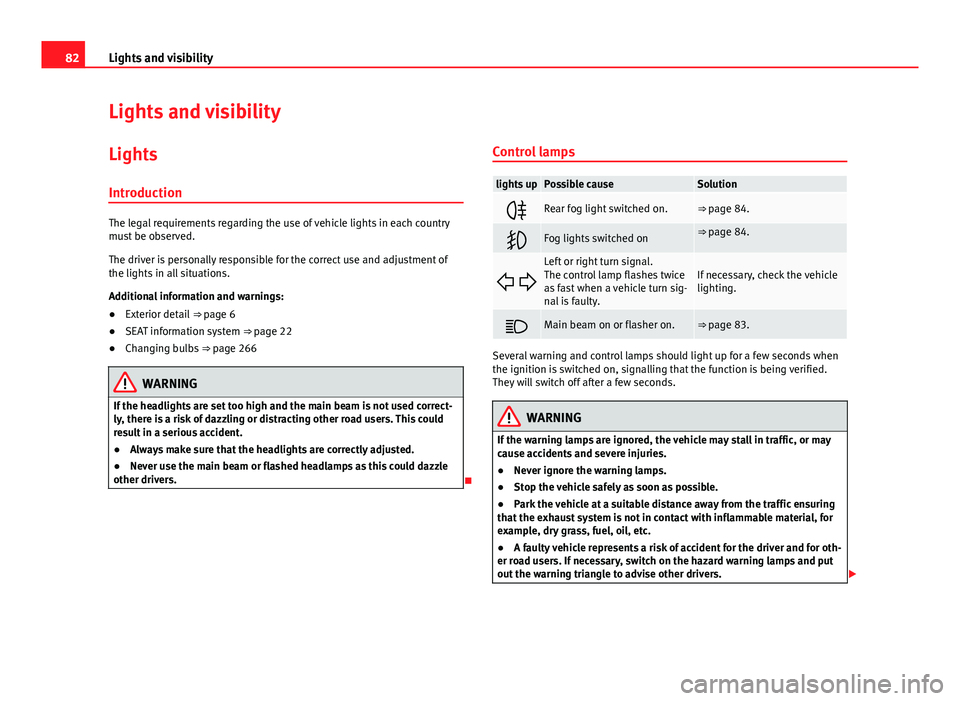
Control lamps
lights upPossible causeSolution
Rear fog light switched on.⇒ page 84.
Fog lights switched on⇒ page 84.
Left or right turn signal.
The control lamp flashes twice
as fast when a vehicle turn sig-
nal is faulty.If necessary, check the vehicle
lighting.
Main beam on or flasher on.⇒ page 83.
Several warning and control lamps should light up for a few seconds when
the ignition is switched on, signalling that the function is being verified.
They will switch off after a few seconds.
WARNING
If the warning lamps are ignored, the vehicle may stall in traffic, or may
cause accidents and severe injuries.
● Never ignore the warning lamps.
● Stop the vehicle safely as soon as possible.
● Park the vehicle at a suitable distance away from the traffic ensuring
that the exhaust system is not in contact with inflammable material, for
example, dry grass, fuel, oil, etc.
● A faulty vehicle represents a risk of accident for the driver and for oth-
er road users. If necessary, switch on the hazard warning lamps and put
out the warning triangle to advise other drivers.