warning light Seat Mii 2015 Owner's manual
[x] Cancel search | Manufacturer: SEAT, Model Year: 2015, Model line: Mii, Model: Seat Mii 2015Pages: 232, PDF Size: 4.23 MB
Page 5 of 232
Table of Contents
Table of Contents
The e s
senti
als . . . . . . . . . . . . . . . . . . . . . . . . 5
Exterior view . . . . . . . . . . . . . . . . . . . . . . . . . . . . 5
Exterior view . . . . . . . . . . . . . . . . . . . . . . . . . . . . 6
Interior view (left guide) . . . . . . . . . . . . . . . . . . 7
How it works . . . . . . . . . . . . . . . . . . . . . . . . . . . . 8
Unlocking and locking . . . . . . . . . . . . . . . . . . . . 8
Before driving . . . . . . . . . . . . . . . . . . . . . . . . . . . 12
Airbags . . . . . . . . . . . . . . . . . . . . . . . . . . . . . . . . 14
Child seats . . . . . . . . . . . . . . . . . . . . . . . . . . . . . 16
Starting the vehicle . . . . . . . . . . . . . . . . . . . . . . 20
Lights and visibility . . . . . . . . . . . . . . . . . . . . . . 21
SEAT information system . . . . . . . . . . . . . . . . . . 23
Cruise control . . . . . . . . . . . . . . . . . . . . . . . . . . . 25
Warning lamps . . . . . . . . . . . . . . . . . . . . . . . . . . 25
Gearbox lever . . . . . . . . . . . . . . . . . . . . . . . . . . . 27
Air conditioning . . . . . . . . . . . . . . . . . . . . . . . . . 28
Level control . . . . . . . . . . . . . . . . . . . . . . . . . . . . 30
Emergencies . . . . . . . . . . . . . . . . . . . . . . . . . . . . 33
Fuses . . . . . . . . . . . . . . . . . . . . . . . . . . . . . . . . . . 33
Bulbs . . . . . . . . . . . . . . . . . . . . . . . . . . . . . . . . . . 34
Action in the event of a puncture . . . . . . . . . . . 34
Changing a wheel . . . . . . . . . . . . . . . . . . . . . . . 35
Snow chains . . . . . . . . . . . . . . . . . . . . . . . . . . . . 40
Emergency towing of the vehicle . . . . . . . . . . . 41
How to jump start . . . . . . . . . . . . . . . . . . . . . . . . 42
Changing the wiper blades . . . . . . . . . . . . . . . . 44
Safety . . . . . . . . . . . . . . . . . . . . . . . . . . . . . . . . 46
Safe driving . . . . . . . . . . . . . . . . . . . . . . . . . . . . 46
Safety first! . . . . . . . . . . . . . . . . . . . . . . . . . . . . . 46
Driving advice . . . . . . . . . . . . . . . . . . . . . . . . . . . 46
Correct position of the vehicle occupants . . . . 47
Pedal area . . . . . . . . . . . . . . . . . . . . . . . . . . . . . . 51 Seat belts
. . . . . . . . . . . . . . . . . . . . . . . . . . . . . . 51
Why wear a seat belt? . . . . . . . . . . . . . . . . . . . . 51
How to properly adjust your seat belt . . . . . . . . 55
Seat belt tensioners . . . . . . . . . . . . . . . . . . . . . . 57
Airbag system . . . . . . . . . . . . . . . . . . . . . . . . . . 58
Brief introduction . . . . . . . . . . . . . . . . . . . . . . . . 58
Airbag safety instructions . . . . . . . . . . . . . . . . . 61
Deactivating airbags . . . . . . . . . . . . . . . . . . . . . 62
Transporting children safely . . . . . . . . . . . . . . . 63
Safety for children . . . . . . . . . . . . . . . . . . . . . . . 63
Child seats . . . . . . . . . . . . . . . . . . . . . . . . . . . . . 65
Emergencies . . . . . . . . . . . . . . . . . . . . . . . . . . 69
Self-help . . . . . . . . . . . . . . . . . . . . . . . . . . . . . . . 69
In case of emergency . . . . . . . . . . . . . . . . . . . . . 69
Vehicle tool kit* . . . . . . . . . . . . . . . . . . . . . . . . . 69
Changing a wheel . . . . . . . . . . . . . . . . . . . . . . . 71
Tyre repair . . . . . . . . . . . . . . . . . . . . . . . . . . . . . . 71
Changing the windscreen wiper blades . . . . . . 74
Tow-starting and towing . . . . . . . . . . . . . . . . . . 74
Emergency locking and unlocking . . . . . . . . . . 76
Fuses and bulbs . . . . . . . . . . . . . . . . . . . . . . . . . 77
Fuses . . . . . . . . . . . . . . . . . . . . . . . . . . . . . . . . . . 77
Changing bulbs . . . . . . . . . . . . . . . . . . . . . . . . . 78
Operation . . . . . . . . . . . . . . . . . . . . . . . . . . . . . 85
General instrument panel . . . . . . . . . . . . . . . . . 85
Instrument panel . . . . . . . . . . . . . . . . . . . . . . . . 84
Instruments . . . . . . . . . . . . . . . . . . . . . . . . . . . . 86
Opening and closing . . . . . . . . . . . . . . . . . . . . . 90
Vehicle key set . . . . . . . . . . . . . . . . . . . . . . . . . . 90
Central locking* and locking system . . . . . . . . 92
Doors . . . . . . . . . . . . . . . . . . . . . . . . . . . . . . . . . . 96
Rear lid . . . . . . . . . . . . . . . . . . . . . . . . . . . . . . . . 97
Electric windows . . . . . . . . . . . . . . . . . . . . . . . . . 99
Sliding/tilting electric panoramic sunroof . . . . 100 Lights and visibility
. . . . . . . . . . . . . . . . . . . . . . 101
Lights . . . . . . . . . . . . . . . . . . . . . . . . . . . . . . . . . 101
Visibility . . . . . . . . . . . . . . . . . . . . . . . . . . . . . . . 105
Windscreen wiper and window wiper sys-
tems . . . . . . . . . . . . . . . . . . . . . . . . . . . . . . . . . . 106
R
ear vision mirror . . . . . . . . . . . . . . . . . . . . . . . . 107
Seats and head restraints . . . . . . . . . . . . . . . . . 108
Adjusting the seat and head restraints . . . . . . 108
Seat functions . . . . . . . . . . . . . . . . . . . . . . . . . . 109
Transport and practical equipment . . . . . . . . . 110
Transporting objects . . . . . . . . . . . . . . . . . . . . . 110
Practical equipment . . . . . . . . . . . . . . . . . . . . . . 112
Luggage compartment . . . . . . . . . . . . . . . . . . . . 118
Roof carrier . . . . . . . . . . . . . . . . . . . . . . . . . . . . . 122
Air conditioning . . . . . . . . . . . . . . . . . . . . . . . . . 124
Heating, ventilation and air conditioning sys-
tem . . . . . . . . . . . . . . . . . . . . . . . . . . . . . . . . . . . 124
Driv
ing . . . . . . . . . . . . . . . . . . . . . . . . . . . . . . . . 128
Steering . . . . . . . . . . . . . . . . . . . . . . . . . . . . . . . 128
Stopping and starting the engine . . . . . . . . . . . 130
Braking and parking . . . . . . . . . . . . . . . . . . . . . 132
Changing gear . . . . . . . . . . . . . . . . . . . . . . . . . . 137
Run-in and economical driving . . . . . . . . . . . . . 141
Engine management and exhaust gas purifica-
tion syst
em . . . . . . . . . . . . . . . . . . . . . . . . . . . . . 145
Driving abroad . . . . . . . . . . . . . . . . . . . . . . . . . . 146
Driving along flooded roadways . . . . . . . . . . . . 146
Driver assistance systems . . . . . . . . . . . . . . . . . 147
Braking and stability systems . . . . . . . . . . . . . . 147
Parking distance warning system* . . . . . . . . . . 149
Cruise control* (Cruise control system -
CCS)
. . . . . . . . . . . . . . . . . . . . . . . . . . . . . . . . . . . 151
Safety Assist* (City Safety Assist function) . . . . 152
Hill driving assistant* . . . . . . . . . . . . . . . . . . . . 156
Start-Stop System . . . . . . . . . . . . . . . . . . . . . . . . 156
Towing bracket device . . . . . . . . . . . . . . . . . . . . 158
Driving with a trailer . . . . . . . . . . . . . . . . . . . . . . 158
3
Page 24 of 232
The essentials
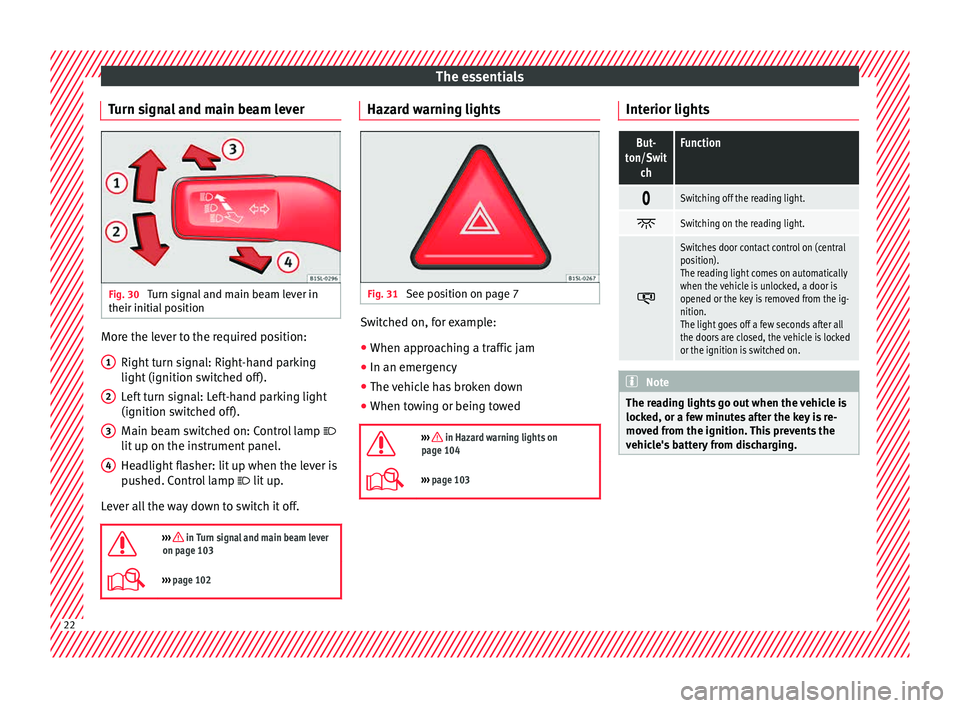
Turn signal and main beam lever Fig. 30
Turn signal and main beam lever in
their initi al
po
sition More the lever to the required position:
Right t
urn s
ignal: Right-hand parking
light (ignition switched off).
Left turn signal: Left-hand parking light
(ignition switched off).
Main beam switched on: Control lamp
lit up on the instrument panel.
Headlight flasher: lit up when the lever is
pushed. Control lamp lit up.
Lever all the way down to switch it off.
››› in Turn signal and main beam lever
on page 103
››› page 102 1
2
3
4 Hazard warning lights
Fig. 31
See position on page 7 Switched on, for example:
● When approaching a traffic jam
● In an emergency
● The vehicle has broken down
● When towing or being towed
››› in Hazard warning lights on
page 104
››› page 103 Interior lights
But-
ton/Swit chFunction
Switching off the reading light.
Switching on the reading light.
Switches door contact control on (central
position).
The reading light comes on automatically
when the vehicle is unlocked, a door is
opened or the key is removed from the ig-
nition.
The light goes off a few seconds after all
the doors are closed, the vehicle is locked
or the ignition is switched on.
Note
The reading lights go out when the vehicle is
lock ed, or a f
ew minutes after the key is re-
moved from the ignition. This prevents the
vehicle's battery from discharging. 22
Page 27 of 232
The essentials
Manually erasing memory 1 or 2
● Select the memory to be erased.
● Press and hold the eject button OK for ap-
pr o
x
imately 2 seconds. Note
On the screen of the SEAT Portable System
(sup p
lied by SEAT) ›››
page 164 other
functions of the multifunction display can be
seen. Cruise control
Oper atin
g the c
ruise control system
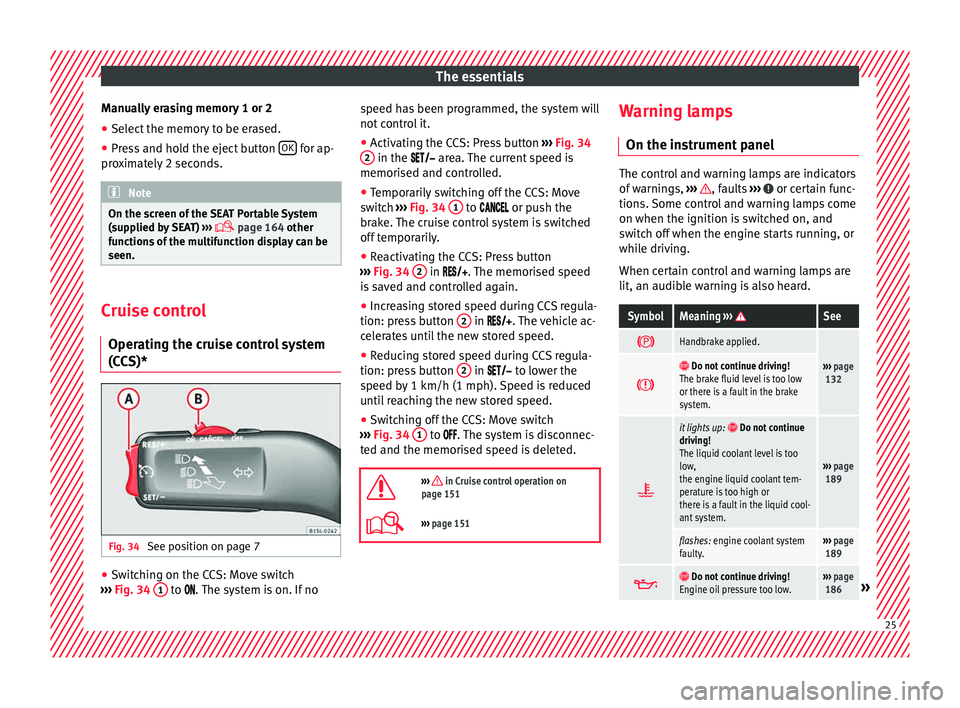
(CCS)* Fig. 34
See position on page 7 ●
Switching on the CCS: Move switch
› ›
›
Fig. 34 1 to .
The system is on. If no s
peed h as been programmed, the system will
not contr
ol it.
● Activating the CCS: Press button ›››
Fig. 34
2 in the ar
e
a. The current speed is
memorised and controlled.
● Temporarily switching off the CCS: Move
switc
h ››› Fig. 34 1 to
or push the
br ak
e. The cruise control system is switched
off temporarily.
● Reactivating the CCS: Press button
›››
Fig. 34 2 in
. The memorised speed
i s
saved and controlled again.
● Increasing stored speed during CCS regula-
tion: pres
s button 2 in
. The vehicle ac-
c
elerates until the new stored speed.
● Reducing stored speed during CCS regula-
tion: pres
s button 2 in t
o lower the
s peed b
y 1 km/h (1 mph). Speed is reduced
until reaching the new stored speed.
● Switching off the CCS: Move switch
›››
Fig. 34 1 to .
The system is disconnec-
t ed and the memori
sed speed is deleted.
››› in Cruise control operation on
page 151
››› page 151 Warning lamps
On the in s
trument
panel The control and warning lamps are indicators
of w
arnin
gs, ››› , faults
››› or certain func-
tions. Some c
ontrol and warning lamps come
on when the ignition is switched on, and
switch off when the engine starts running, or
while driving.
When certain control and warning lamps are
lit, an audible warning is also heard.
SymbolMeaning ››› See
Handbrake applied.
›››
page
132 Do not continue driving!
The brake fluid level is too low
or there is a fault in the brake
system.
it lights up:
Do not continue
driving!
The liquid coolant level is too
low,
the engine liquid coolant tem-
perature is too high or
there is a fault in the liquid cool-
ant system.
››› page
189
flashes: engine coolant system
faulty.››› page
189
Do not continue driving!
Engine oil pressure too low.››› page
186» 25
Page 28 of 232
The essentialsSymbolMeaning
››› See
lights up or flashes:
Do not
continue driving!
Fault in the steering.››› page
128
On the instrument panel: driver
or passenger has not fastened
seat belt.
›››
page
51
Instrument panel display: a pas-
senger in the rear seats has fas-
tened their seat belt.
A passenger in the rear seats
has not fastened their seat belt.›››
page
51
Faulty generator.›››
page
193
Vehicles with the Start-Stop sys-
tem: it is necessary to start the
engine manually.››› page
156
flashes in addition to the rest of
the segments of the fuel gauge:
Fuel tank almost empty.›››
page
180
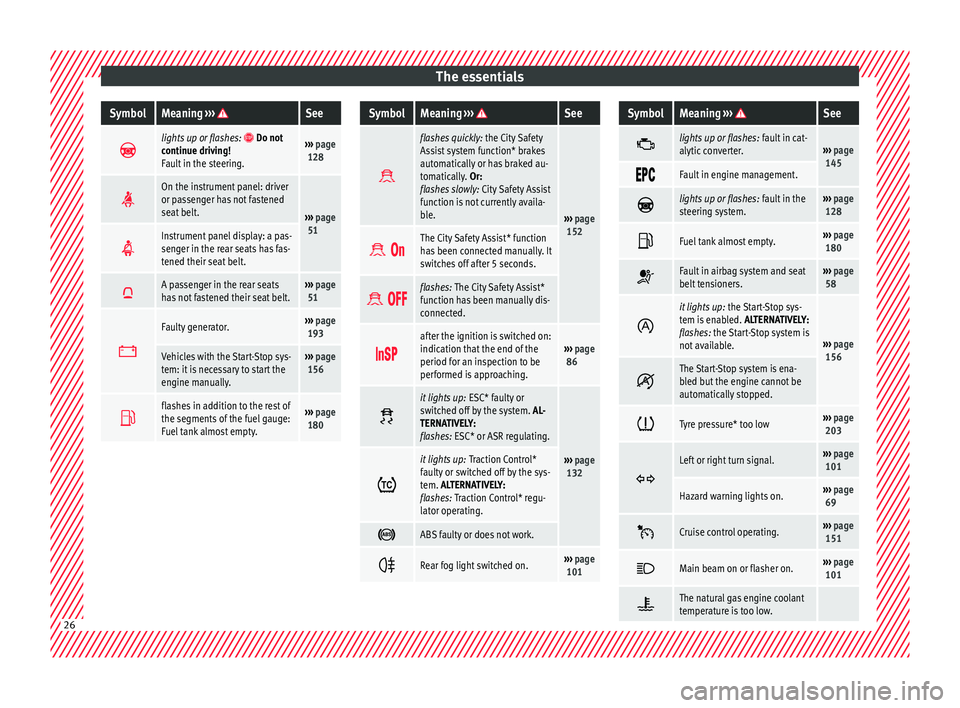
SymbolMeaning ››› See
flashes quickly:
the City Safety
Assist system function* brakes
automatically or has braked au-
tomatically. Or:
flashes slowly: City Safety Assist
function is not currently availa-
ble.
››› page
152
The City Safety Assist* function
has been connected manually. It
switches off after 5 seconds.
flashes: The City Safety Assist*
function has been manually dis-
connected.
after the ignition is switched on:
indication that the end of the
period for an inspection to be
performed is approaching.››› page
86
it lights up:
ESC* faulty or
switched off by the system. AL-
TERNATIVELY:
flashes: ESC* or ASR regulating.
››› page
132 it lights up:
Traction Control*
faulty or switched off by the sys-
tem. ALTERNATIVELY:
flashes: Traction Control* regu-
lator operating.
ABS faulty or does not work.
Rear fog light switched on.›››
page
101
SymbolMeaning ››› See
lights up or flashes:
fault in cat-
alytic converter.››› page
145
Fault in engine management.
lights up or flashes:
fault in the
steering system.››› page
128
Fuel tank almost empty.›››
page
180
Fault in airbag system and seat
belt tensioners.›››
page
58
it lights up:
the Start-Stop sys-
tem is enabled. ALTERNATIVELY:
flashes: the Start-Stop system is
not available.
››› page
156
The Start-Stop system is ena-
bled but the engine cannot be
automatically stopped.
Tyre pressure* too low›››
page
203
Left or right turn signal.›››
page
101
Hazard warning lights on.››› page
69
Cruise control operating.›››
page
151
Main beam on or flasher on.›››
page
101
The natural gas engine coolant
temperature is too low.
26
Page 36 of 232
The essentials
● Rep
l
ace the cover again or close the fuse
box lid.
Bulbs Bul
bs (12 V)
Light source used for each function
Halogen headlightsType
Daytime driving light/side lightW21/5W
Dipped beam headlightsH4 LL
Main beam headlightsH4 LL
Turn signalPY21W NA
Front fog lightType
Fog/cornering lights*HB4
Rear bulb lightType
Brake/side lightsP21/5W LL
Side lightsP21/5W LL
Turn signalPY21W NA LL
Retro fog lightP21W
Reverse lightsR10W Action in the event of a punc-
t
ur
e
Wh
at to do first ●
Park the vehicle on a horizontal surface
and in a saf e p
lace as far away from traffic as
possible.
● Apply the handbrake.
● Switch on the hazard warning lights.
● Manual gearbox: select the 1s
t gear.
● Automatic gearbox: move the sel
ector lever
to P.
● If you are towing a trailer, unhitch it from
your v
ehicle.
● Have the vehicle tool kit ›››
page 70
and the spare wheel ready *
››› page 204.
● Observe the applicable legislation for each
countr
y (reflective vest, warning triangles,
etc.).
● All occupants should leave the vehicle and
wait in a s
afe place (for instance behind the
roadside crash barrier). WARNING
● Alw a
ys observe the above steps and pro-
tect yourself and other road users.
● If you change the wheel on a slope, block
the wheel on the oppo
site side of the car with a stone or similar to prevent the vehicle from
mov
in
g. Repairing a tyre with the anti-punc-
tur
e k
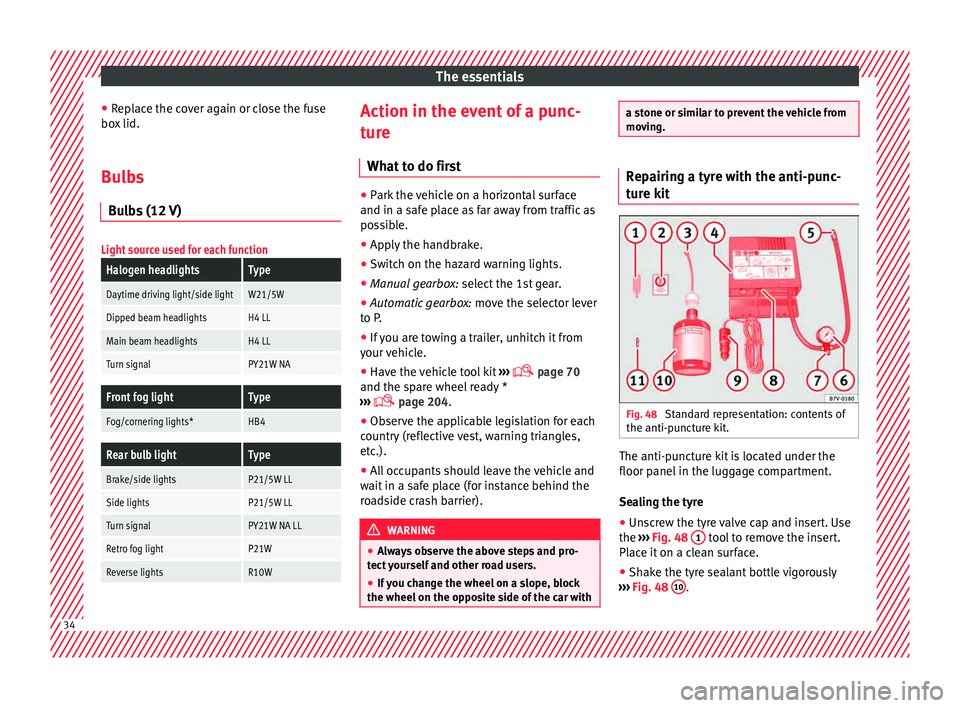
it Fig. 48
Standard representation: contents of
the anti-p u
nct
ure kit. The anti-puncture kit is located under the
floor p
anel
in the lug
gage compartment.
Sealing the tyre
● Unscrew the tyre valve cap and insert. Use
the ›››
Fig. 48 1 tool to remove the insert.
Pl ac
e it
on a clean surface.
● Shake the tyre sealant bottle vigorously
›› ›
Fig. 48 10 .
34
Page 41 of 232
The essentials
WARNING
If the vehicle is not correctly raised, it could
fa l
l off the jack causing serious injury. Please
observe the following rules to minimise the
risk of injury:
● You should only use a jack approved by
SEAT f
or your vehicle. Other jacks, even those
approved for other SEAT models, might slip
out of place.
● The ground should be firm and flat. If the
ground i
s sloped or soft then the vehicle
could slip and fall off the jack. If necessary,
support the jack on a wide solid base.
● If the ground is slippery, such as tiles,
plac
e a non-slip surface (a floor mat, for in-
stance) beneath the jack to avoid slipping.
● Only fit the jack at the prescribed jacking
points. The c
law of the jack should grip the
reinforcement nerve on the underbody
››› Fig. 56.
● You should never place a body limb such as
an arm or leg u
nder a raised vehicle that is
solely supported by the jack.
● If you have to work underneath the vehicle,
you mus
t use suitable stands additionally to
support the vehicle, there is a risk of acci-
dent!.
● Never raise the vehicle if it is tilting to one
side or the engine i
s running.
● Never start the engine when the vehicle is
raised.
The vehicle may come loose from the
jack due to the engine vibrations. Removing and fitting a wheel
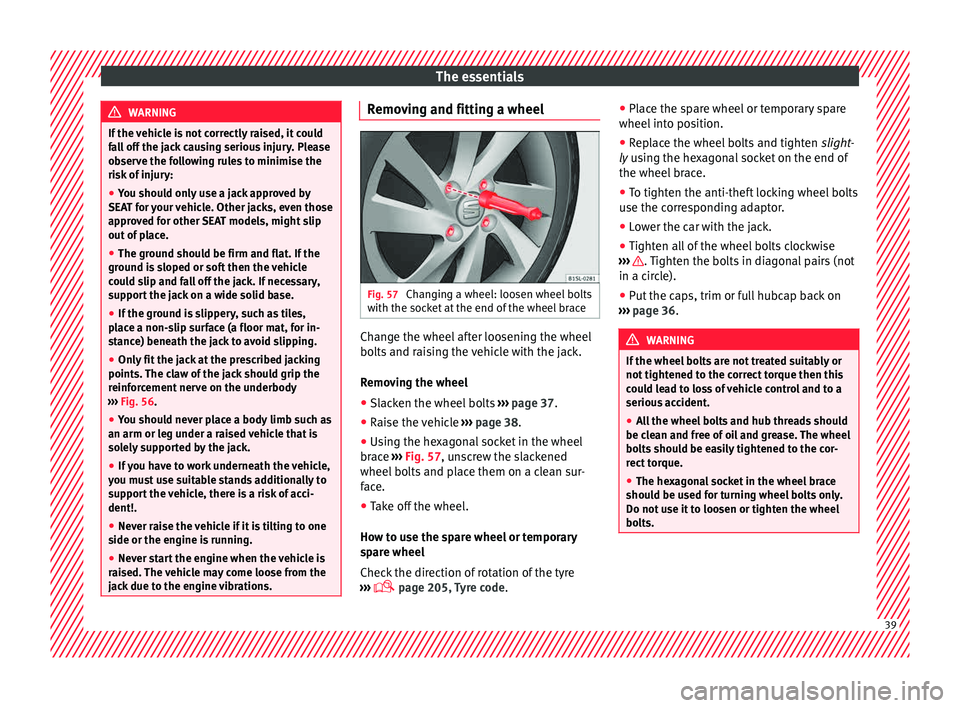
Fig. 57
Changing a wheel: loosen wheel bolts
w ith the soc
k
et at the end of the wheel brace Change the wheel after loosening the wheel
bo
lts
and r
aising the vehicle with the jack.
Removing the wheel
● Slacken the wheel bolts ›››
page 37.
● Raise the vehicle ›››
page 38.
● Using the hexagonal socket in the wheel
brace ›
›› Fig. 57, unscrew the slackened
wheel bolts and place them on a clean sur-
face.
● Take off the wheel.
How to u
se the spare wheel or temporary
spare wheel
Check the direction of rotation of the tyre
››› page 205, Tyre code. ●
Place the s
pare wheel or temporary spare
wheel into position.
● Replace the wheel bolts and tighten slight
-
ly using the hexagonal socket on the end of
the wheel brace.
● To tighten the anti-theft locking wheel bolts
use the corr
esponding adaptor.
● Lower the car with the jack.
● Tighten all of the wheel bolts clockwise
›››
. Tighten the bolts in diagonal pairs (not
in a c ir
c
le).
● Put the caps, trim or full hubcap back on
›››
page 36. WARNING
If the wheel bolts are not treated suitably or
not tight ened t
o the correct torque then this
could lead to loss of vehicle control and to a
serious accident.
● All the wheel bolts and hub threads should
be cle
an and free of oil and grease. The wheel
bolts should be easily tightened to the cor-
rect torque.
● The hexagonal socket in the wheel brace
should be u
sed for turning wheel bolts only.
Do not use it to loosen or tighten the wheel
bolts. 39
Page 44 of 232

The essentials
Driving style
T o
w
ing requires some experience, especially
when using a tow rope. Both drivers should
realise how difficult it is to tow a vehicle. In-
experienced drivers should not attempt to
tow.
Do not pull too hard with the towing vehicle
and take care to avoid jerking the tow rope.
When towing on an unpaved road, there is al-
ways a risk of overloading and damaging the
anchorage points.
Switch on the ignition so that the turn sig-
nals, windscreen wipers and windscreen
washer can work. Ensure that the steering
wheel is unlocked and moves freely.
Place the gear lever in neutral on vehicles
with a manual gearbox. With an automatic
gearbox, place the lever in N.
To brake, press the brake pedal firmly. The
brake servo does not work when the engine
is switched off.
The power steering only works when the igni-
tion is switched on and the vehicle is moving,
provided that the battery is sufficiently charg-
ed. Otherwise, it will need more force.
Ensure that the tow rope remains taut at all
times. ››› in Instructions for tow-starting on
page 75
››› page 74 Tow-starting
In general, the vehicle should not be started
by
t
owing. Jump-starting is much more pref-
erable ››› page 42.
For technical reasons, the following vehicles
can not be tow started:
● Vehicles with an automatic gearbox.
● If the vehicle battery is flat, it is possible
that the en
gine control unit does not operate
correctly.
However, if your vehicle must absolutely be
tow-started (manual gearbox):
● Put it into second or third gear.
● Keep the clutch pressed down.
● Switch on the ignition and the hazard warn-
ing lights.
● Rel
ease the clutch when both vehicles are
movin
g.
● As soon as the engine starts, press the
clutc
h and move the gear lever into neutral.
This helps to prevent a collision with the tow-
ing vehicle. How to jump start
Jump lea
ds If the engine fails to start because of a dis-
ch
ar
ged battery, the battery of another vehi-
cle can be used to start the engine. Before
starting, check the magic eye on the battery
››› page 193.
For starting assistance, jump lead cables con-
forming to the standard DIN 72553 are re-
quired (see the cable manufacturer instruc-
tions). The cable section in vehicles with pet-
rol engine must be at least 25 mm 2
. WARNING
Incorrect use of jump leads and incorrectly
jump st ar
ting could cause the battery to ex-
plode resulting in serious injury. Please ob-
serve the following rules to minimise the risk
of a battery explosion:
● The battery providing current must have
the same v
oltage (12V) and approximately
the same capacity (see markings on battery)
as the flat battery.
● Never charge a frozen or recently thawed
batter
y. A flat battery can also freeze at tem-
peratures close to 0 °C (+32 °F).
● If a battery is frozen and/or has been frozen
then it mus
t be replaced.
● A highly explosive mixture of gases is re-
lea
sed when the battery is being charged. Al-
ways keep lit cigarettes, flames, sparks and 42
Page 46 of 232
The essentials
8. Start the engine of the vehicle with the flat batt
er
y and wait for 2 or 3 minutes until
the engine is running.
Removing the jump leads
9. Before you remove the jump leads, switch off the dipped be
am headlights (if they
are switched on).
10.Turn on the heater blower and heated rear window in the
vehicle with the flat battery.
This helps minimise voltage peaks which
are generated when the leads are discon-
nected.
11.
When the engine is running, disconnect
the leads in reverse order to the details
given above.
Make sure the battery clamps have sufficient
metal-to-metal contact with the battery termi-
nals.
If the engine fails to start, switch off the start-
er after about 10 seconds and try again after
about 1 minute. WARNING
● Ple a
se note the safety warnings referring to
working in the engine compartment
››› page 184.
● The battery providing assistance must have
the same v
oltage as the flat battery (12V) and
approximately the same capacity (see imprint on battery). Failure to comply could result in
an exp
lo
sion.
● Never use jump leads when one of the bat-
teries
is frozen. Danger of explosion! Even af-
ter the battery has thawed, battery acid could
leak and cause chemical burns. If a battery
freezes, it should be replaced.
● Keep sparks, flames and lighted cigarettes
awa
y from batteries, danger of explosion.
Failure to comply could result in an explo-
sion.
● Observe the instructions provided by the
manufact
urer of the jump leads.
● Do not connect the negative cable from the
other vehic
le directly to the negative terminal
of the flat battery. The gas emitted from the
battery could be ignited by sparks. Danger of
explosion.
● Do not attach the negative cable from the
other vehic
le to parts of the fuel system or to
the brake line.
● The non-insulated parts of the battery
clamp
s must not be allowed to touch. The
jump lead attached to the positive battery
terminal must not touch metal parts of the ve-
hicle, this can cause a short circuit.
● Position the leads in such a way that they
cannot c
ome into contact with any moving
parts in the engine compartment.
● Do not lean on the batteries. This could re-
sult
in chemical burns. Note
The vehicles must not touch each other, oth-
erw i
se electricity could flow as soon as the
positive terminals are connected. Changing the wiper blades
Wind s
creen wipers service position Fig. 61
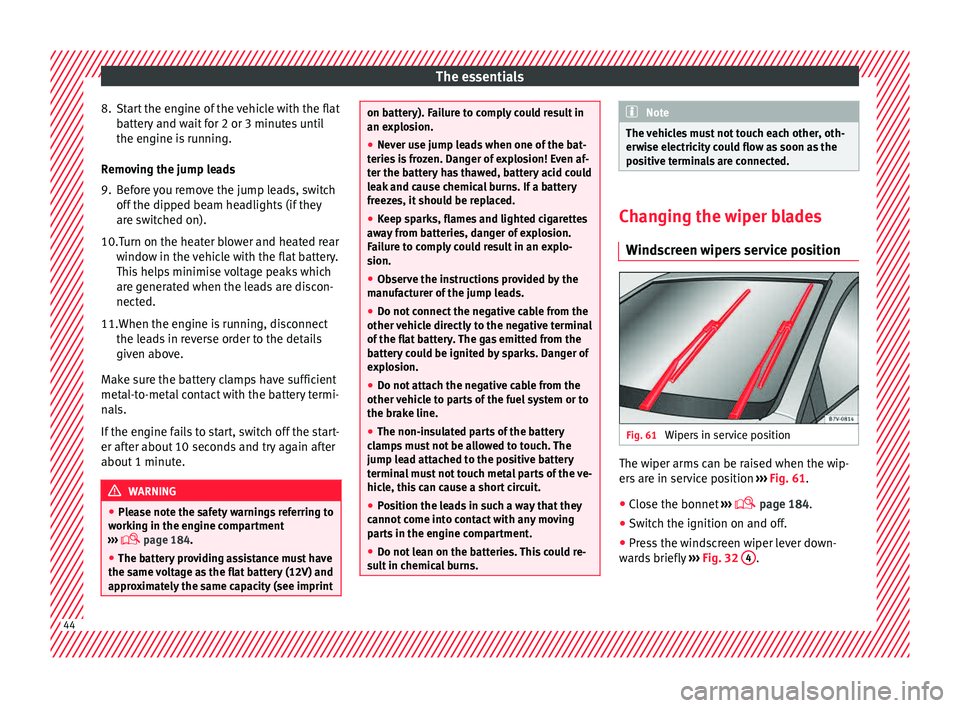
Wipers in service position The wiper arms can be raised when the wip-
er
s
ar
e in service position ››› Fig. 61.
● Close the bonnet ›››
page 184.
● Switch the ignition on and off.
● Press the windscreen wiper lever down-
ward
s briefly ››› Fig. 32 4 .
44
Page 48 of 232
Safety
Safety
Saf e driv
in
g
Safety first! WARNING
● This m
anual contains important informa-
tion about the operation of the vehicle, both
for the driver and the passengers. The other
sections of the on-board documentation also
contain further information that you should
be aware of for your own safety and for the
safety of your passengers.
● Ensure that the on-board documentation is
kept in the
vehicle at all times. This is espe-
cially important when lending or selling the
vehicle to another person. WARNING
Driving under the influence of alcohol, drugs,
medication or n ar
cotics may result in severe
accidents and even loss of life.
● Alcohol, drugs, medication and narcotics
may
significantly alter perception, affect re-
action times and safety while driving, which
could result in the loss of control of the vehi-
cle. Driving advice
B ef
or
e driving For your own safety and the safety of your
pa
s
sengers, always note the following points
before every trip:
– Make sure that the vehicle's lights and turn
signal
s are working properly.
– Check tyre pressure.
– Ensure that all windows provide a clear and
good v
iew of the surroundings.
– Make sure all luggage is secured
›› ›
page 110.
– Make sure that no objects can interfere
with the pedal
s.
– Adjust front seat, head restraint and rear vi-
sion mirror
s properly according to your
size.
– Ensure that the passengers in the rear
seats alw
ays have the head restraints in
the in-use position ›››
page 50.
– Instruct passengers to adjust the head re-
straints
according to their height.
– Protect children with appropriate child
seats and pr
operly applied seat belts
››› page 63. –
Assume the c
orrect sitting position. Instruct
your passengers also to assume a proper
sitting position. ››› page 47.
– Fasten your seat belt securely. Instruct your
pas
sengers also to fasten their seat belts
properly. ››› page 51.
What affects driving safety? As a driver, you are responsible for yourself
and y
our p
assengers. When your concentra-
tion or driving safety is affected by any cir-
cumstance, you endanger yourself as well as
others on the road ››› , for this reason:
– Always pay attention to traffic and do not
g et
di
stracted by passengers or telephone
calls.
– Never drive when your driving ability is im-
paired (e.
g. by medication, alcohol, drugs).
– Observe traffic laws and speed limits.
– Always reduce your speed as appropriate
for ro
ad, traffic and weather conditions.
– When travelling long distances, take
break
s regularly - at least every two hours.
– If possible, avoid driving when you are tired
or stre
ssed.
46
Page 50 of 232
Safety
● Adju s
t
the seat so that there is a distance
of at least 25 cm between the steering wheel
and your chest ››› Fig. 64 and so that you can
hold the steering wheel with both hands on
the outside of the ring at the 9 o'clock and 3
o'clock positions with your arms slightly
bent.
● The adjusted steering wheel must face your
ches
t and not your face.
● Adjust the driver seat forwards or back-
ward
s so that you are able to press the accel-
erator, brake and clutch pedals to the floor
with your knees slightly angled and the dis-
tance between your knees and the dash pan-
el is at least 10 cm ››› Fig. 64.
● Adjust the height of the driver seat so that
you can e
asily reach the top of the steering
wheel.
● Keep both feet in the footwell so that you
have the
vehicle under control at all times.
● Adjust and fasten your seat belt correctly
›››
page 51.
Valid for the passenger:
● Adjust the seat backrest to an upright posi-
tion so that
your back rests completely
against it.
● Move the front passenger seat back as far
as po
ssible for optimum protection should
the airbag deploy.
● Always keep your feet in the footwell while
the vehic
le is in motion. ●
Adjust
and fasten your seat belt correctly
››› page 51.
Valid for the passengers in the rear section:
● Adjust the head restraint so that its upper
edge is
at the same level as the top of your
head, or as close as possible to the same lev-
el as the top of your head and under no cir-
cumstances below eye level. Keep the back
of your neck as close as possible to the head
restraint ››› Fig. 64 and ››› Fig. 65.
● Short people must lower the head restraint
to the firs
t anchorage position, even if your
head is below its upper edge.
● Tall people must raise the head restraint
compl
etely.
● Always keep your feet in the footwell while
the vehic
le is in motion.
● Adjust and fasten your seat belt correctly
›››
page 51.
Adjusting the steering wheel position Read the additional information carefully
› ›
›
page 14.
Adjust the steering wheel before your trip
and only when the vehicle is stationary.
Adjust the correct distance between the driv-
er and the steering wheel ›››
Fig. 64 using the
controls on the driver seat ›››
page 12. WARNING
Incorrect use of the steering wheel adjust-
ment f u
nction and an incorrect adjustment of
the steering wheel can result in severe or fa-
tal injury.
● After adjusting the steering column, push
the lever firm
ly upwards to ensure the steer-
ing wheel does not accidentally change posi-
tion while driving.
● Never adjust the steering wheel while the
vehicl
e is in motion. If you need to adjust the
steering wheel while the vehicle is in motion,
stop safely and make the proper adjustment.
● The adjusted steering wheel should be fac-
ing y
our chest and not your face so as not to
hinder the driver's front airbag protection in
the event of an accident.
● When driving, always hold the steering
wheel with both h
ands on the outside of the
ring at the 9 o'clock and 3 o'clock positions
to reduce injuries when the driver's front air-
bag deploys.
● Never hold the steering wheel at the 12
o'clock
position or in any other manner (e.g.
in the centre of the steering wheel). In such
cases, if the driver's airbag deploys, you may
sustain injuries to your arms, hands and
head. 48