steering wheel adjustment Seat Mii 2016 Owner's manual
[x] Cancel search | Manufacturer: SEAT, Model Year: 2016, Model line: Mii, Model: Seat Mii 2016Pages: 232, PDF Size: 4.9 MB
Page 50 of 232
Safety
Safety equipment Never put your safety or the safety of your
pa
s
sengers in danger. In the event of an acci-
dent, the safety equipment may reduce the
risk of injury. The following list includes most
of the safety equipment in your SEAT:
● Three-point seat belts
● belt tension limiters for the front and rear
side seats,
● B
elt tensioners for the front seats
● Belt height adjustment for the front seats
● Front airbags
● Side airbags in the front seat backrests
● Side airbags in the rear seat backrests*
● Head-protection airbags
● Active front head restraints*
● “ISOFIX” anchor points for child seats in
the re ar s
ide seats with the “ISOFIX” system,
● Height-adjustable front head restraints
● Rear head restraints with in-use position
and non-use pos
ition
● adjustable steering column
The safety
equipment mentioned above
works together to provide you and your pas-
sengers with the best possible protection in
the event of an accident. However, these
safety systems can only be effective if you and your passengers are sitting in a correct
position and u
se this equipment properly.
Safety is everyone's business!
Correct position of the vehicle
occup
ants
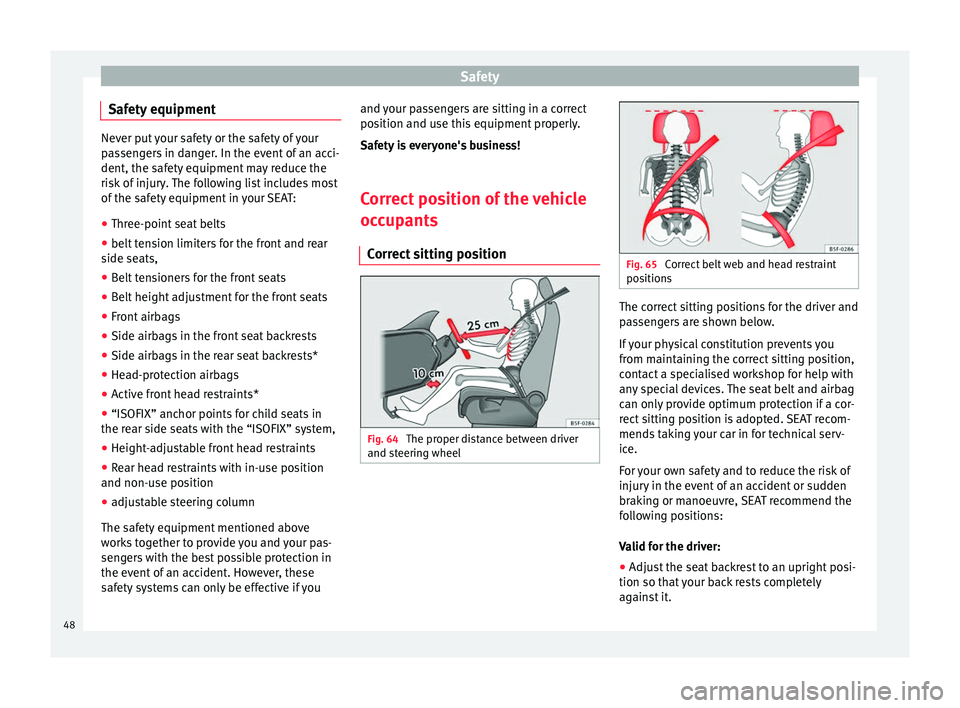
Correct sitting position Fig. 64
The proper distance between driver
and s t
eerin
g wheel Fig. 65
Correct belt web and head restraint
pos ition
s The correct sitting positions for the driver and
p
a
s
sengers are shown below.
If your physical constitution prevents you
from maintaining the correct sitting position,
contact a specialised workshop for help with
any special devices. The seat belt and airbag
can only provide optimum protection if a cor-
rect sitting position is adopted. SEAT recom-
mends taking your car in for technical serv-
ice.
For your own safety and to reduce the risk of
injury in the event of an accident or sudden
braking or manoeuvre, SEAT recommend the
following positions:
Valid for the driver:
● Adjust the seat backrest to an upright posi-
tion so that
your back rests completely
against it.
48
Page 51 of 232
Safe driving
● Adju s
t
the seat so that there is a distance
of at least 25 cm between the steering wheel
and your chest ››› Fig. 64 and so that you can
hold the steering wheel with both hands on
the outside of the ring at the 9 o'clock and 3
o'clock positions with your arms slightly
bent.
● The adjusted steering wheel must face your
ches
t and not your face.
● Adjust the driver seat forwards or back-
ward
s so that you are able to press the accel-
erator, brake and clutch pedals to the floor
with your knees slightly angled and the dis-
tance between your knees and the dash pan-
el is at least 10 cm ››› Fig. 64.
● Adjust the height of the driver seat so that
you can e
asily reach the top of the steering
wheel.
● Keep both feet in the footwell so that you
have the
vehicle under control at all times.
● Adjust and fasten your seat belt correctly
›››
page 52.
Valid for the passenger:
● Adjust the seat backrest to an upright posi-
tion so that
your back rests completely
against it.
● Move the front passenger seat back as far
as po
ssible for optimum protection should
the airbag deploy.
● Always keep your feet in the footwell while
the vehic
le is in motion. ●
Adjust
and fasten your seat belt correctly
››› page 52.
Valid for the passengers in the rear section:
● Adjust the head restraint so that its upper
edge is
at the same level as the top of your
head, or as close as possible to the same lev-
el as the top of your head and under no cir-
cumstances below eye level. Keep the back
of your neck as close as possible to the head
restraint ››› Fig. 64 and ››› Fig. 65.
● Short people must lower the head restraint
to the firs
t anchorage position, even if your
head is below its upper edge.
● Tall people must raise the head restraint
compl
etely.
● Always keep your feet in the footwell while
the vehic
le is in motion.
● Adjust and fasten your seat belt correctly
›››
page 52.
Adjusting the steering wheel position Read the additional information carefully
› ›
›
page 14.
Adjust the steering wheel before your trip
and only when the vehicle is stationary.
Adjust the correct distance between the driv-
er and the steering wheel ›››
Fig. 64 using the
controls on the driver seat ›››
page 12. WARNING
Incorrect use of the steering wheel adjust-
ment f u
nction and an incorrect adjustment of
the steering wheel can result in severe or fa-
tal injury.
● After adjusting the steering column, push
the lever firm
ly upwards to ensure the steer-
ing wheel does not accidentally change posi-
tion while driving.
● Never adjust the steering wheel while the
vehicl
e is in motion. If you need to adjust the
steering wheel while the vehicle is in motion,
stop safely and make the proper adjustment.
● The adjusted steering wheel should be fac-
ing y
our chest and not your face so as not to
hinder the driver's front airbag protection in
the event of an accident.
● When driving, always hold the steering
wheel with both h
ands on the outside of the
ring at the 9 o'clock and 3 o'clock positions
to reduce injuries when the driver's front air-
bag deploys.
● Never hold the steering wheel at the 12
o'clock
position or in any other manner (e.g.
in the centre of the steering wheel). In such
cases, if the driver's airbag deploys, you may
sustain injuries to your arms, hands and
head. 49
Technical data
Advice
Operation
Emergencies
Safety
Page 89 of 232
General instrument panel
Operation
Gener a
l
instrument panel
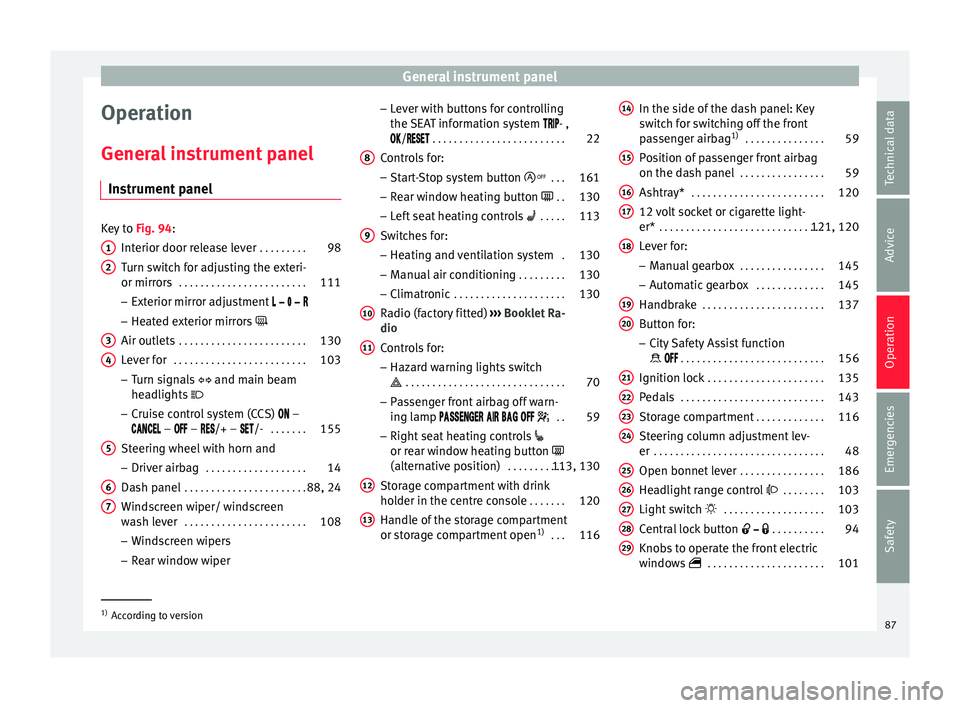
Instrument panel Key to
Fig. 94:
Interior door r el
ease lever . . . . . . . . . 98
Turn switch for adjusting the exteri-
or mirrors . . . . . . . . . . . . . . . . . . . . . . . . 111
– Exterior mirr or a
djustment
– Heated exterior mirrors
Air outlets . . . . . . . . . . . . . . . . . . . . . . . . 130
Lever for . . . . . . . . . . . . . . . . . . . . . . . . . 103
– Turn sign
als and main beam
headlights
– Cruise control system (CCS) –
– – /+ – /- . . . . . . .155
Steering wheel with horn and – Driver airb ag . . . . . . . . . . . . . . . . . . . 14
Da
sh panel . . . . . . . . . . . . . . . . . . . . . . . 88, 24
Windscreen wiper/ windscreen
wash l
ever . . . . . . . . . . . . . . . . . . . . . . . 108
– Wind s
creen wipers
– Rear window wiper
1 2
3
4
5
6
7 –
Lev
er w
ith buttons for controlling
the SEAT information system - ,
/ . . . . . . . . . . . . . . . . . . . . . . . . . 22
Controls for:
– Start
-Stop system button . . .161
– Rear w
indow heating button . .130
– Left
seat heating controls . . . . . 113
Switches for: – Heating and
ventilation system .130
– Manual air c
onditioning . . . . . . . . . 130
– Clim atr
onic . . . . . . . . . . . . . . . . . . . . . 130
Radio (factory fitted) ›››
Booklet Ra-
dio
Controls for:
– Hazard warning lights switch
. . . . . . . . . . . . . . . . . . . . . . . . . . . . . . 70
– Pa s
senger front airbag off warn-
ing lamp . .59
– Right seat
heating controls
or rear window heating button
(alternative position) . . . . . . . . . . .113, 130
Storage compartment with drink
hol der in the c
entre console . . . . . . .120
Handle of the storage compartment
or stor
age compartment open 1)
. . . 116
8 9
10
11
12
13 In the side of the dash panel: Key
sw
it
c
h for switching off the front
passenger airbag 1)
. . . . . . . . . . . . . . . 59
Position of passenger front airbag
on the dash p
anel . . . . . . . . . . . . . . . . 59
Ashtray* . . . . . . . . . . . . . . . . . . . . . . . . . 120
12 volt socket or cigarette light-
er* . . . . . . . . . . . . . . . . . . . . . . . . . . . . . . . 121, 120
Lever for:
– Manual g
earbox . . . . . . . . . . . . . . . . 145
– Autom atic
gearbox . . . . . . . . . . . . . 145
Handbrake . . . . . . . . . . . . . . . . . . . . . . . 137
Button for:
– City
Safety Assist function
. . . . . . . . . . . . . . . . . . . . . . . . . . . 156
Ignition lock . . . . . . . . . . . . . . . . . . . . . . 135
Pedals . . . . . . . . . . . . . . . . . . . . . . . . . . . 143
Storage compartment . . . . . . . . . . . . .116
Steering column adjustment lev-
er . . . . . . . . . . . . . . . . . . . . . . . . . . . . . . . . 48
Open bonnet lever . . . . . . . . . . . . . . . . 186
Headlight range control . . . . . . . . 103
Light switch . . . . . . . . . . . . . . . . . . . 103
Central lock button . . . . . . . . . .94
Knobs to operate the front electric
window
s . . . . . . . . . . . . . . . . . . . . . . 101 14
15
16
17
18
19
20
21
22
23
24
25
26
27
28
29
1)
According to version
87
Technical data
Advice
Operation
Emergencies
Safety
Page 105 of 232
Lights and visibility
Closing the sliding/tilting electric panoramic
s u
nr
oof without the anti-trap function
● Within about 5 seconds of activating the
anti-trap fu
nction, pull knob ›››
Fig. 12
5 until the sliding/tilting sunroof is fully
c lo
sed.
● As
such, the sliding/tilting sunroof will
close w
ithout the anti-trap function!
● If the sunroof still cannot be closed, visit a
speci
alised workshop.
If the knob is released during the closing op-
eration, the sliding/tilting electric panoramic
sunroof opens automatically. WARNING
Closing the sliding/tilting electric panoramic
su nr
oof without the anti-trap function can re-
sult in serious injury.
● The sliding/tilting sunroof should always
be closed c
arefully.
● No person should ever remain in the way of
the sliding/ti
lting sunroof, especially when
closing without the anti-trap function.
● The anti-trap function does not prevent fin-
gers
or other parts of the body from becom-
ing trapped against the roof frame and inju-
ries occurring. Lights and visibility
Light s
C ontr
ol lamps
It lights up
Rear fog light switched on
››› page 21.
It lights up
Front fog lights switched on
››› page 21.
It lights up
Left or right turn signal.
The control lamp flickers twice as fast when a vehicle
turn signal is intermittent. If necessary, check the vehi-
cle's lights.
It lights up
Main beam on or flasher on
››› page 105. Several warning and control lamps light up
f
or a f
ew sec
onds when the ignition is switch-
ed on, signalling that the function is being
verified. They will switch off after a few sec-
onds. WARNING
Observe the safety warnings ›››
in On the
ins trument
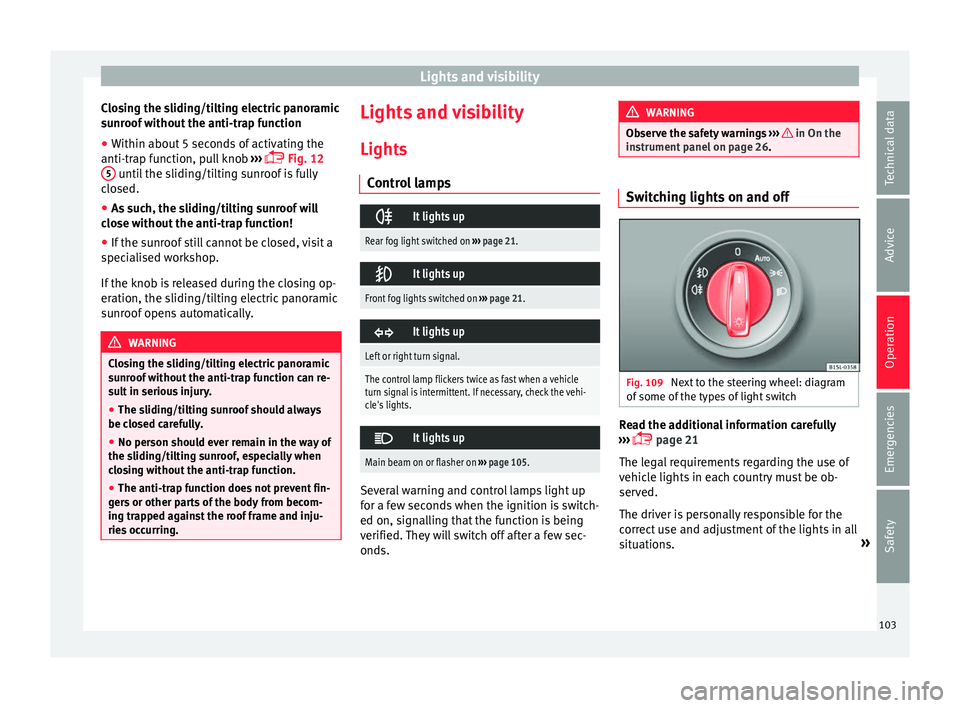
panel on page 26. Switching lights on and off
Fig. 109
Next to the steering wheel: diagram
of some of
the type
s of light switch Read the additional information carefully
› ›
›
page 21
The legal requirements regarding the use of
vehicle lights in each country must be ob-
served.
The driver is personally responsible for the
correct use and adjustment of the lights in all
situations. »
103
Technical data
Advice
Operation
Emergencies
Safety
Page 109 of 232
Lights and visibility
lights remain lit. Upon accelerating, the haz-
ard w
arnin
g lights will be automatically
turned off. Adjusting the headlights
In those countries where vehicles drive on
the other side of
the r
oad to the home coun-
try, the asymmetric dipped beam may dazzle
drivers of oncoming vehicles.
For this reason, stickers may be needed to
cover the headlights when driving abroad.
For further information, please refer to a spe-
cialised workshop. SEAT recommends visiting
a technical service. Note
The use of stickers to cover headlights is only
permitted o v
er a short period. To modify the
direction of the headlamps more permanent-
ly, please take the vehicle to a specialised
workshop. SEAT recommends taking your car
in for technical service. Headlight range control, lighting of
the in
s
trument
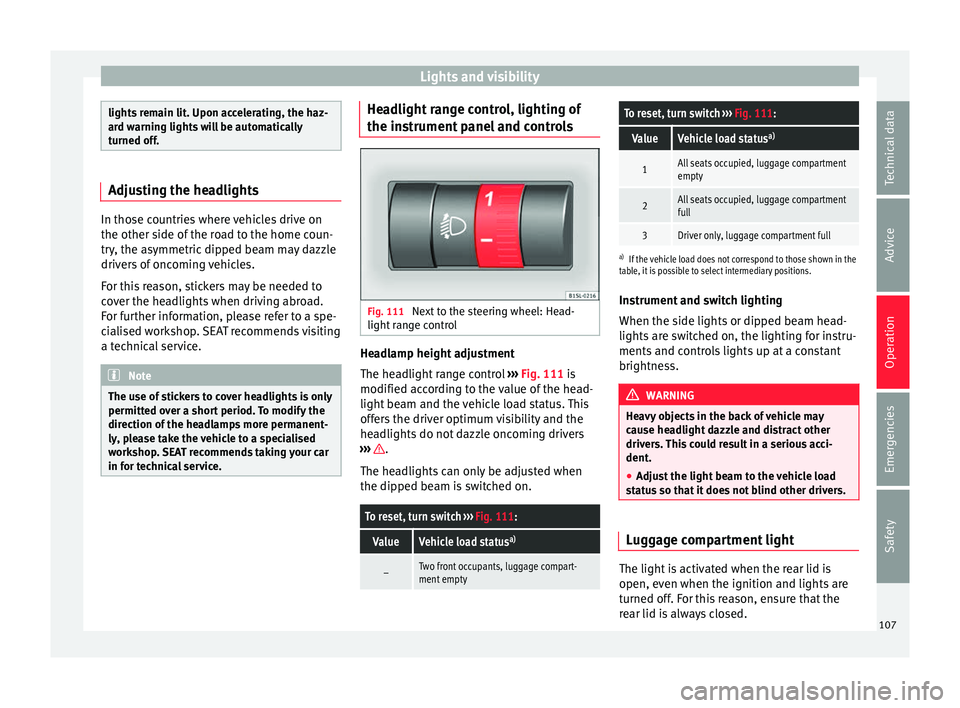
panel and controls Fig. 111
Next to the steering wheel: Head-
light r
an
ge control Headlamp height adjustment
The he
a
dlight
range control ››› Fig. 111 is
modified according to the value of the head-
light beam and the vehicle load status. This
offers the driver optimum visibility and the
headlights do not dazzle oncoming drivers
››› .
The he a
dlights
can only be adjusted when
the dipped beam is switched on.
To reset, turn switch ››› Fig. 111:
ValueVehicle load status a)
–Two front occupants, luggage compart-
ment empty
To reset, turn switch
››› Fig. 111:
ValueVehicle load status a)
1All seats occupied, luggage compartment
empty
2All seats occupied, luggage compartment
full
3Driver only, luggage compartment full
a)
If the vehicle load does not correspond to those shown in the
table, it is possible to select intermediary positions.
Instrument and switch lighting
When the side lights or dipped beam head-
lights are switched on, the lighting for instru-
ments and controls lights up at a constant
brightness. WARNING
Heavy objects in the back of vehicle may
cau se he
adlight dazzle and distract other
drivers. This could result in a serious acci-
dent.
● Adjust the light beam to the vehicle load
stat
us so that it does not blind other drivers. Luggage compartment light
The light is activated when the rear lid is
open, ev
en when the ignition and lights
ar
e
turned off. For this reason, ensure that the
rear lid is always closed. 107
Technical data
Advice
Operation
Emergencies
Safety
Page 207 of 232
Wheels and tyres
Foreign bodies in the tyre
● Do not remove foreign bodies if they have
penetr at
ed thr
ough the tyre wall!
● You should obtain professional assistance
immediately
.
Tyre wear
The wear of tyres depends on a number of
factors, for example:
● Driving style.
● Unbalanced wheels.
● Running gear settings.
Driving
style: Driving round bends quickly or
sudden acceleration or braking speed accel-
erates tyre wear. When the driving style is
normal, if the tyres wear too quickly, have the
running gear settings checked at a special-
ised workshop.
Wheel run-out: The wheels on new vehicles
are balanced. However, certain circumstan-
ces may lead to imbalance (run-out), which is
detected as vibrations in the steering wheel.
Run-out leads to wear of the steering and
suspension. In the event of run out, the
wheels should be balanced again. When a
new wheel is fitted, it should be balanced
again.
Running gear settings : an incorrectly posi-
tioned running gear increases the wear of
tyres and affects your safety while driving. If tyres wear too quickly, have the wheel align-
ment chec
ked at a specialised workshop. WARNING
If you notice unusual vibration or the car pulls
to one s ide whi
le driving, this may indicate
that one of the tyres is damaged.
● Reduce speed immediately and stop, while
obser
ving the highway code.
● Check the wheels and tyres for damage.
● Never carry on driving on worn tyres or
wheels. Reque
st qualified assistance immedi-
ately.
● If there is no visible exterior damage, drive
slowly
and carefully to the nearest special-
ised workshop and have the vehicle checked. Tyre monitor system*
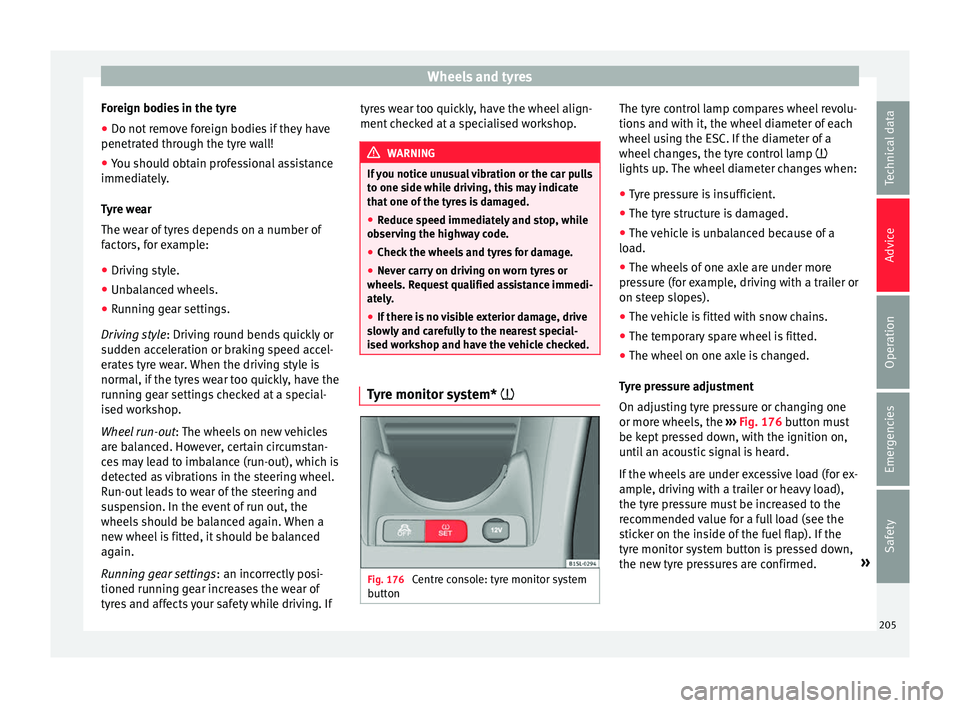
Fig. 176
Centre console: tyre monitor system
b utt
on The tyre control lamp compares wheel revolu-
tion
s
and w
ith it, the wheel diameter of each
wheel using the ESC. If the diameter of a
wheel changes, the tyre control lamp
lights up. The wheel diameter changes when:
● Tyre pressure is insufficient.
● The tyre structure is damaged.
● The vehicle is unbalanced because of a
load.
● The wheel
s of one axle are under more
pres
sure (for example, driving with a trailer or
on steep slopes).
● The vehicle is fitted with snow chains.
● The temporary spare wheel is fitted.
● The wheel on one axle is changed.
Tyr
e pressure adjustment
On adjusting tyre pressure or changing one
or more wheels, the ››› Fig. 176 button must
be kept pressed down, with the ignition on,
until an acoustic signal is heard.
If the wheels are under excessive load (for ex-
ample, driving with a trailer or heavy load),
the tyre pressure must be increased to the
recommended value for a full load (see the
sticker on the inside of the fuel flap). If the
tyre monitor system button is pressed down,
the new tyre pressures are confirmed. »
205
Technical data
Advice
Operation
Emergencies
Safety
Page 226 of 232
Index
Recommended gear . . . . . . . . . . . . . . . . . . . . . . . 148
R ecy
c
led . . . . . . . . . . . . . . . . . . . . . . . . . . . . . . . . 180
Refuelling . . . . . . . . . . . . . . . . . . . . . . . . . . . . . . . 181 control and warning lamps . . . . . . . . . . . . . . . 184
fuel gauge . . . . . . . . . . . . . . . . . . . . . . . . . . . . . 184
mistakes . . . . . . . . . . . . . . . . . . . . . . . . . . . . . . 183
natural gas . . . . . . . . . . . . . . . . . . . . . . . . . . . . 185
opening fuel tank flap . . . . . . . . . . . . . . . . . . . 185
Remote control key unlocking and locking . . . . . . . . . . . . . . . . . . . . 95
Removing ice from the windscreen . . . . . . . . . . . . . . . . . . . 28
Removing ice from the windscreen . . . . . . . . . . . . . . . . . . . . . . 30
Repairs . . . . . . . . . . . . . . . . . . . . . . . . . . . . 165, 180 airbag system . . . . . . . . . . . . . . . . . . . . . . . . . . 166
Repair work . . . . . . . . . . . . . . . . . . . . . . . . . . . . . . 164
Replacement parts . . . . . . . . . . . . . . . . . . . . . . . . . . . . . . . . . 164
Replacement parts . . . . . . . . . . . . . . . . . . . . . . . . 164
Replacing bulbs see "Changing bulbs" . . . . . . . . . . . . . . . . . . . . 79
Reprogramming control units . . . . . . . . . . . . . . . 167
Retaining hooks . . . . . . . . . . . . . . . . . . . . . . . . . . 127
Revolution counter . . . . . . . . . . . . . . . . . . . . . . . . . 88
Rims changing a wheel . . . . . . . . . . . . . . . . . . . . . . . . 36
Roof carrier . . . . . . . . . . . . . . . . . . . . . . . . . . . . . . 127
Roof carrier system . . . . . . . . . . . . . . . . . . . . . . . . 127 fastening the supports . . . . . . . . . . . . . . . . . . . 128
Roof rack . . . . . . . . . . . . . . . . . . . . . . . . . . . . . . . . 127
Rubber seals . . . . . . . . . . . . . . . . . . . . . . . . . . . . . 174
Running in brake pads . . . . . . . . . . . . . . . . . . . . . . . . . . . . 142
new engine . . . . . . . . . . . . . . . . . . . . . . . . . . . . 148
wheels and tyres . . . . . . . . . . . . . . . . . . . . . . . . 202 S
Safe drivin
g safe . . . . . . . . . . . . . . . . . . . . . . . . . . . . . 47
SAFE . . . . . . . . . . . . . . . . . . . . . . . . . . . . . . . 97, 137
safety disabling the front passenger front airbag . . . . 15
Safety . . . . . . . . . . . . . . . . . . . . . . . . . . . . . . . . . . . 47 child safety . . . . . . . . . . . . . . . . . . . . . . . . . . . . . 64
child seats . . . . . . . . . . . . . . . . . . . . . . . . . . . . . . 64
safe driving . . . . . . . . . . . . . . . . . . . . . . . . . . . . . 47
Safety Assist . . . . . . . . . . . . . . . . . . . . . . . . . . . . . 156
Safety equipment . . . . . . . . . . . . . . . . . . . . . . . . . . 48
Safety instructions using child seats . . . . . . . . . . . . . . . . . . . . . 16, 65
using seat belts . . . . . . . . . . . . . . . . . . . . . . . . . 55
Sale of vehicle in other countries / continents . . . . . . . . . . . . 179
Scrapping . . . . . . . . . . . . . . . . . . . . . . . . . . . . . . . 180 airbag system . . . . . . . . . . . . . . . . . . . . . . . . . . 180
vend-of-life vehicles . . . . . . . . . . . . . . . . . . . . . 180
Seat belt adjustment . . . . . . . . . . . . . . . . . . . . . . . . . . 13, 56
Seat belts . . . . . . . . . . . . . . . . . . . . . . . . . . . . . . . . 52 automatic belt retractor . . . . . . . . . . . . . . . . . . . 58
belt tensioner . . . . . . . . . . . . . . . . . . . . . . . . . . . 58
belt tension limiter . . . . . . . . . . . . . . . . . . . . . . . 58
Seatbelts cleaning . . . . . . . . . . . . . . . . . . . . . . . . . . . . . . 178
Seat belts protective function . . . . . . . . . . . . . . . . . . . . . . . 54
purpose . . . . . . . . . . . . . . . . . . . . . . . . . . . . . . . . 52
safety instructions . . . . . . . . . . . . . . . . . . . . . . . 55
twisted belt . . . . . . . . . . . . . . . . . . . . . . . . . . . . . 55
unfastened . . . . . . . . . . . . . . . . . . . . . . . . . . . . . 55
warning lamp . . . . . . . . . . . . . . . . . . . . . . . . . . . 53
Seat belt tensioner . . . . . . . . . . . . . . . . . . . . . . . . . 13
Seat belt tensioners . . . . . . . . . . . . . . . . . . . . . . . . 58 Seat heating . . . . . . . . . . . . . . . . . . . . . . . . . . . . . 113
SEAT inf
ormation system . . . . . . . . . . . . . . . . . . . . 22
Seats . . . . . . . . . . . . . . . . . . . . . . . . . . . . . . . . . . . . 50 heating . . . . . . . . . . . . . . . . . . . . . . . . . . . . . . . 113
incorrect position . . . . . . . . . . . . . . . . . . . . . . . . 50
number of seats . . . . . . . . . . . . . . . . . . . . . . . . . 50
rear backrest . . . . . . . . . . . . . . . . . . . . . . . . . . . 124
Service fluids . . . . . . . . . . . . . . . . . . . . . . . . . . . . 164
Service interval display . . . . . . . . . . . . . . . . . . . . . 90
Side airbags description . . . . . . . . . . . . . . . . . . . . . . . . . . . . . 16
Smell of gas . . . . . . . . . . . . . . . . . . . . . . . . . . . . . 182
Snow chains . . . . . . . . . . . . . . . . . . . . . . . . . 41, 212 temporary spare wheel . . . . . . . . . . . . . . . . . . . 41
Spare fuel canister . . . . . . . . . . . . . . . . . . . . . . . . 183
Spare parts . . . . . . . . . . . . . . . . . . . . . . . . . . . . . . 164
Spare wheel removing . . . . . . . . . . . . . . . . . . . . . . . . . . . . . . 206
Spare wheel or temporary spare wheel advice for driving . . . . . . . . . . . . . . . . . . . . . . . 206
Speed limiter . . . . . . . . . . . . . . . . . . . . . . . . . . . . 155
Speed rating . . . . . . . . . . . . . . . . . . . . . . . . . . . . . 209
Start-Stop system . . . . . . . . . . . . . . . . . . . . . . . . . 161 operation . . . . . . . . . . . . . . . . . . . . . . . . . . . . . . 161
Starting the vehicle . . . . . . . . . . . . . . . . . . . . . . . . 20
Steering . . . . . . . . . . . . . . . . . . . . . . . . . . . . . . . . 133 control and warning lamps . . . . . . . . . . . . . . . 134
electromechanical . . . . . . . . . . . . . . . . . . . . . . 134
power steering . . . . . . . . . . . . . . . . . . . . . . . . . 134
steering column lock . . . . . . . . . . . . . . . . . . . . 134
tendency to pull to one side . . . . . . . . . . . . . . 204
Steering wheel adjustment . . . . . . . . . . . . . . . . . . . . . . . . . . . . . 14
Setting . . . . . . . . . . . . . . . . . . . . . . . . . . . . . . . . . 49
Storage compartment centre console . . . . . . . . . . . . . . . . . . . . . . . . . 118
other storage compartments . . . . . . . . . . . . . . 119
224