warning light Seat Mii 2017 Workshop Manual
[x] Cancel search | Manufacturer: SEAT, Model Year: 2017, Model line: Mii, Model: Seat Mii 2017Pages: 232, PDF Size: 4.91 MB
Page 162 of 232

Operation
Possible malfunction in the laser sensor
If l
a
ser sensor operation is impaired, for ex-
ample due to heavy rain, mist, snow or dirt,
the City Safety Assist system function is tem-
porarily switched off. On the instrument pan-
el display the control lamp flashes.
When the fault in the laser sensor has been
rectified, the City Safety Assist system func-
tion automatically becomes available again.
The control lamp switches off.
The following conditions could prevent the
City Safety Assist system from functioning:
● Tight bends.
● Accelerator pressed all the way down to the
floor.
● If the C
ity Safety Assist system is switched
off or there i
s a fault ››› page 157.
● If the laser sensor is dirty, covered or over-
heated ›
›› page 158.
● In the event of snow, heavy rain or dense
fog.
● If ther
e are vehicles in front.
● Vehicles changing lanes.
● Vehicles moving in the opposite direction
in the same lane.
● V
ery dirty vehicles with a low degree of re-
flection.
● Pre
sence of thick dust. Hill driving assistant*
Operation This function is only included in vehicles with
ESC.
The hi
l
l driving assistant helps the driver to
move off and upward on a hill when the vehi-
cle is stationary.
The system maintains brake pressure for ap-
proximately two seconds after the driver
takes his foot off the brake pedal to prevent
the vehicle from lurching backward when it is
started. During these 2 seconds, the driver
has enough time to release the clutch pedal
and accelerate without the vehicle moving
and without having to use the handbrake,
making start-up easier, more comfortable
and safer.
These are the basic operation conditions:
● being on a ramp or hill/slope,
● doors closed,
● vehicle completely stationary,
● engine running and foot on the brake,
● besides having a gear engaged or being in
neutral f
or manual gear change and with the
selector lever at positions S, D or R in vehi-
cles with an automatic gearbox.
This system is also active when reversing up-
hill. WARNING
● If y
ou do not start the vehicle immediately
after taking your foot off the brake pedal, the
vehicle may start to roll back under certain
conditions. Depress the brake pedal or use
the hand brake immediately.
● If the engine stalls, depress the brake ped-
al or u
se the hand brake immediately.
● When following a line of traffic uphill, if you
want t
o prevent the vehicle from rolling back
accidentally when starting off, hold the brake
pedal down for a few seconds before starting
off. Note
The Official Service or a specialist workshop
can t el
l you if your vehicle is equipped with
this system. Start-Stop System
C ontr
o
l lamps
It lights up
The Start-Stop system is enabled.
160
Page 163 of 232
Driver assistance systems
It lights up
The Start-Stop sys-
tem is enabled but
the engine cannot
be automatically
stopped.
Contact a specialised workshop.
It lights up
The Start-Stop sys-
tem cannot start the
engine.Start the engine by hand using
the vehicle's key
››› page 133.
There is a fault in the
alternator.››› page 196
Flashes
The Start-Stop sys-
tem is not available.Contact a specialised workshop.
Some warning and control lamps will light up
briefly
when the ignition i
s
switched on to
check certain functions. They will switch off
after a few seconds. WARNING
Observe the safety warnings ›››
in On the
ins trument
panel on page 26. Start-Stop system
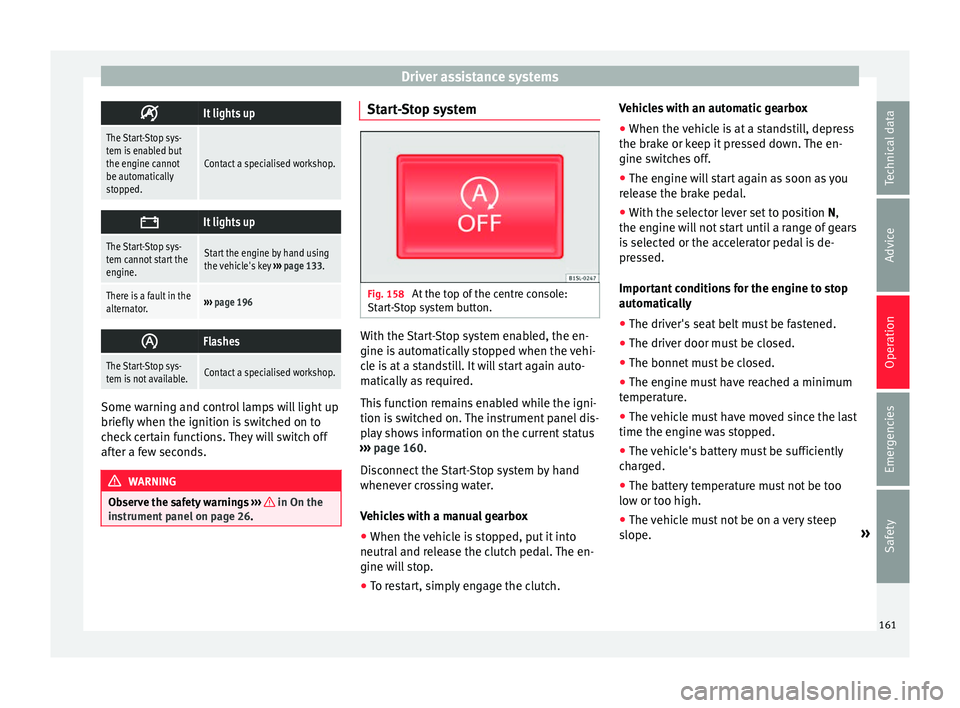
Fig. 158
At the top of the centre console:
St ar
t
-Stop system button. With the Start-Stop system enabled, the en-
gine i
s
aut
omatically stopped when the vehi-
cle is at a standstill. It will start again auto-
matically as required.
This function remains enabled while the igni-
tion is switched on. The instrument panel dis-
play shows information on the current status
››› page 160.
Disconnect the Start-Stop system by hand
whenever crossing water.
Vehicles with a manual gearbox
● When the vehicle is stopped, put it into
neutral and r
elease the clutch pedal. The en-
gine will stop.
● To restart, simply engage the clutch. Vehicles with an automatic gearbox
●
When the vehicle is at a standstill, depress
the brake or k
eep it pressed down. The en-
gine switches off.
● The engine will start again as soon as you
rele
ase the brake pedal.
● With the selector lever set to position N,
the engine wi
ll not start until a range of gears
is selected or the accelerator pedal is de-
pressed.
Important conditions for the engine to stop
automatically
● The driver's seat belt must be fastened.
● The driver door must be closed.
● The bonnet must be closed.
● The engine must have reached a minimum
temperat
ure.
● The vehicle must have moved since the last
time the engine wa
s stopped.
● The vehicle's battery must be sufficiently
char
ged.
● The battery temperature must not be too
low or too high.
● The
vehicle must not be on a very steep
slope. »
161
Technical data
Advice
Operation
Emergencies
Safety
Page 164 of 232
Operation
Conditions for the engine to restart automat-
ic a
l
ly
The engine can be automatically restarted in
the following cases:
● If the vehicle starts to moves.
● If the battery voltage drops.
Conditions
requiring engine start-up using
the key
The engine has to be manually started in the
following cases:
● If the driver unbuckles his/her seat belt.
● If the driver door is opened.
● If the bonnet is opened.
Switc
hing the Start-Stop system on and off
● Press the button situat
ed in the centre
console ››› Fig. 158.
● The button will light up when the Start-Stop
syst
em is switched off.
The engine will start immediately if the vehi-
cle is in Stop mode when the system is
switched off by hand. WARNING
The smart technology included in the hill
hol d c
annot change the laws of physics. Do
not let the extra convenience afforded by the hill hold tempt you into taking any risks
when drivin
g.
● An
y accidental movement of the vehicle
coul
d result in serious injury.
● The hill hold is not a replacement for driver
awar
eness.
● Adjust your speed and driving style to visi-
bility
, weather, road and traffic conditions.
● The hill hold cannot always keep the vehi-
cle at
a standstill on a slope or brake suffi-
ciently when travelling downhill (e.g. on slip-
pery or frozen surfaces). WARNING
The brake servo and the electromechanical
st eerin
g do not work when the engine is
switched off.
● The vehicle must never be allowed to move
with the engine sw
itched off.
● Disconnect the Start-Stop system before
workin
g in the engine compartment. CAUTION
The vehicle's battery could be damaged if the
vehic l
e is used for long periods at very high
outside temperatures. Note
In some cases, it may be necessary to start
the engine b y
hand using the key. Refer to the corresponding control lamp on the instru-
ment p
anel
.162
Page 169 of 232
Care and maintenance
The optimal reach of the equipment is only
ac hiev
ed w
ith an external aerial.
Check first with a specialised workshop that
understands the technical possibilities of in-
stallation if you wish to use a two-way radio
with a transmitting power of over 10 watts.
SEAT recommends taking your car in for tech-
nical service.
All legal requirements, together with the in-
structions for the use of two-way radios must
be observed. WARNING
If the two-way radio is not securely fastened
in pos ition, it
could be sent flying around the
vehicle in the event of sharp braking, sudden
manoeuvres or accident, causing injury.
● While driving, two-way radios must be se-
curely
fastened in position, outside the air-
bags deployment zones, or safely stowed
away. WARNING
When using a two-way radio without a con-
nection to an e xt
erior aerial, the maximum
permitted levels of electromagnetic radiation
may be exceeded. This is also the case if the
aerial has not been correctly installed.
● You should only use a two-way radio inside
the vehic
le if it has first been correctly con-
nected to an exterior aerial. Information stored by the control
u
nit
s Your vehicle is fitted at the factory with a ser-
ies
of
electronic control units responsible for
the engine and gearbox management. In ad-
dition, the control units supervise the per-
formance of the exhaust gas system and the
airbag systems.
Therefore, while the vehicle is being driven,
these electronic control units are continuous-
ly analysing the vehicle data. In the event of
faults or deviations from the theoretical val-
ues, only this data is stored. Normally, the
warning lamps on the instrument panel light
up in the event of faults.
This data can only be read and analysed us-
ing special equipment.
The storing of the data allows specialised
workshops to detect and repair faults. Stored
data may include:
● Data relating to the engine or the gearbox
● Speed
● Direction of travel
● Braking force
● Detection of seat belt
The v ehic
le control units never record conver-
sations held by passengers in the vehicle.
In vehicles equipped with an emergency call
function via the mobile phone or other appli- ances connected in the vehicle, it is possible
to send the v
ehicle position. If the control
unit records an accident with airbag activa-
tion, the system may automatically send a
signal. This will depend on the network oper-
ator. Normally, transmission is only possible
in areas with good coverage.
Event Data Recorder
The vehicle is not fitted with an event data re-
corder.
An event data recorder temporarily stores the
vehicle information. Therefore, in the event of
an accident, it is possible to obtain detailed
information about how the accident occur-
red. Vehicles with airbag systems can store
data relating to impact speed, seat belt sta-
tus, seat positions and airbag activation
times may be stored, etc. The volume of data
depends on the manufacturer.
Event data recorders can only be mounted
with authorisation from the vehicle owner
and, in some countries, they are governed by
local legislation.
Reprogramming control units
On the whole, all the data required for the
component management is stored in the con-
trol units. The programming of certain con-
venience functions, such as the turn signals,
individual door opening and instructions on
the display can be modified using special »
167
Technical data
Advice
Operation
Emergencies
Safety
Page 173 of 232
Care and maintenance
waste. Observe information provided by the
manuf
act
urer. Washing the vehicle
The longer substances such as insects, bird
drop
pin
gs, resinous tree sap, road dirt, in-
dustrial deposits, tar, soot or road salt and
other aggressive materials remain on the ve-
hicle, the more damage they do to the paint-
work. High temperatures (for instance due to
strong sunlight) further intensify the corro-
sive effect. The vehicle undercarriage should
also be thoroughly washed at regular inter-
vals.
Automatic car washes
Always observe the instructions provided at
the automatic car wash. The standard pre-
cautionary measures prior to entering the car
wash should be taken to avoid damage to
the vehicle (close all windows and the roof,
fold in exterior mirrors). If the vehicle is fitted
with additional components (spoiler, roof-
rack, aerial, etc.), check with the car wash su-
pervisor whether these can enter the car
wash ››› .
The v
ehic
le paintwork is so durable that the
vehicle can normally be washed without
problems in an automatic car wash tunnel.
However, wear and damage to the paintwork
will depend on the type of car wash used. SEAT recommends the use of car washes
without bru
shes.
To remove traces of wax on windows and to
prevent wiper blades from scratching, please
observe the following ››› page 172, Cleaning
windows and exterior mirrors .
Washing the car by hand
When washing the car by hand, use plenty of
water to soften the dirt first, and rinse off as
well as possible.
Then clean the vehicle with a soft sponge,
glove or brush using only slight pressure.
Start at the roof and work downwards. Spe-
cial car shampoo should only be used for
very persistent dirt.
Rinse the sponge or glove thoroughly and of-
ten.
Wheels, sills and similar should be cleaned
last. Use a second sponge for this. WARNING
Sharp components on the vehicle may cause
injury .
● Pr
otect arms and hands from sharp edges
when cle
aning the vehicle undercarriage or
the interior of the wheel hubs. WARNING
After the vehicle has been washed, the brak-
ing eff ect
will be reduced (and the braking
distance increased) due to moisture (and ice
in winter) on the brakes.
● “Dry the brakes and remove ice” by braking
caref
ully. Ensure that you are not endanger-
ing other road-users or breaking traffic regu-
lations in the process. CAUTION
● The wat er t
emperature should not exceed
+60°C (+140°F).
● To avoid damage to the paintwork, do not
wash the
vehicle in full sun.
● Do not use rough sponges or similar which
coul
d damage the surface to clean away the
traces of insects.
● Never wipe the headlights with a dry cloth
or spong
e, always moisten first. It is best to
use soapy water.
● Washing the vehicle in low temperatures:
When washin
g the vehicle with a hose, do
not direct water into the lock cylinders or the
gaps around the doors or roof. Locks and
seals could freeze! CAUTION
To avoid any risk of damage to the vehicle,
pl e
ase check the following points before us-
ing an automatic car wash: » 171
Technical data
Advice
Operation
Emergencies
Safety
Page 178 of 232
Advice
Caring for and cleaning the ve-
hic l
e int
erior
Introduction The dye from many items of modern clothing
(e.g. d
ark
jeans) is not always colour-fast.
Seat upholstery (material and leather), espe-
cially when light-coloured, may visibly discol-
our if the dye comes out of clothing (even
when used correctly). This is not an uphols-
tery defect but indicates that the dye in the
item of clothing is not sufficiently colour-fast. WARNING
Car-care products may be toxic and hazard-
ous. If c
ar care products are not suitable or
are used inappropriately, this could result in
accident, serious injury, burns or intoxica-
tion.
● Car care products must always be stored in
the original
container which should be kept
closed.
● Observe information provided by the manu-
factur
er.
● To prevent confusion, never store car care
products
in empty food cans, bottles or other
containers.
● Keep all care products out of reach of chil-
dren.
● Harmfu
l vapours may be produced when us-
ing car c
are products. Therefore, care prod- ucts should only be used in well-ventilated
sp
ac
es or in the open air.
● Never use fuel, turpentine, engine oil, ace-
tone or any
other volatile liquid to wash,
clean or care for the vehicle. These are toxic
and highly flammable. WARNING
Inappropriate care and cleaning of vehicle
c omponent s
may effect the vehicle safety
equipment, increasing the risk of severe in-
jury.
● Vehicle components should only be
cle
aned and maintained in accordance with
the manufacturer's instructions.
● Only use approved or recommended care
products. CAUTION
● Cle
aning products which contain solvents
will damage the material.
● To avoid damage, stubborn stains should
be remov
ed by a specialised workshop. Note
Suitable vehicle care products are available
from y
our technical service. How to care for the upholstery
To treat and maintain your seat upholstery,
keep the f
o
llowing in mind ››› :
● Before entering the vehicle, close any Vel-
cr o f
asteners that might snag on the uphols-
tery or trim fabric. Any open Velcro fasteners
may damage the trim or upholstery fabrics.
● To prevent damage, avoid direct contact
between sharp dec
orative objects and the
upholstery and trim fabrics. Decorative ob-
jects include zips, rivets and rhinestones on
clothing and belts.
● From time to time, clean the dust that gath-
ers in the per
forations, folds and seams so
that the surfaces of the seats are not dam-
aged by its abrasive effect.
● Make sure clothes are colour-fast to avoid
them running and s
taining the upholstery.
This is especially important if the upholstery
is light in colour. CAUTION
If the instructions for upholstery and trim
car e ar
e not followed, they may deteriorate
and discolour. Note
SEAT recommends you take the vehicle to a
Spec i
alised workshop to treat any stains on
the upholstery caused by the discolouration
of clothing. 176
Page 179 of 232
Care and maintenance
Cleaning padding and textile covers Normal cleaning
● Before applying cleaning products, please
re a
d the instructions for handling and the
warnings shown on the container.
● The upholstery, textile covers, and carpet
should be r
egularly vacuumed (with vacuum
brush).
● We recommend that you use a soft sponge
or lint-free, mic
ro-fibre cloth for normal clean-
ing ››› .
Gener al
s
uperficial dirt on upholstery and
textile covers can be cleaned with a normal
foam cleaning product.
If the upholstery and the material trims are
very dirty, we recommend you have them
cleaned by a specialist cleaning form.
Cleaning stains
It may be necessary to clean the whole sur-
face and not only the stain itself. Especially if
the surface has been dirtied through normal
use. Otherwise, the stained area may be-
come lighter than the rest of the surface after
treatment.
Type of
stainCleaning the vehicle
Water-based
stains, e.g.
coffee or fruit
juice.– Use a sponge and wipe with a solu-
tion of water and wool wash.
– Dry with a dry, absorbent cloth.
Persistent
stains, e.g.
chocolate or
make-up.– Apply a washing paste a)
directly to
the stain and allow it to work.
– Apply clean water using a sponge or
damp cloth to remove the cleaning
product deposits.
– Dry with a dry absorbent cloth.
Grease-based
stains, e.g. oil
or lipstick.– Apply neutral soap or cleaning
paste a)
and allow it to work.
– Remove dissolved grease or colour
particles with an absorbent cloth.
– Then apply clean water. Take care not
to soak the upholstery.
a) Bile soap can be used as a cleaning paste. CAUTION
● Brushe s
should only be used to clean the
mats and floor mat! Other surfaces may be
damaged if a brush is used.
● Do not use steam cleaning equipment, as
the dirt bec
omes more encrusted in the mate-
rial when steam is applied.
● Never use brushes for cleaning damp mate-
rial
as they could damage the surface. Cleaning storage compartments,
drink
s
ho
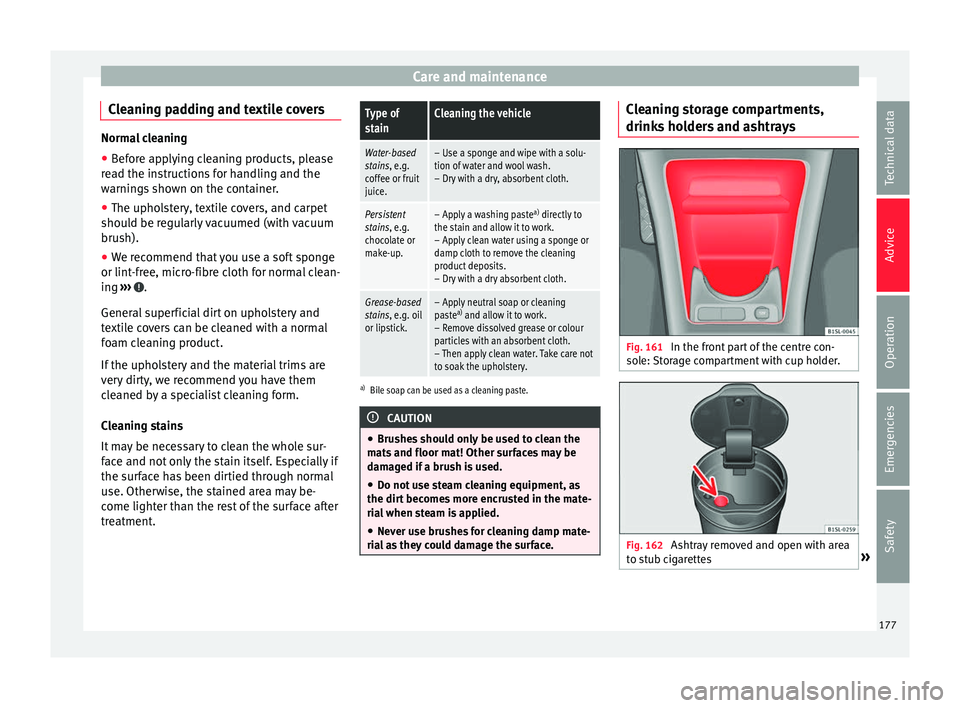
lders and ashtrays Fig. 161
In the front part of the centre con-
so l
e:
Storage compartment with cup holder. Fig. 162
Ashtray removed and open with area
t o s t
ub cigarettes » 177
Technical data
Advice
Operation
Emergencies
Safety
Page 186 of 232
Advice
–
Ins ur
e that the fuel container complies
with manufacturing standards, for exam-
ple, ANSI or ASTM F852-86. CAUTION
● Alw a
ys remove any fuel spilled anywhere
on the vehicle to avoid damage to the wheel
housing, the tyre and vehicle paintwork.
● Refuelling a petrol engine with diesel can
cause seriou
s engine and fuel system dam-
age; the resulting malfunctions are not cov-
ered by the SEAT warranty. If you refuel with
the wrong type of fuel, never start the engine.
This applies to even the smallest amount of
the wrong fuel. Seek specialist assistance.
With the engine running, the composition of
the wrong fuel could significantly damage the
fuel system and the engine itself. For the sake of the environment
Fuels can contaminate the environment. Col-
lect an
y spilt service fluids and allow a pro-
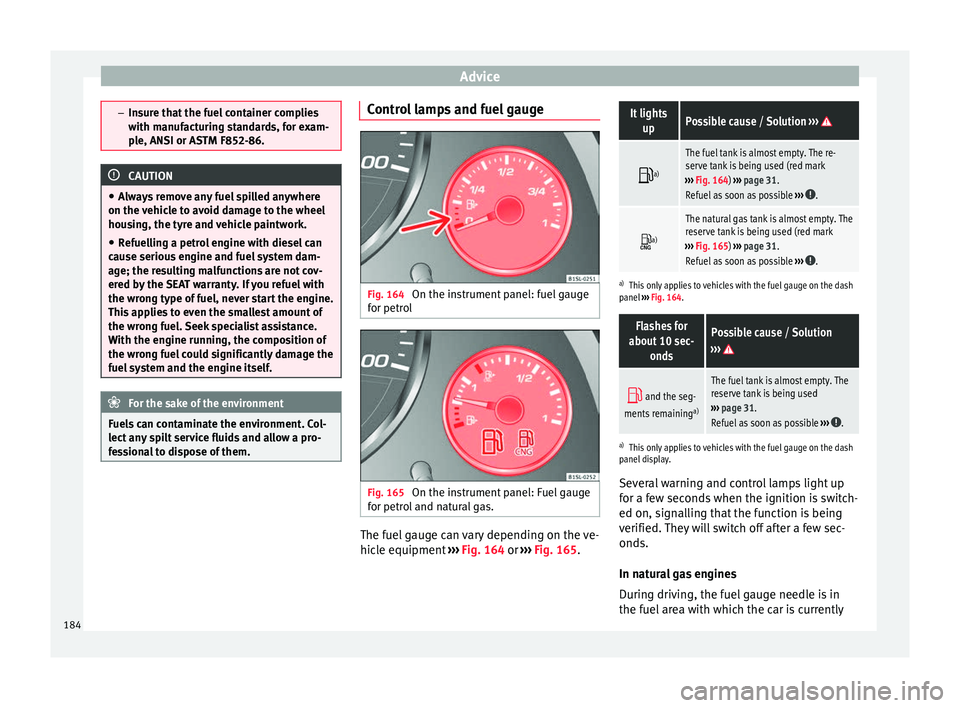
fessional to dispose of them. Control lamps and fuel gauge
Fig. 164
On the instrument panel: fuel gauge
f or petr
o
l Fig. 165
On the instrument panel: Fuel gauge
f or petr
o
l and natural gas. The fuel gauge can vary depending on the ve-
hic
l
e equipment
››› Fig. 164 or ››› Fig. 165.
It lights
upPossible cause / Solution ›››
a)
The fuel tank is almost empty. The re-
serve tank is being used (red mark
››› Fig. 164) ››› page 31.
Refuel as soon as possible ›››
.
a)
The natural gas tank is almost empty. The
reserve tank is being used (red mark
››› Fig. 165) ››› page 31.
Refuel as soon as possible ›››
.
a)
This only applies to vehicles with the fuel gauge on the dash
panel ››› Fig. 164.
Flashes for
about 10 sec- ondsPossible cause / Solution
›››
and the seg-
ments remaining a)The fuel tank is almost empty. The
reserve tank is being used
››› page 31.
Refuel as soon as possible ›››
.
a)
This only applies to vehicles with the fuel gauge on the dash
panel display.
Several warning and control lamps light up
for a few seconds when the ignition is switch-
ed on, signalling that the function is being
verified. They will switch off after a few sec-
onds.
In natural gas engines
During driving, the fuel gauge needle is in
the fuel area with which the car is currently
184
Page 194 of 232

Advice
used engine oil in places such as a garden,
wood
s, dr
ains, roads, paths, rivers and drain-
age systems. Engine coolant
Introduction WARNING
Engine coolant is toxic!
● Only keep engine coolant in its original
c ont ainer
, tightly shut and in a safe place.
● Never store engine coolant in empty food
container
s or bottles as other people may ac-
cidentally drink it.
● Always keep engine coolant out of reach of
chil
dren.
● Ensure that the proportion of engine cool-
ant ad
ditive corresponds to the lowest out-
side temperature to which the vehicle will be
exposed.
● If the outside temperature is extremely low,
the engine coo
lant could freeze causing the
vehicle to stop. As this would also cause the
heating to stop working, vehicle occupants
without warm clothing could freeze. For the sake of the environment
Coolants and additives can contaminate the
env ir
onment. If any fluids are spilled, they should be collected and correctly disposed
of, w
ith r
espect to the environment. Coolant warning lamp
Several warning and control lamps light up
for a f
ew sec
onds when the ignition is switch-
ed on, signalling that the function is being
verified. They will switch off after a few sec-
onds.
It lights up red
Excessive engine
coolant temperature.
Stop the vehicle!
Stop the vehicle safely as soon
as possible. Switch off the en-
gine and let it cool.
Insufficient engine
coolant level.
¡Stop the vehicle!
Check the engine coolant
when the engine has cooled
and, if it is low, refill with en-
gine coolant ››› page 193.
Engine coolant sys-
tem faulty. Do not drive any further.
Obtain professional assis-
tance.
Flashes red
Engine coolant sys-
tem faulty.Seek specialist assistance.
It lights up blue
The natural gas en-
gine coolant tempera-
ture is low. The en-
gine has not reached
the operating temper-
ature.As long as the warning lamp is
on, avoid high engine speeds
and pushing the engine too
hard.
WARNING
Observe the safety warnings ›››
in On the
ins trument
panel on page 26. 192
Page 195 of 232
Checking and refilling levels
Checking the coolant level and top-
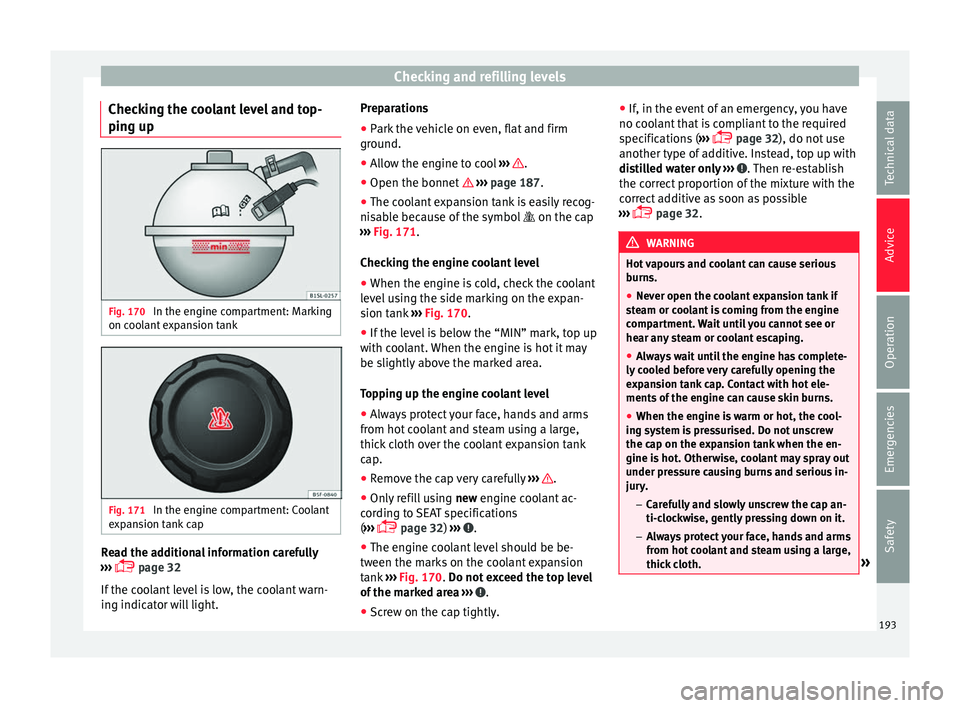
pin g up Fig. 170
In the engine compartment: Marking
on c oo
l
ant expansion tank Fig. 171
In the engine compartment: Coolant
e xp
an
sion tank cap Read the additional information carefully
› ›
›
page 32
If the coolant level is low, the coolant warn-
ing indicator will light. Preparations
● Park the vehicle on even, flat and firm
ground.
● A
llow the engine to cool ›››
.
● Open the bonnet › ›
›
page 187.
● The coolant expansion tank is easily recog-
nisab
le because of the symbol on the cap
››› Fig. 171.
Checking the engine coolant level ● When the engine is cold, check the coolant
level
using the side marking on the expan-
sion tank ››› Fig. 170.
● If the level is below the “MIN” mark, top up
with coo
lant. When the engine is hot it may
be slightly above the marked area.
Topping up the engine coolant level
● Always protect your face, hands and arms
from hot c
oolant and steam using a large,
thick cloth over the coolant expansion tank
cap.
● Remove the cap very carefully ›››
.
● Only refill using new engine c
oo
lant ac-
cording to SEAT specifications
( ›››
page 32)
››› .
● The engine coolant level should be be-
tw een the m
ark
s on the coolant expansion
tank ››› Fig. 170. Do not exceed the top level
of the marked area ››› .
● Screw on the cap tightly. ●
If, in the ev
ent
of an emergency, you have
no coolant that is compliant to the required
specifications ( ›››
page 32), do not use
another type of additive. Instead, top up with
distilled water only ››› . Then re-establish
the c orr
ect
proportion of the mixture with the
correct additive as soon as possible
››› page 32. WARNING
Hot vapours and coolant can cause serious
burn s.
● Nev
er open the coolant expansion tank if
ste
am or coolant is coming from the engine
compartment. Wait until you cannot see or
hear any steam or coolant escaping.
● Always wait until the engine has complete-
ly coo
led before very carefully opening the
expansion tank cap. Contact with hot ele-
ments of the engine can cause skin burns.
● When the engine is warm or hot, the cool-
ing sys
tem is pressurised. Do not unscrew
the cap on the expansion tank when the en-
gine is hot. Otherwise, coolant may spray out
under pressure causing burns and serious in-
jury.
– Carefully and slowly unscrew the cap an-
ti-clockwise, gently pressing down on it.
– Always protect your face, hands and arms
from hot coolant and steam using a large,
thick cloth. » 193
Technical data
Advice
Operation
Emergencies
Safety