sensor Seat Toledo 2016 MEDIA SYSTEM PLUS - NAVI SYSTEM - NAVI SYSTEM PLUS
[x] Cancel search | Manufacturer: SEAT, Model Year: 2016, Model line: Toledo, Model: Seat Toledo 2016Pages: 100, PDF Size: 2.72 MB
Page 15 of 100

Introduction
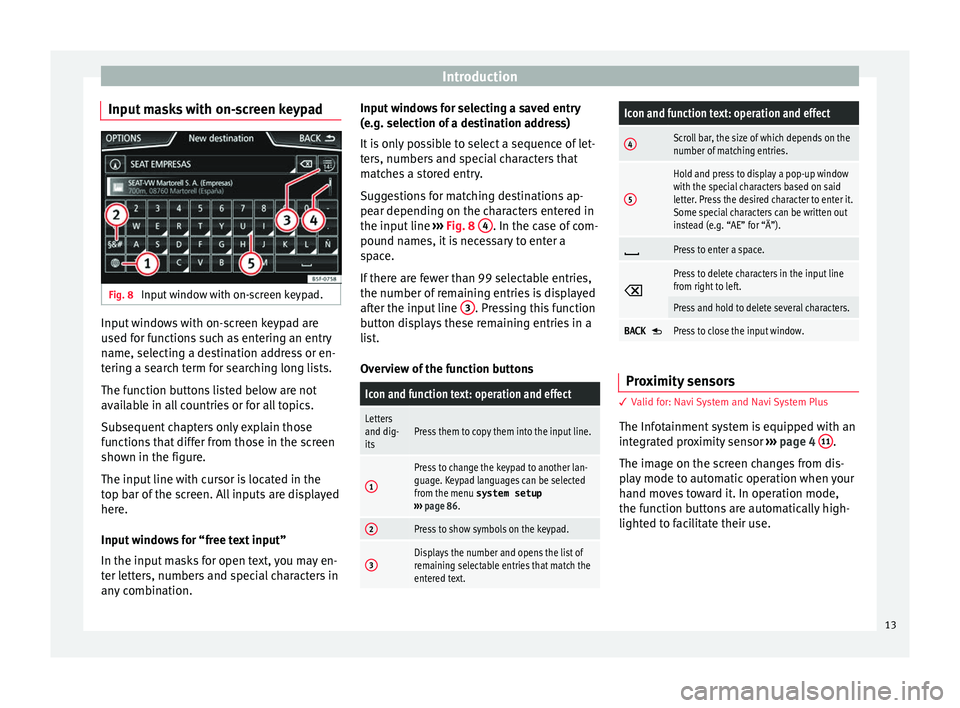
Input masks with on-screen keypad Fig. 8
Input window with on-screen keypad. Input windows with on-screen keypad are
u
sed f
or f
unctions such as entering an entry
name, selecting a destination address or en-
tering a search term for searching long lists.
The function buttons listed below are not
available in all countries or for all topics.
Subsequent chapters only explain those
functions that differ from those in the screen
shown in the figure.
The input line with cursor is located in the
top bar of the screen. All inputs are displayed
here.
Input windows for “free text input”
In the input masks for open text, you may en-
ter letters, numbers and special characters in
any combination. Input windows for selecting a saved entry
(e.g. selection of
a destination address)
It is only possible to select a sequence of let-
ters, numbers and special characters that
matches a stored entry.
Suggestions for matching destinations ap-
pear depending on the characters entered in
the input line ››› Fig. 8 4 . In the case of com-
pou nd n
ame
s, it is necessary to enter a
space.
If there are fewer than 99 selectable entries,
the number of remaining entries is displayed
after the input line 3 . Pressing this function
b utt
on di
splays these remaining entries in a
list.
Overview of the function buttons
Icon and function text: operation and effect
Letters
and dig-
itsPress them to copy them into the input line.
1
Press to change the keypad to another lan-
guage. Keypad languages can be selected
from the menu system setup
››› page 86.
2Press to show symbols on the keypad.
3Displays the number and opens the list of
remaining selectable entries that match the
entered text.
Icon and function text: operation and effect
4Scroll bar, the size of which depends on the
number of matching entries.
5
Hold and press to display a pop-up window
with the special characters based on said
letter. Press the desired character to enter it.
Some special characters can be written out
instead (e.g. “AE” for “Ä”).
Press to enter a space.
Press to delete characters in the input line
from right to left.
Press and hold to delete several characters.
BACK Press to close the input window.
Proximity sensors
3 V
alid for: Navi System and Navi System Plus
The Inf
otainment system is equipped with an
integrated proximity sensor ›››
page 4 11 .
The im ag
e on the s
creen changes from dis-
play mode to automatic operation when your
hand moves toward it. In operation mode,
the function buttons are automatically high-
lighted to facilitate their use.
13
Page 47 of 100

Navigation
Navigation 1)
Nav ig
ation, entr
y and control
Introduction
›› ›
table on page 2
General information
The current vehicle position is determined by
means of the GPS satellite system (Global Po-
sitioning System). Sensors in the vehicle
measure distances that have been driven.
The measurement values are compared with
the detailed map data and the road informa-
tion stored therein. Traffic reports, if any, will
also be taken into account in the route calcu-
lation (dynamic route guidance
››› page 53). Using all the data available,
the Infotainment system calculates the opti-
mum route to the destination.
The destination is defined by entering an ad-
dress or a point of interest, e.g. a petrol sta-
tion or hotel.
Spoken instructions and visual guidance on
the navigation unit and on the instrument
panel will direct you to your destination.
Depending on the country, some infotain-
ment system functions can no longer be se- lected when the vehicle is travelling above a
cer
t
ain speed. This is not a malfunction, but
simply a legal requirement.
Navigation messages When the Infotainment system is unable to
rec
eiv
e any data from GPS satellites (due to a
dense tree canopy, underground car park),
navigation can still continue using the vehi-
cle sensors.
Possible navigation limitations
In areas that are not or are only partially digi-
tised on the data storage device (e.g. insuffi-
cient definition of one-way streets and road
categories), the Infotainment system will still
attempt to provide route guidance.
If navigation data are unavailable or incom-
plete, the navigation system may be unable
to determine the exact vehicle position. As a
result, the navigation may not be as exact as
usual.
Navigation area and updating of navigation
data
Roads and streets are subject to constant
change (e.g. new roads, changes to street
names and building numbers). Therefore, if the navigation data is not updated, then er-
ror
s
or inaccuracies may occur during guid-
ance.
SEAT recommends updating navigation data
on a regular basis. Up to date navigation da-
ta can be acquired at a SEAT dealer.
Use navigation data from a memory
card. 3 On
ly available for the model: Navi System
The SD c
ard is initially to be found inserted in
SD card slot 2.
To update navigation data visit our website:
www.seat.com.
● Insert the memory card ›››
page 35 .
● Do not remove the memory card while test-
ing. W
ait for the testing icon to disappear.
If the inserted memory card contains valid
navigation data, the following message ap-
pears: “The source contains a valid naviga-
tion database”. It is now possible to navigate
with the memory card data. When the memo-
ry card is no longer needed by the hardware,
it will be prepared for removal ›››
page 35. »1)
Valid for: Navi System and Navi System Plus.
45
Page 88 of 100

Setup
Setup
M enu and sy
s
tem settings
Main menu System settings
›› ›
table on page 2
The selection of possible settings will de-
pend on the country, the unit in question and
the vehicle equipment.
● Press the Infotainment system MENU but-
t on and then pr
e
ss the SETUP function but-
t on.
● To a
djust the settings for a certain function,
pres
s the appropriate function button in the
main menu. Changes are automatically stor-
ed when a menu is closed.
Function button: function
Screen: To perform screen setup.
Select display mode: Grid or Carousel.
Switch off screen (in 10 seconds): If this function is ac-
tive and the Infotainment system is not in use, the
screen will switch off after approximately 10 sec-
onds. Pressing the screen or pressing one of the Info-
tainment system buttons will switch the screen back
on.
Brightness: To select the brightness level of the
screen.
Function button: function
Day/Night: To select the display type ( Day, Night or
Automatic ).
Touchscreen tone: Confirmation tone for pressing a
function button is activated.
Proximity sensors: The proximity sensors are activa-
ted. Also see ››› page 13, Proximity sensors .
Show clock in standby mode: In standby mode, the cur-
rent time is shown on the Infotainment system dis-
play.
Date and time: To alter the time and date.
Clock time source: To select the time source (GPS or
manual).
GPS: The date and time can be selected using the
Time zone function button. In this case, the Dateand Time function buttons for manually entering
the data will not be active.
Manually: The date and time can be manually ad-
justed using the Date and Time function buttons.
Time: To manually alter the time.
Automatic summer time (DST)*: The time is set auto-
matically.
Time zone: To change to the desired time zone.
Time format: To select the time display format (12- or
24-hour clock).
Date: To adjust the current time.
Date format: To select the display format for the date
(DD.MM.YYYY , YY-MM-DD or MM-DD-YY ).
Function button: function
Idioma/Language: To select the desired language for the
texts and announcements in the voice control system.
Additional keypad languages: To select the additional key-
pad languages.
Units: To set the measurement units for the vehicle dis-
plays.
Distance , vehicle speed , temperature, volume,
consumption and pressure .
Mobile device data transfer
Data transfer for SEAT apps: Allows the exchange of data
between the vehicle and SEAT applications. These
are not personal data.
Use apps to operate: Changes the level of interaction
with the applications.
Deactivate: Limits specific functions that require a
higher level of security. Confirm
: Allows 100% functionality of the App but
with certain actions relating to the Infotainment
system requiring confirmation. Allow
: Allows the execution of all the available
functions from the App.
Voice control: To perform the voice control setup
››› page 15.
Remove safely: To eject the data storage device (SD card
1/SD card 2/USB) from the system. After correctly eject-
ing the data storage device from the system, the func-
tion button becomes inactive (grey colour).
Factory settings: When resetting factory settings, all en-
tries and changes made are deleted, depending on the
selected setup. 86