airbag Seat Toledo 2016 Owner's manual
[x] Cancel search | Manufacturer: SEAT, Model Year: 2016, Model line: Toledo, Model: Seat Toledo 2016Pages: 248, PDF Size: 5.82 MB
Page 3 of 248
Foreword
Thi s
In
struction Manual and its correspond-
ing supplements should be read carefully to
familiarise yourself with your vehicle.
Besides the regular care and maintenance of
the vehicle, its correct handling will help pre-
serve its value.
For safety reasons, always note the informa-
tion concerning accessories, modifications
and part replacements. If selling the vehicle, give all of the on-board
documentation t
o the new owner, as it
should be kept with the vehicle.
You can access the information in this man-
ual using:
● Thematic table of contents that follows the
manual’s g
eneral chapter structure.
● Visual table of contents that uses graphics
to indicat
e the pages containing “essential” information, which is detailed in the corre-
sponding c
hapters.
● Alphabetical index with many terms and
synonyms
to help you find information. WARNING
Read and always observe safety informa-
tion conc ernin
g the passenger's front air-
bag ››› page 73, Important information
regarding the front passenger's airbag .
Page 5 of 248
Table of Contents
Table of Contents
The e s
senti
als . . . . . . . . . . . . . . . . . . . . . . . . 5
Exterior view . . . . . . . . . . . . . . . . . . . . . . . . . . . . 5
Exterior view . . . . . . . . . . . . . . . . . . . . . . . . . . . . 6
Interior view (left-hand drive) . . . . . . . . . . . . . . 7
Interior view (right-hand drive) . . . . . . . . . . . . . 8
How it works . . . . . . . . . . . . . . . . . . . . . . . . . . . . 9
Unlocking and locking . . . . . . . . . . . . . . . . . . . . 9
Before driving . . . . . . . . . . . . . . . . . . . . . . . . . . . 11
Airbags . . . . . . . . . . . . . . . . . . . . . . . . . . . . . . . . 14
Child seats . . . . . . . . . . . . . . . . . . . . . . . . . . . . . 16
Starting the vehicle . . . . . . . . . . . . . . . . . . . . . . 18
Lights and visibility . . . . . . . . . . . . . . . . . . . . . . 18
Easy Connect . . . . . . . . . . . . . . . . . . . . . . . . . . . 21
Driver information system . . . . . . . . . . . . . . . . . 23
Driving data . . . . . . . . . . . . . . . . . . . . . . . . . . . . 26
Cruise control . . . . . . . . . . . . . . . . . . . . . . . . . . . 31
Warning lamps . . . . . . . . . . . . . . . . . . . . . . . . . . 32
Gearbox lever . . . . . . . . . . . . . . . . . . . . . . . . . . . 34
Air conditioning . . . . . . . . . . . . . . . . . . . . . . . . . 36
Fluid Level control . . . . . . . . . . . . . . . . . . . . . . . 39
Emergencies . . . . . . . . . . . . . . . . . . . . . . . . . . . . 43
Fuses . . . . . . . . . . . . . . . . . . . . . . . . . . . . . . . . . . 43
Bulbs . . . . . . . . . . . . . . . . . . . . . . . . . . . . . . . . . . 44
Action in the event of a puncture . . . . . . . . . . . 44
Changing a wheel . . . . . . . . . . . . . . . . . . . . . . . 46
Snow chains . . . . . . . . . . . . . . . . . . . . . . . . . . . . 49
Emergency towing of the vehicle . . . . . . . . . . . 50
How to jump start . . . . . . . . . . . . . . . . . . . . . . . . 51
Changing the windscreen wiper blades . . . . . . 53
Safety . . . . . . . . . . . . . . . . . . . . . . . . . . . . . . . . 55
Safe driving . . . . . . . . . . . . . . . . . . . . . . . . . . . . 55
Safety first! . . . . . . . . . . . . . . . . . . . . . . . . . . . . . 55
Advice about driving . . . . . . . . . . . . . . . . . . . . . 55 Correct position for passengers . . . . . . . . . . . . 56
Pedal area . . . . . . . . . . . . . . . . . . . . . . . . . . . . . . 60
Seat belts
. . . . . . . . . . . . . . . . . . . . . . . . . . . . . . 61
The whys and wherefores of seat belts . . . . . . . 61
How to properly adjust your seatbelt . . . . . . . . 64
Seat belt tensioners . . . . . . . . . . . . . . . . . . . . . . 65
Airbag system . . . . . . . . . . . . . . . . . . . . . . . . . . 66
Brief introduction . . . . . . . . . . . . . . . . . . . . . . . . 66
Airbag safety instructions . . . . . . . . . . . . . . . . . 69
Deactivating airbags . . . . . . . . . . . . . . . . . . . . . 71
Transporting children safely . . . . . . . . . . . . . . . 72
Safety for children . . . . . . . . . . . . . . . . . . . . . . . 72
Child seats . . . . . . . . . . . . . . . . . . . . . . . . . . . . . 74
Emergencies . . . . . . . . . . . . . . . . . . . . . . . . . . 75
Self-help . . . . . . . . . . . . . . . . . . . . . . . . . . . . . . . 75
Emergency equipment . . . . . . . . . . . . . . . . . . . . 75
Changing a wheel . . . . . . . . . . . . . . . . . . . . . . . 75
Tyre repairs . . . . . . . . . . . . . . . . . . . . . . . . . . . . . 76
Towing the vehicle . . . . . . . . . . . . . . . . . . . . . . . 78
Fuses and bulbs . . . . . . . . . . . . . . . . . . . . . . . . . 80
Fuses . . . . . . . . . . . . . . . . . . . . . . . . . . . . . . . . . . 80
Changing bulbs . . . . . . . . . . . . . . . . . . . . . . . . . 83
Changing the fog light bulbs . . . . . . . . . . . . . . . 86
Changing the rear lights (on the side panel) . . 87
Changing tail lights (on the rear lid) . . . . . . . . . 89
Changing the bulb on the number plate . . . . . . 91
Operation . . . . . . . . . . . . . . . . . . . . . . . . . . . . . 93
Controls and displays . . . . . . . . . . . . . . . . . . . . 93
General instrument panel . . . . . . . . . . . . . . . . . 92
Instruments and warning lamps . . . . . . . . . . . . 94
Instruments . . . . . . . . . . . . . . . . . . . . . . . . . . . . 94
Control lamps . . . . . . . . . . . . . . . . . . . . . . . . . . . 98
Introduction to the Easy Connect system* . . . . 99
System settings (CAR)* . . . . . . . . . . . . . . . . . . . 99 Communications and multimedia
. . . . . . . . . . . 100
Steering wheel controls* . . . . . . . . . . . . . . . . . . 100
Multimedia . . . . . . . . . . . . . . . . . . . . . . . . . . . . . 104
Opening and closing . . . . . . . . . . . . . . . . . . . . . 104
Remote control . . . . . . . . . . . . . . . . . . . . . . . . . . 104
Keys . . . . . . . . . . . . . . . . . . . . . . . . . . . . . . . . . . . 105
Central locking system . . . . . . . . . . . . . . . . . . . . 107
Anti-theft alarm system* . . . . . . . . . . . . . . . . . . 112
Rear lid . . . . . . . . . . . . . . . . . . . . . . . . . . . . . . . . 113
Opening and closing of electric windows . . . . . 115
Lights and visibility . . . . . . . . . . . . . . . . . . . . . . 116
Lights . . . . . . . . . . . . . . . . . . . . . . . . . . . . . . . . . 116
Interior lights . . . . . . . . . . . . . . . . . . . . . . . . . . . 122
Visibility . . . . . . . . . . . . . . . . . . . . . . . . . . . . . . . 123
Windscreen wipers and windscreen wash-
ers . . . . . . . . . . . . . . . . . . . . . . . . . . . . . . . . . . . . 124
Mirr
ors . . . . . . . . . . . . . . . . . . . . . . . . . . . . . . . . . 126
Seats and head restraints . . . . . . . . . . . . . . . . . 127
Adjusting seats and head restraints . . . . . . . . . 127
Seat functions . . . . . . . . . . . . . . . . . . . . . . . . . . 128
Transport and practical equipment . . . . . . . . . 131
Practical equipment . . . . . . . . . . . . . . . . . . . . . . 131
Storing objects . . . . . . . . . . . . . . . . . . . . . . . . . . 137
Luggage compartment . . . . . . . . . . . . . . . . . . . . 138
Roof rack* . . . . . . . . . . . . . . . . . . . . . . . . . . . . . . 141
Air conditioning . . . . . . . . . . . . . . . . . . . . . . . . . 142
Heating and air conditioning . . . . . . . . . . . . . . . 142
Heating and fresh air . . . . . . . . . . . . . . . . . . . . . 144
Air conditioning (manual)* . . . . . . . . . . . . . . . . 145
Climatronic* (automatic air conditioning) . . . . 147
Driving . . . . . . . . . . . . . . . . . . . . . . . . . . . . . . . . 149
Starting and stopping the engine . . . . . . . . . . . 149
Brakes and brake servo systems . . . . . . . . . . . . 152
Braking and stability systems . . . . . . . . . . . . . . 154
Manual gearbox . . . . . . . . . . . . . . . . . . . . . . . . . 156
Automatic gearbox . . . . . . . . . . . . . . . . . . . . . . . 157
Run-in and economical driving . . . . . . . . . . . . . 161
3
Page 16 of 248
The essentials
Airbags Fr ont
airb
agsFig. 15
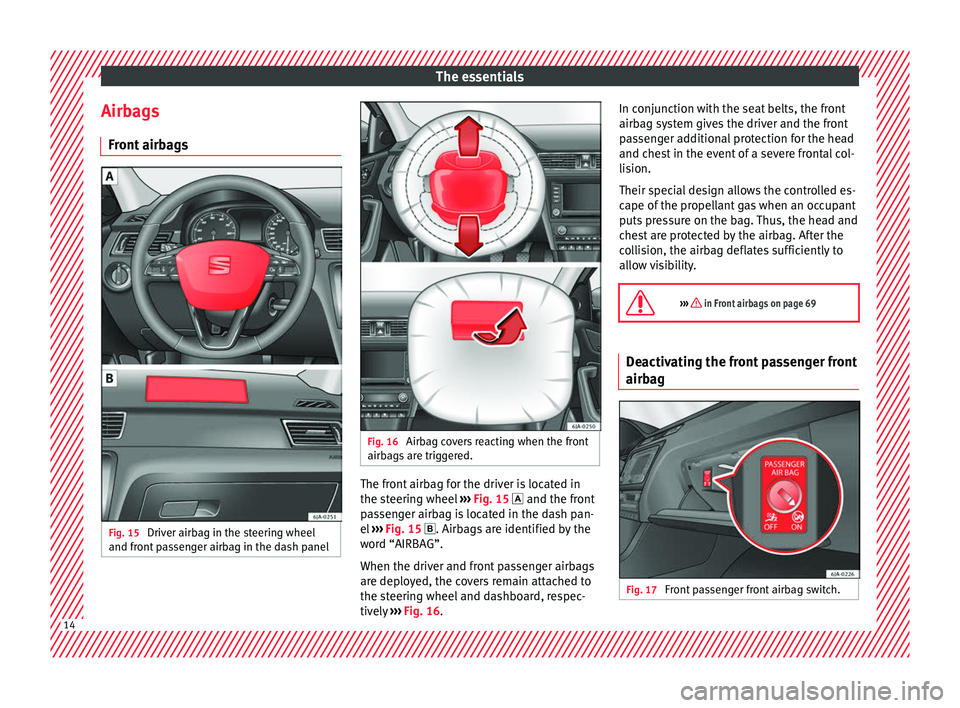
Driver airbag in the steering wheel
and fr ont
p
assenger airbag in the dash panel Fig. 16
Airbag covers reacting when the front
airb ag
s
are triggered. The front airbag for the driver is located in
the s
t
eerin
g wheel ›››
Fig. 15 and the front
passenger airbag is located in the dash pan-
el ›››
Fig. 15 . Airbags are identified by the
word “AIRBAG”.
When the driver and front passenger airbags
are deployed, the covers remain attached to
the steering wheel and dashboard, respec-
tively ›››
Fig. 16. In conjunction with the seat belts, the front
airbag sys
tem gives the driver and the front
passenger additional protection for the head
and chest in the event of a severe frontal col-
lision.
Their special design allows the controlled es-
cape of the propellant gas when an occupant
puts pressure on the bag. Thus, the head and
chest are protected by the airbag. After the
collision, the airbag deflates sufficiently to
allow visibility.
››› in Front airbags on page 69 Deactivating the front passenger front
airb
ag Fig. 17
Front passenger front airbag switch.14
Page 17 of 248
The essentials
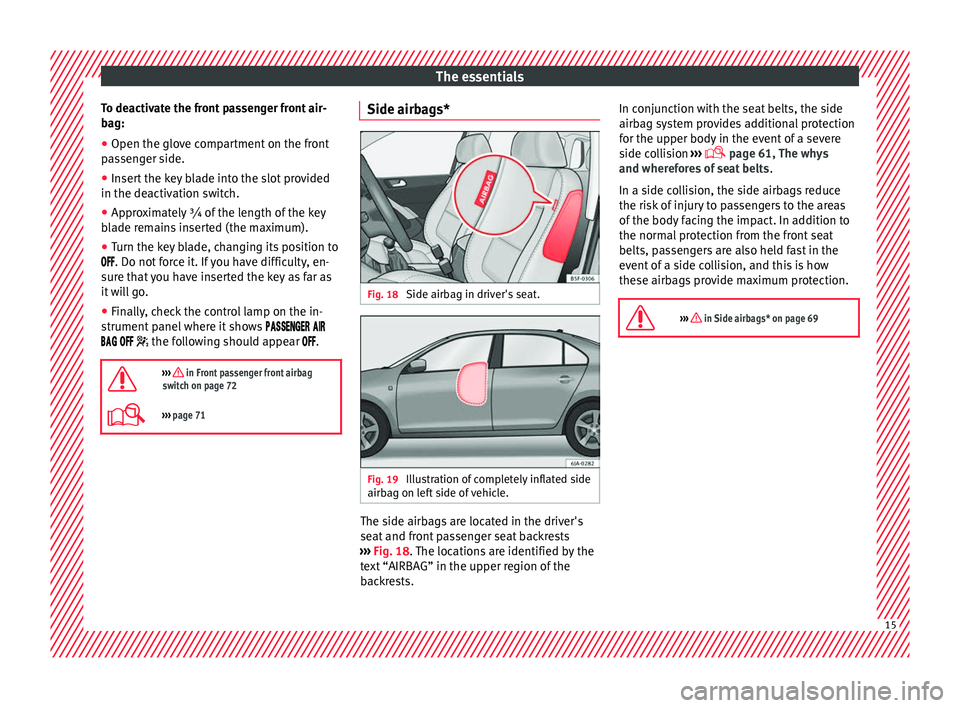
To deactivate the front passenger front air-
b ag:
● Open the glo v
e compartment on the front
pas
senger side.
● Insert the key blade into the slot provided
in the deactivation sw
itch.
● Approximately ¾ of the length of the key
bla
de remains inserted (the maximum).
● Turn the key blade, changing its position to
. Do not for
ce it. If you have difficulty, en-
sure that you have inserted the key as far as
it will go.
● Finally, check the control lamp on the in-
strument p
anel where it shows
the following should appear .
››› in Front passenger front airbag
switch on page 72
››› page 71 Side airbags*
Fig. 18
Side airbag in driver's seat. Fig. 19
Illustration of completely inflated side
airb ag on l
ef
t side of vehicle. The side airbags are located in the driver's
se
at
and fr
ont passenger seat backrests
››› Fig. 18. The locations are identified by the
text “AIRBAG” in the upper region of the
backrests. In conjunction with the seat belts, the side
airbag sys
tem provides additional protection
for the upper body in the event of a severe
side collision ›››
page 61, The whys
and wherefores of seat belts .
In a side collision, the side airbags reduce
the risk of injury to passengers to the areas
of the body facing the impact. In addition to
the normal protection from the front seat
belts, passengers are also held fast in the
event of a side collision, and this is how
these airbags provide maximum protection.
››› in Side airbags* on page 69 15
Page 18 of 248
The essentials
Head-protection airbags* Fig. 20
Location of head-protection airbags. Fig. 21
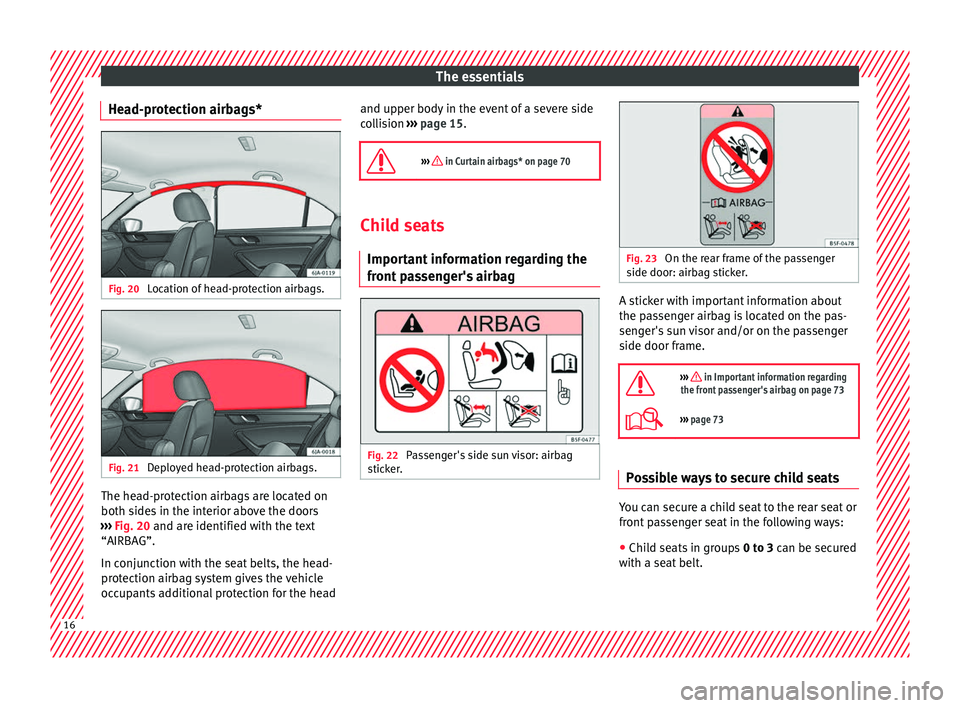
Deployed head-protection airbags. The head-protection airbags are located on
both s
ide
s
in the interior above the doors
››› Fig. 20 and are identified with the text
“AIRBAG”.
In conjunction with the seat belts, the head-
protection airbag system gives the vehicle
occupants additional protection for the head and upper body in the event of a severe side
col
lision ››› page 15.
››› in Curtain airbags* on page 70 Child seats
Important
information regarding the
front passenger's airbag Fig. 22
Passenger's side sun visor: airbag
s tic
k
er. Fig. 23
On the rear frame of the passenger
side door: airb ag s
ticker. A sticker with important information about
the p
a
s
senger airbag is located on the pas-
senger's sun visor and/or on the passenger
side door frame.
››› in Important information regarding
the front passenger's airbag on page 73
››› page 73 Possible ways to secure child seats
You can secure a child seat to the rear seat or
fr
ont
p
assenger seat in the following ways:
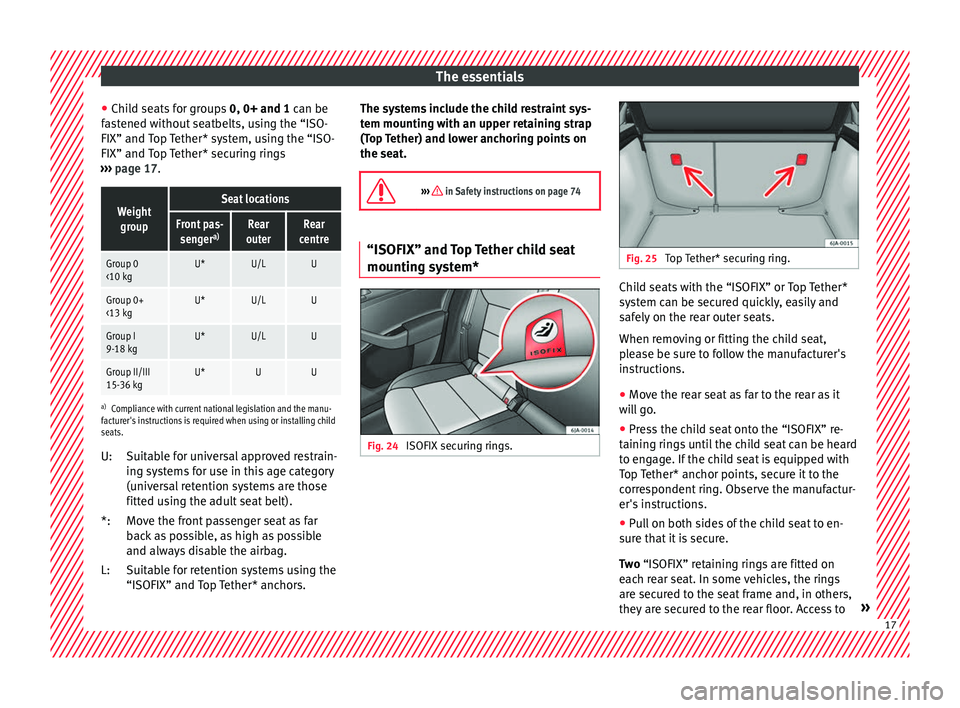
● Child seats in groups 0 to 3 c
an be secured
with a seat belt. 16
Page 19 of 248
The essentials
● Chi l
d se
ats for groups 0, 0+ and 1 can be
fastened without seatbelts, using the “ISO-
FIX” and Top Tether* system, using the “ISO-
FIX” and Top Tether* securing rings
››› page 17.
Weight
groupSeat locations
Front pas- senger a)Rear
outerRear
centre
Group 0
<10 kgU*U/LU
Group 0+
<13 kgU*U/LU
Group I
9-18 kgU*U/LU
Group II/III
15-36 kgU*UU
a) Compliance with current national legislation and the manu-
facturer's instructions is required when using or installing child
seats.
Suitable for universal approved restrain-
ing systems for use in this age category
(universal retention systems are those
fitted using the adult seat belt).
Move the front passenger seat as far
back as possible, as high as possible
and always disable the airbag.
Suitable for retention systems using the
“ISOFIX” and Top Tether* anchors.
U:
*:
L: The systems include the child restraint sys-
tem mountin
g with an upper retaining strap
(Top Tether) and lower anchoring points on
the seat.
››› in Safety instructions on page 74 “ISOFIX” and Top Tether child seat
mounting sy
stem* Fig. 24
ISOFIX securing rings. Fig. 25
Top Tether* securing ring. Child seats with the “ISOFIX” or Top Tether*
sy
s
t
em can be secured quickly, easily and
safely on the rear outer seats.
When removing or fitting the child seat,
please be sure to follow the manufacturer's
instructions.
● Move the rear seat as far to the rear as it
wil
l go.
● Press the child seat onto the “ISOFIX” re-
taining rin
gs until the child seat can be heard
to engage. If the child seat is equipped with
Top Tether* anchor points, secure it to the
correspondent ring. Observe the manufactur-
er's instructions.
● Pull on both sides of the child seat to en-
sure th
at it is secure.
Two “ISOFIX” retaining rings are fitted on
each rear seat. In some vehicles, the rings
are secured to the seat frame and, in others,
they are secured to the rear floor. Access to » 17
Page 35 of 248
The essentials
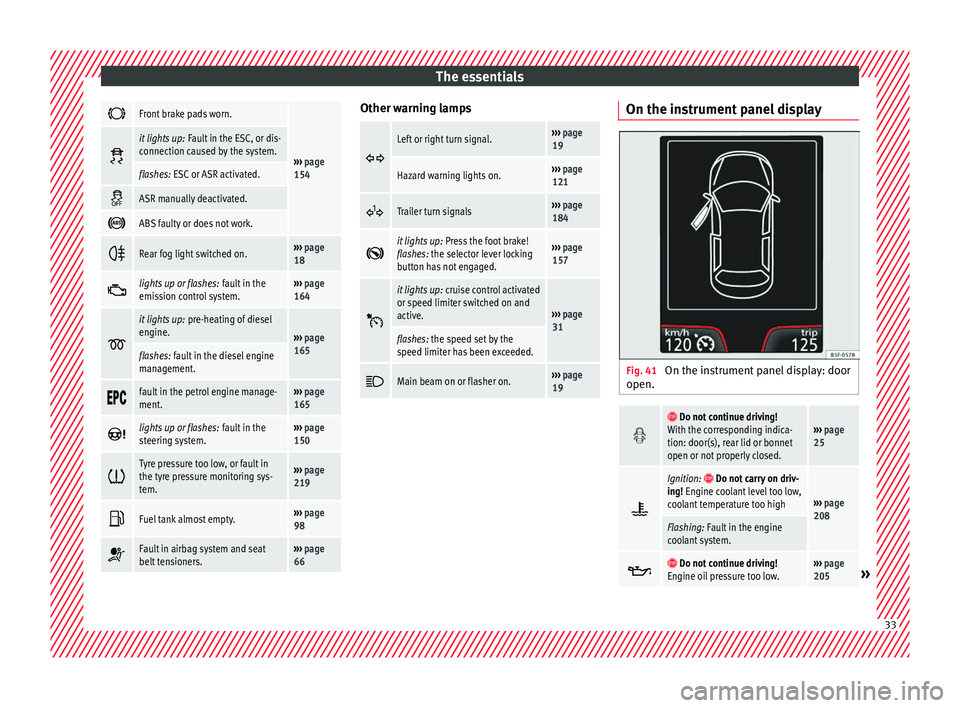
Front brake pads worn.
›››
page
154
it lights up:
Fault in the ESC, or dis-
connection caused by the system.
flashes: ESC or ASR activated.
ASR manually deactivated.
ABS faulty or does not work.
Rear fog light switched on.›››
page
18
lights up or flashes:
fault in the
emission control system.››› page
164
it lights up:
pre-heating of diesel
engine.
››› page
165
flashes: fault in the diesel engine
management.
fault in the petrol engine manage-
ment.›››
page
165
lights up or flashes:
fault in the
steering system.››› page
150
Tyre pressure too low, or fault in
the tyre pressure monitoring sys-
tem.›››
page
219
Fuel tank almost empty.›››
page
98
Fault in airbag system and seat
belt tensioners.›››
page
66 Other warning lamps
Left or right turn signal.›››
page
19
Hazard warning lights on.››› page
121
Trailer turn signals›››
page
184
it lights up:
Press the foot brake!
flashes: the selector lever locking
button has not engaged.››› page
157
it lights up:
cruise control activated
or speed limiter switched on and
active.
››› page
31
flashes: the speed set by the
speed limiter has been exceeded.
Main beam on or flasher on.›››
page
19 On the instrument panel display
Fig. 41
On the instrument panel display: door
open.
Do not continue driving!
With the corresponding indica-
tion: door(s), rear lid or bonnet
open or not properly closed.››› page
25
Ignition: Do not carry on driv-
ing! Engine coolant level too low,
coolant temperature too high
››› page
208
Flashing: Fault in the engine
coolant system.
Do not continue driving!
Engine oil pressure too low.››› page
205» 33
Page 36 of 248
The essentials
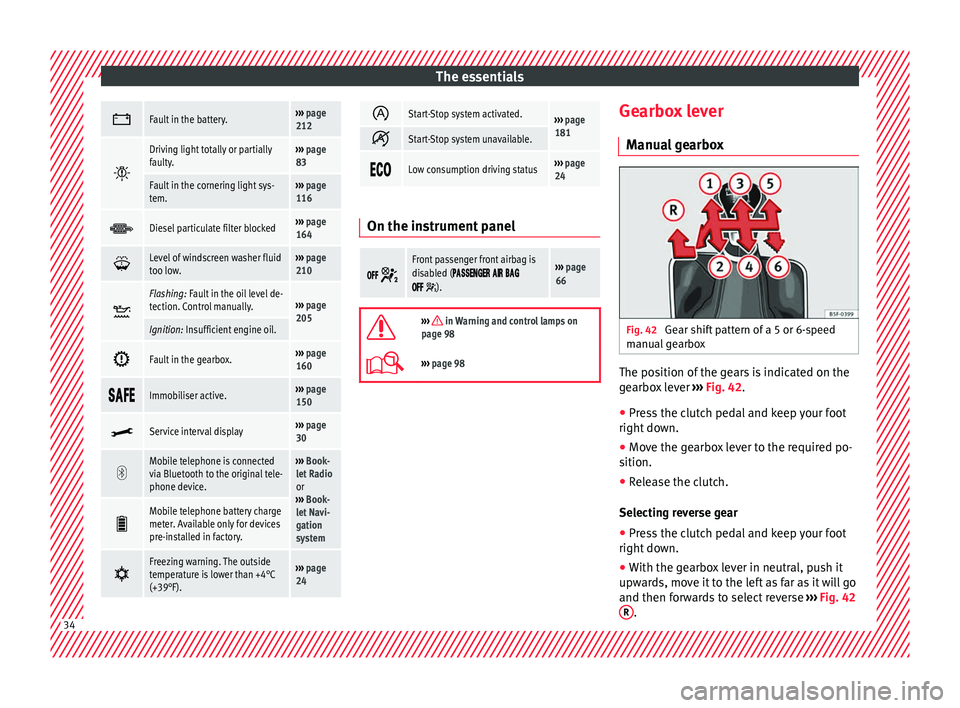
Fault in the battery.›››
page
212
Driving light totally or partially
faulty.›››
page
83
Fault in the cornering light sys-
tem.››› page
116
Diesel particulate filter blocked›››
page
164
Level of windscreen washer fluid
too low.›››
page
210
Flashing: Fault in the oil level de-
tection. Control manually.›››
page
205
Ignition: Insufficient engine oil.
Fault in the gearbox.›››
page
160
Immobiliser active.›››
page
150
Service interval display›››
page
30
Mobile telephone is connected
via Bluetooth to the original tele-
phone device.›››
Book-
let Radio
or
››› Book-
let Navi-
gation
system
Mobile telephone battery charge
meter. Available only for devices
pre-installed in factory.
Freezing warning. The outside
temperature is lower than +4°C
(+39°F).›››
page
24
Start-Stop system activated.›››
page
181
Start-Stop system unavailable.
Low consumption driving status›››
page
24 On the instrument panel
Front passenger front airbag is
disabled (
).
››› page
66
››› in Warning and control lamps on
page 98
››› page 98 Gearbox lever
M anua
l
gearbox Fig. 42
Gear shift pattern of a 5 or 6-speed
m anual
g
earbox The position of the gears is indicated on the
g
e
arbo
x lever ››› Fig. 42.
● Press the clutch pedal and keep your foot
right down.
● Mo
ve the gearbox lever to the required po-
sition.
● Rel
ease the clutch.
Selecting r
everse gear
● Press the clutch pedal and keep your foot
right down.
● W
ith the gearbox lever in neutral, push it
upwar
ds, move it to the left as far as it will go
and then forwards to select reverse ››› Fig. 42
R .
34
Page 58 of 248
Safety
risk of injury. The following list includes most
of the s
af
ety equipment in your SEAT:
● three-point seat belts,
● belt tension limiters for the front and rear
side seats,
● belt
tensioners for the front seats,
● belt height adjustment for the front seats,
● front airbags,
● side airbags in the front seat backrests,
● side airbags in the rear seat backrests*,
● head-protection airbags,
● active front head restraints*,
● “ISOFIX” anchor points for child seats in
the rear s
ide seats with the “ISOFIX” system,
● height-adjustable front head restraints,
● rear head restraints with in-use position
and non-use pos
ition,
● adjustable steering column.
The safety
equipment mentioned above
works together to provide you and your pas-
sengers with the best possible protection in
the event of an accident. However, these
safety systems can only be effective if you
and your passengers are sitting in a correct
position and use this equipment properly.
Safety is everyone's business! Correct position for passengers
Correct
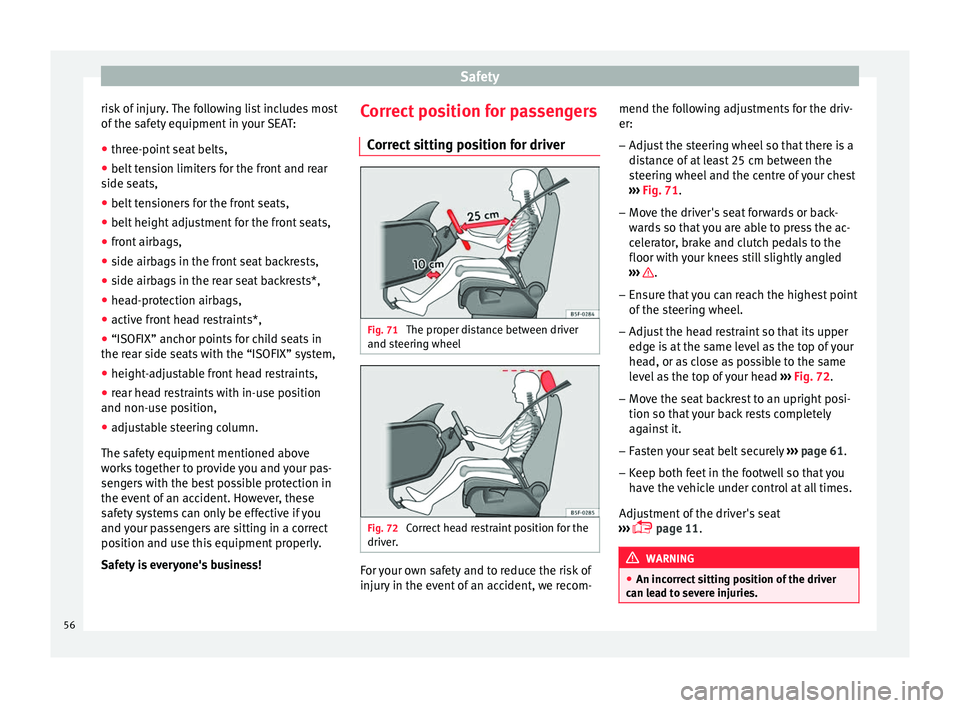
sitting position for driver Fig. 71
The proper distance between driver
and s t
eerin
g wheel Fig. 72
Correct head restraint position for the
driv er
. For your own safety and to reduce the risk of
injur
y
in the ev
ent of an accident, we recom- mend the following adjustments for the driv-
er:
– Adjust the steering wheel so that there is a
dist
ance of at least 25 cm between the
steering wheel and the centre of your chest
››› Fig. 71.
– Move the driver's seat forwards or back-
ward
s so that you are able to press the ac-
celerator, brake and clutch pedals to the
floor with your knees still slightly angled
››› .
– Ensure that you can reach the highest point
of the s
t
eering wheel.
– Adjust the head restraint so that its upper
edge is
at the same level as the top of your
head, or as close as possible to the same
level as the top of your head ››› Fig. 72.
– Move the seat backrest to an upright posi-
tion so that
your back rests completely
against it.
– Fasten your seat belt securely ›››
page 61.
– Keep both feet in the footwell so that you
have the
vehicle under control at all times.
Adjustment of the driver's seat
››› page 11. WARNING
● An incorr ect
sitting position of the driver
can lead to severe injuries. 56
Page 59 of 248
Safe driving
●
Adjus t
the driver's seat so that there is at
least 25 cm distance between the centre of
the chest and the centre of the steering
wheel ››› Fig. 71. If you are sitting closer than
25 cm, the airbag system cannot protect you
properly.
● If your physical constitution prevents you
from maint
aining the minimum distance of 25
cm, contact a specialised workshop. The
workshop will help you decide if special spe-
cific modifications are necessary.
● When driving, always hold the steering
wheel with both h
ands on the outside of the
ring at the 9 o'clock and 3 o'clock positions.
This reduces the risk of injury when the driver
airbag is triggered.
● Never hold the steering wheel at the 12
o'clock
position, or in any other manner (e.g.
in the centre of the steering wheel). In such
cases, if the airbag is triggered, you may sus-
tain injuries to the arms, hands and head.
● To reduce the risk of injury to the driver
during sud
den braking manoeuvres or an ac-
cident, never drive with the backrest tilted far
back! The airbag system and seat belts can
only provide optimal protection when the
backrest is in an upright position and the
driver is wearing his or her seat belt correct-
ly.
● Adjust the head restraint properly to ach-
ieve optima
l protection. Adjusting the steering wheel position
Read the additional information carefully
›› ›
page 13. WARNING
● Never a dju
st the position of the steering
wheel when the vehicle is moving, as this
could cause an accident.
● Move the lever up firmly so the steering
wheel pos
ition does not accidentally change
during driving. risk of accident!
● Make sure you are capable of reaching and
firmly ho
lding the upper part of the steering
wheel: risk of accident!
● If you adjust the steering wheel so that it
points t
owards your face, the driver airbag
will not protect you properly in the event of
an accident. Make sure that the steering
wheel points towards your chest. Correct sitting position for front pas-
sen
g
er For your own safety and to reduce the risk of
injur
y
in the ev
ent of an accident, we recom-
mend the following adjustments for the front
passenger:
– Move the front passenger seat back as far
as po
ssible ››› .–
Mo v
e the se
at backrest to an upright posi-
tion so that your back rests completely
against it.
– Adjust the head restraint so that its upper
edge is
at the same level as the top of your
head, or as close as possible to the same
level as the top of your head ››› page 59.
– Always keep both feet in the footwell in
front of
the front passenger seat.
– Fasten your seat belt securely ›››
page 61.
It is possible to deactivate the front passen-
ger airbag in exceptional circumstances
››› page 71.
Adjusting the front passenger seat
››› page 11. WARNING
● An incorr ect
sitting position of the front
passenger can lead to severe injuries.
● Adjust the front passenger seat so that
there is
at least 25 cm between your chest
and the dash panel. If you are sitting closer
than 25 cm, the airbag system cannot protect
you properly.
● If your physical constitution prevents you
from maint
aining the minimum distance of 25
cm, contact a specialised workshop. The
workshop will help you decide if special spe-
cific modifications are necessary. » 57
Technical data
Advice
Operation
Emergencies
Safety