run flat Seat Toledo 2016 Owner's manual
[x] Cancel search | Manufacturer: SEAT, Model Year: 2016, Model line: Toledo, Model: Seat Toledo 2016Pages: 248, PDF Size: 5.82 MB
Page 47 of 248
The essentials
Repairing a tyre with the anti-punc-
t ur
e k
it Fig. 57
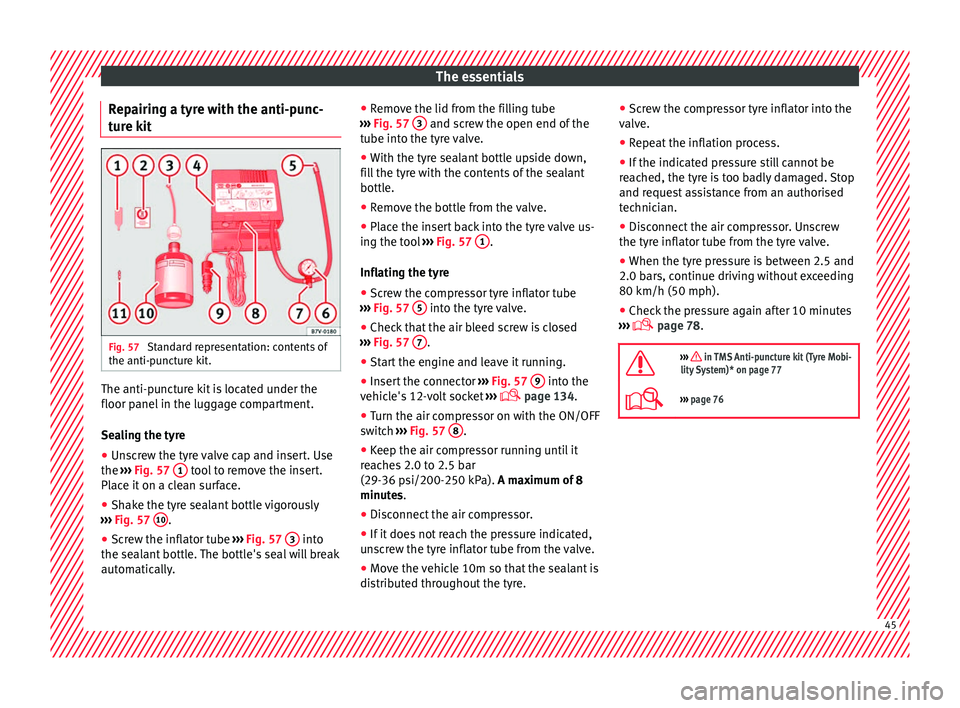
Standard representation: contents of
the anti-p u
nct
ure kit. The anti-puncture kit is located under the
floor p
anel
in the lug
gage compartment.
Sealing the tyre
● Unscrew the tyre valve cap and insert. Use
the ›››
Fig. 57 1 tool to remove the insert.
Pl ac
e it
on a clean surface.
● Shake the tyre sealant bottle vigorously
›››
Fig. 57 10 .
● Screw the inflator tube ››
›
Fig. 57 3 into
the se al
ant
bottle. The bottle's seal will break
automatically. ●
Remov
e the lid from the filling tube
››› Fig. 57 3 and screw the open end of the
t ube int
o the ty
re valve.
● With the tyre sealant bottle upside down,
fill
the tyre with the contents of the sealant
bottle.
● Remove the bottle from the valve.
● Place the insert back into the tyre valve us-
ing the too
l ››› Fig. 57 1 .
Infl atin
g the ty
re
● Screw the compressor tyre inflator tube
›››
Fig. 57 5 into the tyre valve.
● Check that the air bleed screw is closed
› ›
›
Fig. 57 7 .
● Start the engine and leave it running.
● Insert the connector ››
›
Fig. 57 9 into the
v ehic
l
e's 12-volt socket ›››
page 134.
● Turn the air compressor on with the ON/OFF
switc
h ››› Fig. 57 8 .
● Keep the air compressor running until it
r e
ac
hes 2.0 to 2.5 bar
(29-36 psi/200-250 kPa). A maximum of 8
minutes.
● Disconnect the air compressor.
● If it does not reach the pressure indicated,
uns
crew the tyre inflator tube from the valve.
● Move the vehicle 10m so that the sealant is
dis trib
uted throughout the tyre. ●
Scr ew the c
ompressor tyre inflator into the
valve.
● Repeat the inflation process.
● If the indicated pressure still cannot be
reac
hed, the tyre is too badly damaged. Stop
and request assistance from an authorised
technician.
● Disconnect the air compressor. Unscrew
the tyre infl
ator tube from the tyre valve.
● When the tyre pressure is between 2.5 and
2.0 bars, c
ontinue driving without exceeding
80 km/h (50 mph).
● Check the pressure again after 10 minutes
›››
page 78.
››› in TMS Anti-puncture kit (Tyre Mobi-
lity System)* on page 77
››› page 76 45
Page 55 of 248
The essentials
Starting
7. Start the engine of the vehicle with the boo s
tin
g battery and let it run at idling
speed.
8. Start the engine of the vehicle with the flat batter
y and wait for 2 or 3 minutes until
the engine is running.
Removing the jump leads
9. Before you remove the jump leads, switch off the dipped be
am headlights if they are
switched on.
10.
Turn on the heater blower and heated rear
window in the vehicle with the flat battery.
This helps minimise voltage peaks which
are generated when the leads are discon-
nected.
11.When the engine is running, disconnect the lea
ds in reverse order to the details
given above.
Make sure the battery clamps have sufficient
metal-to-metal contact with the battery termi-
nals.
If the engine fails to start, switch off the start-
er after about 10 seconds and try again after
about 1 minute. WARNING
● Ple a
se note the safety warnings referring to
working in the engine compartment
››› page 202.
● The battery providing assistance must have
the same v
oltage as the flat battery (12V) and
approximately the same capacity (see imprint
on battery). Failure to comply could result in
an explosion.
● Never use jump leads when one of the bat-
teries
is frozen. Danger of explosion! Even af-
ter the battery has thawed, battery acid could
leak and cause chemical burns. If a battery
freezes, it should be replaced.
● Keep sparks, flames and lighted cigarettes
awa
y from batteries, danger of explosion.
Failure to comply could result in an explo-
sion.
● Observe the instructions provided by the
manufact
urer of the jump leads.
● Do not connect the negative cable from the
other vehic
le directly to the negative terminal
of the flat battery. The gas emitted from the
battery could be ignited by sparks. Danger of
explosion.
● Do not attach the negative cable from the
other vehic
le to parts of the fuel system or to
the brake line.
● The non-insulated parts of the battery
clamp
s must not be allowed to touch. The
jump lead attached to the positive battery
terminal must not touch metal parts of the ve-
hicle, this can cause a short circuit. ●
Po s
ition the leads in such a way that they
cannot come into contact with any moving
parts in the engine compartment.
● Do not lean on the batteries. This could re-
sult
in chemical burns. Note
The vehicles must not touch each other, oth-
er wi
se electricity could flow as soon as the
positive terminals are connected. Changing the windscreen wiper
b
l
a
des
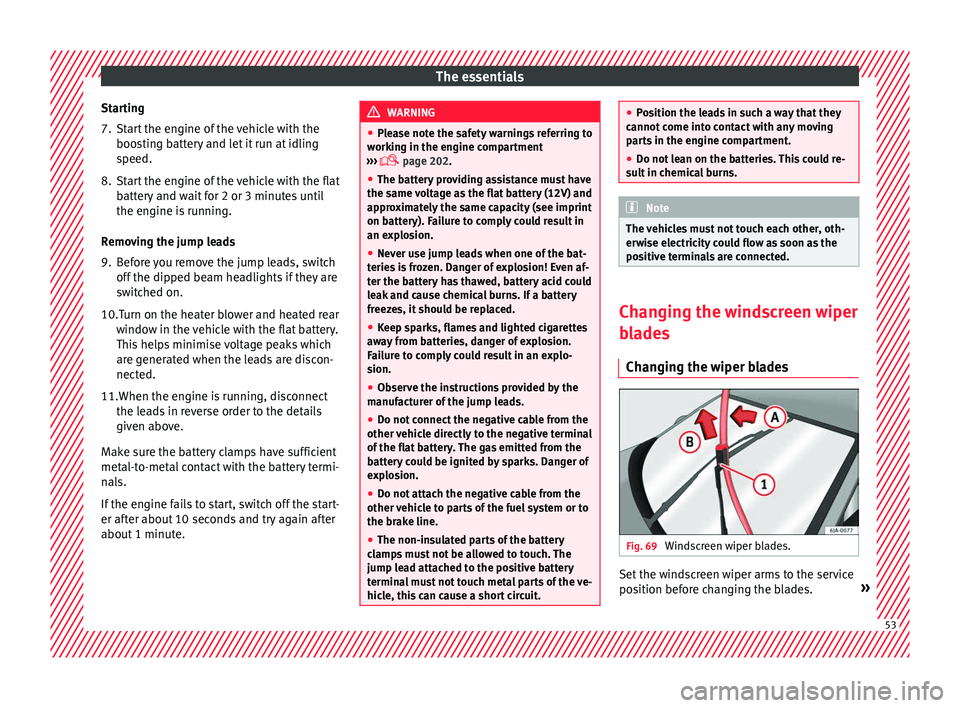
Changing the wiper blades Fig. 69
Windscreen wiper blades. Set the windscreen wiper arms to the service
po
s
ition bef
ore changing the blades. » 53
Page 124 of 248
Operation
Note
● The park in
g lights can only be activated
with the ignition disconnected.
● The parking light will not come on automat-
ical
ly after switching off the ignition if the
left- or right-hand turn signal is left on. Adjusting the headlights
The light beam of the dipped beam lights is
asymmetric: the s
ide of
the road on which
you are driving is lit more intensely.
When a car that is manufactured in a country
that drives on the right travels to a country
that drives on the left (or vice versa), it is nor-
mally necessary to cover part of the headlight
bulbs with stickers or to change the adjust-
ment of the headlights to avoid dazzling oth-
er drivers.
In such cases, the regulations specify certain
light values that must be complied with for
designated points of the light distribution.
This is known as “Tourist light”.
The light distribution of the halogen and full-
LED headlights of the SEAT Toledo allows the
specific “tourist light” values to be met with-
out the need for stickers or changes in the
settings. Note
“Tourist light” is only allowed temporarily. If
you ar e p
lanning a long stay in a country that
drives on the other side, you should take the
vehicle to an Authorised Technical Service to
change the headlights. Interior lights
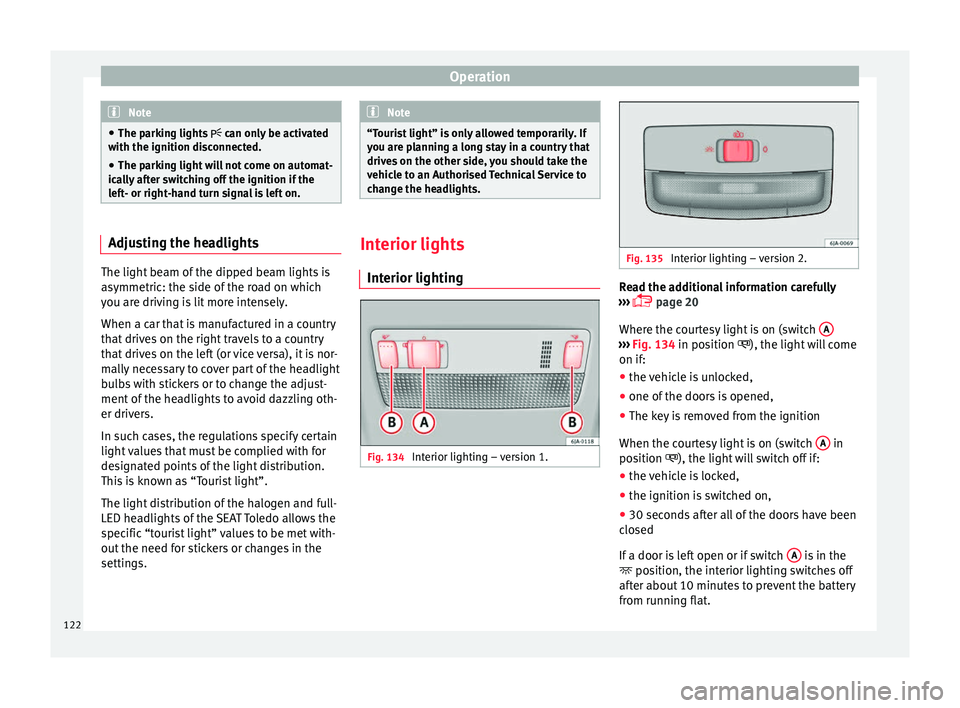
Interior lightin g Fig. 134
Interior lighting – version 1. Fig. 135
Interior lighting – version 2. Read the additional information carefully
› ›
›
page 20
Where the courtesy light is on (switch A ›››
Fig. 134 in pos ition
), the light will come
on if:
● the vehicle is unlocked,
● one of the doors is opened,
● The key is removed from the ignition
When the cour t
esy light is on (switch A in
po s
ition
), the light will switch off if:
● the vehicle is locked,
● the ignition is switched on,
● 30 seconds after all of the doors have been
closed
If
a door is left open or if switch A is in the
po s
ition, the int
erior lighting switches off
after about 10 minutes to prevent the battery
from running flat.
122
Page 139 of 248
Transport and practical equipment
CAUTION
● The comp ar
tments are designed to hold
small objects with a total weight of 1.5 kg.
● Make sure you do not damage the storage
compar
tment or the boot trim when using the
compartment. Storing objects
Lo a
ding the luggage compartment All luggage and other loose objects must be
s
af
ely
secured in the luggage compartment.
Unsecured objects which shift back and forth
could impair the driving safety or driving
characteristics of the vehicle by shifting the
centre of gravity. – Distribute the load evenly in the luggage
compar
tment.
– Place heavy objects as far forward as possi-
ble in the lug
gage compartment.
– Place the heavy objects first.
– Secure heavy objects to the fastening rings
›››
page 137. WARNING
● Loo se lug
gage and other objects in the lug-
gage compartment could cause serious inju-
ries. ●
Alw a
ys stow objects in the luggage com-
partment and secure them on the fastening
rings.
● Use suitable straps to secure heavy ob-
jects.
● D
uring sudden manoeuvres or accidents,
loose ob
jects can be thrown forward, injuring
vehicle occupants or passers-by. This in-
creased risk of injury will be further increased
if a loose object is struck by an inflating air-
bag. If this happens, objects may shoot out-
ward like a missile. Risk of fatal injury.
● Please note that the centre of gravity may
shift when tr
ansporting heavy objects; this
may affect vehicle handling and lead to an ac-
cident. Therefore, it is essential to adjust
your speed and driving style accordingly, to
avoid accidents.
● Never exceed the allowed axle weights or
allo
wed maximum weight. If said weights are
exceeded, the driving characteristics of the
vehicle may change, leading to accidents, in-
juries and damage to the vehicle.
● Never leave your vehicle unattended, espe-
cia
lly when the rear lid is open. Children
could climb into the luggage compartment,
closing the door behind them; they will be
trapped and run the risk of death.
● Never allow children to play in or around
the vehic
le. Close and lock all the doors and
rear lid when you leave the vehicle. Before
you lock the vehicle, make sure that there are
no adults or children in the vehicle. Note
● Air cir c
ulation in the vehicle helps reduce
fogging of the windows. Used air escapes
through ventilation slits in the side trim of
the luggage compartment. Ensure that the
ventilation slots are never covered.
● Straps for securing the load to the fasten-
ing ring
s are commercially available. Fastening rings*
There can be four fastening rings in the lug-
g
ag
e c
ompartment for fastening luggage and
other objects.
– Always use suitable and undamaged straps
to secur
e luggage and other objects to the
fastening rings ››› in Loading the lug-
g ag
e c
ompartment on page 137.
– Pull up the fastening rings to attach the
strap
s.
During a collision or an accident, even small
and light objects can build up so much ener-
gy that they can cause very severe injuries.
The amount of kinetic “energy” depends on
the speed of the vehicle and the weight of
the object. The most significant factor, how-
ever, is the speed of the vehicle.
Example: An object weighing 4.5 kg is lying
unsecured in the vehicle. During a frontal col-
lision at a speed of 50 km/h (31 mph), this »
137
Technical data
Advice
Operation
Emergencies
Safety
Page 159 of 248
Driving
WARNING
Never engage reverse gear when moving for-
war d. Ri
sk of accident! Note
Do not rest your hand on the gear lever while
drivin g.
The pressure of your hand could lead
to premature wear of the gear system. Automatic gearbox
Ba s
ic information The gearbox changes up and down automati-
c
al
ly
. The gearbox can be set to Tiptronic
mode. The gears can be changed manually in
this mode ›››
page 159.
The engine can only be started in positions P
or N. If, on engaging the steering lock,
switching the ignition on/off or starting the
engine, the selector lever is not in these posi-
tions, the informative display will show Move
the selector lever to position
P/N! , or
P/N is shown on the general
dash panel display.
At temperatures below -10°C (14°F), the en-
gine can only be started in position P.
Move the selector lever to position P when
parking the vehicle on a flat surface. On a
slope, the handbrake should be firmly ap- plied before moving the selector lever to the
park po
sition. This reduces the load on the
lock mechanism while making it easier to
move the selector lever from position P.
If, while the vehicle is moving, the selector
lever is accidentally moved to position N, re-
lease the accelerator and wait for the engine
to idle before moving it back into position. WARNING
● Never pr e
ss the accelerator when selecting
the automatic gearbox operating mode when
the vehicle is stationary. Risk of accident!
● Never move the selector lever to positions
R or P when driving. Ri
sk of accident!
● If the vehicle is to be stopped with a gear
selected and the en
gine idling (e.g. waiting
or moving slowly at traffic lights), press down
on the brake pedal because the transmission
is not entirely interrupted when the engine is
idling and the vehicle will tend to start mov-
ing.
● Apply the handbrake firmly and put the se-
lector l
ever in position P before opening the
bonnet and working on the vehicle with the
engine running. Risk of accident! Strictly fol-
low the safety instructions ››› page 202, En-
gine compartment.
● When stopping on a slope (hill), try not to
stop the
vehicle from moving by pressing the
“accelerator” with a gear selected. This could
overheat the clutch. If the clutch risks being
burnt due to this force, it would switch off and the vehicle could move backwards. Risk
of ac
c
ident!
● If you have to stop on a hill, press down on
the brake ped
al to stop the vehicle from mov-
ing.
● The drive wheels could lose traction on a
slipper
y road surface when the kick-down
function is activated. Risk of sliding! CAUTION
● In D SG aut om
atic gearboxes, the double
clutch is protected from overloads. If the hill
hold control is used, the clutches are subjec-
ted to greater force if the vehicle is at a
standstill on a slope or suddenly accelerating
on a slope.
● Should the clutches overheat, the sym-
bol i
s shown on the informative display with
a warning message Gear overheated.
Stop! Instruction Manual! An audible
warning is also heard. Stop the vehicle in this
case, stop the engine and wait until the sym-
bol has switched off. Danger of damage to
the gearbox! You can continue driving once
the symbol is switched off. Starting and driving
Starting
– Press and hold the brake pedal.
– Press and hold the interlock button on the
sel ect
or l
ever knob and move the selector »
157
Technical data
Advice
Operation
Emergencies
Safety
Page 165 of 248

Driving
engine at high rpm in the lower gears uses
an u nnec
e
ssary amount of fuel.
Manual gearbox: shift up from first to second
gear as soon as possible. We recommend
that, whenever possible, you change to a
higher gear upon reaching 2000 rpm. Follow
the “recommended gear” indication that ap-
pears on the instrument panel
››› page 25.
Avoid driving at high speed
We advise you not to drive at the top speed
permitted by the vehicle. Fuel consumption,
exhaust emissions and noise levels all in-
crease very rapidly at higher speeds. Driving
at moderate speeds will help to save fuel.
Avoid idling
It is worthwhile switching off the engine
when waiting in a traffic jam, at level cross-
ings or at traffic lights with a long red phase.
The fuel saved after only 30 - 40 seconds is
greater than the amount of fuel needed to re-
start the engine.
The engine takes a long time to warm up
when it is idling. Mechanical wear and pollu-
tant emissions are also especially high dur-
ing this initial warm-up phase. It is therefore
best to drive off immediately after starting
the engine. Avoid running the engine at high
speed. Periodic maintenance
Periodic m
aintenance work guarantees that,
before beginning a journey, you will not con-
sume more than the required amount of fuel.
A well-serviced engine gives you the benefit
of improved fuel efficiency as well as maxi-
mum reliability and an enhanced resale val-
ue.
A badly serviced engine can consume up to
10% more fuel than necessary.
Avoid short journeys
To reduce the consumption and emission of
polluting exhaust gases, the engine and the
exhaust gas filtration systems should reach
the optimum operating temperature.
With the engine cold, fuel consumption is
proportionally higher. The engine does not
warm up and fuel consumption does not nor-
malise until having driven approximately four
kilometres (2.5 miles). This is why we recom-
mend avoiding short trips whenever possi-
ble.
Maintain the correct tyre pressures
Bear in mind that keeping the tyres at an ad-
equate pressure saves fuel. If the tyre pres-
sure is just one bar (14.5 psi/100 kPa) too
low, fuel consumption can increase by as
much as 5%. Due to the greater rolling resist-
ance, under-inflation also increases tyre wear
wear and impairs handling. The tyre pressures should always be checked
when the tyre
s are cold.
Do not use winter tyres all year round as they
increase fuel consumption by up to 10%.
Avoid unnecessary weight
Given that every kilo of extra weight will in-
crease the fuel consumption, it is advisable
to always check the luggage compartment to
make sure that no unnecessary loads are be-
ing transported.
A roof rack is often left in place for the sake
of convenience, even when it is no longer
needed. At a speed of 100 km/h (62 mph)
and 120 km/h (75 mph) your vehicle will use
about 12% more fuel as a result of the extra
wind resistance caused by the roof rack even
when it is not in use.
Save electricity
The engine activates the alternator, which
produces electricity. With the need for elec-
tricity, fuel consumption also increases. Be-
cause of this, always turn off electrical devi-
ces when you do not need them. Examples of
devices that use a lot of electricity are: the
fan at high speeds, the rear window heating
and the seat heaters*. Note
● If y
ou vehicle has Start-Stop, it is not rec-
ommended to switch this function off. » 163
Technical data
Advice
Operation
Emergencies
Safety
Page 214 of 248
Advice
●
A short c
ircuit is produced if the battery ter-
minals are bridged, e.g. using metal objects,
cables, etc. Possible consequences of a short
circuit: melting of lead plates, battery explo-
sion and fire, splashing acid.
● The following is forbidden while working on
the batter
y: fire and open flames, smoking
and activities that could produce sparks.
Avoid causing sparks when handling cables
or electrical apparatus. Risk of injury in the
event of large sparks.
● Before working on the electrical system,
you mus
t switch off the engine, the ignition
and all electrical components and disconnect
the cable from the negative terminal (-) of the
battery. To change a bulb, simply switch off
the corresponding light.
● Never charge a frozen or thawed out bat-
tery
. Risk of explosion and acid burns! Re-
place a frozen battery.
● Never use the jump leads on batteries in
which the electr
olyte level is too low. Risk of
explosion and acid burns!
● Never use a damaged battery. Risk of ex-
plos
ion! Replace a damaged battery immedi-
ately. CAUTION
● Never di s
connect the battery when the igni-
tion is switched on, as the electrical system
(electronic components) of the vehicle could
be damaged. When disconnecting the battery
from the vehicle electrical system, disconnect its negative terminal (-) first. Only then may
the pos
itiv
e terminal (+) be disconnected.
● When connecting the battery, first connect
the positiv
e terminal (+) and then the nega-
tive terminal (-). The battery cables must nev-
er be connected to the wrong battery termi-
nals. Risk of burning the electrical installa-
tion!
● Make sure the battery acid does not come
into cont
act with the bodywork. Risk of paint-
work damage.
● Do not expose the battery to direct sunlight
to prot
ect it from ultraviolet radiation.
● If the vehicle is not used for 3 or 4 weeks,
the batter
y could run flat. This is because
some components use electricity even in
standby mode (e.g. control units). Prevent the
battery from running flat by disconnecting its
negative terminal or leave it charging at a low
current.
● If you frequently use the vehicle for short
trips, the batt
ery may not fully charge and
could run flat. For the sake of the environment
A flat battery is particularly harmful waste for
the env ir
onment. It must therefore be dis-
posed of according to current local law. Note
Replace a battery once it is older than 5
ye ar
s. Control lamp
If the
control lamp is illuminated while the
en gine i
s running, the battery is not charg-
ing.
Go to a technical service. Have the car's elec-
trical equipment inspected. CAUTION
Additionally, if the warning lamp lights up
whi
le driving, the warning lamp also lights
up (cooling system fault). Stop the vehicle
and switch off the engine – Risk of engine
damage! Lifting the battery cover
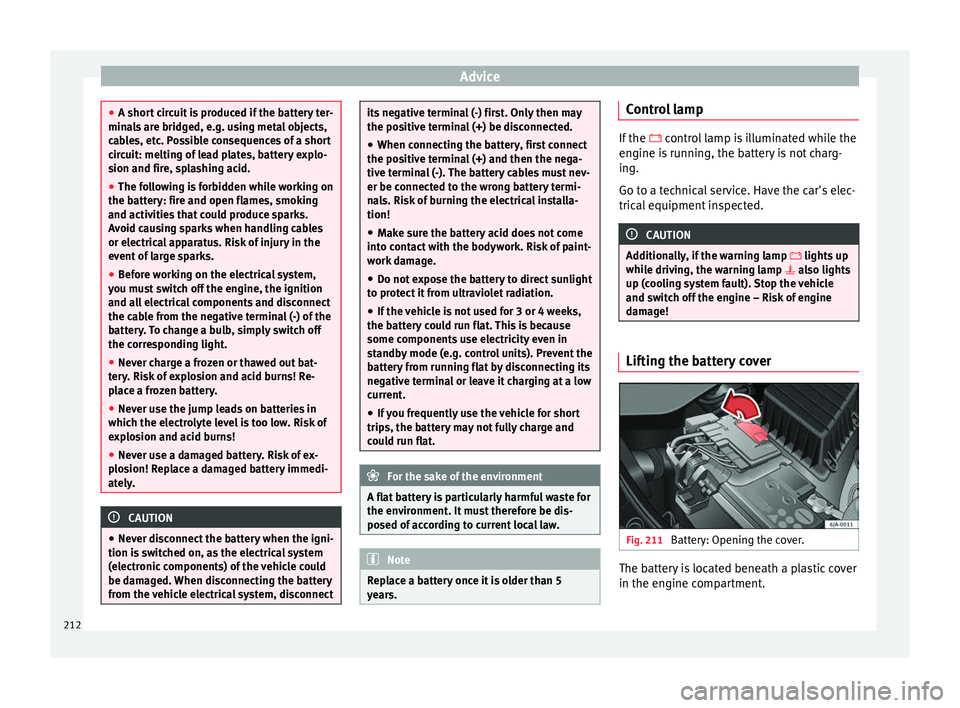
Fig. 211
Battery: Opening the cover. The battery is located beneath a plastic cover
in the en
gine c
omp
artment.
212