fuse box SKODA 120LE 1980 Workshop Manual
[x] Cancel search | Manufacturer: SKODA, Model Year: 1980, Model line: 120LE, Model: SKODA 120LE 1980Pages: 238, PDF Size: 47.09 MB
Page 16 of 238

Lifting
the cor with o
Power iock -
When
r-rsing o service
Power iock, let the
cor rest on
the points
shown in Fi1.1.412.
To tow the cor, hook the towing rope on
to
the brocket under
the cor nose. Threod the pin
through the loop of the rope
ond the brocket
lugs ond secure the pin
with o cotter pin (both
thL pin
ond the cotter pin
ore included in the
cor occessories).
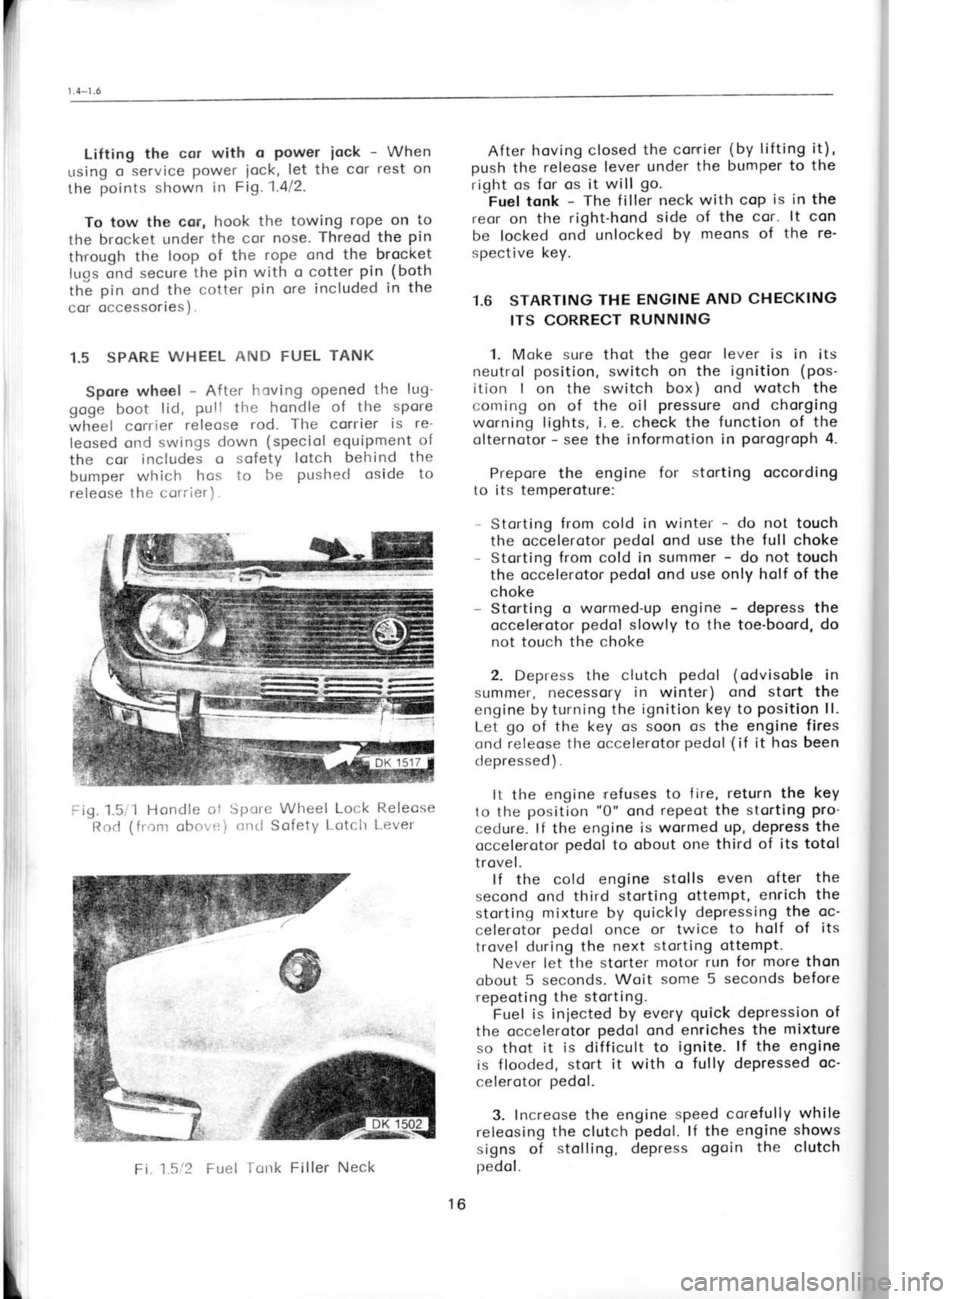
1.5 SPARE WHEEL
AND FUEL TANK
Spore wheel -
After having opened the
lug-
goge boot lid, pull the hondle of the spore
wheel corrier releose
rod.
The corrier is
re-
leosed ond swings
down (speciol equipment of
the cor includes
o sofety lotch behind the
bumper which hos to be pushecl
oside to
releose the corrier
) . After
hoving closed the corrier (by
lifting it),
push the releose lever under
the bumper to the
right os for os it will go.
Fuel tonk -
The filler neck with cop is in the
reor on the right-hond
side of the cor- lt con
be locked ond unlocked by meons of
the re'
spective key.
1.6 STARTING THE
ENGINE AND CHECKING
ITS CORRECT RUNNING
1. Moke sure thot the geor
lever is in its
neutrol position,
switch on the ignition (pos-
ition I on the switch box) ond wotch the
coming on of the oil pressure ond chorging
worning lights, i.
e. check the function of the
olternotor -
see the informotion in porogroph
4.
Prepore the engine
to its temperoture:
- Storting from cold in
the occelerotor pedol
- Storting from cold in
the occelerotor pedol
choke for
storting occording
winter -
do not touch
ond use the full choke
summer -
do not touch
ond use only holf of the
Fig. 1.5/1 Hondle ot
Rod (f ronr obove )Spcre
Wheel Lock
crnrl Safety Lotch -
Storting o wormed-up engine -
depress the
occelerotor pedol
slowly to tlre
toe-boord, do
not touch the choke
2. Depress the clutch pedol
(odvisoble
in
summer, necessory in
winter) ond stort
the
engine by turning the ignition key to position
ll.
Let go
of the key os soon os the engine fires
ond releose the occelerotor pedol
{if it hos
been
clepressed).
It the engine ,refuses
to fire, return the key
to the position "0"
ond rePeot the
storting
Pro-
cedure. lf the engine is wormed up, depress the
occelerotor pedol
to obout one third of its totol
trovel. lf the cold engine stolls even
ofter the
second ond third storting ottemPt, enrich the
storting mixture by quickly
depressing the
oc-
celerotor pedol
once or twice to holf of its
trovel during the next storting ottemPt.
Never let tlre storter motor run for more
thon
obout 5 seconds. Woit
some 5 seconds before
repeoting the storting.
Fuel is injected
by every quick
depression of
the occelerotor pedol
ond enriches the mixture
so thot it is difficult to ignite. lf the engine
is flooded, stort
it
with o fully depressed oc-
celerotor pedol.
3. Increose the engine speed corefully while
releosing the clutch pedol. lf the
engine shows
signs of stolling, depress
ogoin the clutch
pedol.
Relecse
L.ever
Fi.1.5t2 Fuel Tcrtrk Filler
Neck
16
Page 161 of 238

1
1
1
1
1
1:
1r
1l
't,
1',
1:
1:
1l?
ffi{,
ll
---r---
i
fdll
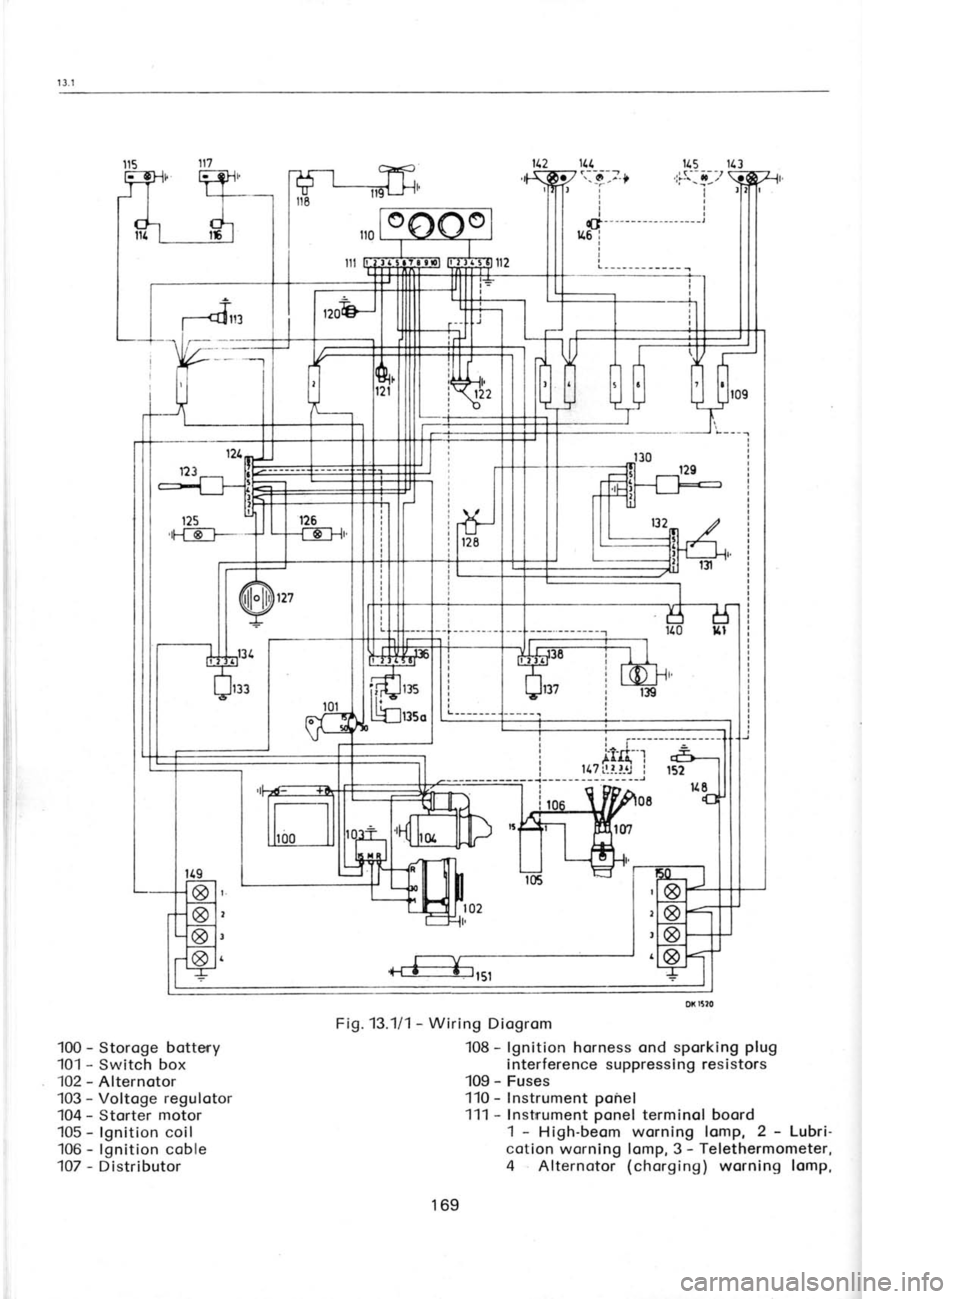
100 -
Storoge botteny
101 -
Switch box
102 -
Alternotor
103 -
Voltoge regulotor
104 -
Storter motor
105 -
lgnition coil
106 -
lgnition coble
107 -
Distributor 115
113
'l7s:,!--,t
ir
rl
tl
tl
t|- -
- --
- - -- - - --- --- -l
116 i
I
I
L--_-___---__ I
Fig. 13.111 -
Wiring Diogrom
108 -
lgnition horness ond sporking plug
interference suppressing resistors
109 -
Fuses
'110 - Instrument ponel
111 -
Instrrument ponel
terminol boord
1 -
High-beom worning lomp, 2 -
Lubri-
cotion worning lomp, 3 -
Telethermometer,
4 Alternotor (chorging)
worning lomp,
169
Page 165 of 238

'i
iiiI 14. Fuse box
Centrol connection of conductors -
do not
seporote them from the bunch!
15. Direction indicotor switches, dip switch,
and horn switch
eight-pole terminol
boord
six-pole terminol boord
16. Porking light switch ond high beom feeder four-pole terminol boord
17. Switch box femole connectors 5.5 with symbols "15",
"30", ond '50"
to be
connected to symbols
"15u, "30', ond '50"
on the switch box
18. Instrument ponel
ten-pole terminol boord
six-pole terminol boord
eorthing coble with lug
'19. Heoter switch
four-pole terminol boord
20. Switch of disobility lights
six-pole terminol boord
21. Door switch, right-hond
green -
femole connector 5.5
22. Dome light,
right-hond
green -
femole connector 5.5
red -
femole connector 5.5
23. Stop switches
forked (yellow) -
femole connectors 5.5 .
red -
femole connector 5.5
white -
femole connector 5.5upper ond lower
switch
upper switch lower switch
24.Fuel gouge block -
femole connector 5.5
yellow -
femole connector 5.5
blue -
femole connector 5.5
to be connected to the respective pins
(blodes) of the some colour of the fuel gouge
25. Storter motor, reversing
lomp switch
conductors with lugs stater motor moin
terminol boord
storter motor
control switch
green -
femole connectors 5.5 heodlomp switch
26. Oil pressure
gouge,
thermometer, corburettor
iet seporotor
green -
femole connector 5.5 yellow
-
femole connector 5.5
green - telethermometer
primory element
femole connector 7.
corburettor
iet seporotor
27. lgnition coil, voltoge regulotor, olternotor,
tochometer
conductor with femole connector ond
bronching lug
femole connector-regulotor terminol 15/54
lug -
ignition coil terminol 15
blue -
femole connector 5.5,
symbol "R"
. regulotor terminol "R"
yellow -
femole connector 5.5,
symbol "M"
regulotor terminol "M"
blue -
connector "R"
. olternotor terminol "R"
yellow -
connector "M".
olternotor terminol "M"
lug terminol "+B"
conductor with
lug ignition coilterminol "1"
(tochometer operotion
)
28. Toil lomp cluster, right.hond
yellow -
femole connector 5.5 toil light
block -
femole connector 5.5 direction indicotors
red -
femole connector 5.5 stop light
green -
femole connector 5.5 reversing lomp
29. Licence plote light
conductors with femole connectors 5.5
30. Toil lomp cluster, left.hond
se point
28.
b) Connection
of free conductors
1. Storoge bottery
bottery coble positive
(*)
terminol -
storter motor
bottery eorthing strip negotive (-)
terminal -
bodywork (eorthing conductor)
2. Engine engine eorthing strip (fostening
lug) -
engine cross beorer (eorthing conductor)
3. Distributor speciol coble from distributor to
ignition
coil; end with interference suppressing
terminol to distributor
coble from distributor to ignition coil
terminol "1"
cylindricol
(pin)
connector
pressure gouge172
Page 179 of 238

(
1
z
Strike the
slip-over ring off the circlip
(towords the motor windlng). Open the circlip
ond pull
it off the shoft together with the re-
leosed ports.
8. lf necessory, re-turn the commutotor ond
scrope or mill out the insulotion between the
lominotions. "Mikonit"
should be 0.4 to 0.8 mm
below the octive surfoce.
Note: The
switch connot be further token
opat. lf
defective, lt hcs to be reploced with
o new one. When cleoning ports
of the storter
motor, do not dip the ormoture or the pinion
with the idler into petrol
or onother degreosing
ogent.The some opplles to the end shieldswith
beorings. By dipping them in o degreosing
ogent, the beorings become procticolly
worth-
less"
Storter Motor Reossembly 1. Lubricote the hellx of the ormoture shoft
with greose -
see Chopter 15.2 'Lubriconts
of
foreing mokeu ond fit the pinion
with the idler
ond the slip-over ring in posltion.
Fit the
circlip
into the groove
in the shoft, ond drive the slip-
on ring over it. The pinion
with the idler must
move freely olong the shoft.
2. Slip the respective
woshers on the shoft in
their originol sequence (corrier
ring, distonce
ring, fibre ring, distonce ring) ond insert the
ormoture with the engoging lever
into the drive
end shield. 3. Suspend the switch
ormoture into the
pre-engoging lever ond bolt down the switch
lightly. Fit the lever pin
into the drive
end
shield ond lock it in position
with the retoiner.
4. Tighten the copscrews of the switch
ond
fit the stotor on the drive
end shield.
5. Instoll the respective
woshers into
the
commutotor end shield in
their originol se-
quence (the dished wosher with its centre
focing the shield, then the ploin
wosher, the
toothed wosher, ond the drive wosher).
6. Fit the commutotor end shield with lifted
brushes on the shoft (in
the position
occording
to the recess
for the excitotion outlet ond the
notch) ond screw in the clomping bolts.
7. Instoll the brush interconnecting strip ond
bolt it down together with the field winding
outlets to the positive
brush holders, lower the
brushes. 8. Fit the Insuloting strip in position
ond bolt
down the cover. 9. Test the storter mottr.
Diognosing Storter Motor Defects in Cor
o) lf the storter motor refuses
to operote, look
first for on interrupted connection between
the bottery ond
the storter
motor, the engine
eorthing ond the storter
motor, or the engine
eorthing ond the bottery. lf these connec-
tions ore in order (current
flows to the ter' DK
1575
Fig. 13.10/3 -
Storter Motor Testlng Connection
minols u30"
ond "50"
with switched on
ignition), stort looking for o foilure of the
storter motor switch. Even in this instonce,
the couse con be o fully dischorged or foulty
bottery.
b) lf the storter motor
continues running
even
ofter the ignition key hos been switched in
the switch box from the position "START",
it hos to be stopped without ony deloy by
disconnecting the bottery (using
its eorthed
pole).
c) lf the storter motor hos no power
to cronk
the engine, stort with switched-on heod-
lights. A
morked dimming indicotes c poorly
chorged bottery.
Tentotive Checking of
Storter Motor
Outside Cor
Connect the terminol "30'of
the storter
motor to o properly
chorged bottery ond incor'
porote on ommeter with o wide
meosuring ronge
into the circuit -
see Fig. 13.10/3.
Stort the
engine (feed
current to the terminol "50").
The
volue of the current ot idling speed must
not
exceed 65 omperes (not
considering the peok
ot
the first momentous deflection).
The storter motor must run noiselessly,
smoothly, ond the pinion
must move smoothly
into ond out of the rest position
(engoge
ond
diesengoge). The engoged pinion
must not ro-
tote direct on the foce of the slip-on ring. The
run-out of the storter motor must not lost longer
thon 8 seconds ofter the disconnection of the
switch from the current supply.
Inspect the brush pressure
springs. The
brushes must
beor on the commutotor by ot
leost two thirds of their surfoce ond they must
move freely in their cells.
The ormoture should hove o noticeoble oxiol
cleoronce (ploy)
not exceeding 0.7 mm.
At
o slight rototion of the pinion
in the direction
of the storter motor rototion,
the idlor must
slip
freely.
186