change wheel SKODA CITIGO 2012 1.G User Guide
[x] Cancel search | Manufacturer: SKODA, Model Year: 2012, Model line: CITIGO, Model: SKODA CITIGO 2012 1.GPages: 157, PDF Size: 3.9 MB
Page 131 of 157
›
Let all of the occupants get out.
While changing a tyre, the occupants of the
vehicle should not stand on the road (instead they should remain behind a crash
barrier).
› Switch off the engine and move the gearshift lever into
Neutral or move the
selector lever for the automatic gearbox into position N.
› Firmly apply the
handbrake.
› Remove the vehicle tool kit
» page 127 and the spare wheel » page 122, Spare
wheel from the luggage compartment. ÐChanging a wheel
First read and observe the introductory information and safety warn-
ings on page 128.
Always change a wheel on a level surface as far as possible.
›
Remove the full wheel trim
» page 122 or caps »
page 123.
› First of all slacken the anti-theft wheel bolt and then the other wheel
bolts » page 130.
› Jack up the vehicle until the wheel that needs changing is clear of the
ground » page 131 .
› Unscrew the wheel bolts and place them on a clean surface (cloth, paper, etc.).
› Remove the wheel.
› Attach the spare wheel and slightly screw on the wheel bolts.
› Lower the vehicle.
› Alternately tighten the wheel bolts opposite each other using the wheel
wrench (crosswise) and then tighten the anti-theft wheel bolt » page 130.
› Reinstall the wheel trim/wheel trim cap or the caps. Note
■ All bolts must be clean and must turn easily.
■ Under no circumstances grease or oil the wheel bolts!
■ When fitting unidirectional tyres, ensure that the direction of rotation is cor-
rect »
page 121, Unidirectional tyres . ÐSubsequent steps
First read and observe the introductory information and safety warn-
ings on page 128.
The following steps must also be performed after changing the wheel.ä
ä ›
Stow and attach the replaced wheel in the spare wheel well using a special
screw » page 122, Spare wheel.
› Stow the vehicle tool kit in the space provided.
› Check
the tyre pressure
on the installed spare wheel as soon as possible.
› Have the
tightening torque of the wheel bolts checked with a torque wrench
as soon as possible.
› Change the damaged wheel or consult a ŠKODA specialist garage about repair
possibilities. Note
■ If it is determined that the wheel bolts are corroded and difficult to turn when
changing the wheel, the bolts must be replaced before checking the tightening
torque. ■ Drive cautiously and only at a moderate speed until the tightening torque has
been checked. Ð
129
Do-it-yourself
Page 143 of 157
No. Power consumer
11 Starter
12 DC-DC voltage converter Ð
Bulbs
ä
Introduction
This chapter contains information on the following subjects:
Headlights 141
Changing the light bulb for side repeater turn signal lights 142
Changing light bulbs for fog lights 142
Changing the bulb for the licence plate light 143
Tail lamp assembly 143
Some manual skills are required to change a bulb. For this reason, if uncertain, we
recommend that bulbs are replaced by a ŠKODA specialist garage or other expert
help is sought.
› Switch off the ignition and all of the lights before replacing a bulb.
› Faulty bulbs must only be replaced with the same type of bulbs. The designa-
tion is located on the light socket or the glass bulb.
› A stowage compartment for replacement bulbs is located in a plastic box in the
spare wheel or underneath the floor covering in the luggage compartment. WARNING
■ Accidents can be caused if the road in front of the vehicle is not sufficiently
illuminated and the vehicle cannot or can only be seen with difficulty by other
road users.
■ Always read and observe the warnings before completing any work in the
engine compartment » page 108, Engine compartment .
■ The H4 bulb is under pressure and may explode during a lamp replacement -
risk of injury! We therefore recommended wearing gloves and safety glasses
when changing a bulb. CAUTION
■ Do not take hold of the glass bulb with naked fingers (even the smallest
amount of dirt reduces the working life of the light bulb). Use a clean cloth, nap-
kin, or similar. ■ When removing and installing the number plate light and tail light make sure
that the paintwork of the vehicle and the tail light are not damaged. Note
■ This Owner's Manual only describes the replacement of bulbs where it is possi-
ble to replace the bulbs on your own without any complications arising. Other
light bulbs should be changed by a
ŠKODA specialist garage.
■ We recommend that a box of replacement bulbs be always carried in the vehi-
cle. Replacement bulbs can be purchased from
ŠKODAOriginal Accessories.
■ We recommend that the headlight settings are checked by a ŠKODA specialist
garage after replacing a bulb in the main or low beam.
■ LED diodes should be changed by a specialist ŠKODA garage. Ð Headlights
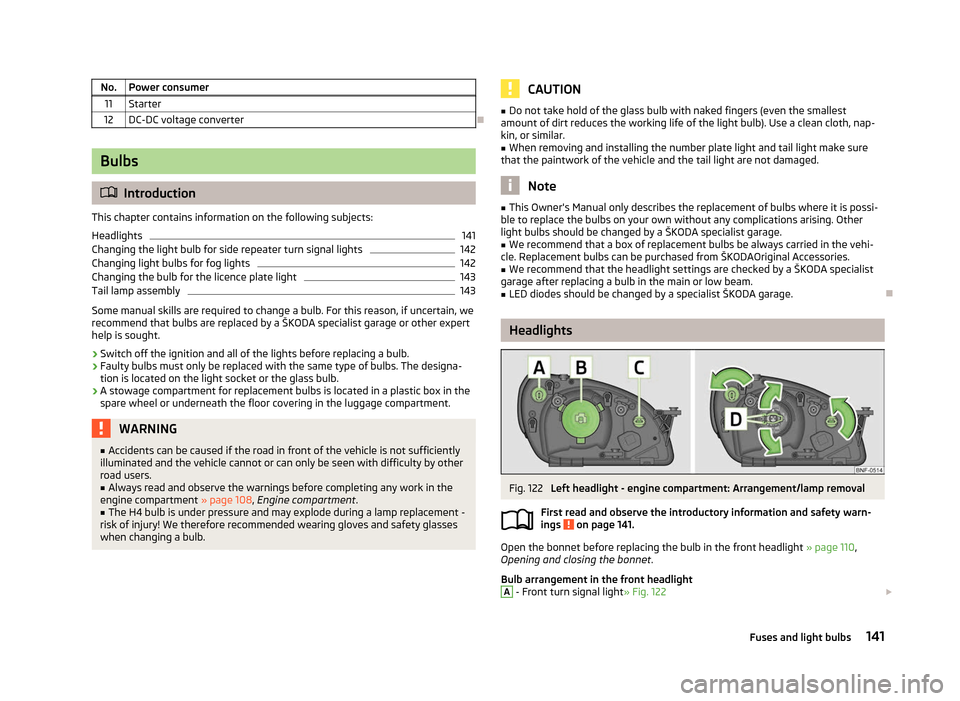
Fig. 122
Left headlight - engine compartment: Arrangement/lamp removal
First read and observe the introductory information and safety warn-
ings on page 141.
Open the bonnet before replacing the bulb in the front headlight
» page 110,
Opening and closing the bonnet .
Bulb arrangement in the front headlight A
- Front turn signal light
» Fig. 122 £
ä
141
Fuses and light bulbs
Page 148 of 157
In the extra-urban driving cycle, the vehicle is accelerated and decelerated in all
gears, corresponding to daily routine driving conditions. The driving speed varies
between 0 and 120 km/h.
The calculation of the combined fuel consumption considers a weighting of about
37
% for the intra-urban cycle and 63 % for the extra-urban cycle. WARNING
Do not exceed the specified maximum permissible weights - risk of accident
and damage. Note
■ If required, you can find out the precise weight of your vehicle by contacting a
ŠKODA
Service Partner.
■ Depending on the range of equipment, style of driving, traffic situation, weather
influences and vehicle condition, consumption values may deviate from the indi-
cated values. ÐDimensions
Dimensions (mm) Length 3563
Width 1641/1645a)
Width including exterior mirror 1910
Height 1478/1463b)
Clearance 136/121b)
Wheel base 2420
Track gauge front/rear 1428/1424a)
Valid for vehicles with rear side doors.
b) The value corresponds to the status with the Green tec package. ÐSpecifications and engine oil capacity
The engine has been factory-filled with a high-grade oil that can be use through-
out the year - except in extreme climate zones. Various oils can be mixed together when refilling.
Engine oils are, of course, undergoing continuous further development. Thus the
information stated in this Owner's Manual is only correct at the time of publica-
tion.
ŠKODA Service Partners are informed about the latest changes by
ŠKODA. We
therefore recommend that the oil change is completed by a ŠKODA Service Part-
ner.
The specifications (VW standards) stated in the following can be indicated sepa-
rately or together with other specifications on the bottle.
The oil capacities include oil filter change. Check the oil level when filling; do not
over fill. The oil level must be between the markings » page 111, Checking the en-
gine oil level .
Specifications and capacity (in l) Engine SpecificationFilling level
1.0 l/44 kW VW 502 00, VW 504 00a)
3.4
1.0 l/55 kW VW 502 00, VW 504 00a)
3.4
1.0 l/50 kW - CNG VW 502 003.4 a)
The use of an engine oil with the VW 504 00 specification requires the use of a fuel according to the
EN 228 standard » page 105, Unleaded petrol or a fuel of comparable quality. Note
■ Before a long drive we recommend that you purchase and carry with you engine
oil which complies with the specification for your vehicle. ■ We recommend that you use oils from ŠKODA Original Accessories. Ð146
Technical data
Page 150 of 157
Index
A
ABS 61
Warning light 17
Accessories 125
Adjusting Exterior mirror 36
Interior mirror 35
Adjusting seats 75
Adjustment Seat 38
Aerial 98
Airbag Deployment 82
Front airbag 83
Side airbag Head-Thorax 84
Switching off 85
System description 82
Air conditioning system 53
Recirculated air mode 55
Antilock brake system 61
Ash tray 45
Assistance systems ESC 60
Assist systems ABS 17, 61
City Safe Drive 66
Cruise control systems (CCS) 63
EDL 61
ESC 17
Parking aid 62
START/STOP 65
TCS 61
Traction Control System (TCS) 17
Visual parking system 63Automatic gearbox 69
Dynamic shift programme 71
Information for driving 69
Kickdown 71
Operational faults 71
Parking 69
Selector lever positions 70
Starting off 69
Stopping 69
Tiptronic 70
Automatic load deactivation 118
Avoiding damage to your vehicle 95
B
Before setting off 74
Belts 78
Belt tensioners 80
Bonnet Closing 110
Opening 110
Brake assist 60
Brake booster 60
Brake fluid Checking 113
Brakes Handbrake 60
Running in 91
Warning light 15
Braking Brake fluid 113
Breakdown kit 132
Bulbs Replacing 141
Button in the driver's door Electrical power windows 26
C
Car computer see Multifunction display 11Car jack 127
Carrier 44
Catalytic converter 91
Central locking button 23
Central locking system 21
lock 22
unlock 22
Changes 125
Changing Engine oil 112
Wheel 128
Charging a vehicle battery 117
Checking Battery electrolyte level 116
Brake fluid 113
Coolant level 112
Engine oil 111
Oil level 111
Windscreen washer fluid 114
Children and safety 87
Child safety Side airbag 88
Child safety lock 21
Child seat Classification 88
ISOFIX 89
on the front passenger seat 87
Suitability 89
TOP TETHER 90
Chrome parts refer to Taking care of your vehicle 99
Cigarette lighter 46
City Safe Drive 66
Warning light 19
Cleaning 97
Artificial leather 101
Headlight lenses 100
Material coverings 102
Materials 101
Natural leather 102
148 Index