key battery SKODA CITIGO 2013 1.G Owner's Manual
[x] Cancel search | Manufacturer: SKODA, Model Year: 2013, Model line: CITIGO, Model: SKODA CITIGO 2013 1.GPages: 176, PDF Size: 10.54 MB
Page 25 of 176
Unlocking and locking
Unlocking and locking
Introduction
This chapter contains information on the following subjects:
Vehicle key
22
Replacing the battery in the remote control key
23
Child safety lock
23
Opening/closing a door
24
Door opening lever
24
Emergency locking of the doors
25
Vehicle key
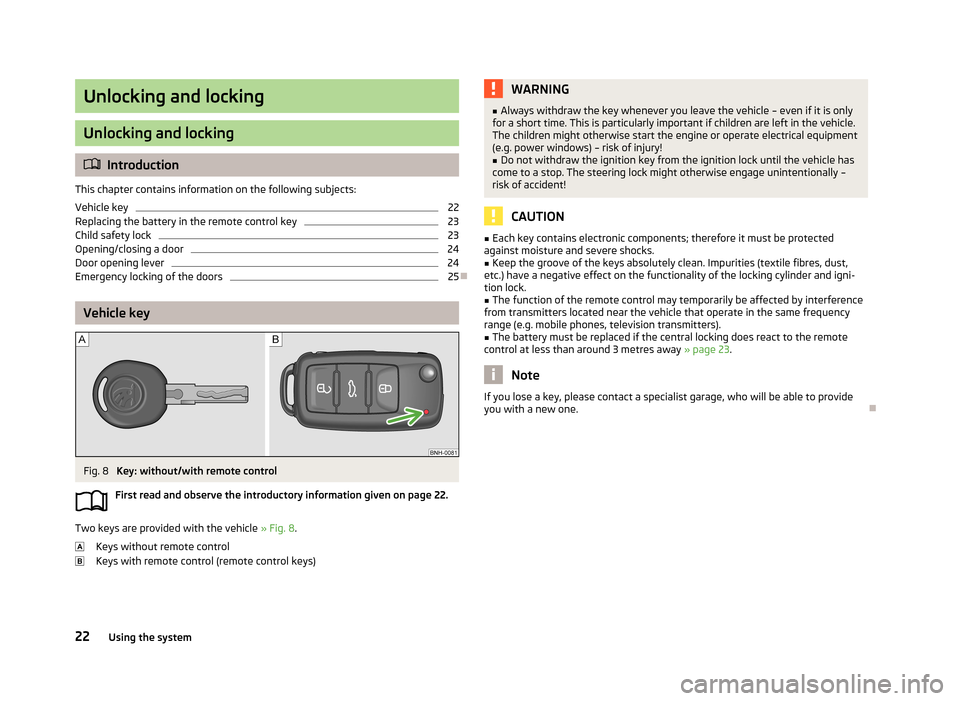
Fig. 8
Key: without/with remote control
First read and observe the introductory information given on page 22.
Two keys are provided with the vehicle » Fig. 8.
Keys without remote control
Keys with remote control (remote control keys)
WARNING■ Always withdraw the key whenever you leave the vehicle – even if it is only
for a short time. This is particularly important if children are left in the vehicle.
The children might otherwise start the engine or operate electrical equipment
(e.g. power windows) – risk of injury!■
Do not withdraw the ignition key from the ignition lock until the vehicle has
come to a stop. The steering lock might otherwise engage unintentionally –
risk of accident!
CAUTION
■ Each key contains electronic components; therefore it must be protected
against moisture and severe shocks.■
Keep the groove of the keys absolutely clean. Impurities (textile fibres, dust,
etc.) have a negative effect on the functionality of the locking cylinder and igni-
tion lock.
■
The function of the remote control may temporarily be affected by interference
from transmitters located near the vehicle that operate in the same frequency
range (e.g. mobile phones, television transmitters).
■
The battery must be replaced if the central locking does react to the remote
control at less than around 3 metres away » page 23.
Note
If you lose a key, please contact a specialist garage, who will be able to provide
you with a new one.
22Using the system
Page 26 of 176
Replacing the battery in the remote control keyFig. 9
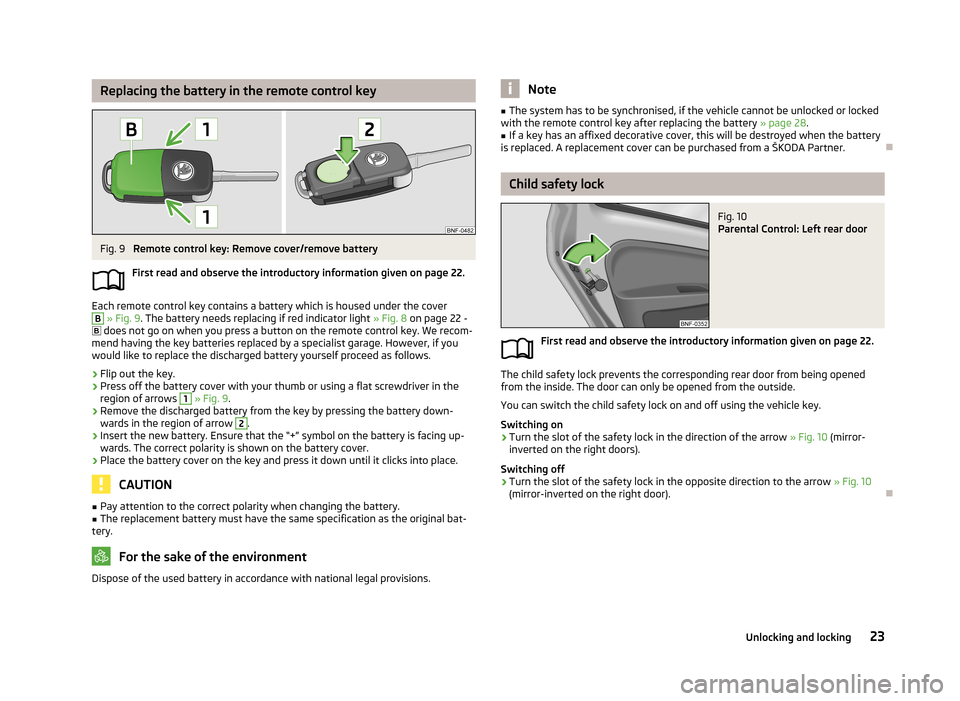
Remote control key: Remove cover/remove battery
First read and observe the introductory information given on page 22.
Each remote control key contains a battery which is housed under the cover
B
» Fig. 9 . The battery needs replacing if red indicator light » Fig. 8 on page 22 -
does not go on when you press a button on the remote control key. We recom-
mend having the key batteries replaced by a specialist garage. However, if you
would like to replace the discharged battery yourself proceed as follows.
›
Flip out the key.
›
Press off the battery cover with your thumb or using a flat screwdriver in the region of arrows
1
» Fig. 9 .
›
Remove the discharged battery from the key by pressing the battery down-
wards in the region of arrow
2
.
›
Insert the new battery. Ensure that the “+” symbol on the battery is facing up-wards. The correct polarity is shown on the battery cover.
›
Place the battery cover on the key and press it down until it clicks into place.
CAUTION
■ Pay attention to the correct polarity when changing the battery.■The replacement battery must have the same specification as the original bat-
tery.
For the sake of the environment
Dispose of the used battery in accordance with national legal provisions.Note■ The system has to be synchronised, if the vehicle cannot be unlocked or locked
with the remote control key after replacing the battery » page 28.■
If a key has an affixed decorative cover, this will be destroyed when the battery
is replaced. A replacement cover can be purchased from a ŠKODA Partner.
Child safety lock
Fig. 10
Parental Control: Left rear door
First read and observe the introductory information given on page 22.
The child safety lock prevents the corresponding rear door from being opened from the inside. The door can only be opened from the outside.
You can switch the child safety lock on and off using the vehicle key.
Switching on
›
Turn the slot of the safety lock in the direction of the arrow » Fig. 10 (mirror-
inverted on the right doors).
Switching off
›
Turn the slot of the safety lock in the opposite direction to the arrow » Fig. 10
(mirror-inverted on the right door).
23Unlocking and locking
Page 30 of 176
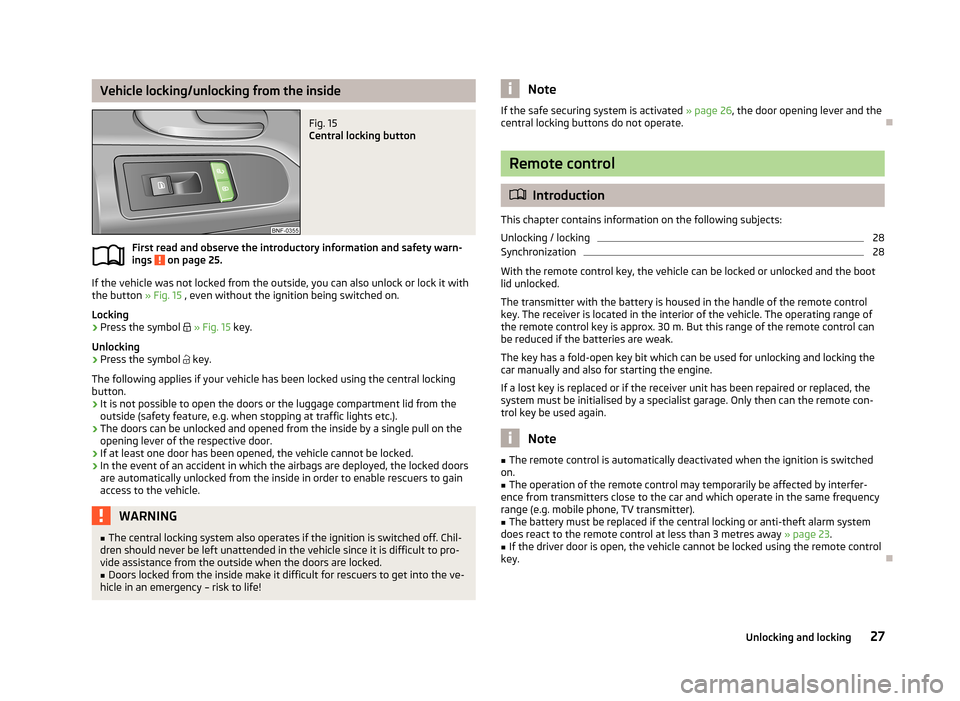
Vehicle locking/unlocking from the insideFig. 15
Central locking button
First read and observe the introductory information and safety warn-ings on page 25.
If the vehicle was not locked from the outside, you can also unlock or lock it with
the button » Fig. 15 , even without the ignition being switched on.
Locking
›
Press the symbol
» Fig. 15 key.
Unlocking
›
Press the symbol
key.
The following applies if your vehicle has been locked using the central locking button.
› It is not possible to open the doors or the luggage compartment lid from the
outside (safety feature, e.g. when stopping at traffic lights etc.).
› The doors can be unlocked and opened from the inside by a single pull on the
opening lever of the respective door.
› If at least one door has been opened, the vehicle cannot be locked.
› In the event of an accident in which the airbags are deployed, the locked doors
are automatically unlocked from the inside in order to enable rescuers to gain
access to the vehicle.
WARNING■ The central locking system also operates if the ignition is switched off. Chil-
dren should never be left unattended in the vehicle since it is difficult to pro-
vide assistance from the outside when the doors are locked.■
Doors locked from the inside make it difficult for rescuers to get into the ve-
hicle in an emergency – risk to life!
NoteIf the safe securing system is activated » page 26, the door opening lever and the
central locking buttons do not operate.
Remote control
Introduction
This chapter contains information on the following subjects:
Unlocking / locking
28
Synchronization
28
With the remote control key, the vehicle can be locked or unlocked and the boot
lid unlocked.
The transmitter with the battery is housed in the handle of the remote control
key. The receiver is located in the interior of the vehicle. The operating range of
the remote control key is approx. 30 m. But this range of the remote control can
be reduced if the batteries are weak.
The key has a fold-open key bit which can be used for unlocking and locking the
car manually and also for starting the engine.
If a lost key is replaced or if the receiver unit has been repaired or replaced, thesystem must be initialised by a specialist garage. Only then can the remote con-
trol key be used again.
Note
■ The remote control is automatically deactivated when the ignition is switched
on.■
The operation of the remote control may temporarily be affected by interfer-
ence from transmitters close to the car and which operate in the same frequency
range (e.g. mobile phone, TV transmitter).
■
The battery must be replaced if the central locking or anti-theft alarm system
does react to the remote control at less than 3 metres away » page 23.
■
If the driver door is open, the vehicle cannot be locked using the remote control
key.
27Unlocking and locking
Page 31 of 176
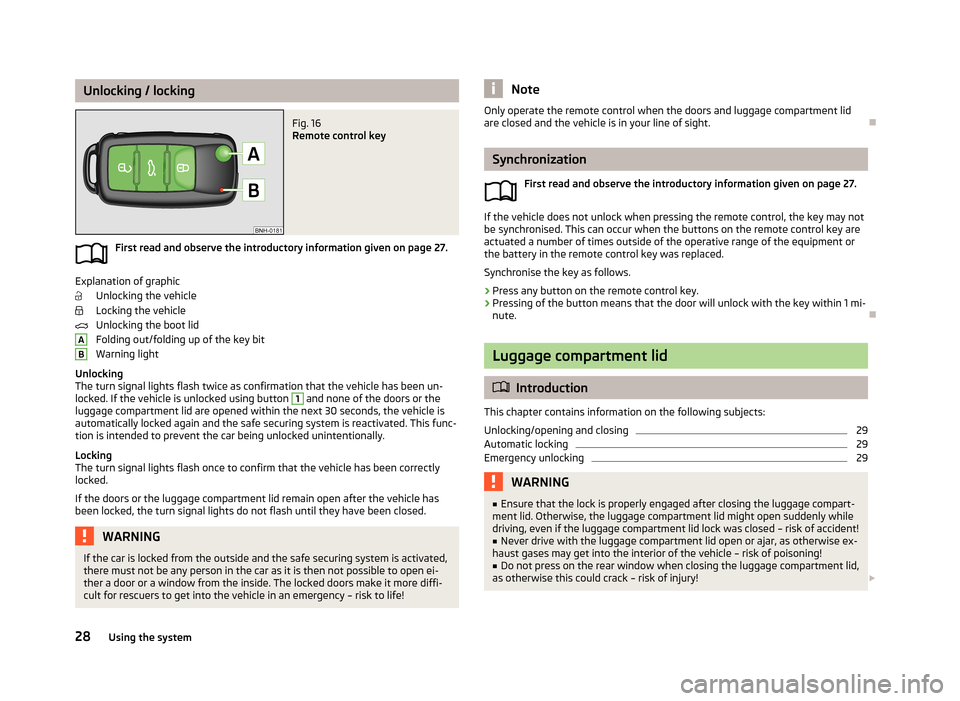
Unlocking / lockingFig. 16
Remote control key
First read and observe the introductory information given on page 27.
Explanation of graphicUnlocking the vehicle
Locking the vehicle
Unlocking the boot lid
Folding out/folding up of the key bit
Warning light
Unlocking
The turn signal lights flash twice as confirmation that the vehicle has been un-
locked. If the vehicle is unlocked using button
1
and none of the doors or the
luggage compartment lid are opened within the next 30 seconds, the vehicle is
automatically locked again and the safe securing system is reactivated. This func-
tion is intended to prevent the car being unlocked unintentionally.
Locking
The turn signal lights flash once to confirm that the vehicle has been correctly
locked.
If the doors or the luggage compartment lid remain open after the vehicle has
been locked, the turn signal lights do not flash until they have been closed.
WARNINGIf the car is locked from the outside and the safe securing system is activated,
there must not be any person in the car as it is then not possible to open ei-
ther a door or a window from the inside. The locked doors make it more diffi-
cult for rescuers to get into the vehicle in an emergency – risk to life!ABNoteOnly operate the remote control when the doors and luggage compartment lid
are closed and the vehicle is in your line of sight.
Synchronization
First read and observe the introductory information given on page 27.
If the vehicle does not unlock when pressing the remote control, the key may notbe synchronised. This can occur when the buttons on the remote control key are
actuated a number of times outside of the operative range of the equipment or
the battery in the remote control key was replaced.
Synchronise the key as follows.
›
Press any button on the remote control key.
›
Pressing of the button means that the door will unlock with the key within 1 mi-
nute.
Luggage compartment lid
Introduction
This chapter contains information on the following subjects:
Unlocking/opening and closing
29
Automatic locking
29
Emergency unlocking
29WARNING■ Ensure that the lock is properly engaged after closing the luggage compart-
ment lid. Otherwise, the luggage compartment lid might open suddenly while
driving, even if the luggage compartment lid lock was closed – risk of accident!■
Never drive with the luggage compartment lid open or ajar, as otherwise ex-
haust gases may get into the interior of the vehicle – risk of poisoning!
■
Do not press on the rear window when closing the luggage compartment lid,
as otherwise this could crack – risk of injury!
28Using the system
Page 70 of 176
It is still fully possible to steer the vehicle if the power steering fails or if the en-gine is not running (e.g. when towing). However, greater physical effort is re-
quired to turn the steering wheel.
If there is a fault in the power steering, the warning light or
lights up in the
instrument cluster » page 18.
Starting and stopping the engine
Introduction
This chapter contains information on the following subjects:
Electronic immobilizer
68
Ignition lock
68
Starting the engine
68
Switching off the engine
68
The engine can only be started using a correctly coded original key.
The engine running noises may louder at first be louder for a short time afterstarting the cold engine. This is quite normal and is not an operating problem.
WARNING■ When driving, the ignition key must always be in the position 2 » Fig. 68 on
page 68 (ignition switched on) without the engine running. This position is
indicated by the warning lights coming on. If this is not the case, this could re-
sult in unexpected locking of the steering wheel – risk of accident!■
Only pull the ignition key from the ignition lock when the vehicle has come
to a complete stop (by applying the handbrake). Otherwise, the steering could
be blocked – risk of accident!
■
When leaving the vehicle, the ignition must always be removed. This is par-
ticularly important if children are left in the vehicle. Children could otherwise
start the engine for example – risk of accident or injury!
■
Never leave the vehicle unattended with the engine running.
■
Never switch off the engine before the vehicle is stationary – risk of acci-
dent!
WARNING■ Never leave the engine running in unventilated or closed rooms. The ex-
haust gases from the engine contain substances such as odourless and col-
ourless carbon monoxide (a poisonous gas) – risk to life!■
Carbon monoxide can cause unconsciousness and death.
CAUTION
■ The starter must only be operated when the engine is not running and the vehi-
cle is at a standstill. The starter or engine can be damaged if the starter is activa-
ted when the engine is running 3
» Fig. 68 on page 68.
■
If the engine does not start up after a second attempt, the fuse for the fuel
pump may have a fault. Check the fuse and replace if necessary » page 154,
Fuses on the underside of the dash panel , or seek assistance from a specialist ga-
rage.
■
Let go of the ignition key as soon as the engine starts otherwise the starter
could be damaged.
■
Do not tow start the engine – there is a risk of damaging the engine and the
catalytic converter. The battery from another vehicle can be used as a jump-start
aid » page 150 , Jump-starting .
CAUTION
■
Avoid high engine revolutions, full throttle and high engine loads before the en-
gine has reached its operating temperature – risk of damaging the engine!■
Do not switch the engine off immediately at the end of your journey after the
engine has been operated over a prolonged period at high loads but leave it to
run at an idling speed for about 1 minute. This prevents any possible accumulation
of heat when the engine is switched off.
For the sake of the environment
Do not warm up the engine while the vehicle is stationary. If possible, start your
journey as soon as the engine has started. Through this the engine reaches its
operating temperature more rapidly and the pollutant emissions are lower.
Note
After switching off the ignition, the radiator fan can intermittently continue to op-
erate for approx. 10 minutes.
67Starting-off and Driving
Page 88 of 176
START-STOP
Introduction
This chapter contains information on the following subjects:
Starting/shutting down the engine
85
Operating conditions of the system
85
Manually activating/deactivating the system
86
The START-STOP system helps you to save fuel while at the same time reducing
harmful exhaust emissions and CO 2 emissions.
The function is automatically activated each time the ignition is switched on. In the start-stop mode, the engine automatically switches to the vehicle's idle phase, e.g. when stopped at traffic lights. The engine restarts automatically
where necessary.
The system can work only if the following basic conditions are met.
The driver's door is closed.
The driver has fastened the seat belt.
The bonnet is closed.The driving speed was higher than 4 km/h after the last stop.
WARNING■ The brake servo unit and power steering only operate if the engine is run-
ning.■
Never let the vehicle roll with the engine switched off.
CAUTION
Always deactivate the START-STOP system before driving through wa-
ter » page 78 .Note■
If the driver's seat belt is removed for more than 30 seconds or the driver's door
is opened during stop mode, the engine must be started manually with the key.■
After manually starting the engine on vehicles with manual transmission, auto-
matic engine shut down is not possible until the vehicle has travelled the re- quired minimum distance for START-STOPmode.
■
Changes to the outdoor temperature can have an effect on the internal temper-
ature of the vehicle battery even after several hours. If the vehicle remains out-
doors for a long time in minus temperatures or in direct sunlight, it can take sev-
eral hours until the internal temperature of the vehicle battery reaches a suitable temperature for proper operation of the START STOP system.
Starting/shutting down the engine
First read and observe the introductory information and safety warn-ings
on page 85.
›
Stop the vehicle (where necessary, apply the handbrake).
›
Put the gear stick into Neutral.
›
Release the clutch pedal.
Automatic engine shut down (STOP phase) takes place. The warning symbol
appears in the instrument cluster display.
›
Depress the clutch pedal.
The automatic start procedure takes place again (START phase). The warning
symbol
goes out.
Operating conditions of the system
First read and observe the introductory information and safety warn-ings
on page 85.
The START-STOP system is very complex. Some of the procedures are hard tocheck without servicing.
No engine shut down is carried out
Before each STOP phase, the system checks whether certain conditions have
been met. No engine shut down takes place in the following situations.
85Assist systems
Page 130 of 176
Engine compartment
Introduction
This chapter contains information on the following subjects:
Opening and closing the bonnet
128
Engine compartment overview
129
Radiator fan
129
Windscreen washer system
129WARNINGInjuries or scolding or risks of accident or fire may occur when working in the
engine compartment. For this reason, it is essential to comply with the warn- ing instructions outlined below and with the general applicable safety rules.
The engine compartment of your car is a hazardous area!WARNINGThe following instructions must be followed before starting work in the en-
gine compartment:■
Turn off the engine and withdraw the ignition key.
■
Firmly apply the handbrake.
■
If the vehicle is fitted with a manual gearbox, move the gearshift lever into
Neutral, or if the vehicle is fitted with an automatic gearbox, move the selec-
tor lever into position N.
■
Allow the engine to cool.
■
Never open the bonnet if you can see steam or coolant escaping from the
engine compartment – risk of scalding! Wait until no more steam or coolant is
escaping.
WARNINGThe following instructions must be followed when working in the engine com-
partment.■
Keep children clear of the engine compartment.
■
Never touch the radiator fan while the engine is still warm. The fan might
suddenly start running!
WARNING (Continued)■ Do not touch any hot engine parts – risk of burns!■The coolant additive and thus all of the coolant is harmful to your health.■
Avoid contact with the coolant.
■
Coolant vapours are harmful to health.
■
Never open the end cover of the coolant expansion reservoir while the en-
gine is still warm. The cooling system is pressurized!
■
When opening the end cover of the coolant expansion reservoir, cover it
with a cloth to protect your face, hands and arms from hot steam or hot cool-
ant.
■
If any coolant splashes into your eyes, immediately rinse out your eyes with
clear water and contact a doctor as soon as possible.
■
Always store the coolant additive securely in its original container, and in
particular out of the reach of children – risk of poisoning!
■
If coolant is swallowed, consult a doctor immediately.
■
Do not leave any items (e.g. cloths or tools) in the engine compartment.
■
Never spill fluids on the hot engine. Such fluids (e.g. the antifreeze con-
tained in the coolant) may ignite!
WARNINGThe following warning instructions must be observed at all times when work-
ing in the engine compartment while the engine is running.■
Pay particular attention to rotating engine parts (e.g. V-ribbed belt, genera-
tor, radiator fan) and the high-voltage ignition system – risk to life!
■
Never touch the electric wiring on the ignition system.
■
Avoid short circuits in the electrical system – particularly on the vehicle's
battery.
■
Always make sure that no jewellery, loose clothing or long hair can get
caught in rotating engine parts – risk to life! Always remove any jewellery, tie
back long hair and wear tight fitting clothing before completing any work.
WARNINGThe following warning instructions must be observed if work has to be carried
out on the fuel or electrical systems.■
Always disconnect the vehicle battery from the electrical system.
■
Do not smoke.
■
Never work near open flames.
■
Always have a functioning fire extinguisher nearby.
127Inspecting and replenishing
Page 159 of 176
Fuses in the engine compartmentFig. 125
Distribution board cover/fuses
First read and observe the introductory information and safety warn-
ings
on page 154.
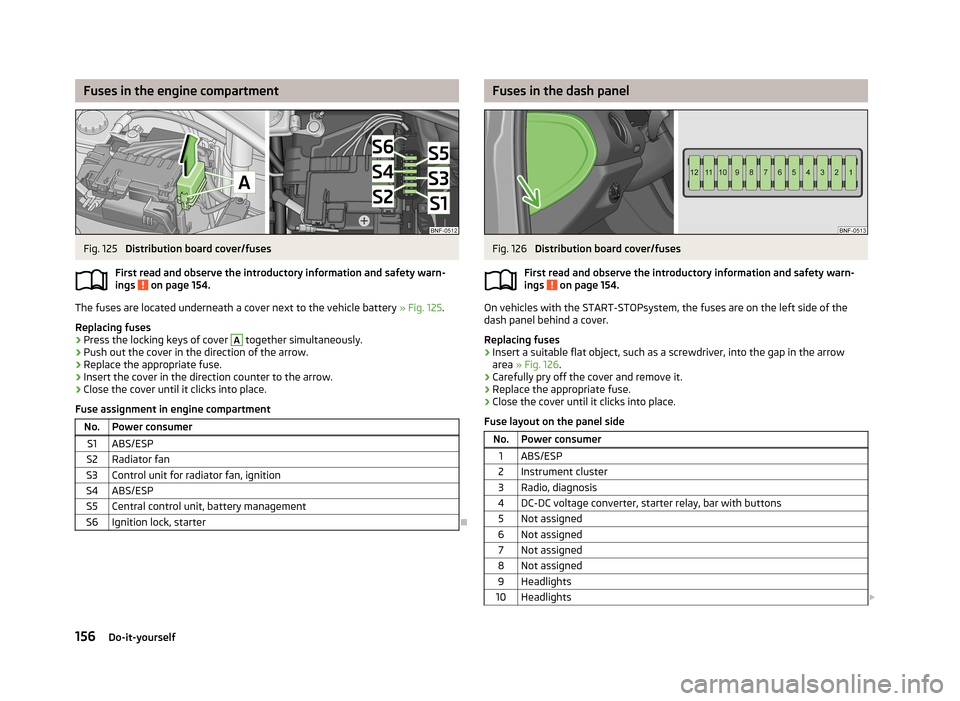
The fuses are located underneath a cover next to the vehicle battery » Fig. 125.
Replacing fuses
›
Press the locking keys of cover
A
together simultaneously.
›
Push out the cover in the direction of the arrow.
›
Replace the appropriate fuse.
›
Insert the cover in the direction counter to the arrow.
›
Close the cover until it clicks into place.
Fuse assignment in engine compartment
No.Power consumerS1ABS/ESPS2Radiator fanS3Control unit for radiator fan, ignitionS4ABS/ESPS5Central control unit, battery managementS6Ignition lock, starter
Fuses in the dash panelFig. 126
Distribution board cover/fuses
First read and observe the introductory information and safety warn-
ings
on page 154.
On vehicles with the START-STOPsystem, the fuses are on the left side of the
dash panel behind a cover.
Replacing fuses
›
Insert a suitable flat object, such as a screwdriver, into the gap in the arrow area » Fig. 126 .
›
Carefully pry off the cover and remove it.
›
Replace the appropriate fuse.
›
Close the cover until it clicks into place.
Fuse layout on the panel side
No.Power consumer1ABS/ESP2Instrument cluster3Radio, diagnosis4DC-DC voltage converter, starter relay, bar with buttons5Not assigned6Not assigned7Not assigned8Not assigned9Headlights10Headlights 156Do-it-yourself
Page 169 of 176
Jump-starting150
locking of the doors25
Towing the vehicle152
Tyre repair148
Unlocking the luggage compartment lid29
Emergency equipment First aid kit
144
Jack144
Vehicle tool kit144
Warning triangle144
Emissions161
Engine Running in
73
Engine compartment127
Brake fluid133
Coolant132
Overview129
Vehicle battery134
Engine oil130
Capacity130
Changing131
Checking131
Replenishing131
Specifications130
Warning light17
Engine revolutions counter11
Environment74
Environmental compatibility77
Environmentally friendly driving74
ESC Function
80
Warning light18
F
Films
116
First aid kit144
Fog lights35
Footmats71
see footmats71
Front airbag99
Front seats42
Fuel122
Fuel gauge11
refer to Fuel122
Refuelling122
Unleaded petrol123
Fuel consumption74
Fuel gauge Fuel gauge
11
Fuses Assignment
154
Colour coding154
Replacing154
G
Gear changing Gear stick
70
Gearshift Information on the switched gearshift
12
Recommended gear12
General view Cockpit
9
H
Handbrake
70
Hazard warning light system36
Head-Thorax100
Headlights Driving abroad
79
Replacing a bulb157
Head restraint45
Heating Control elements
58
Defrost windows59
Exterior mirrors41
operating58
Rear window37
Recommended settings59
Seats44
Heating and air-conditioning57
Hill hold control80
Horn9
I
Ignition
68
Ignition lock68
Immobilizer68
Inertia reels97
Instrument cluster10
Overview10
ISOFIX106
J
Jack
144
Jacking points Raise vehicle
147
Jump-starting150, 151
K
Key Starting the engine
68
L
Lashing eyes
47
Lever Main beam
34
Turn signal34
Windscreen wipers39
lever control71
See lever control71
light low beam
33
on and off33
parking light33
Light Cockpit
36, 37
166Index
Page 170 of 176
Daytime running light34
Headlight beam adjustment34
Parking light36
Replacing bulbs157
Lighting Luggage compartment
46
light on and off33
Lights33
Fog lights35
Hazard warning light system36
Headlight flasher34
Main beam34
Rear fog light35
Turn signal34
Warning lights16
Loading floor49
Loads161
Lock Central locking system
26
locking Vehicle key
22
Locking Door opening lever
24
Emergency locking25
Remote control28
Locking and unlocking from the inside27
low beam33
Luggage compartment Cover
48
Emergency unlocking29
Fixing nets48
Lashing eyes47
Lighting46
see luggage compartment lid29
Unlocking the luggage compartment lid29
Variable loading floor49
Luggage compartment cover48
Luggage compartment lid28, 29
Luggage storage Bag hooks
47
M
Main beam
34
Maintenance76
Decorative films116
Manual gear changing see gear changing
70
Materials defect liability5
MFA see multifunction display
13
Mirror Exterior mirrors
41
Mirrors Interior mirror
40
Vanity38
Mobile phone63
Modes of automated transmission71
Modifications110
Modifications and technical alterations Airbags
112
Service111
Spoiler112
Trailer operation113
Move & Fun63, 64
Multifunction display Functions
13
Memory13
Operation14
N
N1
47
Nets48
O
Oil See Engine oil
131
On-board computer see multifunction display
13
Operating windscreenwipers39
Operation in winter De-icing windows
117
Vehicle battery136
Outside temperature14
Overview Engine compartment
129
Warning lights16
P
Paintwork See Paintwork care
115
Paintwork care115
Parking Parking aid
81
Visual parking system82
parking light33
Parking ticket holder53
Part replacement110
Passive safety Before setting off
90
Driving safety91
Safety equipment90
Passive Safety90
Pedals71
Footmats71
Petrol refer to Fuel
123
Polishing the paintwork See Taking care of your vehicle
115
Power socket 12 V
52
Power steering66
Power windows Button in the driver's door
30
167Index