wiper fluid SKODA CITIGO 2013 1.G Owner's Manual
[x] Cancel search | Manufacturer: SKODA, Model Year: 2013, Model line: CITIGO, Model: SKODA CITIGO 2013 1.GPages: 176, PDF Size: 10.54 MB
Page 6 of 176
Table of Contents
Materials defect liability and ŠKODA warranty for
new cars5
Mobility warranty and ŠKODA extended
warranty.
6
Abbreviations
Using the system
Cockpit
9
Overview
8
warning lights and instruments
10
Instrument cluster
10
Multifunction display (MFA)
13
Warning lights
16
Unlocking and locking
22
Unlocking and locking
22
Central locking system
25
Remote control
27
Luggage compartment lid
28
Electrical power windows
30
Power sliding/tilting roof
31
Lights and visibility
33
Lights
33
Indoor Lighting
36
Visibility
37
Windscreen wipers and washers
38
Rear mirror
40
Seats and stowing
42
Front seats
42
Rear seats
45
Luggage compartment
46
Roof rack system
49Useful equipment50Storage compartments53
Heating and air-conditioning
57
Heating, ventilation and cooling
57
Heating
58
Air conditioning system
59
Communication and multimedia
63
Telephone and Move & Fun
63
Driving
Starting-off and Driving
66
Steering
66
Starting and stopping the engine
67
Brakes
68
Manual gear changing and pedals
70
Automated transmission
71
Running in
73
Economical driving and environmental
sustainability
74
Avoiding damage to your vehicle
78
Driving abroad
79
Assist systems
80
Brake assist systems
80
Parking aid
81
Cruise Control System
83
START-STOP
85
City Safe Drive
86
Safety
Passive Safety
90
General information
90
Correct seated position
91
Seat belts
94
Using seat belts
94
Inertia reels and belt tensioners
96Airbag system98Description of the airbag system98
Airbag overview
99
Deactivating airbags
101
Transporting children safely
103
Child seat
103
Fastening systems
105
General Maintenance
Vehicle care
108
Service intervals
108
Modifications, adjustments and technical
alterations
110
Washing your car
113
Taking care of your vehicle exterior
115
Taking care of the interior
118
Inspecting and replenishing
122
Fuel
122
Vehicles with CNG (compressed natural gas)
mode
123
Engine compartment
127
Engine oil
130
Coolant
132
Brake fluid
133
Vehicle battery
134
Wheels
138
Tyres and wheel rims
138
Winter operation
143
Do-it-yourself
Emergency equipment and self-help
144
Emergency equipment
144
Changing a wheel
145
Tyre repair
1483Table of Contents
Page 41 of 176
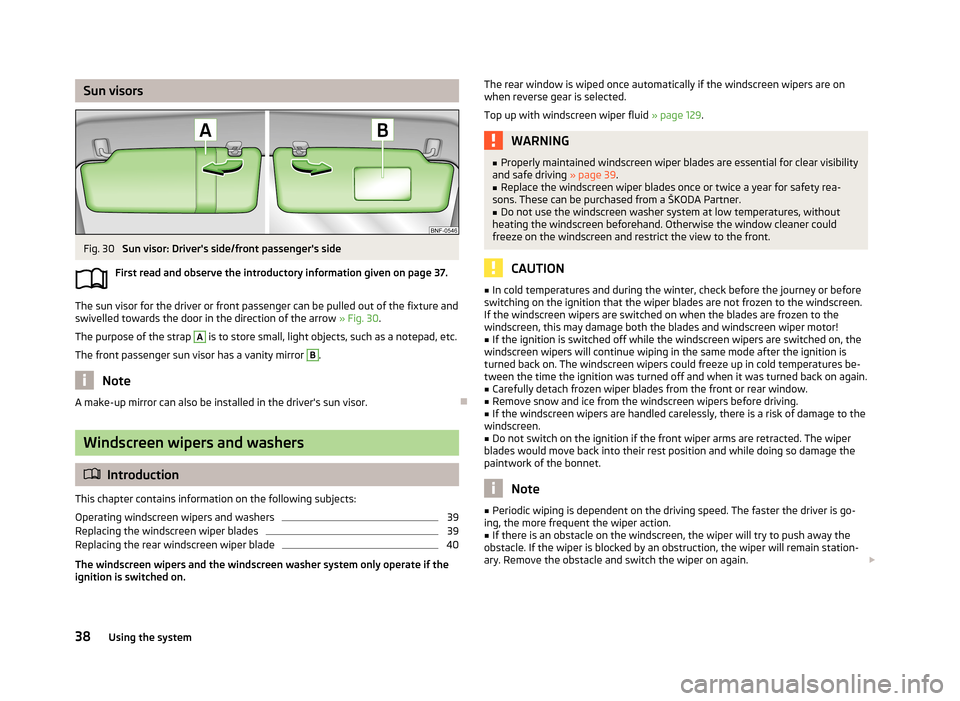
Sun visorsFig. 30
Sun visor: Driver's side/front passenger's side
First read and observe the introductory information given on page 37.
The sun visor for the driver or front passenger can be pulled out of the fixture and
swivelled towards the door in the direction of the arrow » Fig. 30.
The purpose of the strap
A
is to store small, light objects, such as a notepad, etc.
The front passenger sun visor has a vanity mirror
B
.
Note
A make-up mirror can also be installed in the driver's sun visor.
Windscreen wipers and washers
Introduction
This chapter contains information on the following subjects:
Operating windscreen wipers and washers
39
Replacing the windscreen wiper blades
39
Replacing the rear windscreen wiper blade
40
The windscreen wipers and the windscreen washer system only operate if the ignition is switched on.
The rear window is wiped once automatically if the windscreen wipers are on
when reverse gear is selected.
Top up with windscreen wiper fluid » page 129.WARNING■
Properly maintained windscreen wiper blades are essential for clear visibility
and safe driving » page 39.■
Replace the windscreen wiper blades once or twice a year for safety rea-
sons. These can be purchased from a ŠKODA Partner.
■
Do not use the windscreen washer system at low temperatures, without
heating the windscreen beforehand. Otherwise the window cleaner could
freeze on the windscreen and restrict the view to the front.
CAUTION
■ In cold temperatures and during the winter, check before the journey or before
switching on the ignition that the wiper blades are not frozen to the windscreen. If the windscreen wipers are switched on when the blades are frozen to the
windscreen, this may damage both the blades and windscreen wiper motor!■
If the ignition is switched off while the windscreen wipers are switched on, the
windscreen wipers will continue wiping in the same mode after the ignition is
turned back on. The windscreen wipers could freeze up in cold temperatures be- tween the time the ignition was turned off and when it was turned back on again.
■
Carefully detach frozen wiper blades from the front or rear window.
■
Remove snow and ice from the windscreen wipers before driving.
■
If the windscreen wipers are handled carelessly, there is a risk of damage to the
windscreen.
■
Do not switch on the ignition if the front wiper arms are retracted. The wiper
blades would move back into their rest position and while doing so damage the
paintwork of the bonnet.
Note
■ Periodic wiping is dependent on the driving speed. The faster the driver is go-
ing, the more frequent the wiper action.■
If there is an obstacle on the windscreen, the wiper will try to push away the
obstacle. If the wiper is blocked by an obstruction, the wiper will remain station-
ary. Remove the obstacle and switch the wiper on again.
38Using the system
Page 42 of 176
■The capacity of the windscreen washer fluid reservoir is approximately 3 litres.■The wiper blades should be cleaned on a regular basis with a windscreen clean-
er to avoid any smears. The wiper blades should be cleaned with a sponge or
cloth if they are heavily soiled by insect residues, for example.
Operating windscreen wipers and washers
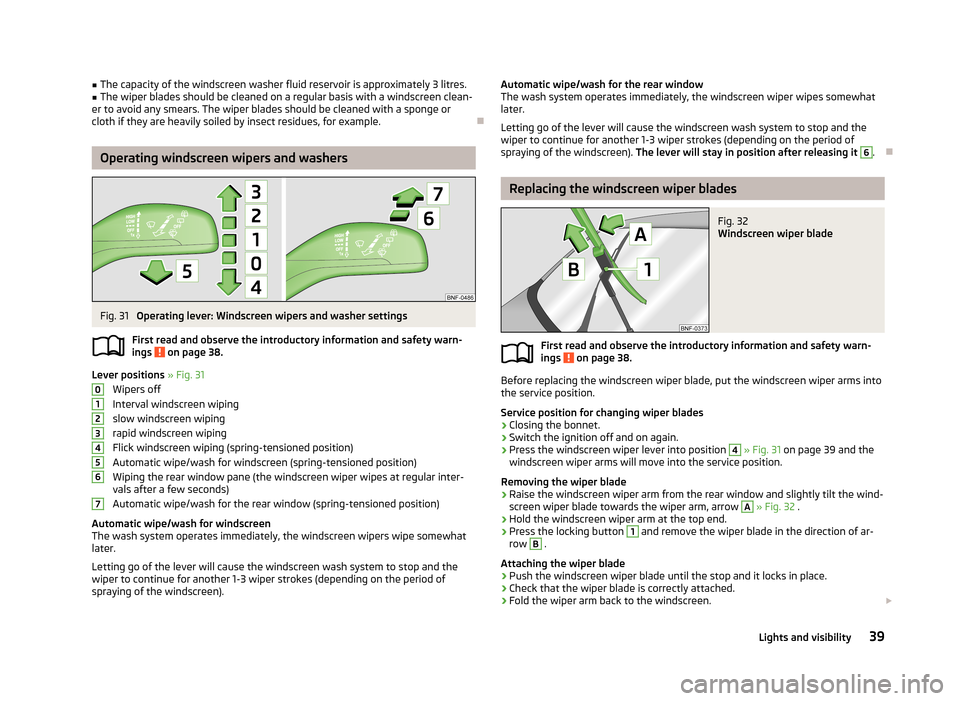
Fig. 31
Operating lever: Windscreen wipers and washer settings
First read and observe the introductory information and safety warn-
ings
on page 38.
Lever positions » Fig. 31
Wipers off
Interval windscreen wiping
slow windscreen wiping
rapid windscreen wiping
Flick windscreen wiping (spring-tensioned position)
Automatic wipe/wash for windscreen (spring-tensioned position) Wiping the rear window pane (the windscreen wiper wipes at regular inter- vals after a few seconds)
Automatic wipe/wash for the rear window (spring-tensioned position)
Automatic wipe/wash for windscreen
The wash system operates immediately, the windscreen wipers wipe somewhat
later.
Letting go of the lever will cause the windscreen wash system to stop and the
wiper to continue for another 1-3 wiper strokes (depending on the period of
spraying of the windscreen).
01234567Automatic wipe/wash for the rear window The wash system operates immediately, the windscreen wiper wipes somewhatlater.
Letting go of the lever will cause the windscreen wash system to stop and the wiper to continue for another 1-3 wiper strokes (depending on the period ofspraying of the windscreen). The lever will stay in position after releasing it 6
.
Replacing the windscreen wiper blades
Fig. 32
Windscreen wiper blade
First read and observe the introductory information and safety warn-
ings on page 38.
Before replacing the windscreen wiper blade, put the windscreen wiper arms into
the service position.
Service position for changing wiper blades
›
Closing the bonnet.
›
Switch the ignition off and on again.
›
Press the windscreen wiper lever into position
4
» Fig. 31 on page 39 and the
windscreen wiper arms will move into the service position.
Removing the wiper blade
›
Raise the windscreen wiper arm from the rear window and slightly tilt the wind-
screen wiper blade towards the wiper arm, arrow
A
» Fig. 32 .
›
Hold the windscreen wiper arm at the top end.
›
Press the locking button
1
and remove the wiper blade in the direction of ar-
row
B
.
Attaching the wiper blade
›
Push the windscreen wiper blade until the stop and it locks in place.
›
Check that the wiper blade is correctly attached.
›
Fold the wiper arm back to the windscreen.
39Lights and visibility
Page 131 of 176
WARNING■Read and observe the information and warning instructions on the fluid con-
tainers.■
Keep fluids in their original containers and keep securely out of the reach of
children!
■
If you intend to work underneath the vehicle, you must secure the vehicle
from rolling away and support it with suitable supporting blocks; the car jack
is not sufficient – risk of injury!
■
Never cover the engine with additional insulation material (e.g. with a cover)
– risk of fire!
■
The bonnet must always be properly closed when driving. Therefore, the
lock must always be checked after closing the bonnet in order to ensure that
it has engaged properly.
■
If you notice that the lock is not properly engaged while driving, stop the ve-
hicle immediately and close the bonnet – risk of accident!
CAUTION
■ Always top up using the correct specification of fluids. This may result in major
operating problems and also vehicle damage!■
Never open the bonnet using the locking lever.
For the sake of the environment
In view of the requirements for the environmentally friendly disposal of fluids and the special tools and knowledge required for such work, we recommend that flu-
ids be changed by a specialist garage.
Note
■ Please consult a specialist garage for any questions relating to fluids.■Fluids with the correct specifications can be purchased from ŠKODA Original Ac-
cessories.
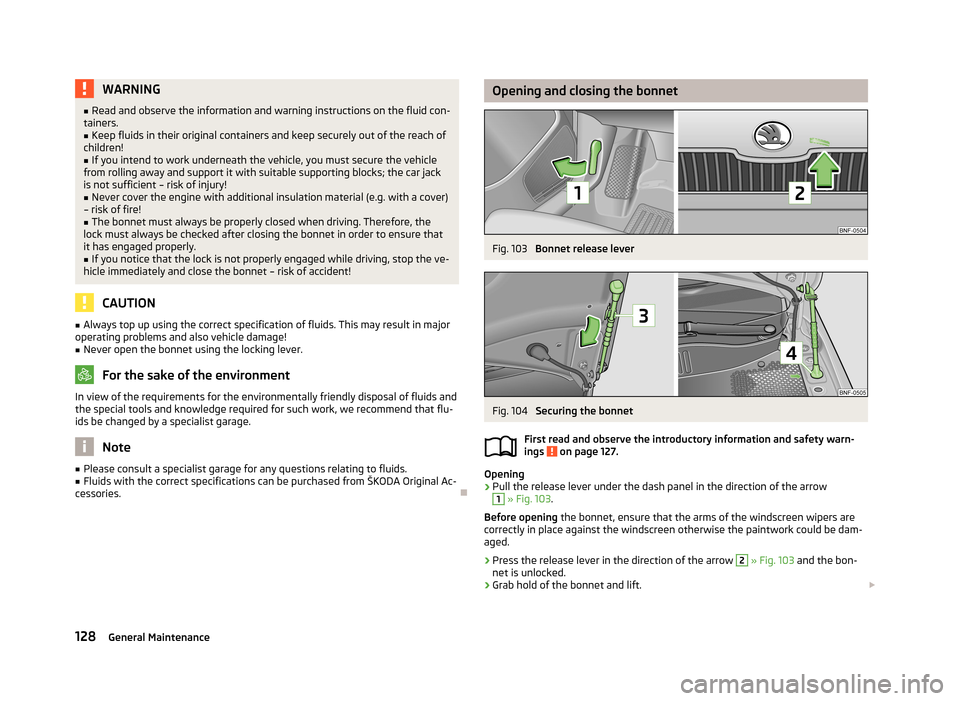
Opening and closing the bonnetFig. 103
Bonnet release lever
Fig. 104
Securing the bonnet
First read and observe the introductory information and safety warn-
ings
on page 127.
Opening
›
Pull the release lever under the dash panel in the direction of the arrow
1
» Fig. 103 .
Before opening the bonnet, ensure that the arms of the windscreen wipers are
correctly in place against the windscreen otherwise the paintwork could be dam- aged.
›
Press the release lever in the direction of the arrow
2
» Fig. 103 and the bon-
net is unlocked.
›
Grab hold of the bonnet and lift.
128General Maintenance
Page 169 of 176
Jump-starting150
locking of the doors25
Towing the vehicle152
Tyre repair148
Unlocking the luggage compartment lid29
Emergency equipment First aid kit
144
Jack144
Vehicle tool kit144
Warning triangle144
Emissions161
Engine Running in
73
Engine compartment127
Brake fluid133
Coolant132
Overview129
Vehicle battery134
Engine oil130
Capacity130
Changing131
Checking131
Replenishing131
Specifications130
Warning light17
Engine revolutions counter11
Environment74
Environmental compatibility77
Environmentally friendly driving74
ESC Function
80
Warning light18
F
Films
116
First aid kit144
Fog lights35
Footmats71
see footmats71
Front airbag99
Front seats42
Fuel122
Fuel gauge11
refer to Fuel122
Refuelling122
Unleaded petrol123
Fuel consumption74
Fuel gauge Fuel gauge
11
Fuses Assignment
154
Colour coding154
Replacing154
G
Gear changing Gear stick
70
Gearshift Information on the switched gearshift
12
Recommended gear12
General view Cockpit
9
H
Handbrake
70
Hazard warning light system36
Head-Thorax100
Headlights Driving abroad
79
Replacing a bulb157
Head restraint45
Heating Control elements
58
Defrost windows59
Exterior mirrors41
operating58
Rear window37
Recommended settings59
Seats44
Heating and air-conditioning57
Hill hold control80
Horn9
I
Ignition
68
Ignition lock68
Immobilizer68
Inertia reels97
Instrument cluster10
Overview10
ISOFIX106
J
Jack
144
Jacking points Raise vehicle
147
Jump-starting150, 151
K
Key Starting the engine
68
L
Lashing eyes
47
Lever Main beam
34
Turn signal34
Windscreen wipers39
lever control71
See lever control71
light low beam
33
on and off33
parking light33
Light Cockpit
36, 37
166Index
Page 171 of 176
R
Radiator fan
129
Raise vehicle147
Rear-view mirror Exterior mirrors
41
Rear fog light35
Rear mirror40
Interior mirror40
Rear seats45
Folding forward45
Rear window heating37
Rear windows Closing
31
Opening31
Recirculated air mode61
Recommended gear12
Refuelling122
Fuel122
Regulation Headlight beam
34
Remote control27
locking28
Synchronisation process28
unlocking28
Remote control key Replacing the battery
23
Repairs and technical alterations110
Replace vehicle battery
137
Replace vehicle battery
137
Replacing Bulb for the fog light
158
Bulb for the licence plate light159
Bulb for the side turn signal lights158
Bulbs157
Bulbs in the tail light159
Fuses154
Fuses in the dash panel156
Fuses in the engine compartment156
Windscreen wiper blade40
Windscreen wiper blades39
Replenishing Coolant
133
Engine oil131
Windscreen washer fluid129
Roof rack mounting points
50
Roof rack system Roof load
50
Running-in The first 1500 km
73
Running in Brake pads
74
Engine73
Tyres74
S
Safe securing system
26
Safety90
Child safety103
Child safety seats103
Correct seated position91
Head restraints45
ISOFIX106
TOP TETHER107
Safety belt Warning light
21
Saving electrical energy74
Seals Taking care of your vehicle
116
Seat Adjusting
43
Seat belts94
Belt tensioners97
Cleaning121
fastening and unfastening96
Inertia reels97
The physical principle of a frontal collision95
Warning light17
Seats Folding forwards
45
Head restraints45
Heating44
Seats and stowing42
Service111
Service display12
Service intervals108
Setting Air conditioning system
61
Heating59
Setting the clock Clock
14
Shifting gears Driving and saving energy
75
Side airbag100
Sliding/tilting roof31
Closing31
Opening and tilting31
Operation31
Snow chains143
Spare wheel141
Speedometer11
Speed symbol See Wheels
141
Spoiler112
START-STOP85
Manually activating/deactivating the system86
Operating conditions of the system85
Starting/shutting down the engine85
Starting and stopping the engine with the key67
Starting engine Jump-starting
150
Starting the engine Jump-starting
151
Key68
168Index
Page 173 of 176
W
Warning lights
16
Warning symbols16
Warning triangle144
Warranty5
Washing108
Automatic car wash system114
by hand114
Chrome parts116
High-pressure cleaner114
Water Driving through
78
Wax treatment See Taking care of your vehicle
115
Weights161
Wheel bolts Anti-theft wheel bolt
148
Caps142
Loosening and tightening146
Wheel rims138
Wheels Bolts
143
Changing145
Full trim142
General information138
Load index140
Replacing wheels139
Service life of tyres139
Snow chains143
Spare wheel141
Speed symbol141
Storing wheels139
Tyre pressure139
Tyre sizes139
Tyre wear indicator139
Unidirectional tyres141
Winter tyres143
Windows117
De-icing117
See Electrical power windows30
Windscreen washer fluid Checking129
Replenishing129
Winter129
Windscreen washer system129
Windscreen washers39
Windscreen wipers Cleaning the windscreen wiper blades
39, 40
Replacing the rear windscreen wiper blade40
Replacing the windscreen wiper blades39
Windscreen washer fluid129
Windscreen wipers and washers38
Winter operation143
Snow chains143
Winter tyres143
Winter tyres See Wheels
143
170Index