dimensions SKODA CITIGO 2015 1.G Owner's Manual
[x] Cancel search | Manufacturer: SKODA, Model Year: 2015, Model line: CITIGO, Model: SKODA CITIGO 2015 1.GPages: 160, PDF Size: 23.1 MB
Page 121 of 160

Tyre damageRead and observe
on page 116 first.
We recommend checking your tyres and wheel rims for damage (punctures,
cuts, splits and bulges, etc.) on a regular basis. Remove foreign bodies (e.g.
small stones) from the tyre tread immediately.
Drive over kerbs and other such obstacles slowly and at right angles wherever
possible in order to avoid damage to tyres and wheel trims.
Immediately replace damaged wheel rims or tyres.
WARNINGNever drive with damaged tyres – risk of accident.
CAUTION
The tyres must be protected from contact with substances such as oil, grease
and fuel, which could damage them. If the tyres come into contact with these
substances, then we recommend you have this checked out in a specialist
workshop.
Unidirectional tyres
Read and observe
on page 116 first.
The direction of rotation of the tyres is marked by arrows on the wall of the
tyre .
The indicated direction of rotation must be adhered to in order to ensure the
optimal characteristics of these tyres.
These characteristics mainly relate to the following: ▶ Increased driving stability.
▶ Reduced risk of aquaplaning.
▶ Reduced tyre noise and tyre wear.
Spare wheel
Read and observe
on page 116 first.
The size of the spare wheel is identical to that of the vehicle factory installedwheels.
After changing the spare wheel, the tyre pressure should be adjusted.
In vehicles with tyre pressure monitoring, the tyre pressure values should be
saved » page 91 .WARNING■
If, you get a puncture and a spare tyre has to be mounted with opposite
direction of rotation, then drive carefully. The best properties of the tyre
are no longer present in this situation.■
If the dimensions or design of the spare wheel differ from the tyres fitted
to the vehicle (e.g. winter tyres or low-profile tyres), it must only be used
briefly in the event of a puncture and if an appropriately cautious style of
driving is adopted.
■
Never use the temporary spare wheel if it is damaged.
Spare wheel
Read and observe
on page 116 first.
A yellow warning label is always displayed on the rim of the temporary spare
wheel.
Please note the following if you intend to use the temporary spare wheel. ▶ The warning label must not be covered after installing the wheel.
▶ Be particularly observant when driving.
▶ The temporary spare wheel is inflated to the maximum inflation pressure for
the vehicle » page 117.
▶ Only use this temporary spare wheel to reach the nearest specialist garage,
since it is not intended for permanent use.
If you need to use a spare wheel, make sure to fit a standard wheel of the ap-
propriate dimensions and design as soon as possible.
In vehicles with tyre pressure monitoring, the tyre pressure values should be
saved » page 91 .
WARNING■
Never drive with more than one temporary spare wheel mounted!■Only use the temporary spare wheel when absolutely necessary.■
Avoid accelerating at full throttle, sharp braking and fast cornering.
■
The snow chains cannot be used on the temporary spare wheel.
■
If the dimensions or design of the temporary spare wheel differ from the
tyres fitted, never drive faster than 80 km/h (or 50 mph).
119Wheels
Page 144 of 160

Technical data
Technical data
Basic vehicle data
Introduction
This chapter contains information on the following subjects:
Vehicle characteristics
142
Operating weight
143
Payload
143
Measurement of fuel consumption and CO 2 emissions according to ECE
Regulations and EU Directives
143
Dimensions
144
Departure angle
145
The details given in the vehicle's technical documentation always take prece-
dence over the details in the Owner's Manual.
The listed performance values were determined without performance-reduc- ing equipment, e.g. air conditioning system.
The values given have been determined in accordance with regulations and in
conditions prescribed by legal or technical provisions for determining the oper-
ating and technical data of vehicles.
Vehicle characteristics
Fig. 149
Vehicle data sticker/type plate
Vehicle data sticker
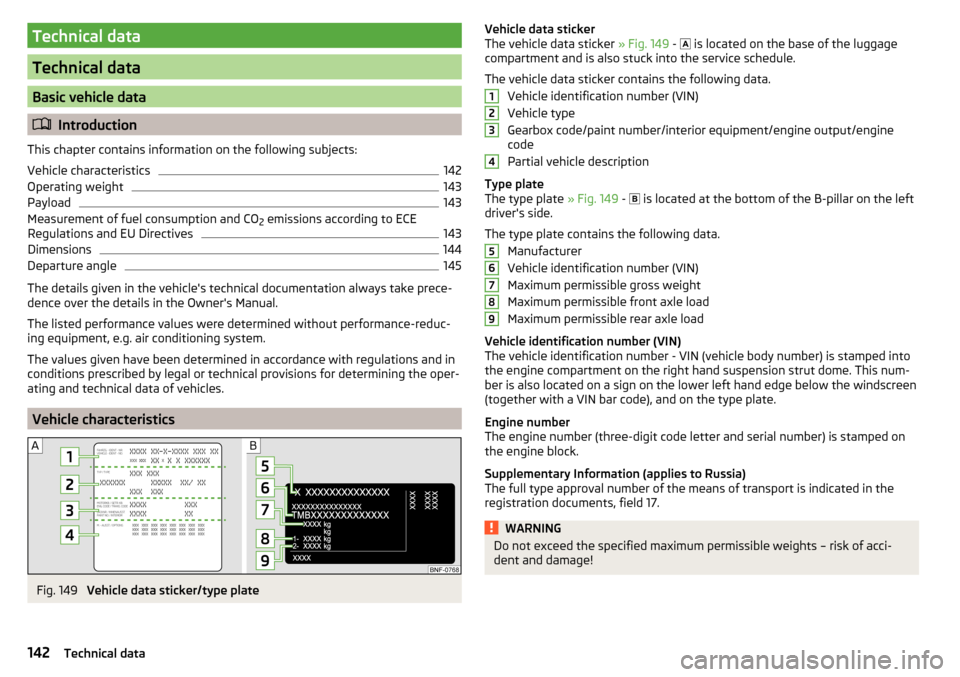
The vehicle data sticker » Fig. 149 - is located on the base of the luggage
compartment and is also stuck into the service schedule.
The vehicle data sticker contains the following data. Vehicle identification number (VIN)
Vehicle type
Gearbox code/paint number/interior equipment/engine output/engine
code
Partial vehicle description
Type plate
The type plate » Fig. 149 -
is located at the bottom of the B-pillar on the left
driver's side.
The type plate contains the following data. Manufacturer
Vehicle identification number (VIN)
Maximum permissible gross weight
Maximum permissible front axle load
Maximum permissible rear axle load
Vehicle identification number (VIN)
The vehicle identification number - VIN (vehicle body number) is stamped into
the engine compartment on the right hand suspension strut dome. This num-
ber is also located on a sign on the lower left hand edge below the windscreen
(together with a VIN bar code), and on the type plate.
Engine number
The engine number (three-digit code letter and serial number) is stamped on the engine block.
Supplementary Information (applies to Russia)
The full type approval number of the means of transport is indicated in the
registration documents, field 17.WARNINGDo not exceed the specified maximum permissible weights – risk of acci-
dent and damage!123456789142Technical data
Page 146 of 160

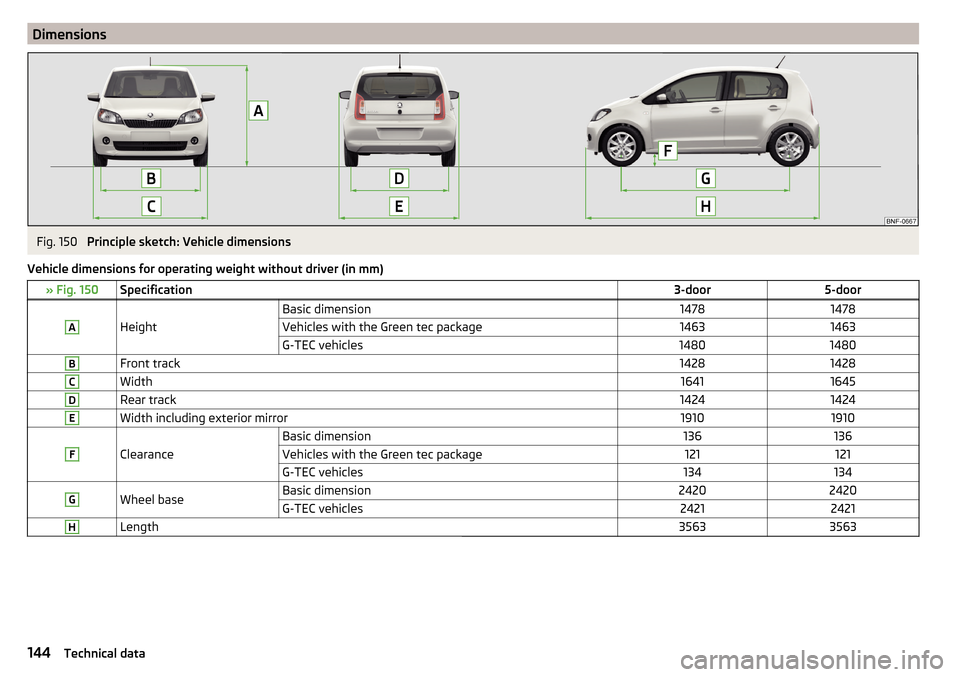
DimensionsFig. 150
Principle sketch: Vehicle dimensions
Vehicle dimensions for operating weight without driver (in mm)
» Fig. 150Specification3-door5-doorA
Height
Basic dimension14781478Vehicles with the Green tec package14631463G-TEC vehicles14801480BFront track14281428CWidth16411645DRear track14241424EWidth including exterior mirror19101910F
Clearance
Basic dimension136136Vehicles with the Green tec package121121G-TEC vehicles134134GWheel baseBasic dimension24202420G-TEC vehicles24212421HLength35633563144Technical data
Page 156 of 160

Checking the battery electrolyte level114
Operation in winter114
Safety instructions112
Vehicle care Alcantara
101
Anodized parts98
Artificial leather101
Cavity protection99
Chrome parts98
Cleaning vehicle exterior96
Cleaning wheels99
Decorative and protective films97
Door locking cylinder99
Headlight glasses98
Interior care100
Maintenance97
Materials101
Natural leather100
Plastic parts98
Polishing the vehicle paintwork97
Rubber seals98
Safety belt102
Seat covers101
Under-body protections99
washing95
Vehicle data sticker142
Vehicle data sticker and nameplate Vehicle data sticker and nameplate
142
Vehicle dimensions144
Vehicle height144
Vehicle Identification Number (VIN)142
Vehicle length144
Vehicle tool kit122
Vehicle width144
vest Positioning of the reflective vest
122
VIN Vehicle Identification Number
142
Visibility50
Visors see Sun visors51
Visual parking system87
W
Warning at excessive speeds
32
Warning lights34
Warning symbols34
Warning triangle122
Washing Automatic car wash system
96
by hand95
Washing the vehicle Pressure Washer
96
Washing vehicles95
Waste container59
Weather conditions92
Wheel bolts Anti-theft wheel bolts
124
Caps124
Loosening and tightening125
Wheel rims116
Wheels Age of wheels
116
Changing123
Driving style118
Full trim124
General information116
Load index120
Snow chains121
Speed symbol120
Storage of wheels116
stow123
take out123
Tyre damage119
Tyre pressure117
Tyre size120
Tyre wear118
Tyre wear indicator118
Unidirectional tyres119
Wheel balance118
Wheel replacement118
Winter tyres120
Window wiper Replacing the rear window wiper blade
134
Windscreen washer fluid Checking
108
Replenishing108
Winter108
Windscreen washer system108
Windscreen washer system52
Windscreen wipers Replacing the windscreen wiper blades
133
Servicing position for the windscreen wiper arms
133
Windscreen washer fluid108
Windscreen wipers and washers51
Winter operation120
De-icing windows98
Snow chains121
Winter tyres120
Winter tyres See Wheels
120
Wiper blades100
Wiper interval52
Wipers Maintaining wiper blades
100
154Index