lock SKODA CITIGO 2015 1.G Owner's Manual
[x] Cancel search | Manufacturer: SKODA, Model Year: 2015, Model line: CITIGO, Model: SKODA CITIGO 2015 1.GPages: 160, PDF Size: 23.1 MB
Page 4 of 160
Table of Contents
Board literature4
Notes
5
Structure and more information about the
Owner's Manual
6
Abbreviations
Safety
Passive Safety
8
General information
8
Correct and safe seated position
8
Seat belts
11
Using seat belts
11
Inertia reels and belt tensioners
13
Airbag system
14
Description of the airbag system
14
Airbag overview
15
Deactivating airbags
17
Transporting children safely
19
Child seat
19
Fastening systems
22
Using the system
Cockpit
27
Overview
26
Instruments and control lights
28
Instrument cluster
28
Multi-function display (MFD)
31
Warning lights
34
Unlocking and opening
39
Unlocking and locking
39
Luggage compartment lid
42Window operations43Panorama sliding/tilting roof45
Lights and visibility
47
Lights
47
Indoor Lighting
50
Visibility
50
Windscreen wipers and washers
51
Rear mirror
52
Seats and head restraints
54
Seats and head restraints
54
Seat features
55
Transporting and practical equipment
58
Useful equipment
58
Luggage compartment and transporting
cargo
64
Roof rack
67
Heating and ventilation
69
Heating, manual air conditioning system
69
Communication and multimedia
72
Telephone and Move & Fun
72
Driving
Starting-off and Driving
75
Starting and turning off the engine
75
START-STOPsystem
77
Brakes and parking
78
Manual gear changing and pedals
80
Automated transmission
81
Running-in and economical driving
83
Avoiding damage to your vehicle
84
Assist systems
85
General information
85
Braking and stabilisation systems
85
Parking aid (ParkPilot)
86
Cruise Control System
88City Safe Drive89Tyre pressure monitoring90
General Maintenance
Care and maintenance
92
Modifications, adjustments and technical
alterations
92
Washing vehicle
95
Cleaning vehicle exterior
96
Interior care
100
Inspecting and replenishing
102
Fuel
102
Engine compartment
106
Engine oil
109
Coolant
110
Brake fluid
112
Vehicle battery
112
Wheels
116
Tyres and wheel rims
116
Winter operation
120
Do-it-yourself
Emergency equipment and self-help
122
Emergency equipment
122
Changing a wheel
123
Puncture repair kit
127
Jump-starting
129
Towing the vehicle
130
Remote control
132
Emergency unlocking/locking
132
Replacing windscreen wiper blades
133
Fuses and light bulbs
134
Fuses
134
Replacing bulbs
1382Table of Contents
Page 9 of 160
AbbreviationsAbbreviationDefinitionrpmEngine revolutions per minuteABSAnti-lock brake systemAGMVehicle battery typeASGAutomatic gearboxTCSTraction controlCNGcompressed natural gasCO2Carbon dioxideCOCDeclaration of conformityEDLElectronic differential lockECEEconomic Commission for EuropeEPCEngine performance checkESCElectronic Stability ControlDRim depthEUEuropean UnionG-TECLabelling for natural gas vehiclesHBAHydraulic brake assistHHCUphill start assistkWKilowatt, measuring unit for outputMGManual gearboxMFDMultifunction displayMPIGasoline engine with a multi-point fuel injectionN1Panel van intended exclusively or mainly for the transporta-
tion of goodsNmNewton meter, measuring unit for the engine torqueOPSvisual parking systemTMCService for transmitting traffic information to the driverVINVehicle identification numberWWatt, unit of power7Abbreviations
Page 11 of 160
WARNING■The front seats and all head restraints must be adjusted to match the
body size at all times and the seat belt must always be fastened properly to
provide the most effective levels of protection to the passengers.■
Each occupant must correctly fasten the seat belt belonging to the seat.
Children must be fastened » page 19, Transporting children safely with a
suitable restraint system.
■
By sitting incorrectly, the occupant is risking life-threatening injuries.
■
The seat backrests must not be tilted too far back when driving, as this
will impair the function of the seat belts and of the airbag system – risk of
injury!
Correct seat position of the driver
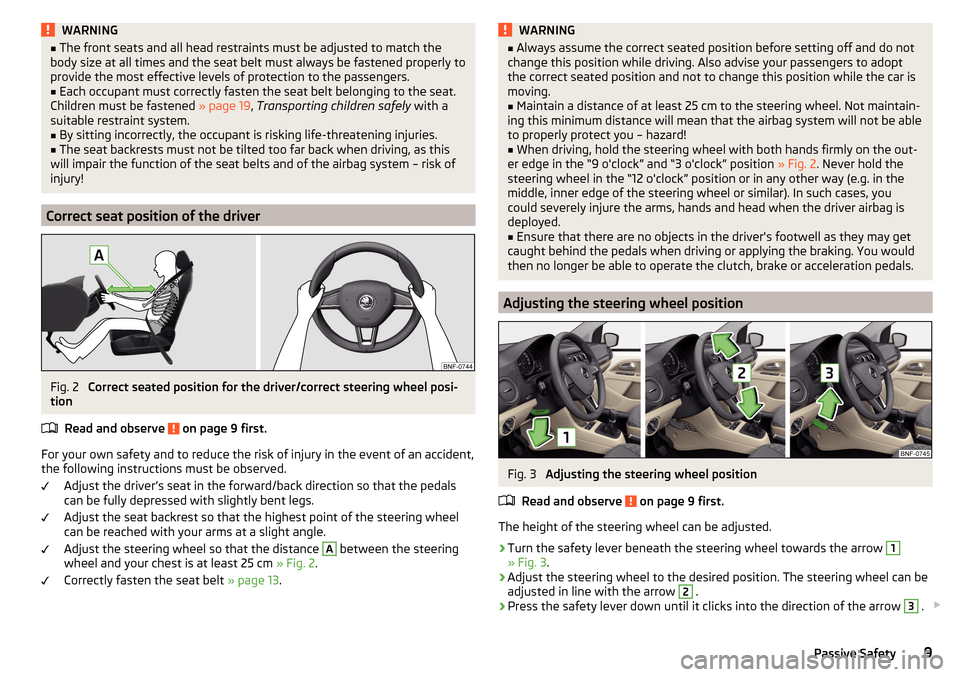
Fig. 2
Correct seated position for the driver/correct steering wheel posi-
tion
Read and observe
on page 9 first.
For your own safety and to reduce the risk of injury in the event of an accident,
the following instructions must be observed.
Adjust the driver’s seat in the forward/back direction so that the pedals
can be fully depressed with slightly bent legs.
Adjust the seat backrest so that the highest point of the steering wheel
can be reached with your arms at a slight angle.
Adjust the steering wheel so that the distance
A
between the steering
wheel and your chest is at least 25 cm » Fig. 2.
Correctly fasten the seat belt » page 13.
WARNING■
Always assume the correct seated position before setting off and do not
change this position while driving. Also advise your passengers to adopt
the correct seated position and not to change this position while the car is
moving.■
Maintain a distance of at least 25 cm to the steering wheel. Not maintain-
ing this minimum distance will mean that the airbag system will not be able
to properly protect you – hazard!
■
When driving, hold the steering wheel with both hands firmly on the out-
er edge in the “9 o'clock” and “3 o'clock” position » Fig. 2. Never hold the
steering wheel in the “12 o'clock” position or in any other way (e.g. in the
middle, inner edge of the steering wheel or similar). In such cases, you
could severely injure the arms, hands and head when the driver airbag is
deployed.
■
Ensure that there are no objects in the driver's footwell as they may get
caught behind the pedals when driving or applying the braking. You would
then no longer be able to operate the clutch, brake or acceleration pedals.
Adjusting the steering wheel position
Fig. 3
Adjusting the steering wheel position
Read and observe
on page 9 first.
The height of the steering wheel can be adjusted.
›
Turn the safety lever beneath the steering wheel towards the arrow
1
» Fig. 3 .
›
Adjust the steering wheel to the desired position. The steering wheel can be
adjusted in line with the arrow
2
.
›
Press the safety lever down until it clicks into the direction of the arrow
3
.
9Passive Safety
Page 12 of 160
WARNING■Never adjust the steering wheel when the vehicle is moving only when
the vehicle is stationary!■
The safety lever must be locked so that the steering wheel cannot acci-
dentally change position – risk of accident!
Correct seated position for the front passenger
Read and observe
on page 9 first.
For passenger safety and to reduce the risk of injury in an accident, the follow-
ing instructions must be observed.
Position the front passenger seat back as far as possible. The front pas-
senger must maintain a distance of at least 25 cm to the dash panel so
that the airbag offers the greatest possible safety if it is deployed.
Correctly fasten the seat belt » page 13.
In exceptional cases the front passenger airbag can be deactivated
» page 17 , Deactivating airbags .
WARNING■
Maintain a distance of at least 25 cm to the dash panel. Not maintaining
this minimum distance will mean that the airbag system will not be able to
properly protect you – hazard!■
Always keep your feet in the footwell when the car is being driven – nev-
er place your feet on the instrument panel, out of the window or on the
surface of the seats! You will be exposed to increased risk of injury if it be-
comes necessary to apply the brake or in the event of an accident. If an air-
bag is deployed, you could suffer fatal injuries by adopting an incorrect
seated position!
Correct seated position for the passengers in the rear seats
Read and observe
on page 9 first.
To reduce the risk of injury in the event of a sudden braking manoeuvre or an
accident, the occupants on the rear seats must observe the following.
Adjust the head restraint so that the top edge of the head restraint is at
the same level as the upper part of your head.
Correctly fasten the seat belt » page 13.
Use a suitable child restraint system if transporting children in the vehicle
» page 19 , Transporting children safely .
10Safety
Page 13 of 160
Seat belts
Using seat belts
Introduction
This chapter contains information on the following subjects:
The physical principle of a frontal collision
12
Correct routing of seat belt
12
Fastening and unfastening seat belts
13
Seat belts that are fastened correctly offer good protection in the event of an
accident. They reduce the risk of an injury and increase the chance of survival
in the event of a major accident.
Properly fastened seat belts hold occupants to correctly set seats in the right
seat position.
Particular safety aspects must be observed when transporting children in the
vehicle » page 19 , Transporting children safely .
WARNING■
Fasten your seat belt before each journey – even when driving in town!
This also applies to other passengers - there is a danger of injury!■
Maximum seat belt protection is only achieved if you are correctly seated
» page 8 , Correct and safe seated position .
■
The seat backrests of the front seats must not be tilted too far to the rear
otherwise the seatbelts can lose their effectiveness.
WARNINGInformation on the correct routing of the belt■Always ensure that the webbing of the seat belts is properly routed. Seat
belts which are not correctly adjusted can themselves cause injuries even
in minor accidents.■
A seat belt which is hanging too loose can result in injuries as your body is
moved forward by the kinetic energy produced in an accident and is then
suddenly held firm by the belt.
■
The belt webbing must not run across solid or fragile objects (e.g. specta-
cles, ball-point pens, bunches of keys etc.). Such objects can cause injury.
WARNINGInformation on dealing with the safety belts■The belt webbing must not be jammed in-between at any point or twis-
ted, or chafe against any sharp edges.■
Make sure you do not catch the seat belt when closing the door.
WARNINGInformation on the proper use of the safety belts■No two persons (also not children) should ever use a single seat belt to-
gether.■
The lock tongue should only be inserted into the lock which is the correct
one for your seat. Wrong use of the safety belt will reduce its capacity to
protect and the risk of injury increases.
■
The slot of the belt tongue must not be blocked, otherwise the belt
tongue will not lock in place properly.
■
Many layers of clothing and loose clothing (e. g. a winter coat over a jack-
et) do not allow you to be correctly seated and impairs proper operation of
the seat belts.
■
Do not use clamps or other objects to adjust seat belts (e.g. for shorten-
ing the belts for smaller persons).
■
The seat belts for the rear seats can only fulfil their function reliably
when the seat backrests are correctly locked into position » page 57, Seat
backrests .
WARNINGInformation on the care and maintenance of the safety belts■The belt webbing must always be kept clean. Soiled belt webbing may im-
pair proper operation of the inertia reel » page 102, Safety belts .■
The seat belts must not be removed or changed in any way. Do not at-
tempt to repair the seat belts yourself.
■
Check the condition of all the seat belts on a regular basis. If any damage
to the seat belts, seat belt connections, inertia reel or the lock is detected,
the relevant seat belt must be replaced by a specialist garage.
■
Damaged seat belts which have been subjected to stress in an accident
and were therefore stretched, must be replaced – this is best done by a
specialist garage. The anchorage points of the belts must also be inspec-
ted. The anchorage points for the belts should also be checked.
11Seat belts
Page 15 of 160
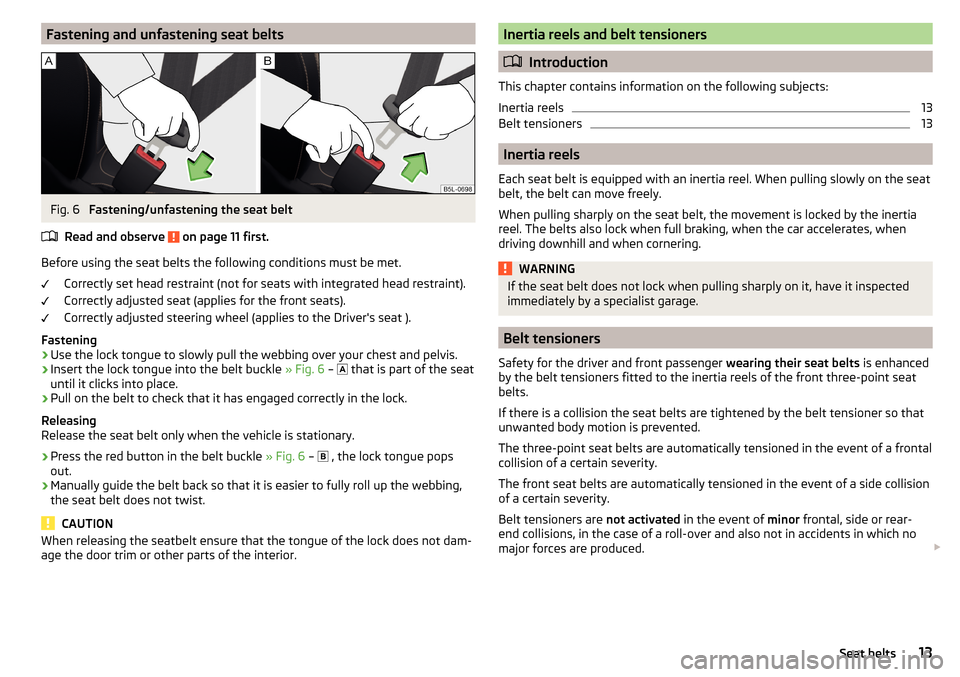
Fastening and unfastening seat beltsFig. 6
Fastening/unfastening the seat belt
Read and observe
on page 11 first.
Before using the seat belts the following conditions must be met. Correctly set head restraint (not for seats with integrated head restraint).
Correctly adjusted seat (applies for the front seats).
Correctly adjusted steering wheel (applies to the Driver's seat ).
Fastening
›
Use the lock tongue to slowly pull the webbing over your chest and pelvis.
›
Insert the lock tongue into the belt buckle » Fig. 6 –
that is part of the seat
until it clicks into place.
›
Pull on the belt to check that it has engaged correctly in the lock.
Releasing
Release the seat belt only when the vehicle is stationary.
›
Press the red button in the belt buckle » Fig. 6 –
, the lock tongue pops
out.
›
Manually guide the belt back so that it is easier to fully roll up the webbing,
the seat belt does not twist.
CAUTION
When releasing the seatbelt ensure that the tongue of the lock does not dam-
age the door trim or other parts of the interior.Inertia reels and belt tensioners
Introduction
This chapter contains information on the following subjects:
Inertia reels
13
Belt tensioners
13
Inertia reels
Each seat belt is equipped with an inertia reel. When pulling slowly on the seat
belt, the belt can move freely.
When pulling sharply on the seat belt, the movement is locked by the inertia
reel. The belts also lock when full braking, when the car accelerates, when
driving downhill and when cornering.
WARNINGIf the seat belt does not lock when pulling sharply on it, have it inspected
immediately by a specialist garage.
Belt tensioners
Safety for the driver and front passenger wearing their seat belts is enhanced
by the belt tensioners fitted to the inertia reels of the front three-point seat
belts.
If there is a collision the seat belts are tightened by the belt tensioner so that
unwanted body motion is prevented.
The three-point seat belts are automatically tensioned in the event of a frontal
collision of a certain severity.
The front seat belts are automatically tensioned in the event of a side collision
of a certain severity.
Belt tensioners are not activated in the event of minor frontal, side or rear-
end collisions, in the case of a roll-over and also not in accidents in which no
major forces are produced.
13Seat belts
Page 17 of 160
System descriptionRead and observe
on page 14 first.
The inflation of the airbag is carried out in a fraction of a second.
When the airbags are deployed, they fill with gas and inflate.
A grey white or red, non-harmful gas is released when the airbag is inflated.
This is perfectly normal and is not an indication of a fire in the vehicle.
Depending on the vehicle equipment, the airbag system consists of the
following parts. ▶ Front airbag for the driver and the front passenger » page 15.
▶ Side airbags Head-thorax » page 17.
▶ Airbag warning light in the instrument cluster » page 37,
Airbag system
.
▶ Key switch for the front passenger airbag » page 18.
▶ Warning light for the front passenger airbag in the middle of the dash panel
» page 18 .
Airbag deployment
Read and observe
on page 14 first.
The airbag system is only functional when the ignition is switched on.
Triggering conditions
It is not possible to generally determine which deployment conditions apply to
the airbag system in every situation. An important role is played by factors
such as the type of object that the vehicle hits (hard/soft), the impact angle, vehicle speed etc.
A decisive factor for the deployment of the airbags is the deceleration which
occurs. If the vehicle deceleration which occurs and is measured during the
collision remains below the prescribed reference values specified in the control
unit, the airbags are not deployed although the vehicle may well suffer severe
damage to the bodywork as a consequence of the accident.
The following airbags will be deployed in the event of a severe frontal
collision.
▶ Driver’s front airbag.
▶ Front passenger airbag.
The following airbags will be deployed in the event of a severe side collision. ▶ Head-Thorax side airbag on the crash side.
When an airbag is deployed, the following events occur.
▶ The interior light comes on (if the automatic operation of the interior light is
switched on - switch
).
▶ The hazard warning lights are switched on.
▶ All doors are unlocked.
▶ The fuel supply to the engine is interrupted.
When there is no air bag deployment?
With minor frontal and side collisions, rear collision, overturning of the vehicle
or vehicle roll-over there is no airbag deployment.
Airbag overview
Introduction
This chapter contains information on the following subjects:
Front airbags
15
Side airbags Head-Thorax
17
Front airbags
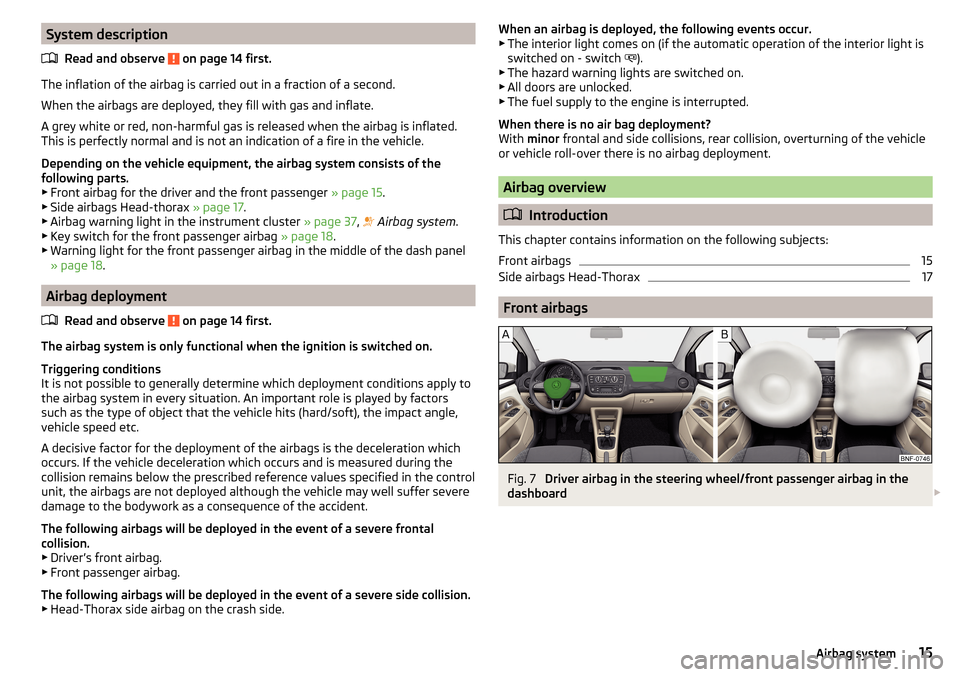
Fig. 7
Driver airbag in the steering wheel/front passenger airbag in the
dashboard
15Airbag system
Page 26 of 160
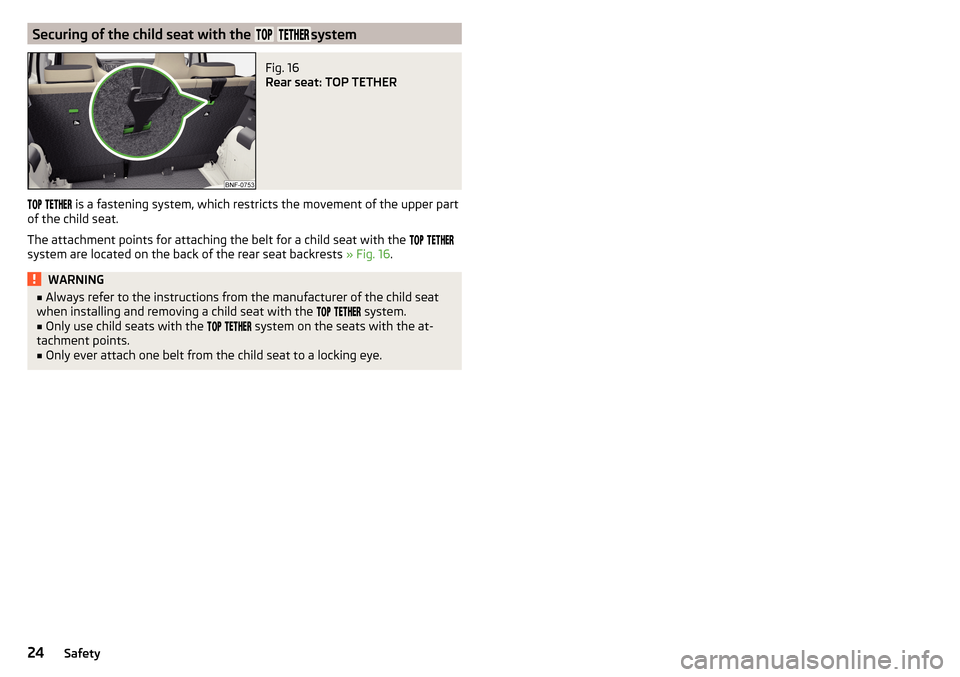
Securing of the child seat with the systemFig. 16
Rear seat: TOP TETHER
is a fastening system, which restricts the movement of the upper part
of the child seat.
The attachment points for attaching the belt for a child seat with the
system are located on the back of the rear seat backrests » Fig. 16.
WARNING■
Always refer to the instructions from the manufacturer of the child seat
when installing and removing a child seat with the system.■
Only use child seats with the
system on the seats with the at-
tachment points.
■
Only ever attach one belt from the child seat to a locking eye.
24Safety
Page 29 of 160
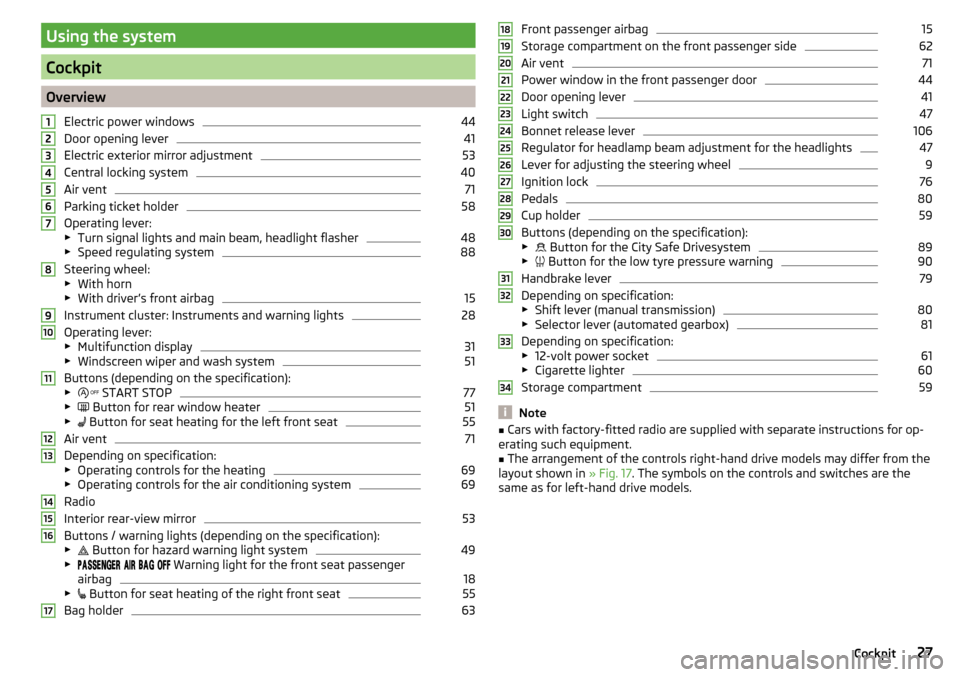
Using the system
Cockpit
OverviewElectric power windows
44
Door opening lever
41
Electric exterior mirror adjustment
53
Central locking system
40
Air vent
71
Parking ticket holder
58
Operating lever:
▶ Turn signal lights and main beam, headlight flasher
48
▶Speed regulating system
88
Steering wheel:
▶ With horn
▶ With driver’s front airbag
15
Instrument cluster: Instruments and warning lights
28
Operating lever:
▶ Multifunction display
31
▶Windscreen wiper and wash system
51
Buttons (depending on the specification):
▶ START STOP
77
▶
Button for rear window heater
51
▶
Button for seat heating for the left front seat
55
Air vent
71
Depending on specification:
▶ Operating controls for the heating
69
▶Operating controls for the air conditioning system
69
Radio
Interior rear-view mirror
53
Buttons / warning lights (depending on the specification):
▶ Button for hazard warning light system
49
▶
Warning light for the front seat passenger
airbag
18
▶ Button for seat heating of the right front seat
55
Bag holder
631234567891011121314151617Front passenger airbag15
Storage compartment on the front passenger side
62
Air vent
71
Power window in the front passenger door
44
Door opening lever
41
Light switch
47
Bonnet release lever
106
Regulator for headlamp beam adjustment for the headlights
47
Lever for adjusting the steering wheel
9
Ignition lock
76
Pedals
80
Cup holder
59
Buttons (depending on the specification):
▶ Button for the City Safe Drivesystem
89
▶
Button for the low tyre pressure warning
90
Handbrake lever
79
Depending on specification:
▶ Shift lever (manual transmission)
80
▶Selector lever (automated gearbox)
81
Depending on specification:
▶ 12-volt power socket
61
▶Cigarette lighter
60
Storage compartment
59
Note
■Cars with factory-fitted radio are supplied with separate instructions for op-
erating such equipment.■
The arrangement of the controls right-hand drive models may differ from the
layout shown in » Fig. 17. The symbols on the controls and switches are the
same as for left-hand drive models.
181920212223242526272829303132333427Cockpit
Page 33 of 160
The arrow symbol is shown after the name of the engaged gear.- Recommends that you change up to a higher gear
- Recommends that you change down to a lower gear
Gear recommendation - vehicles with manual transmission
The recommended gear and the arrow icon is displayed.
If e.g.
appears, this means it would be beneficial to change up from a lower
gear into 3rd gear.
Gear recommendation - vehicles with automated manual transmission mode
for manual gearshifting (Tiptronic)
The currently engaged gear and the relevant arrow icon is displayed.
If .g
appears, this means it would be beneficial to change up from 3rd gear
to a higher gearWARNINGThe driver is always responsible for selecting the correct gear in different
driving situations, such as overtaking.
Multi-function display (MFD)
Introduction
This chapter contains information on the following subjects:
Operation
31
Multifunction display details
31
Warning at excessive speeds
32
Memory
33
33
The driving data is displayed on the multifunction display.
The multifunction display only operates if the ignition is switched on. After the ignition is switched on, the function that was last selected before switching
off the ignition is displayed.
WARNING■ Concentrate fully at all times on your driving! As the driver you are fully
responsible for the operation of your vehicle.■
Even at temperatures of around +4 °C, black ice may still be on the road
surface! You should therefore not only rely on the outside temperature dis-
play for accurate information as to whether there is ice on the road.
Operation
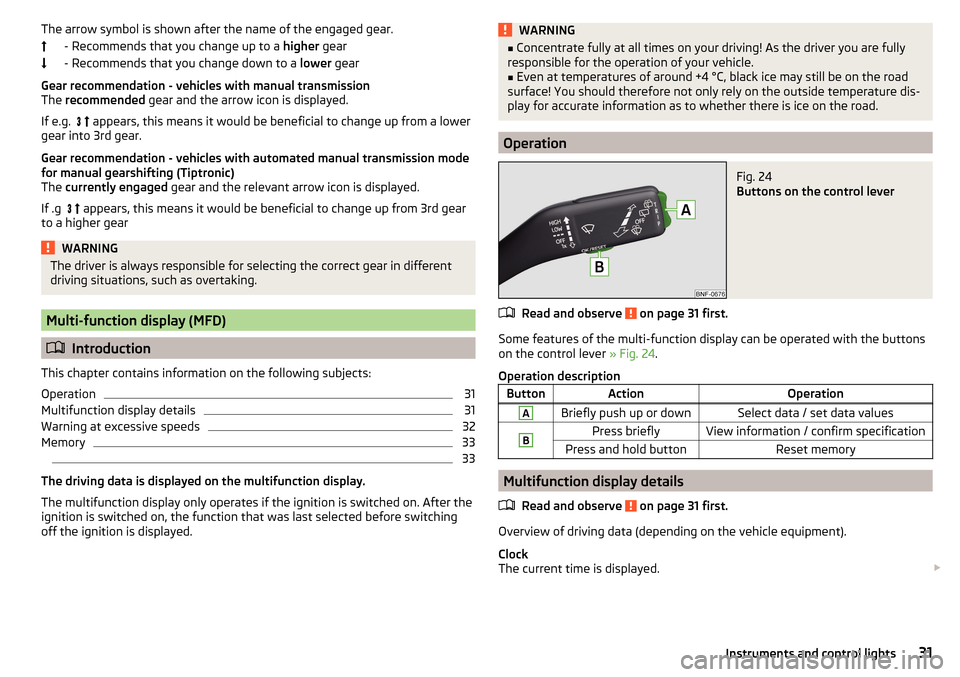
Fig. 24
Buttons on the control lever
Read and observe on page 31 first.
Some features of the multi-function display can be operated with the buttons
on the control lever » Fig. 24.
Operation description
ButtonActionOperationABriefly push up or downSelect data / set data valuesBPress brieflyView information / confirm specificationPress and hold buttonReset memory
Multifunction display details
Read and observe
on page 31 first.
Overview of driving data (depending on the vehicle equipment).
Clock
The current time is displayed.
31Instruments and control lights