fluid SKODA FABIA 2000 1.G / 6Y User Guide
[x] Cancel search | Manufacturer: SKODA, Model Year: 2000, Model line: FABIA, Model: SKODA FABIA 2000 1.G / 6YPages: 86, PDF Size: 3.58 MB
Page 18 of 86
Downloaded from www.Manualslib.com manuals search engine FABIA 2000➤Inspection and Maintenance
InspectionEdition 09.04
S00.5301.14.2002-2 page 8 02
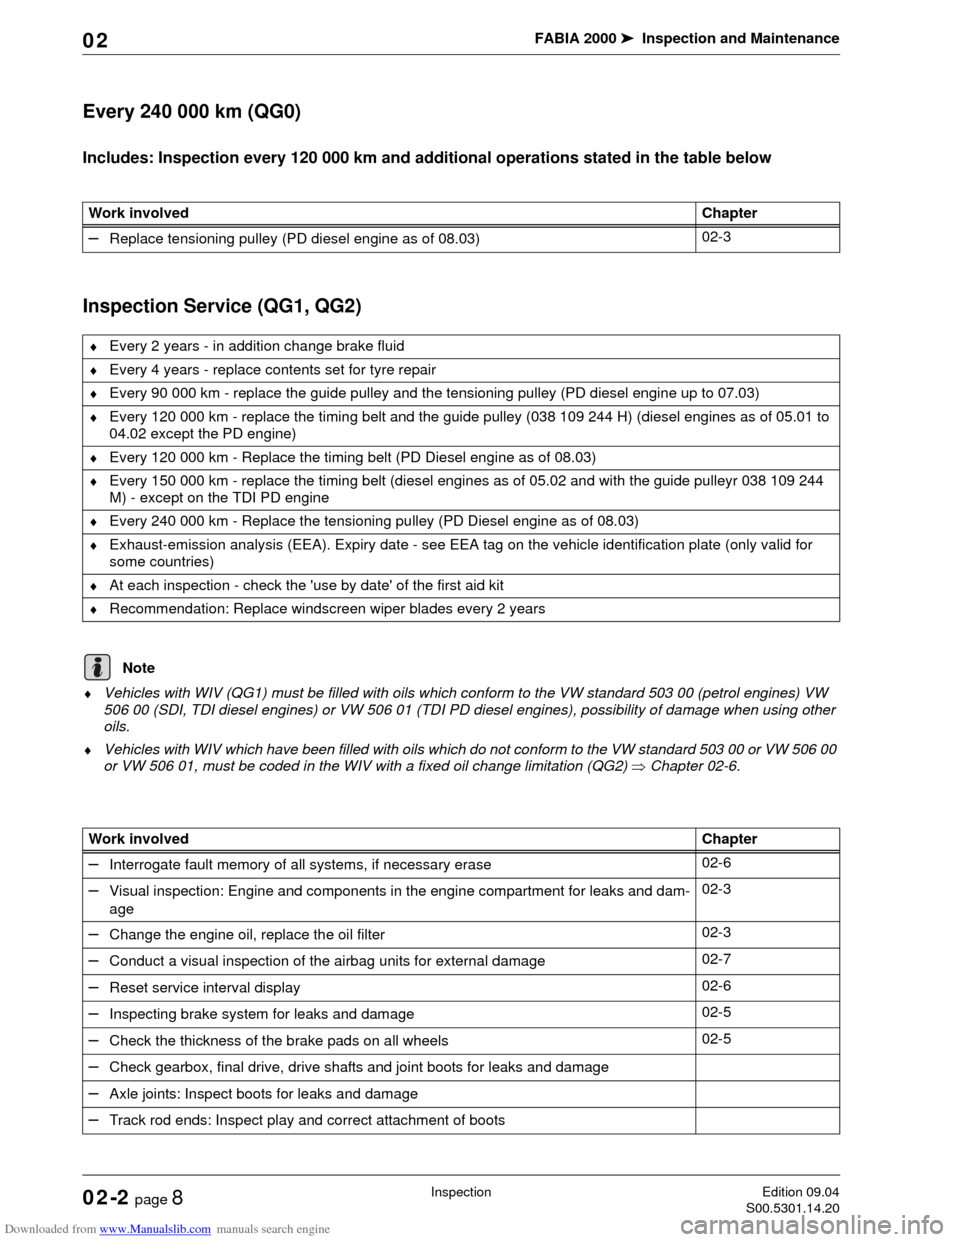
Every 240 000 km (QG0)
Includes: Inspection every 120 000 km and additional operations stated in the table below
Inspection Service (QG1, QG2)
♦Vehicles with WIV (QG1) must be filled with oils which conform to the VW standard 503 00 (petrol engines) VW
506 00 (SDI, TDI diesel engines) or VW 506 01 (TDI PD diesel engines), possibility of damage when using other
oils.
♦Vehicles with WIV which have been filled with oils which do not conform to the VW standard 503 00 or VW 506 00
or VW 506 01, must be coded in the WIV with a fixed oil change limitation (QG2) ⇒Chapter 02-6. Work involvedChapter
–Replace tensioning pulley (PD diesel engine as of 08.03)02-3
♦Every 2 years - in addition change brake fluid
♦Every 4 years - replace contents set for tyre repair
♦Every 90 000 km - replace the guide pulley and the tensioning pulley (PD diesel engine up to 07.03)
♦Every 120 000 km - replace the timing belt and the guide pulley (038 109 244 H) (diesel engines as of 05.01 to
04.02 except the PD engine)
♦Every 120 000 km - Replace the timing belt (PD Diesel engine as of 08.03)
♦Every 150 000 km - replace the timing belt (diesel engines as of 05.02 and with the guide pulleyr 038 109 244
M) - except on the TDI PD engine
♦Every 240 000 km - Replace the tensioning pulley (PD Diesel engine as of 08.03)
♦Exhaust-emission analysis (EEA). Expiry date - see EEA tag on the vehicle identification plate (only valid for
some countries)
♦At each inspection - check the 'use by date' of the first aid kit
♦Recommendation: Replace windscreen wiper blades every 2 years
Note
Work involvedChapter
–Interrogate fault memory of all systems, if necessary erase02-6
–Visual inspection: Engine and components in the engine compartment for leaks and dam-
age02-3
–Change the engine oil, replace the oil filter02-3
–Conduct a visual inspection of the airbag units for external damage02-7
–Reset service interval display02-6
–Inspecting brake system for leaks and damage02-5
–Check the thickness of the brake pads on all wheels02-5
–Check gearbox, final drive, drive shafts and joint boots for leaks and damage
–Axle joints: Inspect boots for leaks and damage
–Track rod ends: Inspect play and correct attachment of boots
Page 19 of 86

Downloaded from www.Manualslib.com manuals search engine FABIA 2000➤Inspection and Maintenance
InspectionEdition 09.04
S00.5301.14.2002-2 page 9 02
–Check the tyre inflation pressure (including spare wheel), correct if necessary02-5
–Inspect tyre wear (including spare wheel)02-5
–Inspect tyre tread depth (including spare wheel) and record (FL..., FR..., RR..., RL...,
SP...)02-5
–Inspect exhaust system for leaks, damage and attachment
–Brake fluid volume: Check level, if necessary top up02-5
–Battery: test02-6
–Check the anti-freeze in the cooling system and record ...... °C, check for leaks, top up
coolant if necessary02-3
–Flap lock for the engine bonnet: grease
–Inspect operation of all switches, all electrical components, gauges/indicators and con-
trols for proper operation02-6
–Windscreen wiper and washer system: Inspect condition of wiper blades, wiper operation,
washer system: if necessary top up fluid02-7
–Inspect plenum chamber for dirt, clean if necessary02-7
–Inspect operation of tilting roof and grease the runners02-7
–Headlights: Inspect, if necessary adjust02-6
–Gear oil: Inspect level and top up if necessary (manual gearbox)02-4
–Draining the fuel filter (diesel engine)
–Inspect trailer coupling (with removable arm - manufacturer Profsvar)02-7
–Check underbody protection and body paintwork for damage02-7
–Dust and odour filter element for the passenger compartment: replace02-7
–Air filter: Clean the housing, replace the insert every 4 years or 60.000 km.02-3
–Replace the fuel filter (diesel engine with fuel operation, which does not comply with DIN
EN 590-standard)
–Ribbed V-belt: Inspect condition and for vehicles without tensioning pulley also the ten-
sion - every 60.000 km02-3
–Replace the fuel filter (diesel engine) - every 60.000 km
–Spark plugs: replace - every 60.000 km.02-3
–Automatic gearbox: Check the ATF level, and top up if necessary, every 60.000 km
–Check the timing belt for the camshaft on a 4-cylinder petrol engine at 90.000 km and
then every 30.000 km after that
–Replace the emergency battery for the alarm system - every five years02-6
After each inspection
–Complete the „Next Service“ sticker and affix sticker to the side of the dash panel (on the
driver's side)
–Perform road test including inspection of proper operation of footbrakes and handbrake,
gearshift and steering, final inspection02-9
–„Mirror tag“ - complete and attach to interior mirror
–Hand customer the completed and signed form Work involvedChapter
Page 20 of 86

Downloaded from www.Manualslib.com manuals search engine FABIA 2000➤Inspection and Maintenance
InspectionEdition 09.04
S00.5301.14.2002-2 page 10 02
Oil change (QG1, QG2)
Work involvedChapter
–Change engine oil
–Replace engine oil filter02-3
–Disc brake pads: Inspect thickness02-5
–Reset service interval display02-6
–Drain away water from the fuel filter (diesel engine with fuel operation, which does not
comply with DIN EN 590-standard)
After each oil change
–Enter the next service date on the „Next Service“ sticker and affix sticker to the side of
the dash panel on the driver's side, that is according to the indicator or the kilometer
schedule (also the date for changing the brake fluid)
–Complete and attach service mirror tag to the interior rear-view mirror
–Hand customer the completed and signed form
Page 40 of 86
Downloaded from www.Manualslib.com manuals search engine FABIA 2000➤Inspection and Maintenance
EnginesEdition 09.04
S00.5301.14.2002-3 page 20 02
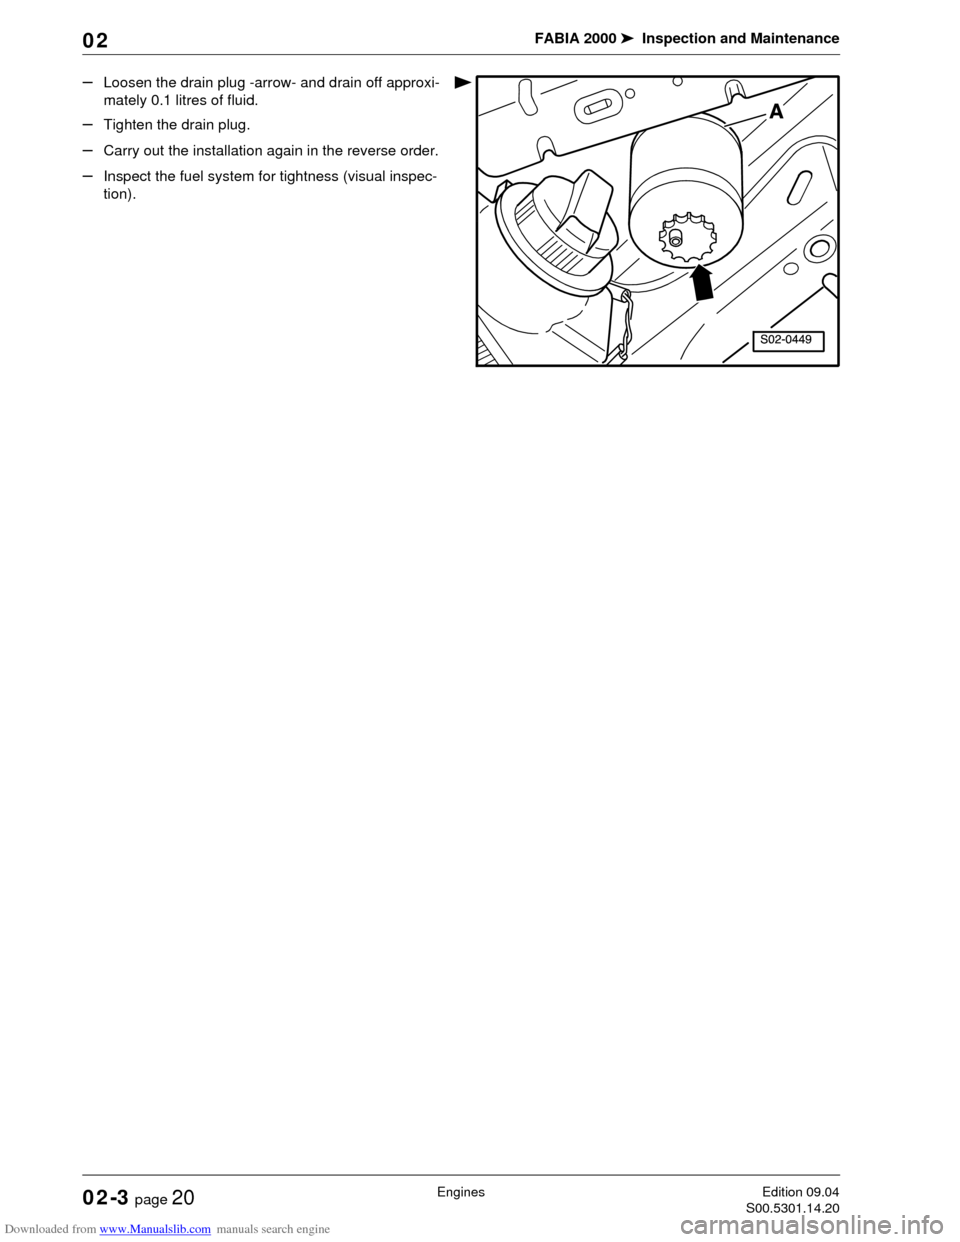
–Loosen the drain plug -arrow- and drain off approxi-
mately 0.1 litres of fluid.
–Tighten the drain plug.
–Carry out the installation again in the reverse order.
–Inspect the fuel system for tightness (visual inspec-
tion).
Page 48 of 86
Downloaded from www.Manualslib.com manuals search engine FABIA 2000➤Inspection and Maintenance
ChassisEdition 02.04
S00.5301.13.2002-5 page 2 02
ways replace the brake linings on both sides (repair
measure).
Avoid soiling from brake fluid or grease flowing out.
Inspecting brake system for leaks and
damage
–Inspect master brake cylinder, brake servo unit (for
ABS: hydraulic unit), brake pressure regulator, brake
calipers for leaks and damage.
–Inspect brake hoses for twisting.
–Ensure that the brake hoses do not touch any parts of
the vehicle when the steering is turned to full left or full
right lock.
–Inspect the brake hoses for porous and brittle points.
Inspect the brake hoses and brake lines for chafing
points.
–Inspect the brake connections and attachments to en-
sure they are correctly fitted, free of leaks and corro-
sion.
Changing brake fluid (every 2 years)
Special tools, test and measuring equipment and
auxiliary items required
♦Extraction device
♦Brake pedal support, e.g. - V.A.G 1869/2-
Use only fresh genuine brake fluid FMVSS 571.116 DOT
4.
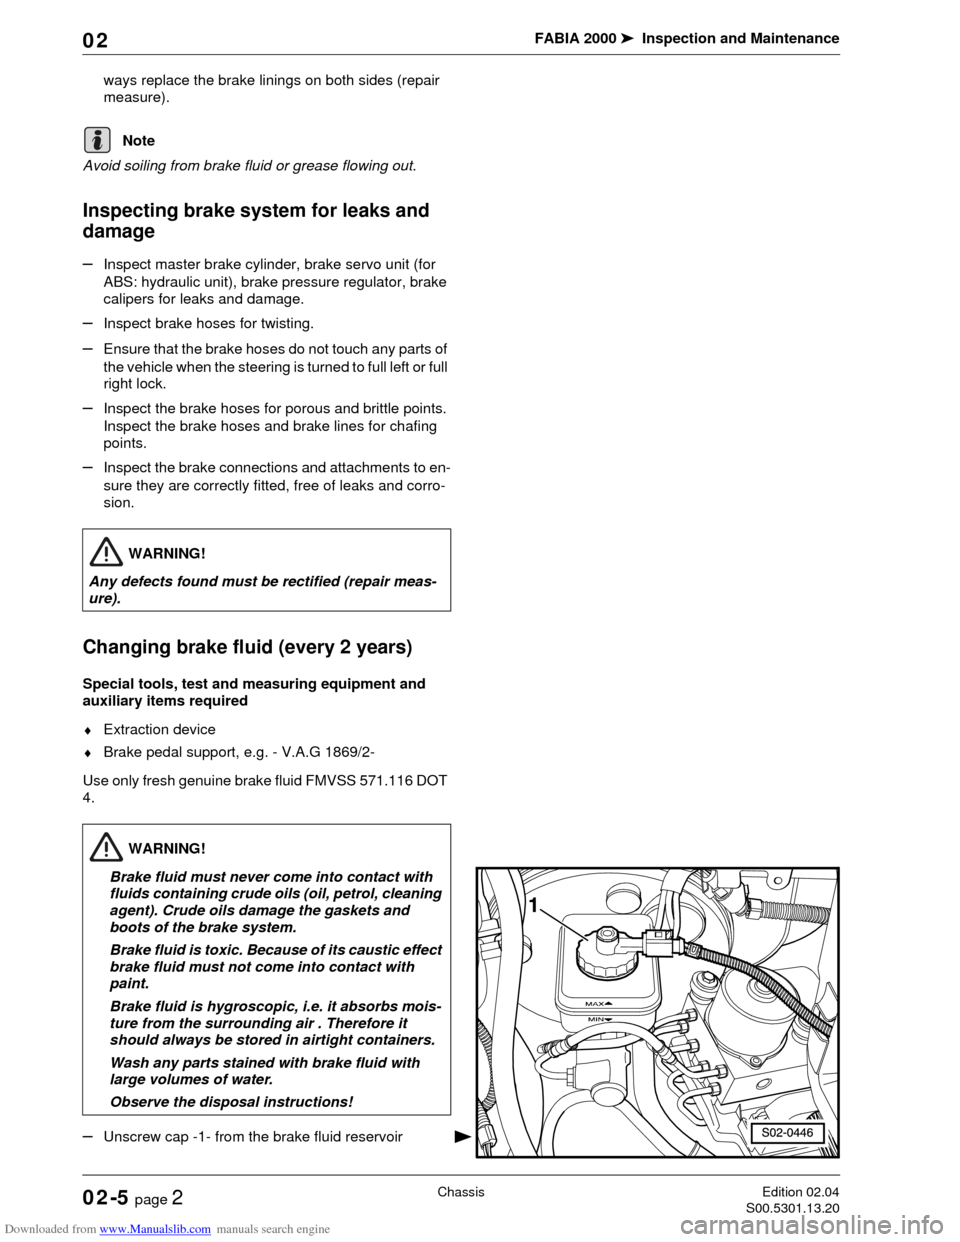
–Unscrew cap -1- from the brake fluid reservoir
Note
WARNING!
Any defects found must be rectified (repair meas-
ure).
WARNING!
Brake fluid must never come into contact with
fluids containing crude oils (oil, petrol, cleaning
agent). Crude oils damage the gaskets and
boots of the brake system.
Brake fluid is toxic. Because of its caustic effect
brake fluid must not come into contact with
paint.
Brake fluid is hygroscopic, i.e. it absorbs mois-
ture from the surrounding air . Therefore it
should always be stored in airtight containers.
Wash any parts stained with brake fluid with
large volumes of water.
Observe the disposal instructions!
Page 49 of 86
Downloaded from www.Manualslib.com manuals search engine FABIA 2000➤Inspection and Maintenance
ChassisEdition 02.04
S00.5301.13.2002-5 page 3 02
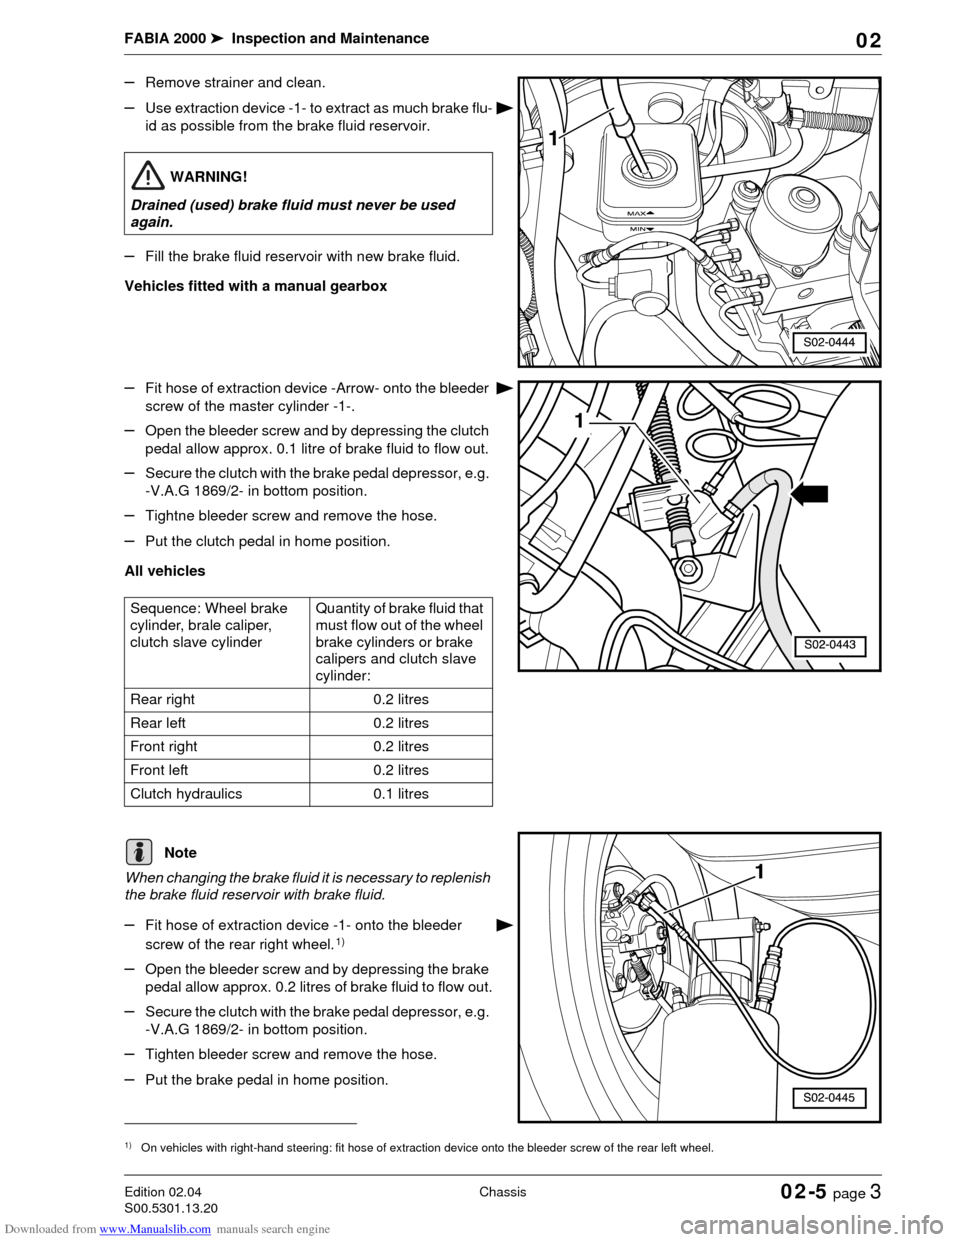
–Remove strainer and clean.
–Use extraction device -1- to extract as much brake flu-
id as possible from the brake fluid reservoir.
–Fill the brake fluid reservoir with new brake fluid.
Vehicles fitted with a manual gearbox
–Fit hose of extraction device -Arrow- onto the bleeder
screw of the master cylinder -1-.
–Open the bleeder screw and by depressing the clutch
pedal allow approx. 0.1 litre of brake fluid to flow out.
–Secure the clutch with the brake pedal depressor, e.g.
-V.A.G 1869/2- in bottom position.
–Tightne bleeder screw and remove the hose.
–Put the clutch pedal in home position.
All vehicles
When changing the brake fluid it is necessary to replenish
the brake fluid reservoir with brake fluid.
–Fit hose of extraction device -1- onto the bleeder
screw of the rear right wheel.
1)
–Open the bleeder screw and by depressing the brake
pedal allow approx. 0.2 litres of brake fluid to flow out.
–Secure the clutch with the brake pedal depressor, e.g.
-V.A.G 1869/2- in bottom position.
–Tighten bleeder screw and remove the hose.
–Put the brake pedal in home position.
WARNING!
Drained (used) brake fluid must never be used
again.
Sequence: Wheel brake
cylinder, brale caliper,
clutch slave cylinderQuantity of brake fluid that
must flow out of the wheel
brake cylinders or brake
calipers and clutch slave
cylinder:
Rear right 0.2 litres
Rear left 0.2 litres
Front right 0.2 litres
Front left 0.2 litres
Clutch hydraulics 0.1 litres
1)On vehicles with right-hand steering: fit hose of extraction device onto the bleeder screw of the rear left wheel.
Note
Page 50 of 86
Downloaded from www.Manualslib.com manuals search engine FABIA 2000➤Inspection and Maintenance
ChassisEdition 02.04
S00.5301.13.2002-5 page 4 02
–Repeat the procedure for all wheels in the following
sequence: rear left, front right and front left.
1)
–Insert strainer in the brake fluid reservoir and fill with
brake fluid up to the specified level.
–Inspect pedal position and idle travel at brake pedal.
Idle travel: max. 1/3 of pedal travel.
Vehicles with ABS or ABS/EDL:
A road test on such models must be carried out after
bleeding the brake system. While doing so perform at
least one ABS adjustment!
Inspecting the brake fluid level
Use only fresh genuine brake fluid FMVSS 571.116 DOT
4.
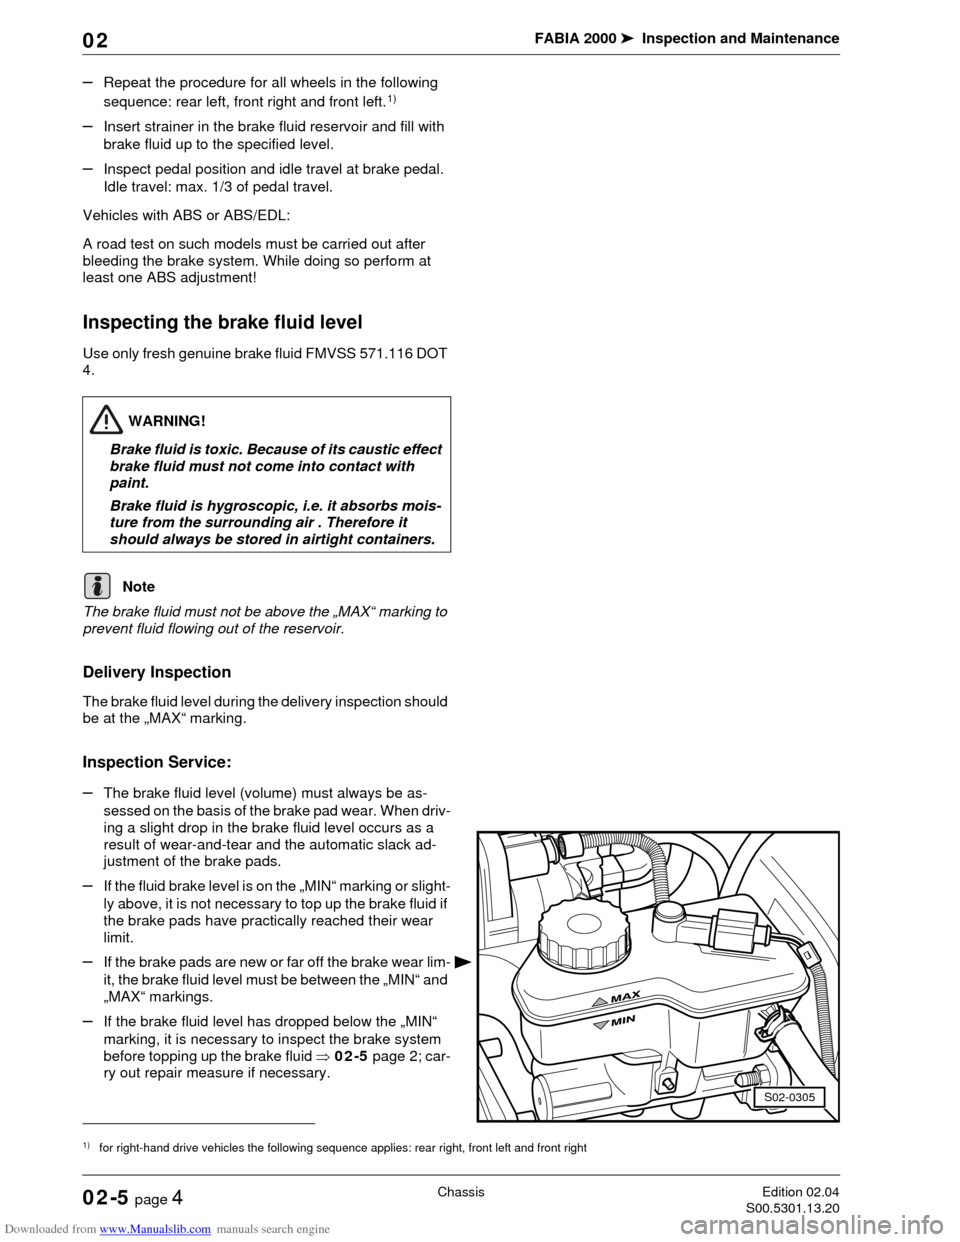
The brake fluid must not be above the „MAX“ marking to
prevent fluid flowing out of the reservoir.
Delivery Inspection
The brake fluid level during the delivery inspection should
be at the „MAX“ marking.
Inspection Service:
–The brake fluid level (volume) must always be as-
sessed on the basis of the brake pad wear. When driv-
ing a slight drop in the brake fluid level occurs as a
result of wear-and-tear and the automatic slack ad-
justment of the brake pads.
–If the fluid brake level is on the „MIN“ marking or slight-
ly above, it is not necessary to top up the brake fluid if
the brake pads have practically reached their wear
limit.
–If the brake pads are new or far off the brake wear lim-
it, the brake fluid level must be between the „MIN“ and
„MAX“ markings.
–If the brake fluid level has dropped below the „MIN“
marking, it is necessary to inspect the brake system
before topping up the brake fluid ⇒02-5 page 2; car-
ry out repair measure if necessary.
1)for right-hand drive vehicles the following sequence applies: rear right, front left and front right
WARNING!
Brake fluid is toxic. Because of its caustic effect
brake fluid must not come into contact with
paint.
Brake fluid is hygroscopic, i.e. it absorbs mois-
ture from the surrounding air . Therefore it
should always be stored in airtight containers.
Note
S02-0305
Page 71 of 86
Downloaded from www.Manualslib.com manuals search engine FABIA 2000➤Inspection and Maintenance
BodyEdition 09.04
S00.5301.14.2002-7 page 3 02
The materials and the corresponding work instructions
are listed in the ⇒Technical Service Handbook, Part 6 -
Technology of paint repairs, chemical materials.
Inspecting plenum chamber and water
drain openings for dirt, cleaning if neces-
sary
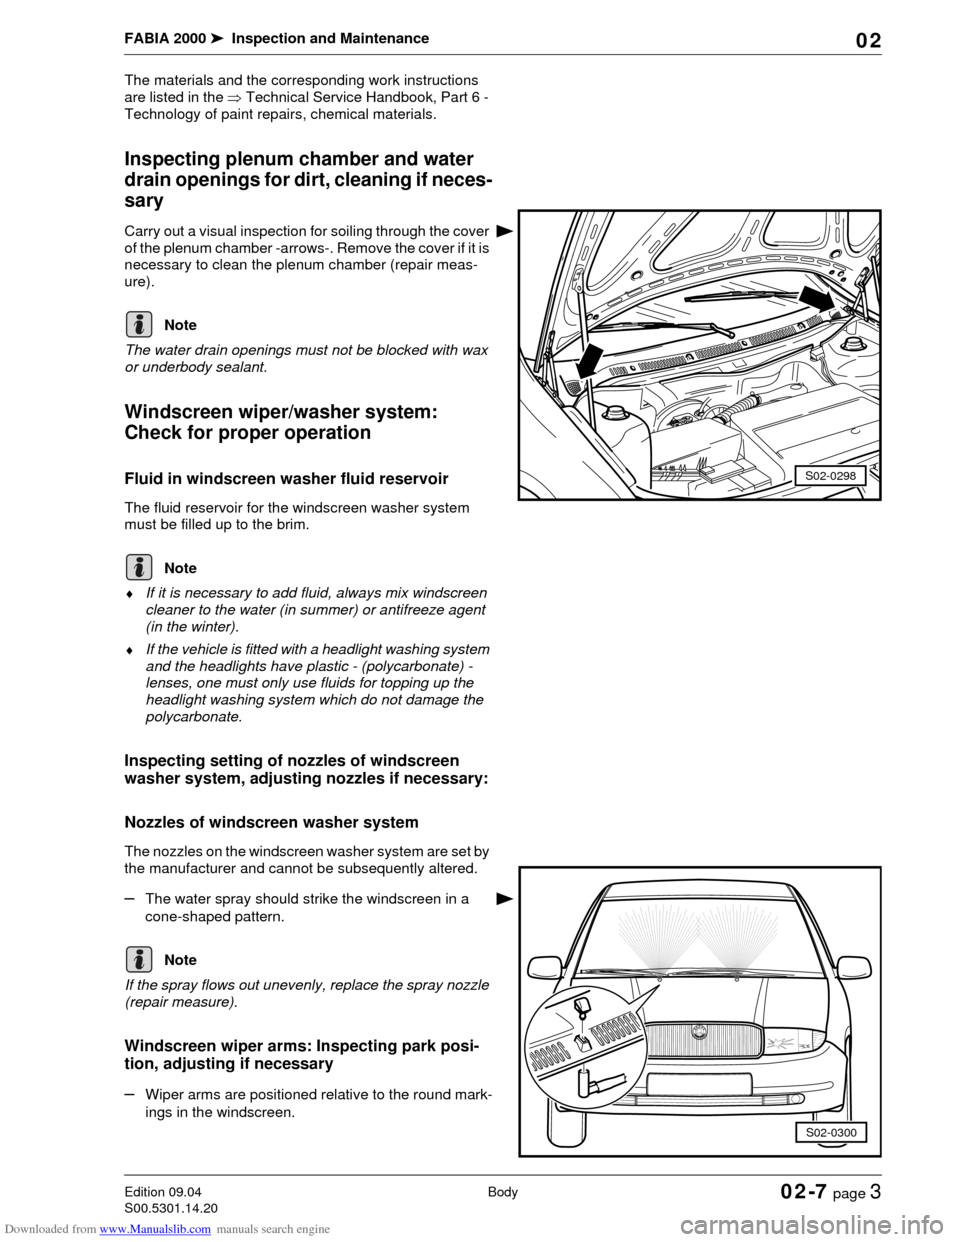
Carry out a visual inspection for soiling through the cover
of the plenum chamber -arrows-. Remove the cover if it is
necessary to clean the plenum chamber (repair meas-
ure).
The water drain openings must not be blocked with wax
or underbody sealant.
Windscreen wiper/washer system:
Check for proper operation
Fluid in windscreen washer fluid reservoir
The fluid reservoir for the windscreen washer system
must be filled up to the brim.
♦If it is necessary to add fluid, always mix windscreen
cleaner to the water (in summer) or antifreeze agent
(in the winter).
♦If the vehicle is fitted with a headlight washing system
and the headlights have plastic - (polycarbonate) -
lenses, one must only use fluids for topping up the
headlight washing system which do not damage the
polycarbonate.
Inspecting setting of nozzles of windscreen
washer system, adjusting nozzles if necessary:
Nozzles of windscreen washer system
The nozzles on the windscreen washer system are set by
the manufacturer and cannot be subsequently altered.
–The water spray should strike the windscreen in a
cone-shaped pattern.
If the spray flows out unevenly, replace the spray nozzle
(repair measure).
Windscreen wiper arms: Inspecting park posi-
tion, adjusting if necessary
–Wiper arms are positioned relative to the round mark-
ings in the windscreen.
S02-0298
Note
Note
S02-0300
Note