ignition SKODA FABIA 2000 1.G / 6Y User Guide
[x] Cancel search | Manufacturer: SKODA, Model Year: 2000, Model line: FABIA, Model: SKODA FABIA 2000 1.G / 6YPages: 86, PDF Size: 3.58 MB
Page 63 of 86
Downloaded from www.Manualslib.com manuals search engine FABIA 2000➤Inspection and Maintenance
Electrical SystemEdition 09.04
S00.5301.14.2002-6 page 9 02
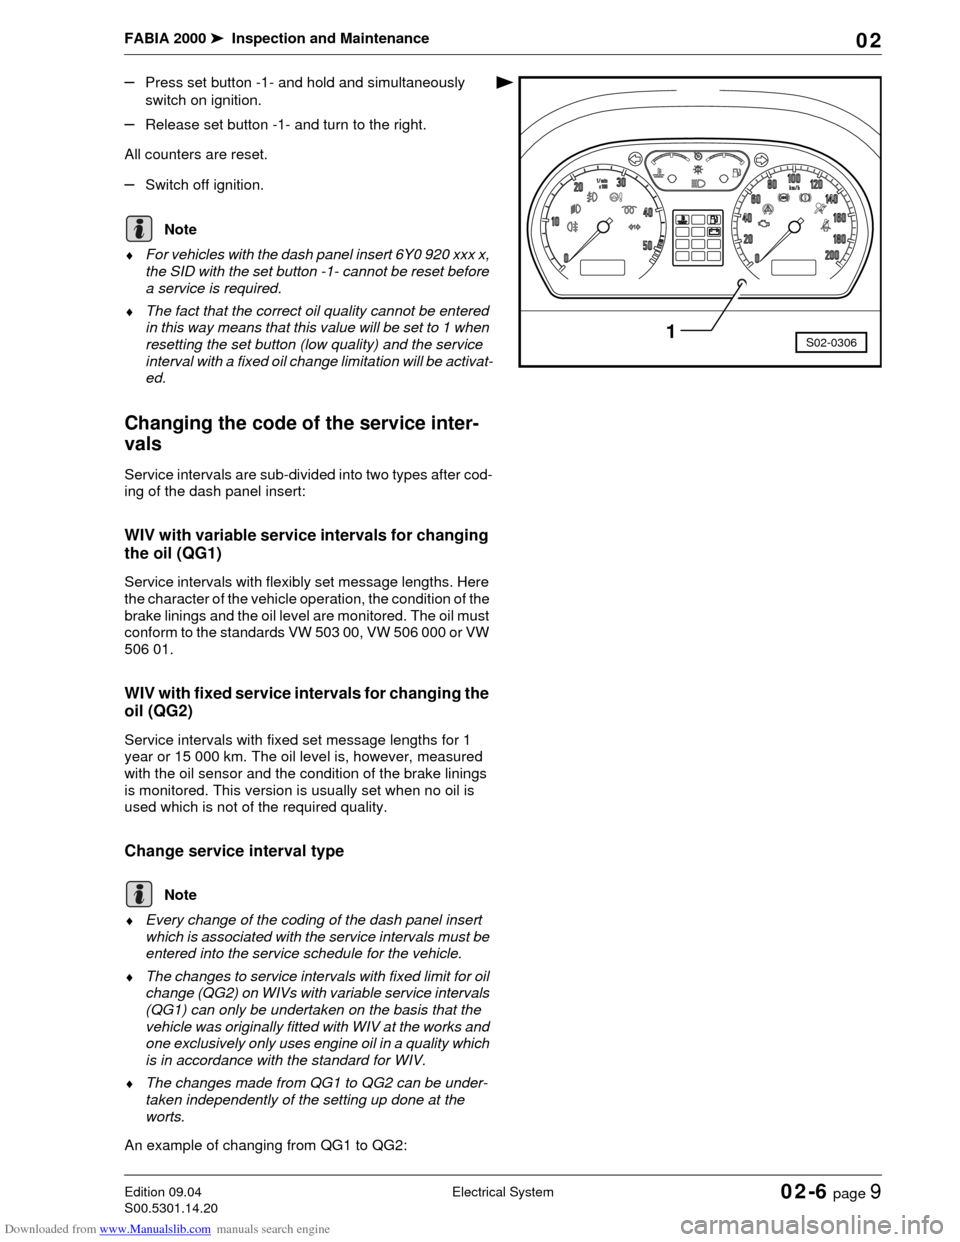
–Press set button -1- and hold and simultaneously
switch on ignition.
–Release set button -1- and turn to the right.
All counters are reset.
–Switch off ignition.
♦For vehicles with the dash panel insert 6Y0 920 xxx x,
the SID with the set button -1- cannot be reset before
a service is required.
♦The fact that the correct oil quality cannot be entered
in this way means that this value will be set to 1 when
resetting the set button (low quality) and the service
interval with a fixed oil change limitation will be activat-
ed.
Changing the code of the service inter-
vals
Service intervals are sub-divided into two types after cod-
ing of the dash panel insert:
WIV with variable service intervals for changing
the oil (QG1)
Service intervals with flexibly set message lengths. Here
the character of the vehicle operation, the condition of the
brake linings and the oil level are monitored. The oil must
conform to the standards VW 503 00, VW 506 000 or VW
506 01.
WIV with fixed service intervals for changing the
oil (QG2)
Service intervals with fixed set message lengths for 1
year or 15 000 km. The oil level is, however, measured
with the oil sensor and the condition of the brake linings
is monitored. This version is usually set when no oil is
used which is not of the required quality.
Change service interval type
♦Every change of the coding of the dash panel insert
which is associated with the service intervals must be
entered into the service schedule for the vehicle.
♦The changes to service intervals with fixed limit for oil
change (QG2) on WIVs with variable service intervals
(QG1) can only be undertaken on the basis that the
vehicle was originally fitted with WIV at the works and
one exclusively only uses engine oil in a quality which
is in accordance with the standard for WIV.
♦The changes made from QG1 to QG2 can be under-
taken independently of the setting up done at the
worts.
An example of changing from QG1 to QG2:
S02-03061
Note
Note
Page 64 of 86

Downloaded from www.Manualslib.com manuals search engine FABIA 2000➤Inspection and Maintenance
Electrical SystemEdition 09.04
S00.5301.14.2002-6 page 10 02
–Connect -V.A.G 1552-.
–Switch on ignition.
–Enter address word 17 „Dash Panel Insert“ and con-
firm with .
Readout on display (e.g.):
–Note the dash panel insert coding.
–Press key.
Readout on display (e.g.):
–Press key.
Readout on display:
–Enter function 07 „Code control unit“ and confirm with
key.
Readout on display:
–Enter dash panel insert coding which is identical to the
original coding. The value on the fourth position must,
however, be altered from 1 to 2.
XXX1X - QG1
XXX2X - QG2
Readout on display (e.g.):
–Confirm the entry with key .
Readout on display (e.g.):
–Press key.
Readout on display (e.g.):
–Press key.
Readout on display:
–Enter 06 for „End output“.
Readout on display:
–Confirm the entry with key .
–Switch off ignition.
–Switch off -V.A.G 1552-.
Inspecting headlight beam setting and
adjusting if necessary
Special tools, test and measuring equipment and
auxiliary items required
♦Headlight beam setting device
In principle the following inspection and setting descrip-
tion applies for all countries. However, comply with na-
tional guidelines and legislation of the relevant country.
⇒Operating instructions for the headlight beam setting
device
Q
6Y1919870B COMBIINSTRUMENT VDO X09 ->
Coding 03111 WSC 12345
TMBMC46Y0Y7000001 SKZ7Z0W0204038 ->
Vehicle system test HELP
Select function XX
Q
Coding control unit
Enter code number XXXXX (0-32767)
Coding control unit
Enter code number 03121 (0-32767)
Q
6Y1919870B COMBIINSTRUMENT VDO X09 ->
Coding 03121 WSC 12345
TMBMC46Y0Y7000001 SKZ7Z0W0204038 ->
Vehicle system test HELP
Select function XX
Vehicle system test HELP
06 End output
Q
Page 69 of 86
Downloaded from www.Manualslib.com manuals search engine FABIA 2000➤Inspection and Maintenance
BodyEdition 09.04
S00.5301.14.2002-7 page 1 02
02-7 Body
Airbag units: Visual inspection
Inspecting operation of airbag unit
When the ignition is switched on the airbag warning lamp
K75 lights up for approximately 4 seconds. Should the
warning lamp flash again for a further 12 seconds this is
an indication that the front passenger airbag or the side
airbag unit on the front passenger is electronically locked
(valid for vehicles which do not have an airbag switch-off
function).
The warning lamp will go out after 4 seconds for vehicles
which are fitted with an airbag switch-off function and
switching off of the front passenger airbag will be sig-
nalled by the warning lamp „AIRBAG OFF“ in the middle
of the dash panel.
♦If warning lamp K75 does not go out after 4 seconds
and lights up continously there is a fault.
♦If the warning lamp goes out and then lights up again
the control unit is not coded, the wrong control unit has
been fitted or there is a fault.
♦If the airbag warning light K75 flashes constantly, it is
then necessary to replace the airbag control unit J234.
If the warning light indicates a fault, the fault must be
rectified (repair measure) Body Work; Rep. Gr. 01.
Inspecting airbag for external damage
Driver and front passenger airbag units
The logo „AIRBAG“ on the padded boss of the steering
wheel (driver's side) and on the right side of the dash pan-
el (passenger side) indicates that an airbag is fitted.
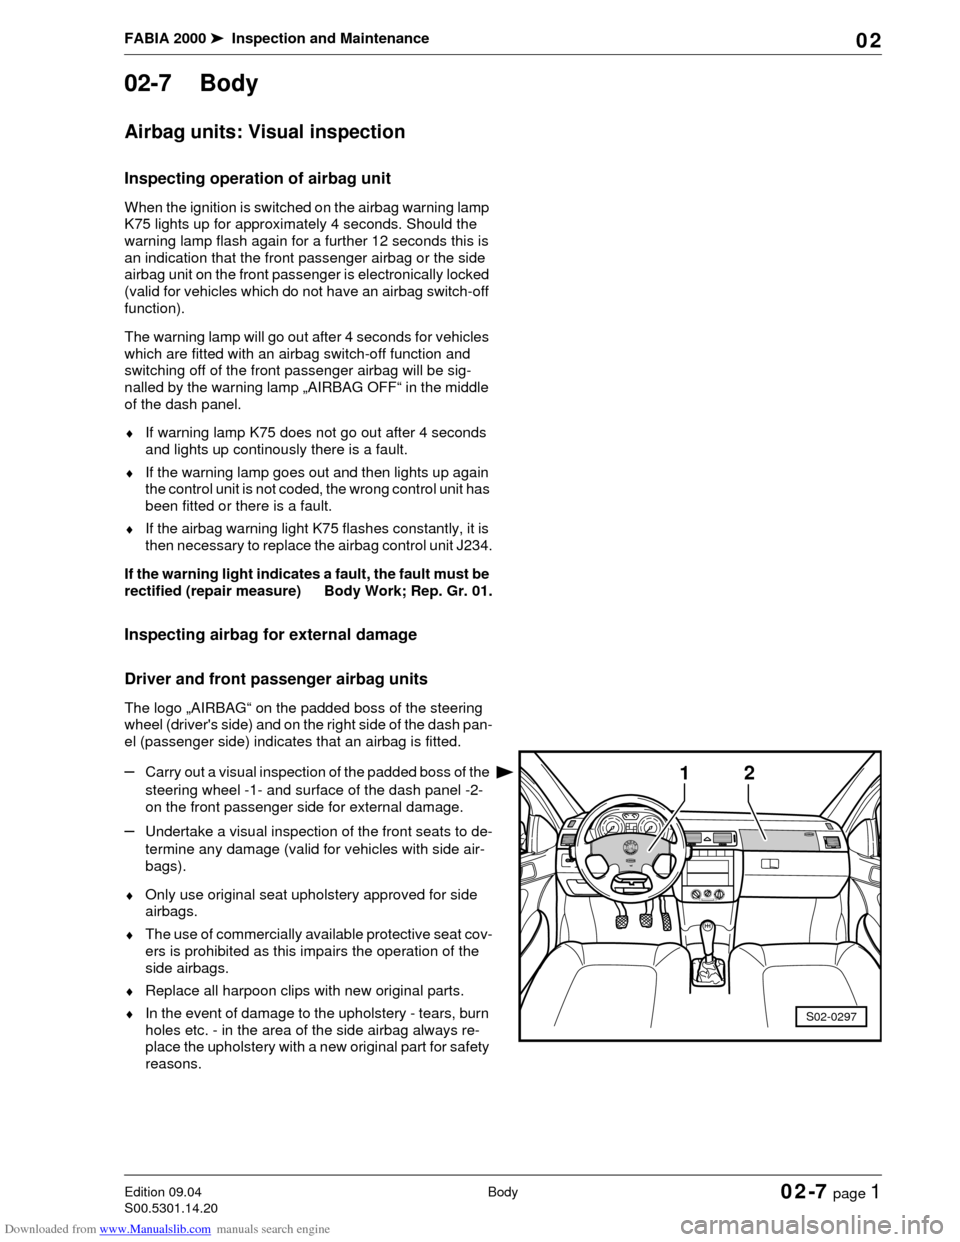
–Carry out a visual inspection of the padded boss of the
steering wheel -1- and surface of the dash panel -2-
on the front passenger side for external damage.
–Undertake a visual inspection of the front seats to de-
termine any damage (valid for vehicles with side air-
bags).
♦Only use original seat upholstery approved for side
airbags.
♦The use of commercially available protective seat cov-
ers is prohibited as this impairs the operation of the
side airbags.
♦Replace all harpoon clips with new original parts.
♦In the event of damage to the upholstery - tears, burn
holes etc. - in the area of the side airbag always re-
place the upholstery with a new original part for safety
reasons.
1
S02-0297
2
Page 70 of 86
Downloaded from www.Manualslib.com manuals search engine FABIA 2000➤Inspection and Maintenance
BodyEdition 09.04
S00.5301.14.2002-7 page 2 02
Do not affix any stickers or cover over the padded boss of
the steering wheel -1- and the foam-lined surface of the
airbag unit on the front passenger side -2- or do not carry
out any modifications to these parts. These parts must
only be cleaned with a dry and slightly moistened cloth.
Inspect key switch for deactivation of
front passenger airbag
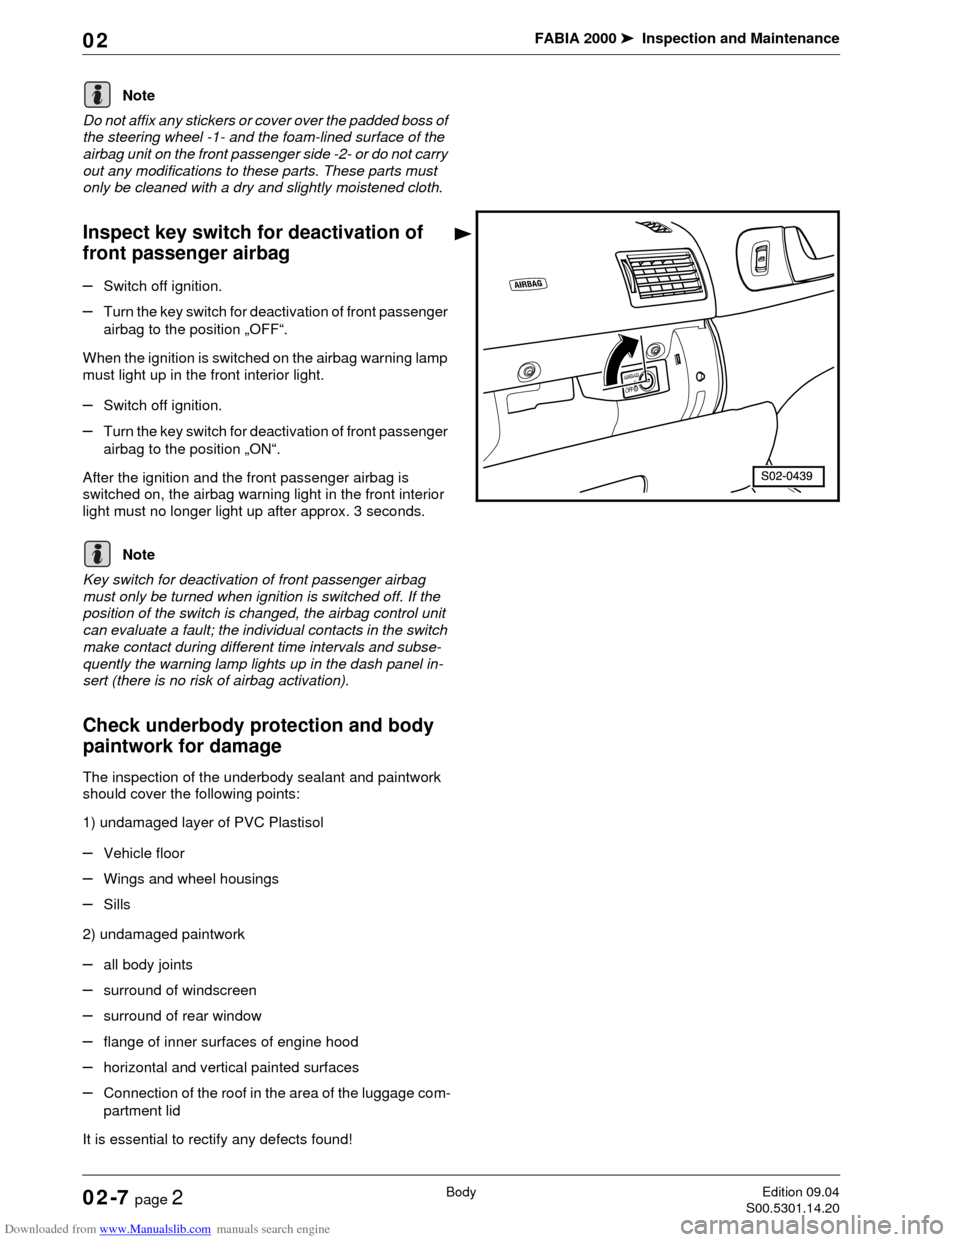
–Switch off ignition.
–Turn the key switch for deactivation of front passenger
airbag to the position „OFF“.
When the ignition is switched on the airbag warning lamp
must light up in the front interior light.
–Switch off ignition.
–Turn the key switch for deactivation of front passenger
airbag to the position „ON“.
After the ignition and the front passenger airbag is
switched on, the airbag warning light in the front interior
light must no longer light up after approx. 3 seconds.
Key switch for deactivation of front passenger airbag
must only be turned when ignition is switched off. If the
position of the switch is changed, the airbag control unit
can evaluate a fault; the individual contacts in the switch
make contact during different time intervals and subse-
quently the warning lamp lights up in the dash panel in-
sert (there is no risk of airbag activation).
Check underbody protection and body
paintwork for damage
The inspection of the underbody sealant and paintwork
should cover the following points:
1) undamaged layer of PVC Plastisol
–Vehicle floor
–Wings and wheel housings
–Sills
2) undamaged paintwork
–all body joints
–surround of windscreen
–surround of rear window
–flange of inner surfaces of engine hood
–horizontal and vertical painted surfaces
–Connection of the roof in the area of the luggage com-
partment lid
It is essential to rectify any defects found!
Note
Note
Page 77 of 86
Downloaded from www.Manualslib.com manuals search engine FABIA 2000➤Inspection and Maintenance
Exhaust-emission AnalysisEdition 09.04
S00.5301.14.2002-8 page 1 02
02-8 Exhaust-emission Analy-
sis
The exhaust-emission analysis must be carried out ac-
cording to the relevant national legislation of the particu-
lar country.
Exhaust-Emission Analysis on Models
with Fuel Engines
Perform the following visual inspections and comply with
the setting conditions below before performing the ex-
haust-emission analysis:
Visual inspection
♦Lambda probes are connected
♦All vacuum hoses are connected
♦All wires of the activated charcoal filter system are
connected
♦All the electrical wires of the ignition and injection sys-
tem are connected
♦Hose for crankcase ventilation is connected
♦The exhaust system must be undamaged and tight
♦Catalyst must be undamaged
Test and setting conditions
•Perfect operation of the engine
•Perfect operation of the ignition system
•Intake system tight
•All electrical components are switched off (radiator fan
must not run during the test)
♦If any errors are noticed they must be repaired.
♦The idling speed, ignition point and CO content are
only measured as they cannot be adjusted.
♦The CO content is set to nominal value by the lambda
control. Faults in the lambda control are detected by
the self-diagnosis and stored in the fault memory.
♦When interrogating the fault memory (engine electron-
ics) all detected faults must be repaired and the fault
memory must be erased.
♦To prevent injury to persons and/or damage to the ig-
nition and injection system make sure the ignition is
switched off when disconnecting and connecting the
wires of the ignition system.
Connect the test equipment to the vehicle
To prevent industrial accidents or avoid causing damage
to the ignition system, pay attention to the following:
Note
Note
Note
Page 78 of 86

Downloaded from www.Manualslib.com manuals search engine FABIA 2000➤Inspection and Maintenance
Exhaust-emission AnalysisEdition 09.04
S00.5301.14.2002-8 page 2 02
♦Disconnect and connect wires of the ignition system
(including high-voltage wires) when the ignition is
switched off.
–Connect the tester in compliance with the operating
instructions.
The exhaust gas probe must be fully inserted into the ex-
haust tailpipe (do not insert into the suction tube)!
–Start engine and run in idle.
–Measure idle speed and CO content.
Test Values for Exhaust-Emission Analysis on Models with Fuel Engines
Note
Engine identification
charactersARV and AQV ARV and AQV ARV and AQV AWY
Model year MY00 MY01 MY02 MY02 ➤
Oil temperature min. 80 °Cmin. 80 °C min. 80 °Cmin. 80 °C
Catalyst warming-up time2 min.
at 2500 rpm2 min.
at 2500 rpm2 min.
at 2500 rpm2 min.
at 2500 rpm
Idling speed
(rpm)590 ... 790 590 ... 690 590 ... 790 600 ... 800
CO content at idle speed
(measured after catalyst)0,0 ... 0,5% 0,0 ... 0,5% 0,0 ... 0,5% 0,0 ... 0,5%
Increased idling speed
(rpm)2400 - 2600 2400 - 2600 2400 - 2600 2400 - 2600
Lambda value
at 2850 - 2900 rpm0,97 ... 1,03 0,97 ... 1,03 0,97 ... 1,03 0,97 ... 1,03
CO content
at 2850 - 2900 rpmmax. 0.3% max. 0.3% max. 0.3% max. 0.3%
Speed for control loop
test (rpm)490 ... 890 490 ... 790 490 ... 890 500 ... 900
Lambda probe version - - - Jump probe
Voltage jump (V) - - - 0,3
DELTA-lambda 0,03 0,03 0,03 0,03
Test speed - - - Idling speed
Page 83 of 86
Downloaded from www.Manualslib.com manuals search engine FABIA 2000➤Inspection and Maintenance
MiscellaneousEdition 06.01
S00.5301.06.2002-9 page 1 02
02-9 Miscellaneous
Tow starting/Towing
♦A towing rope or towing bar must only be fitted to the
above towing lugs.
♦The towing rope must be elastic to protect the vehicle.
Therefore only use synthetic ropes or ropes manufac-
tured in an equally elastic material. However, it is saf-
er to use a towing bar!
♦Make sure no unauthorised traction forces and no jolt-
ing loads are exerted. During towing manoeuvres
away from hardened road surfaces there is a risk of
overloading and damaging the fixation parts.
♦Before starting the engine by towing, first use the bat-
tery of another vehicle as a start aid.
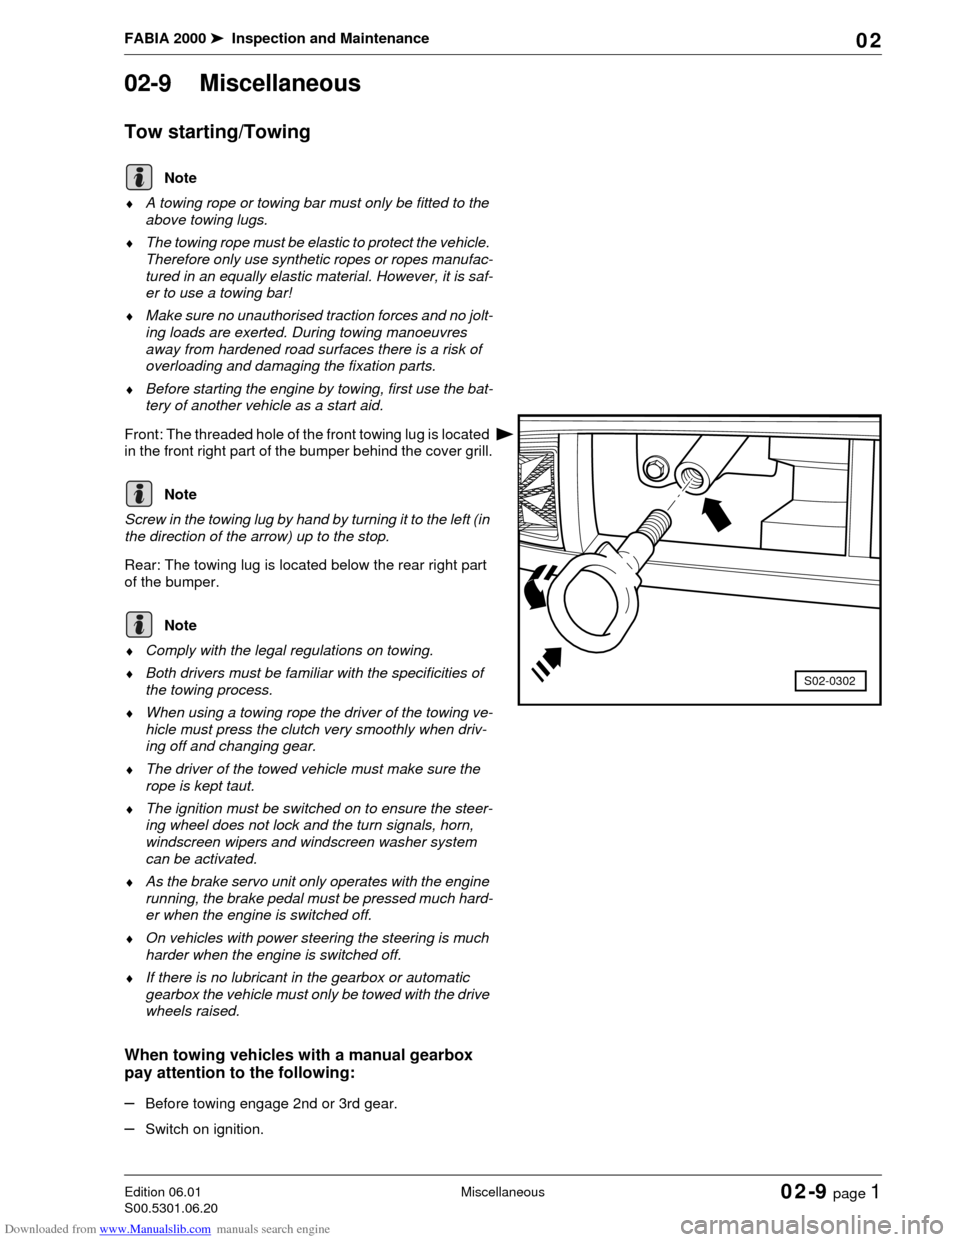
Front: The threaded hole of the front towing lug is located
in the front right part of the bumper behind the cover grill.
Screw in the towing lug by hand by turning it to the left (in
the direction of the arrow) up to the stop.
Rear: The towing lug is located below the rear right part
of the bumper.
♦Comply with the legal regulations on towing.
♦Both drivers must be familiar with the specificities of
the towing process.
♦When using a towing rope the driver of the towing ve-
hicle must press the clutch very smoothly when driv-
ing off and changing gear.
♦The driver of the towed vehicle must make sure the
rope is kept taut.
♦The ignition must be switched on to ensure the steer-
ing wheel does not lock and the turn signals, horn,
windscreen wipers and windscreen washer system
can be activated.
♦As the brake servo unit only operates with the engine
running, the brake pedal must be pressed much hard-
er when the engine is switched off.
♦On vehicles with power steering the steering is much
harder when the engine is switched off.
♦If there is no lubricant in the gearbox or automatic
gearbox the vehicle must only be towed with the drive
wheels raised.
When towing vehicles with a manual gearbox
pay attention to the following:
–Before towing engage 2nd or 3rd gear.
–Switch on ignition.
Note
S02-0302
Note
Note