ECU SKODA FABIA 2000 1.G / 6Y Workshop Manual
[x] Cancel search | Manufacturer: SKODA, Model Year: 2000, Model line: FABIA, Model: SKODA FABIA 2000 1.G / 6YPages: 86, PDF Size: 3.58 MB
Page 13 of 86

Downloaded from www.Manualslib.com manuals search engine FABIA 2000➤Inspection and Maintenance
InspectionEdition 09.04
S00.5301.14.2002-2 page 3 02
Delivery Inspection (Export)
–Proper operation of seat belts, seat belt height adjuster, power windows and sun roof
–Inspect upholstery, interior trim, carpeting and footmats for cleanliness and damage
–Inspect all switches, all electrical components, gauges/indicators and controls02-6
–Radio: Inspect for proper operation, store stations, set clock, encode02-6
–Reset service interval display02-6
–Power windows: Inspecting positioning02-6
–Key switch for airbag deactivation, front passenger side: Check function „ON/OFF“ and
switch-over to the position „ON“02-7
–Fit net in luggage compartment (if available)
–Check the car tool kit, spare wheel and accessories, that they have all been supplied and
are properly secured
–Install the carpets supplied in the vehicle
–Perform a test drive
Underside of vehicle (on lift platform)
–Inspect underbody (underbody protection for damage)02-7
–Inspect for leaks and damage: Engine, gearbox, final drive, steering, brake system, axles,
joint boots. Check proper routing of the brake hoses and brake lines, fuel lines including
ventilation of the fuel system02-3, 02-5
–Inspect tyres and wheels for damage02-5
Concluding operations
–Interrogate fault memory of all systems, if necessary erase02-6
–Remove protective seat covers
–Remove recharging table (if affixed)
–Complete the service schedule, affix the vehicle data sticker in the Service Schedule to
the floor of the luggage compartment next to the spare wheel„Next Service Date“ sticker
and affix to the side of the dash panel on the driver's side, hand the card „Škoda Assist-
ance“ to the customer02-7
–Final inspection to ensure proper condition for handover to the customer
Inspections and operations to be completed Chapter
Vehicle (exterior)
–Plastic and rubber parts: Inspect for cleanliness and damage
–Inspect bodywork and paintwork for damage02-7
–Check operation of the tailgate lock and the fuel filler cap, door contact switch, operation
of the door handles, door locks and safety buttons, central locking from outside as well as
inside, child safety locks, ability to close all locks on the vehicle using all keys (including
the spare key)02-7
–Check operation of the anti-theft alarm system
–Tighten the wheel bolts to specified torque (steel and light alloy wheels 120 Nm), fit wheel
caps02-5
–Check the tyre inflation pressure (including spare wheel), if necessary correct the tyre in-
flation pressure, fit valve caps02-5
–Vehicles in stock for more than 6 months: Change brake fluid02-5
Page 39 of 86

Downloaded from www.Manualslib.com manuals search engine FABIA 2000➤Inspection and Maintenance
EnginesEdition 09.04
S00.5301.14.2002-3 page 19 02
–Unlock hooks -arrows-.
–Loosen the fuel filter and remove.
Installing
–Install new fuel filter.
–Lock hooks -arrows-.
–Fit the new O-ring for the regulating valve.
–Install regulating valve -4- with the connected fuel
hoses.
–Attach retaining clips -3-.
–Install the fuel hoses -1- and -2- and secure with hose
clamps.
The direction of flow is indicated with arrows (do not
switch connections).
–Inspect the fuel system for tightness (visual inspec-
tion).
Draining the fuel filter (diesel engine)
♦Make sure no diesel fuel comes into contact with the
coolant hoses. If necessary clean the hoses immedi-
ately!
♦Collect fuel in a suitable vessel!
♦It is absolutely necessary to observe the oil disposal
instructions!
–Remove retaining clip -2- and remove regulating valve
-1- with the connected fuel hoses.
–Unlock hooks -arrows-.
–Loosen the fuel filter and remove.
Note
Note
S02-0324
1
2
1
2
3
4
S02-0323
Page 44 of 86
Downloaded from www.Manualslib.com manuals search engine FABIA 2000➤Inspection and Maintenance
GearboxEdition 07.03
S00.5301.12.2002-4 page 4 02
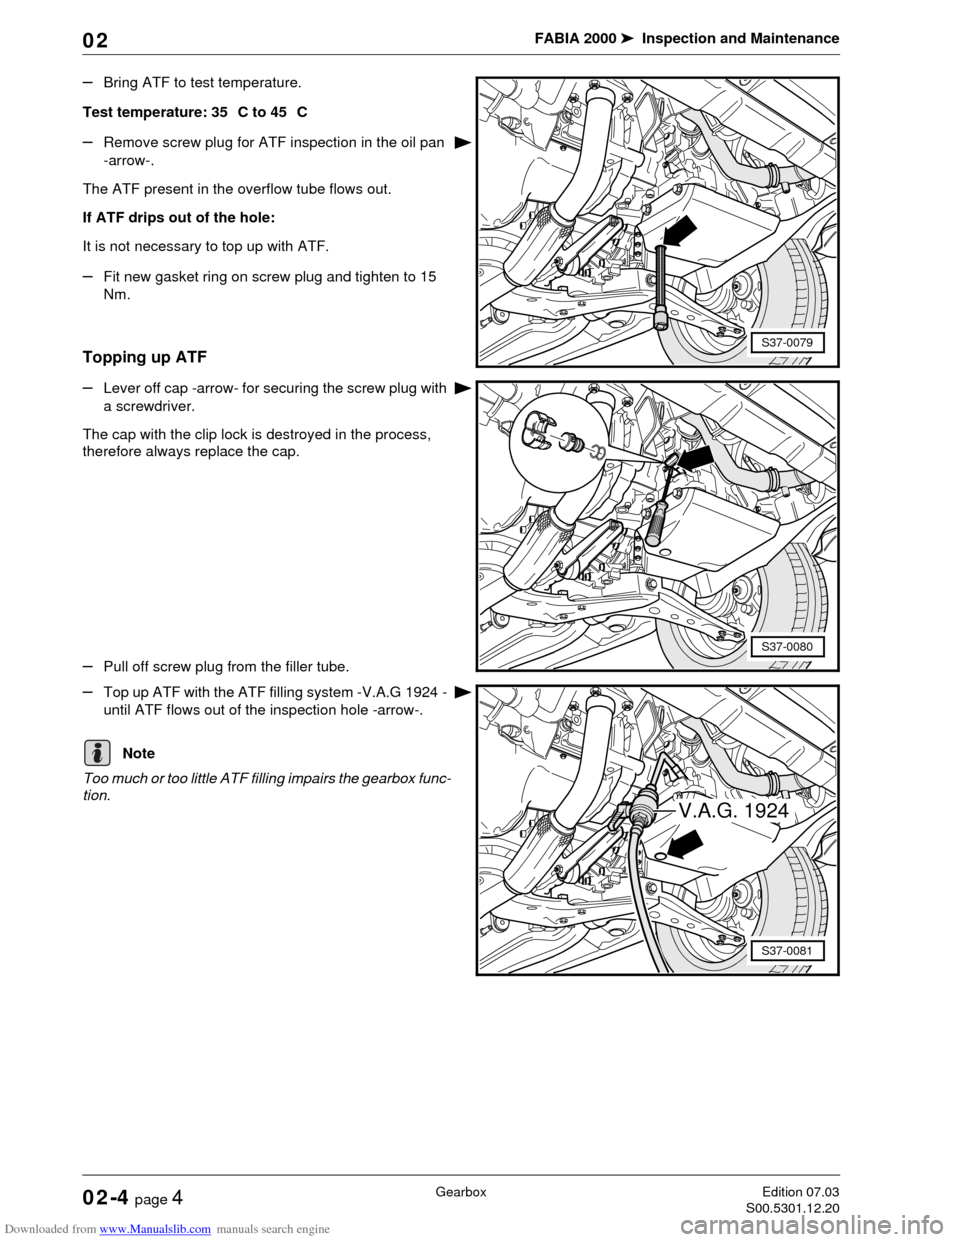
–Bring ATF to test temperature.
Test temperature: 35 C to 45 C
–Remove screw plug for ATF inspection in the oil pan
-arrow-.
The ATF present in the overflow tube flows out.
If ATF drips out of the hole:
It is not necessary to top up with ATF.
–Fit new gasket ring on screw plug and tighten to 15
Nm.
Topping up ATF
–Lever off cap -arrow- for securing the screw plug with
a screwdriver.
The cap with the clip lock is destroyed in the process,
therefore always replace the cap.
–Pull off screw plug from the filler tube.
–Top up ATF with the ATF filling system -V.A.G 1924 -
until ATF flows out of the inspection hole -arrow-.
Too much or too little ATF filling impairs the gearbox func-
tion.
S37-0079
S37-0080
V.A.G. 1924
S37-0081
Note
Page 45 of 86
Downloaded from www.Manualslib.com manuals search engine FABIA 2000➤Inspection and Maintenance
GearboxEdition 07.03
S00.5301.12.2002-4 page 5 02
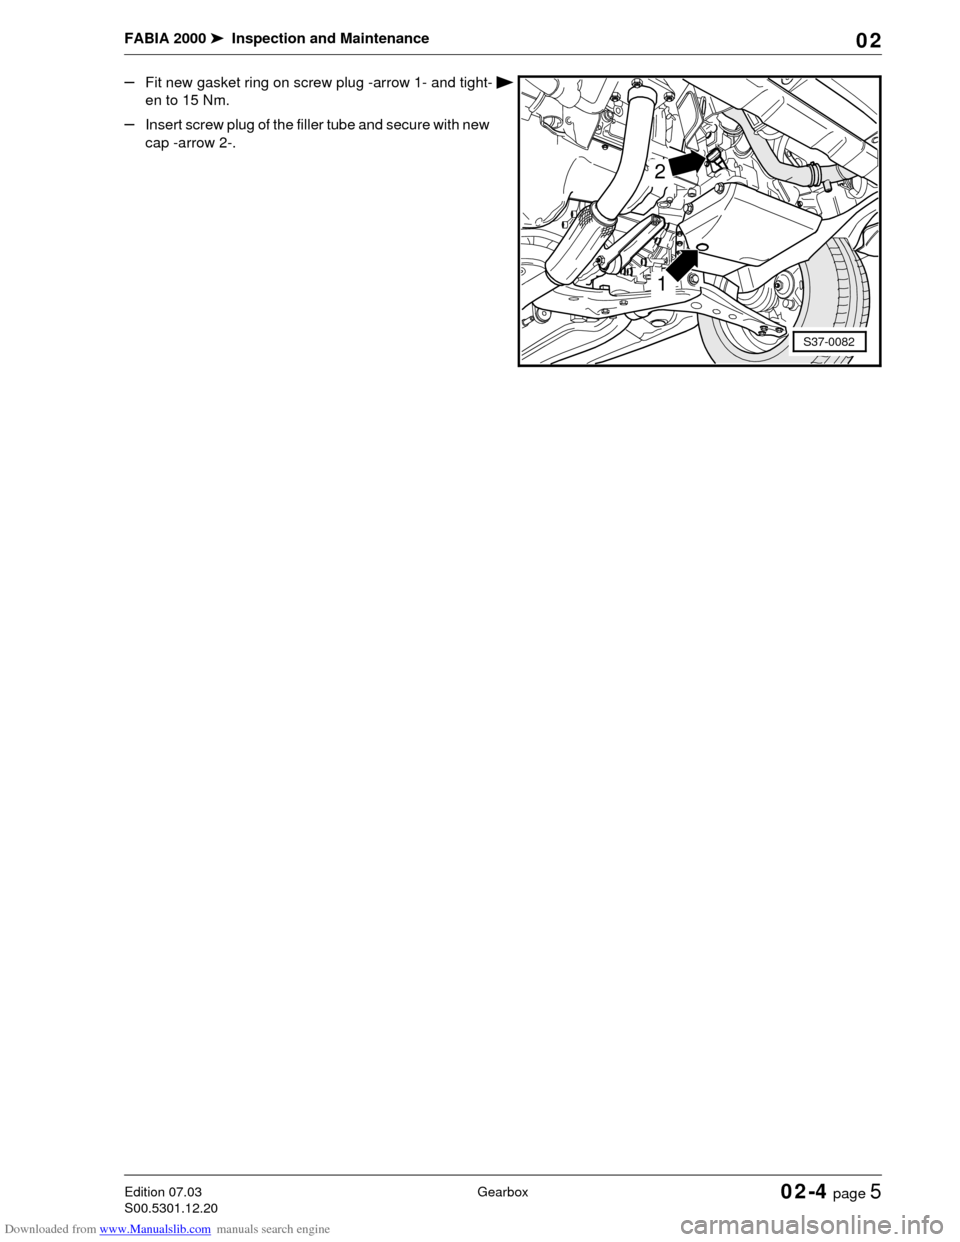
–Fit new gasket ring on screw plug -arrow 1- and tight-
en to 15 Nm.
–Insert screw plug of the filler tube and secure with new
cap -arrow 2-.
1
2
S37-0082
Page 49 of 86
Downloaded from www.Manualslib.com manuals search engine FABIA 2000➤Inspection and Maintenance
ChassisEdition 02.04
S00.5301.13.2002-5 page 3 02
–Remove strainer and clean.
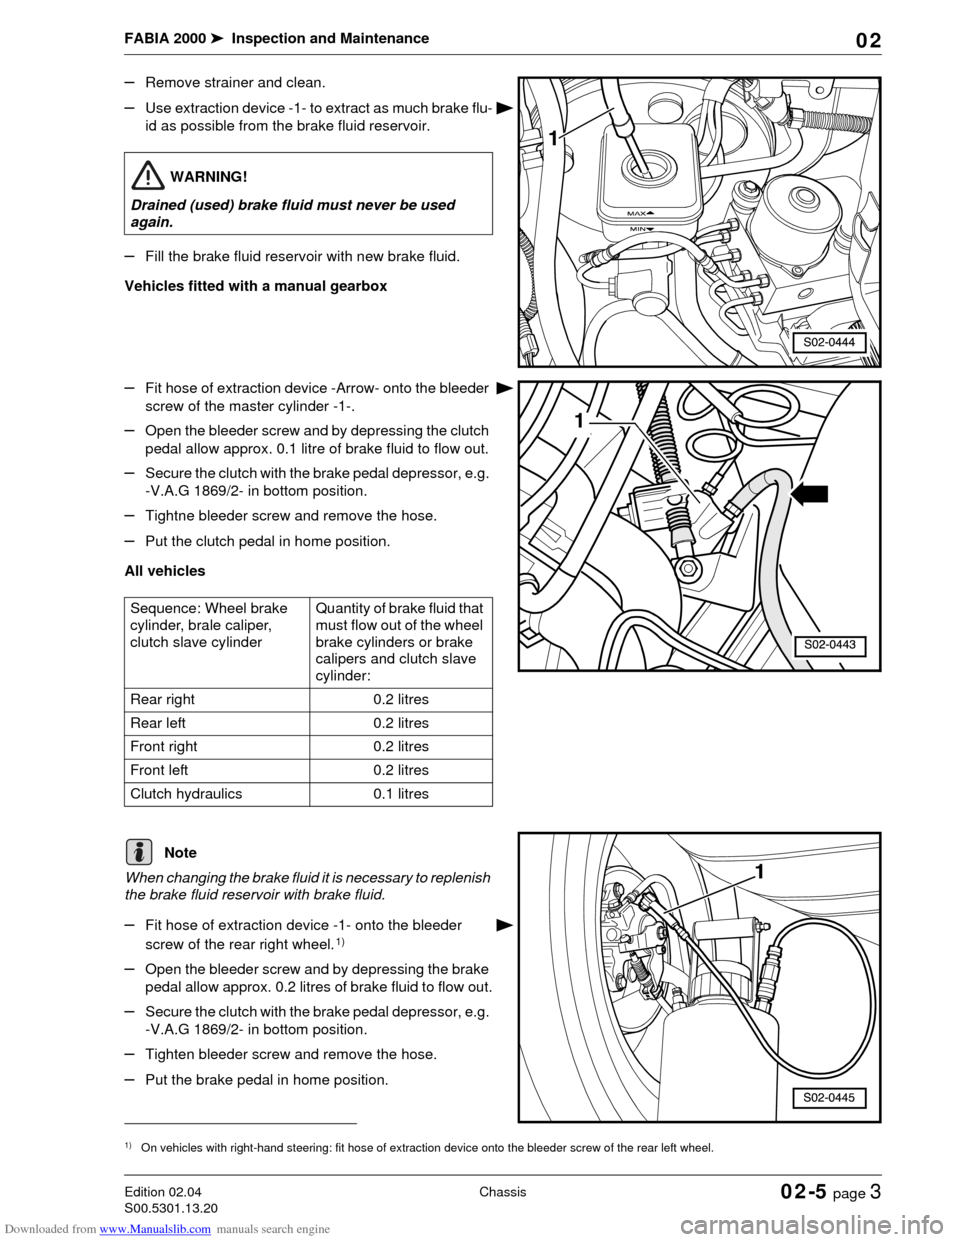
–Use extraction device -1- to extract as much brake flu-
id as possible from the brake fluid reservoir.
–Fill the brake fluid reservoir with new brake fluid.
Vehicles fitted with a manual gearbox
–Fit hose of extraction device -Arrow- onto the bleeder
screw of the master cylinder -1-.
–Open the bleeder screw and by depressing the clutch
pedal allow approx. 0.1 litre of brake fluid to flow out.
–Secure the clutch with the brake pedal depressor, e.g.
-V.A.G 1869/2- in bottom position.
–Tightne bleeder screw and remove the hose.
–Put the clutch pedal in home position.
All vehicles
When changing the brake fluid it is necessary to replenish
the brake fluid reservoir with brake fluid.
–Fit hose of extraction device -1- onto the bleeder
screw of the rear right wheel.
1)
–Open the bleeder screw and by depressing the brake
pedal allow approx. 0.2 litres of brake fluid to flow out.
–Secure the clutch with the brake pedal depressor, e.g.
-V.A.G 1869/2- in bottom position.
–Tighten bleeder screw and remove the hose.
–Put the brake pedal in home position.
WARNING!
Drained (used) brake fluid must never be used
again.
Sequence: Wheel brake
cylinder, brale caliper,
clutch slave cylinderQuantity of brake fluid that
must flow out of the wheel
brake cylinders or brake
calipers and clutch slave
cylinder:
Rear right 0.2 litres
Rear left 0.2 litres
Front right 0.2 litres
Front left 0.2 litres
Clutch hydraulics 0.1 litres
1)On vehicles with right-hand steering: fit hose of extraction device onto the bleeder screw of the rear left wheel.
Note
Page 74 of 86
Downloaded from www.Manualslib.com manuals search engine FABIA 2000➤Inspection and Maintenance
BodyEdition 09.04
S00.5301.14.2002-7 page 6 02
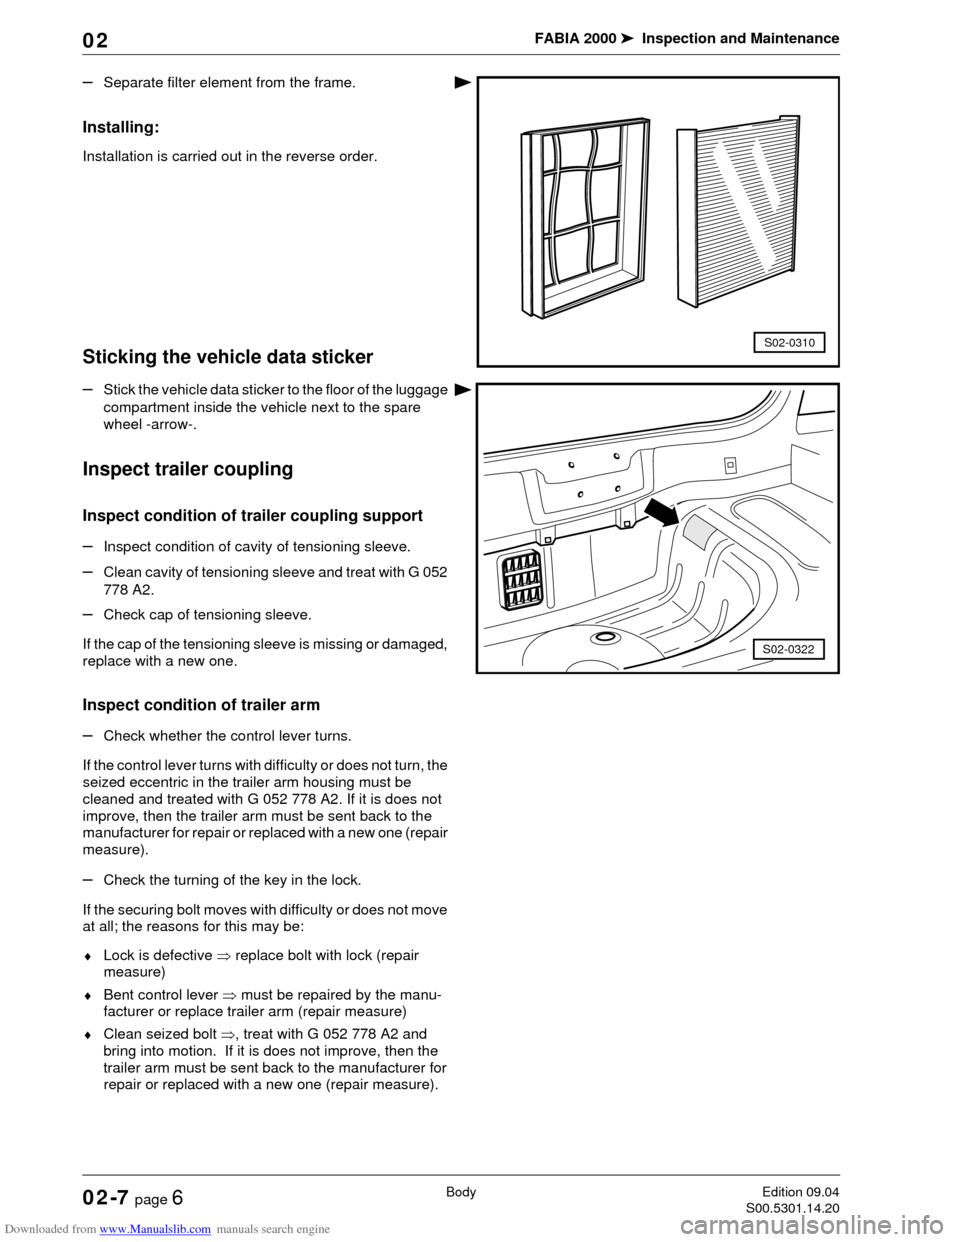
–Separate filter element from the frame.
Installing:
Installation is carried out in the reverse order.
Sticking the vehicle data sticker
–Stick the vehicle data sticker to the floor of the luggage
compartment inside the vehicle next to the spare
wheel -arrow-.
Inspect trailer coupling
Inspect condition of trailer coupling support
–Inspect condition of cavity of tensioning sleeve.
–Clean cavity of tensioning sleeve and treat with G 052
778 A2.
–Check cap of tensioning sleeve.
If the cap of the tensioning sleeve is missing or damaged,
replace with a new one.
Inspect condition of trailer arm
–Check whether the control lever turns.
If the control lever turns with difficulty or does not turn, the
seized eccentric in the trailer arm housing must be
cleaned and treated with G 052 778 A2. If it is does not
improve, then the trailer arm must be sent back to the
manufacturer for repair or replaced with a new one (repair
measure).
–Check the turning of the key in the lock.
If the securing bolt moves with difficulty or does not move
at all; the reasons for this may be:
♦Lock is defective ⇒ replace bolt with lock (repair
measure)
♦Bent control lever ⇒ must be repaired by the manu-
facturer or replace trailer arm (repair measure)
♦Clean seized bolt ⇒, treat with G 052 778 A2 and
bring into motion. If it is does not improve, then the
trailer arm must be sent back to the manufacturer for
repair or replaced with a new one (repair measure).
S02-0310
S02-0322
Page 81 of 86
Downloaded from www.Manualslib.com manuals search engine FABIA 2000➤Inspection and Maintenance
Exhaust-emission AnalysisEdition 09.04
S00.5301.14.2002-8 page 5 02
All tubes and plug connections, which had been removed
or disconnected for the test and adjustment, must be re-
inserted or connected.
Technical data of the spark plugs Chapter 02-3.
Exhaust-Emission Analysis on Models
with Diesel Engines
♦When possible the test should be carried out immedi-
ately after the road test and also outdoors. If specific
reasons prevent this (weather conditions, excessive
noise in residential areas) the test may also be per-
formed in the workshop.
♦Secure the engine bonnet in the first stop while meas-
uring to reduce the noise.
Visual inspection
♦Hose for crankcase ventilation is connected
♦Fuel system and injection pump must be tight
♦The exhaust system must be undamaged and tight
♦All vacuum hoses are connected
Test and setting conditions
•Engine oil temperature at least 80 °C
•All electrical components disconnected
•No fault stored in the fault memory ⇒Chapter 02-6,
connect vehicle system tester and interrogate fault
memory
Correct detected faults before measuring (repair meas-
ure).
Connect the test equipment
–Connect the tester in compliance with the operating
instructions.
–Start engine, warm up to normal temperature and run
in idle.
–Perform the exhaust-emission analysis.
♦Activate and inspect auxiliary equipment such as e.g.
power steering, automatic gearbox or air conditioning
system. Check whether the engine continues to run
perfectly under this load.
♦All tubes and plug connections, which had been re-
moved or disconnected for the test and adjustment,
must be re-inserted or connected.
Note
Note
Note
Note
Page 85 of 86
Downloaded from www.Manualslib.com manuals search engine FABIA 2000➤Inspection and Maintenance
MiscellaneousEdition 06.01
S00.5301.06.2002-9 page 3 02
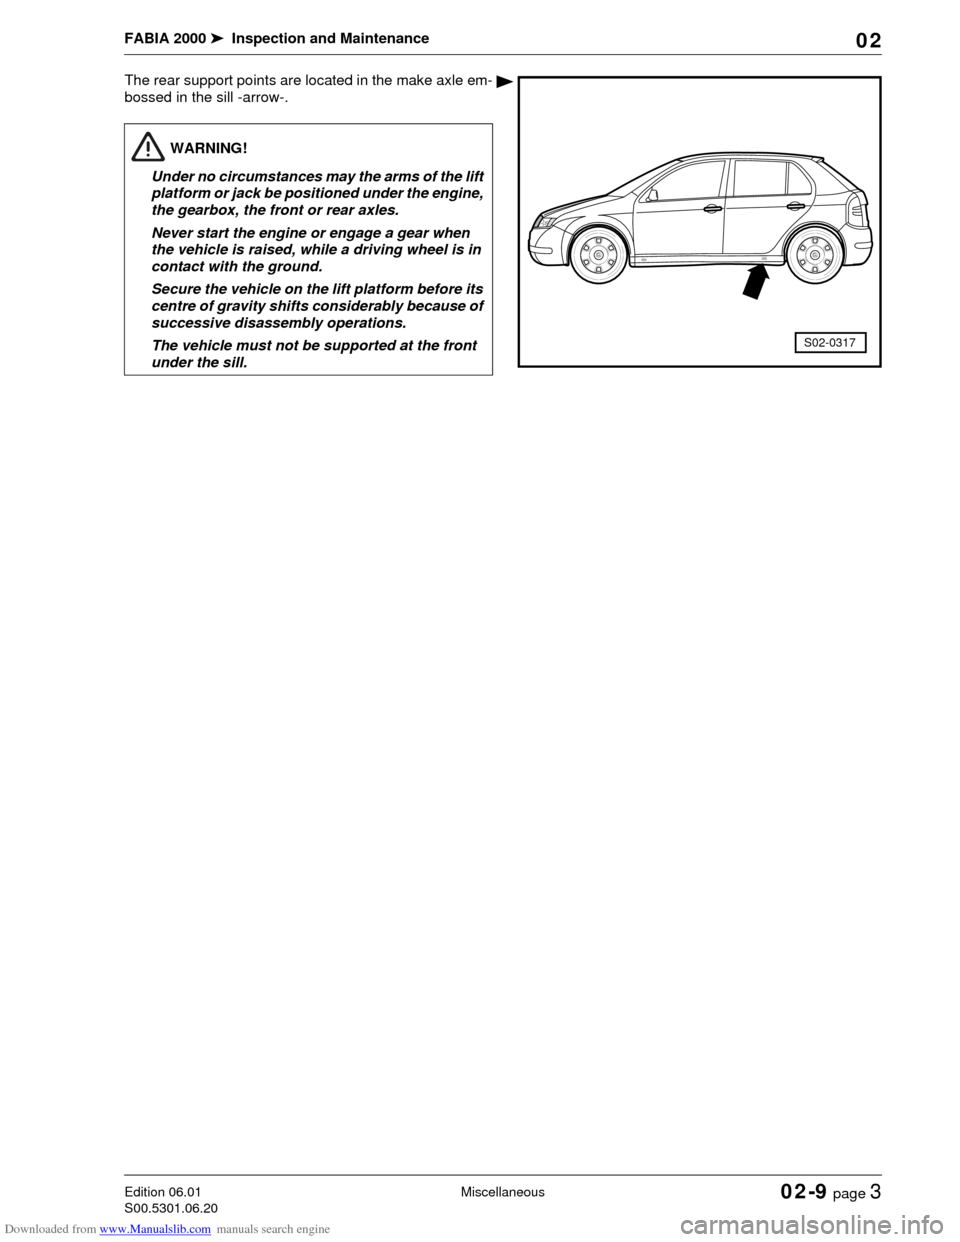
The rear support points are located in the make axle em-
bossed in the sill -arrow-.
S02-0317
WARNING!
Under no circumstances may the arms of the lift
platform or jack be positioned under the engine,
the gearbox, the front or rear axles.
Never start the engine or engage a gear when
the vehicle is raised, while a driving wheel is in
contact with the ground.
Secure the vehicle on the lift platform before its
centre of gravity shifts considerably because of
successive disassembly operations.
The vehicle must not be supported at the front
under the sill.